1
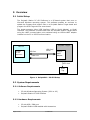
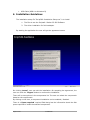
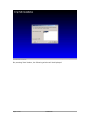
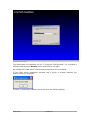
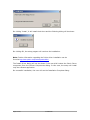
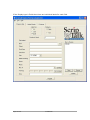
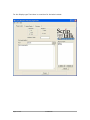
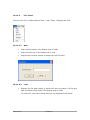
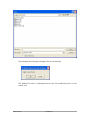
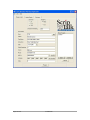
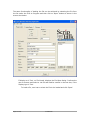
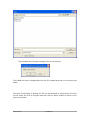
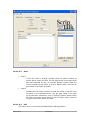
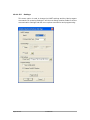
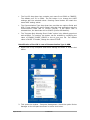
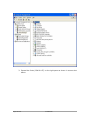
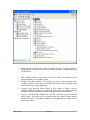
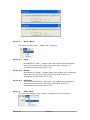
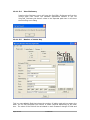
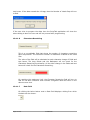
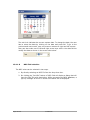
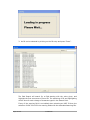
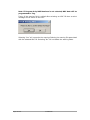
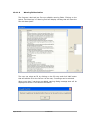
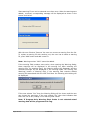
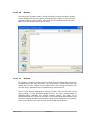
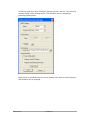
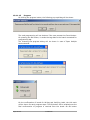
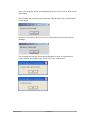
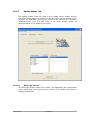
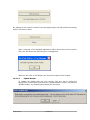
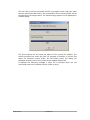
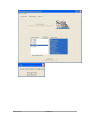
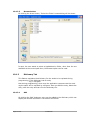
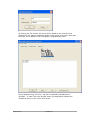
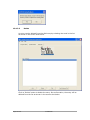
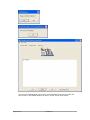
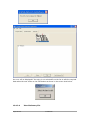
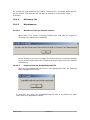
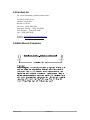
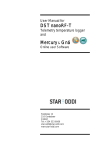
Scriptalk Station
Pharmacy Application
User Manual
Page 1 of 61
Confidential
CONTENTS
1
INTRODUCTION ...................................................................................... 4
2
PURPOSE ................................................................................................ 4
3
SCOPE..................................................................................................... 4
4
AUDIENCE............................................................................................... 4
5
OVERVIEW.............................................................................................. 5
5.1 INITIAL SETUP .......................................................................................5
5.2 SYSTEM REQUIREMENTS ...........................................................................5
5.2.1
Software Requirements .............................................................5
5.2.2
Hardware Requirements ............................................................5
6
INSTALLATION GUIDELINES................................................................... 6
7
UNINSTALLATION GUIDELINES ............................................................ 11
8
LIMITATIONS ....................................................................................... 12
9
GUI BEHAVIORS ................................................................................... 13
9.1
9.2
10
BEHAVIORS OF THE KEYS ........................................................................ 13
OTHER BEHAVIORS ................................................................................ 13
HOW TO USE PC GUI SOFTWARE ........................................................ 15
10.1
TABS ............................................................................................... 15
10.1.1 Program Label Tab................................................................... 15
10.1.1.1 Label Size .............................................................................. 15
10.1.1.2 Display As.............................................................................. 15
10.1.1.3 File - Menu ............................................................................ 18
10.1.1.3.1 New ................................................................................ 18
10.1.1.3.2 Load ................................................................................ 18
10.1.1.3.3 Save................................................................................ 23
10.1.1.3.4 Exit ................................................................................. 23
10.1.1.3.5 Settings ........................................................................... 24
10.1.1.4 View – Menu .......................................................................... 28
10.1.1.4.1 Label ............................................................................... 28
10.1.1.4.2 Reader............................................................................. 28
10.1.1.4.3 Dictionary ........................................................................ 28
10.1.1.5 Help - Menu ........................................................................... 28
10.1.1.5.1 Help ................................................................................ 29
10.1.1.5.2 About .............................................................................. 29
10.1.1.5.3 Update............................................................................. 29
10.1.1.5.4 View Dictionary................................................................. 30
10.1.1.5.5 Number of Labels Req........................................................ 30
10.1.1.6 Characters Remaining ............................................................. 31
10.1.1.7 Date field............................................................................... 31
10.1.1.8 NDC field selection.................................................................. 32
10.1.1.9 Warning field selection ............................................................ 35
10.1.1.10 Browse ................................................................................ 37
10.1.1.11 Refresh................................................................................ 37
10.1.1.12 Parser Application ................................................................. 39
10.1.1.13 Program .............................................................................. 45
10.1.2 Update Reader Tab .................................................................. 47
Page 2 of 61
Confidential
10.1.2.1 What’s My Version .................................................................. 47
10.1.2.2 Update Reader ....................................................................... 48
10.1.2.3 Browse button........................................................................ 51
10.1.3 Dictionary Tab ......................................................................... 51
10.1.3.1 Add....................................................................................... 51
10.1.3.2 Delete ................................................................................... 53
10.1.3.3 Edit....................................................................................... 55
10.1.3.4 View Dictionary File................................................................. 56
10.1.4 Dictionary Tab ......................................................................... 57
10.1.5 Miscellaneous .......................................................................... 57
10.1.5.1 Not able to start the transfer session ........................................ 57
10.1.5.2 Could not find the ScriptalkDB.mdb file ..................................... 57
11
UPDATE USING NFC ........................................................................... 58
11.1
11.2
11.3
SET-UP FOR NFC: ........................................................................... 58
STARTING FILE TRANSFER ............................................................ 58
VARIOUS VOICE PROMPTS............................................................. 58
12
WARRANTY ........................................................................................ 60
13
CONTACT US ...................................................................................... 61
14
WALL MOUNT TEMPLATE .................................................................... 61
Page 3 of 61
Confidential
1 Introduction
ScripTalk Station with USB-Serial converter (pharmaceutical version) is a
portable electronic device that allows pharmacies to program ‘smart label / RFID
Tags’ with prescription information using the PC GUI Software and update
firmware and libraries using the PC GUI. The communication interface between
Target and PC GUI is either USB or Serial
Near Field Communication (NFC) has also been incorporated to allow data
transfers to other end users ScripTalk Stations.
2 Purpose
The purpose of this document is to provide user level guidance about Scriptalk
Station PC GUI Software system and NFC. This document will provide details on
the features of the product, the initial setup environment on the PC to run the
software, the installation instructions, the help guidelines to work with the Host
application and NFC Use cases.
3 Scope
This document is limited to provide details for the user about how to use
Scriptalk Station PC GUI Software on the Host PC and NFC.
4 Audience
The target audience of this document is the end users of Scriptalk Station PC
GUI Software.
Page 4 of 61
Confidential
5 Overview
5.1 Initial Setup
The Scriptalk Station PC GUI Software is a PC-based system that runs on
Microsoft Windows operating system. This software enables an end-user to
update the firmware and support files on a Scriptalk Station Target board and
program the RFID Tags with the same board.
The target supports either USB Interface (USB to Serial Adapter) or Serial
Interface. This software communicates with the Scriptalk Station Target board
using the UART communication port emulated using an USB-to-UART adapter
installed on the PC or RS232 communication.
Scriptalk target
Host PC
Scriptalk
PC GUI
Application
USB Port/
Serial
USB Port
COM Port
USB-toUART
Adapter
RFID Link
RFID
Tag
Figure -1 ScriptalkM – PG GUI Setup
5.2 System Requirements
5.2.1 Software Requirements
•
PC with Windows Operating System (2000 or XP)
•
Scriptalk Station PC GUI Software
5.2.2 Hardware Requirements
•
PC with USB / COM port
•
Scriptalk Station USB enabled with Accessories
Page 5 of 61
Confidential
•
USB Cable (USB A to Miniature B)
6 Installation Guidelines
The installation setup file “ScriptTalk Installation Setup.exe” is to install
1. The files to use the Scriptalk Station PC GUI Software
2. The driver installation for Pololu adapter
By starting the application the user will get the agreement screen
On clicking ‘cancel’, user can exit the installation. On accepting the agreement, the
user can click the ‘I Agree’ button to continue the installation.
There will be two options in the components list. The user can select the components
based on the requirement.
By clicking on the item, a component installation can be enabled / disabled.
There is a ‘Space required’ required field that gives the information about the disk
space required to install the selected components.
Page 6 of 61
Confidential
On pressing ‘Next’ button, the following window will be displayed.
Page 7 of 61
Confidential
The default path of installation will be “C:\Program Files\Scriptalk”. For providing a
different path click the ‘Browse’ button and select a new path.
On clicking the Install button, the selected components will be installed.
If the Pololu driver installation selected, and if pololu is already installed, the
following dialog is displayed.
If Pololu is not already installed, then it will show the following dialog
Page 8 of 61
Confidential
On clicking ‘Install’, it will install the drivers and the following dialog will be shown.
On clicking OK, the setup program will continue the installation.
Note: Further information regarding the Pololu driver installation can be
found at http://www.pololu.com/products/pololu/0391/
The Install Driver dialog will not be shown if the user didn’t select the Pololu Driver
component from the Choose Components dialog. In this case, the setup will install
only the software application.
On successful installation, the user will see the Installation Complete dialog.
Page 9 of 61
Confidential
On clicking the ‘Close’ button, the dialog will disappear.
Page 10 of 61
Confidential
7 Uninstallation Guidelines
The Scriptalk Station PC GUI software can be un-installed in two ways.
1. On selecting the Uninstall from the start menu programs of Scriptalk.
Start->Programs->ScripTalk->Uninstall.
Also refer the screen shot as shown below
2. With the help of Add/Remove Programs, Scriptalk PC GUI can be
uninstalled. Perform the step as described below.
Start->Settings->Control Panel->Add/Remove Programs
Under Add/Remove Programs select ScripTalk PC_GUI and click on
Change/Remove Button.
Page 11 of 61
Confidential
8 Limitations
Limitations of Scriptalk Station PC GUI software are listed below
1. The data base file (contains NDC and Warning IDs) should be named as
ScriptalkDB.mdb and this file should be in the current path from where the
executable is running.
2. The ‘ScripTalk_Station_UserManual.pdf’ and ‘ScripTalk_Update.txt’
should be placed in the current path from where the executable is running to
open it on pressing Help menu.
3. ‘UpdateVersions’ is the folder name the application expects in the current
folder for update reader version sub-folders.
4. The GUI can allow the user to only download the following specific files if
those are under UpdateVersions.
•
batteryPrompt.dat
•
prompt.dat
•
monograph.dat
•
ScripTalk_Config.dat
•
NDC2MONO.dat
•
SCRIPTALK.ldr
•
DOWNLOAD_APP.ldr
•
NFCAbort.raw
•
NFCCompleted.raw
•
NFCNoFile.raw
•
NFCAway.raw
•
Any files with the .bdc extension
•
Any files with the .dat extension
•
Any files with the .rul extension
•
Any files with the .raw extension
5. ‘Labels’ is the folder name the application expects to maintain the labels for
programming.
Page 12 of 61
Confidential
9 GUI behaviors
9.1 Behaviors of the keys
Keys
provided
Behavior
Ctrl + A
Select all.
Shift + Home
Select all. Key provided only for text display. For fields display
it is blocked.
Ctrl + V
Paste the clipboard content.
Ctrl + C
Copy the selected text.
Ctrl + X
Cut the selected text.
Delete
Delete the selected text if some text is selected. If there is no
selected text then it will delete a character, which is after the
cursor position.
Ctrl + Z
Undo the last change happened in the control where the focus
is.
Backspace
Delete the selected text if some text is selected. If there is no
selected text then it will delete a character, which is before the
cursor position.
9.2 Other behaviors
•
The target/reader will voice out before downloading if the battery supply is
applied, “Entering into download mode when the External Power is
not applied may result in unexpected result.” Prefer to power adapter
or use fresh batteries (fully charged batteries) for downloading.
•
On Card programming, after showing progress dialog, if the target is not
in the position to update the positive or negative acknowledgement to the
host due to some unavoidable reason then, there will not be any error
messages from the ScripTalk GUI. The user can close the progress window
by clicking on the Close button on the title bar of the progress dialog, if
the user found that the target is hanging.
•
In case “Span over multiple labels” is not selected when the characters
typed in the field(s) /text mode reached the maximum limit, the
Characters Remaining field becomes Red and it displays a negative value.
•
If “Span over multiple labels” data valid for a maximum of 10 tags is
allowed.
•
The GUI sends the ScripTalk_Config.dat as the last file if it presets. If file
is not available, the GUI shows the following warning message about the
unavailability of the file. Even if the user didn’t select the file
Page 13 of 61
Confidential
ScripTalk_Config.dat, the GUI automatically sends the file with other files
for each transfer session.
Page 14 of 61
Confidential
10 How to use PC GUI software
Once the initial setup of Scriptalk Station PC GUI Software is ready, the user can
start the software,
1. By double left click on the icon
Or
2. By pressing right click on the icon and click on Open.
10.1 Tabs
Scriptalk Station PC GUI Software has three main Tabs in the GUI screen
1. Program Label
2. Update Reader
3. Dictionary
10.1.1
Program Label Tab
10.1.1.1
Label Size
Program Label tab has three types of Label Sizes - 2K, 10K and 32K.
The default Label Size is 32K.
10.1.1.2
Display As
Program Label tab has two types of displays: Fields display and Text display.
The default display type is Fields.
Page 15 of 61
Confidential
If the Display type is Fields then there are individual labels for each field.
Page 16 of 61
Confidential
For the Display type Text there is a text box for the label content
Page 17 of 61
Confidential
10.1.1.3
File - Menu
The top menu ‘File’ contains options ‘New’, ‘Load’, ‘Save’, ‘Settings’ and ‘Exit’.
10.1.1.3.1
New
•
Clear the field values, if the Display type is Fields.
•
Clears the text box, if the Display type is Text.
•
Displays the file name window to accept the new file name
10.1.1.3.2
•
Load
Displays the file Open dialog. It allows the user to browse a .lbl file and
load its content in the fields, if the Display type is Fields.
To Load a file, user has to select the file to be loaded and click ‘Open’.
Page 18 of 61
Confidential
It will display the following message if file is not selected.
The loaded file name is displayed next to the File Loaded as shown in the
screen shot
Page 19 of 61
Confidential
Page 20 of 61
Confidential
The same functionality of loading the file can be achieved by selecting the file from
the list under the Files to Program and then click on ‘Open’ button as shown in the
screen shot below.
If display as is Text, on FileLoad, displays the file Open dialog. It allows the
user to browse and select a .txt file and load its content in the text box, if the
Display type is Text.
To Load a file, user has to select the file to be loaded and click ‘Open’.
Page 21 of 61
Confidential
It will display the following message if file is not selected
The loaded file name is displayed next to the File Loaded as shown in the screen shot
below.
The same functionality of loading the file can be achieved by selecting the file from
the list under the Files to Program and then click on ‘Open’ button as shown in the
screen shot below.
Page 22 of 61
Confidential
10.1.1.3.3
•
Save
Case 1
o
•
If the file name is already entered using File Name window as
shown above under the New, the file gets saved in the path which
has been selected by user on clicking ‘Browse’ button under the
Files to Program group which is next to ‘Open’ button. Also the file
gets listed in the space provided.
Case 2
o
Displays the File Name window to enter the name of the file if the
file name is not selected earlier. The file gets saved in the path
which has been selected by user on clicking ‘Browse’ button under
the Files to Program group which is next to ‘Open’ button. Also the
file gets listed in the space provided.
10.1.1.3.4
Exit
This menu item is to close the Scriptalk Station GUI application.
Page 23 of 61
Confidential
10.1.1.3.5
Settings
This menu option is used to change the UART settings and the label program
commands. On pressing Settings it will show a dialog contains fields to set the
communication settings and few more options used while card programming.
Page 24 of 61
Confidential
•
The Port ID drop-down box contains port name from COM0 to COM255.
The default port ID is COM1. The OK button is to change the UART
settings with the selected values. Pressing Cancel button will retain the
same UART setting values.
•
The Communication Type drop-down box provides two options Serial and
USB. If user selects the option Serial, then the Host application sets the
communication baud rate to 115200 (RS232). If the option USB is
selected then, the baud rate will be 921600 (Pololu USB Module).
•
The “Program Only Warning Short Codes” option is by default greyed out
and selected. To unselect, the button can be enabled by modifying the
value of ENABLE_SHORT_CODES in the st_com_port file. The default
value is FALSE. To enable, change the value to TRUE.
Identification of Port ID in case of Communication Type is USB:
1. Right Click on My Computer and Select Manage as shown in screen shot
below.
2. This opens the window - Computer Management. Select the option Device
Manager on the left pane as shown in screen shot below.
Page 25 of 61
Confidential
3. Expand the Ports (COM & LPT) on the right pane as shown in screen shot
below.
Page 26 of 61
Confidential
4. Select the Com port number which is beside the text – e.g.Pololu USB to
Serial Adapter (COM17) in the Communication Interface Settings dialog as
shown above.
•
Span multiple labels this option is used to enable the feature of card
programmability over multiple cards.
•
Program Only NDC Number This option is used to either program NDC
numbers or data. If this option is clicked NDC number will be programmed
else NDC data will be programmed.
•
Program Only Warning Short Codes This option is used to either
program Warning numbers or actual text. If this option is clicked Warning
number will be programmed else warning data will be programmed.
•
Purge This will purge (delete) the *.lbl and *.txt files from the archived
labels folder. This folder will be placed under the ‘Labels’ folder. Before
purging the files, confirmation window will be displayed as shown in the
screen shot below.
Page 27 of 61
Confidential
10.1.1.4
View – Menu
This menu contains ‘Label’, ‘Reader’ and ‘Dictionary’.
10.1.1.4.1
Label
On selection of ‘Label’, ‘Program Label’ tab window will be displayed.
Same can be achieved by using key functionality. Press Alt + V
simultaneously and then press ‘L’ key.
10.1.1.4.2
Reader
On selection of ‘Reader’, ‘Update Reader’ tab window will be displayed.
Same can be achieved by using key functionality. Press Alt + V
simultaneously and then press ‘R’ key.
10.1.1.4.3
Dictionary
On section of ‘Dictionary’, ‘Dictionary’’ tab window will be displayed.
Same can be achieved by using key functionality. Press Alt + V
simultaneously and then press ‘D’ key.
10.1.1.5
Help - Menu
The Help menu contains ‘Help’, ‘About’, ‘Update’ and ‘View Dictionary’.
Page 28 of 61
Confidential
10.1.1.5.1
Help
Pressing Help menu will open the ScripTalk_Station_UserManual.pdf from the
current path from where the software application started. If the file
ScripTalk_Station_UserManual.pdf doesn’t exists in the expected path then it
will throw the following error dialog
10.1.1.5.2
About
This menu item press will show the information about the software in a
dialog.
10.1.1.5.3
Update
This will take the web site address from the file ScripTalk_Update.txt from the
current path. If the file ScripTalk_Update.txt doesn’t exists in the current path
then it will throw the following error dialog.
Page 29 of 61
Confidential
10.1.1.5.4
View Dictionary
Pressing View Dictionary menu will open the ScripTalk_Dictionary.txt from the
current path from where the software application started. If the file
ScripTalk_Dictionary.txt doesn’t exists in the expected path then it will throw
the following error dialog
10.1.1.5.5
Number of Labels Req
This is a non-editable filed that shows the number of labels required to program the
data. The PC GUI calculates the number of labels required depending on the label
size. The value of the field will be calculated on each character change of fields and
Page 30 of 61
Confidential
text boxes. If the data exceeds the 10 tags, then the Number of Labels Req will turn
to Red.
If the user tries to program the data, then the ScripTalk application will show the
above dialog to alert the user and will not proceed with programming.
10.1.1.6
Characters Remaining
This is a non-editable field that shows the number of characters remaining
after compression. The maximum number of characters is based on the Label
Size.
The value of the field will be calculated on each character change of fields and
text boxes. The keys Delete and the Backspace will not check for the
Characters Remaining functionality. All the other change in the fields and text
boxes will check for the Characters Remaining.
On reaching the maximum limit, the Character Remaining field will turn to
Red for the alert indication and it shows a negative value as shown in the
above screen shot.
10.1.1.7
Date field
On clicking the below button next to Date field displays a dialog from which
the date can be chosen.
Page 31 of 61
Confidential
The red circle indicates the current system date. To change the date, the user
has to select the date by clicking on the date and press OK. To go to the
previous and next month, user can press on buttons to right and left corners.
User can also make use of left and right arrow keys with in the date field to
modify the date as shown in the screen shot below.
10.1.1.8
NDC field selection
The NDC value can be selected in two ways.
1. By directly selecting an NDC ID from the drop down box.
2. On clicking the ‘Set NDC’ button of NDC field will display a dialog that will
have the NDC IDs with description. While processing the NDC database, a
pop up message as shown in screen shot below will be displayed.
Page 32 of 61
Confidential
3. An ID can be selected by clicking on the ID entry and press “Done”.
The field Search will search for a field starting with the value given, and
highlight the first occurrence of found ID. The searching of ID and highlighting
will be done for each change of character typed in the Search field.
If any of the warning field is not edited when selecting an NDC ID then the
selection of NDC ID will fill the warning fields with the associated warning IDs.
Page 33 of 61
Confidential
Note: If Program Only NDC Numbers is not selected, NDC data will be
programmed to Tag.
If any of the warning field is edited after selecting an NDC ID then an alert
message will be shown to the user.
Selecting “Yes” will overwrite the warning fields by the warning IDs associated
with the selected NDC ID. Selecting “No” will not affect the warning fields.
Page 34 of 61
Confidential
10.1.1.9
Warning field selection
The Program Label tab has five non-editable warning fields. Clicking on the
button ‘Set Warnings’ of Warning field will display a dialog that will have the
IDs with description.
The user can select an ID by clicking on the ID entry and click ‘Add’ button
that will add the ID to the list box. At the max, 5 warnings can be selected.
When more than 5 warnings are added, warning dialog message alert will be
displayed as shown in the screen shot below.
Page 35 of 61
Confidential
Same warning ID can not be selected more than once. When the warnings are
added / removed, corresponding message will be displayed as shown in the
screen shot below.
With the use of button ‘Remove’ the user can remove a warning from the list.
To replace a warning ID with another one, the user has to select a warning
ID, press ‘Add’ button and add a new ID.
Note: Warning number ‘0000’ cannot be added.
If the warning field contains some value, when opening the Warning dialog,
those warnings will be displayed in the warning list. After selecting the
warning IDs, on pressing Done, the Warning dialog will disappear and the
selected warnings will be displayed in the warning fields. On clicking ‘Set
Warnings’ button of Warning field, if the warning field contains default
warning IDs associated with the NDC field then the following alert dialog will
be displayed.
If the user selects “Yes” then the Warning Dialog will be shown and the user
can choose the warnings. If the user selects “No” then that indicates that
there will not be any change in the warning field values.
Note: If Program Only Warning Short Codes is not selected actual
warning data will be programmed to Tag.
Page 36 of 61
Confidential
10.1.1.10
Browse
On clicking the ‘Browse’ button, ‘Select the folder to save the labels’ window
will be displayed to set the path for maintaining the Labels. In case, the user
wants to select a ‘Labels’ folder, other than the one available at the current
path then, the Browse option can be used.
10.1.1.11
Refresh
This button is used to refresh the list of files from the labels folder which will
be displayed on the right hand side. This functionality is useful when the user
copies the file from outside to the labels folder. On clicking this button, the
new file will be listed and will be indicated by a buzzer sound.
There is also another approach for listing the files, when the files are copied
from outside. In the ScripTalk_Update.txt file, an entry corresponding to
REFRESH_RATE identifies the refresh timeout period. The value to be
specified should be in terms of seconds. The file gets listed automatically once
the timer expires and play the sound file /beep sound depends on the setting.
If the timer value is zero, the files will not be listed automatically.
Page 37 of 61
Confidential
PC GUI will play the sound “ScripTalk_Refresh_Sound” wav file if the sound is
selected under sound settings menu. The sound file can be changed by
selecting browse button.
Beep option is provided under the sound setting menu and its both frequency
and Duration can be changed.
Page 38 of 61
Confidential
10.1.1.12
Parser Application
This option is used to load either .lbl file or .txt file using RX filed number. Enter the
RX number and click run button as shown in below (both field and Text mode). It will
open the file which is in the name of RX number.
Page 39 of 61
Confidential
Page 40 of 61
Confidential
Page 41 of 61
Confidential
The directory path settings for parser application can be selected as shown the figure
below.
If PC GUI is not finding the parser application in the selected path, It will pop-up the
warning message as follows.
Page 42 of 61
Confidential
If the parser application is disabled in the PC GUI version, the run icon will be
disabled as shown in the below figure
If the run button is selected without entering the RX number in the RX field, the PC
GUI display the warning message
If the PC GUI is not finding the file name within the delay period, It will display the
warning message as follows
Page 43 of 61
Confidential
If PC GUI is not getting the proper return values expected protocol, PC GUI will
display the message after the delay period.
Page 44 of 61
Confidential
10.1.1.13
Program
On clicking the program button, the following pop-up dialog will be shown.
The card programming will not be done if the user presses the Cancel button.
On pressing the OK button, it sends the tag data to the board connected for
programming tag.
The following two-progress dialog will be shown in case of Span Multiple
labels selected.
On the confIrmation of board for Writing and Verifying Label, the tick mark
will be shown for each progress steps. The OK button will be enabled once the
final conformation of progress is received from the board. On OK button
Page 45 of 61
Confidential
press, the progress dialog will disappear and the control will be back to the
main dialog.
The following warning dialog will be shown if the Writing Label process failed
on the target
On failure of Verifying Label process, the GUI shows the following warning
message.
The following are the two screen shots displayed in case of programming
empty data for the display type “Field” and “Text” respectively.
Page 46 of 61
Confidential
10.1.2
Update Reader Tab
The Update Reader screen will show a list of reader version folders and the
files under those folders. By clicking on the item, a file can be selected or deselected. The application picks up the version folder names from a directory
“UpdateVersions” from the path which is set using ‘Browse’ button as
described below or the default current path.
10.1.2.1
What’s My Version
On clicking the button ‘What’s My Version”, the application will communicate
to the board, gets the current firmware version of the reader and shows in
the appropriate label.
Page 47 of 61
Confidential
On waiting for the version number from the target board, the GUI shows the waiting
state in the version label.
After 2 seconds, if the Scriptalk application didn’t receive the current version
then, the GUI shows the following error message box.
After the user click on OK button, the My Version label will be cleared.
10.1.2.2
Update Reader
To update the reader with any new version, the user has to select the
appropriate version folder and press the ‘Update Reader” button. On pressing
‘Update Reader’, the following alert dialog will be shown.
Page 48 of 61
Confidential
The user has to put the connected board in to program mode. And then when
the user presses the OK button, the selected files of the selected folder will be
transferred to the target board. The transferring progress will be displayed in
a status dialog.
The first progress bar will show the status of the current file transfer. The
second progress bar shows the Over all progress of transfer of all the files
under the selected version folder. On OK button press, the dialog will
disappear and the control will be back to the Update Reader tab.
It displays the following message if other file is selected which are not
mentioned under the Limitation section (Refer 4 item).
Page 49 of 61
Confidential
Page 50 of 61
Confidential
10.1.2.3
Browse button
On clicking the brows button, ‘Select the Folder’ browse dialog will be shown.
In case, the user wants to select a UpdateVersion folder, other than the one
available at the current path then, the Browse option can be used.
10.1.3
Dictionary Tab
This feature maintains the dictionary for the words to be replaced during
programming. If the dictionary has an entry
mg = milligram
then during programming, when ever the application comes across the word
mg the same will be replaced by milligram. User can Add the entry, delete the
entry, edit the entry and can view the dictionary file.
10.1.3.1
Add
On clicking the ‘Add’ button an entry can be added to the dictionary which can
display the window as shown in the screen shot below.
Page 51 of 61
Confidential
On clicking the ‘Ok’ button, the entry will be added to the list and will be
displayed in the space provided as shown in the screen shot below. Note that
the entry will be added in the lexicographic (alphabetical) order.
During programming, the Entry: mg will be replaced by Replacement:
milligram. In case if an entry already exists, the application displays the
window as shown in the screen shot below.
Page 52 of 61
Confidential
10.1.3.2
Delete
An entry can be deleted from the dictionary by selecting the word in the list
as shown in the screen shot below.
Click on ‘Delete’ button to delete the entry. On conformation, the entry will be
deleted from the list as shown in the screen shot below.
Page 53 of 61
Confidential
An error will be displayed if the entry is not selected from the list when the
user clicks on the Delete button as shown in the screen shot below.
Page 54 of 61
Confidential
10.1.3.3
Edit
Replacement entry in the dictionary can be modified with ‘Edit’ option.
The selection of entry can be done in 2 ways.
a. Select the entry from the list and click on ‘Edit’ button
b. Double click on the selected entry in the list.
On performing any one of the above, window will be displayed to enter the
new value as shown in the screen shot below.
Enter the new value to be replaced and click on ‘Ok’ button. On conformation,
the replacement value will be modified in the dictionary and will be displayed
in the space provided as shown in the screen shot below.
Page 55 of 61
Confidential
An error will be displayed if the entry is not selected from the list to edit the required
data when the user clicks on the Edit button as shown in the screen shot below.
10.1.3.4
Page 56 of 61
View Dictionary File
Confidential
On clicking the ‘View Dictionary File’ button, Dictionary file - ScripTalk_Dictionary.txt
can be viewed. The dictionary file can also be viewed on clicking Help->View
Dictionary.
10.1.4
Dictionary Tab
10.1.5
Miscellaneous
10.1.5.1
Not able to start the transfer session
When there is no proper connection between the host and the target the
following error dialog will be displayed.
On the display of this error message, the communication connection between
the PC and the board has to be rechecked (through Hyper terminal or sample
executables).
10.1.5.2
Could not find the ScriptalkDB.mdb file
When the ScriptalkDB.mdb not found in the appropriate folder, the following
error message will be shown
To overcome this issue, the ScriptalkDB.mdb file has to be placed the same
folder where the application started.
Page 57 of 61
Confidential
11 Update using NFC
Files from one ScripTalk station can be transferred to another without any wired
connection, i.e. over RF field. This can be done with minimal intervention required by
user.
11.1 SET-UP FOR NFC:
1. Put both the ScripTalk Station (target as well as source) into download
mode by pressing “Prev” and “Next” key During Power ‘ON’.
2. Keep one ScripTalk Station on the top of other, facing each other.
Now the boards are ready for file transfer over NFC.
11.2 STARTING FILE TRANSFER
Once the setup is done, Press center “Read” Key on the target unit. The target
unit on which files need to be updated will start beeping. Beep will be more
frequent initially (during identifying the source). When the files transfer starts,
beeping becomes less frequent. Various states of the file transfer will be
indicated with voice prompts on the source ScripTalk station.
11.3 VARIOUS VOICE PROMPTS
All the voice prompts are played on the source station, i.e. the ScripTalk
Station from which files are transferred.
• FILE TRANSFER START PROMPT:
Start of file transfer over NFC is indicated to the user with the following voice
prompt.
“Starting NFC file transfer”
• FILE TRANSFER COMPLETION PROMPT:
Following voice prompt indicates the completion of file transfer.
“NFC file transfer completed”
Also, the target station stops beeping.
• BOARD PROXIMITY ALERT:
When the ScripTalk Station are moved away from each other during NFC
transfer, a voice prompt alerts to the user about the same.
“Transfer not complete, please put the device back on the top of the
unit”
On the target unit beeping will become more frequent.
• NO FILES TO TRANSFER ALERT:
Decision about identifying the files to be transferred is done on the basis of file
size.
Page 58 of 61
Confidential
For prompt file, monograph file, and NDC2MONO file, respective file sizes are
compared on the both the ScripTalk Station. Whichever file size is not matching
is selected for NFC transfers.
All the dictionary files available on the source station are transferred to the
target irrespective of their file size.
If respective file sizes match, and no dictionary file is available, user is alerted
with the following voice prompt.
“No files to transfer”
And also the Target ScripTalk Station stops beeping.
• TRANSFER ABORTED ALERT:
After initiation of transfer if the ScripTalk Station are kept away from each
other for more than 20 seconds, NFC transfer is aborted. And this is indicated
by following voice prompt.
“NFC file transfer aborted”
Target Station stops beeping.
• DEBUGGING NFC RELATED ISSUES:
Utmost care is taken to inform user about different states of NFC file transfer.
However, if the NFC transfer is not starting or if it behave erratically, please
check following.
1. Check if the ScripTalk Stations are kept in the close proximity or not. Keep
one station on the top of the other, and both the station should face each
other
2. Restart both the station in download mode. To do so, press “Prev” and
“Next” key while powering on the unit. Keep one board on the top of other,
and initiate NFC transfer.
Page 59 of 61
Confidential
12 Warranty
En-Vision America, Inc. (hereafter “Seller”) warrants that the products
manufactured by it and supplied hereunder are free from defects in material
and workmanship. If any such product shall be proved to Seller’s satisfaction
to be non-conforming within twelve (12) months from date of delivery, Seller
shall have the option to credit the purchase price of such product or repair or
replace such product. Such credit, repair, or replacement shall be Seller’s sole
obligation and Buyer’s exclusive remedy hereunder and shall be conditioned
upon Seller’s receiving written notice of any alleged nonconformity within
fifteen (15) days after receipt of shipment and, at Seller’s option, return of such
products to Seller, F.O.B. its factory. Products supplied by Seller that are
manufactured by someone else are not warranted by Seller in any way, but
Seller agrees to assign to Buyer any warranty rights in such products that
Seller may have from the original manufacturer.
This exclusive remedy shall not be deemed to have failed of it’s essential
purpose so long as the Seller is willing and able to repair or replace
nonconforming products or credit the purchase price within (90) days of the
date the Seller determines that such products are nonconforming. Any
suggestions by Seller or Seller’s agents regarding use, application, or suitability
of the products shall not be construed as an expressed warranty unless
confirmed to be such in writing by Seller.
IMPORTANT SAFETY INSTRUCTIONS:
READ ALL INSTRUCTIONS BEFORE USING
Warning!
If you have difficulty reading a label, find a caregiver to read the printed label
on the prescription. Do not guess or make assumptions as to the contents or
directions for any prescription medication.
Warning! Only use the DC power supply provided by En-Vision America.
Damage may occur if a different power supply is used.
Warning! The reader is water resistant only. It should not be placed in water.
If dropped into water, it should be removed immediately and dried off. To
keep the product safe from harm, always store the reader in the convenient
holder that has been provided. Simply attach the holder to a nearby wall or
surface near your prescriptions.
Page 60 of 61
Confidential
13 Contact Us
For more information, please contact us at:
En-Vision America, Inc.
1845 W. Hovey Ave.
Normal, IL 61761
Toll Free: (800) 890-1180
Customer Service: (309) 452-3088
Tech Support: (309) 452-9368
Fax: (309) 452-3643
E-mail: [email protected]
Website: www.envisionamerica.com
14 Wall Mount Template
Page 61 of 61
Confidential