1
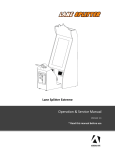
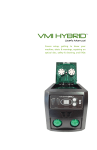
VMI 2500 Buffer
User’s Manual
Covers setup, getting to know your
machine, alerts & warnings, repairing an
optical disc, safety & cleaning, and FAQs
For models 2500 and 2550i
Light to Mid-Commercial Use
Maximum recommended daily use of 50 repair cycles
TM
THANK YOU
VenMill Industries, Inc
670 Douglas Street
Uxbridge, MA 01569 USA
USA 800-928-0090
No. Am. 866-864-0210
Intl. 508-278-0091
Fax 508-278-0005
www.venmill.com
For purchasing the VMI 2500/2550i Buffer
TM
This unit is intended to clean/repair the
following discs: Blu-Ray, CD-ROMs, Music
CDs, Data CDs, DVDs, HD-DVDs, Computer
Discs, Game Discs, Books on disc, all
recordable CDs and DVDs, double-sided
discs, & 3 Inch Discs (only with adapter).
SAVE ALL PACKING MATERIALS. FAILURE
TO USE PACKAGING DESIGNED FOR THIS
UNIT MAY CAUSE DAMAGE TO THE UNIT
AND WILL VOID WARRANTY. FOR MORE
INFO CONTACT [email protected].
© 2012 VenMill Industries, Inc. All rights reserved. Under the copyright laws, this manual may not be copied, in
whole or in part, without the written consent of VenMill.
Every effort has been made to ensure that the information in this manual is accurate. VenMill is not responsible
for printing or clerical errors.
Names and designs are trademarks of VenMill Industries, Inc. Artwork and Design © 2012 VenMill Industries, Inc.
All Rights Reserved.
The maximum amount of repairs per bottle may vary based on cleaning cycle usage. See www.venmill.com for
more information.
CAUTION: Units and consumables are designed for use in specific regions. Your warranty will be voided if you
purchase the equipment and/or consumables outside of your designated region. Purchase only through Authorized
Distributors found on our website at www.venmill.com. If uncertain, please contact [email protected].
READ BEFORE OPERATING EQUIPMENT
SECTION 1
Unpacking and Repacking.............................................................................................1
SECTION 2
Getting to Know Your Unit.............................................................................................3
SECTION 3
Items and Features of Your Machine..........................................................................4
SECTION 4
Modes of Operation.........................................................................................................7
SECTION 5
Quick Start...........................................................................................................................9
SECTION 6
Standard Maintenance................................................................................................. 11
Rubber Platter......................................................................................................... 11
Buffing Wheels........................................................................................................ 12
C2 Chip...................................................................................................................... 13
Machine Cleaning.................................................................................................. 14
Splash Guard........................................................................................................... 14
Cleaner Disc............................................................................................................. 15
Rubber Platter......................................................................................................... 16
SECTION 7
VMI 2500/2500i BufferTM FAQs................................................................................... 17
SECTION 8
Specifications................................................................................................................... 19
SECTION 1
Unpacking and Repacking
SAVE ALL PACKING MATERIALS. FAILURE TO USE PACKAGING DESIGNED FOR
THIS UNIT WILL CAUSE DAMAGE TO THE UNIT AND WILL VOID WARRANTY.
Parts that need to be saved are as follows:
VMI 2500 Shipping Box | Internal Foams (2 foams total) | Outside Foam Left
Outside Foam Right | Protective Plastic Bag
There is a charge plus shipping for packing materials, if they are discarded.
Unpacking:
1. Open the Shipping Box. Remove
support documents / accessories. Pull
out the VMI 2500 that is encased within
the outside foams, by pulling upwards.
2.
Remove the left and the right outside
foams.
3.
Take the VMI 2500 out of the plastic bag.
4.
Locate the two side panel thumbscrews
and unscrew them.
5.
Lift the side panel up and away from
the machine.
6.
Locate foam # 2, which is positioned
in the front part of the machine, under
the buffing wheel, and remove.
7.
Locate foam # 1, which is behind the
Main Motor in the back of the machine,
and remove.
8.
Install the side panel and screw down
the thumbscrews.
9.
Remove any green tape located on the
outside of the machine.
10. Plug in the power cord.
11. On the back side of the machine, turn
the ON/OFF switch to the ON position.
12. LCD screen will power on and display a
blue backlight with Menu.
13. Your VMI 2500 is now ready to be used.
1
SECTION 1
Unpacking and Repacking
Repacking:
1.
1.
Turn off power to the machine.
2.
Remove the power cord from the back
of the unit.
3.
Locate the two side panel thumbscrews
and unscrew them.
4.
Lift the side panel up and away from
the machine.
5.
Locate the Main Motor. Push down on
the top front of the Main Motor, so that
the back end lifts up slightly.
6.
Insert foam # 1 behind the back of the
Main Motor, against the back wall of
the machine.
7.
Locate the Platter on the front of the
machine.
8.
Insert foam # 2 to the right of the Platter
and below the Buffing Wheel.
9.
Install the side panel and screw down
the thumbscrews.
2.
1.
10. Place VMI 2500 into the Protective
Plastic Bag.
11. Place machine into the left and the
right outside foams.
2.
12. Place VMI 2500 that has been encased
within the outside foams and protective
plastic bag into the Shipping Box.
13. Insert anything else that has been
required by the Technical Support
Department.
14. Close and tape box shut.
15. Write provided RMA number on the
outside of the Shipping Box.
Note: In order to send a machine in for servicing, a customer must call Technical Support first (866864-0210) to troubleshoot the unit. If an authorized technician deems that the machine is in need of
servicing, they will provide the customer with an RMA form to fill out. Any machine sent in without
authorization may be denied delivery and will be returned to the customer at their expense.
2
SECTION 2
C2 Chip
Getting to
Know Your Unit
On/Off
Fan
Power Cord Plug
Top Cover
Display
Splash
Guard
Buffing Wheel
Start Button
Repair Option
Buttons
Disc Platter
3
Items and Features of Your Machine
SECTION 3
Items and Features of Your Machine
Initial Setup:
There are several items that have been provided with your VMI 2500, but which have
been separated from the unit. Please find these items stored within the packing
material.
Buffing Solution
There is one bottle of Buffing Solution that has been
shipped with your VMI 2500 machine. This bottle is
rated for enough solution to run about 250 minutes of
machine use. NOTE: SHAKE THE BUFFING SOLUTION
BOTTLE WELL, BEFORE EACH USE!
Consumable Counter Chip (C2 Chip)
The VMI 2500 unit comes with a consumable counter
chip which is good for 500 minutes of machine use.
This chip has been preinstalled on the back of the
machine. NOTE: THE VMI 2500 CAN NOT OPERATE
WITHOUT A C2 CHIP! The amount of usage on this
chip will be displayed on the front LCD Screen. On the
“Main” Menu, in the middle section, this is where the
total Chip Count is displayed. This “Count” located on
the LCD Screen will decrease the amount of supplies
left on the C2 Chip as the Operator continues to use
the machine. When the Chip count drops to 10%,
an asterisk (*) will appear next to the “Count” line.
This is to inform the Operator that supplies should
be ordered at this time. At this point, while a cycle
is running, the “Start” button will flash from Green
to Blue and Error Message: “Low Chip” will appear
on the Main Menu. Once the chip is depleted the
machine will notify the Operator and no more cycles
will be allowed, until a new C2 Chip is installed. Once
a new C2 Chip is installed, all counts will be reset. The
Operator does not need to perform a manual reset of
the machine.
WARNING: CONSUMABLE COUNTER CHIPS ARE
DESIGNATED SPECIFICALLY PER COUNRTY CODE! A
USA REGIONED C2 CHIP WILL NOT BE COMPATIBLE
WITH A EUROPEAN OR AUSTALIAN CODED VMI 2550i
AND VISA VERSA.
4
SECTION 3
Items and Features of Your Machine
Buffing Wheel
The VMI 2500 unit comes with a preinstalled Buffing Wheel.
This wheel is good for a total of 500 minutes of use.
Cleaner Disc
The VMI 2500 unit comes with a Cleaner Disc which
is designed to be used in the machine for cleaning/
raking the Buffing Wheel. The machine is designed to
inform the Operator, after about 20 cycles of use, to
run the Cleaner Disc through the machine.
NOTE: Do not apply Buffing Solutions on the Cleaner Disc.
During the buffing process your Buffing Wheel
removes oil, dirt, and a small layer of plastic from
the surface of your disc. This build up, over time, will
cause your Buffing Wheel to become dirty and stiff.
This can result in damaged media and a decrease
in your Buffing Wheel life expectancy. The VMI 2500
Cleaner Disc cleans and softens your Buffing Wheel.
NOTE: IT IS HIGHLY RECOMMENDED THAT YOU RUN THE
CLEANER DISC AS THE LAST CYCLE OF THE DAY, REGARDLESS
OF WHEN THE CLEANER DISC WAS LAST RUN!
Rubber Platter
The VMI 2500 unit comes with a preinstalled rubber
platter. There is no specific time frame for how long
a rubber platter will last, it could be one day or one
year depending on how the machine is used and
maintained. If the disc can no longer sit flat on the
rubber platter or the imprinting on the surface is no
longer visible, then it should be replaced. If there are
any large nicks, gouges, lifted edges, or tares – then
the rubber platter should be replaced. If the machine
is making a high pitched squealing noise during the
cycle, then the rubber platter should be replaced.
Power Cord
The VMI 2500 unit comes with a power cord based
on the region that the machine is designated for.
This power cord simply needs to be installed into
the power inlet located on the back of the unit. Then
proceed to take the other end of the power cord and
plug it into a wall outlet.
5
SECTION 4
Modes of Operation
Modes of Operation
Regular
This option encompasses any of the following types
of discs: CD-ROMs, Music CDs, Data CDs, DVDs, HDDVDs, Computer Discs, Game Discs, Books on Disc, all
recordable CDs and DVDs, Double Sided Discs, Blu-Ray,
and PS3. Note: On this mode of operation, Blu-Ray and
PS3 discs may only be cleaned. For a “Repair” solution
for these types of discs, run them on the Deep Mode.
The VMI 2500 is preset to run on the “Regular” mode, as indicated by the Green
LED light illuminated on the Start Button. Located on the LCD Screen in the
“Main” Menu, on the bottom section, this is where the Cycle Mode is displayed.
If the line reads: “Cycle REG”, then your unit is ready for a regular repair mode.
This mode is set to run for 1 minute.
Deep
This option encompasses any of the following types
of discs: CD-ROMs, Music CDs, Data CDs, DVDs, HDDVDs, Computer Discs, Game Discs, Books on Disc, all
recordable CDs and DVDs, Double Sided Discs, BluRay, and PS3.
The VMI 2500 is preset to run on the “Regular” mode.
To switch the machine over to the “Deep” mode of
operation, press either one of the Scroll Buttons. Once the machine is set to the
“Deep” mode, this will be indicated by a Blue LED light illuminated on the Start
Button. Located on the LCD Screen in the “Main” Menu, on the bottom section,
this is where the Cycle Mode is displayed. If the line reads: “Cycle Deep”, then
your unit is ready for a deep repair mode. This mode is set to run for 2 minutes.
Cleaner
Over time, the Buffing Wheel will become encased with
dried compound and plastic particles. Buffing Wheels
left in this condition will affect the repair quality of the
discs and in some extreme circumstances may cause
damage to the discs themselves. For this reason the
VMI 2500 has been designed to notify the Operator
to clean the Buffing Wheel. After about 20 minutes
of machine operation, the Main Menu will display the
message: “Cycle CLNR”, on the bottom section of the Cycle Mode line. The Start
Button will also flash an illuminated Red LED light. At this point load the Cleaner
6
SECTION 4
Modes of Operation
Disc onto the rubber platter. Note: Make sure the Cleaner Disc is loaded Label
Side Down! Close the front cover and press the Start Button. Upon completion,
the machine will reset back to the preset “Regular” mode and the Operator can
now continue using the machine.
At certain times, the Operator may choose to run the “Cleaner” mode before
the machine instructs the Operator to do so. In order to activate this mode of
operation, press either one of the Scroll Buttons. Once the machine is set to the
“Cleaner” mode, this will be indicated by a flashing Blue LED light illuminated
on the Start Button. The Cycle Mode displayed on the bottom section of the
Main Menu will read: “Cycle CLNR”. Proceed to insert the Cleaner Disc, close the
front cover, and press the Start Button.
Emergency Stop
A situation may present itself in which an Operator may desire to stop a cycle
prematurely. At any time during the cycle, the Operator may press any button
on the User Interface or lift open the front cover, to stop the cycle. Once the
button is pressed or the front cover is lifted open, the cycle will stop and the
Main Menu will display error message: “Emergency Stop Wait”. An illuminated
flashing red LED light on the Start Button will also appear. Once the machine has
realigned itself (Note: The Front Cover must be closed in order for the machine
to realign itself ), the machine will reset back to the last mode of operation that
the Operator had selected previously. The Operator may now continue with
using the machine.
Replace Chip
The consumables (buffing wheel and buffing solution) have been designed
to be replaces all at the same time. The consumables originally provided with
the VMI 2500 and the VMI 2500 Combo Packs are all rated for 500 minutes of
operation. Each configuration is accompanied by a Consumable Counter Chip
which informs the unit that the consumables have been replaced and installed.
The amount of consumable usage time is displayed on the Count line located
on the Main Menu. As the consumables deplete over time, the Count line will
expire down in number of minutes left on the chip. Once the C2 Chip has
reached 10%, the main menu will display the following information:
Failure to use consumables designed for this unit will cause damage to both unit and
disc thereby voiding your warranty. For Authorized Distributors visit www.venmill.com.
7
SECTION 4
Modes of Operation
STAT READY
COUNT 050*
CYCLE REG
STAT EMPTY
COUNT 000
CYCLE RC
The asterisk (*) symbol will appear next to the count down
time to indicate to the Operator that they should consider
ordering more supplies for their unit. Another indication is
provided for the Operator during the actual repair cycle itself.
The Status line will read: “Low Chip” and the Start button will
flash from Blue to Green while the cycle is in process.
Once the C2 Chip has reached 0%, the main menu will display
the following information:
At this point the machine will not allow the Operator to run
any other operations, until a new C2 Chip is installed. To
replace the C2 Chip:
1. Locate the used C2 Chip inserted on the back of the machine.
2. Remove the used C2 Chip. Once removed, an exposed RS232 port will
become visible.
3. Install a new C2 Chip into the RS232 port.
WARNING: CONSUMABLE COUNTER CHIPS ARE DESIGNATED SPECIFICALLY PER
COUNRTY CODE! A USA REGIONED C2 CHIP WILL NOT BE COMPATIBLE WITH A
EUROPEAN OR AUSTALIAN CODED VMI 2550i AND VISA VERSA.
STAT READY
COUNT 500
CYCLE REG
Once a new C2 Chip has been installed, the main menu will
display the following information:
At this point the Operator can now resume operation. Note:
There is no need for the Operator to perform any manual
resets to the main. Once the new C2 Chip has been installed
all counts are reset.
Error Messages:
ES003:�����������������������������Magnetic Switch Sensor is not detecting that the Platter
is in the home position.
EC004:�����������������������������Lift Cam Switch is not detecting that the Lift Cam has
reset back to the home position.
EMC006:�������������������������The machine is not detecting the proper amount of
amperage on the main motor.
RC:������������������������������������Replace All Consumables
Emergency Stop:��������Emergency Shutdown Mode
8
SECTION 5
QUICK START
QUICK START - How to Use Your Machine
1.
Turn on power to the unit by
moving the ON/OFF switch to
the ON position, located in the
rear of the unit.
2.
Select which type of repair
mode you would like by
pressing either of the Scroll
Buttons located on the User
Interface.
3.
Spread the Buffing Solution
evenly over the surface of the
optical side of the disc. Note:
Avoid spreading solution on
the clear plastic center ring of
the disc, since the machine will
not touch this area and solution
will still be visible after the
repair cycle. When not in use,
place the Buffing Solutions
cap back on to keep moist.
Failure to use consumables designed for this unit will cause damage to both unit and
disc thereby voiding your warranty. For Authorized Distributors visit www.venmill.com.
9
SECTION 5
QUICK START
4.
Open the Front Cover and
place the DVD/CD/Blu-Ray
onto the platter, with LABEL
SIDE OF DISC FACING DOWN!
5.
Close the Front Cover and
press the Start Button.
Once the cycle has completed,
open the Front Cover,
and remove your disc.
Important Note: You may run
a disc through the VMI 2500
more then 1 time. If needed a
disc can be run multiple times
through the machine to achieve
optimum repair quality.
Failure to use consumables designed for this unit will cause damage to both unit and
disc thereby voiding your warranty. For Authorized Distributors visit www.venmill.com.
10
SECTION 6
Standard Maintenance
RUBBER PLATTER
When should I replace my rubber platter?
There is no specific time frame for how
long a Rubber Platter will last, it could be
one day or one year, depending on how
the machine is used and maintained. If the
disc can no longer sit flat on the Rubber
Platter, or the imprinting on the surface is
no longer visible, then the Rubber Platter
should be replaced. If there are any nicks,
gouges, edges that are lifted, or tears – the
Rubber Platter should be replaced.
How to replace the Rubber Platter:
1.
Turn off power to the unit!
2.
Locate the two side panel thumbscrews
and unscrew them.
3.
Lift side panel up and away from the
machine.
4.
Locate the Rubber Platter.
5.
Peel old Rubber Platter off of the platen.
Note: A razor blade or a scraper can be
used to do this.
6.
Take the new Rubber Platter and remove
the white backing.
7.
Center and place the new Rubber
Platter on the platen.
8.
Make sure the Rubber Platter is fully
seated on the platen.
9.
Install the side panel and screw down
the thumbscrews.
10. Turn on power.
11
Standard Maintenance
Standard Maintenance
SECTION 6
BUFFING WHEELS
How to replace the Buffing Wheels:
1.
Turn off power to the unit.
2.
Locate the two side panel thumbscrews
and unscrew them. Lift side panel up
and away from the machine.
3.
Locate the Splash Guard which sits on
top of the main motor and above the
Buffing Wheel.
4.
Pull up on the Splash Guard until
it releases from the main motor.
Note: The Splash Guard is a snap fitted
piece.
5.
Located on front of the Buffing Wheel,
is a washer and a Spade style screw,
which holds the Buffing Wheel to the
spindle. Hold the Buffing Wheel with
one hand and turn the Spade Screw
counter clockwise with the other.
6.
Remove the screw and the washer from
the spindle and pull off the old Buffing
Wheel.
7.
Install the new Buffing Wheel. Insert the
washer and tighten down the screw.
8.
Reinstall the Splash Guard by snapping
it onto the top of the main motor.
Note: Pull the Splash Guard forward until
it snaps into place a second time.
9.
Install the side panel and screw down
the thumbscrews.
10. Turn on power.
12
SECTION 6
Standard Maintenance
C2 CHIP
When should I replace my C2 Chip?
Each C2 Chip is programmed for a total of
500 minutes of operation. The amount of
usage on this chip will be displayed on the
front LCD Screen. On the “Main Menu”, in the
middle of the screen, this is where the total
Chip count is displayed. This “Count” will
decrease the amount of minutes left on the
C2 Chip as the Operator continues to use
the machine. When the count drops to 10%,
an asterisk (*) will appear next to the Count
display. This is to inform the Operator that
supplies should be reordered. At this point,
while a cycle is running, the “Start”button will
flash from Green to Blue. Then error message
“Low Chip” will appear on the main menu.
Once the chip is depleted the machine will
notify the Operator and no more cycles will
be allowed, until a new C2 Chip is installed.
Once a new C2 Chip is installed, all counts
will be reset. The Operator does not need to
perform a manual reset to the machine.
How do I replace my C2 Chip?
1.
Turn the machine around, so that the back
of the unit is facing you.
2.
Locate the C2 Chip.
3.
Pull the chip out and away from the
RS232 port.
4.
Take the new C2 Chip and install it into
the RS232 port.
5.
The machine will automatically reset
the counters.
Failure to use consumables designed for this unit will cause damage to both unit and
disc thereby voiding your warranty. For Authorized Distributors visit www.venmill.com.
13
Standard Maintenance
SECTION 6
How to clean out the machine.
Recommendation: Clean the machine weekly.
1.
Turn off power to the unit!
2.
Locate the two side panel thumbscrews
and unscrew them.
3.
Lift side panel up and away from the
machine.
4.
Remove any dust or debris from the
machine. Note: Use canned air, a
vacuum, or even by hand.
5.
With a paper towel or cloth, wipe off
any buffing solution residue, left on the
side panel or internal walls.
6.
Install the side panel and screw down
the thumbscrews.
7.
Turn on power.
How to clean the Splash Guard:
Recommendation: Clean the Splash Guard
weekly, when the rest of the machine is being
cleaned out.
1.
IMPORTANT: Turn off power to the unit.
2.
Locate the two side panel thumbscrews
and unscrew them.
3.
Lift side panel up and away from the
machine.
4.
Locate the Splash Guard which sits on
top of the main motor and above the
Buffing Wheel.
Failure to use consumables designed for this unit will cause damage to both unit and
disc thereby voiding your warranty. For Authorized Distributors visit www.venmill.com.
14
SECTION 6
5.
Pull up on the Splash Guard until
it releases from the main motor.
Note: The Splash Guard is a snap fitted
piece.
6.
Run the Splash Guard under warm water,
from any sink faucet. Wipe away any left
over buffing solution residue with a paper
towel or cloth.
7.
Reinstall the Splash Guard by snapping
it onto the top of the main motor.
Note: Pull the Splash Guard forward until
it snaps into place a second time.
8.
Install the side panel and screw down
the thumbscrews.
9.
Turn on power.
Standard Maintenance
How to clean the Cleaner Disc:
The Cleaner Disc must be maintained on
a regular basis. You can identify that the
Cleaner Disc needs to be cleaned by seeing a
heavy buildup on the surface.
1.
Use a “Glass Cleaner” (such as Windex)
on the surface of the Cleaner Disc and
let it sit for a minute.
2.
Using a paper towel, wipe the buildup
off the Cleaner Disc. Start from the
center and work your way out.
3.
Make sure the Cleaner Disc is dry,
before use.
4.
Another option is to use a plastic style
bristle brush to scrub the surface.
Failure to use consumables designed for this unit will cause damage to both unit and
disc thereby voiding your warranty. For Authorized Distributors visit www.venmill.com.
15
Standard Maintenance
SECTION 6
How to clean the Rubber Platter and why:
From time to time the Rubber Platter may
become dirty. When this happens, dust
particles can become entrapped in the top
surface of the platter. This causes the surface
to become slick. When the Rubber Platter is
slick discs tend to slip on the surface. In worse
case scenario, this slipping could cause a disc
to break.
1.
Take any glass cleaner (such as Windex)
and spray the Rubber Platter.
2.
Let the solution sit for about a minute.
3.
Wipe the rubber platter dry with a
paper towel.
4.
If slippage continues, replace the
Rubber Platter.
How to clean the Fan Filter:
After 60 minutes of operation the machine will
display “Filter CLNR” message. This message
is to indicate to the operator that they should
clean out the fan filter, to keep constant air
flow in the machine.
1.
Locate fan guard on the back of the
machine and pull off plastic guard.
2.
Remove filter and blow out collected
debris.
3.
Re-install filter and guard.
4.
Push any button on the user interface
to continue with normal operation.
Failure to use consumables designed for this unit will cause damage to both unit and
disc thereby voiding your warranty. For Authorized Distributors visit www.venmill.com.
16
SECTION 7
For further assistance with questions
not included please refer to our website,
www.venmill.com.
How often should I use my VMI 2500
Cleaner Discs?
The VMI 2500 will indicate when it is time
to run a cleaning cycle for the buffing
wheel. After 20 minutes of operation,
the Main Menu will display the message:
“Cycle CLNR”, on the bottom section of
the Cycle Mode line. The Start Button
will also flash an illuminated Red LED
light. At this point load the Cleaner Disc
onto the rubber platter. Note: Make sure
the Cleaner Disc is loaded Label Side
Down! Close the front cover and press
the Start Button. Upon completion, the
machine will reset back to the preset
“Regular” mode and the Operator can
now continue with using the machine.
VenMill highly recommends that the
Cleaner Disc be run as the last cycle of
the day, regardless of when the Cleaner
Disc was run last!
Why is the VMI 2500 Cleaner Disc
important?
During the buffing process your Buffing
Wheel removes oil, dirt, buffing solution,
and a small layer of plastic from the
surface of your disc. This build up, over
time, will cause your Buffing Wheel to
become dirty and stiff. This can result in
an inferior repair and a decrease in your
Buffing Wheel life expectancy. The VMI
2500 Cleaner Disc cleans and softens
your Buffing Wheel.
When should I clean my VMI 2500
Cleaner Disc?
VenMill does not recommend going
17
VMI 2500/2550i Buffer FAQs
past 5 runs without cleaning off your
VMI 2500 Cleaner Disc. If a build up of
junk is noticed on the Cleaner Disc, feel
free to clean it off at anytime.
Can I clean a 3 inch disc?
Yes, but you will need to obtain a special
3 inch adapter from VenMill Industries.
Can I run a 3 inch disc without an
adapter?
No! This will damage your 3 inch disc
and your rubber platter.
Why is the Buffing Solution important?
The Buffing Solution is a unique
formula, which accomplishes two very
important tasks: prevents static charges
from developing during the buffing
process and adds in the repair process
rendering the disc optically clear.
Must I use the Buffing Solution on my
discs?
Yes! Besides the inferior repair results,
the static charge produced during
the buffing process can create
unpredictable errors in the unit and
may cause damage.
The center of my disc still has Buffing
Solution on it after a repair.
The Buffing Wheel never touches the
inner most clear plastic center of the
disc. If there is Buffing Solution in the
center of the disc, it can be wiped away.
To prevent this from happening, only
use the Buffing Solution on the recorded
portion of the disc.
Can I repair a Double Sided disc?
Yes!
VMI 2500/2550i Buffer FAQs
SECTION 7
Can I repair a Blu-ray disc?
Yes!
runs with the Cleaner Disc to improve
the condition of the Buffing Wheel. If
you do not see any improvement you
will need to change your wheel.
Can I repair a disc that is warped or
cracked?
No! This may result in further damage to
the media and/or your unit.
How long will a bottle of Buffing
Solution last?
If used properly, one bottle of Buffing
Solution should last approximately 250
minutes of machine operation. You may
order consumables through VenMill
directly at www.venmill.com, or through
our current distributors located on our
website under the Distributors’ tab. If
you have any questions, please contact
us at 800-928-0090 / 866-864-0210 Intl.
or email [email protected].
How much Buffing Solution must I
use?
VenMill suggests that the entire optical
surface of the disc be covered with
the Buffing Solution. This will ensure
optimal repair capabilities. To achieve
this, place one dab North, East, South,
West and then spread around.
Can I run my unit over 500 minutes
without replacing the C2 Chip?
No! Once the C2 Chip is depleted the
unit will not allow for any more cycles
to be run. Once a new C2 Chip has been
installed, the machine will continue
with normal operation.
Why is my Buffing Wheel discolored?
This indicates that the Cleaner Disc
has not been run enough or that the
Cleaner Disc is packed with junk and
needs to be cleaned. It may take several
My machine lost power and is not
turning back on!
The VMI 2500 has been equipped with
an internal thermostat to ensure that the
machine does not overheat and cause
damage to your machine or your digital
media. Once the internal temperature
reaches about 130 degrees (Fahrenheit)
the thermostat will turn off power to
the machine, so that it can cool down.
The machine may be down for about
15 minutes, before the power will turn
back on. To help cool the machine
down faster, open the Front Cover. If the
power has not turned back on within an
hour please contact Technical Support
at 800-928-0090.
May LCD panel just “Blue Screened”
and the entire machine restarted!
If the Power Cord is not fully inserted
into the back of the machine, this can
cause a short, which will restart the
firmware program on the logic board.
Remove the Power Cord from the back
of the machine and then reinstall the
Power Cord by pushing in as far as it can
go.
How can I tell how many total cycles
have run on my VMI 2500?
Turn on unit and open the front
cover. Press the repair button and
the display will show how many total
cycles you have run. Totals are broken
down by regular, deep, and clean
cycles.
18
SECTION 8
Specifications
Disconnect unit from supply circuit before opening
Déconnecter du circuit d’alimentation avant d’ouvrir
Warning and cautions
You are cautioned that any changes or modifications not expressly approved in
this manual could void your warranty.
Operating room temperature is 72°F(22°C) +/- 12°F(7°C)
To prevent fire or shock hazard, do not expose the unit to rain or moisture.
If you have any questions about this product, you may call VenMill Industries
Customer Service at 800.928.0090 USA, or 866.864.0210 N.Ameri.
CAUTION: This symbol is intended to alert the user to the possible
presence of uninsulated “dangerous voltage” within the product’s
enclosure that may be of sufficient magnitude to constitute a risk of
electric shock to persons.
EMERGENCY STOP: Pushing either “Stop” or “Open” button on the
front panel during the buffing cycle will stop the unit and reset the
firmware. A series of three beeps will be heard and the tray could
open. You may resume normal operation.
PATENT PENDING
19
Specifications
SECTION 8
Specifications
Unit operates on 220/240V 50 Hz AC power 10 amp max
Safety features:
•
Disconnectable power cord
•
ON/OFF switch
•
Safety interlock when interior is exposed
•
Process controlled to prevent operation when front cover is the opened
position
•
One thermal circuit breaker will shut off power if internal temperature
exceeds 130° F (54° C)
•
Fan operates when the unit is running
•
Emergency stop with any buttons or opening of the front cover
•
•
•
Weight: 21lbs
•
Dimension: 11.25 in x 10.25 in x 6.75 in
•
Power: Safe DC Power
•
Part Number: PNV2500
•
Supplies used with unit: Buffing pads, and Repair Solutions.
•
Warranty: 1 Year Limited
•
Process: Simple-to-use, one-touch
20
FOR SUPPORT INFORMATION
www.venmill.com
or
508-278-0091
866-864-0210 TOLL FREE
FOR NON-NORTH AMERICAN SERVICE
PLEASE CALL YOUR REGIONAL DISTRIBUTOR
If you are not sure who your regional distributor
is please contact [email protected]
Mailing Address:
VenMill Industries, Inc.
670 Douglas Street
Uxbridge, MA 01569-2001
RE-ORDER INFORMATION FOR (ONLY FOR THE USA)
CONSUMABLES USED WITH THE VMI 2500
VMI Combo Pack (1 wheel, 2 bottles, and 1 C2 chip)..........................PN2501
VMI Rubber Platter...................................................................................PN2012G
VMI Cleaner Disc..........................................................................................PN2519
2500M.PNV2500.012612.2