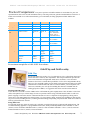
1
NMCLAY 3300 Girard Blvd NE Albuquerque NM 87107 PMC User’s Guide 800-781-2529 505-881-2350 Fax 505-881-6067 (and Art Clay too) A Manual for Success with Precious Metal Clays and BRONZclay Winter 2013 Edition edited by Brant Palley of Silver-Clay.com Original Text by Tim McCreight Silver Clay represents a dramatic development in the handling of precious metals. Silver Clay consists of microscopic particles of silver or gold suspended in an organic binder to create a pliable material with a consistency similar to modeling clay. Silver Clay can be worked in the fingers and with simple tools to create a vast range of forms and surfaces unobtainable or laborious with traditional techniques. When it is heated to a high temperature, the binder burns away and the metal particles fuse to form solid metal that can be sanded, soldered, colored and polished like conventional material. This booklet describes some of the techniques devised for Precious Metal Clay (PMC) and Art Clay, and will guide you through your first firing experience. What Is It? Precious Metal Clay is a patented material developed by Mitsubishi Materials Corporation of Japan in the early 1990s. The principle ingredient in PMC is tiny metal particles only 20 microns in diameter. As a point of reference, it would take as many as 25 of these particles to make up a single grain of table salt. The rest of the material consists of water and an organic (naturally occurring) binder. After firing, both the water and binder have been completely removed, so PMC may be hallmarked and will assay as .999 pure. Dried-out PMC or unwanted fired objects can be refined just like conventional precious metal. The firing process leaves a metal that is less dense than conventional sheet or wire. This means that a piece of jewelry made of PMC is lighter than the same piece made by fabrication or casting. Because it is less dense, PMC is not recommended for applications that require high tensile strength such as findings. PMC is available in two versions: standard PMC, which provides the best modeling and greater shrinkage characteristics; and PMC+, which is denser, has less shrinkage and offers several firing options. Three years after introducing PMC, Mitsubishi Materials Corporation developed a second version, called PMC+. Both kinds of clay are worked with the same tools, fired in the same kiln, and can be finished in exactly the same way. Everything in this book applies equally to both versions, with two exceptions: PMC+ has a different firing schedule, and it shrinks less. Tools You can use PMC just about anywhere, but a stable, well-lit area is best. A table or desk is ideal. A sheet of plastic or a kitchenware lid makes a convenient work surface that allows you to rotate the work easily. Avoid using cardboard because it will draw water out of the clay and stiffen it. For this same reason, avoid working in a draft from a heater, air conditioner or fan. A thin film of olive oil on the fingers prevents the PMC from sticking to the skin and seals its surface against dehydration. Other useful tools are a plastic rolling pin (such as a piece of PVC pipe), a razor knife and a small burnisher. Various pencil-like tools can be devised from toothpicks, skewers, chopsticks, popsicle sticks and scribes. You might find yourself collecting bits of fabric, plastic and wood to take advantage of PMC’s wonderful ability to pick up textures. E-mail [email protected] Web Sites: NMCLAY.COM duncanpaintstore.com Silver-Clay.com 1 NMCLAY 3300 Girard Blvd NE Albuquerque NM 87107 800-781-2529 505-881-2350 Fax 505-881-6067 Kilns PMC can be fired in any furnace that will sustain the required temperature with reasonable stability. Almost any kiln with a pyrometer, like those used for burnout or enameling, will work. The kiln should be located away from combustible surfaces and plugged into a properly wired socket so that its cord cannot be snagged or tripped over. It’s helpful to have work gloves, longhandled tongs and a heat-resistant surface like a brick in front of the kiln to set work on when it comes out of the kiln. Silver-Clay.com sells a programmable kiln that maintains a selected temperature for a set length of time, then shuts off automatically. Though not essential for success with PMC, this unit is designed specifically for silver clay and makes the firing process as foolproof as the modeling. Paragon’s SC-2 will also fire Glass, enamels, ceramics and more! Shrinkage When PMC is fired, the water and binder vaporize and disappear completely. Because these together make up about 30% of the original PMC, the object after firing is reduced to about 70% of its original size. This offers exciting possibilities because the shrinkage is proportionate. All the images, textures and details you create in the clay original will be retained in the final version—only smaller! This is a little like using the reduction button on a photocopier and nearly as easy. PMC+ has a higher metal content. Fired PMC3 & PMC+ pieces are 88% of the original size. Basic Forming Before handling PMC, put a couple drops of olive oil in your palm and rub your hands together to cover them with a thin film. This prevents the clay from sticking and seals the surface of the material to inhibit dehydration. Unwrap the PMC, pinch off what you need for the next couple minutes and rewrap the rest to prevent it from drying out. Precious Metal Clay is sold ready to use and does not need wedging or other preparation. Making Sheets Sheets of PMC can be made by ”patting out” a wafer, but a more uniform result can be made with a rolling pin. Any cylindrical objects will do—a section of plastic pipe about an inch in diameter and 6-8 inches long is a convenient size. Sandwiching the clay between layers of plastic wrap or a plastic bag during this process slows drying and makes it easy to lift the sheet off the table. To create a sheet of specific thickness, run the roller along spacers set up on either side of the lump as shown. These can be of plastic, metal, wood or mat board. It’s handy to have several thicknesses, or try stacking them for greater variety. Strips, bars and square wire are made by slicing pieces from the sheet with a razor knife. Making Wire To make a round wire, roll a lump of PMC in the palms of your hands to form a thick ”snake.” To reduce further, set the clay on a smooth, flat surface and roll it under a flattened palm as shown. You’ll quickly discover the appropriate pressure and motion to create wires and tapers to suit your needs. Technical Fact Sheet What is the Difference? Why six products? Do I need all 6? Each version has its unique benefits: PMC Original has ideal workability and a relatively high shrinkage that allows wonderful detail. PMC+ and Art Clay fire very quickly and result in a dense and durable material. they also allow for firing at three different temperatures, the lowest of which makes certain implants and enamels possible. PMC3 and ArtClay650 and Art Clay Slow Dry 650 fire at an even lower temperature (1110 F and 1200 for artclay650) which allows sterling and stainless findings to be imbedded. Alternative, low tech firing devices become possible like stove top firing. Not every artist will need all three versions. Some people find a preference and stick with it, while others use different materials depending on the nature of their work. How do they do It? In the end is it all silver? Yes, all three versions yield the same metal, 100% silver. The difference is not in the ingredients but in the shape of the particles. Original PMC is made with flake like particles that allow room for the binder, which gives the material its workability. PMC+ is made with a particle with more neatly defined edges. This allows for quicker fusing and a denser material. Notice that the spaces between particles are smaller - this will result in more durable jewelry. The newest member of the team, PMC3, uses particles that are even smaller than the silver dust used in the other versions. The denser packing allows this material to fuse at a lower temperature. E-mail [email protected] Web Sites: NMCLAY.COM duncanpaintstore.com Silver-Clay.com 2 NMCLAY 3300 Girard Blvd NE Albuquerque NM 87107 800-781-2529 505-881-2350 Fax 505-881-6067 Practical Comparisons: Everyone's experience will differ and there is no substitute for your own experimentation. Here Is the relevant information side by side. along with some general recommendations. The choice of which version of PMC to use will be determined by your work habits, the firing equipment available and the time available. PMC PMC+ PMC3 Artclay Workability excellent slightly stiff excellent excellent Shrinkage 25-30% 10-15% 10-15% 8% Firing Temp. & Time 1650 for 2 hours 1650 for 10 min. 1290 for 10 min. 780/1435o F and above - hold time 5 minutes - (not to exceed 900/1650o F) 1560 for 20 min. 1200 for 20 min. 700/1290o F - hold time 15 minutes 1470 for 30 min. 1110 for 30 min 650/1200 o F - hold time 30 minutes Strength pretty good very good very good very good Available types Clay Clay Clay Syringe slip-paste Clay Syringe slip-paste Uses pendants brooches charms beads rings pendants bracelets rings charms pendants bracelets rings charms pendants bracelets For maximum strength fire at 1600-1650F for two hours. Gold Clay and Gold overlay Gold Clay This 22 karat material is an alloy of 91.7% gold and 8.3% silver, refined into microscopic particles that fuse at relatively low temperatures. This unique combination provides rich yellow color and unusual strength. PMC Gold can be used alone, or as a decorative element on silver items. Consider these possibilities: Co-fire silver and gold PMC side by side Layer silver and gold to make precious metal wood grain patterns Solder or fuse PMC Gold elements to fabricated and cast items As with silver PMC, you can rehydrate with clean water, and make your own slip from sanding dust. Because Gold PMC has the working properties of PMC3, we suggest that newcomers test ideas in that material. Working with PMC Gold Artists who have used other versions of PMC before will find that the gold is slightly denser. This will make it feel a little stiffer, and explains why it will take longer for water to penetrate. Before using, knead the material while it is still in its plastic wrapping to loosen the structure. Add small amounts of water to compensate for drying during working, but be conservative. Seal unused material to retain moisture. Use wood, plastic, rubber, and steel tools. Finishing is done just like any precious metal, including abrasives, tumbling, hand burnishing, and polishing compounds. PMC Gold can be soldered with any gold solder below 22 karat. Firing PMC Gold As with other metal clays, allow the work to dry, preferably overnight. Drying may be hastened with moderate heat. The recommended firing apparatus is a programmable electric kiln, which provides dependable control. Schedule A: 900º C (1650º F) at least 10 minutes Schedule B: 850º C (1560º F) at least 30 minutes Schedule C: 750º C (1380º F) at least 60 minutes Schedule D: 700º C (1290º F) at least 90 minutes E-mail [email protected] Web Sites: NMCLAY.COM duncanpaintstore.com Silver-Clay.com 3 NMCLAY 3300 Girard Blvd NE Albuquerque NM 87107 800-781-2529 505-881-2350 Fax 505-881-6067 Torch Firing. It is also possible to fire PMC Gold with any jewelers torch. Dry completely, set work on a soldering pad, and bring to a red glow. Hold at this temperature for at least two minutes. Art Clay Gold 22K INGREDIENTS: 95% of indicated weight is K22 (Gold 91.7%, Silver 8.3 %). After firing: K22 100% FIRING TEMPERATURE / HOLDING TIME: 1814ºF for 60 min. MELTING POINT: 1931ºF To join Art Clay Gold together or to mend a jointed area, use Art Clay Gold in paste form, which can be made as follows: Put Art Clay Gold in a small plate Add a few drops of water and blend it evenly with something like a spatula. Shape as you wish using your fingers, a mold, etc. If Art Clay Gold becomes stiff to handle, place it in a zip loc bag, add a few drops of water, and knead it until it becomes soft. Note: Remember that the finished piece shrinks 15%, so size your piece accordingly. Place the piece in the kiln. (If you are firing more than two pieces, make sure the pieces are not touching each other) Temperature1814ºF Holding Time 60 min. How do you fire Art Clay Silver and Gold clay together? The best way to make a combination piece is first to make the gold element, then fire it at 1860F for 60 minutes. This completely sinters the gold. Then build the Art Clay Silver around the gold element, using any of the three forms of Art Clay Silver. Then fire again at 1600F for 10 minutes. The gold and silver piece shown in the picture gallery was made in this manner. Gold overlay Aura22 and Accent gold for silver are new products used to add gold accents to fired, unfinished silver clay. Follow the instructions for each product carefully. Gold can be torch fired. One gram covers about 1” x 1.5”. Complete instructions can be downloaded from www.nmclay.com Accent gold for silver (AGS)consists of one gram of pure, 24 K gold powder dispersed in a non-toxic water based liquid medium. It is used to apply gold accent layers to fine silver jewelry articles, including those prepared from silver clay. Accent Gold for Silver™ paint is used by applying it with either a brush or a knife tip to a silver piece, drying, and then heating the piece to bond the gold powder to itself and the silver. After cooling, the gold layer is burnished and the desired final finish is applied Aura22 is tiny particles of pure gold (91.6%) are blended with 8.4% fine silver particles to create a precious metal with deep yellow color and the ability to fuse to silver at relatively low temperatures. The result is a layer of gold that is considerably thicker than possible with electroplating. Gold Foil for Keum-Bo The Process: Put the work onto a hotplate and turn it up to High. To test the heat of the PMC object, touch a toothpick to it. When the wood chars, the metal is hot enough that the fusing process has begun. At this point, secure the object with one hand as you lightly press the foil or Aura 22 down against the silver. The goal of this step is to press out microscopic gaps that exist between the silver base and the gold layer. When the two pure metals are in perfect contact, bonding is instant. Generally, start with a light stroke, then rotate the piece and follow up with firm-er pressure using strokes that run in a different direction from the first. You will notice that the burnisher leaves marks; these will be removed by polishing after the layers are bonded. If the color is weak, or if you have changed your idea for the piece and want to cover a larger area, you can add on additional gold and repeat the process. It is also possible to combine traditional keum-boo and Aura 22 on a single piece. Basic Forming Techniques Textures One of the exciting qualities of PMC is its ability to capture impressions. In most cases the clay is simply pressed against the textured object or the object is pressed into the clay. Textures with deep undercuts should be avoided because they will tear out when the clay is being pulled away. If for some reason the clay sticks to the texture, try laying a piece of plastic wrap over the texture first. If the texture is too delicate for this solution try spraying the texture with a thin film of cooking spray (e.g. PAM®). Remember that some textured items can be burned away in the firing process. As an example, it might be easiest to press a leaf into PMC and simply leave it there when the piece is set into the kiln. All that will remain of the leaf after sintering is a fine ash that can be easily brushed away. Overlays & Joints In many cases, connections can be made by overlapping pieces of PMC. Often the pieces are simply layered into position and lightly pressed together. If the clay is starting to dry, add a tiny drop of water with a brush at the edge of the overlay. When a situation offers less contact, dampen the two surfaces to be connected with a drop of water and texture them with fine lines E-mail [email protected] Web Sites: NMCLAY.COM duncanpaintstore.com Silver-Clay.com 4 NMCLAY 3300 Girard Blvd NE Albuquerque NM 87107 800-781-2529 505-881-2350 Fax 505-881-6067 using a blade or point. Press the pieces firmly together and rub the surface to hide the seam. This process can be used on rods and on the edges of sheets. Carving A variation of the usual way of working PMC involves creating a form that is then carved to achieve crisp detail. Dry the form in a medium oven (250°F) for at least 10 minutes, then allow it to air-cool. The material will be “leather hard” and can be worked with carving tools and burnishers. Refiring & Repair Precious Metal Clay can be refired several times with no problem. Because of this, the clay can be used to make repairs on other PMC objects and in other heattolerant materials as well. If a joint fails, press fresh PMC onto the cleaned surface and refire to create a new joint. PMC & Other Materials Items that can withstand the temperatures required for fusing can be permanently attached to PMC work by simply pressing them into the soft clay. In most cases the natural shrinkage of the process acts to clutch the embedded objects, securing them into position. Common sense and experimentation will be helpful here, but remember these guidelines: 1. The materials must remain unharmed at the temperatures used. 2. The embedded object must be clean; impurities will compromise the bond with the clay. 3. Wherever possible, arrange a mechanical grip to supplement the fusion of metal to metal. For instance, if a panel of gold was being pressed into a silver sheet, the edges of the panel should be angled to allow the shrinkage of the clay to press down on and “capture” the plate. Copper and brass can be mechanically bonded to PMC like this but will not fuse because of the oxide films they produce when heated. 4. Many embedded materials are damaged by rapid cooling, so allow the finished piece to air-cool after sintering. For Embedding into PMC Do Use Cubic Zirconia Synthetic Ruby Synthetic Sapphire High-Fired Ceramics Enamel Powder Don’t Use Pearls Opals Bone, Shell Wood Most Glass except with PMC3 or ACS650 HotPot Kiln for PMC3 or Art Clay 650 only. PMC Kiln Paragon SC-2 Firing shrinkage, density and hardness all increase with time and temperature. That is to say, if you “short fire” PMC you will make it weaker. The longer the firing process the denser the metal, achieving maximum at the durations shown below. Firing at temperatures above these risks melting the material—it’s real metal and will melt just like conventional metal when heated to its melting point. Pieces may be fired any time after they are made, though pieces with widely varying cross sections should be dried slowly to prevent cracking. Flat pieces are laid directly on a kiln shelf, fire brick or clean soldering pad and set directly into the kiln. Work can be very close together as long as the pieces don’t touch each other. Contoured or hollow pieces require a little more care to ensure that they don’t slump or collapse during the process. Support these forms on vermiculite, plaster or alumina hydrate powder available from Silver-Clay.com . It can be reused almost indefinitely so a pound should be enough for most studios. a terra-cotta flowerpot or saucer are used to contain the alumina when firing large forms. Steps in Firing 1. 2. 3. 4. Set the completed PMC object on a heatable tile, cradling it in a bed of alumina hydrate if the form is other than flat Set the tile into the kiln on bits of brick that lift it off the floor, facilitating both heating and removal of the object. Program and start the kiln or, if firing manually, turn it to a high setting. PMC does not need to be vented, though when other materials are included (like cores), ventilation may be necessary. If you have a manual machine: When the pyrometer indicates that the correct temperature has been reached, turn the dial back slightly to ensure that the temperature does not go higher. Check the clock and maintain this temperature for the recommended time. There is no disadvantage in heating the work longer. When many pieces or a sagger box is used, a longer time is recommended to ensure complete fusion. When the time has passed, turn off the kiln. Silver PMC pieces will look white, and gold work will be an orange-brown; neither will look metallic yet. The work can be quenched in water for immediate inspection unless stones or other nonmetal embedded objects have been used, E-mail [email protected] Web Sites: NMCLAY.COM duncanpaintstore.com Silver-Clay.com 5 NMCLAY 3300 Girard Blvd NE Albuquerque NM 87107 in which case the work should be air-cooled. 800-781-2529 505-881-2350 Fax 505-881-6067 Torch Firing PMC+ and PMC3 by Tim McCreight For the record, it has always been possible to fire PMC with a torch. The hard part was finding someone to hold a torch for two hours! With the creation of PMC+ torch firing became a viable option. As we know, PMC+ is converted into solid silver when heated to 1650° F (900° C) for 10 minutes. At this temperature, even at a few minutes less we can make solid silver jewelry. Jewelers use a variety of torches, all of which deliver more heat than is needed to fire PMC. People with experience in metalwork and a good idea for heat colors will be able to fire PMC+ with any traditional torch. If a person is buying a torch specifically to fire PMC+, a butane torch like the Blazer makes a good choice. These compact torches are relatively inexpensive ($13-60). In fact I even saw one at a kitchen supply company where it was sold to caramelize crème brûlée. The torches are sold empty and filled (and refilled as needed) from a can of butane that can be bought from the same suppliers, grocery stores or tobacconists. Note that the standard torch is rated at 2000° F so it can melt PMC. Torch Firing Process 1. 2. 3. 4. Allow the work to dry overnight or drive off moisture with a hairdryer, coffee warmer or in a slow oven. Torch firing is not recommended for large items. Place the work on a soldering block or fire brick, which is in turn set on either a fireproof surface or something that can be singed (like a piece of plywood). If you are working on the kitchen counter and the piece rolls off the block you don't want to scar the countertop. Light the torch and hold it so the flame is nearly vertical with the tip of the cone about 3/4" away from the work. Within a minute the piece will be enveloped in a soft flame as the binder burns away. The flame will soon go out by itself. Within another minute the piece will start to glow red. Continue heating until this becomes a bright and luminous color. At this point, glance at a clock. Hold this color as uniformly as possible for at least 5 minutes (10 minutes will produce a denser result) glancing away periodically to relieve your eyes. When the time is up, turn off the torch and allow the piece to cool at least until the red color is gone, at which point it can be quenched. Educate Yourself Here's a test I recommend to anyone who intends to fire with a torch. It takes a few minutes and requires the investment of a dollar or two in PMC, but it will go a long way toward understanding the process and building confidence. Pull off a peanut-sized bit of PMC+, split it in half, and roll out two small rods. Follow the instructions above with one added step. After the complete cycle, move the rods apart on the brick so you can focus on one of them. Concentrate the flame on this rod in an effort to melt it, which might be possible even with the regulated torch. You'll see a bright mercury-like skin form on the piece and the red color will become even brighter. The edges will start to curl and the PMC will be drawn up into a ball. Make a mental note of what you saw and this way you'll know the signs of melting so you can withdraw the torch in time before damaging a piece you care about. To complete the experiment, allow the other rod to cool and test it by bending, filing, burnishing and polishing. This will confirm that, sure enough, torch firing really works! Gas Stove Top Firing Position a stainless steel mesh over the gas burner, turn on the burner and note where the mesh glows red the brightest, that’s where you will put your small dry piece. Turn off the burner and place the PMC3 or Art Clay 650 piece on that spot that glowed the brightest. Turn on the burner LOW and watch for the binder burning out (smoke). When the smoking stops turn up the burner until the silver clay turns red (turn off the lights to see it better). Set the stove’s timer for 10 minutes. Be Careful the mesh and silver is HOT! Cool as normal. Make sure the silver clay is as dry as possible. Don’t try this with very large thick pieces or large stones. If the silver clay glows bright orange turn the stove down. How To fire Silver-Clay in a cone sitter kiln. Low fire clay fires to 1200 F which corresponds to cone 019-020, the highest recommended firing temperature of all silver is 1650F or cone 010-011. Ceramic kilns fire much slower than jewelry kilns so the actual hold time is not too important. For PMC3 or Art Clay 650 fast fire to cone 017 no hold time needed. (Fire on High until the cone turns off). let cool as long as you can wait. For regular art clay or PMC+ use cone 014. 011 is the hottest possible cone for the most durable item. (Actually if your rate is 585F in the last 200 degrees then cone 020 works out to 1201F if you want to get technical) but we need a no hold time temp to fire to. Don’t try to fire PMC original if you have no way to hold for 2 hours. Place the silver-clay on a kiln washed shelf right under the cone setter. That way the cone is measuring the temp right at E-mail [email protected] Web Sites: NMCLAY.COM duncanpaintstore.com Silver-Clay.com 6 NMCLAY 3300 Girard Blvd NE Albuquerque NM 87107 800-781-2529 505-881-2350 Fax 505-881-6067 the silver-clay. All of these suggestions relate to computerized kilns too if you can’t figure out the ramp and hold programming. Don’t worry about the cost of firing a large kiln it is about $1.00 per hour. Place the Silver-Clay near the cone sitter or thermocouple, on a shelf, use Alumina Hydrate to support the piece if it seems like it needs it. Hollow Forms Precious Metal Clay lends itself to the creation of hollow forms such as beads, cups and large pendants. A core is created of a material that will burn away, and the clay is built up and modeled around it. During heating the combustible core literally “goes up in smoke,” which passes safely through the pores of the still-forming metal. This allows completely enclosed forms to be made. Cores can be made Cork Clay or Paper Clay. Ventilation will be required because an unpleasant odor and dangerous fumes are likely to result. Steps in Making a Hollow Form 1. 2. 3. Create a form from a combustible material. Its size and shape will determine the interior space of the silver piece before shrinkage. This core can be made by molding or carving, depending on the material. Roll out sheets or wires of PMC and press these onto the core. If the clay doesn’t adhere to the core, coat it with wax by dipping the core into a cup of molten wax. The PMC is then modeled, carved and textured as described previously. Set the form on a bed of alumina, using a sagger box for larger forms as needed and heat in the usual way. When the firing is complete the pieces may be finished as usual. Hollow-core bead Open-work beads can be formed on a core that burns away Finishing PMC can be:• soldered • tumbled • sandblasted • wire-brushed • enameled • polished • plated • patinated • left as fired • burnished • pickled Soldering As mentioned, PMC is metallurgically just like other metals but structurally a little more porous. It can be joined by using the same flux, hard solder and torches as silver and gold, but because of its porosity, PMC will “soak up” solder. When possible, prepare an area to be soldered by burnishing to close the pores and reduce the tendency to absorb solder. Even then it’s important to use a delicate hand with the torch, removing the heat as soon as solder starts to flow. Of course even in conventional metal, fine silver and gold behave a little differently than their more familiar alloys, so care and attention is recommended when first soldering Precious Metal Clay. Because of its porosity, PMC objects can retain pickle unless they are thoroughly rinsed. Neutralize the acid by boiling the pieces in a dilute solution of baking soda and water or by cleaning them in an ultrasonic machine for about 15 minutes. Perhaps the most obvious option for finishing is to leave the PMC with the finish achieved in the kiln. In a piece that will be rubbed during wear such as a ring, the raised areas will be burnished naturally while the recesses remain white (silver) or yellow (gold). To polish to a high shine, the metal should be burnished, either by hand or through mechanical polishing. Magnetic polishers, in which small rods and spheres of steel are tossed against work by rotating magnets are ideal because of their speed and ability to polish without damaging the surface. To burnish by hand, use a steel burnisher to rub the surface smooth. After washing with soap and water, the final polish is achieved with very fine sandpaper or by tumbling . Silver PMC can be oxidized with liver of sulfur or a proprietary colorant just like conventional metals. Pure gold does not tarnish. Silver-Clay & Ceramic Techniques Silver-Clay offers exciting possibilities for combining metal and clay in ways that have never been possible before. The huge range of clay bodies, firing atmospheres and glazes make this a vast area for experimentation. Here are a few suggestions: Paint a bead or small bisque figure with Silver-Clay slip, fire and polish! Use Art Clay Overlay paste to decorate on top of a fired glaze or porcelain bisque. See Silver-clay.com or nmclay.com for silver overlay paste and book Slip PMC can be mixed with water to create a thin paste that can be painted, cast and dipped. It is a convenient material for repairing cracks in drying PMC, and is recommended to reinforce joints. A “slip jar” makes a practical way to reuse PMC crumbs; drop them into a jar and add a couple drops of water at the end of each working session. This way you’ll have some slip ready when you need it. PMC slip can be cast into a plaster mold but the mold must be sealed to prevent the PMC from sticking. To dip cores into PMC, secure a wax-covered core to a thin wire and lower it into a thin slip. Allow this layer to dry and redip as needed to achieve the desired thickness of PMC. A similar effect can be achieved by painting the thinned clay onto a form or delicate texture. Overlay Conventional stoneware clay can be pressed into PMC either before or after the Precious Metal Clay has been fired. The two materials will often fuse, but a mechanical grip is recommended to ensure a strong bond. PMC offers E-mail [email protected] Web Sites: NMCLAY.COM duncanpaintstore.com Silver-Clay.com 7 NMCLAY 3300 Girard Blvd NE Albuquerque NM 87107 800-781-2529 505-881-2350 Fax 505-881-6067 possibilities for metal inserts or repairs in previously fired ceramic ware, subject of course to allowable firing temperatures. You can throw PMC on a potter's wheel Throwing PMC can be thrown on a potter’s wheel just like earthen clay and will create a vessel with all the finger marks and textures characteristic of ceramic ware. It is also possible to attach PMC elements to a bisqued ceramic piece to create precious metal details such as rims, medallions and handles. Storage & Shelf Life You’ll notice that your Precious Metal Clay arrived wrapped in plastic film and sealed in a box to keep it fresh. Don’t expose the clay to air until you’re ready to use it, and then only pinch off what you can use in a couple of minutes. For long-term storage, set your boxes of PMC in a zipper-locked plastic bag with a small bit of dampened paper towel. Kept this way, PMC can be used as much as a year after purchase. Left exposed, it will harden overnight. A word about the date stamp you’ll see on the package: PMC does not “go bad” after the stamped date, but this allows you to rotate your stock intelligently. Once hard, it’s possible to restore the clay to its pliable state, but it’s difficult to make it quite as smooth as when new. To rejuvenate dry clay, make numerous cuts into the block or pierce it repeatedly with a needle, then submerge the lump in water for a few seconds. Wrap the wet lump in plastic, allow the clay to absorb the water for a couple of hours, then knead the lump through the plastic. Regardless of the consistency of PMC, its metal content is unchanged and can be retrieved through traditional refining techniques. Health & Safety Precious Metal Clay has been certified by an independent testing facility to be safe in every phase of its use and to conform to ASTM D4236. Issues of safety arise not from PMC, but in the normal use of the high-temperature furnaces used in the sintering process. These kilns should be positioned on a stable surface, away from combustible materials. Never leave a kiln unattended and take special care if animals or young children are in the area. As always, when working around heat, wear appropriate clothing, avoiding clothes made of synthetic fabrics. There is little reason to stare into the kiln, but if you need to do this, protective lenses should be worn. PMC Guild Founded in 1999, the PMC Guild is an educational and support organization created to help PMC users, researchers, teachers and artists. The guild operates a website at www.PMCguild.com, sponsors a nationwide Certification Program, and provides resource materials and technical support. Membership is open to all BUY Silver Clay Now! Call New Mexico Clay at 1-800 781-2529 or log on to www.nmclay.com or www.silver-clay.com Silver-Clay Precious Metal Clay (PMC) PMC+ and PMC3 represent a dramatic development in the handling of precious metals. PMC consists of microscopic particles of silver or gold suspended in an organic binder to create a pliable material with a consistency similar to modeling clay. PMC can be worked in the fingers and with simple tools to create a vast range of forms and surfaces unobtainable or laborious with traditional techniques. When it is heated to a high temperature, the binder burns away and the metal particles fuse to form solid metal that can be sanded, soldered, colored and polished like conventional material. See www.silverclay.com for detailed instructions. PMC Starter Kit includes 25 grams PMC3 Clay, 15 grams of slip, 9 gram syringe, CeCe Wires book, polishing brush, tool kit, Two 4mm CZ gems and a firing grate for easy firing. Art Clay Silver Kit, Get Started! Everything you need to get started making, firing, and polishing NEW Art Clay Silver 650. Includes 20grams of Clay, 10g paste and syringe, two instruction books, a firing grate, brass brush, and two 4mm CZ's. With this kit you will get a good start on your new adventure! All prices subject to change PMC Prices change daily according to the price of Silver And Gold click here for today’s price Art Clay silver is another brand of silver-clay, just as good, click here for today’s Art-clay price ACS has some different types of products like Slow-Dry and Overlay Paste E-mail [email protected] Web Sites: NMCLAY.COM duncanpaintstore.com Silver-Clay.com 8 NMCLAY 3300 Girard Blvd NE Albuquerque NM 87107 800-781-2529 505-881-2350 Fax 505-881-6067 All Kilns are By Paragon. We will ship from New Mexico or from Dallas Texas area. All Kilns feature a fiber muffle and 3 button digital controller. Call or check the web site http://www.nmclay.com for discounted kiln prices! Gems listed below come in three types, Round stones you can fire, Cabs that you don’t fire, Other strange stones click here to see more. Your Guide to BRONZCLAY BronzClay and COPPRclay is easily sculpted, molded, carved and formed, and becomes solid bronze when fired. Your imagination and just a few simple tools will allow you to create solid bronze pieces-jewelry to sculptures and everything in between! Working with BronzClay BronzClay is just that: a clay. Like clay, it's highly workable but it also dries quickly. You'll notice the clay stiffening and cracking when it begins to dry. Some tips to keep in mind: While working the clay, refresh it periodically with a small amount of water using a spray bottle or brush. Wrap pieces that you are not currently working on in plastic and place to the side. Avoid using tools that absorb water. When not in use, keep the clay tightly wrapped in plastic and place the wrapped piece in a sealed plastic bag for added protection. Store all unopened packages (as well as opened packages) of Note: After prolonged exposure to air BronzClay will develop a black surface. Scrape away this black layer until you reach the useable clay, which will be unaffected and ready to use. Making Slip : Slip will quickly become one of your favorite tools for working with BronzClayTM, and it's easy to make. Simply mix tiny pieces of clay (filings, small dried or wet pieces, etc.) with water (we recommend distilled water for a longer shelf-life) until you reach a yogurt consistency. Keep your slip stored in a sealed container. Note: Slip will last for about one week, so make only enough for your immediate need. Drying the Clay : Once you've finished your piece, you will need to dry the clay before firing it. Gently place the piece on a warming surface such as a coffee mug warmer or the top of a kiln. Once dry, you'll notice the clay is leather hard, making it very easy to add finishing touches such as filing, drilling, sanding and carving. Once BronzClay is fired, it's much more difficult to finish, so take advantage of this pre-fired stage to do as much of your detailed finishing work as possible. Firing To reduce oxidation, the piece(s) must be surrounded by activated carbon during firing. Firing BRONZclay is a two-step process that uses low heat to prepare the kiln's atmosphere, then high heat to sinter the alloy. 1. Spread 1" of activated carbon granules on the bottom of a stainless steel firing container. 2. Place the piece on top of the layer; if firing two or more pieces, leave at least ½” between pieces, more if the pieces are large. 3. Pour more activated carbon granules on top of the pieces until the container is full, making sure there is a 1/2" layer of granules on top of the pieces. Again, if you are firing many pieces in layers, make sure there is at least 1/2" of space between the vertical layers as well. 4. Put the stainless steel lid on the firing container and place it in the kiln on stilts to allow good heat circulation. Note: Most kilns are cooler in the front near the door, so the front of your firing container will be cooler than the other sides. Compensate for this by placing the pieces closer to the sides and back of the firing container. If you have a top-loading kiln, there's no need to adjust. Firing Thin Pieces: pieces that are 6 cards thick or less, fire according to the following program: Ramp at 500°F/hour to 1550°F, and hold for 2 hours. Total firing time (including warm-up) will be between 4 and 5 hours. Firing Thick Pieces: For pieces that are thicker than 6 cards (3mm), fire according to the following program (this firing schedule will also work for thin pieces): Ramp at 250°F/hour to 1550 F and hold for 3 hours. Total firing time (including warm-up) will be about 9 hours. Firing Fastfire BRONZclay Ramp at full speed to 1525°F, and hold for 2 hours. Finishing : Once fired, the BronzClayTM piece is a solid piece of metal. As with other metals, it can be sawn, drilled, sanded, patinated or soldered using traditional jewelry tools and materials. Keep in mind that many finishing techniques will be easierˇ to perform at the dried, pre-fired stage.ˇ Quantity Pricing Available See Base Metal clays Prices Tools for the metal Tools for the clay E-mail [email protected] Web Sites: NMCLAY.COM duncanpaintstore.com Silver-Clay.com 9