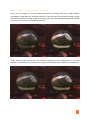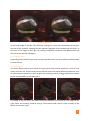
1
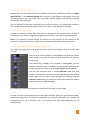
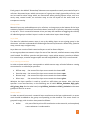
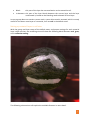
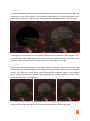
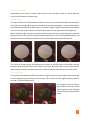
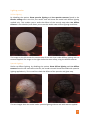
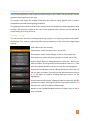
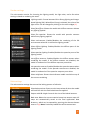
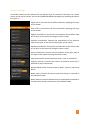
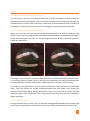
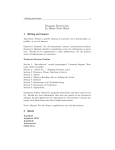
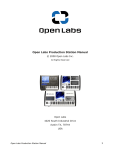
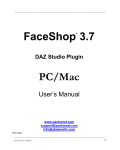
User Manual Version 1.0 Table of Contents What is mFusion? ....................................................................................................................... 3 Feature List .......................................................................................................................................... 3 Installation .................................................................................................................................. 3 Workflow .................................................................................................................................... 4 Basics ................................................................................................................................................... 4 Importing models ............................................................................................................................ 4 Importing IBL environments ............................................................................................................ 4 Importing Adobe® Photoshop® files ............................................................................................... 5 Loading and saving projects ............................................................................................................ 5 Setting up material layers in Adobe® Photoshop®.............................................................................. 5 Groups ............................................................................................................................................. 5 Group order ..................................................................................................................................... 6 Layer data ........................................................................................................................................ 6 Layer naming convention ................................................................................................................ 6 Vector masks ................................................................................................................................... 6 Setting up material layers in mFusion ................................................................................................. 7 Layer contributions ......................................................................................................................... 8 Layer blend modes ........................................................................................................................ 10 Normal blend modes ..................................................................................................................... 12 Lighting modes .................................................................................................................................. 14 Diffuse lighting............................................................................................................................... 14 Specular lighting ............................................................................................................................ 14 Graphical User Interface .......................................................................................................... 15 General settings ................................................................................................................................ 15 Render settings.................................................................................................................................. 16 Bake settings ..................................................................................................................................... 16 Material settings................................................................................................................................ 17 Tips ........................................................................................................................................... 18 Controls .................................................................................................................................... 20 Keyboard Shortcuts ........................................................................................................................... 20 Technical Support ..................................................................................................................... 21 Minimum System Requirements ....................................................................................................... 21 2 What is mFusion? mFusion lets you texture your assets using layered materials. It works directly with layers, groups and vector masks contained in Adobe® Photoshop® files, so you never have to leave your favorite tool when doing texturing work. Each layered material has different contributions to the diffuse, specular, normal, and gloss map, all of which can be tweaked in mFusion. Additionally, all changes to Adobe® Photoshop® files will be picked up automatically using mFusion’s built-in hot-reload feature. This workflow allows an artist to think in terms of individual layers of a material, like iron at the bottom, scratches on the surface, and paint on top. Each layer has completely individual blending options, and can be enabled & disabled freely. Once you are satisfied with what you see, the resulting material can be baked down into one texture map each per channel (diffuse, specular, normal, and gloss). This allows an artist to build complex material setups consisting of stacked layers, without having to worry about the run-time cost associated with many blended materials. The resulting textures are engine-agnostic, and can be used in any game engine, including Unreal® Engine, CryENGINE®, or Unity®. Feature List • • • • • • • • • • • • • Work with groups, layers, smart objects and vector masks in Adobe® Photoshop® Import material layers from .psd files Import models from .fbx files Hot-reload .psd and .fbx files, no manual steps required Blinn-Phong Lighting Image-Based Lighting using a Blinn-Phong BRDF 24 pre-filtered cube maps ready to be used for Image-Based Lighting Customizable lighting and rendering options Separate diffuse and specular lighting 3 different layer blend modes: Linear, Hard, Soft 3 different normal blend modes: Detail, Overlay, Bump Real-time bake preview Baking of complex material setups into one texture per channel Installation After downloading mFusion, simply install the application using the provided installer. 3 Workflow Basics mFusion focuses on a layer-based workflow using Adobe® Photoshop®. Layers and their channels, like diffuse and specular maps, are all set up directly from within Photoshop® by adding groups, and then adding layers to those groups. Per-group vector masks are used to control how a layer contributes to the look of the over-all material by blending with all existing layers underneath it. All key assets that make up the material, such as diffuse and normal maps, as well as per-layer blend masks, are all created in Adobe® Photoshop®. Material layer setup, such as specifying the order of material layers, their names and individual channels, is also controlled by creating according groups in Adobe® Photoshop®. Per-layer blend modes, channel contributions, and all rendering-related setup is done exclusively in mFusion. Whenever the Adobe® Photoshop® document currently in use is saved and its content changes, mFusion will automatically pick up the changes, and update the GUI and rendering view accordingly. Importing models Models can be imported from any .fbx file by clicking on Import model… in the General settings tab in the GUI. In the dialog that will open, select any .fbx file exported from a digital content creation tool such as Autodesk® Maya® or 3ds Max®. The .fbx import process supports files exported from all versions of Autodesk® products, up to and including 2015 product versions. Once a model has been imported into an mFusion project, any subsequent change to the .fbx file will be picked up automatically by the built-in hot-reload functionality. Note: When exporting models as .fbx, make sure that the model has already been triangulated prior to export, e.g. by selecting Mesh Triangulate in Autodesk® Maya®. This is necessary because there is a known bug in the FBX export plug-in which prevents the exporter from properly triangulating meshes upon export. Additionally, make sure to select File Type Specific Options Include Geometry Tangents and Binormals in the FBX export dialog, otherwise normal mapping will not work. Importing IBL environments Image-based lighting environments can be imported from proprietary .ibl files by clicking on Import IBL environment… in the General settings tab. In the dialog that will open, select any of the .ibl files that ship with mFusion in the IBL Environments directory. Note: Image-based lighting is only active when the corresponding lighting model is selected. 4 Importing Adobe® Photoshop® files Material files can be imported from any Adobe® Photoshop® .psd file by clicking on Import Material PSD… in the General settings tab in the GUI. In the dialog that will open, select any .psd document on your hard disk. The .psd import process supports files saved in Adobe® Photoshop® CS5 and higher. Once a material file has been imported into an mFusion project, any subsequent change to the .psd file will be picked up automatically by the built-in hot-reload functionality. Loading and saving projects Projects are saved to .fusion files, and store the settings for all material layers, as well as references to the model, image-based lighting environment, and material document used. Note: It is important to never change the directory or file structure of files relative to the project file, otherwise mFusion cannot find the referenced files when loading a project. Setting up material layers in Adobe® Photoshop® The following image shows the group and layer setup of the default asset that ships with mFusion. The first layer of the material is called rock, and contains 4 texture maps, one for each channel. Note that this group does not contain a vector mask. The second layer, added on top of rock, is called grass, and also contains 4 texture maps. In addition, this group also holds a vector mask that specifies which parts of rock and grass blend together. The last and top-most layer is called reflective coat, and only contains a normal map. All other texture maps assume their default values. Note that the vector mask specifies the blending between reflective coat and all layers below it, which is the result of the blend operation between rock and grass. The following sub-sections explain the structure of the setup in more detail. Groups In order to create a new material layer to be used in mFusion, add a new group to the Adobe® Photoshop® document, and name it accordingly. By saving the document, the changes will immediately show up in mFusion, and a new material will have been added to the GUI automatically. 5 Each group in the Adobe® Photoshop® document corresponds to exactly one material layer in mFusion. Document layers which are not part of a group are simply ignored by mFusion, and can be used for other things which are convenient when painting texture maps, such as a cavity map, several masks, an occlusion map, or the UV layout of the asset used as a transparent overlay. Group order Material layers are ordered bottom-up in mFusion, so that groups at the bottom of the layer window in Adobe® Photoshop® become the lower-most layer in mFusion, with others stacking on top of it. This is convenient because it lets you keep the workflow of toggling the visibility of individual groups and their layers in order to make other layers show through. Layer data The data for individual texture maps is set up by adding layers to an existing group in the document. mFusion understands the following 4 texture map channels: diffuse map, specular map, normal map, and gloss map. Layer data can consist of both rasterized layers as well as Smart Objects. In case a group does not contain a layer for one of the channels, a default texture map will be used instead. For diffuse, specular and gloss maps, a pure white texture is used as a default. For normal maps, a neutral tangent-space normal map (RGB 128, 128, 255) is used instead. Layer naming convention In order to know which layer corresponds to which texture map, mFusion follows a naming convention for so-called layer specifiers: • • • • Diffuse map: Specular map: Normal map: Gloss map: the name of the layer must contain the letters diff. the name of the layer must contain the letters spec. the name of the layer must contain the letters norm. the name of the layer must contain the letters gloss. Whether the layer specifier is used as a prefix or suffix does not matter. Also, the layer specifier is not case-sensitive, so the following are all valid: Diffuse_Variation, High_spec, dull_glossy_Map. On the other hand, using Diffuse_Variation and DIFF_Variation in the same group will result in an error. Vector masks In order to control how much a material layer contributes to the layer underneath it, a vector mask should be added to the group corresponding to that material. The vector mask is a grayscale image, with its colors interpreted as follows: • White: this part of the layer has full contribution to the material, and completely covers whatever is underneath it. 6 • • Black: this part of the layer has no contribution to the material at all. In-between: this part of the layer blends between the current layer and the layer underneath it, based on the blending mode selected for that layer. In case a group does not contain a vector mask, a pure white mask is assumed, which is mostly useful for the lower-most layer of a material, such as rock in the default asset. Setting up material layers in mFusion With the group and layer setup of the default asset, and proper settings for each material layer inside mFusion, the rendering view will show the following blend between rock, grass, and a reflective coating: The following sub-sections will explain the available features in more detail. 7 Layer contributions For each layer, the contribution of the vector mask to each of the channels can be controlled separately in the mFusion GUI. Technically speaking, the contribution of each channel acts as a multiplier to the provided vector mask for a layer, allowing the artist to fine-tune channel contributions without having to touch the texture map or the vector mask in Adobe® Photoshop® again. This is especially convenient if you build the layered assets using a library of base materials such as iron, concrete, stone, etc., so you do not need to change the texture data for each and every asset. Furthermore, this allows you to easily stack layers that only affect a certain property of a material, such as scratches mostly affecting the normal map of a surface, or wetness affecting mostly the specular and gloss map. By disabling the contribution of a particular channel (by setting it to zero), layers belonging to a certain group in Adobe® Photoshop® only need to provide the textures for channels that need to be blended, and can use the default texture maps for the rest. This keeps storage and memory requirements low, and the workflow fast. Example 1: Diffuse and specular contributions The image on the left shows a blend between rock and grass, with grass having no contribution to the diffuse channel of the material. The result shows that parts which are marked as grass using the vector mask only change the specular appearance of the blended material. In contrast, the image on the right shows the same setup of layers and vector masks, although with a pure diffuse contribution of the grass layer, resulting in a material that has the specular properties of rock, but the diffuse properties of a blend between rock and grass. 8 Example 2: Diffuse, specular and gloss contributions Here, the first image on the left shows the reflective coating with only a slight diffuse contribution. Note how the underlying blend of rock and grass can be seen through certain parts of the reflective coating. In the first image on the right, the reflective coating has a 100% pure white contribution to the diffuse channel. Diffuse contribution In the second image on the left, the reflective coating has been applied with a very low specular contribution. In the image on the right, the coating shows full specular contribution. Specular contribution 9 Gloss contribution In the third image on the left, the reflective coating has a very low contribution to the gloss channel of the material, keeping the dull specular highlights of the underlying rock layer. In contrast, in the image on the right, the coating completely transforms the appearance from dull into sharp specular highlights. Layer blend modes Depending on the kind of layers that are to be blended, there are three different blend modes to choose from. 1) Linear blend The linear blend mode is best suited for layers which have similar properties, such as rock, stone, concrete, etc. It does not work very well for layers with vastly different properties, such as rock and grass, because it tends to give the resulting material a foggy appearance caused by the incompatibility of the two layers. The image on the left and in the middle show two different rock structures. The image on the right shows the resulting material using a linear blend mode, which is able to keep all the details of the base layers. 10 2) Hard blend Contrary to the linear blend mode, the hard blend mode is best suited for layers with different properties, such as rock and grass. The hard blend mode applies a threshold operation to the vector mask of the layer, and uses the resulting mask for blending between the two layers. The image on the left shows the threshold operation of the hard blend mode applied to the supplied vector mask. Black regions show where the layer underneath will contribute to the material, with the result of the operation depicted in the image on the right. 3) Soft blend Similar to the hard blend mode, the soft blend mode also applies a threshold operation, but additionally fades the blend weights at the edges of the vector mask, based on a user-supplied setting. This leads to a much more natural-looking blend between organic and inorganic layers, and can be used to e.g. simulate grass growing in the cavities of a rock structure, if the supplied vector mask is a height map. This series of images shows a soft blend between rock and grass, with blend factors increasing from the left to right, leading to a rock material covered more and more by grass. 11 Normal blend modes Depending on the kind of normal maps that are to be blended, there are three different normal blend modes to choose from. 1) Detail blend This blend mode is the default blend mode for normal maps, and should always be used when two layers containing high-frequency normal maps are blended together. As the name implies, the detail blend mode treats both layers as containing high-frequency detailed normal maps, and tries to keep as much detail as possible from both normal maps when blending them. When used with high-frequency and low-frequency normal maps, the low-frequency map will most likely eliminate much of the high-frequency detail as a result of the blend operation, and therefore a better suited blend mode such as overlay blend should be used instead. This series of images shows two different rock layers on the left and in the middle, and the blended result using the detail blend mode on the right. Note how both normal maps contain high-frequency details, and how the result is able to capture those details from both maps. 2) Overlay blend The overlay blend mode should be used when a high-frequency normal map is overlaid on top of a low-frequency normal map, and vice versa. This ensures that the high-frequency detail is not lost in the blending process. The images on the left show a layer made of concrete, with a high-frequency layer blended on top using the overlay blend mode. 12 3) Bump blend The bump blend mode can be used to give layers the appearance of them having a certain thickness, like paint or coating. In addition to the normal map supplied for a layer, this blend mode adds bump mapping based on the edges of the vector mask. This blend mode is useful in cases where detail blend and overlay blend do not suffice in creating the desired blend effect. The image on the left shows the vector mask that is used to apply red paint on top of a concrete layer. The red paint layer does not have any normal map applied. The image in the middle shows the red paint applied using detail blend, the image on the right using overlay blend. Both blend modes fail to create the desired result. In contrast, the following images show the same layer setup, this time using the bump blend mode. From left to right, the bump scale parameter of the bump blend mode that is provided in the graphical user interface is slowly increasing. This creates the illusion of the red paint layer having a certain thickness. 13 Lighting modes Diffuse lighting By disabling the options Show specular lighting and Use specular textures found in the Render settings tab in the GUI, the render view will show the model with diffuse lighting applied only. This enables you to audit the effects of the normal map when Use diffuse textures is also disabled, and allows you to see the model under diffuse lighting conditions. The image on the left shows the normal map of the rock layer under diffuse lighting with no textures applied. The image on the right shows the same setup, using the diffuse textures. Specular lighting Similar to diffuse lighting, by disabling the options Show diffuse lighting and Use diffuse textures found in the same tab in the GUI, the render view will show the model with specular lighting applied only. This is useful to check the effects of the specular and gloss map. The two images show the model under specular lighting without and with textures applied. 14 Graphical User Interface The mFusion application view is split into two main parts: the render view on the left, and the graphical user interface on the right. The render view shows the loaded model with the material setup applied, and is used to manipulate the camera and lighting conditions. The graphical user interface serves as the central point for configuring rendering options, bake settings, and material properties. All tabs in the graphical user interface can be opened & closed simply by clicking on them. General settings This tab contains entries for loading and saving projects, for importing models and Adobe® Photoshop® files, and for importing cube map environments to be used with image-based lighting. Help: Opens this user manual. Load project: Loads a project from a .fusion file. Save project: Saves recent changes in the current project file. Save project as: Saves the current project to a new .fusion file. Import model: Opens a dialog window to select the .fbx file you want to import. Pressing the file-shortcut button next to it (1) will open an explorer window with the current .fbx file highlighted. Import IBL environment: Opens a dialog window to select the .ibl file you want to import. Pressing the file-shortcut button next to it (2) will open an explorer window with the current .ibl file highlighted. Import material PSD: Opens a dialog window to select the .psd file you want to import. Pressing the file-shortcut button next to it (3) will open the .psd file in Adobe® Photoshop®. Always on top: Enables/disables mFusion to always stay on top of other windows. 15 Render settings This tab contains entries for choosing the lighting model, the light color, and a few other settings related to rendering the asset. Lighting model: Choose between Blinn-Phong lighting and imagebased lighting (IBL). When Blinn-Phong is selected, the color of the light source can be changed by clicking on the color widget (1). Show flat diffuse: Shows the model with diffuse textures without any lighting applied. Show flat specular: Shows the model with specular textures without any lighting applied. Show environment: Enables/disables the rendering of the IBL environment when IBL is selected as lighting model. Show diffuse lighting: Enables/disables the diffuse parts of the lighting model. Show specular lighting: Enables/disables the specular parts of the lighting model. Use diffuse textures: Enables/disables the diffuse texture when rendering the model. If the diffuse textures are disabled, the model is rendered as if the diffuse map was pure white. Use specular textures: Enables/disables the specular texture when rendering the model. If the specular textures are disabled, the model is rendered as if the specular map was pure white. Show wireframe: Shows the wireframe model overlaid on top of the current rendering. Bake settings This tab contains settings that control the baking process of mFusion. Show bake preview: Shows a real-time preview of what the model will look like with the final baked textures applied. Output width & height: Controls the size of the baked textures. Bake now: Bakes the current material setup into texture maps. All maps are automatically saved to the local application data directory, which can be opened by pressing the shortcut button next to it (1). Note: Previously baked files will be overwritten. 16 Material settings These tabs contain entries relevant for one specific layer of a material. Each layer has a name shown at the top of the tab, and can be enabled/disabled individually by checking the box on the right (1). Offset U & V: Controls the UV offset used when applying this layer to the model. Scale U & V: Controls the UV scale used when applying this layer to the model. Diffuse contribution: Controls the contribution of the diffuse map of this layer to the material (using the vector mask). Specular contribution: Controls the contribution of the specular map of this layer to the material (using the vector mask). Normal contribution: Controls the contribution of the normal map of this layer to the material (using the vector mask). Gloss contribution: Controls the contribution of the gloss map of this layer to the material (using the vector mask). Layer blend mode: Choose between linear, hard, or soft blend. Softness amount: Controls the amount of softness when soft is selected as layer blend mode. Normal blend mode: Choose between detail, overlay, and bump blend. Bump scale: Controls the bump scale when bump is selected as normal blend mode. Bump inwards: Controls whether bumps should point outwards or inwards when bump is selected as normal blend mode. 17 Tips #1: Regularly save material documents It is important to save the .psd material document as often as possible, so that mFusion can properly keep track of all changes. This is especially important when changing group and layer related data such as their order and names. Otherwise, mFusion sometimes has no chance of knowing e.g. whether the order of groups has changed, or groups have been renamed. #2: Enable the real-time bake preview Make sure to use the real-time bake preview before baking the final result into textures. This makes it much easier to judge whether the selected bake resolution is capable of capturing all details when baking the material, or if the resulting textures will be blurry when being used in a different application. The image on the left shows a real-time bake preview for a bake resolution of 512x512 pixels. The resulting material appears blurry, and the visual difference can easily be spotted when switching between ordinary render view and bake preview in the GUI inside mFusion. The image on the right shows a real-time bake preview for a bake resolution of 1024x1024 pixels. Here the results are visually indistinguishable from the render view, hence this resolution should be used for baking the material. There is also no need to choose any bake resolution higher than 1024x1024 in this setup, because the source art was not created at a higher resolution. #3: Use drag & drop All supported file types (.fusion, .fbx, .ibl, .psd) can be dragged & dropped into the render view to the left of the graphical user interface, and mFusion will automatically know what to do. 18 #4: Manage projects, keep files together As briefly stated in Loading and saving projects, project files save references to the model file, IBL environment file, and material document used. If any of those files are moved to a different location on the hard disk, mFusion can no longer find the files at the original location stored in the project file. In such cases, mFusion tries to load the files from other locations in the following order: • • In the same directory as the project file. In all paths relative to the project file. If a referenced file cannot be found in any of the above-mentioned locations, only then will mFusion report an error upon loading a project file. #5: Make use of default layer data In cases where certain channels of a group do not contribute to the material, simply do not provide any data for that layer in the corresponding group in the material document. mFusion will create a default texture map instead. Similarly, instead of providing layers filled with white for diffuse, specular, or gloss maps, do not provide any texture data for such a layer at all. Again, it is much more efficient to let mFusion create a default texture instead. Remember that mFusion provides pure white textures for diffuse, specular and gloss maps, and neutral normal maps by default. There are several reasons why it is beneficial to let mFusion create default texture maps in case the layer data is not needed: • • • Not providing layer data keeps the .psd file smaller, which leads to less wasted memory, and allows Adobe® Photoshop® to save the file faster. Smaller .psd files can be imported by mFusion much faster. Default texture maps provided by mFusion use much less GPU memory than layer data. All in all, paying attention to the size of the .psd file by keeping an eye on the used layers can lead to a smoother and more responsive workflow. #6: Use smart objects For layers that require a complex setup within Adobe® Photoshop®, as is often the case with e.g. diffuse maps that consist of a pure color layer and several sub-layers such as cavity and occlusion, with different modifiers applied, it is beneficial to use Smart Objects for such layers. mFusion automatically detects Smart Objects, and imports their resulting layer data, no matter what the Smart Object itself contains. 19 Controls Press the following keys and buttons to control the camera while moving the mouse: • • • Alt + Left Mouse Button: Rotate camera Alt + Right Mouse Button (or mouse wheel): Dolly camera Alt + Middle Mouse Button: Pan camera When in IBL mode, press the following keys and buttons to control the IBL environment while moving the mouse: • Ctrl + Left Mouse Button: Rotate the IBL environment When in Blinn-Phong mode, press the following keys and buttons to control the light source while moving the mouse: • • • Ctrl + Left Mouse Button: Control light source transparency Ctrl + Right Mouse Button (or mouse wheel): Move light source along the z-axis Ctrl + Middle Mouse Button: Move light source on the xy-plane Note: The light source is only shown when the selected lighting model is Blinn-Phong. Keyboard Shortcuts Ctrl + L - Load project Ctrl + S - Save project Shift + Ctrl + S - Save project as T - Toggle always on top Tab - Change lighting model D - Toggle flat diffuse S - Toggle flat specular E - Toggle IBL environment W - Toggle wireframe P - Toggle real-time bake preview B - Bake now F1 - Open this user manual F2 - Open the developer log file 20 Technical Support Having trouble? If you experience any problems while using mFusion, we are here to help you. Before contacting technical support, please always make sure that your Microsoft® Windows® operating system is up-to-date with the latest patches installed, and that you have installed the latest drivers from your graphics card manufacturer. For general technical inquiries and bug reports, write to: [email protected]. Please always state the version of the operating system you are using, as well as your graphics card model and the installed driver version. mFusion tries its best to deal with unforeseen circumstances as gracefully as possible. In cases where this is not possible, e.g. a hard crash, please attach the log.txt file found in the local application data directory (%localappdata%\Molecular Matters\mFusion) to your technical inquiry. Minimum System Requirements • • • • Microsoft® Windows® 7 32-bit/64-bit 2.0 GHz CPU 4 GB RAM DirectX 11 compatible video card, such as NVIDIA® GeForce® 500 series 21