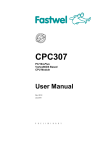
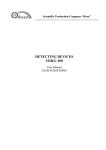
1
User Manual DAC-BT05 POS M/B with Intel® Atom N270/VGA, LVDS, TTL, Giga LAN, USB, SATA, SSD Copyright The documentation and the software included with this product are copyrighted 2011 by Advantech Co., Ltd. All rights are reserved. Advantech Co., Ltd. reserves the right to make improvements in the products described in this manual at any time without notice. No part of this manual may be reproduced, copied, translated or transmitted in any form or by any means without the prior written permission of Advantech Co., Ltd. Information provided in this manual is intended to be accurate and reliable. However, Advantech Co., Ltd. assumes no responsibility for its use, nor for any infringements of the rights of third parties, which may result from its use. Acknowledgements Award is a trademark of Award Software International, Inc. IBM, PC/AT, PS/2 and VGA are trademarks of International Business Machines Corporation. Intel and Atom are trademarks of Intel Corporation. Microsoft Windows® is a registered trademark of Microsoft Corp. RTL is a trademark of Realtek Semi-Conductor Co., Ltd. ESS is a trademark of ESS Technology, Inc. UMC is a trademark of United Microelectronics Corporation. SMI is a trademark of Silicon Motion, Inc. Creative is a trademark of Creative Technology LTD. CHRONTEL is a trademark of Chrontel Inc. All other product names or trademarks are properties of their respective owners. ii Product Warranty (2 years) Advantech warrants to you, the original purchaser, that each of its products will be free from defects in materials and workmanship for two years from the date of purchase. This warranty does not apply to any products which have been repaired or altered by persons other than repair personnel authorized by Advantech, or which have been subject to misuse, abuse, accident or improper installation. Advantech assumes no liability under the terms of this warranty as a consequence of such events. Because of Advantech‘s high quality-control standards and rigorous testing, most of our customers never need to use our repair service. If an Advantech product is defective, it will be repaired or replaced at no charge during the warranty period. For outof-warranty repairs, you will be billed according to the cost of replacement materials, service time and freight. Please consult your dealer for more details. If you think you have a defective product, follow these steps: 1. Collect all the information about the problem encountered. (For example, CPU speed, Advantech products used, other hardware and software used, etc.) Note anything abnormal and list any onscreen messages you get when the problem occurs. 2. Call your dealer and describe the problem. Please have your manual, product, and any helpful information readily available. 3. If your product is diagnosed as defective, obtain an RMA (return merchandize authorization) number from your dealer. This allows us to process your return more quickly. 4. Carefully pack the defective product, a fully-completed Repair and Replacement Order Card and a photocopy proof of purchase date (such as your sales receipt) in a shippable container. A product returned without proof of the purchase date is not eligible for warranty service. 5. Write the RMA number visibly on the outside of the package and ship it prepaid to your dealer. Technical Support and Assistance 1. 2. Visit the Advantech web site at www.advantech.com/support where you can find the latest information about the product. Contact your distributor, sales representative, or Advantech's customer service center for technical support if you need additional assistance. Please have the following information ready before you call: œ Product name and serial number œ Description of your peripheral attachments œ Description of your software (operating system, version, application software, etc.) œ A complete description of the problem œ The exact wording of any error messages iii Contents Chapter Chapter 1 General Introduction ...........................1 1.1 1.2 1.3 Introduction ............................................................................................... 2 Product Feature ........................................................................................ 2 Specifications ............................................................................................ 3 1.3.1 Functional Specification ................................................................ 3 1.3.2 Mechanical Specification .............................................................. 5 1.3.3 Electrical Specification .................................................................. 6 1.3.4 Environmental Specification.......................................................... 6 2 H/W installation....................................7 2.1 Jumpers .................................................................................................... 8 2.1.1 Jumper list..................................................................................... 8 Table 2.1: Jumper list .................................................................. 8 2.1.2 Jumper Settings ............................................................................ 8 Connectors .............................................................................................. 10 2.2.1 Connector list .............................................................................. 10 Table 2.9: Connector List .......................................................... 10 2.2.2 Connector Settings ..................................................................... 11 Placement .............................................................................................. 14 2.3.1 Front side ................................................... 14 2.3.2 Rear side ........................................................................ 14 2.2 2.3 Chapter 3 BIOS settings .....................................15 3.1 3.2 BIOS Introduction .................................................................................... 16 BIOS Setup ............................................................................................. 16 3.2.1 Main Menu .................................................................................. 17 3.2.2 Standard CMOS Features .......................................................... 18 3.2.3 Advanced BIOS Features ........................................................... 19 3.2.4 Advanced Chipset Features........................................................ 21 3.2.5 Integrated Peripherals................................................................. 23 3.2.6 Power Management Setup ......................................................... 25 3.2.7 PnP/PCI Configurations .............................................................. 27 3.2.8 PC Health Status ........................................................................ 28 3.2.9 Frequency/Voltage Control ......................................................... 29 3.2.10 Load Optimized Defaults............................................................. 30 3.2.11 Set Password .............................................................................. 30 3.2.12 Save & Exit Setup ....................................................................... 32 3.2.13 Quit Without Saving .................................................................... 32 v Chapter 1 1 General Introduction This chapter gives background information on the DAC-BT05 Sections include: ¢ Introduction ¢ Product Feature ¢ Specifications 1.1 Introduction The DAC-BT05 is a 3.5" SBC (Single Board Computer) with Embedded Intel® Atom N270 1.6 GHz Processor. The DAC-BT05 can support DDR2 memory up to 2GB, has five USB 2.0 compatible ports, Giga LAN(1000Mbps) interface, LVDS interface. The DAC-BT05 also supports two SATA and six COM ports. 1.2 Product Features General ¢ CPU: Intel® Atom Processor N270 1.6GHz ¢ System Chipset Intel® 945GSE +ICH7M ¢ BIOS: AWARD® 8 Mbit Flash BIOS ¢ System Memory: DDRII 400/533 MHz SDRAM up to 2GB ¢ SSD: Supports CompactFlash® Card TYPE I/II ¢ Watchdog Timer: Single chip Watchdog 255-level interval timer, setup by software ¢ Battery: Lithium 3 V/210 mAH I/O ¢ I/O Interface: 2 x SATA(Supports 150MB/s,one on I/O board), 1 x KB/mouse, 6 x RS232( 2xRS-232 on I/O board), 1 x LPT, ¢ USB: 6 x USB 2.0 compliant ports(2x USB ports on I/O board) ¢ Audio: Line out, Mic-in ¢ Cash Drawer: one RJ-11 connector (12V and 24V selectable) Ethernet ¢ Chipset: Intel 82583V ¢ Speed: 10/100/1000 Mbps ¢ Interface: 1 x RJ45 ¢ Standard: Compliant with IEEE 802.3, IEEE 802.3u, IEEE 802.3x, IEEE 802.ab. Display ¢ Chipset: Intel® 945GSE ¢ Memory Size: Up to 64 MB of dynamic video memory allocation ¢ Resolution: - CRT display Mode: Supports QXGA Up to 2048 x 1536 - LVDS display Mode: Up to 800 x 600 18bits 2 1.3 Specifications 1.3.1 Functional Specification Processor Intel® Atom™ Processor N270 ¢ Intel® Atom TM N270 at 1.6 GHz with 512 KB L2 cache ¢ 437-pin FCBGA8 package ¢ FSB: 533 MHz ¢ Bus Ratio: 12 ¢ Manufacturing Technology: 45nm ¢ Thermal Design Power: 2.5 W ¢ Thermal Specification: 90°C ¢ VID Voltage Range: 90 V-1.100 V Chipset (945GSE) Memory 945GSE GMCH Supports 2 GB maximum memory One 64-bit wide DDR2 SDRAM single channel Supports DDR2 400, DDR2 533, 256 Mb, 512 Mb 1 Gb and 2Gb DDR2 technology Only x8, x16 DDR2 devices with 4 or 8 banks Support for DDR2 On-Die Termination(ODT) Socket: SODIMM Socket: 1. 200-pin SODIMM socket type *1 945GSE Graphic and Video Controllers Intel 3.5 Gen Integrated Graphic Engine DVMT 3.0 (Dynamic Video Memory Technology) Display Dynamic Power Saving Technology 2.0 (Intel DPST 2.0) Intel Smart 2D Display Technology (S2DDT) 3 Chipset (ICH7M) IDE Interface ICH7M supports: Single, independent IDE signal channel Supports one CF device ICH7M supports: H.D. Codec ALC886 I/F Concurrent PCI/PCIe Support for HD codec Up to 2.1 channel of PCM audio output Connectors:Line-out, Line-in, Mic-in: Pin header 2*5P (M) 2.0 mm ICH7M chip supports: PCI 2.1 Bus Controller 32-bit 3.3 V 33 MHz PCI interface with 5 V tolerant inputs PC/PCI DMA PCI Express 1.0a SATA Connector ICH7M supports: Independent DMA operation on two ports Data transfer rates of up to 1.5 Gb/s (150 MB/s) Operation of AHCI using memory space Several optional sections of the Serial ATA II SATA connectors: Connector: Serial ATA II 7 pins 1.27 mm x 2 USB Interface ICH7M supports: 5 USB 2.0 ports which are high-speed, full- speed, and low-speed capable Port-routing logic determines whether a USB port is controlled by UHCI or EHCI ICH7M supports: Full ACPI (Advanced Configuration and Power Management BIOS Power Interface) 2.0 Supports S1, S5 PCI CLKRUN# and PME# support SMI# (System Management Interrupt) generation ICH7M supports: Award 8M SPI Flash BIOS, APM 1.2/ ACPI 1.1. FWH Type 4 Other Chipsets 945GSE Intel 3.5 Gen Integrated Graphic Engine ¢ CRT: Supports QXGA Up to 2048 x 1536, Graphic and Controllers Video ¢ LVDS: Support 18-bit LVDS panel, LVDS connector : Hirose DF13 type 20 pin CRT connector : D-SUB15 at coastline Intel 82583V. ¢ Compliant with IEEE 802.3, IEEE 802.3u, IEEE LAN 802.3x, IEEE 802.ab. ¢ Support 1000Mbps. Connectors: Phone Jack RJ45 8P 90D(F) Fintek F81216DG (4E/$4F): ¢ Compatible UARTs with Data rates to 1.5Mbps Serial ports ¢ Support IRQ Sharing among serial ports. ¢ Connectors: 3xCOM port via D-Sub 9 CONN, 1xCOM port on 2x5 wafer CONN, 2xRS232 on IO Board Parallel port N/A Keyboard/Mouse connectors PS/2 Keyboard and Mouse interface. Connector: Mini-Din 6P at coastline Cash Drawer Connector. ¢ one RJ11 ¢ 12V and 24V selectable 1.3.2 Mechanical Specification 1.3.2.1 Dimension (mm) L200 mm * W125 mm 5 1.3.3 Electrical Specification 1.3.3.1 Power supply Voltage Voltage requirement with AT Power: AT: +24 VDC 5% 1.3.3.2 Power Supply Current Supply Current (ATX) CPU : Intel Atom N270 1.6 GHz XP Mode 1.3.3.3 ATX 5V 12 V Typical 1.90 A 0.07 A Suspend 1.36 A 0.06 A Max Load 2.38 A 0.09 A RTC Battery Typical Voltage : 3.0 V Nomal discharge capacity : 210 mAh 1.3.4 Environmental Specification 1.3.4.1 Operating Temperature Operating temperature: 0 ~ 60°C (32~140°F) * Tested under 60°C chamber temperature with 0.23 m/s air flow. Operating temperature:-20~80°C * Only for wide-temp SKU(PCM-9361FZ-1GS6A1E) 1.3.4.2 Operating Humidity Operating Humidity:10% ~ 90% Relative Humidity, non-condensing 1.3.4.3 Storage Temperature Standard products (0 ~ 60°C) Storage temperature: 20~70°C 1.3.4.4 Storage Humidity Standard products (0 ~ 60°C) Relative Humidity: 95% @ 60°C 6 Chapter 2 2 H/W installation This chapter explains the setup procedures of the DAC-BT05 hardware, including instructions on setting jumpers and connecting peripherals, switches, indicators and mechanical drawings. Be sure to read all safety precautions before you begin the installation procedure. 2.1 Jumpers 2.1.1 Jumper list Table 2.1: Jumper list CMOS1 CMOS REST1 RESET LPC1 JP1/2/4/6 LPC COM Port selection JP7 Cash Drawer 2.1.2 Jumper Settings CMOS1:CMOS Jump Setting CMOS1 Jumper Setting 1-2 Normal (Default) 2-3 Clear CMOS CMOS1 1 RTC_RST# 2 3 C116 PH_3x1V_2.54mm 1uF 25V 0603 JP1/2/4/6:COM Port Setting JP1/JP2/JP4/JP6 Jumper setting (Default) 8 JP1(3-4)1 +VCC5 MINIJUMPER_2_2.0mm 1A FS1 (20) RS232_NRI1_C RS232_NRI1_C JP2(3-4)1 SNRI1 1 3 5 SMD1812P150TF/24 1.5A JP1 2 4 6 FS2 (20) RS232_NRI2_C RS232_NRI2_C JP4(3-4)1 SNRI2 PH_3x2V_S2.00mm 1 3 5 SMD1812P150TF/24 1.5A JP2 2 4 6 FS4 (21) RS232_NRI4_C RS232_NRI4_C JP6(3-4)1 SNRI4 1 3 5 JP4 2 4 6 FS6 1A SNRI6 SMD1812P150TF/24 1.5A +VCC12 1A 1A RS232_NRI4 PH_3x2V_S2.00mm +VCC5 RS232_NRI6_C 1A RS232_NRI2 PH_3x2V_S2.00mm SMD1812P150TF/24 1.5A MINIJUMPER_2_2.0mm +VCC12 1A +VCC5 MINIJUMPER_2_2.0mm 1A 1A RS232_NRI1 +VCC5 MINIJUMPER_2_2.0mm 1A +VCC12 1A 1 3 5 JP6 2 4 6 +VCC12 1A 1A RS232_NRI6 PH_3x2V_S2.00mm JP7:Cash Drawer((Default Pin 1-Pin 2)) JP7 JP7(1-2)1 1 +VCC12 2 3 +VCC24 MINIJUMPER_2_2.54mm PH_3x1V_2.54mm 9 2.2 Connectors 2.2.1 Connector list Table 2.9: Connector List MIC1 COMP1 MIC-in COM USB1 USB LPT1 Printer SATA1 SATA PWR SATA Connector SATA power UPS1 UPS CN6 PCIEx8 DIMM1 Memory socket BH1 Battery holder CF2 CF Slot SW1T Switch Drawer LAN1 Cash Drawer RJ45+USB stack Connector CN2 COM+VGA connector COM1 COM Stack Connector CN3 PS2 CN5 DC_IN1 DC out DC In 10 2.2.2 Connector Settings Connector Pin Define: Mic-in: (MIC1) 1 2 3 4 MIC_JD MIC_z_R MIC_z_L MIC1 WB_4V_2.0mm A COM: (COMP1) COMP1 RS232_NDCD61 2 RS232_NDSR6 RS232_NRXD6 3 4 RS232_NRTS6 RS232_NTXD6 5 6 RS232_NCTS6 RS232_NDTR6 7 8 RS232_NRI6_C 9 10 WB_5x2V_2.00mm 11 USB (USB1) +VCC5_USB34 D2- USB1 1A D2+ C278 100uF 6.3V Printer C279 0.1uF 16V 1 2 3 4 D3- 5 6 D3+ 7 8 9 10 WB_5x2V_2.00mm (LTP1) LPT1 LPT_SSTB# 1 LPT_SPD0 3 LPT_SPD1 5 LPT_SPD2 7 LPT_SPD3 9 LPT_SPD4 11 LPT_SPD5 13 LPT_SPD6 15 LPT_SPD7 17 19 SACK# 21 SBUSY 23 SPE 25 SSLCT 2 4 6 8 10 12 14 16 18 20 22 24 26 SAFD# SERR# SINIT# SSLIN# BH_13x2V_2.00mm 12 1A (SATA1) 9 SATA Connector 1 2 3 4 5 6 7 SATA0_z_TX+ SATA0_z_TX- GND TX+ TXGND RXRX+ GND 8 SATA0_z_RXSATA0_z_RX+ SATA Power +VCC5 SATA1 SATA_7V (SATA_PWR1) +VCC12 1 2 3 4 SATA_PWR1 WB_4V_2.5mm C360 10uF 10V 0805 UPS Connector C361 10uF 16V 0805 (UPS1) +VCC24 1 2 3 4 SMB_z_CLK 5 SMB_z_DAT 6 UPS1 WB_6V_2.5mm 13 2.3 Placement 2.3.1 Front Side 2.3.1 Rear Side 14 Chapter 3 BIOS settings 3 3.1 BIOS Introduction AwardBIOS 6.0 is a full-featured BIOS provided by Advantech to deliver superior performance, compatibility, and functionality to industrial PCs and embedded boards. Its many options and extensions let you customize your products to a wide range of designs and target markets. The modular, adaptable AwardBIOS 6.0 supports the broadest range of thirdparty peripherals and all popular chipsets, plus Intel, AMD, nVidia, VIA, and compatible CPUs from 386 through Pentium, AMD Geode, K7 and K8 (including multiple proces- sor platforms), and VIA Eden C3 and C7 CPUs. You can use Advantech's utilities to select and install features that suit you and your customers' needs. 3.2 BIOS Setup The DAC-BT05 system has AwardBIOS 6.0 built-in, which includes a CMOS SETUP utility that allows users to configure settings as required or to activate certain system features. The CMOS SETUP saves configuration settings in the CMOS RAM of the motherboard. When the system power is turned off, the onboard battery supplies the necessary power to the CMOS RAM so that settings are retained. To access the CMOS SETUP screen, press the <Del> button during the poweron BIOS POST (Power-On Self Test). CMOS SETUP Navigation and Control Keys: < ↑ >< ↓ <Enter> >< ← <Esc> Move to highlight >< → > Select Item item Main Menu - Start Quit sequence <Page Up/+> Sub Menu - Exit the current page and return to level above Increase the numeric value or make changes <Page Down/-> Decrease the numeric value or make changes <F1> General help, for Setup Sub Menu <F2> Item Help <F5> Load Previous Values <F7> Load Optimized Default <F10> Save all CMOS changes 16 3.2.1 Main Menu Press the <Del> key during startup to enter the BIOS CMOS Setup Utility; the Main Menu will appear on the screen. Use arrow keys to highlight the desired item, and press <Enter> to accept, or enter the sub-menu. ¢ Standard CMOS Features This setup page includes all the features for standard CMOS configuration. ¢ Advanced BIOS Features This setup page includes all the features for advanced BIOS configuration. ¢ Advanced Chipset Features This setup page includes all the features for advanced chipset configuration. ¢ Integrated Peripherals This setup page includes all onboard peripheral devices. ¢ Power Management Setup This setup page includes all the power management items. ¢ PnP/PCI Configurations This setup page includes PnP OS and PCI device configuration. ¢ PC Health Status This setup page includes the system auto-detect CPU and system temperature, voltage, and fan speed. ¢ Frequency/Voltage Control This setup page includes CPU host clock control, frequency ratio and voltage. ¢ Load Optimized Defaults This selection loads optimized values for best system performance configuration. ¢ Set Password Establish, change or disable passwords. ¢ Save & Exit Setup Save CMOS value settings to CMOS and exit BIOS setup. ¢ Exit Without Saving Abandon all CMOS value changes and exit BIOS setup. 17 3.2.2 Standard CMOS Features ¢ ¢ ¢ ¢ Date The date format is <weekday>, <month>, <day>, <year>. Weekday Month From Sun to Sat, determined and display by BIOS only From Jan to Dec. Day From 1 to 31 Year From 1999 through 2098 Time The times format in <hour> <minute> <second>, base on the 24-hour time IDE Channel 0/1 Master/Slave IDE HDD Auto-Detection - Press "Enter" for automatic device detection. Halt on This item determines whether the computer will stop if an error is detected during power up. No Errors All Errors The system boot process will not stop for any error Whenever the BIOS detects a non-fatal error the system boot process will be stopped. All, But Keyboard The system boot process will not stop for a keyboard error, but will stop for all other errors. (Default value) All, But Diskette The system boot process will not stop for a diskette error, but will stop for all other errors. The system boot process will not stop for a keyboard or disk error, but will stop for all other errors. All, But Disk/Key ¢ ¢ ¢ Base Memory Displays the amount of base (or conventional) memory installed in the system. Extended Memory Displays the amount of extended memory (above 1 MB in CPU's memory address map) installed in the system. Total Memory Displays the total system memory size. 18 3.2.3 Advanced BIOS Features ¢ ¢ ¢ ¢ ¢ ¢ ¢ ¢ ¢ CPU Feature This item allows the user to adjust CPU settings such as CPU ratio, VID and Thermal, and special features like XD flag. Hard Disk Boot Priority This item allows the user to select the boot sequence for system devices such as HDD, SCSI, and RAID. CPU L1 & L2 Cache [Enabled] This item allows user to enable CPU L2 cache and ECC checking function. CPU L3 Cache [Enabled] This item allows the user to enable/disable CPU L3 cache. Hyper-Threading Technology [Enabled] This item allows the user to enable/disable Hyper-threading support for the Intel® Pentium® 4 processor with HT Technology. Quick Power On Self Test [Enabled] This field speeds up the Power-On Self Test (POST) routine by skipping re-testing a second, third and fourth time. The default setting is enabled. First / Second / Third / Other Boot Drive Hard Disk Sets boot priority for the hard disk. CDROM Sets boot priority for CDROM. USB-FDD Sets boot priority for USB-FDD. USB-ZIP Sets boot priority for USB-ZIP. USB-CDROM Sets boot priority for USB-CDROM. LAN Sets boot priority for LAN. Disabled Disables this boot function. Boot Up NumLock Status [On] This item allows the user to activate the Number Lock key at system boot. Gate A20 Option [Fast] This item allows the user to switch on or off A20 control by port 92. 19 ¢ Typematic Rate Setting This item allows the user to set the two typematic control items. This field controls the speed of œ Typematic Rate (Chars/Sec) This item controls the speed at which the system registers auto repeated keystrokes. The eight settings are: 6, 8, 10, 12, 15, 20, 24 and 30. œ Typematic Delay (Msec) This item sets the key press delay time before auto repeat begins. The four delay rate options are: 250, 500, 750 and 1000. ¢ ¢ ¢ ¢ Security Option [Setup] System System requires correct password before booting, and also before permitting access to the Setup page. Setup System will boot, but requires correct password before permitting access to Setup. (Default value) APIC Mode[Enabled] This item allows the user to enable/disable the "Advanced Programmable Interrupt Controller". APIC is implemented in the motherboard and must be sup- ported by the operating system; it extends the number of IRQs available. MPS Version Control for OS [1.4] This item sets the operating system multiprocessor support version. OS Select For DRAM > 64 MB [Non-OS2] Select OS2 only if the system is running the OS/2 operating system with greater than 64 MB of RAM on the system. 20 3.2.4 Advanced Chipset Features Note! ¢ ¢ ¢ ¢ ¢ ¢ ¢ ¢ The "Advanced Chipset Features" screen controls the configuration of the board's chipset register settings and performance tuning - the options on this screen may vary depending on the chipset type. It is strongly recommended that only technical users make changes to the default settings. DRAM Timing Selectable [By SPD] This item enables users to set the optimal timings for items 2 through 5, system default setting of "By SPD" to follow the SPD information and ensure the system running in stable and optimal performance. CAS Latency Time [Auto] This item enables users to set the timing delay in clock cycles before SDRAM start a read command after receiving it. DRAM RAS# to CAS# Delay [Auto] This item enables users to set the timing of the transition from RAS (row address strobe) to CAS (column address strobe) as both rows and column are separately addressed shortly after DRAM is refreshed. DRAM RAS# Precharge [Auto] This item enables users to set the DRAM RAS# precharge timing, system default is setting to "Auto" to reference the data from SPD ROM. Precharge delay (tRAS) [Auto] This item allows user to adjust memory precharge time System Memory Frequency [Auto] This item allows user to adjust memory frequency to improvement performance. SLP_S4# Assertion Width [4 to 5 Sec] This item allow user to set the SLP_S4# Assertion Width. System BIOS Cacheable [Enabled] This item allows the system BIOS to be cached to allow faster execution and better performance. 21 ¢ ¢ ¢ ¢ ¢ ¢ ¢ ¢ ¢ Video BIOS Cacheable [Disabled] This item allows the video BIOS to be cached to allow faster execution and better performance. Memory Hole At 15M-16M [Disabled] This item reserves 15MB-16MB memory address space to ISA expansion cards that specifically require the setting. Memory from 15MB-16MB will be unavailable to the system because of the expansion cards can only access memory at this area. PCI Express Root Port Func [Press Enter] This item allows the user to adjust the PCIE port to on, off, or auto. On-Chip Frame Buffer Size [8MB] This item allows the user to adjust on-chip graphics of memory buffer. DVMT Mode [DVMT] This item allows the user to adjust Intel's Dynamic Video Memory Technology (DVMT). BIOS provides three option to choose (DVMT,FIXED and Both). DVMT/FIXED Memory Size [128MB] This item allows the user to adjust DVMT/FIXED graphics memory size. Boot Display [LFP+CRT] This item allows the user to decide which display mode to use for the boot display. Panel Type(LFP1) [ 800 x 600, 18bits] This item allows the user to adjust panel resolution. Backlight Control [80%] This item allow the user to adjust panel backlight. 22 3.2.5 Integrated Peripherals Note! The "Integrated Peripherals" screen controls chipset configuration for IDE, ATA, SATA, USB, AC97, MC97 and Super IO and Sensor devices. The options on this screen vary depending on the chipset. ¢ OnChip IDE Device This item enables users to set the OnChip IDE device status, including IDE devices and setting PIO and DMA access modes. Some chipsets support newer SATA devices (Serial-ATA). ¢ Onboard Device This item enables users to set the Onboard device status, includes enable USB, AC97, MC97 and LAN devices. Super IO Device This item enables users to set the Super IO device status, includes enable Floppy, COM, LPT, IR and control GPIO and Power fail status. USB Device Setting This item enables users to set the USB device type. ¢ ¢ 23 ¢ ¢ ¢ ¢ ¢ ¢ ¢ Onboard Serial port 1 [ 3F8/IRQ4] This item allows the user to adjust serial port 1 address. Onboard Serial port 2 [ 2F8/IRQ3] This item allows the user to adjust serial port 2 address. Onboard Serial port 3 [ 3E8/IRQ10] This item allows the user to adjust serial port 3 address. Onboard Serial port 4 [ 2E8/IRQ5] This item allows the user to adjust serial port 4 address. Onboard Serial port 5 [ 3E0/IRQ6] This item allows the user to adjust serial port 5 address. Onboard Serial port 6 [ 2E0/IRQ11] This item allows the user to adjust serial port 6 address. Onboard Parallel Port [378/IRQ7] This item allows the user to adjust parallel port address and IRQ. Parallel Port Mode [SPP] This item allows the user to adjust parallel port mode. ECP Mode Use DMA [3] This item allows the user to adjust the ECP DMA resource. 24 3.2.6 Power Management Setup Note! ¢ ¢ The "Power Management Setup" screen allows configuration of the system for effective energy savings while still operating in a manner consistent with intended computer use. ACPI Function [Enabled] This item defines the ACPI (Advanced Configuration and Power Management) feature that makes hardware status information available to the operating system, and communicate PC and system devices for improving the power management. ACPI Suspend Type [S3 (STR)] This item allows user to select sleep state state when the computer is in suspend mode. S1 (POS) S3 (STR) ¢ ¢ The suspend mode is equivalent to a software power down. The system shuts down with the exception of a refresh current to the system memory. Run VGABIOS if S3 Resume° [Auto] This item allows the user to enable run VGA bios if system resume from S3. Power Management [Min Saving] This item allows user to select system power saving mode. Min Saving Minimum power management. Suspend Mode=1 hr. Max Saving Maximum power management. Suspend Mode=1 min. User Define Allows user to set each mode individually. Suspend Mode= Disabled or 1 min ~1 hr. 25 ¢ Video Off Method [DPMS] This item allows the user to determine the manner in which the monitor is blanked. V/H SYNC+Blank ¢ ¢ ¢ ¢ ¢ ¢ Blank Screen This option will cause the system to turn off vertical and horizontal synchronization ports and write blanks to the video buffer. This option only writes blanks to the video buffer. DPMS Initial display power management signaling. Video Off In Suspend [Yes] This item allows user to turn off video during system enter suspend mode. Suspend Type [Stop Grant] This item allows user to determine the suspend type. Modem use IRQ [3] This item allows user to determine the IRQ which the MODEM can use. Suspend Mode [1 Hour] This item allows user to determine the time of system inactivity, all devices except the CPU will be shut off. HDD Power Down Mode [15 Min] This item allows user to determine the time of system inactivity, the hard disk drive will be powered down. Soft-Off by PWR-BTTN [Instant-Off] This item allows the user to define the power button functions. ¢ ¢ ¢ ¢ Instant-Off Press the power button to power off instantly. Delay 4 Sec Press and hold the power button for 4 sec to power off. PWRON After PWR-Fail [Former-Sts] This item allows the user to select recovery after power fail function; this function depends on the chipset. Wake-Up by PCI card [Enabled] This item allows user to defines PCI cards to wake up the system from the suspend mode. Power On by Ring [Enabled] This item allows user to define the system will resume by activating of modem ring. Resume by Alarm [Disabled] This item allows user to enable and key in Date/time to power on system Disabled Disable this function. Enabled Enable alarm function to power on system Day (of month) Alarm 1-31 Time (HH:MM:SS) Alarm (0-23) : (0-59) : 0-59) 26 3.2.7 PnP/PCI Configurations Note! ¢ ¢ ¢ ¢ ¢ ¢ This "PnP/PCI Configurations" option sets up the IRQ and DMA (both PnP and PCI bus assignments). Init Display First [PCI Slot] This item is setting for start up Video output from PCI or Onboard device. Reset Configuration Data [Disabled] This item allow user to clear any PnP configuration data stored in the BIOS. Resources Controlled By [Auto (ESCD)] œ IRQ Resources This item allows you respectively assign an interruptive type for IRQ-3, 4, 5, 7, 9, 10, 11, 12, 14, and 15. œ DMA Resources This item allows you respectively assign an interruptive type for DMA, 0, 1, 2, 3, 4, 5, 6, and 7. PCI VGA Palette Snoop [Disabled] The item is designed to solve problems caused by some non-standard VGA cards. A built-in VGA system does not need this function. INT Pin 1~8 Assignment [Auto] This item allows the user to select the interrupt request (IRQ) assigned to a device connected to the PCI interface on your system. Maximum Payload Size [4096] This item allows the user to adjust maximum TLP (Transaction Layer Packet) payload size. 27 3.2.8 PC Health Status Note! ¢ ¢ ¢ This "PC Health Status" page reports the thermal, fan and voltage status of the board. This page may vary according to the chipset installed. Current CPU Temperature [Show Only] This item displays current CPU temperature. FAN 1 Speed [Show Only] This item displays current system FAN(s) speed(s). VCC/ 2.5 V/ 5V/ 12V [Show Only] This item displays current CPU and system voltage. 28 3.2.9 Frequency/Voltage Control Note! ¢ ¢ ¢ ¢ The "Frequency/Voltage Control" screen controls the CPU host and PCI frequency. The options on this page vary depending on the chipset; items show up according to installed CPU capacities. CPU CIock Ratio [6X] This item enables users to set the CPU clock ratio by manually. Auto Detect PCI Clk [Enabled] This item enables users to set the PCI Clk either by automatic system detection or manually. Spread Spectrum [Disabled] This item enables users to set the spread spectrum modulation. CPU Host/SRC/PCI Clock [Defautl] This item enables users to set the CPUhost/SRC/PCI clock. 29 3.2.10 Load Optimized Defaults Note! "Load Optimized Defaults" loads the default system values directly from ROM. If the stored record created by the setup program should ever become corrupted (and therefore unusable), select Load Setup Defaults to have these default values load automatically for the next bootup. 3.2.11 Set Password Note! To enable this feature, you should first go to the "Advanced BIOS Features" menu, choose the Security Option, and select either System or Setup, depending on which aspects you want password protected. System requires a password both to boot the system and to enter Setup. Setup requires a password only to enter Setup. A password may be at most 8 characters long. 30 To Establish Password 1. Choose the Set Password option from the CMOS Setup Utility Main Menu and press <Enter>. 2. When you see Enter Password, enter the desired password and press <Enter>. 3. At the Confirm Password prompt, retype the desired password, then press <Enter>. 4. Select Save to CMOS and exit, type <Y>, then <Enter>. To Change Password 1. Choose the Set Password option from the CMOS Setup Utility main menu and press <Enter>. 2. When you see Enter Password, enter the existing password and press <Enter>. 3. You will see the Confirm Password prompt, type it in again, and press <Enter>. 4. Select Set Password again, and at the Enter Password prompt, enter the new password and press <Enter>. 5. At the Confirm Password prompt, retype the new password, and press <Enter>. 6. Select Save to CMOS and exit, type <Y>, then <Enter>. To Disable a Password 1. Choose the Set Password option from the CMOS Setup Utility main menu and press <Enter>. 2. When you see the Enter Password prompt, enter the existing password and press <Enter>. 3. You will see Confirm Password, type it in again, and press <Enter>. 4. Select Set Password again, and at the Enter Password prompt, DO NOT enter anything - just press <Enter>. 5. At the Confirm Password prompt, again, DO NOT type in anything - just press <Enter>. 6. Select Save to CMOS and exit, type <Y>, then <Enter>. 31 3.2.12 Save & Exit Setup Note! Typing "Y" will quit the BIOS Setup Utility and save user setup values to CMOS. Typing "N" will return to BIOS Setup Utility. 3.2.13 Quit Without Saving Note! Typing "Y" will quit the BIOS Setup Utility without saving any changes to CMOS. Typing "N" will return to the BIOS Setup Utility. 32 www.advantech.com Please verify specifications before quoting. This guide is intended for reference purposes only. All product specifications are subject to change without notice. No part of this publication may be reproduced in any form or by any means, electronic, photocopying, recording or otherwise, without prior written permission of the publisher. All brand and product names are trademarks or registered trademarks of their respective companies. © Advantech Co., Ltd. 2009