1
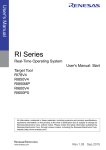
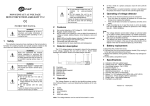
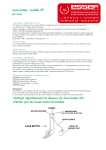
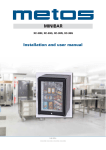
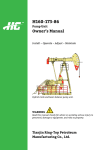
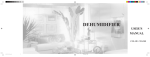
User Manual
Released version 2.5
August, 2005
www.norcotek.com
Copyright Notice
The proprietary information contains in this document is protected by
the copyright. All rights are reserved. It does not allow any nonauthorization in copied, photocopied, translated or reduced to any
electronic or machine readable in whole or in part form without prior
written consent from the manufacturer except for copied by the
purchaser for backup purposes.
The manufacturer keeps the rights in the subject to change the
contents of this manual without prior notices in order to improve the
function design, performance, quality and reliability. The author
assumes no responsibility for any errors or omissions, which may
appear in this manual. Nor does it make a commitment to update the
information contained herein.
Trademarks
NORCO is a registered trademark of Huabei Shuntong Technology
Co Ltd. China.
All other product names or trademarks mentioned in this manual are
the properties of their respective owners.
Disclaimer
The manufacturer makes no representations or warranties,
expressed, statutory or implied, regarding the fitness or
merchantability of this product for any particular purpose. Further, the
manufacturer is not liable for any damages, including but not limited
to, lost profits, lost savings, or other incidental or consequential
damages arising out of the use of this product. The manufacturer
also reserves the right to make any improvements or modifications to
the product described in this manual at any time, without notice of
these changes.
Table of Contents
Unpacking your DS-600S
Chapter 1 Introduction
1.1 Over View
1.2 Specification
Chapter 2 Installation Introductions
2.1 Installing hard drives
Cautions
Unpacking Your DS-600S:
Open the DS-600S box and carefully remove the DS-600S unit and
accessories, the DS-600S and accessories including the following
items:
NORCO DS-600S unit (with four cooling fans, without hard drive)
NORCO-LIB600 backplane board
Three pairs of hard drive bay adapter
One SATA data cable
User’s manual
Screws and screwdriver (HDD tray unlock tool)
Chapter 1 Introduction
1.1 Overview
· 4U rack mount chassis, six hot-swappable SATA slim drive
bays with the standard SATA interface backplane.
· Hot-swappable HDD tray with special designed power-off and
lock mechanism.
· 150 Mbps maximum data transfer.
· Support ATX motherboard up to 12" x 10".
· Front panel with power ON/OFF and system reset switch.
· Excellent cooling system.
· Lockable front panel door
Front View
Rear View
Inside View
1.3 Specification
Construction
Drive Bay
Applications
Data speed
Material
Dimension( W x D
xH)
Cooling fan
Operating System
Power Supply
PCI Extension
Switch
Options
Color Options
Weight
Temperature
Range
Relative Humidity
(non-condensing)
Heavy duty 1.2mm steel, meets FCC/CE Class
6 x hot-swappable SATA slim drive bays, 3 x 5.25" bays, 1
x 3.5 " bay
With six hot-swappable SATA slim drive bays, you are
already capable of creating a 4U rack mount computer
system with Terabyte storage. An excellent solution for
media streaming, and massive data warehousing
150 Mbps maximum data transfer
Heavy-duty 1,2mm steel. Inside: bright zinc, Outside:
texture-coated
19" x 21.5" x 7" (482mm x 545mm x 177mm)
4 x 80mm top fans, 2 x 60mm optional rear fans
Windows NT, Windows 2000, Windows 2003, NetWare,
Tru64 UNIX, Open VMS, Linux
Available ATX
7 Full height and length slots
Power ON/OFF x 1, System reset x 1, Keyboard lock x 1
Support ATX motherboard up to 12" x 10"
Grey / Beige / Black
16.4 kg/36 lb (NET) 18.2 kg/40 lb (GROSS) (without hard
drive)
Operating 41°F to 104°F (5°C to 40°C) Shipping -31°F to
167°F (-35°C to 75°C)
Operating 10% to 90% Shipping 5% to 90%
Chapter 2 Installation Introductions
2.1 Installing hard drives
1. Insert the small screwdriver into the unlock hole of the HDD
tray, push the unlock button softly to unlock the handle. The
HDD tray will slide out.
2. Connect the power and data connectors to the HDD; fasten the
HDD with four screws.
3. Insert the HDD tray with HDD back to the chassis; push the
handle back to lock the HDD tray.
4. Use SATA data cable to connect LIB600 board with
motherboard or Raid card.
Cautions
1. DS600S supports different size of HDD in the same system.
2. It will cause damage if removing the HDD tray from the chassis
before unlocking the tray by using the unlock tool.
3. In order to assure the best cooling effect, do not remove the
chassis top cover away when the system is running.
4. Do not remove the HDD tray until the data is completely
transferred. Otherwise the data may be lost!