1
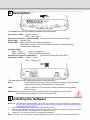
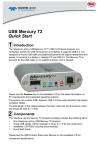
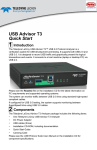
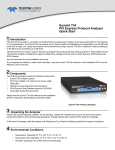
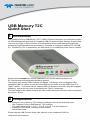
USB Mercury T2C
Quick Start
1 Introduction
The Teledyne LeCroy USB Mercury T2C™ USB 2.0 Protocol Analyzer is a verification system
for USB development and testing. It supports USB 2.0 and the Power Delivery Protocol that
runs over the Type-C(TM) connector. It is designed to record USB traffic and graphically
present the logical transactions and events. It connects to a laptop or desktop PC via USB
2.0. The Mercury T2C is powered by the USB cable, so no additional power cord is needed.
Please see the Readme file on the installation DVD for the latest information on
PC requirements and supported operating systems.
The system can monitor USB 2.0 traffic (Hi Speed, Full Speed, and Low Speed) using
compliant USB 2.0 cables, as well as Power Delivery 2.0 traffic over the USB Type-C to
Type-C cables. It will work with all existing USB 2.0 devices and hosts (using the supplied
Adapters), as well as new ones incorporating the Type-C connectors.
The total length of the cables between the Host under test and the Device under test should
be kept to < 4 feet.
2 Components
The Teledyne LeCroy Mercury T2C Analyzer package includes the following items:
• One Teledyne LeCroy USB Mercury T2C Analyzer
• Five USB cables (A to C, C to C, C to B, C to uB, C to A Receptacle)
• Installation DVD-ROM, including documentation
• Quick Start Guide
Please see the USB Protocol Suite User Manual on the installation DVD for
component specifications.
3 Description
The front panel has the following indicators and connectors:
Connector 1 LED
(Green - Good)
(Red - Flip it over!)
Analyzer Connector 1 (downstream) Connects to Device under test (UFP).
Power LED (Green if on)
Status LED (Blue if system successfully initializes)
(Red while booting. If red for more than a minute, hardware failure)
(Green while initializing)
Analyzer LEDs
Trig - Trigger
(Green if triggering)
Rec - Recording
(Red if recording enabled)
Analyzer Connector 2 (upstream)
Connects to Host under test (DFP).
Connector 2 LED (Green - Good)
(Red - Flip it over!)
The rear panel has the following indicators and connectors:
Aux:
9-pin Mini DIN connector, used for External Trigger In and Out BNC
connections. (Cable sold separately - AC032XXA‐X)
USB:
Type C connector for connection to host computer running USB
Protocol Suite
Warning: Do not open the enclosure. No operator serviceable parts are inside.
Refer servicing to Teledyne LeCroy customer care.
4 Installing the Software
Note: You must install the software before connecting the Analyzer to the host machine for the first time.
Refer to the System Requirements in the readme file for information about the exact Windows
operating systems supported.
1.
Insert the installation disc into the host machine's DVD drive.
2.
Typically, the installation process will automatically start. If it doesn't, browse to the 'Autorun' folder
on the installation disc, then double-click the 'autorun.exe' file.
3.
Follow the on-screen instructions to complete the installation.
Note: If you get an error message during installation of the drivers, consult your system administrator.
5 Setting Up the Analyzer
To set up the Analyzer:
1. Connect the USB port to a USB port on the PC using the LONG
(3-foot/1-meter) USB 2.0 cable.
Note: Use of a longer cable for this connection may cause the Mercury T2C to
malfunction.
2. Plug the Analyzer Host's USB cable into the USB Type-C Connector in the
rear of the Mercury T2C. At power-on, the Analyzer initializes itself in
approximately ten seconds and performs an exhaustive self-diagnostic that
lasts about five seconds.
3. Click Next after you see the Add New Hardware Wizard window.
4.
5.
Follow the Microsoft® Windows® on-screen Plug-and-Play instructions for the
automatic installation of the Analyzer as a USB device on your analyzing PC
(the required USB files are included on the Installation DVD)
Click Finish when you see the message that says “Windows has finished
installing the software that your new hardware requires” and the driver files
have been installed in your PC.
6 Starting the Application
To start the application, launch the Teledyne LeCroy USB Protocol Suite program
from the Start Menu:
Start > Programs > LeCroy > USB Protocol Suite > USB Protocol Suite.
You can use the software with or without the system connected to the host.
Without the Analyzer, the program functions as a trace viewer to view, analyze,
and print trace files.
The first time you open the USB Protocol Suite application, confirm proper
installation by selecting About from the Help menu to view the Software Version,
Firmware Version, BusEngine™ Version, and Unit Serial Number.
Note: When the Mercury T2C is unplugged from the host, it loses its Bus Engine
image. The image updates automatically when the Application runs.
7 First USB Recording
After installing and launching the software, you can test the system by performing
the following steps:
1. Connect cables to the Device and Host under test (UFP and DFP). Connect
the Device to Connector 1, and the Host to Connector 2. If the connector
LED's show Red, flip them over. This will allow any high speed data on the
3.1 twisted pairs to be connected together (if they exist!)
2. Select Recording Options under Setup on the Menu Bar.
3. Select the General tab to display the following dialog box showing factory
default settings such as Snapshot and 16 MB buffer size. For the first
recording, you can leave these settings unchanged.
4. Click OK to activate the recording options you selected.
5. Turn on the USB devices under test and initiate data transfer or otherwise
create traffic on the link.
6.
7.
Click
on the Tool Bar. The system starts to record the USB traffic
immediately. After 16 MB of traffic are recorded, the Analyzer uploads the
data and displays the packets in the trace window.
To terminate recording before the snapshot automatically completes,
8.
click
on the Tool Bar.
When the recording session is finished, the traffic is automatically uploaded
from the Analyzer to the hard drive on your PC as a file named data.usb or
the name you assigned as the default filename. While the file is being
uploaded, you should see a brown progress bar at the bottom of the screen.
When the bar disappears, it indicates that the data has been uploaded to
disk.
To save a current recording for future reference, select Save As under File
on the Menu Bar, OR click
on the Tool Bar to display the standard
Save As screen.
Give the recording a unique name and save it to the appropriate directory.
For additional information on the results display, see the
USB Protocol Suite User Manual.
Teledyne LeCroy Customer Support
Mail:
3385 Scott Blvd., Santa Clara, CA 95054-3115
Web:
teledynelecroy.com/tm/Library/software/PSG
E-mail: [email protected]
Tel:
(800) 909-7112 (USA and Canada)
Tel:
(408) 653-1260 (worldwide)
Fax:
(408) 727-6622 (worldwide)
Trademarks and Servicemarks
Teledyne LeCroy, Teledyne LeCroy Mercury T2C, USB Protocol Suite,
CATC Trace, and BusEngine are trademarks of Teledyne LeCroy.
Microsoft and Windows are registered trademarks of Microsoft Inc.
All other trademarks are property of their respective companies.
Disclaimer
Users are fully responsible for their application of any products. The Software
License and Limited Warranty for the accompanying product are set forth in
information that shipped with the product and are incorporated herein by this
reference. If you are unable to locate the Software License or Limited Warranty,
contact Teledyne LeCroy for a copy.
Changes
Product specifications are subject to change without notice.
Teledyne LeCroy reserves the right to revise the information in this document
without notice or penalty.
Copyright
© 2015 Teledyne LeCroy, Inc. All rights reserved.
Part Number: 925222-00 Rev A, April 2015
This document may be printed and reproduced without additional permission, but
all copies should contain this copyright notice.