1
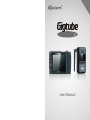
User Manual
Index
Safety Notice
Foreword
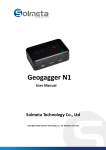
Product Introduction
Main Features
Components
Receiver
Transmitter
Accessories
Battery Setup & Charging
1
2
3
11
b. Transmitter Setup
11
4
c. Receiver Setup
11
5
d. Video Shooting
12
5
6
6
Transmitter
6
6
7
7
8
Brightness
8
Contrast
8
8
Matching Directions
8
View mode
Function and Operation
9
1. Setup
2. Drive Modes
a. Single Shot Mode
11
a. Camera Setup
4
Receiver
Signal Matching
11
d. Bulb Mode
11
3
6
Screen Information
Button Information
Adjustments
10
c. Self-Timer Mode
3.Video Recording
Battery Setup
Charging
b. Continuous Mode
9
9
10
10
4.Multiple Camera Control
Playback & Delete
Browse Pictures
Delete Pictures
12
13
13
14
Sleep Mode
14
Specifications
14
Important Notice
15
Troubleshooting
16
Safty Notice
Foreword
To prevent damage to your product or injury to yourself or to others, read
the fol lowing safety precautions in their entirety before using this
equipment. Keep these safety instructions where al l those who use this
equipment wi l l read them.
Thanks for purchasing Aputure Gigtube Wireless II DSLR Digital Remote
Viewfinder. Gigtube Wireless II is a live-view wireless display and remote
with infinite photographic possibilities. It inherits the excellent performance
of the original Gigtube Wireless, while adding new features such as video
recording, a longer range, multiple camera shutter control, and multiple
shooting modes. What's more, it includes a built-in camera and playback for
DSLRs without live-view. For the best results, read this user guide carefully.
Do not disassemble or modify
Failure to observe this precaution could result in electric shock or product
malfunction. Should the product break open as the result of a fall or other
accident, remove the batteries.
Keep dry
Do not handle with wet hands or immerse in or expose to water or rain.
Failure to observe this precaution could result in fire or electric shock.
Do not use in the presence of flammable gas. Failure to observe this
precaution could result in explosion or fire.
Keep out of reach of children
This device contains small parts which may pose a choking hazard. Consult
a physician immediately if a child swallows any part of this device.
Do not expose to high temperatures
Do not leave the device in a closed vehicle under the sun or in other areas
subject to extremely high temperatures. Failure to observe this precaution
could result in fire or in damage to the casing or internal parts.
Observe precaution when handling batteries
Use only batteries listed in this manual. Do not mix old and new
batteries or batteries of different types.
Do not short or disassemble.
Do not attempt to insert batteries upside down or backwards.
Batteries are prone to leakage when fully discharged. To avoid
damage to the product, be sure to remove the batteries when leaving
the product unattended for prolonged periods or when no charge
remains.
Should liquid from the batteries come into contact with skin or
clothing, rinse immediately with fresh water.
1
2
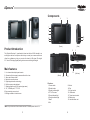
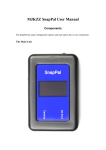
Components
3
4
7
8
9
12
6
10
5
(Front)
(Side)
Product Introduction
2
The Gigtube Wireless II (mentioned in below text will use GWII instead) is an
exciting new device from Aputure that lets you control your camera and shoot
video from a distance, giving you remote live view by 2.4G signal. The bright
3.5” color LCD displays great quality pictures even under bright sunlight.
1
(Top)
Main features
1. Live view wireless display and remote
2. Camera built-in to support cameras without live-view
3. Video start & stop control *
4. Monitor 4 cameras at once
5. Digital-signal transfer technology
6. Built-in memory and playback
7. Working distance up to 100 meters(open area)
8. 3.5", 320x240 pixel, TFT LCD
9.Easy mounting screen hood
10.Strong resistance to interference
13
(Back)
14
15
Receiver:
1. Power switch
2. Shutter button
3. Shutter indicator light
4. TFT LCD screen
5. Sleep indicator light
6. Charge indicator light
7. Menu
8. Set
9. Delete
10.Tab
11. AV-out socket
12. USB socket
13. Tripod mount socket
14. Battery tray
15. Heat emission vent
*Note: only used for select Canon models cameras. For details please refer to P15.
3
(Bottom)
4
11
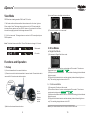
Battery Setup & Charging
5
3
2
Battery setup
11
6
Receiver
GWII receiver uses one NP-60 battery
which can be used continuously for 6
hours after fully charged. To insert the
battery, follow the arrow's direction to
open the battery hatch. Note the +/icons when inserting the battery.
12
(Front)
(Back)
4
1
10
7
8
(Top)
(Side)
9
1. Power switch
2. Signal light
3. Power light
4. Charge indicator light
5. Match
6. Antenna
1
7. USB socket
8. IR socket
9. CAMERA socket
10. Camera hot shoe mount
11. Battery tray
12. Heat emission vent
3
2
Transmitter
GWII transmitter uses one NP-60
battery which can be used continuously
for 6 hours after fully charged. To
insert the battery, follow the arrow's
direction to open the battery hatch. Note
the +/- icons when inserting the battery.
Transmitter:
4
Charging*
(Same for transmitter and receiver)
5
6
7
1.Turn off the power switch of GWII transmitter or receiver.
2.Connect with USB cable via USB socket, charge for about 2.5 hours until full.
While charging, the indicator light is red. When fully charged, the indicator light
will turn off.
Accessories:
1. Sunshade
2. NP-60 battery
3. Data cable (Different cameras
use different cables. For details,
see insert page )
4. USB cable
5. Charger
6. AV-out cable
7.IR cable (Only for Canon DSLRs)
*Note: Turn the power off while charging.
5
6
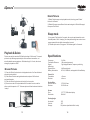
Adjustments
Screen information
Signal intensity
(When there is no signal
the indicator will show
an 'X')
Signal
Indicator
(There are four
different
signals: 1, 2, 3,
4)
Shooting mode
(Includes: Single Shot,
Continuous, Self-Timer,
Bulb, and Video recording)
View mode
(There are two view
modes: ' Mini' and
' LV '
Brightness
1.Press 'Menu' button and navigate to Brightness (5 levels total).
2.Press 'Set' button to adjust brightness. Each level increases brightness by 20%.
BRIGHT
1
mini
H
Power
indicator ('H'
represents
receiver
power; 'C'
represents
transmitter
power)
C
NO IMAGE
N/M
N/M Playback Indicator
('N' represents current picture number; 'M'
represents total quantity of saved pictures)
Button information
BRIGHT
Contrast
1.Press 'Menu' button and navigate to Contrast.
2.Press 'Set' button to adjust contrast. Each level increases contrast by 20%.
CONTRAST
CONTRAST
Signal Matching
One receiver can control and view 4 cameras by switching signals amongst 4
different transmitters mounted on cameras. In order to do this, one must match
signals to each transmitter.
Matching Directions:
1.Menu
2.Previous picture in
playback mode
1. Auto-focus (Half press)
2.Shutter release (Full press)
1.SET
2.Next picture in playback
mode
3.LV/Mini mode switch
button
1.Playback button
2.Delete(Full press for 2
second)
1.Power on receiver, press 'Menu' button and navigate to 'Match'. Default signal
is 1.
2.Press 'Set' button to switch between different signals.
3.Once your signal is chosen, fully press the shutter button on the receiver. The
shutter indicator light will flicker, and then stop after a few seconds.
4.Press the 'Match' button on transmitter while the receiver's shutter indicator
light is flickering, or after it stops.
5.The signal light of transmitter will start to flicker. When it stops, it is successfully
matched with the receiver.
6.The Signal will be matched successfully when the receiver’s signal intensity
indicator shows from an 'X' to
.
1.Signal switch button
2.Sleep(Full press for 2
second)
7
8
4) Lens and Camera should be set to autofocus.
View Mode
GWII has two viewing modes: 'Mini' and 'LV' mode.
1.'Mini' mode relies on the transmitter's internal camera for live-view. It gives a
35mm angle of view. The image shown on the receiver's LCD is only what this
internal camera captures, not your DSLR. However, if your lens is set to 35mm,
it should be roughly equivalent to the image shown on GWII.
5) Turn on the camera's live-view mode.*
2.'LV' is live view mode. The image shown on receiver's LCD is exactly what your
DSLR captures.
Note: The default view mode is 'Mini'. Press 'Set' button to change to 'LV' mode.
1
mini
H
C
Mini mode
2. Drive Modes
a. Single Shot Mode
1
LV
H
C
LV mode
1) Set camera to 'Single Shot' drive mode.
Functions and Operation
1. Setup
1) Connect transmitter to the camera's hotshoe.
2) Connect one end of cable to transmitter's 'camera' socket. Connect twin end to
camera's AV-Out and remote shutter sockets.
CAMERA
socket
2) Press 'Menu' button of receiver and navigate to 'Drive mode'. Then choose
B
'single shot' mode. DRIVE MODE
3) Half press the shutter button on receiver to activate focusing (shutter indicator
light turns green).
4) Fully press the shutter button to activate shutter (shutter indicator light turns
red). The resulting image is shown on the LCD.
b. Continuous Mode
AV out
socket
Remote
shutter
socket
3)Switch on the transmitter and receiver.
5
9
1) Set camera to 'Continuous' drive mode.
2) Press 'Menu' button of receiver and navigate to 'Drive mode'. Then choose
B
continuous shooting mode. DRIVE MODE
3) Half press the shutter button on receiver to activate focusing (shutter indicator
light turns green).
4) Fully press the shutter button to activate shutter (shutter indicator light turns
red). The resulting image is shown on the LCD.
*Note: If your camera doesn't have live-view, use GWII's 'Mini' mode.
10
5
c. Self-Timer Mode
1) Set camera to 'Single Shot' drive mode.
2) Press 'Menu' button of receiver and navigate to 'Drive' mode. Then choose
DRIVE MODE
B
'Self-Timer' shooting mode.
1) Connect the transmitter and camera via data cable. Connect one end of data
cable with transmitter; insert the twin end to AV-Out and remote shutter sockets.
2) Connect one end of the IR cable with transmitter via IR socket. Point the other
end towards camera's IR sensor. Adjust the transmitter antenna vertically.
3) Press the shutter button on receiver; camera shutter will be triggered after 5
seconds.
Note: Alternatively, you may set your camera to Self-Timer mode. Both will work.
d. Bulb Mode
1) Set camera to 'Bulb' drive mode.
2) Press 'Menu' button of receiver and navigate to 'Drive mode'. Then choose
'Bulb' shooting mode. DRIVE MODE
B
3) To start the exposure, fully press the shutter button on GWII (shutter indicator
light on receiver is off, shutter indicator light on transmitter stays red)
4) To stop the exposure, half-press the shutter button again (both shutter
indicators lights on transmitter and receiver turn off).
AV out
socket
Aim at IR sensor
*Note: During IR operation, there is no need to connect data cable with camera's
remote shutter socket.
3. Video Recording*
c. Receiver Setup
a. Camera Setup
2) Set camera to video mode.
1) Set camera to 'infrared' mode.
Press the 'Menu' button of receiver and navigate to 'Drive mode', press the 'Set'
B
button and choose video mode. DRIVE MODE
d. Video Shooting
3) In the camera's menu, start the remote control function for video mode.
(Certain cameras do not require this step)
1) To start video recording, fully press shutter button on GWII receiver. (Shutter
indicator lights on both transmitter and receiver are red)
2) To stop video recording, re-press shutter button on GWII receiver. (Both
shutter indicator lights off)
4. Multiple Camera Control
b. Transmitter Setup
*Note: only used for select Canon models cameras which support infrared mode. For
details please refer to P15.
11
1) Please refer to the Signal Match section of this manual and match signals
with each camera first.*
2) To start focus, half-press shutter button on receiver (both shutter indicators
lights are green). To take a picture or record video, fully press shutter button of
receiver, (both shutter indicators light are red). Press the 'Tab' button of receiver
to switch between different cameras.
*Note: Can be used for both stills and video, as long as you switch drive modes on GWII.
12
Delete Pictures
1) Delete Single Images: enter playback mode, then long press 'Delete'
button for 2 seconds.
2) Delete All Images: press 'Menu' button and navigate to 'Delete All Images',
then press 'Set' button.
Sleep mode
1
1) Long press 'Tab' button for 3 seconds, the receiver and transmitter enter
into sleep mode. While “sleeping”, the sleep indicator light on receiver turns
orange; power indicator light on transmitter turns red.
2) To wake up the receiver, long press 'Tab' button again for 3 seconds.
Playback & Delete
Pictures can only be saved on GWII while shooting in 'Mini' mode. The saved
picture is only the image captured by built-in camera on transmitter, not
actually what the camera captures. While shooting in 'LV' mode, there is no
storage or playback on GWII.
Browse Pictures
1) Press the 'Delete' button to enter into playback mode. You'll see the latest
saved picture by default.
2) Press 'Menu' button to navigate backwards, and press 'Set' button to
navigate forwards.
3) Press the 'Delete' button to revert back to live-view mode.
4) Connect one end of AV output cable with AV socket of receiver, and the
other end with computer or TV. To browse pictures follow the above directions
in step 1.
13
Specifications
Frequency:
Transmitter Distance:
Signal:
technology
Signal source:
Battery Information:
2.4GHz
100 meters (open area)
Digital signal transfer, frequency switching
4 different signals
NP-60, 1200mAH, rechargeable Lithium Battery
Power Life:
Transmitter:
Receiver:
>5 hours
>6 hours
Product Size:
Remote Control:
Receiver:
127×79×30 mm
87×50×41 mm
Screen:
Size:
Resolution:
3.5” TFT, 16M colors display
320x240
Viewing Angle:
Horizontal:
Vertical:
Storage:
120°
105°
100 pictures (available in Mini mode)
14
Important Notice
Troubleshooting
1.Mini mode is available for DSLRs without live view.
e.g. Canon 400D (Rebel XTi), 350D (Rebel XT), 300D (Rebel),30D,20D,
1D MarkII N, 1Ds Mark II, 1D Mark II, etc; Nikon D200, D2Xs, D2Hs, D2X, D2H,
D1H, D1X, D1, etc.
1. Q: Why is my camera unable to shoot?
A: Be sure batteries are installed correctly and the power switch is on.
A: Be sure GWII transmitter and receiver are on the same signal.
A: Be sure cable is connected correctly.
A: Use manual focus on your lens if your camera's shutter does not support liveview during AF.
2.Select Canon DSLRs can't auto-focus when half pressing the shutter button in
live-view mode.
e.g. Canon 1000D (Rebel XS), 500D (Rebel T1i), 450D (Rebel XSi)
Note: Above cameras can auto focus by pressing camera's * button.
e.g. Canon 5D Mark II, 50D, 40D, 1D Mark IV, 1Ds Mark III, 1D Mark III
Note: Above cameras can auto focus by pressing AF-ON button.
Tip: When using above cameras with GWII, using the Mini mode enables one
to auto-focus.
3. In Mini mode, there is no instant playback after pressing the shutter.
As Mini live view mode utilizes the built-in camera on the transmitter
and not the camera's live view, it can't show focusing and playback as captured
by the camera's LCD. However, it can playback the photo taken by the built-in
camera, while the original pictures have been stored on the camera's memory
card.
2. Q: Why is my camera unable to control video?
A: Be sure your camera and GWII is in IR mode.
A: Be sure receiver is set to video mode.
A: Be sure the IR cable is connected correctly, with one end aimed at the
cameras IR sensor.
A: Be sure the transmitter and receiver are matched to the same signal.
A: Be sure your camera is Canon brand DSLR. Other brands will not work.
3. Q: Why is my camera unable to control multiple camera shutters?
A: Be sure each transmitter has been matched successfully with the receiver.
A: Be sure receiver signal has been switched to appropriate transmitter.
A: Be sure the receiver and each transmitter are not low on power.
A: Be sure the cable is connected correctly.
(Rebel T2i),500D(Rebel T1i).
4. Q: What can I do about signal disturbance or shooting interference?
A: Try another signal.
A: Be sure the sign is the same on transmitter and receiver.
A: Move the receiver or camera to a non-interfering position until signal connects.
A: Adjust the antenna to a new position.
A: Be sure you are not moving, and that there are no moving objects between
transmitter and receiver.
5. Photo storage can only be used in Mini mode, storing only the snapshot
from the built-in camera, not the actual picture from your camera.
5. Q: Why is my camera are unable to auto-focus in live view mode?
A: Please read the previous page, #2.
4. Camera must be set to 'Infrared' mode to control video. This function is limited
to Canon cameras.
e.g. Canon EOS 1D X, 5D Mark II, 7D, 60D , 600D (Rebel T3i), 550D
6. When using GWII, there may be signal disturbance (static, delay, etc) if you
are moving, or if an object moves between transmitter and receiver (such as a
car, or people). This is inherent in wireless technology, and is not a fault of GWII.
15
16