1
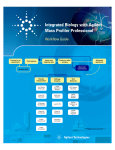
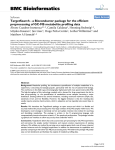
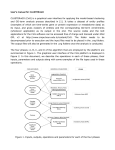
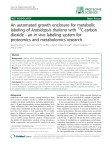
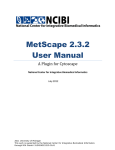
Agilent G3835AA MassHunter Profinder Software Quick Start Guide Getting Started 7 User Interface 8 Basic Profinder Workflow 15 Feature Extraction Workflow Algorithms 25 Monitoring your computer while running Profinder 28 Install Profinder 29 What is Agilent Profinder? Agilent Profinder software is a stand-alone program, optimized for batch feature extraction from TOF and Q-TOF based profiling data files. Feature extraction, combined with chromatographic alignment across multiple data files, is a critical step in the peak finding and data reduction workflow that minimizes the appearance of both false positive and false negative features by “binning” the features in the chromatographic time domain. Profinder reduces your acquired data size and complexity through the removal of redundant and non-specific information by identifying the important variables (features) associated with the data. Careful feature extraction yields a smaller data set that is more easily processed without any compromise in the information quality. Profinder is optimized to not only extract features from large data sets but also provides you with an intuitive user interface to inspect and review each feature across the files associated with your data set. With Profinder you can review and compare extracted ion chromatograms and mass spectral data associated with each feature. Your can save your feature extraction progress to a project to review, adjust, and reprocess at a later time. Features of Profinder The feature files generated by Profinder can be imported into Agilent Mass Profiler Professional (MPP), a powerful chemometrics platform used in any MS-based differential analysis to determine relationships among two or more sample groups and variables. Features of Profinder • Open all of the files associated with your Agilent TOF and Q-TOF LC/MS data set (sample files) in a single selection process. • Create methods for your feature extraction and chromatographic alignment by following a guided step-by-step wizard for the selected algorithm. • Choose from three feature extraction algorithms: Molecular Feature Extraction, Recursive Feature Extraction, and Targeted Feature Extraction. • Extract the features from all of the data files in your data set by running a single algorithm. • Automatically generate an extracted ion chromatogram (EIC) and extracted compound chromatogram (ECC) for each feature found in each data file. • Review your features and chromatographic alignment using an intuitive graphical interface. • Delete false positive features from your results. • Export your extracted features via two file formats: • Compound exchange format (CEF) is a file format that is used to exchange data between Agilent software. CEF files are imported into MPP for statistical analysis. • Comma separated value (CSV) is an ASCII text file that is readily imported into text editors and spreadsheets. • Save your feature extraction parameters as Profinder methods. • Save your feature extraction progress as a Profinder project file and open the project at a later time to review, adjust, and reprocess your data files. 2 Profinder Quick Start Guide Where is Profinder used in your experiment? Where is Profinder used in your experiment? Profinder is used to extract the features from LC/MS data files you acquired from your experimental samples. An untargeted differential analysis experiment may include eight steps as shown below. Profinder is used in step three. 1 Prepare for your experiment 2 Acquire your data - Data Acquisition 3 Extract the spectral features - Profinder 4 Import and organize your data - MPP 5 Create your initial analysis - MPP 6 Identify features in your data - ID Browser 7 Save your project - MPP 8 Perform advanced analysis operations - MPP Figure 1 shows the steps and Agilent tools that are used in an untargeted differential analysis. The feature finding steps performed by Profinder can alternatively be accomplished using a sequence of steps involving MassHunter Qualitative Analysis, DA Reprocessor, and MPP as described in the Agilent Metabolomics Workflow - Discovery Workflow Guide. Profinder Quick Start Guide 3 Where is Profinder used in your experiment? Figure 1 4 MassHunter Profinder is an optimized feature extraction tool for TOF and Q-TOF LC/MS data sets. The feature extraction performed by Profinder is similar to that performed by the combination of MassHunter Qualitative Analysis, DA Reprocessor, and MPP. Profinder Quick Start Guide Where to Find More Information Where to Find More Information Online Help Press F1 To get more information about a pane, window, or dialog box, place the cursor on the pane, window, or dialog box of interest and press F1. Help Menu Click Help > Contents to access the contents of the Profinder Help including wizards, basic tasks, user interface, and reference information. Click Help for information specific to wizards. Documents MPP Quick Start Guide Agilent G3835AA MassHunter Mass Profiler Professional Software - Quick Start Guide (Agilent publication G3835-90009, Revision A, November 2012) MPP Familiarization Guide Agilent G3835AA MassHunter Mass Profiler Professional Software - Familiarization Guide (Agilent publication G3835-90010, Revision A, November 2012) MPP Application Guide Agilent G3835AA MassHunter Mass Profiler Professional Software - Application Guide (Agilent publication G3835-90011, Revision A, November 2012) Mass Profiler Professional User Manual Agilent MassHunter Mass Profiler Professional User Manual (Agilent publication, January 2012). Discovery Workflow Guide Agilent Metabolomics Workflow Discovery Workflow Guide (Agilent publication 5990-7067EN, Revision B, October 2012) Discovery Workflow Overview Agilent Metabolomics Workflow Discovery Workflow Overview (Agilent publication 5990-7068EN, Revision B, October 2012) Profinder Quick Start Guide 5 Where to Find More Information Integrated Biology Workflow Guide Integrated Biology with Agilent Mass Profiler Professional - Workflow Guide (Agilent publication 5991-1909EN, Revision A, June 2013) Integrated Biology Workflow Overview Integrated Biology with Agilent Mass Profiler Professional - Workflow Guide Overview (Agilent publication 5991-1910EN, Revision A, June 2013) Qualitative Analysis Familiarization Guide for LC/MS Agilent MassHunter Workstation Software Qualitative Analysis (Agilent publication G3335-90146, Revision A, October 2012) Quantitative Analysis Familiarization Guide Agilent MassHunter Workstation Software Quantitative Analysis (Agilent publication G3335-90152, Revision A, February 2013) Training Road Show Slide Presentation Metabolome Analysis - From Sample Prep Through Data Analysis (Metabolomics Road Show, March 2011) Training Courses Visit www.chem.agilent.com to view a listing of training courses for MPP. 6 Profinder Quick Start Guide Getting Started How do I get started? Getting Started How do I get started? This Quick Start Guide helps you install Profinder, review the Profinder user interface, and perform feature extraction using your data. 1 Install Profinder. Follow the instructions in “Install Profinder” on page 29. 2 Launch Profinder. Double-click the Profinder icon located on your desktop, or click Start > All Programs > Agilent > MassHunter Workstation > Profinder B.06.00. 3 Review the following three sections in this Quick Start Guide: “User Interface” on page 8 “Basic Profinder Workflow” on page 15 “Feature Extraction Workflow Algorithms” on page 25 4 Review the “Discovery Workflow Guide” (see “Documents” on page 5). This guide helps you improve your results by covering topics that help you: • Prepare for an experiment • Explain the parameters related to finding features • Perform an initial differential analysis using MPP 5 Extract the features in your samples following the example Basic Profinder Workflow (see “Basic Profinder Workflow” on page 15). Profinder Quick Start Guide 7 User Interface Main Functional Areas User Interface A feature may be referred to as a compound, molecular feature, element, or entity during the various steps of analysis using Agilent MassHunter software. Help and detailed information regarding the various parameters and statistical treatments are available when you press F1 or click Help > Contents from the menu bar. Main Functional Areas The main Profinder window consists of three parts: (1) the Menu Bar, (2) the Toolbar, and (3) the Main Window. The main functional areas are shown in Figure 2. Figure 2 8 The main functional areas of Profinder as viewed before you begin a project. Profinder Quick Start Guide User Interface Main Functional Areas 1. Menu Bar The menu bar (Figure 3) provides actions that are used for managing your projects, methods, display, and extracting features. Figure 3 Menu bar 2. Toolbar The toolbar is located below the menu bar and contains five groups of buttons for commonly used tasks: Project: New project, Open project, and Save project Samples: Add sample files to your new or current project. Main Window: Display or hide the various tables and results generated by Profinder, so you can increase the available display area for your review. Profinder Quick Start Guide 9 User Interface Main Functional Areas Feature Coloring: Toggle the feature coloring by sample group. Extraction: Select the feature selection algorithm you want to review, edit, and apply to your data set. 3. Main Window The main window, see Figure 2 on page 8, is further divided into up to four areas — Compound Groups, Compound Details, Chromatogram Results, and MS Spectrum Results that are used to review the results from applying the feature extraction method to your data set. Compound Groups The data presented in Compound Groups is organized as a list of all of your extracted features averaged across all of the data files in your project - averaged feature information. The Compound Groups window shows a table of compound-level information for each feature extracted from at least one data file, if the data was extracted using Batch Molecular Feature Extraction, or for all targeted features, if the data was extracted using Batch Targeted Feature Extraction. Quantitative information is shown as the average value for the feature across all of the files where the feature was found. A “compound group” is a single compound (feature) found in any one or more of the data files in a project. For example, if the first data file in the project yields 35 compounds, then at least 35 compound groups are in the project. If additional unique compounds are found in the other data files, then additional compound groups are created. 10 Profinder Quick Start Guide User Interface Main Functional Areas Information regarding the available columns are found in the online Help in the topic “Compound Groups Table Columns.” A list of the available columns is displayed when you right-click within the Compound Groups table, and then click Add/Remove Columns (see Figure 4 on page 12). Compound Details The data presented in Compound Details is organized as a list of the appearance of a selected feature (compound) in all of the data files in your project - feature information by data file. The Compound Details window shows a table of compound-level information for a single feature selected in the Compound Group window. The quantitative information is shown for the selected feature as it is found in each data file in your project. Information regarding the available columns are found in the online Help “Compound Details Table Columns.” A list of the available columns is displayed when you right-click within the Compound Details table, and then click Add/Remove Columns (see Figure 4 on page 12). Chromatogram Results Chromatogram Results presents the extracted ion chromatogram (EIC) for each feature and, for non-targeted feature extraction, the extracted compound chromatogram (ECC) for the ions contained in the molecular feature for the feature selected in the Compound Groups window. An EIC/ECC set is displayed for each data file. By default the chromatograms are displayed in an alternating sequence of ten colors to help you review the data for a particular data file as you select different features. Profinder Quick Start Guide 11 User Interface Shortcut menu commands MS Spectrum Results MS Spectrum Results presents the averaged mass spectrum (MS) across the integrated ECC for the feature selected in the Compound Groups window for each data file. By default the MS is displayed in an alternating sequence of ten colors, matched with the Chromatogram Results, to help you review the MS data for a particular data file as you select different features. Shortcut menu commands A right-click in any of the main windows shows you a menu of options (Figure 4) applicable to where you click and to your current selection. Options available include customize the columns in the table views, copy to the system clipboard, and delete compound groups or individual compounds. Compound Groups Compound Details Figure 4 12 Chromatogram Results MS Spectrum Results The shortcut menu commands available within the main window automatically adjust based on the active area. Profinder Quick Start Guide User Interface Definitions Definitions Algorithm An algorithm is a set of automated, sequential mathematical tasks performed to find, filter, align, and extract features from your chromatographic/mass spectral data sets. Feature A feature is synonymous with compound. A feature is referred to interchangeably with compound, molecular feature, element, or entity during the various steps of analysis using Agilent MassHunter software. Method A method is a set of parameters that are associated with the three feature extraction algorithms used by Profinder. Methods containing the parameters for the algorithms can be saved using unique file names. Wizard A wizard is a sequence of interactive steps used by Agilent MassHunter software to guide you through the steps necessary to complete an analytical task. Profinder uses a set of wizards to guide you through the parameters associated with each feature extraction algorithm. Workflow A workflow is an Agilent document or a graphical overview that captures a sequence of steps to guide you through an analytical task. A workflow may cover more than one wizard and may include steps performed by more than one Agilent MassHunter software program. Help Online Help and detailed information regarding the various fields and statistical treatments are available by pressing F1, clicking , or clicking Help > Contents from the menu bar. Profinder Quick Start Guide 13 User Interface Unsaved parameter changes Unsaved parameter changes When you make a change to a parameter in Profinder, the software automatically places a change icon (a blue triangle shape) in the wizard tab and next to the value containing the parameter where you made a change. This icon indicates that you have unsaved parameters changes and helps you remember to save the changes you have made to the method. The original parameter value may be viewed by placing your pointer over the change icon. When you save your method, the change icons disappear. 14 Profinder Quick Start Guide Basic Profinder Workflow Unsaved parameter changes Basic Profinder Workflow The basic Profinder workflow guides you through the steps necessary to extract features from your sample files. The steps shown in Figure 5 are described in the following sections: • “Add sample files” on page 16 • “Select your feature extraction algorithm and then edit and run the method” on page 19 • “Export your Profinder features” on page 21 • “Save your Profinder method” on page 23 • Optional “Save your Profinder project” on page 24 Figure 5 The basic Profinder workflow Profinder Quick Start Guide 15 Basic Profinder Workflow Add sample files Add sample files In this task, you launch Profinder, select your sample files, and add the sample files to your Profinder project. Steps Detailed Instructions 1 Start Profinder. • Click the Profinder icon on your desktop, or click Start > All Programs > Agilent > MassHunter Workstation > Profinder B.06.00. 2 Begin your Profinder project by adding sample files. • Click File > Add/Remove Sample Files, or click Add/Remove Sample Files on the toolbar. 3 Add files to the Add Sample Files dialog box. • Click Add file(s) to display the Open file dialog box. 16 Comments • If you click File > New Project after starting Profinder, you are automatically prompted to add sample files. • When you click Add/Remove Sample Files after launching Profinder, Profinder starts a new project as if you clicked File > New Project. Profinder Quick Start Guide Basic Profinder Workflow Add sample files Steps Detailed Instructions Comments 4 Select at least one sample data file in the Open file dialog box. a Browse to the folder containing your sample files. b Select at least one sample data file. c Click Open. • Selected sample data files are highlighted in the Open file dialog box. • If you are just starting to become familiar with feature extraction you may want to select a single data file. Selecting a single data file reduces the time it takes Profinder to perform your feature extraction and to display the results for your review. • After you have developed your feature extraction method and applied it to one or more sample data files, you can click Add Sample Files, select your entire data set, and rerun feature extraction. 5 (Optional) Enter Sample Group value to the sample files in the Add Sample Files dialog box. a Click the data entry cell under the Sample Group column, next to the sample file name. b Enter the group identification text. c Repeat for each sample file. • When the data entry cell is selected it is initially highlighted using a background color. • When entering Sample Group names, the entries must use identical letters, numbers, punctuation, and case in order for the grouping functions to perform properly. Profinder Quick Start Guide 17 Basic Profinder Workflow Add sample files Steps Detailed Instructions Comments 6 Mark the samples to add to your project. a Mark the samples to add to your project in the Show/Hide column. b Click OK. • Select a single data file if you are developing your feature extraction method. • All of the Sample Files in the same project have to have the same polarity. If some of the Samples have a Positive Polarity and some have a Negative Polarity, then an error message is shown when you click OK. Your new project is now begun. You are immediately guided to select a feature extraction algorithm and then through the steps to edit and run the method. 18 Profinder Quick Start Guide Basic Profinder Workflow Select your feature extraction algorithm and then edit and run the method Select your feature extraction algorithm and then edit and run the method Three feature extraction algorithms are available in Profinder: • Batch Molecular Feature Extraction (MFE) • Batch Recursive Feature Extraction (RFE, default) • Batch Targeted Feature Extraction (TFE) An overview of each extraction algorithm is found in the section “Feature Extraction Workflow Algorithms” on page 25. Each algorithm is designed to efficiently extract the features (compounds) in your sample data files. Steps Detailed Instructions Comments 1 Select the feature extraction a Click one of the three algorithms. algorithm to apply to your samples. b Click Next. • MFE performs chromatographic deconvolution and aligns the features across the selected sample files using mass and RT. See “Batch Molecular Feature Extraction” on page 25 for the wizard steps. • RFE performs MFE and then uses the mass and RT of each feature to perform a targeted feature extraction. See “Batch Recursive Feature Extraction” on page 26 for the wizard steps. • TFE uses an input formula source, CEF file, or database to extract features. See “Batch Targeted Feature Extraction” on page 27 for the wizard steps. 2 Review and edit the parameters for the feature extraction algorithm. • Click Help to activate online Help specific for the current tab in the wizard. • Click Cancel to stop editing the algorithm parameters. Any changes made to the algorithm parameters are not saved. Profinder Quick Start Guide a Make changes to the parameters on each wizard tab for each step. b Click Next to go to the next step of the wizard. c Click Previous to return to an earlier step. 19 Basic Profinder Workflow Select your feature extraction algorithm and then edit and run the method Steps Detailed Instructions Comments 3 Run the feature extraction algorithm. a Click Finish to run the extraction algorithm on your sample data. b An Operation in Progress dialog box is displayed while the extraction process is running. • The feature extraction process can take a long time. Example processing times for sixteen (16) LC/MS data files running on a computer with a 2.6 GHz i7 processor, a 128 GB SSD, and 32 GB RAM: • MFE: 21 min, 5094 features • RFE : 48 min, 5094 features • TFE : 08 min, 1099 features • These times increase by more than three times (>3x) using a computer with a 2.4 GHz dual core processor, a 500 GB 7200 rpm HD, and 8 GB RAM. 4 Review your results. • Review your results and then export the results and save your method. • Using the Compound Groups, Compound Details, Chromatogram Results, and MS Spectrum Results windows, you can edit your results: delete a compound group, delete abundance from compound details window or chromatogram results window, and integrate a peak manually. More information is available in the online Help. • The next steps in this Quick Start Guide help you export your results and save your method. 20 Profinder Quick Start Guide Basic Profinder Workflow Export your Profinder features Export your Profinder features You save the features in your sample data files to a file format called a compound exchange file (CEF) that is used to exchange data between Agilent software. CEF files are used to import your molecular features into Mass Profiler Professional. Steps Detailed Instructions 1 Select Export as CEF from the File menu. • Click File > Export as CEF. Profinder Quick Start Guide Comments 21 Basic Profinder Workflow Export your Profinder features Steps Detailed Instructions Comments 2 Export your features (compounds) to CEF files. a Click All compounds for Export contents. b Clear Export median RT/mass instead of measured RT/mass for Exported RT/mass value override. c Click At the location of data file for Export destination. All of the CEF files are placed in the same folder containing the sample data files. d Click OK. • The features extracted from your sample data files are exported to CEF files. A separate CEF file is created for each sample data file. • The number of CEF files created is identical to the number of sample data files that were extracted in your Profinder project. 22 Profinder Quick Start Guide Basic Profinder Workflow Save your Profinder method Save your Profinder method You save your Profinder feature algorithm method using a unique name. Steps Detailed Instructions Comments 1 Select Save from the menu bar. • Click Method > Save. • If you have not previously saved your method, Save is the same as Save As and prompts you for a name to save your method. 2 Type the file name and save your method. a Type the name to use for your method file in the Save Method dialog box. b Click Save. • The Save Method dialog box does not appear when you click Save for your method if you previously saved your method. • Click Method > Save As if you want to save your method using a new file name. • If acquisition parameters exist in the current method, you can select whether to also save the acquisition method parameters to the new method. Profinder Quick Start Guide 23 Basic Profinder Workflow Save your Profinder project Save your Profinder project This is an optional step. You can save your Profinder project, including the current sample data file extraction results so that you can continue reviewing your results and the extraction method at a later time. Steps Detailed Instructions Comments 1 Select Save Project from the menu bar. • Click File > Save Project. • If you have not previously saved your project, Save Project is the same as Save Project as and prompts you for a name to save your project. 2 Type the file name and save your project. a Type the name to use for your project file in the Save as dialog box. b Click Save. • The Save As dialog box does not appear when you click Save Project if you previously saved your project. • Click File > Save Project as if you want to save your project using a new file name. • Note: Profinder project files can be one GB or more in file size. 24 Profinder Quick Start Guide Feature Extraction Workflow Algorithms Batch Molecular Feature Extraction Feature Extraction Workflow Algorithms Three feature extraction algorithms are available in Profinder. Each extraction algorithm is designed to efficiently extract the features (compounds) in your sample data files. The resulting compound groups are imported into your MPP experiment. When you begin a new analysis, start with “loose” feature extraction algorithm parameters and review the results for false positive and false negative features. Then adjust the algorithm parameters to reduce the appearance of false positive features without increasing the loss of actual features - false negative features. Batch Molecular Feature Extraction Molecular feature extraction (MFE) performs chromatographic deconvolution to find the features in your samples. After finding the features, the features (compounds) are aligned across all of the selected sample files using mass and retention time (RT). After performing MFE, Profinder employs an algorithm to re-assign ion species using cross-file analysis to generate compound groups. Figure 6 Profinder Quick Start Guide Four steps are presented in the Batch Molecular Feature Extraction Method wizard. 25 Feature Extraction Workflow Algorithms Batch Recursive Feature Extraction Batch Recursive Feature Extraction Recursive Feature Extraction (RFE) performs MFE, as described above, and then uses mass and retention time of the results to perform a targeted feature extraction referred to as Find by Ion (FbI). Using the untargeted MFE results for a targeted FbI feature extraction is referred to as recursive feature extraction. After calculating the median mass, median RT, and composite spectrum from the aligned features found using MFE, FbI uses the median values to perform a targeted extraction to improve the reliability in finding the features in your data. This recursive feature finding, combined with replicate samples in your data set, improves the statistical accuracy of your analysis and reduces the potential for obtaining a false positive or false negative answer to your hypothesis. The recursive feature extraction workflow performed by Profinder is similar to that outlined in the Agilent Metabolomics Workflow - Discovery Workflow Guide. The difference is that the feature extraction process happens in a single step, in the same application, without moving CEF files back and forth between MassHunter Qualitative Analysis, DA Reprocessor, and Mass Profiler Professional as illustrated in Figure 1 on page 4. Figure 7 26 Eight steps are presented in the Batch Recursive Feature Extraction Method wizard. Profinder Quick Start Guide Feature Extraction Workflow Algorithms Batch Targeted Feature Extraction Batch Targeted Feature Extraction Targeted feature extraction (TFE) uses an input formula source, CEF file, or database containing molecular formulas, mass, and/or retention time information to extract features from your data using a process referred to as Find Compounds by Formula. After feature extraction is performed, compound alignment produces a result such that one compound target can only have one compound extracted per data file. Find Compounds by Formula typically uses molecular formula information to calculate the ions and isotope patterns derived from the formula as the basis to find features in the sample data file. When the input molecular features consist of mass and retention time, instead of molecular formula, FbF calculates reasonable isotope patterns and uses these patterns with retention time tolerances to find the target features in the sample data files. When the input molecular features are filtered from a find process that was previously untargeted, the molecular features found using Find Compounds by Formula is also referred to as recursive finding. Figure 8 Profinder Quick Start Guide Five steps are presented in the Batch Targeted Feature Extraction Method wizard. 27 Monitoring your computer while running Profinder Batch Targeted Feature Extraction Monitoring your computer while running Profinder You can monitor your computer’s resources, especially memory, while running Profinder. Right-click on the computer taskbar and then click Start Task Manager to launch the Windows Task Manager. Select the Performance tab to monitor your CPU and memory usage. For additional details regarding your computer’s memory usage click Resource Monitor and select the Memory tab. See Figure 9. If your memory usage approaches the amount of physical RAM, adding additional RAM increases performance. Figure 9 28 Monitoring the system and memory resources on your computer. Profinder Quick Start Guide Install Profinder Batch Targeted Feature Extraction Install Profinder Install Profinder on the highest performing computer you have available to reduce the time it takes to extract the features from your sample files. Profinder requires a computer running Windows 7 (64-bit) with at least 8GB of RAM. Note: To significantly improve Profinder performance, and to reduce the time needed to extract features from your data sets, make sure that your computer has 16 GB or more of RAM and a solid-state hard drive. 1 Install the Supplemental Disk, then double-click Profinder.exe to begin installation of Profinder. 2 Click Install in the Agilent MassHunter Workstation Profinder Software Installation dialog box. 3 Click Yes in the User Account Control dialog box. A setup progress indicator appears briefly and launches the Profinder setup wizard. Profinder Quick Start Guide 29 Install Profinder Batch Targeted Feature Extraction 4 Click Next. 5 Read the End-User License Agreement. 6 Mark I accept the terms in the License Agreement in order to continue with the installation. 7 Click Next. 8 Click Browse or type a new folder and path if you want to change the folder location where Profinder is installed. 9 Click Next. 10 Click Browse or type a new folder and path if you want to change the folder location that Profinder uses by default for your data files. You can change the customer data files location only for a new installation of Profinder. If other MassHunter software products are installed on the computer, Profinder automatically uses the existing default folder location. 11 Click Next. 30 Profinder Quick Start Guide Install Profinder Batch Targeted Feature Extraction 12 Click Install. 13 Click Finish. 14 Click Close to complete Profinder setup. Profinder Quick Start Guide 31 www.agilent.com In this book The Agilent G3835AA MassHunter Profinder Software - Quick Start Guide presents the first steps to use the MassHunter Profinder Software. Agilent Technologies, Inc. 2013 Revision A, December 2013 *G3835-90014* G3835-90014