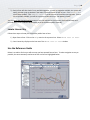
1
Peer to Peer User Manual A comprehensive guide from installation and setup to advanced features like merger analysis and econometric data Last Edited: March 2010 1001 Connecticut Avenue NW, Suite 1001, Washington DC 20036 800-446-7453 | [email protected] | p2psoftware.com Table of Contents Getting Started with Peer to Peer Welcome to Peer to Peer ............................................................................................................................3 Peer to Peer Overview ................................................................................................................................3 System Requirements for Peer to Peer.........................................................................................................4 Install Peer to Peer......................................................................................................................................5 Install Peer to Peer for 64-Bit Platforms .......................................................................................................6 Activate and Set Proxy Settings....................................................................................................................7 Determine Version Number.........................................................................................................................8 Check for Software Updates ........................................................................................................................9 Locate License Key ....................................................................................................................................10 Use the Reference Guide ...........................................................................................................................10 Uninstall Peer to Peer ...............................................................................................................................11 Peer to Peer's Data Sets Know What Data is Available .....................................................................................................................12 Become Familiar with the 5300..................................................................................................................14 Understand FirstLook................................................................................................................................14 Update Quarterly Data ..............................................................................................................................15 Comparison Sets in Peer to Peer Set Default Comparisons ...........................................................................................................................16 Multiple Comparisons ...............................................................................................................................17 Peer Groups – What You Are Comparing Create Custom Peer Groups ......................................................................................................................18 Import Peer Groups ..................................................................................................................................20 Export Peer Groups...................................................................................................................................21 Manage Peer Groups ................................................................................................................................22 Custom Displays - How You Are Comparing Modify Built-In Displays.............................................................................................................................22 Create Custom Displays.............................................................................................................................23 P age |2 Custom Displays - How You Are Comparing (Continued) Import Custom Displays ............................................................................................................................25 Export Custom Displays.............................................................................................................................26 Manage Custom Displays...........................................................................................................................27 Limit Graph Axes Using Zoom ....................................................................................................................28 Formulas - How You Are Calculating Know Formula Modifiers ...........................................................................................................................28 Create Custom Formulas ...........................................................................................................................29 Share Your Analysis Export Your Charts, Data, and Rankings......................................................................................................30 Share your Analyses with Other Peer Users ................................................................................................30 Peer to Peer’s Advanced Features Employ Merger Analysis ............................................................................................................................30 P age |3 Getting Started with Peer to Peer Welcome to Peer to Peer Welcome to Peer to Peer, and thank you for purchasing! You are now on your way to understanding your credit union’s performance in the most accurate context possible and recognizing strategic opportunities based on credit union data. Callahan & Associates appreciates your business and looks forward to working with you to make your credit union’s financial analysis as easy and effective as possible. In order to make the process of learning how to use Peer to Peer as simple as possible, please read this manual. It reviews the basic functionality of the software. If at any time you have questions about Peer to Peer, please do not hesitate to ask. You can find more information online at p2psoftware.com or you can contact the Callahan & Associates’ Analytics Team by calling (800) 446 – 7453 or emailing [email protected]. There is much, much more to learn about Peer to Peer. We highly recommend that you attend at least one of each of the Fundamentals/Intermediate and Advanced training sessions. Details about trainings are available on p2psoftware.com. Peer to Peer Overview Peer to Peer has a vast array of functionality. Here is an overview of some of the basic functions in Peer to Peer. You can find more detailed information about Peer to Peer, including information about its more advanced functionality, in later sections of this user manual and at Peer to Peer’s website: www.p2psoftware.com. RSS Feed The RSS Feed loads when you first open Peer to Peer. The RSS Feed includes software updates, community information, related articles, and upcoming events. The RSS Feed is a good resource for information that may be applicable to you. Primary Comparison Your primary comparison is the credit union or peer group against which you are benchmarking all of your comparisons. Typically, your primary comparison is your own credit union. Selecting a primary comparison is the first thing you should do once you have installed and activated Peer to Peer. You can change your primary – or any of your comparisons or peer groups – at any time. Note: You can set your primary comparison as either a peer group or an individual credit union. Comparisons Peer to Peer supports all kinds of comparisons for your charts, graphs, and reports: 1.) credit union vs. credit union, 2.) credit union vs. peer groups, 3.) peer groups vs. peer groups, 4.) many credit unions vs. many peer groups, 5.) and more! P age |4 Your comparisons are always visible under the Comparisons drop-down menu at the top of the main Peer to Peer screen (underneath the top menu bar). Any graph can also have multiple comparisons displayed. For example, on a single chart you can show your credit union’s performance compared to national averages, a peer group composed of all credit unions in your state, and another individual credit union in your area. Standard Peer Groups Peer to Peer includes two kinds of standard, or built-in, peer groups. The first type of peer group is asset-based. Peer comes with several asset-based national peer groups. The second standard peer group is the entire credit union industry (all credit unions). You can also compare your primary comparison to individual credit unions. Custom Peer Groups In addition to the available standard peer groups, you can also create and save custom peer groups. For example, try creating a peer group of comparably-sized credit unions in your region who have similar Fields of Membership to your credit union, or select credit unions based on their performance in a specific financial ratio. Note: Peer groups display the weighted average performance of all selected credit unions. Built-In Displays Peer to Peer offers over 230 built ‐in displays. These performance displays are organized categorically into folders that are available on the left-hand side of the Peer to Peer screen. You can access the different display categories by clicking on the Select Your Report or Graph drop-down menu. Each display will either be listed singularly or will be grouped in a subfolder. Click on a display to run the report, or double-click the subfolders to open them. When run, each display shows a chart, its underlying data, and, if applicable, the credit union’s ranking. Custom Displays You can create your own custom displays if Peer to Peer does not include a graph that you would like to use. You can also create a default series of displays that you frequently want to access in one convenient place. Sharing Your Analysis You can share your analysis in Peer to Peer in many different ways. You can export your peer groups and custom graphs into Excel or PowerPoint. You can also copy and paste them into any other program. Simply click the appropriate button under Display Options. Export multiple displays at one time by selecting File in the top menu bar and clicking on Export. System Requirements for Peer to Peer System Requirements for Peer to Peer: 1.) Operating System: Windows 2000, XP, or Vista (Windows is currently the only platform that Peer to Peer supports) 2.) Recommended RAM: 1GB or greater 3.) Recommended available HD space: 4GB or greater 4.) Recommended processor: 1.8GHz or greater 5.) Internet Connection (any speed) P age |5 Other Installation Requirements: 1.) To install Peer to Peer, you must be logged into Windows with a user account that has Desktop Administrator Level Permissions, otherwise the install will not complete successfully. If you are unsure about your user account permission level, contact your IT professional. 2.) During the install process, you will be required to reboot your computer. We recommend exiting all other applications before you begin installing Peer to Peer. 3.) Installing Peer to Peer will also install Microsoft SQL, the database that supports Peer. There are no additional requirements for installing SQL, and the installation should happen automatically as part of Peer to Peer’s installation. 4.) To complete the installation, you will need to enter a License Key. That Key will activate the software by connecting to Callahan & Associates database over the internet. See below for directions on how to locate your License Key within Peer to Peer. Misplaced keys: Please contact Software Support at (800) 446 – 7453. Important: Each new installation of Peer to Peer requires a unique email address and an active License Key. If you would like to install Peer to Peer on more than one computer, you must have more than one license. Callahan & Associates offers additional seats for Peer to Peer at a significant discount. For more information or to purchase additional licenses, call (800) 446 – 7543 or email [email protected]. Install Peer to Peer Installing Peer to Peer is the first step toward getting the most out of your credit union data and Callahan & Associates’ expertise. We recommend that a member of your IT Department reviews this document and works through these steps because you must have Administrator Level Permissions to install the software correctly. Note: You do not have to uninstall older versions of Peer to Peer before installing the newest one. Important: These are the instructions for installing Peer on a 32-bit operating system. If you use a 64-bit operating system, you will first need to follow a different set of instructions. See the Install Peer to Peer for 64-Bit Platforms section below for the installation instructions for 64-bit operating systems. To install Peer to Peer, follow these steps: 1.) Go to http://www.creditunions.com/peer2/setup.exe. 2.) A pop-up window will appear asking you, “Do you want to run or save this file?” Click Save. Do not select Run. You must save the setup.exe file to your computer. Please be patient. It may take a while to download the .exe file onto your computer. Factors like your computer’s amount of available RAM and internet connection will all affect the exact length of time it takes to complete the download. 3.) Once you have downloaded and saved the file on your computer, navigate to where you saved it. Open the file by double-clicking on it. Click Run. P age |6 4.) An Install Wizard will pop-up. Follow its instructions and prompts. Note: Peer to Peer will only install correctly on your desktop’s C: drive. Please do not attempt to install the software on other drives. 5.) Once you have followed all of the instructions and clicked Install, the software will begin to load on your computer. Please be patient, as the install may take some time to complete. 6.) The Installation Wizard will notify you once the download has completed successfully. Click Finish. 7.) A pop-up window will appear asking you to restart your computer. Click Yes. 8.) You will also need to complete the activation process to receive full access to all of the data and functionality of Peer to Peer. For more information, visit the Activation Instructions section. Install Peer to Peer for 64-Bit Platforms To install Peer to Peer on 64-bit operating systems such as Windows 7, follow these steps: 1.) Download and install SQL Server 2005 Express Edition (64-bit version) from here: http://www.microsoft.com/Sqlserver/2005/en/us/express-down.aspx Important: Make sure you click on the link that says, “For the 64-bit install of SQL Server 2005 Express Edition, click here.” The link is available under the first section of the website called “SQL Server 2005 Express Edition SP3.” 2.) After you click the link, a File Download window will appear. Click Save. Save the .exe file on your computer. Please be patient. It may take a while to download the .exe file onto your computer. 3.) When the download is complete, click Run. Click Run again in the next pop-up window. 4.) Accept the Terms & Conditions and click Next. 5.) Click Install on the Installing Prerequisites Screen and Next once they have been installed successfully. 6.) Click Next at the Welcome screen. 7.) Click Next at the System Configuration Check screen 8.) On the Registration Information screen, provide Name and Company, and uncheck Hide Advanced Configuration Options. 9.) On the Feature Selection screen, click Next. 10.) On the Instance Name screen, select Named Instance and replace "SQLExpress" (or other text) with "Peer2" (no quotes). Click Next. P age |7 11.) On the Service Account screen, change the “Use built-in System account” option to “Local System.” Click Next. 12.) On the Authentication Mode screen, click Next. 13.) On the Collation Settings screen, click Next. 14.) On the Configuration Options screen, make sure “Enable User Instances" is checked. Click Next. 15.) On the Error and Usage Report Settings screen, click Next. 16.) On the Ready to Install screen, click Next. 17.) Click Next when all Setup Progress options read “Setup finished." 18.) Click Finish. 19.) Continue installing Peer to Peer as normal (see Install Peer to Peer) After you have installed the 64-version of SQL, you are not yet finished installing Peer to peer. To finish installing Peer, follow the steps in the Install Peer to Peer section of this user manual. Once you have installed the correct, 64-bit version of SQL on your computer, the rest of the steps for installing Peer to Peer are the same, regardless of your operating system. Activate and Set Proxy Settings Before you have access to all of the data and functionality of Peer to Peer, you must activate your software. You will need your License Key in order to activate your software. For more information about your License Key, visit the Install section of this user manual. To activate Peer to Peer, follow these steps: 1.) Open Peer to Peer. If you have a proxy server in place at your organization, proceed to Step Two. If you do not have a proxy server, proceed to Step Eight. If you are not sure if your company has a proxy server, please consult your IT department. Note: Peer will often automatically pick up your organization’s proxy settings, so it can sometimes be easier to try to activate your copy of Peer to Peer first, before attempting to enter proxy information. If you try to activate your software and receive an “Internet not found” error, the most likely reason is that you need to input proxy server data. 2.) After you launch Peer to Peer for the first time (and every subsequent time thereafter until you register Peer to Peer with a valid License Key), a pop-up window will appear prompting you to activate the program. Choosing Open Trial Version will activate a trial version of Peer to Peer that functions for 30 days. Note: Trial versions of Peer to Peer have limited credit union data and will expire so you must eventually activate your version of Peer. P age |8 3.) Click Open Trial Version and enter the software as a trial user. 4.) Peer to Peer will prompt you to select a primary credit union and a primary peer group. Your choices do not affect the proxy settings and you will be able to change your selections later. 5.) After entering the main window of Peer to Peer, go to the Tools menu in the top menu bar. Select Proxy Settings. 6.) The Proxy Settings window will pop-up. Enter in the appropriate information about your proxy server into the text fields. Click OK. Important: Please consult your IT department if you are unsure about these settings. Callahan & Associates will not have this information. 7.) Close Peer to Peer and then re-launch the application. This will reopen the Activation-Trial window. 8.) Click Enter Activation Key. The Activation Detail window will pop-up. 9.) Enter in your contact information and your License Key and click Submit. 10.) Once you have successfully activated Peer to Peer, a message will pop-up saying, “You have successfully activated your copy of Peer to Peer. Please restart your software now.” Click OK. Important: Your License Key is case sensitive. Note: Your computer must be connected to the internet for the activation to work properly. 11.) The next time you open Peer to Peer, the program should not prompt you to activate your software. Determine Version Number Checking the version number of your Peer to Peer is important when ensuring that you are running the most current version of the software. To check your software’s version number follow these steps: 1.) Open Peer to Peer. Click on the Help menu in the top menu bar. Select About Peer to Peer. 2.) The version number displays in the third row of the About Peer to Peer window. 3.) To determine if your software is completely up-to-date, visit the Peer to Peer website and compare your version number with the current version number listed. As a rule of thumb, if you are behind one quarter’s data and updates or more, you will want to download a new setup.exe file and reinstall Peer to Peer instead of manually updating your system. For example, if third quarter data has just been released, and your most recent Peer data is still first quarter data, you should uninstall and then reinstall Peer to Peer instead of manually downloading each update. We suggest updating using this method in order to save you time. Each update must download consecutively, and there is no way to work around this process. For example, if you are currently running first quarter data but P age |9 would like to update to third quarter data, you cannot skip to the last upgrade and just download the new data set. You would have to download each update in order, with the new data set being last. For more information about uninstalling and reinstalling Peer to Peer, visit the Uninstall and Install sections of this user manual. If you are not behind one quarter’s data and updates, it is easier and faster for you to download each update. You will not have to select each update individually; when you manually update Peer to Peer it will automatically install every available upgrade. However, you will need to let Peer to Peer run uninterrupted during the updating process. Visit the Check for Software Updates section to learn more. Check for Software Updates You should periodically check for software updates to ensure that you are always on the latest version of Peer to Peer. There are three different ways to check for upgrades. Check for Software Updates Using Auto-Updates If you currently use Auto-Updates, that system should always keep you up-to-date. You can see the date that Auto-Updates last upgraded Peer to Peer in the bottom-right-hand corner of the program. The notification should read, “Last updated on xx/xx/xxxx,” with the date filled-in with the last time that Auto-Updates upgraded Peer. If the date listed is not current, you may want to check for software updates manually. There are two circumstances when there may be software updates available even though Auto-Updates is functioning normally. The first is that Callahan & Associates released a patch earlier in the day, and AutoUpdates has not checked for program upgrades yet. Auto-Updates will only run at the time you selected when you configured the feature. Peer to Peer will wait to download it when it runs Auto-Updates later that night. For example, if we release a software patch at 2:00 pm and you have Auto-Updates set to run at 3:00 am, your system will not download the update until Auto-Updates runs at 3:00 am, even though the upgrade is available at 2:00 pm. Second, some updates may have failed during the auto ‐update process and need tobe downloaded again. If a download fails for any reason, Auto-Updates will try to download the upgrade again the next time that it runs. You can either wait for the next update to run and see if the upgrades download correctly or you can download them manually. You can always manually download available upgrades while you are enrolled in Auto-Updates. This does not affect the Auto-Updates process. Check for Software Using the Pop-Up Notification If updates are available when you open Peer to Peer, a pop-up window will appear in the lower-right-hand corner of the program. Click Install Now to install the updates. Click Install Later if you do not want to install the new updates. You can always install available upgrades at another time. Check for Software Updates Manually If you do not use Auto-Updates or would like to download an upgrade manually at any time while using AutoUpdates, follow these steps: 1.) Click on the Tools menu in the top menu bar. 2.) Select Check for Software Updates. P a g e | 10 3.) Peer to Peer will then check for any available upgrades. If there are upgrades available, the system will notify you with a pop-up window in the lower-right-hand corner of Peer to Peer. Click Install Now to install the updates. Click Install Later if you do not want to install the new upgrades. If there are no updates available, you will see a pop-up window that says, “No update(s) found.” Visit the Determine Version Number section of this user manual for tips on when you should uninstall and reinstall Peer to Peer instead of downloading all of the available updates manually. Locate License Key Follow these steps to locate your License Key within Peer to Peer: 1.) Open Peer to Peer. Click on the Help menu in the top menu bar. Select About Peer to Peer. 2.) Your License Key displays on the last row of the About Peer to Peer window. Use the Reference Guide Below is an outline of what you will see once you have opened Peer to Peer. To make navigation as easy as possible, the most commonly used areas of Peer to Peer are highlighted below. P a g e | 11 1.) Top Menu Bar – The top menu bar of Peer to Peer is the main navigation within the program. File – The File menu contains the Import and Export functions of Peer to Peer. You can also manage your custom displays here. Selections – The Selections menu is where you can set your primary comparison and your comparison set(s). Peer Groups – The Peer Groups menu is the central location of all peer group-related options. You can create new peer groups, manage existing ones, or export peer groups here. Tools – The Tools menu houses the program options of Peer to Peer. From here, you can check for software updates, set Auto-Updates, change your graphics settings, and more. Help – The Help menu contains information about how to get assistance with Peer to Peer. 2.) Select Your Report or Graph – Select Your Report or Graph is the drop-down menu of Peer to Peer’s built-in displays. You can also access or create custom displays here. 3.) Displays – The available displays under Select Your Report or Graph auto-populate here. Click on an individual display to run the report or double-click on a sub-folder to access additional displays. 4.) Primary Comparison – View your current primary comparison from the Primary window or select Change Primary from the drop-down menu to change it. 5.) Comparison Sets – View your current comparison set(s) from the Comparisons window or select Change Comparison from the drop-down menu to change it. 6.) Cycle – View the data cycle for your current analysis or select a new cycle from the drop-down menu. 7.) Display Window – The Display Window appears when you run a built-in or custom display. It autopopulates with the chart or graph related to the selected display. Chart – The Chart tab contains the graphical analysis of the display. Data – The Data tab contains the raw data related to the selected display. Rank – The Rank tab shows the ranking of your primary comparison within your comparison set, if applicable. 8.) Display Options – The Display Options buttons include the Save, Copy, Print, and Preview functions. Export your display with the Excel and PowerPoint buttons. Uninstall Peer to Peer Note: It is critical that the person logged into the computer has Administrator Level access to his or her computer in order to complete the uninstall process successfully. If you are not sure about the permissions associated with your Windows User Account, please contact your IT Administrator. The most common reason for uninstalling Peer to Peer is to make it easier to upgrade to the newest version of the software when you reinstall it. If you are behind more than one quarter’s data and updates, we generally recommend that you uninstall and then reinstall Peer to Peer instead of downloading all of the available updates manually. For more information about when you should uninstall and reinstall Peer to Peer, visit the Determine Version Number section of this user manual. P a g e | 12 Important: Please make a note of your License Key before uninstalling Peer to Peer. You will need this key to reinstall the program successfully. For more information about how to locate your License Key within Peer to Peer, please see the Install section of this user manual. To uninstall Peer to Peer for any reason, follow these steps: 1.) Backup any saved work in Peer to Peer. We strongly recommend that you backup your work if you ever intend to reinstall the program. Backing-up your information is the only way to ensure that you will be able to recreate your saved reports quickly and easily when you reinstall Peer. For more information, visit the Export Custom Displays and Export Peer Groups sections of this user manual. 2.) When you are finished backing-up and saving your work, close Peer to Peer. Please make sure to exit the program before uninstalling. 3.) Click on the Start button in the lower-left-hand corner of your screen. Select Control Panel. 4.) Windows XP users will click on Add or Remove Programs. Windows Vista users will click on Uninstall a Program under the Programs category of the Control Panel Homepage. Alternatively, for Visa users, from the Control Panel Classic View, simply select Programs and Features. 5.) Find Peer to Peer in your list of installed programs. Then click Remove or Uninstall from the top menu bar. 6.) A pop-up window will appear asking if you are sure that you would like to remove the program. Click Yes. 7.) An Uninstall Wizard should pop-up. Follow its instructions. 8.) When completed, Peer to Peer should be removed from the installed program list. 9.) Close the Control Panel. The uninstall process is complete. For information about how to reinstall Peer to Peer, visit the Install section of this user manual. Peer to Peer's Data Sets Know What Data is Available Peer to Peer incorporates many different types of data. The available data includes 5300 Call Report Data, econometric data, Return of the Member (ROM) scores, CUPP (Credit Union Performance Profile) scores, performance reports, and proprietary survey data. 1.) 5300 Call Report Data – all fields and account codes (see Become Familiar with the 5300 for more information) P a g e | 13 2.) Econometric Data – Economy, Credit, Census, GDP, Money Supply and Interest Rates, Stock Market a. Economy - Retail sales, auto sales, personal savings rates, unemployment rates, median CPI b. Credit – Consumer credit outstanding, mortgage purchases, mortgage refinances, mortgage applications c. Census – Population information d. GDP – GDP change, GDP due to personal consumption e. Money Supply and Interest Rates – Money supply, LIBOR rates, Fed funds rates, Treasury rates, mortgage rates f. Stock Market – S&P 500, Nasdaq, Dow Jones 3.) Return of the Member (ROM) Scores – ROM scoring, ROM for Each Credit Union a. ROM scoring – Total return to members, return to savers, return to borrowers, member service usage b. ROM for each credit union 4.) Credit Union Performance Profile (CUPP) Scores – Asset Quality, Capital Adequacy, Earnings and Operational Efficiency, Liquidity, Summary for Credit Union a. Asset Quality – Reserves + undivided earnings / net assets; increase/decrease capital ratio; reserves + allowance for loan loss + undivided earnings / loans; solvency indicator; delinquent loans / allowance for loan loss + regular reserve b. Capital Adequacy – Delinquent loans / prior year loans; percent change in delinquent loans; net charge-offs / prior year delinquent loans; operational income + provision expense / delinquent loans; earnings assets / all shares and funding liabilities c. Earnings and Operational Efficiency – Operating expenses / total income; net operating income + provision expense / total income; net charge-offs / net operating income; return on average net assets; net income / total expenses d. Liquidity – Annual share growth; liquid funds ratio / loans-to-savings ratio; net liquid funds / short term savings; percent loans maturing in less than one year; assets greater than one year / net assets 5.) Performance Reports – Performance Trends, Operational Review, CUSOs, Technology Review a. Performance Trends – Two-year financial comparison, Five-year balance sheet, five-year income statement, five-year ratio report, five-year FPR ratios, rankings b. Operational Review – 5300 Call Report, ATMs and branches, contact information, employees, members c. Credit Union Service Organizations (CUSOs) d. Technology Review – Electronic delivery channels, electronic financial services, technology partners 6.) Propriety Survey Data – Service providers, vendor information, detailed position titles, and more You can create custom displays and formulas using any of the data available in Peer to Peer. Peer also includes built-in displays for the available data. You can locate the different displays under Select Your Report or Graph. P a g e | 14 Become Familiar with the 5300 Peer to Peer includes all fields and account codes from the 5300 Call Report, and you can find a PDF of the latest Call Report under the Help menu to use as a reference guide. When creating reports or using account codes within Peer to Peer, you can either enter “a” + “Account Code” (ie, account 958 – # of Used Vehicle Loans – is a958) or use the Formula Wizard (Binocular button) to locate account codes by category or description/key word using the Tree and Search tabs. Tree allows you to search by category, and Search lets you search by keyword. The Formula Wizard contains the most commonly used fields from the 5300 Call Report. See the Know What Data is Available section to learn what other data sets are accessible within Peer to Peer. Understand FirstLook Each quarter Peer to Peer subscribers get access to FirstLook, which allows them access to quarterly data weeks before the official NCUA release. Each quarter, FirstLook includes about 99% of industry assets, so Peer users can start their analyses early. Note: FirstLook data is typically available approximately two weeks before final release data. Callahan & Associates will notify users once it becomes available each quarter. Important: You must download FirstLook data into Peer to Peer in order to access it. Simply being on the latest version of Peer to Peer does not mean that you have FirstLook data available. Peer to Peer treats it differently than regular quarterly data, so you must proactively download the FirstLook data set in order to use it. Follow these steps to download FirstLook data: 1.) Click on the File menu in the top menu bar. Scroll to Import and click FirstLook Data. Note: You will only be able to select FirstLook Data if FirstLook is available. If you cannot click FirstLook Data, then the figures are either not available yet or the final release of quarterly data has already come out. 2.) Peer to Peer will automatically search for the latest FirstLook data. 3.) A pop-up window will appear asking, “Would you download it now?” Click Yes. 4.) The download process will begin. As Peer to Peer updates your peer groups and mergers, you will see another pop-up window. Click OK. 5.) A pop-up window will appear when the download is complete. Click OK. 6.) If your primary credit union does not participate in FirstLook, you will see a pop-up window prompting you to choose a different credit union as your primary. Click OK. P a g e | 15 To create a peer group that includes all credit unions participating in FirstLook, follow these steps: 1.) Click on the File menu in the top menu bar. Scroll to Import and click Peer Groups. 2.) In the Manage window, click Import. 3.) In the Open window, navigate to C:\Program Files\Peer-to-Peer 2.0\Download\FL 4.) In the Open window, change the file type you are looking for from .p2p to .txt in the drop-down menu above the Open and Cancel buttons. 5.) You should see at least one .txt file appear: PEER_FL.txt. Select this file. Click Open. 6.) The credit unions that participate in FirstLook will be listed in the Import window. Name your FirstLook peer group and then click Save. 7.) Exit by clicking Exit or the X in the upper-right hand of the window. 8.) You can now set your Primary, Comparison(s), and Cycle and start your FirstLook analysis. Important: FirstLook data is updated often (nearly daily) during the weeks leading up to a quarterly data release. As there are no version numbers associated with FirstLook, the only way to ensure that you have the latest data is to update FirstLook daily. Note: Peer to Peer will automatically remove FirstLook from the Cycle menu after you update to final quarterly data. There is no other way to remove it prior to the final release. Update Quarterly Data Peer to Peer updates its data quarterly. The exact timing of each data release is dependent upon the National Credit Union Association (NCUA). At Callahan & Associates, we always aim to have the data up and running in Peer to Peer as quickly as possible, and it is typically live in the program within one to two business days after a new data release. In order to access the latest quarterly data in Peer to Peer, you must first be on the most up-to-date version of the software. Peer to Peer will treat the new data like a normal software patch, downloading it with AutoUpdates or when you manually update your system. Assuming you are on the current version of Peer, the download will take approximately 45 minutes to an hour to complete. However, this estimate is dependent upon your Internet connection, among other things. If you are not on the current version of Peer, the download time will vary depending on how far behind you are in the updating process, as all of the previously released upgrades will need to load sequentially before the newest quarterly data release can install. We strongly recommend that you enroll in Auto-Updates once you are up-to-date because it will consequently take care of the hassle of downloading new data and software patches. In fact, if you are using Auto-Updates, you will automatically download the new data at night while you are not using your computer. P a g e | 16 Comparison Sets in Peer to Peer Set Default Comparisons Peer to Peer lets users save their default comparisons in order to speed up their analyses and to prevent users from having to enter in their desired comparisons each time they open the program. Note: Your comparisons are always visible under the Primary and Comparisons drop-down menus at the top of the main Peer to Peer screen (underneath the top menu bar) and can be controlled from there or from the Selections menu (click on Selections and then select either Primary, Comparisons, or Default). To set your default comparisons, follow these steps: 1.) Click on Selections in the top menu bar. Select Default. A Default Primary/Comparison window will appear. If you would like to change your primary comparison, continue to Step Two. If you would like to change your comparison set, continue to Step Five. 2.) To change your primary comparison, click Change to the right of the Primary window. This will bring up the Primary Selection window (the same as having clicked on Primary instead of Default under the Selections menu). Your primary comparison can be either a single credit union or a peer group. To select an individual credit union, make sure that you select Credit Union in the Type drop-down menu. To select a peer group, select Peer Group in the Type drop-down menu. 3.) You can search for a credit union by name in the Search for primary credit union text box, or you can search by state in the State drop-down menu. You can sort the credit unions by name or assets. 4.) Select the credit union or peer group that you would like to use as your default primary and select Go to Analysis. From the Primary Selection window, click Change Comparison to move on to the Comparison Selection window, where you can set your default comparison or comparison set. 5.) To change your default comparison or comparison set (from the Default Primary/Comparison window), click Change to the right of the Comparisons window. Visit the Multiple Comparisons section of this user manual for more information about changing your comparison set. 6.) Selecting Go to Analysis from the Default Primary/Comparison, Primary Selection, and Comparison Selection windows saves your selected primary and comparisons as your defaults. P a g e | 17 Multiple Comparisons Peer to Peer allows you to compare your primary credit union or peer group to many different types of peers. You can compare credit union vs. credit union, credit union vs. peer groups, peer groups vs. peer groups, many credit unions vs. many peer groups, and more! This section is about changing your comparison set and learning how to compare your primary comparison to multiple comparison sets. For more information about how to change your primary comparison, visit the Set Default Comparisons section of this user manual. Note: Your comparisons are always visible under the Comparisons drop-down menu at the top of the main Peer to Peer screen (underneath the top menu bar) and can be controlled from there or from the Selections menu (click on Selections and then select Comparisons). To set up multiple comparisons, follow these steps: 1.) Go to the Comparisons drop-down menu and click on Change Comparisons. 2.) A Comparison Selection window will pop-up. 3.) To select individual credit unions, go to the Credit Unions box on the left-hand side and use the State drop-down menu to choose your location. Once you have chosen a state, Peer to Peer will autopopulate a list showing the credit unions in that state. You can sort the credit unions by name or asset size. 4.) To select a credit union as a comparison, click on the name of the credit union and then click on (the down arrow button). This will add the credit union to your list of comparisons in the Your Selected Comparisons box. 5.) To select peer groups, go to the Peer Groups box on the right-hand side of the Comparison Selection window. Select a peer group the same way you selected an individual credit union – by clicking on it and then clicking (the Down Arrow button). This will also add the credit union to your list of comparisons in the Your Selected Comparisons box. 6.) To deselect or remove a comparison from the Selected Comparisons box, select the comparison you would like to remove and then click (Up Arrow button). 7.) If you would like to save your selected comparisons as your default set, click Save as Default. When you do, a pop-up window will appear letting you know that by saving this set of comparisons as your default, Peer to Peer will automatically load with this set as your main comparison. Click Yes. A second window will pop-up asking, “Do you want to load this comparison set now?” Click Yes. 8.) If you would like to change your primary comparison, you can either select the Change Primary button or click on the Primary tab in the Comparison Selection window. For more information about changing your primary, see the Set Default Comparisons section of this user manual. 9.) Once you are finished selecting your comparisons, click Go to Analysis to return to the main Peer to Peer window. P a g e | 18 Peer Groups – What You Are Comparing Create Custom Peer Groups Peer to Peer’s power in analytics comes from its ability to customize peer group selection. Experiment with both and take advantage of Peer to Peer’s full range of functionality. To create peer groups, follow these steps: 1.) Go to Peer Groups in the top menu bar and scroll to New. You can choose to select credit unions individually with Simple Select or to walk-through the step-by-step peer-building process using Custom Build. If you choose Simple Select, continue on to Step Two. If you choose Custom Build proceed to Step Nine. 2.) Click Simple Select. A Simple Selection window will appear. 3.) Use the State drop-down menu to select the location of the credit union you would like to select. Select a state. A list of all of the credit unions in that state will auto-populate in the Matches box. You can sort the list by Name or Assets. 4.) If you would like to search for credit unions across all states, select All CUs in the State drop-down menu. A list of all available credit unions will auto-populate. You can sort the list by Name, State, or Assets. 5.) You can also search for a credit union by name by typing the name of the credit union you are looking for in the Search text box and then clicking Find!. 6.) To select a credit union, click on it in the Matches box, and then click > (the Right Arrow). You can also simply double-click on it in the Matches box. You will see your selected credit unions move to the Selected Credit Unions box on the right side. 7.) To remove a credit union from the Selected Credit Unions box, double click on it, or click on it and then click < (the Left Arrow). 8.) You must name and save your peer group in order to be able to use it in your analysis. 9.) With Custom Build, you will see a Selection Process window appear. You can choose from six major criteria to select your peer groups – Financials, Geography, Charter/FOM, Top/Bottom, Vendors, and Exclude. 10.) As you select criteria, credit unions that match your criteria will appear in the Matching Credit Unions: [x] box, with x being the number of matching credit unions. The credit unions that display here match your criteria across all tabs, not just the tab that you are currently on (assuming you have selected criteria from more than one tab/category). 11.) You can clear your criteria at any time by clicking Clear. Note: Clear only clears the criteria from the tab that you are on currently. It will not clear all of the criteria that you have set across all tabs. P a g e | 19 12.) Click << Back and Next >> to navigate through the different tabs. You can also click on the tabs in the top navigation to skip to a specific tab. 13.) You can remove a matching credit union at any time by clicking on it in the Matching Credit Unions: [x] box and then clicking Remove. Note: Unlike for the rest of the tabs, if you remove a credit union from the Exclude tab, it will include the credit union in your peer group. 14.) In the Financials tab, use the pre-selected financial criteria – Assets, Loans, Investments, and Members – or use the Formula Wizard to select credit unions based on other financial criteria. Enter the parameters for each criterion for your peer group in the Minimum and Maximum boxes. Note: You can use the Formula Wizard (Binocular button) to locate account codes by category or description/key word using the Tree and Search tabs. Tree allows you to search by category, and Search lets you search by keyword. The Formula Wizard contains the most commonly used fields from the 5300 Call Report as well as hundreds of pre ‐programmed formulas. To add an account code, double-click it. Your selected formula(s) will auto-populate in the bottom box. Click Done when you are finished with your selections. 15.) Click Preview to display credit unions that match your peer group criteria in the Matching Credit Unions: [x] box. 16.) In the Geography tab, Peer automatically selects the entire U.S. – denoted by the orange states. To deselect states, click on the individual state or click Clear All in the upper right-hand-corner of the map. Unselected states are in white. Simply click on states again to reselect them. Clicking All States will also reselect all states. 17.) You can also select states by region in the NCUA region box. To select more than one region, hold down Ctrl while you click on each. 18.) You can also select individual state counties. Double-click on a state to open a county map. Select counties by clicking on them in the state’s map or selecting them from the list in the Counties box on the right-hand side. Note: You geographic peer group can be a combination of individual states, regions, and counties. 19.) In the Charter/FOM tab, Peer automatically selects all charter types and fields of membership. To deselect, click on any charter type or FOM or select Clear All. Selected charter/FOM types are in blue. Deselected ones are in white. 20.) In the Top/Bottom tab, find credit unions using extremes. For example, create a peer group using the top 50 credit unions in ROA. Use the Use drop-down menu and select Top, Bottom or Closest. Pick how many credit unions you would like to include by writing a number in the blank text box (the text box to the right of the Use drop-down menu). In the In text box, type the formula description or account code you would like to use to select your peer group. You can also use the Formula Wizard. 21.) In the Vendors tab, choose credit unions based on what vendor they use. Select what kind of vendor you would like to search for by clicking on an entry in the pre-populated Type of Service box. Peer to Peer will display the applicable companies in the Providers box. Select a specific provider by clicking on the company name or click Select All to include all providers in the selected category. If you click Preview, Peer to Peer will show you credit unions that also use that service provider. P a g e | 20 22.) In the Exclude tab, you can upload a list of credit unions that you automatically want to remove from your current peer group selections. Create a .txt or .csv file of charter numbers or credit unions you would like to exclude. To upload the file, click Browse and select your file. Click Exclude. Peer will display the excluded credit unions in the Excluded Credit Union(s) box. To remove a credit union from your exclusion list, click on the credit union and hit Remove. 23.) Once you are satisfied with your created peer group, click Name & Save. A Save Group pop-up will appear. You can name your custom peer group in the Name Your Peer Group text box. You also have another chance to review your peer group and make any last minute exclusions. 24.) Once you are satisfied, decide whether you would like your peer group to be dynamic or static. Important: Dynamic peer groups save the specific set of criteria you have selected rather than the specific credit unions. The exact list of credit unions included in dynamic peer groups will change each quarter based on new quarterly data. For example, if you are limiting your peer group to credit unions under $100M in assets, and next quarter one of your matching credit unions has more than $100M in assets, it will no longer be a part of the peer group next quarter. Static peer groups save the specific set of credit unions. The list of matching credit unions in the peer group will stay the same despite changes in quarterly data. 25.) Click either Dynamic or Static. A pop-up will appear notifying you that your peer group is being saved. Click OK. Once Peer to Peer has saved your peer group successfully another pop-up will appear notifying you of that and asking if you would like to add this peer group to your comparison set. Click Yes. 26.) Your new custom peer group is now available for you analyses. Import Peer Groups To ease the sharing process, Peer to Peer lets its users import previously created peer groups. You first need a .txt or a .p2p file containing the charter or CDS ID numbers for the credit unions that you would like to include in your peer group. Important: To import a list of charter numbers, include only a list of the charter numbers in your .txt file. Do not include any header information. The list does not need to be comma delimited. It simply needs to be a single column of charter numbers. To import a list of CDS ID numbers, include the header “CDS” in your text file, and then follow the same formatting as with the charter numbers. Note: To create a .txt file if you have an Excel of your desired charter numbers, you must format the number cells as general content. To do this, highlight the list of charter numbers, and right-click on the column containing the charter numbers. Go to Format Cells. Select the main Number tab and click on General. Click OK. Copy and paste this Excel list into Notepad and save. Make sure you do not save any header information. Only save the list of charter numbers. To import peer groups, follow these steps: 1.) Once you have a .txt file or a .p2p file of charter numbers for credit unions in your desired peer group, go to File in the top menu bar. Scroll to Import, and select Peer Groups. P a g e | 21 2.) A Manage window will appear. Click on Import. 3.) An Open window will appear. The visible file type defaults to .p2p. If you are importing a .txt file, change the file type in the drop-down menu. Depending on your version of Microsoft, it is located either above or to the left of the Open and Cancel buttons. 4.) Navigate to where you saved your file. Select it, and click Open. 5.) An Import window will pop-up. This window will show you the names and number of credit unions in your peer group. Name your peer group and click Save. 6.) When you have successfully imported your peer group, a pop-up will appear saying, “Peer group saved successfully.” Click OK. 7.) The Manage window will remain visible, and Peer to Peer should now list your newly imported peer group at the bottom of Your Peer Group List. Click Exit to leave the Manage window. Export Peer Groups Peer to Peer allows users to export their standard and custom peer groups. You can either archive the saved exported files as back-ups or share them with others. To export your peer groups, follow these steps: 1.) Go to File in the top menu bar. Scroll to Export, and select Peer Groups. 2.) An Export window will appear. Select the peer group that you would like to export by highlighting it (clicking on it). 3.) The credit unions that are a part of the selected peer group for the current financial quarter will autopopulate in the Credit Unions in Peer Group window. 4.) Choose the file format that you would like use for your export by clicking on Export to .p2p or Export to .CSV. Note: Exporting to .p2p is preferable if you are trying to share your saved set with another Peer to Peer user, as he or she can be easily import the file into Peer to Peer in this format. Alternatively, exporting to .csv saves a file that is compatible with Microsoft Excel and many other programs, so this format is preferable if you are trying to manipulate your peer groups in a program other than Peer to Peer. 5.) Regardless of the format you chose, a Save As window will appear. Save the file wherever you would like on your computer and name it in the File name text box. Do not change the default file type. Click Save when you are finished. 6.) A pop-up window will appear saying, “File exported successfully.” Click OK. 7.) The Print option allows you to print the list of credit unions to your local or network printer. 8.) Email creates a .p2p file that automatically attaches to a blank email in your default email client. P a g e | 22 Manage Peer Groups Peer to Peer makes it easy to manage your standard and custom peer groups. You can delete, import, combine, and edit peer groups all in one location. To manage your peer groups, follow these steps: 1.) Click on Peer Groups in the top menu bar and select Manage. 2.) A Manage window will appear that displays your peer groups under Your Peer Group List. In the Manage window, you have the following options – Delete, Import, Combine, Edit, and Exit. 3.) To delete a peer group, highlight the group(s) and click Delete (to deselect a highlighted peer group, simply click on the highlighted peer group again). 4.) To import peer groups, you need a .txt file of the charter numbers for each credit union you want in the peer group. See Import Peer Groups for more information on how to import peer groups. 5.) To merge peer groups, highlight the groups that you would like to join and click Combine. Review your combined peer group list and name the new group in the Peer Group Name text box. Click Save. When Peer is finished saving your new peer group, a pop-up window will appear saying, “Peer group saved successfully.” Click OK. Important: Peer to Peer will not delete the original peer groups that you combined. 6.) To edit peer groups, click on the individual peer group that you would like to edit and click Edit. This will bring you back to either the Custom Build or Simple Select window, depending on how you originally built your peer group. You can now make any desired changes and resave the peer group. For more information about creating and editing custom peer groups, visit the Create Custom Peer Groups section of this user manual. 7.) When you are finished managing your peer groups, click Exit. Custom Displays - How You Are Comparing Modify Built-In Displays Peer to Peer comes with over 235 built-in displays. You can modify pre-built displays and save your changes or create custom displays. For more information about how to create custom displays, visit the Create Custom Displays section of this user manual. To modify a pre-built display, follow these steps: 1.) Select a built-in display that you would like to modify. Open your selected report by clicking on it. 2.) Right-click on the chart and select Edit. A pop-up will will appear stating, “This is a built-in graph that you are not allowed to edit. Would you like to make it a custom graph?” Click Yes. P a g e | 23 3.) A My Displays window will pop-up. You can rename the display and choose the folder that you will save it under. You can either choose an existing folder in My Displays or create a new folder for this report. 4.) To create a new folder, click Create Folder. A Create New folder window will appear. Name your new folder and click Create Folder. Peer will notify you that it created your new folder successfully. Click OK. Important: If you create a new folder for your modified built-in display, the new folder will not show up in the list in the My Displays window after you create it. Simply type the name of the folder in the text box for Folder Name, and Peer will save your display there correctly. 5.) Once you are happy with the name of the custom display and its folder, click Save. 6.) Peer will alert you with a pop-up saying, “Custom display saved successfully.” Click OK. 7.) Peer to Peer saves your custom displays under My Displays. My Displays is located in the dropdown menu on the upper-left-hand side of your screen under Select Your Report or Graph. The custom displays are located in the My Displays folder. Double-click on the My Displays folder to expand it. You should see all of your imported custom displays saved in this folder. 8.) Navigate to the folder where you saved your modified built-in display. Open the report. 9.) Right-click on the chart and select Edit Custom Display. 10.) An Account Selection window will pop-up. You can change the name of the display (or graph), manipulate the formula that populates the graph, and change the name of the formula that shows up on the display when you preview it. You can also use the formula wizard to find the exact formula you want to use. 11.) Make any desired changes to your custom display, and click Preview to review the changes that you have made. Click Save in the Account Selection window or right-click on the chart and select Save when you are finished. Preview also automatically saves your work. Create Custom Displays You can create custom displays in Peer to Peer if you want information that is not provided as a built-in report. Peer to Peer gives you the flexibility to be as creative as you would like in your custom reports. To create a custom display, follow these steps: 1.) From Peer to Peer’s main window, click on the Select Your Report or Graph drop-down menu. Scroll to and select My Displays. 2.) Click on Create New and choose your display type by click on its icon. Click OK. Important: To select the best chart or graph, you must understand each available type: P a g e | 24 Single Credit Union or Peer Group – Single/Current Cycle These four reports allow you to view a single credit union or peer group’s performance. You can toggle between your primary comparison and your comparison set’s performance in the same display, but Peer displays only one at a time. (Click the Credit Unions drop-down menu to change between your primary comparison and comparison set). Peer also displays only one cycle’s results (ie just 2Q 2009) at a time. Single Credit Union or Peer Group – Historical/Over-Time These five reports allow you to view a single credit union or peer group’s performance. You can toggle between your primary comparison and your comparison set’s performance in the same display, but Peer displays only one at a time. (Click the Credit Unions drop-down menu to change between your primary comparison and comparison set). These reports display quarterly information going as far back as Peer to Peer has data. All Comparisons – Single/Current Cycle These four reports allow you to view your primary comparison and the average of the peer group/comparison set against one data point (ie Member Growth). Peer displays both your primary comparison and your comparison set in the same chart, so there is no need to toggle back and forth. You will see only one cycle’s data at a time. All Comparisons – Historical/Over-Time These two reports allow you to view your primary comparison and the average of the peer group/comparison set against one data point (ie Member Growth). Peer displays both your primary comparison and your comparison set in the same chart, so there is no need to toggle back and forth. You will see quarterly information going as far back as Peer to Peer has data. Detailed These eight report display the performance of all credit unions within your comparison set individually. This means, if you include a peer group, that these reports will treat all the credit unions within those peer groups individually. This type of report is only available for a single data cycle. Note: Peer to Peer includes detailed pop-ups for each individual report type. The explanations appear when you hover over the report’s icon. 3.) An Account Selection window will pop-up. In this window, you can enter in the formula(s) for your custom display and name your report. 4.) To name your report, simply type into the Graph Title text box. 5.) To enter formulas, type in your formula as “a” + “Account Code.” For example, account 958 (# of Used Vehicle Loans) is a958 in Peer to Peer. For more information about the available formulas, visit the Peer to Peer Formulas section of this user manual. Note: You can also use the Formula Wizard (Binocular button) to locate account codes by category or description/key word using the Tree and Search tabs. Tree allows you to search by category, and Search lets you search by keyword. The Formula Wizard contains the most commonly used fields from the 5300 Call Report as well as hundreds of pre ‐programmed formulas. To add an account code, double-click it. Your selected formula(s) will auto-populate in the bottom box. Click Done when you are finished with your selections. P a g e | 25 The Formula Wizard also contains a link to the latest 5300, so you can locate account codes via the NCUA form. After you find the code you are looking for, just remember to type an “a” before the number when you add it in the Account Selection window. 6.) If you would like to make changes to the titles that Peer will display for each account code, simply edit the titles in the Titles to Use text box. 7.) If you would like to change the format that Peer will use to display your account codes, click on the Format Type drop-down menu and scroll to and select the format that you would like to use. 8.) If you would like to change the order of your formulas, place your cursor is in the text box of the formula you would like to change and click the (Up Arrow) or the (Down Arrow) to reorder them. 9.) To delete a formula, place your cursor is in the text box of the formula you would like to delete and click Delete. 10.) If you would like to add more formula rows, click Insert. New rows will always appear at the bottom of the formula list. 11.) To view your created display, click Preview. If you have not saved the display yet, Peer to Peer will store your newly created display in the Temporary Displays folder. If you need to make changes to your display, right-click on the display and go to Edit Custom Display to go back to the Account Selection page. 12.) To save your display, click Save. You can also save your display by right-clicking on the report after previewing it and selecting Save from the available menu. 13.) A Save Custom Graph window will pop-up prompting you to confirm the name of the display and the file’s save location. To save the display in an existing folder, select this option and click the dropdown menu to locate the existing folder. To save in a new folder, select this option and name your new folder. When you are finished, click Save. You will see a pop-up when your display has saved successfully. Click OK. 14.) To access your custom display, use the Select Your Report or Graph drop-down menu to select My Display. Double-click on the My Displays folder and then double click on your folder to open its contents. Import Custom Displays Importing custom displays allows you to load your own custom reports into Peer to Peer or import the reports created by Callahan & Associates. There is currently only one supported file type for custom displays: .CRC files. Only .CRC files will load into Peer to Peer correctly. To import custom displays, follow these steps: Note: If you are importing a custom display that you downloaded from p2psoftware.com, start at Step One. If you are importing your own .CRC file, start at Step Three. P a g e | 26 1.) Open the .zip file that you downloaded from p2psoftware.com. 2.) Copy the .CRC file and paste the file into your computer. You can save the file anywhere you like, but be sure to remember where you saved it, as you will need to access the file again in later steps. 3.) Open Peer to Peer. Click on File in the top menu bar. Scroll to Import and then select Custom Displays. 4.) In the Import window, select Browse… 5.) In the Open window, access your saved .CRC file. Select it, and click Open. 6.) Click Import once the appropriate .CRC file is open in the Import window. 7.) When the file has finished loading correctly, you will see a pop-up saying, “Custom display(s) imported successfully.” Click OK. 8.) Close the Import window or repeat these steps to import another file. Peer to Peer saves your custom displays under My Displays. My Displays is located in the drop-down menu on the upper-left-hand side of your screen under Select Your Report or Graph. The custom displays are located in the My Displays folder. Double-click on the My Displays folder to expand it. You should see all of your imported custom displays saved in this folder. Export Custom Displays Peer to Peer allows you to export custom displays so that you can share you analysis with others and back-up and save your work. Note: These instructions assume that you have already created and saved the custom displays you would like to export. For more information about creating custom displays, visit the Creating Custom Displays section of this user manual. Important: There is no way currently to share or backup just one display from a folder. You must include all of the individual reports within any given folder. To export custom displays, follow these steps: 1.) Go to File in the top menu bar and scroll to Export. Select Custom Displays. 2.) An pop-up window will appear. In the Export window, select the display that you would like to export. Note: Peer to Peer will list the displays available for export in the Export window. 3.) Choose between Export and Email. If you select Export, Peer to Peer will prompt you to name and save a .CRC file onto your computer. If you select Email, Peer will create a .CRC file using the name of your exported folder and will attach the file to a blank email, using your default email client. Note: As .CRC files are the only file types that you can import into Peer to Peer, .CRC files are the only types that you can export, as well. P a g e | 27 4.) If you chose Email, the exporting process is finished. If you chose Export, select the location on your computer where you would like to save your .CRC file within the Save As window. Name the file and click Save. Do not try to save the file as a different file type. 5.) A pop-up window will appear saying, “Custom display exported successfully,” when the process is complete. Click OK. 6.) Exit the Export window by clicking the X in the upper-right-hand corner of the window. Manage Custom Displays You can manage your custom displays from a central location. You can create new folders, reorganize custom displays, or delete displays from one window. To manage custom displays, follow these steps: 1.) Go to the File menu, and click My Displays. A My Displays window will appear. Your displays will be visible under Custom Display List. Click on + (the plus sign) or double-click on a display folder to expand it. 2.) Click Create Folder to create a new folder. Enter the name of your new folder in the Create New Folder window that pops-up, and then click Create Folder. Your new folder will appear at the bottom of the display list in the My Displays window. 3.) When you expand your new folder, you will see a message saying, “Drop custom displays here and then delete this one.” That “display” is simply a placeholder. Delete it after you have added another display to this folder. 4.) You can reorganize your custom displays by dragging and dropping them in different folders. Only drag/drop works. Ctrl + c and Ctrl + v do not work. Note: Dragging displays into different folders does not remove them from the original folder. It only adds them to the new one. 5.) You can delete individual displays or folders containing multiple displays. To delete custom displays, highlight the display you would like to remove and click Delete. A pop-up window will appear saying, “Are you sure you want to delete custom display?” Click Yes. Another pop-up will appear saying “Custom display deleted successfully.” Click OK. Note: If you delete an entire folder, the pop-ups will read: “Are you sure you want to delete folder and its contents?” and “Custom displays deleted successfully.” 6.) Click X in the upper-right-hand corner of the My Displays window when you are finished. P a g e | 28 Limit Graph Axes Using Zoom You can zoom in on specific quadrants of your built-in and custom displays. This allows you to get a clearer view of certain areas or time periods of the graph by adjusting the axes on the original graph or chart. Note: The zoom function works with both charts and rankings. To zoom in on displays, follow these steps: 1.) Select and open the display you would like to zoom in on. 2.) Click and hold the left button of the mouse while you drag the mouse across the area of the display that you would like to magnify. 3.) You will see a gray box appear as you drag the mouse across the selected area. The gray box shows you exactly what you have selected and what will appear in the zoomed-in window. 4.) When you are satisfied with the selected area, let go of the mouse button. Peer to Peer will automatically zoom in on the highlighted area of the display. 5.) To zoom back out, simply click the Zoom Out button. Formulas - How You Are Calculating Know Formula Modifiers Peer to Peer includes some preprogrammed formulas and the ability to create your own. Standard operators function in Peer to Peer: + (addition) - (subtraction) * (multiplication) / (division) Peer to Peer supports mathematical order of operations including parenthetical grouping. There are also formula modifiers that you can use in Peer to Peer. X Growth Growth(x) Growth of x over last full year (ratio of x prior to year x) Example: In 4Q 2009, growth(loans) is the annualized loan growth in 2009 (12-month loan growth). Two-Year X Growth Growth2(x) The annualized growth of x over the last two years Example: In 4Q 2009, growth2(loans) is the annualized loan growth from 4Q 2007- 4Q 2009 (24-month loan growth). P a g e | 29 Three-Year X Growth Growth3(x) The annualized growth of x over the last three years Example: In 4Q 2009, growth3(loans) is the annualized loan growth from 4Q 2006- 4Q 2009 (36-month loan growth). Four-Year X Growth Growth4(x) The annualized growth of x over the last two years Example: In 4Q 2009, growth4(loans) is the annualized loan growth from 4Q 2005- 4Q 2009 (48-month loan growth). Quarter Modifiers X:(.25, .5, .75, 1) The data for X one, two, three, four (one year) quarters prior Example: In 4Q 2009, assets:.75 will show asset numbers from 1Q 2009. Assets:1 will show assets from 4Q 2008. Create Custom Formulas Peer to Peer allows you to create custom formulas if you would like to analyze fields not commonly associated with each other. To create a custom formula, follow these steps: 1.) Access the Formula Wizard. The Formula Wizard is accessible via the binocular button in the Selection windows for creating custom peer groups and custom displays. 2.) Click on Create New under My Formula in the Tree tab of the Formula Wizard. 3.) Enter the name of your custom formula in the Name text box. 4.) Enter your formula in the Formula text box. 5.) If you would like specify the width of the column in your custom formula, enter it in the Width text box. If not, leave this field blank. 6.) If you would like to specify the number of decimal places your custom formula displays in its results, enter it in the Decimals text box. If not, leave this field blank. 7.) Click either Save or Save & Add, if you would like to create another custom formula. 8.) Once you have created and saved your custom formula, Peer to Peer makes it available under My Facts , which is located within My Formulas in the Formula Wizard. P a g e | 30 Share Your Analysis Export Your Charts, Data, and Rankings Callahan & Associates designed Peer to Peer in such a way that sharing your analyses is as easy as possible. There are several click-to-export options in the Display Options toolbar of Peer to Peer. In fact, exporting your analyses can both let you share them and save them as back-ups in case you ever experience computer problems or need to uninstall and reinstall Peer to Peer. To export your analyses, you can: Click to Export to Excel and PowerPoint When you run a report in Peer to Peer, the Display window appears. In the Display window, you can export your charts and rankings by clicking either the Excel or PowerPoint buttons in the Display Options toolbar. However, you can only export data directly to Excel. Copy and Paste Your Reports in Any Program You Like In addition to the click-to-export Excel and PowerPoint buttons, the Display window also lets you save, copy, print, and preview your reports via the similarly named buttons in the Display Options toolbar. Never has communicating with your Board, management, and staff been easier. Note: For information on exporting your custom peer groups and custom displays, visit the Export Peer Groups and Export Custom Displays sections, respectively. Share your Analyses with Other Peer Users You can share your analyses easily with other Peer users by exporting a .CRC or .p2p file that they can import into the program. You can export peer groups as a .p2p or .csv file and custom displays as a .CRC file. You can also email both peer groups and custom displays. Peer groups email as a .p2p file and custom displays email as a .CRC file. See the Export Peer Groups and Export Custom Displays sections of this user manual for more information on how to share your analyses easily with other Peer users. Peer to Peer’s Advanced Features Employ Merger Analysis One of Peer to Peer’s advanced features is Merger Analysis. In Peer to Peer, you have the ability to merge two or more credit unions and then run financial analyses to see the results of the hypothetical merger. This feature makes the uncertainty of merging credit unions together more manageable. P a g e | 31 To merge credit unions together, follow these steps: 1.) Under the Tools menu in the top navigation bar, select Merge Credit Unions. A Merge window will appear. 2.) Within the Merge window, select the credit unions that you would like to combine. You can filter credit unions by state or simply look through a list of all credit unions in the State drop-down menu. You can also search for a credit union by name in the Search text box. Matching credit union(s) will autopopulate in the Matches box. Note: If you have selected a specific state, Search will only search within that state. To search through all available credit unions, make sure you select the All CUs list from the State drop-down menu. 3.) Select the credit union you would like to add to your CUs to Merge List by clicking on it and then selecting the > (right arrow) button. To remove a credit union from your merge list, select it and then click the < (left arrow) button. 4.) Once you are satisfied with the credit unions you are merging, name your merged credit union in the Name Merged CU text box. 5.) Click Save when you are ready to merge your credit unions. 6.) A pop-up window will appear saying, “Merged credit union saved successfully” when Peer to Peer has finished saving your new credit union. 7.) Your newly merged credit union now “exists” and is ready for your analysis. Peer to Peer saves merged credit unions under the State drop-down menu under Merged CUs (at the top of the list, above Alaska ) when you are trying to set your primary and your comparison set(s). Note: You cannot include your merged credit union in a peer group. However, with multiple comparisons available in Peer to Peer, you can see your merged credit union alongside any other peer groups you wish. You can treat your merged credit union as any other comparison when you run your standard and custom displays. It will behave the same was as your other primary or comparison set credit unions. Note: Regardless of what you named your merged credit union, you will know which credit union it is, as Peer adds “(MERGE)” to the end of its name. 1001 Connecticut Avenue NW, Suite 1001, Washington DC 20036 800-446-7453 | [email protected] | p2psoftware.com