1
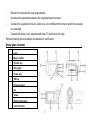
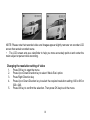
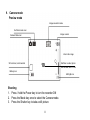
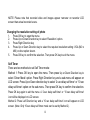
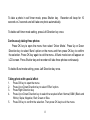
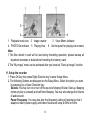
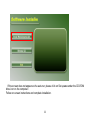
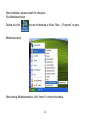
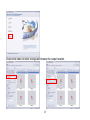
Video Recorder User’s Manual
1
DV140
FCC statement
This device complies with part 15 of FCC rules. Operation is subject to the following two
conditions: (1) this device may not cause harmful interference, and (2) this device must accept
any interference received, including interference that may cause undesired operation.
Caution: Changes or modifications to this unit not expressly approved by the party responsible
for compliance could void the user’s authority to operate the equipment.
NOTE: This equipment has been tested and found to comply with the limits for a Class B digital
device, pursuant to Part 15 of the FCC Rules. These limits are designed to provide
reasonable protection against harmful interference in a residential installation. This
equipment generates, uses, and can radiate radio frequency energy and, if not installed
and used in accordance with the instructions, may cause harmful interference to radio
communications. However, there is no guarantee that interference will not occur in a
particular installation. If this equipment does cause harmful interference to radio or
television reception, which can be determined by turning the equipment off and on, the
user is encouraged to try to correct the interference by one or more of the following
measures:
2
-
Reorient or relocate the receiving antenna.
-
Increase the separation between the equipment and receiver.
-
Connect the equipment into an outlet on a circuit different from that to which the receiver
is connected
-
Consult the dealer or an experienced radio TV technician for help.
Pertinent testing documentation is available for verification.
Kn ow your r ecord er
1
Lens
2
Macro switch
3
Shutter key
4
Busy light
5
Power key
6
OK key
Direction keys:
Up
7
Down
Right/ LED switch
Left/ Self timer
3
8
Mode key
9
Battery lid
10
Speaker
11
Wrist strap loop
12
Wrist strap hole
13
Zoom in key
14
Zoom out key
15
USB/TV out port
16
LED light
17
Self timer light (red LED)
18
Tripod socket
19
SD card slot
20
LCD Screen
4
Star t to use
NOTE:
Please insert three fresh AAA batteries and SD/SDHC memory card to
operate the recorder
1. Installing Batteries
1. Open the battery lid
2. Insert three AAA alkaline batteries according to the terminals polarity location.
3. Insert the front end of the battery lid into the battery latch, press the back end of the
battery lid and then press the lid securely closing the battery compartment.
2. Using SD Card
You must insert and use SD/MMC memory card; recorder will store all recorded
images and video on the card. Max. card size is 8GB.
Note that the card has a tiny “LOCK” slider located on the side.
Set this slider to “non-LOCK” position before inserting and taking video or still images.
1. Push the SD card into the slot until it is completely inserted.
2. To remove / replace the card, lightly press inserted card and recorder will eject the
card.
3. The SD card has to be formatted first: Press OK key and then press Right Direction
key to enter Setup Menu. Press Up and Down Direction key to select ‘Format’ option.
5
Press Right Direction key and then press Up or Down Direction key to select ‘Yes’ option.
The memory card will be formatted automatically.
Please note that all the previous DATA in card will be deleted when formatted.
3. Selecting Lens Mode
Slide the Macro / Normal lens selector to set either Normal (for everyday use) or Macro
mode (only for close-up) depending on the distance of the main subject.
1. Normal setting
is suitable for shooting subjects located 140cm or more away
from the recorder
2. Macro setting
is suitable for shooting close-up subjects 2.5 -5cm away.
4. Power ON / OFF the recorder
1. Power ON: press the Power key for a second or two to turn the recorder ON.
2. Power OFF: press the Power key (when the recorder is active) to turn the power
6
OFF.
Auto Power OFF: When recorder has been left idle for 1 minute, the recorder will turn
OFF automatically. The automatic power OFF delay time can be set at 1, 3 or 5
minutes. Go to Setup Mode / Power Save and make adjustment if necessary (see
also Section 11 Setup the recorder).
3. Low power: When the batteries become exhausted, the LCD display will display low
battery icon
and the Auto Power feature will turn the recorder OFF.
5. Selecting the MODE of the recorder
When activated, the recorder is set in the Video (recording) mode.
Press the MODE key to change or select desired mode:
Video (default mode) – recording video clips
Camera mode – taking still photos, images
Playback mode – playing back recorded video
or displaying still photos
6. Setting Date and Time:
Press OK key. Then press Right Direction key to enter Setup Menu. Press Up and
Down Direction key to select ‘Date & Time’ option. Then press Right Direction key and the
current system date and time are displayed on the LCD screen.
7
To change the date and time, use the Direction key: Up or Down to adjust, Right key to
move the cursor, OK key to confirm, then OK key to Exit setup mode.
To leave the date and time unaltered, press Left key and then OK key to Exit setup mode.
7. Indicators / LED lights:
Busy light - the light will turn on when the recorder is busy recording video, capturing
photo, processing data, or being connected to computer.
LED light – this supporting light may be used when recording video/ pictures in dark
environment.
Please note that this lamp is effective for short distances only.
Self Timer light – indicates that the recorder Self Timer has been activated.
8
8. Video mode:
Preview mode
Video resolution; it can be selected at 640x480 or 320x240
Video Recording Icon
The remaining time for recorded
Video; ex 1 minute 8 seconds left
Zoom ratio range
SD card icon; card inserted
Battery icon
The LED Lamp is turned ON
Recording the Video clip
1. Open the LCD screen.
2. Press / hold the Power key and turn the recorder ON
3. Press the Shutter key to start recording video
4. To stop recording, press the Shutter key again.
Note that if the memory card is full, recorder will stop recording by itself.
5. Zoom IN or zoom OUT during recording by pressing Zoom keys; recorder has 4X
digital zoom range.
9
NOTE: Please note that recorded video and images appear slightly narrower on recorder LCD
screen than actual recorded scene.
• The LCD screen acts as a viewfinder to help you more accurately point at and center the
main subject or person while recording.
Changing the resolution setting of video
1.
2.
3.
4.
5.
Press OK key to open the menu.
Press Up or Down Direction key to select ‘Movie Size’ option.
Press Right Direction key.
Press Up or Down Direction key to select the required resolution setting: 640 x 480 or
320 x 240.
Press OK key to confirm the selection. Then press OK key to exit the menu.
10
9.
Camera mode:
Preview mode
Image resolution mode
Self timer mode icon
Image counter
Camera Mode icon
Zoom ratio range
SD card icon; card inserted
10
Self timer counter; photo
Will be taken after 10 sec
Battery icon
LED light icon
Shooting
1. Press / hold the Power key to turn the recorder ON
2. Press the Mode key once to select the Camera mode.
3. Press the Shutter key to take a still picture
11
NOTE: Please note that recorded video and images appear narrower on recorder LCD
screen than actual recorded scene.
Changing the resolution setting of photo
1.
2.
3.
4.
5.
Press OK key to open the menu.
Press Up or Down Direction key to select ‘Resolution’ option.
Press Right Direction key.
Press Up or Down Direction key to select the required resolution setting: VGA (640 x
480) or other option shown.
Press OK key to confirm the selection. Then press OK key to exit the menu.
Self Timer
There are two methods to set Self Timer mode:
Method 1: Press OK key to open the menu. Then press Up or Down Direction key to
select ‘Driver Mode’ option. Press Right Direction key and a sub-menu will appear on
LCD screen. Press Up or Down direction key to select ‘2 sec delay self timer’ or ’10 sec
delay self-timer’ option on the sub-menu. Then press OK key to confirm the selection.
Press OK key again to exit the menu. A ‘2 sec delay self timer’ or ’10 sec delay self timer’
icon will be displayed on LCD screen.
Method 2: Press Left Direction key and a ’10 sec delay self timer’ icon will appear on LCD
screen. (Note: Only 10 sec delay self timer mode can be set by Method 2).
12
To take a photo in self timer mode, press Shutter key. Recorder will beep for 10
seconds or 2 seconds and will take one photo automatically.
To delete self timer mode setting, press Left Direction key once.
Continuously taking three photos:
Press OK key to open the menu then select ‘Driver Mode’. Press Up or Down
Direction key to select ‘Burst’ option on the menu and then press OK key to confirm
the selection. Press OK key again to exit the menu. A Burst mode icon will appear on
LCD screen. Press Shutter key and recorder will take three photos continuously.
To delete Burst mode setting, press Left Direction key once.
Taking photo with special effect
1.
2.
3.
4.
5.
Press OK key to open the menu.
Press Up or Down Direction key to select ‘Effect’ option.
Press Right Direction key.
Press Up or Down Direction key to select the required effect: Normal; B&W (Black and
White); Sepia; Negative; Red; Green or Blue.
Press OK key to confirm the selection. Then press OK key to exit the menu.
13
10.
Playback mode:
1. Press / hold the Power key to turn the recorder ON
2. Press the Mode key twice to select the Playback mode.
Playback
Video
Photo
You can view still images or video by pressing direction key Left or Right and for a
video file just press the shutter key to play it.
You can also zoom in or zoom out of the viewed photo by pressing zoom key. By
pressing Left or Right Direction key after zooming in, the recorder will enter into pan mode
to view the image. To resume normal preview mode, press OK key.
Press OK key to open the menu, you will see several options:
Lock: You can lock/unlock the photo/video files that you choose.
Delete: You can delete one/all files.
14
Slide Show: You can setup the Slide Show and activate it.
Effect: You can create special effects on the photo files.
Rotate: You can rotate the photo image by 90 degrees clockwise.
Voice Memo: You can add/delete voice record to the photo files.
Start-up Image: You can select one photo taken and set it as the Start-up Image
of the recorder.
NOTE:
• When video file is previewed, only Lock and Delete options in the menu are active.
• Please note that recorded video and images appear narrower on recorder LCD screen than
actual recorded scene.
• All recorded images and video will be displayed full frame and show real image size when
played back on computer monitor and TV screen.
Thumbnail mode
Note:
15
•
•
•
•
: This icon indicates recorded Video (AVI file)
: This icon indicates still picture (JPG file) with added voice Memo.
: No icon is displayed on still pictures.
In PLAYBACK mode, press Zoom Out Key (adjacent to LCD screen) selecting
the “thumbnail” format.
Press UP, DOWN, LEFT or RIGHT keys to browse through images, then press
OK (center key) to select image for an instant review.
Press Zoom In Key to enlarge and view image in full resolution.
Press Zoom Out Key to return to normal screen size and press same key
again to return to “thumbnail” format.
Playing recorded video
1.
Select desired video record (see “film recorder” icon on the LCD screen)
2.
Press the Shutter key to start playing recorded video, press Shutter key again
to stop playing.
16
Add voice memo on photo file
1.
Switch the recorder to playback mode.
2.
Browse to the photo you wish to add voice memo.
3.
Press OK key and select ‘Voice Memo’ option by pressing Up or Down
Direction key.
4.
Press Right Direction key and a sub-menu appears on LCD screen.
5.
Select ‘Add’ Option and then press OK key to confirm.
6.
Counter appears on LCD screen. The recorder is now ready to record voice
memo. Just speak out the message and the microphone on the recorder will
record the message automatically. At the same time, the counter keeps on
counting automatically, indicating the time of recording voice memo.
7.
Press OK key again to stop recording voice memo.
Note: The maximum time of voice memo recorded is 30 seconds.
Play Photo(with voice memo) file
1
2
Select the photo with voice Memo in Playback mode;
Press Shutter key to start playing the voice Memo of the selected photo (with
voice memo) file:
Press OK key to stop playing the voice Memo, UP key to pause/resume
playing the voice Memo.
17
1 Playback mode icon 2 Image counter
3 Voice Memo indicator
4 PHOTO file indicator 5 Playing time
6 Control panel for playing voice memo
Note:
1 The files stored in card will be lost during formatting operation, please backup all
important memories or data before formatting the memory card.
2 The “My image” menu can be activated after you have set “Start-up Image” function.
11. Setup the recorder
1. Press OK key then press Right Direction key to enter Setup Menu.
2. The following Options are displayed on the Setup Menu. Select the option you want
by pressing Up or Down Direction key:
Sounds: You may turn on or turn off the sound of tripping Shutter, Start-up, Beeping
(when any key is pressed) and self timer Beeping. You may also change the Volume
of audio sound.
Power Frequency: You may also alter the frequency setting of recorder so that it
adapts to match power supply and indoor fluorescent lamp at 50Hz or 60Hz.
18
Power Save: You may make the power turn off in 1 minute, 3 minutes or 5 minutes.
Date & Time: Set up the date and time (see Section 6: Setting Date and Time).
Language: Change the menu to a different language.
Language option selection: Your video recorder has the option to display
commands and messages on the screen in English, French, Spanish, Italian,
Portuguese or Dutch or possibly alternative languages. To select language, activate
the video recorder and it will remain in Video Recording Mode. Press the OK Key
and the RIGHT Key to enter the Setup Menu. Use UP/DOWN keys to scroll and
select Language menu, then press the RIGHT key to review Language choices.
Use UP/DOWN keys to scroll and select desired Language and press OK key to
confirm and set your language choice.
TV Out: Change the TV output format to suit PAL or NTSC television system.
Start-up Image: Disable the start-up image, reset the default start-up manual or use
the image you select to be the start-up image.
Format: Format the SD/MMC card (see Section 2: Using the SD Card).
Reset all: Reset all the options to default values.
Setting the start up image:
1.
Switch the recorder to playback mode.
2.
Browse to the photo you wish to use as the start-up image.
3.
Press OK key and select ‘Start-up Ima’ option by pressing Up or Down
Direction key.
4.
Press Right Direction key and a sub-menu appears on LCD screen.
5.
Select ‘Set’ Option by pressing Up or Down Direction key and then press OK
key to confirm.
6.
Press OK key again and then press Right Direction key to enter Setup Menu.
19
7.
8.
9.
10.
11.
12.
Select ‘Start-up Ima’ option by pressing Up or Down Direction key.
Press Right Direction key. A sub-menu appears on LCD screen.
Select ‘My Image’ option by pressing Up or Down Direction key. Then press
OK key to confirm.
Press OK key again to exit the Setup Menu.
Press the Power key to turn off the recorder.
Press the Power key to turn on the recorder. The photo you select will display
on LCD screen as the start-up image.
To Disable the start-up image, select the ‘Start-up Ima’ option in the Setup Menu and
then select ‘Off’ option. After turning the recorder off and on again, the start-up
screen will be blank.
To reset the start-up image to default setting, select the ‘Start-up Ima’ option in the
Setup Menu and then select ‘System’ option. After turning the recorder off and on
again, the default start-up screen will be displayed. Alternatively, select ‘Reset All’
option in the Setup Menu. Confirm Reset All function by selecting ‘Yes’ option in the
sub-menu.
20
Application to PC
Connect to PC
1.
Use supplied USB cable and connect recorder to the computer.
2.
Download files from the recorder to the computer: After connecting the recorder to
PC, a removable disc icon will appear in the window of “My Computer”. The
photos/video files you have taken will be saved in the file folder \ DCIM\ 100MEDIA
in the removable disc. Select the taken/ recorded files in the file folder "100MEDIA".
Copy (or drag by using the mouse) the files to the file folder in the hard disc in which
you save your files.
TV Output
1. Plug in TV cable: Insert the single-connector to recorder. Connect the end with
double-connectors to video (yellow) and to audio (red or white) input jack on TV.
2. Turn on TV and recorder.
3. Switch mode on TV to select video input (see your TV manual for instructions).
Uploading your video clips to YouTube
Install the ArcSoft MediaImpression program to gain easy YouTube access.
1. Install the ArcSoft MediaImpression program
Insert the CD-ROM into the computer CD-ROM drive. The auto-run screen will appear. Click
“Install MediaImpression”
21
(If the screen does not appear as the auto-run, please click on Set up.exe under the CD-ROM
drive icon on the computer.)
Follow on-screen instructions and complete installation.
22
23
After installation, please restart the computer.
Run MediaImpression :
Double click the
icon on the desktop or follow “Start → Programs” to open:
MediaImpression
After starting MediaImpression, click “Import” to import the media.
24
Choose the video recorder storage and choose the output location.
25
Choose require file and click the import, selected file will be stored in the output location.
Click “Go to start page” to return the main screen, click the “Video” or “All media” to use
the “YouTube” function.
26
Choose file and click the “upload to YouTube”.
Enter your username and password to login to YouTube, execute upload.
27
Technical Specification s
Video resolution
VGA: 640x480(30fps), QVGA: 320×240(30fps)
Picture resolution
640×480 pixels, 320x 240 pixels
Lens
F3.1 f=6.5mm
Focus settings
Digital zoom
2.5cm~5cm (Macro) / 140cm~infinity (standard mode)
4×
LCD display screen
1.44〞TFT LCD
Memory card support
Maximum 8GB
Video storage
VGA: Up to 7 hours approximately with 8GB SD/MMC card
Still Image storage
VGA (640 x 480): over 40,000 pictures (with 8GB SD/MMC card)
Self- timer
2 second/ 10 second delay
Exposure
Automatic
Function modes
Video record, Shoot photo, playback
File format
Video: AVI
White balance
Auto
USB interface
High Speed USB 2.0 interface
TV output
NTSC or PAL, selectable
Power supply
Battery: 3×AAA alkaline 1.5V (not supplied)
Dimensions (L×W×H)
3.9 x 2.2 x 1.5 inches (98x56x39 mm)
Weight
3oz (92 grams) - excluding batteries
Photo: JPG
28
System req uir emen ts
System Requirements
Operating System
Windows , XP, Vista, 7
Central Processing unit
Intel Pentium III 1GHz or CPU of equal or higher performance
Memory
512 MB or higher
Sound Card, Display Card
The sound card and the display card shall support DirectX8 or higher
version.
CD Driver
4 times speed or above
Hard Disk
Available space 1 GB or more
Other
One standard USB 1.1 or USB 2.0 interface
DV140 -06202011
29