1
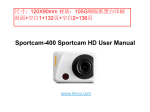
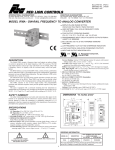
Trevi GO 2250 FHD Sport FHD Camera User manual English 1 Function Thank you for choosing this camera. Please carefully read the manual before using, and keep it at a safe place for future reference. The compilation of the user manual refers to the latest information. The manual quotes captured screen displays and graphics, with the aim to introduce the digital camera through detailed and direct methods. Due to the differences of technical R&D and production batch, those captured screen displays and graphics indicated in the manual may be different from that of actual digital camera. Precautions TF high-speed card (multimedia memory card) at Class4 or above is required for this camera. Instructions for using the memory card ● In case of a newly purchased memory card for the first time use, or data available in the memory card unrecognized for the camera or image captured by other cameras, please ensure to firstly format the memory card; ● Before plugging in or out the memory card, please firstly disconnect power supply of the camera; ● After using for many times, performance of the memory card will be lowered. In case of lowered performance, a new memory card is needed to purchase; ● The memory card is a precise electronic device. Please don’t bend it and keep it away from falling or heavy load; ● Don’t keep the memory card in the environment with strong electromagnetic or magnetic field, like the place near speaker or receiver of TV; 2 ● Don’t use or keep the memory card in environment with over high or low temperature; ● Keep the memory card clean and away from contacting liquid. In case of contacting liquid, please dry it with soft cloth; ● In case of keeping the memory card idle, place it into the card sleeve; ● Please note that the memory card will get hot after long-term use, and this is normal; ● Don’t use the memory card having used on other digital cameras. If to memory card on this camera, please firstly format it with the camera; ● Don’t use the memory card having formatted on other camera or card reader; ● In case of one of the followings with the memory card, the recorded data may be damaged: - Improper use of the memory card; - Disconnect power supply or take the memory card out during recording, deleting (formatting) or reading; ● You are recommended to backup important data on other media like soft disk, hard disk, CD. Camera Maintenance ● Keep it in a dry and dark place for keeping idle; ● Use proper protective cover to avoid lens and display scratched; ● In case of cleaning the surface of camera lens, first blow the dust off the surface, use a cloth or paper available to optical equipment to wipe the lens gently. Use the professional camera cleanser to clean the lens. Do not use any organic solvent; ● Do not touch the lens surface by fingers. 3 System requirements When operating or using the digital camera, please take minimum system requirements for the computer of the camera into consideration. You are strongly recommended to use better computer equipment for operating the camera to achieve the optimized effect. The minimum system requirements are as below: System Requirements Operating System CPU MSDC Internal Memory Microsoft Window 2000,XP, Vista, 7,8 Mac OS X ver: 10.0.0 or above version Intel Pentium of more than 1GB Hz or other CPU with equivalent performance Larger than 1GB Sound Card and Display Card CD Driver The sound card and video card shall support DirectX8 or higher version. Hard Disk Free space of more than 2GB Others One standard USB1.1 or USB2.0 port Speed of 4 times or faster 4 Function Features This camera is equipped with various characteristics and functions: Digital VDR; Digital camera Mass Storage (Removable disk); 8X digital zoom Seamless video Infrared remote control Appearance 5 6 Key Functions and Indicators Key/Indicator Power key Shutter key MENU key Function Power On/Off; switch over among video recording, capturing and playback Video recording/capturing; play/stop playing video file (Playback mode); menu confirmation Open and exit from menu;Stop play video files (playback mode) 7 Up key Down key Charger indicator Busy indicator Infrared remote control Digital zoom-in: select menu (after opening the menu); file page-up; pause playing video (playback mode); Retreat quickly video (playback mode) Digital zoom-out: select menu (after opening the menu); file page-down ; Fast forward video (playback mode) Indicator lights in red during charging, and the indicator turns off after charging full.(Power off charging) When the camera is busy (for example: during film recording, capturing, automatic screen-off), the busy indicator will light. Boot mode, infrared remote control on this lamp, can push a button corresponding to video camera and take photos, shutdown operation Start to use 1.Charge the built-in lithium battery The camera is equipped with built-in 3.7V lithium battery. Please ensure power available for the camera and timely charge it in case of low battery. 8 Connect the camera to computer for charging under shutdown status. The charging indicator will be on when charging, and will be off when the battery is fully charged. Generally, the battery can be fully charged after 2-4 hours. 2. How to use the memory card 2.1. Properly insert the TF card into the card holder as per the instructions indicated near the card holder. 2.2. To remove the TF card, press the end of memory card gently, the card will be ejected. 9 Note: The camera is not equipped with built-in memory. Please insert memory card before using. Before using the camera, it is a must to format the memory card on the camera. 3. Startup and shutdown: 3.1 Startup: press the POWER key for 3 second, the camera will show startup screen and enters into POWER ON state; 3.2 Shutdown: press the POWER key when the camera is under idle mode to shut down; 3.3 Auto shutdown: the camera will be shut down automatically when the camera is under idle mode for a certain time to save power. The default time for auto shutdown is 3 min. 3.4 Shutdown under low power: when the battery is under low power, Please charge the battery timely. When the battery icon turns red, the camera will be shut down automatically. 4. Function modes switching The camera has 3 modes: photo mode, recording mode, and playback mode. Use the power key to switch the modes after starting up. Recording mode: for recording videos; Photo mode: for taking photos; Playback mode: for playing back the current video. 10 5. Indicators 5.1 BUSY indicator: When the camera is working (e.g. recording, photographing, auto screen off etc.), the indicator will light; 5.2 Charging indicator: In shutdown state, the lightened indicator means the user is charging the camera. 6. Photo/recording mode It enters automatically into recording mode. Press Shutter to start recording, and press Shutter again to stop recording. Press Shutter to directly take photo. In rerecording/photo mode, press Up/Down for digital zoom in/out. 6.1 Screen display in photo mode 1. 2. 3. 4. 5. 6. 7. 8. 9. Photo mode; Three photos continuous shooting mode; Self-timer mode; Photo resolution; Photo quality; Available shooting count; Icon of digital zoom; Battery state; Face detect; 11 6.2 Screen display in recording mode 1. 2. 3. 4. 5. 6. 7. 8. Video mode; Video quality; Video framerate Video resolution; Available time to record; Face detect; Icon of digital zoom; Battery state; Note: 1. When using the HD size or FHD video, you must use the TF high-speed card at class 4 or above . 2. Automatic screen-off will be performed during recording for saving power. User may short press Power key or shutter key to enable the screen for displaying. 12 7. Playback mode Press Power key to enter playback mode to browse photo/video, play the video recorded by this camera. Press Up/Down key to access to previous or next photo/video. Play movie: Press the shutter button to start/pause play video, press the up/down key to Retreat quickly /fast forward playback, press the MENU button to stop play video. Video file playback Video pause mode 13 8. Menu Setting Mode 8.1 Menu display In photo, recording and playback mode, press Menu key to open the menu, and then press Up/Down key to select menu, press the Shutter key to enter submenu. When selecting menu, the selected menu will be displayed with blue background. In video mode setting, "Seamless" menu has Optional Settings:1/3/5 minutes. When choose one of them, it will record video segment every corresponding time automatically and continuously. When the storage of SD-Card is full, then it will delete the first video segment to create new space for continuous recording. Note: “Seamless” function is only for driver recording, after choosing 1/3/5 minute ,the menu will be upside down, user can fix the camera upside down with suction cup mount (Not included ) for loop recording Recording menu mode 14 Photo menu mode 8.2 System mode menu setting After opening the menu by pressing Menu key, press power key to switch over to setting main menu, press Up/Down key to select menu, and after that to press Shutter key for confirming to enter the submenu. In the submenu, press Up or Down key to select menu, and press Shutter to confirm. After returning to the main menu, press Menu key to exit from the menu. 15 System menu mode 8.3 Setting date and time Press Menu key to open the menu, press Power key to switch to setting menu, and then press Shutter key to confirm. Press Down key to select “Date and time” in menu item, and then press Shutter key to enter setting window. In setting window, press Power key to select items (date, time) to be adjusted, and then press Up key or Down key to make adjustment, press Shutter key for confirmation at completion of adjustment(Note: there are 16 not little confirmation screen ,time can be saved while pressing the shutter button), or press Menu key to cancel setting and exit. Finally, press Menu key to exit from setting mode. 8.4 Playback mode menu setting In playback mode Press Menu key to open playback main menu, press Up or Down key to select menu, press Shutter key to enter submenu. In the submenu, press Up or Down key for selection, and press Shutter key to confirm. After returning to the main menu, press Menu key to exit from the menu. 17 Playback menu 9. Remote control application 9.1. Remote control button instructions. 18 9.2 The use of remote control. You can take a photo/ video or power off the camera by using a remote control. Make sure the signal emission port of the remote controller face to the infrared light window of the camera while pressing button to control the camera. Note: The remote control doesn’t have function to power on the camera. 9.3 Remote controller battery replacement When the remote control battery is low, need to replace the battery, please be careful to open the battery door with a coin, avoid scratching the battery door., When replacing the battery, put a coin inside the groove in the 19 middle of the battery cover, to unscrew battery cover according to direction and replace old battery (when put the new battery, please note the positive and negative pole), then put the battery cover and screw till tighten. + (Picture 1,open the battery cover) (Picture 2,take out the battery) (Picture 3,in the battery) (picture 4, close the battery cover) 20 11. Connect to computer to download photo/video When the camera is connected with the computer and entering removable disk mode, there will be a removable disk added in the window of “My computer”. The photo or video file may be stored in the catalogue of “DCIM\100MEDIA” in the removable disk. You may enter this catalogue to copy files on to hard disk of your computer. Note: During file downloading, it is prohibited to disconnect USB connection, and plugging out the memory card when USB connected is also prohibited to avoid loss of data. Technical parameters Image sensor 5.0 mega-pixel CMOS image sensor Function mode Recording, photo, playback Digital zoom 8x LCD screen 2.0” LCD screen Picture resolution 12M (4000 x 3000), 8M (3264 x 2448), 5M (2592 x 1944) 21 Video resolution FHD (1920x1080 30fps),HD (1280X720 30fps) ,HD (1280X720 60fps) Storage medium TF card (Maximum supporting 32GB) File format JPEG, MOV Self- Timer 2 sec./10 sec. USB port USB 2.0 Power supply Built-in 3.7V 700mAh rechargeable lithium battery Menu language English / Spanish / French / German / Italian Power Save 1 min. / 3 min./5 min./ OFF Operating system requirements Dimensions Windows XP/Vista/7/8, Mac 10.8 58.1x43.2x24mm 22 Note: The product design specification is made based on updated information when compiling this product manual. The specification is subject to change without further notice. The product is subject to the actual camera. PRECAUTIONS FOR CORRECT DISPOSAL OF THE PRODUCT The symbol shown on the equipment indicates that waste must be disposed of in “separate collection” and so the product must not be disposed of together with urban waste. The user must take the product to special “separate waste collection centers” provided by local government, or deliver it to the retailer against the purchase of a new product. Separate collection of waste and subsequent treatment, recycling and disposal operations promotes the production of equipment with recycled materials and limits negative effects on the environment and on health caused by improper handling of waste. Illegal disposal of the product leads to the enforcement of administrative penalties. WARNING FOR A CORRECT USE OF RECHARGEABLE BATTERY - Recharge the battery in an ambient temperature between 5°C and 35°C. - When the recharge is complete the device shows a message/signal (check the user’s guide). - Don’t recharge more than the suitable period to prevent the risk of overheating and burst. - Recharging the battery over the suitable period or an extended period of inactivity may reduce battery duration. - Rechargeable battery is liable to wear and tear and its performance will reduce gradually. - To extend the duration of the battery use it when is completely charged up to the complete discharging, then recharge it fully before use it again. Recharge a battery not completely consumed, will result a reduced duration. In this case, repeat the full charging/discharging cycle many times. - Avoid recharge the battery for the whole night. 23 INFORMATION NOTE ON THE REMOVAL AND DISPOSAL OF BATTERIES Warning: Only high-qualified personnel should perform this operation! BATTERY REMOVAL The appliance should not be plugged to the mains socket when performing this operation! 1) Open the battery compartment; 2) Select the battery; 3) Disconnect and remove the battery. Used batteries should not be disposed of with household waste or thrown into fire or water. Used batteries should be recycled or disposed of in separate waste collection centers. 24 For additional information and updates of this product see: www.trevi.it Trevi S.p.A. Strada Consolare Rimini-San Marino, 62 47924 RIMINI (RN) Italy Made in CHINA 25