1
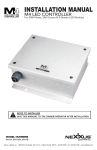
Carcam.ie G-800 Dual Mirror Camera – incorporating Reverse Parking Function Installation & User Manual Thank you for purchasing this high definition rear view mirror dual car camera. This is a high quality and stylish product which should not adversely affect the original look of your car. The device is a professional high definition car camera, with dual front & rear cameras and the addition of an automated car reversing function. It can record high resolution video and take super clear pictures and store these to the 32GB Class 10 Micro SD Card as supplied by Carcam.ie. This manual includes the usage, specification and notes about the device. Read it carefully before using the product to ensure you get the most from it and keep the user manual safe for future reference. Carcam.ie will also keep a copy of the manual on our website. If after reading the manual, you are unsure about any function or operation of the camera, contact [email protected] with your problem and one of our staff will reply by email or phone to assist you. Accessories: Fixing Belts X 2 Car Rear Camera X 1 Cable for Connection to Car Reversing Circuit X 1 Car Charger X 1 USB Cable X 1 User Manual X 1 1. Product Features 1. Adjustable 170 degree ultra-wide angle front lens. 2. The rear camera will work automatically once plugged in. 3. When the ignition is switched on, the device will automatically turn on and begin to record. 4. Seamless loop recording means the device will not miss any data while driving. 5. Once the rear camera is connected into the reversing light circuit (professional recommended), when reverse is selected, the screen will display the rear camera view and a guide grid for safer reversing. 6. The camera also supports manual reversing function. The screen will automatically display dual cameras (PIP) on start up. Pressing the “Up” button will switch to rear camera only, which can assist with reversing in the absence of the connection in (5) above. 7. The mirror houses a 4.3inch high definition LCD screen. 8. G-Sensor function. In the event of an accident involving the vehicle, the video will be saved and not over written in the loop recording cycle. 9. Parking Sensor. The camera will switch on and record for circa 20 seconds in the event of the car being hit in a car park situation. 10. Motion sensor. When parked the camera will switch on and record if the front lens detects motion outside. 11. LED lights around the front lens to assist with night vision in close proximity. 12. Stylish look & easy installation. 2. Appearance of the interface 1. LCD Screen 2.Power Button 3.MENU Button 4.MODE Button 5.Up Select Button 6.Down Select Button 7.OK Button. 8. GPS (Non use). 9. Micro SD Card Slot 10. AV Interface 11. USB/Charging 12. Speaker 13. Reset Button 14. Back Holder 15. LED fill in light 16. Lens Button Function : ON/OFF Button MENU Button MODE Button Long press to turn on/off. When powered up, short press to turn on/off infrared fill in light. Short press to enter function setting menu. (Note: you can only enter this menu when the camera is not recording, so press the OK button [button 7] to stop recording and then the MENU button to enter the Menu). When in the Menu, pressing the Menu button will exit the menu setting. In images or video browsing mode, press the Menu button to delete option. In standby mode, press it to record, take photos and replay. When recording, long press the MODE button to lock the video. (Note: This is an option if you and the camera witness something which you’re not involved in, but could offer evidence if required). In the dual camera recording mode, press to switch the camera display from Front, to Rear, to Dual display. In the MENU mode, press to navigate the menu options. This button is also used to browse the pictures in the Up Select Button picture replay mode. In the video replay mode, press to fast backward. Long press this button to switch motion detect from on/ off. In the dual camera recording mode, press to switch the camera display from Front, to Rear, to Dual display. In the MENU mode, press to navigate the menu options. It’s used to browse the pictures in the picture replay mode. Down Select Button In the video replay mode, press to fast forward. Under the standby and recording mode, short press Down Select Button to switch audio recording from on/off. Long press it, to open parking monitor. While recording video and taking pictures, press to start/stop. OK Button In the MENU mode, press to conform Menu setting. In the video replay mode, press to play the video; Note: The device does not support GPS at the moment. CMOS 3.Specification 1.2M CMOS Sensor, 1/4 inch Light-sensing Motion detection Surface Area Lens Dual lens, 170 degree ultra-wide angle lens. Gravity sensor LCD 4.3inch high definition LCD screen Audio Photo Format JPG Cycle recording Picture resolution 8.0MP Front Camera 2.0MP 1920*1080P(FHD) Back Camera 1.0MP 720*480P SDHC, Support up to 32G TF Card H.264 Compression Code,MP4 Play format 4 core LED Language Three-dimensional Vibration Sensor, Save the Recording Video Built-in Microphone/Speaker(AAC) Seamless continuous recording. New file automatically covers oldest file when SD card is full. Locked files can’t be overwritten. Multi language Battery Built-in lithium ion polymer battery DDR 1G DDR3 Operating temperature Aperture -20℃ TO 70℃ Video resolution Storage Video format CPU Fill-in light Built-in Sensitive Motion Detection 2.0 4.Installation instructions Notes: 1. Use the back straps in accessories to fix the camera to the original car's rear-view mirror. Depending on the size of the original car mirror, you may have to offset the mirror slightly. (NOTE: once installed, check the clearance to the sun visors? In a small number of installations, because the mirror is wider than the original in may snag the sun visor when it’s being lowered. Check this now, so you’re aware if the mirror needs to be adjusted when lowering this visor) 2. Connect the car charger to the 12V socket (cigarette lighter), to charge the car camera (The device only supports charging by USB5V). The car charger has a supplementary USB socket built into it so you can plug another device in while it’s in use. 3. As long as the car camera is connected to the 12V socket switching on the ignition will power up the camera and it will start recording automatically. When the ignition is switched off, the car camera will stop recording and save the recorded data. 4. To use the rear camera it only needs to be plugged in to begin recording. Ideally, the rear camera should be installed at the top and in the centre of the rear window. 5. Please note the device should be connected to the car charger or DC power when in use as it requires reasonable power. When disconnected, the internal battery can only power the unit for a short time. Please also use the original car charger to charge the car camera. Fixing Belts Installation Front Camera Installation 1. Fix the car camera to the original car's rear-view mirror. Check the position of the 12v charger socket and if that is positioned to one side of the dash then run the cable in this direction from the mirror (shortest route). 2. Run the cable along the front windshield and it should be possible to tuck the cable behind the windscreen rubber and/or under the head-cloth. TIP: Where you pull any rubber seal back to open access to the head-cloth or inner panels, don’t refit this yet, as you may also be able to use this route for the rear camera cable. 3. From the top of the windscreen/head-cloth run the cable down the A-pillars. Again it should be possible to hide the cable behind the door seal rubber and/or behind the A-pillar panel, which should be accessible when the rubber is pulled back. 4. Feed the cable from here along the bottom of the dash panel/glove box, or if it suits better under the carpet. Where necessary, cable tie the cable to the back of these panels, or to existing cables. 5. Insert the charger to the 12v socket. Where there is excess, roll up and cable tie behind the dash in a suitable position. The front camera installation is now finish. Rear Camera Installation 1. Insert the back camera into the camera port. Decide your route for the cable and it may be possible to use some of the same route as the car charger cable, or you may decide to run the rear camera cable down the other side of the windscreen. TIP: If your car has two reversing lights, you can run the cable down either side of the roof of the car, but if your car has only one reverse light on the driver or passenger side of the car, you should run the cable down this side of the car as it will make it easier for connection into the reverse light circuit. 2. Run the cable along the front windshield and it should be possible to tuck the cable behind the windscreen rubber and/or under the head-cloth. 3. Run the cable to the rear window behind the top of the door rubber seals or under the head cloth. 4. When you reach the rear window pause and now fix the rear camera to the top of the rear window in a centre location. TIP: Where the rear window has a rear wiper, try to place the camera so it’s recording through a glass section which is swept by the rear wiper. Before tucking the cable from the lens under the head-cloth/rear window rubber, assess if the window opens as part of a hatchback door? If it does, it will be necessary to allow a small amount of cable slack at the camera lens, so it’s not pulled from the window when the rear door opens. 5. You’re now ready to plug the rear camera lens into the rear camera cable. Again assess how much excess cable you will have and where is a suitable location to tuck this away behind the head-cloth or possibly the C-pillar inner panel. 6. The two wires on the cable need to be connected into the reversing light circuit by a suitably qualified professional. The red wire is the trigger wire and should be connected to the live wire powering the reverse light bulb and the black wire is connected to earth. 7. Roll up the excess cable in the appropriate location and cable tie it. Once the reverse light circuit has been connected you can tuck the excess cable away. 5.System Menu The System Menu can only be accessed in stand-by mode. When the camera is powered up, press the Menu button immediately to access System Menu before the camera starts recording. If the camera has started recording, press the OK button to stop the recording and then press Menu to access the System Menu. 1. Video Quality: Optional 1080P(Full HD)/ 720P(HD);default is:1080P(Full HD)The item is highlighted in blue and pressing OK accesses the sub-menu which can be navigated using the up & down buttons. When you have decided on the setting press OK to store it and the camera will revert to the main system menu. 2. Photo Quality: Optional 1M/2M/3M/8M ;default:1M. This refers to the quality of any static images you may wish to take with the camera which in truth is unlikely! The item is highlighted in blue and pressing OK accesses the sub-menu which can be navigated using the up & down buttons. When you have decided on the setting press OK to store it and the camera will revert to the main system menu. 3. Video Time Length : Options are; 2 minutes/ 3 minutes / 5minutes with factory default set for 2 minutes. Video is recorded onto files of 2, 3 or 5 minute duration. The item is highlighted in blue and pressing OK accesses the sub-menu which can be navigated using the up & down buttons. When you have decided on the setting press OK to store it and the camera will revert to the main system menu. Carcam.ie has set this to 5 minute duration as in our opinion this is the best option. 4. Move Detect :Move detect is a function where the camera will switch on and record for a short duration when in stand-by mode (car parked or ignition switched off). It’s useful as a security device if someone tampers with the car or perhaps when the car is parked outside your house. In this scenario, the camera will switch on automatically and record for a short duration when the front camera lens picks up motion. Note: It’s important to switch move detect off before driving as failure to do so it will result in the camera only recording when it detects motion! i.e. if the car was stopped at traffic lights or in traffic recording would cease in this setting. The move detect options are: on/off and default is off. 5. White Balance: Several adjustments are available with “Auto” the preferred setting. However, you may wish to try some of the other settings and adjust as per your personal choice. Settings: Auto / Sunny / Fluorescent / Cloudy / Incandescent with the default setting of Auto. 6.Contrast:As with white balance above with the default setting 0. Options are: 0 / 1 / 2 / 3 / 4 / 5. 7. Exposure: This setting allows you to open or close the front camera lens to allow more or less light into it. The default setting is 0 but if you find the ambient daylight is very poor such as in the middle of winter, you could try opening the Exposure using the + settings to let more light in. Similarly if you felt the images were too bright as in summer you have the option to close the lens using the – settings. The default setting is 0 and Carcam.ie has found this very effective and any other setting chosen is by your personal choice. Options are: -3 / -2 /-1 / 0 / +1 / +2 / +3. 8. Power-On Record:This setting ensures the camera begins recording a few seconds after powering up which is the preferred setting. You will know the camera is recording as the timer in the top left corner beside the red video cam icon will begin counting. Settings are Open (Auto Record) or Off with the default set to Open. 9. Screen Timeout:Screen timeout determines how long the screen will stay on after the car is started. The screen coming on is a good idea, as it shows you what views the cameras have and confirms that they are recording. However, we recommend the screen switching off after 30 seconds, so it doesn’t represent a distraction to the driver. The options are: 10 Seconds/ 20 Seconds/ 30 Seconds/ Off Factory Default is 20 Seconds but Carcam.ie has set this to 30 seconds. 10. Record Voice:This switches the camera microphone on or, thereby recording, or not, the interior conversations in the car. The default setting is; Open (audio on) and you will need to agree you policy here, particularly if your children (teenagers) are using the vehicle! 11. Park Monitor :This is a clever function and when set to open (on) it will switch the cameras on when the car is parked and the camera detects movement, such as someone bumping the car in a carpark. If the camera detects a collision or shaking, it will automatically open to record for approximately 20 seconds & then turn off automatically. When the car is parked, this function is powered by the internal battery, so the camera will only have a limited number of such recording possibilities during any parked period. The setting are: Open (on) or Off, with the factory default; Off. However, Carcam.ie has set this to open (on) and this setting can be left on and it will have no negative effect on the normal camera recording cycle. 12. G-SENSOR :The G- Sensor detects a vehicle impact (car crash) and will automatically store that recording to a special “SOS” file on the SD card. The advantage here is that if the camera remains operational, any “SOS” files will not be over-written in the loop recording cycle. The options for the g-Sensor setting are high/ Medium/ Low & Off with the factory default setting of; Medium. However, Carcam.ie has found in the testing cycle that Irish Roads, particularly traffic calming measures can trigger the G-Sensor in “medium” setting, so we have set the G-Sensor to “High”. 13. Sensor light:The Sensor Light is a bank of LEDs around the front camera lens, designed to offer assistance in night recording where there is poor ambient light. The options are; Off/ Open (on continuously) or Auto with the default setting of Auto. 14. Date Setting: to set the date, enter the date menu and press OK button to open Date &Time setting. Each setting will highlight in turn and use the Use & Down buttons to adjust and press Mode button to store the setting and move to the next parameter. Press the OK Button to finish and revert to the main System Menu. 15. Language:There are 14 language options which are;Optional Simplified Chinese/Traditional Chinese / English / Russian / German / Japanese / French / Portuguese / Korean / Italian / Czech / Polish / Slovak / Spanish with the default setting of: English 16. Time Watermark (Date stamp) :This is the option to have the date and time displayed on recordings which is important in the event of an accident or incident witnessed by the camera. The options are Open (on) or Close (off) and the default is on. 17. Factory Reset: This is a digital electronic device and if at any point it functions incorrectly you should use the Factory Reset button. The options are to Confirm or Cancel. Note: where a Factory Reset is confirmed some of the aforementioned settings will have to be re-entered. 18. Version. This just refers to the firmware version in the camera. PLAYBACK FUNCTIONS The easiest and best way to check recordings is to connect the camera to a PC using the USB cable supplied. The device will ask "Open USB storage devices and charging mode",Up button and down button to switch, press OK button to confirm. The device should be identified by the PC as a “Removal Disk” and you can click through to the DCIM Folders. DCIM A is the front camera recordings and DCIM B is the rear camera recordings. You can also access the recorded files by removing the Micro SD card and connecting this to a PC using the adapter peovided. It is also possible to check recordings on the camera when in situ. To do this enter the system to function setting. Remember, to access the menus the camera must stop recording so press the OK button to stop recording. DISPLAYS, CAMERA & PLAYBACK FUNCTIONS. (A) RECORDING DISPLAY Start recording & video time runs (B) CAMERA FUNCTION In Standby State (camera not recording) – Press Mode Button. Hint: Remember the camera starts recording a couple of seconds after power on and to stop recording and return it to stand-by state press the OK button. Press Mode Button Enter Camera Function Press OK Button to take static photos. (Photo display: 1M A is front camera, 1M B is back camera) ( C ) VIDEO PLAYBACK FUNCTION In Standby State – Press Mode Button Press Button Mode Enter Video files Function Press OK Button to playback video and/or browse photos. (Note: Where the letters“SOS” appear on a files name, this file has been locked and won’t be recorded over in the loop cycle. Locked files also can’t be deleted, so if the file is required, copy the locked file to your computer. It may then be necessary to re-format the SD card to clear these files. 7. Sample fault handling The car camera won’t turn on? 1.Please confirm whether there is power in the battery or connect the car charger. Is the charger light illuminated? The camera won’t record video or photos? 1. Please confirm whether the Micro SD card is installed correctly in the device 2. If you are using an SD Card other than that supplied by Carcam.ie, check the storage speed of the card? The camera requires a Micro SD Card – Class 10 – UHS 1- 300X or higher. 3.Please check there is no physical damage to the SD. The camera won’t playback video or photos on your PC? 1. Please rename the file when saving it on in your computer. 2. Try using a different program such as VLC which can be downloaded onto a PC for free. 3. SD card may be damaged, please change card. 8.Warning 1. The device is a precision electronic product. Do not drop, shake or shock violently. Do not disassemble or the warranty will be invalidated. 2. When charging the device, please make sure the power and car charger are stable. Over voltage and over current will damage the device. If the device won’t power up, please check the power and the car charger. 3. The device comes with glass mirror. And should be treated accordingly. Do not hit hit the mirror and keep it away from corrosive substance. 4.Do not expose the device to the rain or water, or it will affect the life span and usage of the device. 5.Do not expose the device to an overly humid environment. The device is not waterproof. and the operating temperature should be less than 60℃. 6.If the recording video is blurry, please check the lens to see whether it is clean. 7.Do not use the camera under extreme artificial light, or it may damage the internal photosensitive components. 8.When using the device, if the screen and the key are non-responsive please use the RESET button (13) on the back of the mirror and it should restart. 9.When making any connections to the camera or rear lens pleas be gentle and don’t force a connection. 10.The front lens is rotatable. But it is not recommended to rotate it aggressively or frequently. 11.The device only supports a high speed Micro SD Card above 8GB capacity. The card must be Class 10 and UHS-1, ideally 300X or higher. 12.When the camera is recording mode, only press OK to exit. 13.The G-Sensor may need to be adjusted depending on the amount of locked “SOS” files on the memory card. 14.When finished with this device, it must be disposed of in accordance with local legislation. Under no circumstances should this device ever be disposed of in a fire.