1
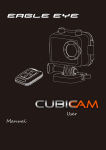
A1 User Manual Please read the user manual clearly for avoiding any wrong opeartion, current manual is not the newest and not complete, please contact us if any query. ~1~ Catalog Main Feature ................................................................................................................................. 4 Install and Use ............................................................................................................................... 5 1. Camera buttons .................................................................................................................. 5 2. Install Memory Card ........................................................................................................... 6 3. Install the Mounts ............................................................................................................... 6 4. Connect to cigar lighter ...................................................................................................... 7 5. Video record and Capture................................................................................................... 7 6. Video Playback ................................................................................................................... 8 7. Delete files ......................................................................................................................... 8 8. Connect to Television ......................................................................................................... 9 9. Connect with Computer .................................................................................................. 10 System Icons ................................................................................................................................ 11 REC Setting .................................................................................................................................. 12 REC Mode .............................................................................................................................. 12 1. Video Resolution : ............................................................................................................ 12 2. Loop record setting .......................................................................................................... 12 3. Motion Detection ............................................................................................................. 13 4. Record Audio ................................................................................................................... 13 5. Date & Time stamp .......................................................................................................... 14 6. G-Sensor .......................................................................................................................... 14 7. Fatigue driving Warning ................................................................................................. 15 Video & Picture Setting............................................................................................................... 16 1. Picture Capture Mode....................................................................................................... 16 2. Image size ........................................................................................................................ 17 3. Still Picture Quality ........................................................................................................... 17 ~2~ 4. Sharpness ......................................................................................................................... 18 5. Color Effect....................................................................................................................... 18 6. ISO Setting ....................................................................................................................... 19 7. Anti-Shaking of Hands...................................................................................................... 19 8. Date & Time stamp .......................................................................................................... 20 System Setting ...................................................................................................................... 21 1. Exposure Setting .............................................................................................................. 21 2. White balance .................................................................................................................. 21 3. Date/Time Setting ............................................................................................................ 22 4. Beep Sound ...................................................................................................................... 23 5. Language ......................................................................................................................... 23 6. TV mode output ............................................................................................................... 24 7. Frequency......................................................................................................................... 24 11. Format .......................................................................................................................... 26 12. Default setting............................................................................................................... 27 13. Version .......................................................................................................................... 27 14. Firmware Update ........................................................................................................... 28 ~3~ Main Feature 480 x 240,1.5”TFT LCD Screen 3MP HD COMS Sensor 135º Wide angle FHD 1080p ; H.264 Compression into MOV Video format G-Sensor reaction, Save the current video compulsively when the accident occurred. Zero second leakage REC function, save all datum . Auto REC: Camera will turn on and start video record automatically after launch the vehicle. Loop REC: Set up in different REC time. Support photo shot Video resolution option in setting: 16:9 Full HD 1920 x 1080p 30FPS 16:9 HD 60FPS 16:9 HD 4:3 WVGA 1280 x 720p 1280 x 720p 848 x 480 30FPS 30FPS Picture resolution option in setting: 4000 x 3000 12MP 3200 x 2400 8MP 2592 x 1944 5MP Video & Picture playback Support 1GB~32GB High speed TF memory card High speed USB2.0 interface for Power charge and Data transfer USB & RCA output optional ~4~ Install and Use 1. Camera buttons 1, REC/Confirm 8, Menu 2,Reset 9, Down 3,Power/Mode 10,MIC 4, Power indicator 11, Lens 5, REC indicator 12,USB Port / Video output 6, LCD Screen 13,TF card slot 7, Up 14-15,Mount /3M adhesive ~5~ 2. Install Memory Card a ,Please install the TF Card according the graphic: b ,This camera without build in storage, support 1GB~32GB TF Card external memory expand. c , After install the TF card ,rest available memory could be checked on the screen. Attention: Please use the original TF card for good using experience. Bad or phony TF card would happen the problem like “can not read” or “file damaged”. Please format the TF card in this camera before use it at first time. 3. Install the Mounts + = ~6~ 4. Connect to cigar lighter Mini 8pin side insert to camera , car charger side insert to cigar lighter. 5. Video record and Capture a ,Camera will power on and start video record automatically while starting the car or connecting the power source, a red icon will flash on left corner of screen during this time. b , Press POWER button transfer to picture shot mode, press REC to take a photo, press< and > to zoom in/out. ~7~ 6. Video Playback Press POWER button to enter the video file, press < or > to browse the videos and photos Press REC to play or pause the video, press < or > to fast forward or fast rewind. Press < or > to browse next photo 7. Delete files Press MENU under playing or browsing state, delete option menu will display on the screen. Press < > to choose Choose Delete:Press REC button to confirm delete and the delete option menu will appear, or press MENU to quit. Delete Current:Press REC to delete current file, or press MENU to cancel operation. Delete All: Press REC to delete all video & picture files, or press MENU to cancel operation. Choose Protect : Press REC button to confirm and protect option menu will appear, or press MENU to quit. ~8~ Lock Current : Current file will not effected by loop record and will not be deleted. Unlock Current: Current file would be deleted if the memory card is full under loop record mode. Lock All: All video and picture files will not effected by loop record and will not be deleted. Unlock All : All video and picture files would be deleted if the memory card is full under loop record mode. Slide Show: Press REC to enter in 2 seconds slide show mode Press REC to confirm operation and quit Attention: The files will not be recovered after deleted, recommend to backup before do this operation. 8. Connect to Television A,USB-RCA cable connect with TV RCA side insert to TV (Yellow for Video, White for Audio); 8 pin USB side insert to camera. ~9~ 9. Connect with Computer Connect the camera with computer via USB cable, available for data transfer, update the camera firmware and charge. After connect with the computer, option menu will be display on the screen, press < or > to make a choice. Press REC to confirm operation. Mass Storage : Connect with computer to browse , copy or playback in the computer. TV: Connect to TV , could play the video clips and pictures in the camera memory card. Video : Connect with computer to charge the power and it is also available to operate the camera and do recording. ~ 10 ~ System Icons REC Mode Capture Mode Scan Mode REC setting Capture setting System setting HDR MIC on Loop REC / 5 Minutes per video clip Exposure Value Full HD 1080p 30FPS Anti-Shaking ON White Balance ISO Photo pixel Photo quality TF Card condition Battery Charging No SD card installed ( Use internal memory) Protected file while G-sensor active ~ 11 ~ REC Setting REC Mode Press MENU under REC mode to enter main menu, press < > to select setting content, press REC to confirm operation. 1. Video Resolution : Press < > to select suitable resolution , press REC to confirm , save and quit. 2. Loop record setting Press < > to select loop recording under REC mode , press REC to confirm operation and quit. Press < > to select suitable loop time , press REC to confirm , save and quit 6 First time default loop time is 5 minutes OFF : Loop record is not activated , the camera will continue record till the SD card full or the vehicle turned off, the system will not save the video in part. ~ 12 ~ 3. Motion Detection Press < > to select motion detection under REC mode , press REC to confirm operation . Press < > to select off or on, press REC to confirm setting , save and quit. ON: REC mode will turn to motion detection mode directly and Auto Record model will not available any more. Motion detection : Active to start video record only when detect movement. The default Recording time will continue 10 Seconds if there without 2nd movement detected. Camera will record continuously if movement always detected. 4. Record Audio Press < > to select “ Record audio” under REC mode , press REC to confirm and enter. Press < > to select ,press REC to confirm and quit. Off: Video clip without sound On:Video clip with sound ~ 13 ~ 5. Date & Time stamp Press MENU to enter the main menu of the camera , press < > to select time stamp Press REC to confirm and enter to select menu, press < > to select , press REC to save and quit. OFF: Video clip without Date & Time stamp On : Video clip with Date & Time stamp 6. G-Sensor Press MENU to enter main menu, press < > to select G-Sensor. Press < > to select Off: Turn OFF G-Sensor High : High sensitive respond to active G-sensor Middle : Middle sensitive respond to active G-sensor Low : Low sensitive respond to active G-sensor ~ 14 ~ Note: This function is useful for saving current file when vehicle suddenly stop or traffic accident happen. 7. Fatigue driving Warning Press MENU to enter main menu, press < > to select Fatigue driving Warning Press < > to select Warning icon: Note: Off: Close warning 1Hour:Warning per hour 3Hour:Warning per 3 hours 2Hour:Warning per 2 hours 4Hour:Warning per 4 hours ~ 15 ~ Video & Picture Setting 1. Picture Capture Mode Press POWER to select Capture Mode, press MENU to enter main menu ,press < > to select Press < > to select capture mode, press REC to confirm and enter select menu Single : Press REC button once to take one picture immediately 2S / 5S / 10S timer : Delay 2s/5s/10s to take picture after press REC button ~ 16 ~ 2. Image size Press < > to select the image size , press REC to enter the select menu. Press < > to select suitable image size according to personal need, press REC to save and quit . 3. Still Picture Quality Press < >to select image quality, press REC to enter select menu. Press < > to select image quality. Press REC to save setting and quit. Note: Default setting is High quality . ~ 17 ~ 4. Sharpness Press < > to select sharpness ,press REC to enter select menu Press < > to select suitable sharpness option, press REC to save and quit. Remark: Default setting is Normal. 5. Color Effect Press < > to select the effect of color Press REC to enter setting Press < > to select to select suitable photo effect, press REC to save option and quit. Normal : Normal color picture Black & White: Black and white picture Sepia: Retro special efficiency picture Remark: Default setting is Normal color picture. ~ 18 ~ 6. ISO Setting Press < > to select ISO under capture mode, press REC to confirm and enter option menu. Press < > to select suitable ISO according to different enviroment Press REC to save selection and quit. Remark: Default Setting is Auto 7. Anti-Shaking of Hands Press < > to select Anti-Shaking ,press REC to enter the option menu. Press < > to select OFF or ON Press REC to save option and quit Remark : Default setting is ON, recommend to turn on. ~ 19 ~ 8. Date & Time stamp Press < > to select date stamp ,press REC to enter the option menu. Press < > to select turn on or turn of the date stamp. Press REC to confirm , save and quit. Off: Picture without date display Date : Picture with date display Date / Time : Picture with time and date display Remark: Default setting is Date & Time displayed in the picture. ~ 20 ~ System Setting Press the “ MENU “ button twice to enter the system setting menu. 1. Exposure Setting Press MEMU to enter the current setting ,press menu again to enter system setting menu. Press < > to select exposure Press REC to enter setting menu Select suitable exposure according to different environment Press REC to save setting and quit Remark : Default setting is +0.0 2. White balance Press < > to select white balance setting Press < > to select ~ 21 ~ Press REC to confirm, save and quit Remark: Default setting is auto 3. Date/Time Setting Press < > to select Date/ Time, press REC to correct time and date Press REC to confirm and enter, Press < > to adjust time and date, press REC to confirm ,save and forward to next setting. Press REC to save and quit. ~ 22 ~ 4. Beep Sound Press < > to select beep sound ,press REC to enter setting . Press < > to select turn on / off the button sound Press REC to confirm setting and quit 5. Language Press < > to select language ,press REC to setting Press REC to confirm and press< > to select language Press REC to confirm and quit Remark : Default setting is English ~ 23 ~ 6. TV mode output Press < > to select TV mode Press REC to confirm and select , press < > to select PAL system Press REC to confirm and quit NTSC: 60Hz for Europe , America, Japan, etc. PAL: 50Hz for China and some Asia countries Most TV compatible with NTSC / PAL automatically ,could be used directly without external setting Remark : Default setting is NTSC system 7. Frequency Press < > to select frequency Press REC to confirm and select ,press < > to select Press REC to confirm setting and quit ~ 24 ~ Note: The frequency here means Power Frequency. 8. Image Rotation Press < > to select Image Rotation Press REC to confirm and select Off:Normal picture On : 180° Rotated picture 9. Screen Saver 10. Press < > to select Screen Saver Press REC to confirm and select Press REC to confirm , save and quit Off: Screen will not turn OFF 3 minutes : Screen will turn OFF automatically after 3 minutes if without any operation ~ 25 ~ 5minutes : Screen will turn OFF automatically after 5 minutes if without any operation. 10 minutes : Screen will turn OFF automatically after 10 minutes if without any operation 11. Format Press < > to select format Press REC to confirm and select Press < > to select format or not ,press REC to confirm Cancel : Cancel operation and TF card will not be formatted OK : format the current TF card Press REC to confirm and quit Attention: Data could not be recovered after formatting operation, please be cautious. ~ 26 ~ 12. Default setting Press < > to select default setting Press REC to confirm and select ,press < > to select whether return menu to default setting or not. Press REC to confirm and quit. Cancel : Cancel operation and system will not be reset OK: Reset to factory setting 13. Version Press < > to select the version ,press REC to confirm and watch the version information. Press REC to quit to the setting menu. ~ 27 ~ 14. Firmware Update Download the firmware package from the official website or local distributers website , the package as below After released: Copy the file “ FW96650A.bin” to the root directory of TF card Install the TF card to the camera and turn on , update process will run automatically. ~ 28 ~ Specifications ITEM SPEC Build in storage 32MB TF card 1-32GB LCD sensor Main Spec Video Audio Size 1.5inch resolution 480x240 size image pixel Camera Spec Other Spec Support 32GB SDHC CMOS 2304H x1536V output port USB/RCA Microphone built in Output port USB/RCA speaker built in USB USB 2.0 high speed Battery 3.7[V], 300[mAH] Li-ion battery Car charger DC 5V, 1A Interface Power 1/3inch REMARK Main Unit size 80x31.5x39mm weight g motion detection Yes loop record yes timing record yes zoom yes AV record option yes TF card full notice yes time stamp yes image flip yes video quality option yes support record under screen off yes ~ 29 ~ Battery included Specifications ITEM SPEC File protected while lower power Yes REMARK Full HD1920x1080 30FPS HD1280x720 30FPS Video record HD1280x720 60FPS optional HD1280x720 30FPS Video & QVGA 848x480 60fps Picture Capture optional Sound slid show yes Thumbnail browse No Video 12MP 3648 x 2736 10MP 3264 x 2448 8MP yes record Playback 4032x3024 support WVGA: 848x480 Frame rates 30 fps file format Full HDMOV H.264 Playing speed optional X1, X2,X 4,X 8 Accessories Camera Unit 1 Manual Disc 1 3D Mount 1 USB & RCA cable 1 Cigar Charger 1 Cable clip 5 ATTENTION: Product will lost warranty if disassemble personally ~ 30 ~ Please login www.jeasun.net for more product information. ~ 31 ~