1
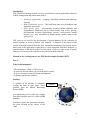
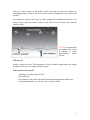
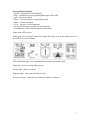
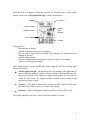
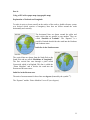
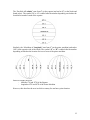
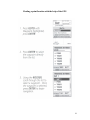
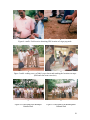
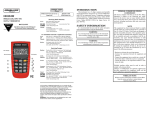
Introduction to GIS and Working and Use of a GPS (Model Example Garmin GPS 72) A Training Programme on the Functions and Use of GPS Receivers for the field staff of the Forest Department, Karnataka, southern India Nandita Mondal, Smita Nair, Narendra Babu and Surendra Varma 1 Introduction to GIS and Working and Use of a GPS (Model Example Garmin GPS 72) A TRAINING PROGRAMME ON THE FUNCTIONS AND USE OF GPS RECEIVERS For the field staff of the Forest Department, Karnataka, southern India September 30th to October 7th 2004 Conducted at Bandipur Tiger Reserve, Bannerghatta National Park, BRT Wildlife Sanctuary, Rajiv Gandhi National Park Karnataka Organised by The Forest Department, Govt. of Karnataka Karnataka Forest Department With the technical supports from Asian Elephant Research and Conservation Centre, (A division of Asian Nature Conservation Foundation – ANCF) Centre for Ecological Sciences, Indian Institute of Science, Bangalore Centre for Ecological Sciences, Indian Institute of Science, Bangalore Karnataka Forest Department was born on 11.1.1864 with a complement of five officers. The main aim of the department is to protect, conserve and promote sustainable development of the forests of the State and to promote tree based farming in support of soil and water conservation on agricultural lands. The department protects the forests and wildlife from various types of pressures and threats. The main protection activities include fire protection, boundary consolidation, prevention and removal of encroachment from the forest area, prevention of illicit cutting of timber and firewood, indiscriminate harvest of Non timber forest produce, prevention of poaching of wild animals etc. The Department undertakes regeneration, soil and moisture conservation works, canopy manipulation, weeding, climber cutting habitat improvement, wildlife management etc., The department aims at increasing the productivity of the forests to meet the growing demands of the people. The afforestation is done on degraded forest lands, community lands, C & D class lands, fore-shore areas and other institutional lands. Asian Elephant Research and Conservation Centre – AERCC (a division of Asian Nature Conservation Foundation - ANCF) was set up in early 1998 to deal exclusively with matters pertaining to the Asian Elephant, viewed as the flagship species in the context of conservation of biologically rich tropical forests of this region. AERCC undertakes applied research and direct field conservation activities pertaining to the Asian elephant and its habitat. The centre has created a comprehensive database on Asian elephant populations, and is actively involved in field research projects and on the ground conservation initiatives, organizing scientific workshops, and promoting projects beneficial to elephant conservation. The centre is a major capacity building centre in Asia with focus on providing training in recent techniques for censusing elephants and other large mammals, monitoring and research on elephant-human conflict, evaluation and institution of mitigation techniques and the use of GIS (Geographical Information System) for evaluating elephant habitats. The Centre for Ecological Sciences at the Indian Institute of Science offers opportunities for research in a variety of areas in ecology.. These include animal behaviour, evolutionary biology and sociobiology, community and habitat ecology, molecular genetics and conservation biology, large mammal and forest ecology, and climate change. Research is being carried out on a number of taxa, ranging from ants to elephants, and including wasps, crickets, spiders, herpetofauna, birds and mammals. The projects range from theoretical to laboratory to field-based research with the different approaches being used in a complementary manner. Suggested citation: Mondal, N., Nair, S., Babu, N and Varma, S. (2004). Introduction to GIS, the working and use of a GPS (model example Garmin GPS72): A training programme on the functions and use of GPS receivers for the field staff of the Forest Department, Govt. of Karnataka. A Joint Publication of Karnataka Forest Department, Centre for Ecological Sciences, and Asian Elephant Research and Conservation Centre – AERCC (a Asian Nature Conservation Foundation - ANCF), Bangalore, India. Copyright © KFD/CES/AERCC-2004 Photo Credits: Front Cover & Back cover: Surendra Varma, all other photographs: Nandita Mondal. Contents Preface Acknowledgements 1 2 Section1: Introduction to GIS and working and use of a GPS (model example Garmin GPS72) 3 Introduction Manual on the working and use of a GPS (model example Garmin GPS72) Part 1: What is this instrument? Part 2: Components of a GPS – example: model „GPS72‟ Part 3: Using a GPS – Working with waypoints Part 4: Using a GPS with a paper map (topographic map) References Section 2: Field Guide Step-by-Step instructions for basic operations on a GPS: „Working with Waypoints‟ Storing a location on the GPS Retrieving data from the GPS Finding a point/location with the help of the GPS 4 4 4 6 9 11 14 15 17 18 19 Appendix 1: A) Conversion from degrees-minutes-seconds to decimal degrees B) Conversion from decimal degrees to degrees-minutes-seconds C) Locating points on a paper map 20 21 22 Appendix 2: Training programme on the functions and use of GPS receivers for the field staff of the Forest Department, Karnataka Training programme photos 23 25 Preface Given the wide value of the application of Global Positioning System (GPS) technology, use of the same by the forest department for the management of the forest and wildlife is either limited or not known. GPS receiver instruments were provided to the Forest Department by the Monitoring of Illegal Killing of Elephants (MIKE) for development of the elephant sighting and mortality database on a national scale. The organization had conducted a training programme on the technology behind the working of a GPS. As a review of the knowledge gained through the MIKE programme and, also, to introduce the wider applications of the instrument in habitat and conservation issues, a follow-up training programme was required, and hence such a programme was conducted, for field staff of the forest department in the state of Karnataka, southern India. This experience of conducting training programme on the functions and use of GPS receivers for the forest department staff of Karnataka, helped us to develop a specific document on the subject. At the end of the programme the participants were asked to provide their feedback regarding the usefulness of the programme and suggest improvements of the same. The participants from three forest divisions did find the programme a useful one, giving them a theoretical understanding of the working of a GPS. However, all were of the view that two days was not sufficient for familiarizing themselves with a GPS and using it in the field. Suggestions were given to include practical (field) exercises using the instrument. Resource personnel were asked to provide similar material for working with tracks and backtracking, and a more detailed version of the existing material. Some participants took the responsibility of explaining the concepts in simpler, locally understandable words. This helped the resource persons to assess the involvement and understanding attained by the participants. Each site and in each session participants were asked to come forward and give their views on their learning experience. Their feedback further reflected their capacity of grasping the concepts. However, for the programme to be more effective, it should focus on training a higher number of staff members and at regular intervals to retain the concepts and hence for efficient use of the systems. This document, developed based on these experiences has 2 sections, the first provides some insights on GIS, usage of GPS in wildlife studies, on the working and use of a specific GPS model (Garmin 72). Through this section, we bring in the introduction to GIS, GPS instrument, satellites, components of a GPS, application of GIS, GPS in forest and wildlife management and other aspects related to it. The 2nd section as field Guide, introduces the user to the step-by-step instructions for basic operations. We have also included appendixes of conversion from degree-minutes to decimal degrees, decimal to degrees-minutes-seconds, locating points on a paper map and the experience of conducting the training programme We believe the document developed for a training programme may act as knowledge base and also as a user guide to forest staff across the country and to other field researchers as well. Surendra Varma Programme Coordinator Bangalore – September 2004. Acknowledgments Many individuals and institutions provided their valuable inputs for conducting this programme and to, also, develop this document. We wish to thank Mr. R.M. Ray IFS, PCCF – Wildlife & Chief Wildlife Warden, and Mr. Anur Reddy IFS, Chief Conservator of Forests (CCF-Wildlife) for their keen interest and personal involvement in conducting this programme for the forest department staff. Deputy Conservators of Forests (DCF), Assistant Conservators of forests (ACF) Forest Range Officers, Foresters, Forest Guards and Forest Watchers of Bandipur Tiger Reserve, Bannerghatta National Park, BRT Wildlife Sanctuary, Rajiv Gandhi National Park showed deep interests in executing and participating in this program. Prof. Sukumar (Professor at Indian Institute of Science) and Dr. Arun Venkataraman (Programme Officer MIKE) were the sources of motivation in conducting this program. Special thanks are due to Mr. Sudhira, Centre for Ecological Sciences, Indian Institute of Science, for his inputs. All material has been adapted from the Garmin website, www.garmin.com, and manuals published by Garmin 2 Section 1: Introduction to GIS and Working and Use of a GPS (Model Example Garmin GPS72) 3 Introduction GPS (Global Positioning System) receivers are utilized in various applications related to wildlife management and conservation such as o Landscape applications – mapping, identifying locations and landscape elements o Study of particular species – flora and fauna (any taxa), distribution and abundance, movement o Other specific issues – encroachment, assessing habitat continuity and fragmentation, disturbance due to various factors such as fire, grazing, developmental activities (hydroelectric projects, road network, human artifacts, etc.), and, assessment of human animal conflict status at the species level GPS receivers are used for the development of spatial databases by the collection of spatial locations in terms of latitude and longitude. A database so developed would consist of locations collected from the field. Information pertaining to the specific task at hand (such as the application/s stated above) is then associated with these locations. A spatial database of this kind can then be used within a GIS for a wide variety of spatial analysis as a tool to provide solutions to the problem identified initially. Manual on the working and use of a GPS (model example Garmin GPS72) Part 1: What is this instrument? • The instrument is called a „GPS receiver‟ • It is used to find out where you are on the earth‟s surface • It gives a location in terms of latitude and longitude • It obtains signals from satellites… Satellites A network of 24 satellites is constantly circling the earth in outer space. These satellites form the Global Positioning System (GPS). Satellite Our instrument receives radio wave signals from these satellites and so is called a GPS receiver. With these signals the instrument calculates the given location on the surface of the earth. 4 There are control centers on the earth‟s surface that make sure that the satellites are functioning properly. That way the user can get accurate information with respect to the location. The concept of control centres may be little complicated to understand, but there is no need to worry about the control centers as the GPS receivers interact only with the satellites above. NOTE! It is important to get signals from at least 4 satellites to know approximately where you are. Who uses it? Almost everyone uses the GPS instrument, at least in outdoor applications like marine navigation, forestry, even simple adventure sports. Why use it for forest work? - Advantage over paper maps in field Quick and easy Can reference to any other map which has latitude and longitude marked on it No doubt about where you are; can convey easily to others 5 Part 2: Components of a GPS – example: model „GPS72‟ Here‟s what the black instrument (GPS receiver) looks like. There are many models of GPS receivers. The one that is shown here, is called the „GPS72‟ manufactured by the company „Garmin‟, a USA based company. It mainly has: Interface keys Display Screen The display screen shows what are called „pages‟ available for various uses. Consider, GPS as a book that has 5 different pages one can flip through. Here there is no need turn the pages with one‟s fingers, but the interface keys are used to go to each page. These are the interface keys on GPS: Zoom Go to Page On/Off Menu Qui t Enter Scroll/navigation 6 Keys and their functions: • On/Off – Switches the GPS on and off • Page – With this key one can go through the pages of the GPS • Quit – Cancel any option • Menu – View the options for a particular screen • Enter – Can save an option • Go to – Can go to a saved waypoint • Zoom – Zoom in and out of the screen (track page) • Scroll/Rocker – Select different options on the screen Pages of the GPS receiver If the „page‟ key is pressed 5 times, the 5 pages that can be seen on the display screen of the GPS receiver are as follows: GPS information page - gives information on locations and satellite status Map page – shows on a map where you are Pointer page – shows a compass Highway page – also a map, but shows a road Active route page – shows the route that one could be working on 7 When the GPS is switched on (using the red key), the first page that is shown on the display screen is the „GPS information page‟, which is shown below: Altitude Accuracy Receiver status Satellite location Satellite signal strength Date and time Location The page shows - Date and time of the day. - Altitude of the place where you are standing. - Receiver status, which indicates whether a 2D position or 3D position has been attained by the GPS. - Satellite signal strength. - Location, giving latitude and longitude of the place where one is standing. - Accuracy of the location (reading). Three things must be checked on this page before using the GPS for collecting data. These are as follows: Satellite signal strength – The black bars show the strength of the signals that are received from the satellites. Each bar is for one satellite. The longer the black bar, the more the strength of the signal. It is important that at least 4 of these bars be visible on GPS screen. The diagram marked „satellite location‟ shows which satellites are giving a signal. Accuracy – This number indicates how accurate the GPS reading is. The lower the value of this number, the more accurate is the reading. Location - Latitude and longitude readings should be visible on GPS screen. The reading obtained by the GPS is shown in the area marked „Location‟. 8 Part 3: Using a GPS – Working with Waypoints What are waypoints? “Waypoint” is the technical term used for a location that is obtained with the GPS. It is important to store these waypoints on the instrument for later reference. One can view the stored waypoints on the GPS. Using the GPS one can also find a particular location of our choice. These functions have been explained in the following steps: Step-by-Step Marking and storing a waypoint on the GPS: - Press and hold the ENTER/MARK key. The „Mark Waypoint‟ page will appear. Highlight the „OK‟ button. Press the ENTER key again to save. Retrieving stored waypoints from the GPS: - Press the MENU key twice. The „Main Menu‟ page will appear. Highlight the „POINTS‟ option in the list and press the ENTER key. A „Waypoints by Name‟ page will appear with a list of your saved locations. Finding a waypoint with the help of the GPS: - Press the GOTO key With the „Waypoint‟ option highlighted, press ENTER Press ENTER again to select a waypoint directly from the list. Use the ROCKER key to scroll through the list and select a waypoint. When the waypoint one wants to go to is selected, press ENTER. Press PAGE until the „Compass Page‟ is displayed. Follow the direction of the arrow in the compass. Examples of uses of waypoints Location of anti-poaching camps – Once the locations of anti-poaching camps in given area is known, one can view where each camp is located on a map. One can also use the GOTO option to find the way to any of the camps. Location of burnt areas – One can mark where a fire has occurred in the forest. This will be useful for showing how frequently an area gets burnt. 9 Mapping tree species – sandalwood? By marking the locations of sandalwood trees and then on a map, one can see where sandalwood is more abundant in the forest and monitor those areas effectively. Location of animal sightings When an animal is seen, such as a tiger or an elephant herd, it is good to obtain a location so that it can be conveyed to others where exactly the animal/s was/were sighted. The repeated sightings of the tigers and obtaining their locations through GPS instrument, the distribution of tiger is known GPS locations can be used for many more things! 10 Part 4: Using a GPS with a paper map (topographic map) Explanation of Latitude and Longitude To make it easier to locate oneself on the surface of the earth, a global reference system was devised which consists of imaginary lines that are drawn around the earth horizontally and vertically. The horizontal lines are drawn around the globe and make circles that are parallel to one another. They are called “Parallels of Latitude”. The “Equator” is a parallel of latitude that divides the earth into the Northern and Southern zones. India lies in the Northern zone. The vertical lines are drawn from the North Pole to the South Pole and are called “Meridians of Longitude”. The first vertical line runs through a place called Greenwich, which is in England. This line is called the “Prime Meridian” and it divides the earth into the Eastern and Western zones. India lies in the Eastern zone. The units of measurements for these lines are degrees (denoted by the symbol „o‟). The “Equator” and the “Prime Meridian” are at 0o (zero degrees). 11 The “Parallels of Latitude” start from 0o (at the equator) and end at 90o (at the North and South poles). The symbol „N‟ or „S‟ is added after the number depending on whether the location lies north or south of the equator. Similarly, the “Meridians of Longitude” start from 0o (at the prime meridian) and end at 180o (at the opposite side of the earth). The symbol „E‟ or „W‟ is added after the number depending on whether the location lies east or west of the prime meridian. India lies roughly between - latitudes 8oN and 38oN of the Equator - longitudes 68oE and 98oE of the Prime Meridian However, this describes the area in which a country lies and not a point location. 12 Any one line of latitude and any one line of longitude will intersect one another at a point on the earth‟s surface. This point describes a location somewhere on earth and the position is expressed with the help of numbers (degrees) and is commonly called “coordinates”. For a set of co-ordinates the first number represents the latitude and the second number represents the longitude. To be more precise in describing a point location, finer measurements are used. Just like how a meter is divided into centimeters and then further into millimeters, a degree is divided into minutes and a minute is in turn divided into seconds. A degree is divided into 60 minutes (denoted by „). A minute is divided into 60 seconds (denoted by “). So when describing a particular location in India, first the latitude is stated in degrees, minutes and seconds, followed by N (because India lies North of the Equator). Then the longitude is stated in degrees, minutes and seconds, followed by E (because India lies East of the Prime Meridian). For example, the co-ordinates for Bangalore city in degrees, minutes and seconds are 12° 57' 35‟‟ N 77° 37' 42‟‟ E Some GPS receivers display the co-ordinates as decimal degrees, which just show the same co-ordinates in a decimal number system. For example, the co-ordinates for Bangalore city in decimal degrees are 12.95972° N 77.62833° E To see how this conversion is done, refer Appendix 1. 13 Latitudes and longitudes on a paper map Survey of India (SOI) topographic maps has latitudes and longitudes marked on them. Each map covers a small area, so the latitudes and longitudes marked are at the level of minutes. However, seconds are not marked on these maps. A typical SOI at a scale of 1:50,000 has 4 lines of longitude and 4 lines of latitude dividing the map into square boxes. These lines are spaced at intervals of 5 minutes. A GPS will give co-ordinates that are in decimal degrees. This can be converted to degrees-minutes-seconds (see Appendix A) and then the point can be located on the topographic map using simple measurements (see Appendix B for procedure). A GPS can therefore be used with paper (topographic) maps in providing an overall picture of the landscape where the points of interest are located. References GPS Garmin manuals o GPS guide for beginners o An introduction to using a Garmin GPS with paper maps for land navigation o GPS 72 Personal Navigator – Quick start guide o GPS 72 Personal Navigator – Owner‟s manual and reference guide World Wide Web 14 Section 2: FIELD GUIDE Step-by-Step instructions for basic operations on a GPS „Working with Waypoints‟ 15 Check! When the GPS is switched on, one need to wait for the signals to be received by the GPS; the number of bars on the display should be at least four. Latitude and longitude readings should be visible on the screen. The number on the top-right corner of the screen showing accuracy should be as low as possible. Wait for this number to become steady. 16 Storing a location on the GPS Press and hold the ENTER/MARK key The „Mark Waypoint‟ page will appear Highlight the „OK‟ button Press the ENTER key again to save 17 Retrieving the data from the GPS Press the MENU key twice The „Main Menu‟ page will appear Highlight the „POINTS‟ option in the list and press the ENTER key A „Waypoints by Name‟ page will appear with a list of your saved locations 18 Finding a point/location with the help of the GPS 19 Appendix 1: A) Conversion from degrees-minutes-seconds to decimal degrees For the latitude of Bangalore, the calculation is as follows: 12° 57' 35‟‟ Step 1: The degree number remains the same. 12 Step 2: The minute value is divided by sixty 60 minutes = 1 degree Therefore, 57 minutes = [(57 * 1)/60] degrees = 0.95 Step 3: The second‟s value is divided by (sixty * sixty) 60 * 60 seconds = 1 degree Therefore, 35 seconds = [(35 * 1)/(60 * 60)] degrees = 0.00972 The final value in decimal degrees is 12 + 0.95 + 0.00972 = 12.95972 20 B) Conversion from decimal degrees to degrees-minutes-seconds For the latitude of Bangalore, the calculation is as follows: 12.95972° Step 1: The degree number remains the same. 12° Step 2: Multiply the value after the decimal by sixty to obtain the minute value 0.95972*60 = 57.5832 Therefore the minute value is 57 Step 3: Multiply the value after the decimal in step 2 by sixty to obtain the seconds value 0.5832*60 = 34.992 Hence the second value is 35 (rounded to the nearest unit) The final value in degrees-minutes-seconds is 12° 57‟ 35‟‟ 21 C) Locating points on a paper map Let‟s take Bangalore city‟s co-ordinates as an example. 12° 57' 35‟‟ N 77° 37' 42‟‟ E Step 1: First locate the latitude 12° 57' and the longitude 77° 37'. If the number 57 is not marked find the latitude of a lower value. That would be 55 in this case. Similarly, if the number 37 is not marked find the longitude of a lower value. That would be 35. Your point lies in the box above the latitude 12° 55' and to the right of the longitude 77° 35'. Step 2: Measure the distance between the two latitudes marked 55 and 0. This would be around 18 cm. This means that: 5 minutes = 18 cm Therefore, 1 minute = 18/5 = 3.6 cm Step 3: We need to locate 57‟, which is 2 minutes away from 55‟. With a scale measure (3.6 * 2 =) 7.2 cm from the line marked 55 to get the latitude 12° 57'. Mark this on the map as a line parallel to the line 55. Step 4: Similarly locate the longitude 77° 37'. Mark this on the map as a line parallel to the line 35 . Step 5: The point where both these lines meet in the box will give the location of Bangalore city approximately on your map. 22 Appendix 2: Training programme on the functions and use of GPS receivers for the field staff of the Forest Department, Karnataka GPS (Germin GPS72) was distributed to forest department staff by MIKE for a specific use of developing elephant mortality data base and the organisation also conducted a capacity building programme on the function and usage of GPS – instrument. To review the knowledge gained through the training programme conducted by the MIKE and also introduce or update the other applications of the instrument, the Karnataka Forest Department with the technical supports of the Asian Elephant Research and Conservation Centre – a division of Asian Nature Conservation Foundation- and Centre for ecological Sciences, Indian Institute of Science, conducted this training programme Objectives The approaches followed in this training programme were as follows: o Simplification of the existing information, providing user-friendly and easy-tocomprehend concepts o Introducing these concepts o Actual ground training of staff as interactive sessions, with emphasis on usage of local language Simplification was needed for o Letting people know that the subject is not complicated and can be understood and used by anyone o Introduction of a few but more effective operations which have direct relevance in day-to-day applications Methodology As initial step, a manual was developed explaining the working of a GPS and providing diagrammatic representations and flowcharts on the steps required to do simple operations using the instrument. The focus was maintained on the Garmin model GPS72. The manual was developed in English and Kannada. The same was provided in booklet form to assist the participants while using a GPS in field. Introducing the concepts through classroom sessions focused on o introduction to the GPS receiver instrument and its working o Working with waypoints – theory: Recording of points in the field using the GPS, storing on the instrument, retrieving the saved points on the GPS o Working with tracks – theory: Using the track option to save paths walked, tracking back to a saved location o Using a GPS with a paper map: Marking the recorded locations on a topographic map Actual ground training of staff included: o Introduction to the interface and keys of the GPS instrument 23 o Initialization procedure for the instrument o Marking waypoints using the instrument o Tracking and backtracking using the instrument Structure: The programme was conducted for the following protected forest areas of Karnataka - Bandipur Tiger Reserve Bannerghatta National Park Rajiv Gandhi National Park The training was conducted for two days in each of the protected area. In each site approximately 15 to 20 forest staff were trained. The participants comprised of Deputy Conservator of Forests (DCF), Assistant Conservator of Forests (ACF), Range Forest Officers (RFO), Foresters (F), Forest Guards (FG), Forest Watchers (FW), and, draftsmen and surveyors of the department. The classroom sessions were for about 4 hours in each of the sites on each day. Copies of the manual and booklet were distributed to the participants at the commencement of the class. The ground training extended upto 6 hours per day on average. At each site the introductory session of concepts and the instrument was done. This was followed by demonstrations to groups of around 5 participants, thus forming 3 to 4 groups with one resource person per group. Each individual of the groups was made to handle the GPS and use it for the field exercises assigned. In each of the sessions participants were asked to provide a summary of theory that was taught. This provided an assessment of their understanding of the concepts behind the working of a GPS. 24 Training Programme Photos a b Figure 1a and b: Getting the feel of GPS instrument a b Figure 2a and b: Introducing the GPS instruments to the training programme participants a b Figure 3a and b: Introducing the concept through class room sessions 25 a b Figure 4 a and b: Field exercise obtaining GPS location of a tiger pug mark a b Figure 5 and b: reading survey of India‟s topo sheets and marking the locations on maps (field and class room exercises) a b Figure 6a: Participants from Bandipur National Park Figure 6: Participants from Bannerghatta National Park 26 Global Positioning System (GPS) receivers are utilized in various applications related to wildlife management and conservation. Given the broad value of the function of this technology, use of the same by the concerned management systems for our forests is either limited or not known. This document developed based on an experience of conducted on a training program on the functions and use of GPS receivers for the Forest Department staff Karnataka may act as knowledge base and user manual to forest staff and also for other wildlife and related field researchers. 27