1
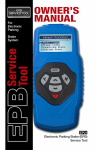
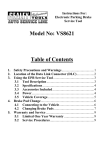
Instructions For:
Model: VS8622
Table of Contents
1.
2.
3.
4.
5.
6.
Safety Precautions and Warnings.......................................1
Location of Data Link Connector (DLC) ...........................2
Using the EPB Service Tool .................................................3
3.1 Tool Description .........................................................3
3.2 Specifications ..............................................................4
3.3 Accessories ..................................................................4
3.4 Navigation Characters...............................................4
3.5 Vehicle Power .............................................................4
3.6 Product Setup .............................................................5
3.7 Vehicle Coverage........................................................7
Diagnostics ............................................................................7
4.1 Diagnose EPB on Audi A5/A6/A8 & Passat ............8
4.2 Diagnose Mercedes SBC..........................................16
Updates ................................................................................34
Warranty and Service ........................................................35
6.1 Limited One Year Warranty ..................................35
6.2 Service Procedures...................................................35
VS8622_1.03_12/03/09
1. Safety Precautions and Warnings
To prevent personal injury or damage to vehicles and/or the
brake tool, read this instruction manual first and observe the
following safety precautions at a minimum whenever working on
a vehicle:
Always perform automotive testing in a safe environment.
Wear safety eye protection that meets ANSI standards.
Keep clothing, hair, hands, tools, test equipment, etc. away from
all moving or hot engine parts.
Operate the vehicle in a well ventilated work area: Exhaust gases
are poisonous.
Put blocks in front of the drive wheels and never leave the
vehicle
unattended while running tests.
Use extreme caution when working around the ignition coil,
distributor cap, ignition wires and spark plugs. These
components
create hazardous voltages when the engine is running.
Keep a fire extinguisher suitable for gasoline/chemical/electrical
fires nearby.
Don’t connect or disconnect any test equipment while the
ignition
is on or the engine is running.
Keep the brake tool dry, clean, and free from oil/water or grease.
Use a mild detergent on a clean cloth to clean the outside of the
brake tool, when necessary.
VS8622_1.03_12/03/09
1
2. Location of Data Link Connector (DLC)
The DLC (Data Link Connector or Diagnostic Link Connector) is the
standardized 16-cavity connector where diagnostic brake tools
interface with the vehicle's on-board computer. The DLC is usually
located 12 inches from the centre of the instrument panel (dash),
under or around the driver’s side for most vehicles. If Data Link
Connector is not located under dashboard, a label should be there
telling location. For some Asian and European vehicles, the DLC is
located behind the ashtray and the ashtray must be removed to access
the connector. If the DLC cannot be found, refer to the vehicle’s
service manual for the location.
VS8622_1.03_12/03/09
2
3. Using the EPB Service Tool
3.1 Tool Description
1
2
3
4
5
EOBD CABEL -- Connects the brake tool to the vehicle’s Data
Link Connector (DLC).
LCD DISPLAY -- Indicates test results.
UP SCROLL BUTTON -- Moves up through menu and
submenu items in menu mode.
DOWN SCROLL BUTTON -- Moves down through menu and
submenu items in menu mode.
Y BUTTON -- Confirms a selection (or action) from a menu list,
or returns to previous menu.
VS8622_1.03_12/03/09
3
6
N BUTTON -- Cancels a selection (or action) from a menu or
returns to previous menu.
3.2 Specifications
1)
2)
3)
4)
5)
6)
Display: Backlit, 128 x 64 pixel display
Operating Temperature: 0 to 60°C (32 to 140 F°)
Storage Temperature: -20 to 70°C (-4 to 158 F°)
Power: 8 to 18 Volts provided via vehicle battery
Dimensions:
Length
Width
Height
110.3 mm (4.34”)
69.5 mm (2.74”)
18.5 mm (0.73”)
GW: 0.4Kg (0.88lb)
3.3 Accessories
1)
2)
3)
User’s manual -- Instructions on tool operations.
USB cable -- Used to update the device.
CD -- Has USB driver, update tool, and user’s manual in it.
3.4 Navigation Characters
Characters used to help navigate the brake tool are:
1) “►” -- Indicates current selection.
2) “x/x” -- Indicates total # of items/pages and their sequence.
3.5 Vehicle Power
The power for the brake tool is provided via the vehicle Data Link
Connector (DLC). Follow the steps below to turn on the brake tool:
1) Find the DLC on vehicle.
•
A plastic DLC cover may be found for some vehicles and you
need to remove it before plugging the EOBD cable.
2)
Plug EOBD cable to the vehicle’s DLC.
VS8622_1.03_12/03/09
4
3.6 Product Setup
The brake tool allows you to make the following adjustments and
settings:
1) Language: Selects desired language. The device supports English
by default.
2) Contrast: Adjusts the contrast of the LCD display.
3) Tool Information: Provides important information about the
device, such as S/N, software version, hardware version and
trouble code library version.
•
The Settings of the unit will remain until change to the existing
settings is made.
To enter the setup menu
From home screen, press N button to enter System Setup menu.
Follow the instructions to make adjustments and settings as described
in the following setup options.
………………System Setup…………
►1) Language
2) Contrast
3) Tool Information
.
1/3
Language Setup
1) From System Setup menu, use UP/DOWN button to select
Language, and press Y button.
……………….System Setup………… ….
1/3
► 1) Language
2) Contrast
3) Tool Information
VS8622_1.03_12/03/09
5
2)
Use UP/DOWN button to select the desired language and press
Y button to save your selection and return to previous menu.
…………………Language………………….
1/1
► English
Contrast Adjustment
1)
From System Setup menu, use UP/DOWN button to select
Contrast, and press Y button.
…………….System Setup………… …….
2/3
1) Language
►2) Contrast
3) Tool Information
2)
From Contrast menu, use UP/DOWN button to adjust contrast,
and press Y button to save and return or press N button to exit
without saving.
…………….…..Contrast ………………….
Contrast (35%)
Use
or
to change
Tool Information
1)
From System Setup menu, use UP/DOWN button to select Tool
Information, and press Y button.
VS8622_1.03_12/03/09
6
…………….System Setup………… …….
3/3
1) Language
2) Contrast
►3) Tool Information
2)
View tool information on the screen.
Tool Information
Serial No. :
Burn Date:
S/W Ver :
H/W Ver :
LIB Ver
:
3)
…….
xxxxxxxx
11/12/08
V1.00
V1.01
V1.00
Press any key to return.
3.7 Vehicle Coverage
The VS8622 Electronic Parking Brake Service Tool is specially designed
to work with Audi A6/A8 (2004-on), Passat (2005-on), Mercedes
E211/E219 (up to 2006), and Mercedes S221 (up to 2007).
4. Diagnostics
The VS8622 is a multifunction solution specially designed to help
technicians replace brake pads safely and efficiently. It is able to
read/clear EPB/SBC trouble codes, deactivate/activate SBC/EPB
system, change brake fluid/bleed brake system, inspect brake air and
set thickness of rear brake callipers after changing brake discs &
pads.
1)
2)
3)
4)
5)
6)
Turn the ignition off.
Release the park brake and make sure the car is properly blocked.
Locate the vehicle’s 16-pin Data Link Connector (DLC).
Plug into the EOBD cable to the vehicle’s DLC.
Turn the ignition on.
Press Y button from home screen to enter Diagnostic Menu.
VS8622_1.03_12/03/09
7
……
Diagnostic Menu…………… …
1/3
► 1) EPB-Audi A8
2) EPB-Other VAG
3) SBC-Mercedes
4.1 Diagnose EPB on Audi A5/A6/A8 & Passat
The VS8622 is able to open/close brake pads, read/clear EPB trouble
codes that are equipped with EPB system. It can also enter thickness
of rear brake callipers after changing brake discs & pads on Audi
A8 cars.
1)
Use UP/DOWN button to select EPB-Audi A8 or EPB-Other
VAG from Diagnostic Menu and press Y button to confirm.
……
Diagnostic Menu…………… …
1/3
►1) EPB-Audi A8
2) EPB-Other VAG
3) SBC-Mercedes
A. Reading Codes
1)
Use UP/DOWN button to select EPB-Audi A8 or EPB-Other
VAG from Diagnostic Menu and press Y button to confirm.
……
Diagnostic Menu…………… …
1/3
►1) EPB-Audi A8
2) EPB-Other VAG
3) SBC-Mercedes
VS8622_1.03_12/03/09
8
2)
Use UP/DOWN button to select Read Codes from Select
Function menu and press Y button to confirm.
.....
Select Function
► 1) Read Codes
2) Erase Codes
3) Deactivate Brake
4) Activate Brake
.. ...
1/5
Note: Audi A5/A6 and VW Passat do not support adaptation function,
so if you use the device to work on these vehicles, there are only four
items available in the Select Function menu and the screen shows as
below:
.....
Select Function
► 1) Read Codes
2) Erase Codes
3) Deactivate Brake
4) Activate Brake
3)
1/4
View DTCs and their definitions on screen.
00585 stored
1/3
EGR Temp Sensor (G98)
sporadic 014-Defective
4)
The sequence of the DTCs, total number of codes detected
and type of codes (stored or current) will be observed in the
display.
If more than one DTC is found, use UP/DOWN button, as
necessary, until all the codes have been shown up.
5)
VS8622_1.03_12/03/09
9
If no codes are detected, a “No codes are stored in the
module!” message displays on the screen.
6)
If the code definition is not found in the built in DTC library,
a “DTC definitions not found! Please refer to User's
Manual!” message comes up prompting you to look up the
definition in the vehicle service manual.
Press N button to return to previous menu.
B. Erasing Codes
CAUTION: Do not erase the codes before the system has been
checked completely by a technician.
This function is performed with key on engine off (KOEO). Do not
start the engine.
1) Use UP/DOWN button to select Erase Codes from Diagnostics
Menu and press Y button.
............ Select Function
1) Read Codes
►2) Erase Codes
3) Deactivate Brake
4) Activate Brake
...... ...
2/5
2) A warning message comes up asking for your confirmation.
.............Erase Codes............. ...
Erase trouble codes!
Are you sure?
YES
NO
If you do not wish to proceed to erase the codes, then press
N button or use UP/DOWN button to select NO and then
VS8622_1.03_12/03/09
10
press Y button to exit. A “Command Cancelled!” message
shows up. Press any key or wait a few seconds to return
3) Press Y button to erase.
If the codes are cleared successfully, an “Erase Done!”
message shows up.
If the codes are not cleared, then an “Erase Failure. Turn
Key on with Engine off!” message displays.
C. Deactivate Brake
WARNING: Deactivate the EPB system before carrying out any
maintenance/service work on the brakes such as changing of pads,
discs and callipers!
Use proper tools to avoid the risk of injuries to mechanics and
technicians and damage to the brake system.
Make sure the vehicle is properly blocked after deactivation of the
system.
1) To deactivate the EPB functions, use UP/DOWN button to select
Deactivate Brake from Select Function menu and press Y
button.
.........
Select Function
1) Read Codes
2) Erase Codes
► 3) Deactivate Brake
4) Activate Brake
2)
...... ...
3/5
Use UP/DOWN button to select the purpose of deactivating the
brake.
.........
Deactivate Brake ...... ...
► 1) For Pad Change
2) For Repair
VS8622_1.03_12/03/09
11
Note: Please select the purpose of activation properly.
For Pad Change is used to open the brakes completely to change
worn pads. If you just intend to do repairs on the brakes other than
changing the pads, please select For Repair. If For Repair is selected,
the brake will not open wide enough for pad change and it is not
necessary to do the adaptation for Audi A8 either.
3) Wait a few minutes while the tool is deactivating the brakes.
When they are deactivated successfully, a “Deactivation Done!”
message comes up:
.........
Deactivate Brake ...... ...
Deactivation Done!
Press any key to con.
If the tool fails to open the brake pads, a “Deactivation
Failed! Please try again!” message comes up.
- Verify that the ignition is ON;
- Check if the brake tool’s OBD II connector is securely
connected to the vehicle’s DLC;
- Check that the park brake is released;
- Turn the ignition off and turn it back on 10s later;
- Repeat the process.
If the “Deactivation Failed!” message does not go away,
then contact your local distributor or the manufacturer’s
customer service department for assistance.
4) Press any key or wait a few seconds to return to previous menu.
D. Activate Brake
WARNING: The EPB system must be activated after finishing the
maintenance/service work on the brakes.
Make sure the vehicle is properly blocked before and after
deactivation of the system.
VS8622_1.03_12/03/09
12
1)
To close the brake pads after finishing the maintenance/service
work on the brakes, use UP/DOWN button to select Activate
Brake from Select Function menu and press Y button.
........
1)
2)
3)
►4)
2)
Select Function
Read Codes
Erase Codes
Deactivate Brake
Activate Brake
...... ...
4/5
Wait a few minutes while the device is activating the brakes.
When they are activated successfully, following screen shows:
…………… Activate Brake
…….. .
Activation Done!
Go to Adaptation?
YES
NO
Note: It is necessary to do the adaptation only when brake pads have
been changed. So if you did not change them, please use UP/DOWN
button to select NO to exit.
If you use the device to work on Audi A6 and VW Passat,
following screen shows after the activation is completed:
…………… Activate Brake
.
Activation Done!
Press any key to con.
If the tool fails to open the brake pads, an “Activation
Failed! Please try again!” message comes up.
- Verify that the ignition is ON;
VS8622_1.03_12/03/09
13
3)
- Check if the brake tool’s EOBD connector is securely
connected to the vehicle’s DLC;
- Check that the park brake is released;
- Turn the ignition off and turn it back on 10s later;
- Repeat the process.
If the “Activation Failed!” message does not go away,
then contact your local distributor or the manufacturer’s
customer service department for assistance.
If a “The selected function is not supported!” message
shows on the display,
- Check that the park brake is released;
- Repeat the process.
If you wish to go to set the thickness of calliper, press Y button to
continue.
If you do not wish to do the adaptation of calliper at this
moment, press N button or use UP/DOWN button to select
NO and then press Y to exit.
…………… Activate
Brake
…….. .
Activation Done!
Go to Adaptation?
YES
4)
NO
Use UP/DOWN button to enter new pad thickness, and press Y
button to confirm.
........
Adaptation
...... ...
03 mm
[ ] or [ ] = Change
[N] = Exit, [Y] = Confirm
If you want to quit the setting, press N button and a
“Command Cancelled!” message comes up.
VS8622_1.03_12/03/09
14
5)
6)
An “Adaptation Done!” message comes up on device screen
indicating the setting is performed successfully.
If the setting is not carried out successfully, an “Adaptation
Failed!” message shows. Repeat operations above to try
again.
Wait a few seconds or press any key to return.
E. Adaptation
The Adaptation is used to enter the new callipers thickness of
rear brake callipers after changing brake discs & pads on Audi
A8 cars.
1) Turn on ignition.
2) Release the park brake.
3) Open the brake completely by selecting EPB-Audi
A8-->Deactivate Brake-->For Pad Change as instructed on
Page11-12.
4) Change the pads.
5) Activate the brakes as instructed on Page 12-13.
6) Use UP/DOWN button to select Adaptation from Select
Function menu and press Y button.
........
Select Function
►5) Adaptation
7)
...... ...
5/5
Wait a few seconds until following screen shows:
........
Adaptation
...... ...
03 mm
[ ] or [ ] = Change
[N] = Exit, [Y] = Confirm
VS8622_1.03_12/03/09
15
8)
Use UP/DOWN button to enter new pad thickness, and press Y
button to confirm.
If you want to quit the setting, press N button and a
“Command Cancelled!” message comes up.
9) An “Adaptation Done!” message comes up on device screen
indicating the setting is performed successfully.
If the setting is not carried out successfully, an “Adaptation
Failed!” message shows. Repeat steps above to try again.
10) Wait a few seconds or press any key to return.
11) Turn the ignition off.
4.2 Diagnose Mercedes SBC
The VS8622 is able to deactivate/activate SBC functions, change
brake fluid/bleed brake system, inspect brake air, read/clear SBC
trouble codes, and retrieve ECU information on Mercedes vehicles
that are equipped with SBC system.
1)
Use UP/DOWN button to select SBC-Mercedes
Diagnostic Menu and press Y button to confirm.
from
……
Diagnostic Menu…………… …
1/3
1) EPB-Audi A8
2) EPB-Other VAG
►3) SBC-Mercedes
2)
Wait a few seconds while the device is communicating with the
vehicle until following screen shows.
.....
Select Function
► 1) Read Codes
2) Erase Codes
3) Deactivate Brake
4) Activate Brake
VS8622_1.03_12/03/09
16
1/7
3)
If the brake tool fails to communicate with the vehicle’s
ECU (Engine Control Unit), a “LINK ERROR!” message
shows up on the display.
Verify that the ignition is ON;
Check if the brake tool’s EOBD connector is securely
connected to the vehicle’s DLC;
Turn the ignition off and turn it back on 10s later.
If the “LINK ERROR!” message does not go away, then
there might be problems for the brake tool to communicate
with the vehicle. Contact your local distributor for
assistance.
To exit the SBC test, press N button from Select Function menu,
and a prompt comes up asking your confirmation.
............
.Exit Test...........
...
Exit SBC Test!
Are you sure?
YES
4)
NO
Press Y button to confirm if you do wish to exit; if you do not
wish to return, press N button or use UP/DOWN button to select
NO and then press Y button to continue.
A. Reading Codes
1)
Use UP/DOWN button to select Read Codes from Select
Function menu and press Y button to confirm.
.....
Select Function
► 1) Read Codes
2) Erase Codes
3) Deactivate Brake
4) Activate Brake
VS8622_1.03_12/03/09
17
.. ...
1/7
2)
View DTCs and their definitions on screen. If the code definition
covers more than one screen, use Y button to turn to next page(s)
to view additional information.
C2117 stored
2/3
Control unit A7/3n1
(SBC control unit),
Internal fault
3)
4)
The sequence of the DTCs, total number of codes detected
and type of codes (stored or current) will be observed on the
display.
When more than one DTC is found, use UP/DOWN button, as
necessary, until all the codes have been shown up.
If no codes are detected, a “No codes are stored in the
module!” message displays on the screen.
If the code definition is not found in the built in DTC library,
a “DTC definitions not found! Please refer to vehicle
service manual!” message comes up prompting you to look
up the definition in the vehicle service manual.
Press N button to return to previous menu.
B. Erasing Codes
CAUTION: Do not erase the codes before the system has been
checked completely by a technician.
This function is performed with key on engine off (KOEO). Do not
start the engine.
1) Use UP/DOWN button to select Erase Codes from Diagnostics
Menu and press Y button.
VS8622_1.03_12/03/09
18
............ Select Function
1) Read Codes
►2) Erase Codes
3) Deactivate Brake
4) Activate Brake
2)
...... ...
2/7
A warning message comes up asking for your confirmation.
.............Erase Codes............ ...
Erase trouble codes!
Are you sure?
YES
3)
NO
If you do not wish to proceed to erase the codes, press N
button or use UP/DOWN button to select NO and then
press Y button to exit. A “Command Cancelled!” message
shows up. Press any key or wait a few seconds to return.
Press Y button to erase.
If the codes are cleared successfully, an “Erase Done!”
message shows up.
If the codes are not cleared, then an “Erase Failure. Turn
Key on with Engine off!” message displays.
C. Deactivate Brake
WARNING: Deactivate the SBC system before carrying out any
maintenance/service work on the brakes such as the changing of
pads, discs and fluids!
Use proper tools to avoid the risk of body injuries to mechanics and
technicians and damage to the brake system.
Make sure the vehicle is properly blocked before and after
deactivation of the system.
1) To open the brake pads, use UP/DOWN button to select
Deactivate Brake from Select Function menu and press Y
button.
VS8622_1.03_12/03/09
19
.........
Select Function
1) Read Codes
2) Erase Codes
► 3) Deactivate Brake
4) Activate Brake
...... ...
3/7
2) Wait a few minutes while the tool is deactivating. When the
brakes are deactivated successfully, following screen show:
.........
Deactivate Brake ...... ...
Deactivation Done!
Press any key to con.
If the tool fails to open the brake pads, a “Deactivation
Failed! Press any key to con.” message shows.
3) Press any key to return to previous menu.
D. Activate Brake
CAUTION: The SBC system must be activated after finishing the
maintenance/service work on the brakes.
Make sure the vehicle is properly blocked before and after
deactivation of the system.
1) To close the brake pads after finishing the maintenance/service
work on the brakes, use UP/DOWN button to select Activate
Brake from Select Function menu and press Y button.
........
1)
2)
3)
►4)
VS8622_1.03_12/03/09
Select Function
Read Codes
Erase Codes
Deactivate Brake
Activate Brake
20
...... ...
4/7
2)
Wait a few minutes while the device is activating the brakes.
When they are activated successfully, following screen shows:
…………… Activate
Brake
…….. .
Activation Done!
If the tool fails to close the brakes, an “Activation Failed!
Press any key to con.” message shows.
3)
Press any key to return to previous menu.
E. Change Brake Fluid
WARNING: DO NOT operate the brake pedal until you are
prompted to!
Make sure the central lock is deactivated!
Use extreme caution during the whole bleeding process as the
pressure of pump bleed screw will be up to 100 bar!
1) Connect a charger to vehicle battery.
2) Prepare at least 2.0 litres of brake fluid and pour the liquid into
brake fluid accumulator.
3) Connect the fluid accumulator to brake’s master cylinder with the
accumulator tube.
4) Plug the device to vehicle DLC and turn ignition on.
5) Use UP/DOWN button to select SBC-Mercedes from
Diagnostic Menu and press Y button to confirm.
……
Diagnostic Menu…………… …
1/3
1) EPB-Audi A8
2) EPB-Other VAG
►3) SBC-Mercedes
VS8622_1.03_12/03/09
21
6)
Use UP/DOWN button to select Change Brake Fluid from
Select Function menu and press Y button.
........
Select Function
....
► 5) Change Brake Fluid
6) Inspect Brake Air
7) ECU Information
.
5/7
Important: To complete the brake fluid change process, make
sure vehicle battery is fully charged and is in good condition. The
brake tool keeps detecting battery voltage during the whole
process. Once the voltage is too low to support the operation, a
“STOP: Voltage at control unit SBC xx.xV” message indicating
battery low comes up as below:
........
Change Fluid
....
.
STOP: Voltage at
control unit SBC
10.2V
If the voltage stays at a low level, the device is not able to proceed
with the service work. So stop the service by holding N button for
at least 1 second, and an “Operation failed!” message comes up.
7) Follow onscreen instructions to complete the first phase of
operation:
- Connect filling and bleeding unit.
- Set pressure: 2.0→2.5 bar.
- Wait until the pressure has built up.
- Open bleeder screw at rear left brake calliper.
- Hold bleeder hose tight.
8) If you wish to move to the second phase of operation, press Y
button as instructed.
If you do not wish to continue the service, press N button to
exit, and an “Operation failed!” message comes up.
VS8622_1.03_12/03/09
22
9)
10)
11)
12)
13)
14)
15)
16)
17)
18)
19)
You can exit the fluid change service at any phase of the
operation with N button.
To complete the second phase of operation, do the following as
instructed:
- Turn off filling and bleeding equipment.
- Wait until the pressure drops.
- Disconnect filling and bleeding equipment.
Press Y button to move to next phase.
To complete the third phase, do the following as instructed:
- Set pressure: 0.5bar.
- Wait until the pressure has built up.
Press Y button to move to phase 4.
Following instructions on device screen to finish the fourth phase:
- Reduce pressure at filling and bleeding unit to 0bar.
- Turn off filling and bleeding equipment.
- Leave filling and bleeding unit connected.
- Wait until the pressure drops.
- If the filling and bleeding unit has a shutoff valve, close it.
- Switch on filling and bleeding unit.
Press Y button to continue with phase 5.
Follow onscreen instructions to finish the fifth phase.
- Set pressure: 2.0→2.5 bar.
- If present, open shutoff valve for filling and bleeding unit.
- Wait until the pressure has built up.
- Hold bleeder hose tight.
- The pressure at the bleeder screw is greater than 100bar!
Press Y button to continue.
Follow onscreen instructions to finish the sixth phase.
- Close bleeder screw at rear right brake calliper.
- Open bleeder screw at rear left brake calliper.
- Hold bleeder hose tight.
Press Y button to continue.
Follow onscreen instructions to finish the seventh phase.
- Close bleeder screw at rear left brake calliper.
- Open bleeder screw at front left brake calliper.
- Operate brake pedal at least 5 times and release again (pump).
- Stop pumping once the brake fluid flows out free of bubbles.
- Hold bleeder hose tight.
VS8622_1.03_12/03/09
23
20) Press Y button to continue.
21) Wait a few seconds until following screen shows:
....5..
Change Fluid
....
.
Operate the brake pedal
at least 5 times
and release again
(pump).
22)
23)
24)
25)
26)
27)
The number “x” on the upper left corner of screen indicates
how many times you need to operate the brake pedal.
Operate the brake pedal at least 5 times as instructed.
Follow onscreen instructions to finish the eighth phase.
- Hold bleeder hose tight.
Press Y button to continue.
Follow onscreen instructions to finish the ninth phase.
- Close bleeder screw at front left brake calliper.
- Open bleeder screw at front right brake calliper.
- Operate brake pedal at least 5 times and release again (pump).
- Stop pumping once the brake fluid flows out free of bubbles.
- Hold bleeder hose tight.
Press Y button to continue.
Wait a few seconds until following screen shows:
....5..
Change Fluid
....
.
Operate the brake pedal
at least 5 times
and release again
(pump).
28) Operate the brake pedal at least 5 times as instructed.
29) Follow onscreen instructions to finish the tenth phase.
- Hold bleeder hose tight.
30) Press Y button to continue.
31) Follow onscreen instructions to finish the eleventh phase.
- Close bleeder screw at front right brake calliper.
- All bleeder screws are closed.
VS8622_1.03_12/03/09
24
- Brake system venting has been completed.
- Set filling and bleeding unit pressureless.
- Leave filling and bleeding unit connected.
32) Press Y button to continue and wait until the “Operation Done!”
message shows:
........
Change Fluid
....
.
Operation Done!
Press any key to con.
If the operation is not carried out successfully, an
“Operation Failed!” message shows. Repeat the process to
try again.
33) Press any key or wait a few seconds to return.
F. Inspect Brake Air
If brake system fails, only the front wheels are braked via a
separate hydraulic circuit without brake servo assistance. The
Inspect Brake Air is to ensure that no air is present in the
separate hydraulic circuit.
Important: DO NOT operate the pedal until you are prompted to
do; otherwise the service may not be completed.
1) Use UP/DOWN button to select Inspect Brake Air from Select
Function menu and press Y button to confirm.
........
Select Function
....
.
6/7
5) Change Brake Fluid
► 6) Inspect Brake Air
7) ECU Information
2)
View onscreen prompts and press Y button to continue.
VS8622_1.03_12/03/09
25
........
Inspect Brake Air ....
1. This test serves to
ensure that no air
is present in this
separate hydraulic
circuit.
2. [Y] =Con. [N] =Return
3)
4)
5)
6)
7)
8)
9)
.
1/1
Follow onscreen instructions to finish the first phase of operation:
- Pressure reservoir: check pretension pressure.
- Actuation takes about 30s.
Press Y button or gently actuate and then release the brake pedal
to continue.
If you do not wish to continue, press N button to exit and a
“User Aborted!” message comes up.
You can exit the air inspection service at any phase of the
operation with N button.
Wait a few seconds while the device is communicating with the
vehicle. And follow onscreen instructions to finish the second
phase of operation:
- The brake system pressure reservoir is OK.
- Check fill status of rear wheel brake circuits.
Press Y button or gently actuate and then release the brake pedal
as instructed to continue.
Wait a few seconds while the device is communicating with the
vehicle. And follow onscreen instructions to finish the third phase
of operation:
- Brake system fill status is OK.
- Check fill status of pedal travel simulator.
Press Y button or gently actuate and then release the brake pedal
as instructed to continue.
Use UP/DOWN button to view onscreen prompts
........
Inspect Brake Air ....
1. Increase brake
pressure slowly and
evenly.
2. Brake pressure must
not rise beyond the
specified range!
VS8622_1.03_12/03/09
26
.
1/2
Prompt screen to be continued…
........
Inspect Brake Air ....
3. Actual value should
be within the black
range and be held
for 5s.
4. [Y] =Con. [N] =Return
.
2/2
10) Press Y button to continue.
........
Inspect Brake Air
....
2.3 bar
0
.
25
↑
Hold pressure within
black range for 5s.
The black block “ ” in the screen indicates specified
pressure range of current phase.
11) Operate the brake pedal gently to raise the pressure to 4.5-5.5 bar
and hold it for 5 seconds as instructed.
........
0
Inspect Brake Air
....
4.5 bar
.
25
↑
Hold pressure within
black range for 5s.
If the pressure can not reach the specified range for a long
period, hold N button for about 2s to exit, and a “User
Aborted!” message shows on the display.
Whenever you operate the pedal too hard and the pressure is
raised beyond the specified range of current phase,
following screens come up prompting you to repeat the
process to try again:
VS8622_1.03_12/03/09
27
........
Inspect Brake Air....
1. Brake pressure must
not rise beyond the
specified range!
2. Repeat the process.
3. Press [Y] or
gently actuate and
.
1/2
Prompt screen to be continued…
........
Inspect Brake Air....
then release the
brake pedal to
continue.
4. [N]= Return.
.
2/2
12) Continue to operate the pedal gently to increase the pressure to
9.5-10.5 bar and keep it for 5s.
........
Inspect Brake Air
....
0.1 bar
0
↑
.
25
Hold pressure within
black range for 5s.
13) Keep operating the pedal to increase the pressure to 19.5-20.5 bar
and hold it for 5s.
14) Follow onscreen instructions to finish current phase of operation:
- Release brake pedal.
- A strong brake pedal kickback indicates a fault.
- Did brake pedal pulse weakly?
- If YES, press [Y] or gently actuate and then release the brake
pedal to continue.
- If NO, press [N].
15) Press Y button or gently actuate and then release the pedal to
continue, and the device starts to communicate with the vehicle.
16) Use UP/DOWN button to view onscreen prompts
VS8622_1.03_12/03/09
28
........
Inspect Brake Air ....
1. Increase brake
pressure slowly and
evenly.
2. Actual value should
be within the black
range and be held
.
1/2
Prompt screen to be continued…
........
Inspect Brake Air ....
.
2/2
for 5s.
3. [Y] =Con. [N] =Return
17) Press Y button and following screen shows:
........
0
Inspect Brake Air
....
7.8 bar
.
25
↑
Hold pressure within
black range for 5s.
18) Actuate the pedal gently to raise the pressure to 10-20 bar and
keep it for 5s.
19) Follow onscreen instructions to complete operation of current
phase:
- The fill level of the pedal travel simulator is in order.
- Release brake pedal.
- Check fill status of wheel brake circuit HZ2 (secondary brake
circuit).
20) Press Y button or gently operate the pedal to continue, and the
device starts to communicate with the vehicle.
21) Use UP/DOWN button to view onscreen prompts
VS8622_1.03_12/03/09
29
........
Inspect Brake Air ....
1. Increase brake
pressure slowly and
evenly.
2. At 10 bar the brake
pedal counterforce
is reduced but
.
1/3
prompt screens to be continued…
........
Inspect Brake Air ....
needs to be applied
further!
3. Brake pressure must
not rise beyond the
specified range!
4. Actual value should
........
Inspect Brake Air ....
be within the black
range and be held
for 5s.
5. [Y] =Con. [N] =Return
.
2/3
.
3/3
22) Press Y button and following screen shows:
........
0
Inspect Brake Air
....
11.8 bar
.
25
↑
Hold pressure within
black range for 5s.
23) Actuate the pedal gently to raise the pressure to 20-24 bar and
keep it for 5s.
24) Follow onscreen instructions to complete operation of current
phase:
- The fill level of wheel brake circuit HZ2 (secondary brake
circuit) is in order.
VS8622_1.03_12/03/09
30
- Release brake pedal.
- Checking fill status of wheel brake circuit HZ1 (primary brake
circuit).
25) Press Y button or gently actuate and then release the pedal to
continue, and the device starts to communicate with the vehicle.
26) Use UP/DOWN button to view onscreen prompts
........
Inspect Brake Air ....
1. Increase brake
pressure slowly and
evenly.
2. At 10 bar the brake
pedal counterforce
is reduced but
.
1/3
prompt screens to be continued…
........
Inspect Brake Air ....
needs to be applied
further!
3. Brake pressure must
not rise beyond the
specified range!
4. Actual value should
........
Inspect Brake Air ....
be within the black
range and be held
for 5s.
5. [Y] =Con. [N] =Return
.
2/3
.
3/3
27) Press Y button and following screen shows:
........
0
Inspect Brake Air
....
23.4 bar
25
↑
Hold pressure within
black range for 5s.
VS8622_1.03_12/03/09
31
.
28) Actuate the pedal gently to raise the pressure to 20-24 bar and
keep it for 5s.
29) Follow onscreen instructions to complete operation of current
phase:
- The fill level of wheel brake circuit HZ1 (primary brake circuit)
is in order.
- Release brake pedal.
- Brake system fill status is OK.
30) Press Y button or gently actuate and then release the pedal to
complete the air inspection service and following screen shows:
........
Inspect Brake Air
....
.
1. The test is OK.
2. No air is in brake
system.
3. End of test.
If the device fails to inspect brake air, following screens
come up:
........
Inspect Brake Air
....
.
1. Fail to inspect
brake system for
air.
2. Function of SBC is
not assured.
prompt screen to be continued…
........
Inspect Brake Air
3. Please repeat the
process.
31) Press any key to return.
VS8622_1.03_12/03/09
32
....
.
G. Retrieve ECU Information
1)
To retrieve ECU information, use UP/DOWN button to select
ECU Information from Select Function menu and press Y
button to confirm.
........
Select Function
....
.
7/7
5) Change Brake Fluid
6) Change Brake Air
► 7) ECU Information
2)
View retrieved information on device screen.
........
Select Function
MB : 005 431 50 12
Supp: Bosch
H/W : 12/04
S/W : 12/04
ID : 00/06
3)
Press any key to return.
VS8622_1.03_12/03/09
33
....
.
5. Updates
The tool allows user to update program and DTC library.
• To update software and DTC library, you need the following
tools:
1)
2)
3)
4)
5)
VS8622 tool, PC or laptop with USB ports & USB cable
Place included CD into CD-ROM driver, or download Maxi-Link
Download Tool from our website: www.sealey.co.uk
Download the latest update file from our website:
www.sealey.co.uk.
Follow onscreen instructions on your computer to install
Maxi-Link Download Tool.
Launch Maxi-Link, and start the update application by selecting
VS8622.
Connect the VS8622 to computer with the USB cable supplied.
VS8622_1.03_12/03/09
34
6. Warranty and Service
6.1 Limited One Year Warranty
Sealey warrants to its customers that this product will be free from all
defects in materials and workmanship for a period of one (1) year from
the date of the original purchase, subject to the following terms and
conditions:
1) The sole responsibility of Sealey under the Warranty is limited to
either the repair or, at the option of Sealey, replacement of the
brake tool at no charge with Proof of Purchase. The sales receipt
may be used for this purpose.
2) This warranty does not apply to damages caused by improper use,
accident, flood, lightning, or if the product was altered or repaired
by anyone other than the Manufacturer’s Service Centre.
3) Sealey shall not be liable for any incidental or consequential
damages arising from the use, misuse, or mounting of the brake
tool.
4) All information in this manual is based on the latest information
available at the time of publication and no warranty can be made
for its accuracy or completeness. Sealey reserves the right to make
changes at any time without notice.
6.2 Service Procedures
If you have any questions, please contact your local store, distributor
or
visit our website at www.sealey.co.uk.
If it becomes necessary to return the brake tool for repair, contact your
local distributor for more information.
VS8622_1.03_12/03/09
35