1
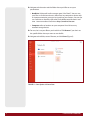
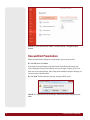
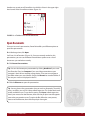
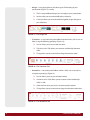
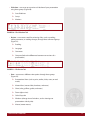
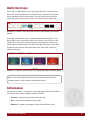
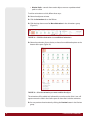
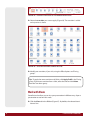
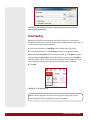
Using Microsoft
PowerPoint
CS043A
© 2015 Professional Career Development Institute, LLC. All rights reserved.

Accredited by the Accrediting Commission of the Distance Education and Training Council.
The Accrediting Commission of the Distance Education and Training Council is listed by the U.S.
Department of Education as a nationally recognized accrediting agency.
CONTENTS
AN INTRODUCTION TO MICROSOFT POWERPOINT
1
Launch the Program
Review Program Options
Save Documents
1
3
6
PRESENTATION BASICS
7
Add and Format Text
Delete Text
Use the Clipboard
Share Documents
Use the AutoRecover Feature
Save as PDF
Close and Exist Presentations Open Documents
7
9
9
9
10
11
12
13
OTHER FEATURES
Work with the Ribbon
Use Presentation Templates
Modify Slides
Insert Images and Objects
Modify Slide Designs
Add Animations
Add Transitions
Work with Views
Present Slideshows
Use the Find and Replace Features
Check Spelling Print Presentations 14
14
18
19
21
23
23
25
26
27
29
30
31
ADDITIONAL RESOURCES
31
Get Help with PowerPoint
Review Other Resources
31
33
USING MICROSOFT POWERPOINT
iii
AN INTRODUCTION TO MICROSOFT
POWERPOINT
Welcome to this introductory guide to Microsoft PowerPoint. This application
is part of the Microsoft Office suite. It allows users to create presentations so
that they can share information with an audience. Presentations, or slideshows,
are limited only by the user’s imagination, as PowerPoint offers a variety of
different elements to include on slides, or the pages that make up the slideshow.
You might choose to include text that has been formatted in different ways;
multimedia, such as photographs, graphics, animations, or data from other
programs; and sounds such as music or sound effects. PowerPoint also allows
you to create interesting transitions between slides during a slideshow. And,
once you’ve created and saved your presentation, you can share it with others
in a number of ways. For example, you can display the slideshow using your
computer, you can create a printout of your slide deck, or you can email slides
directly to someone else.
When you’ve completed this guide, you’ll be able to
•
Create PowerPoint presentations from scratch and preformatted templates
•
Open, close, and exit PowerPoint
•
Add and format text and check spelling
•
Add transitions and animations to slides
•
Save, share, and print presentations
•
Present slideshows using MS PowerPoint
•
Work with the Ribbon and different views
•
Access help
•
Share files online using OneDrive
Note: This guide covers the operation of MS PowerPoint 2013. Other versions
of PowerPoint may look and work differently than what’s described here. Check
your user’s manual to identify the version of PowerPoint that you’re using.
Launch the Program
We’ll start with an introduction to PowerPoint and a review of the different parts
of the window. You can launch PowerPoint in different ways. You can click on the
program in your computer’s Start menu, double-click the PowerPoint icon on
your desktop, or click the PowerPoint icon if it appears in your toolbar.
è Launch PowerPoint now.
USING MICROSOFT POWERPOINT
1
Once you start PowerPoint, the Start screen will appear (Figure 1), displaying your
options. You can create a blank presentation or work with a template. A template
is a preformatted presentation that has been created for a particular use, such as
a business presentation or an organizational chart, as seen in Figure 1.
FIGURE 1—The PowerPoint Start screen offers many different options, including
templates, which are available to the right.
We’ll begin by creating a blank presentation.
è Click Blank presentation. A blank presentation opens. The first slide has
placeholders for a title and subtitle (Figure 2).
FIGURE 2—The first slide of a blank presentation in PowerPoint is a title slide.
2
USING MICROSOFT POWERPOINT
Review Program Options
Figure 3 shows the different parts of the PowerPoint interface, as described
below.
FIGURE 3—The Parts of the PowerPoint Window
A The Quick Access Toolbar at the upper left of the screen allows you to
access common commands at all times. The Save, Undo, Repeat, and Start
Slide Show from Beginning commands are displayed by default. You can
customize this toolbar to add or remove other commands, if you wish.
B To the right of the Quick Access Toolbar is the filename. In new, blank
presentations, the filename appears as “Presentation” with a number; this
updates once you give your file a name.
C To the far right of the title are additional commands, namely,
•
The question mark allows you to access the Help menu.
•
ext is an icon for display options for the Ribbon. (You’ll read more
N
about the Ribbon below).
•
T he straight line allows you to minimize your screen. If you have
PowerPoint open right now, click this icon. PowerPoint is no longer
displayed. But don’t worry, you can bring it back very easily! Simply
click the PowerPoint icon on the bottom of your screen (signified by
the green file with an X).
USING MICROSOFT POWERPOINT
3
•
T o the right of the minimize button is an option that appears as one
box or two, depending on which is selected. If you click on the double
boxes, you’ll shrink the size of the PowerPoint screen on your desktop.
If you click on the single box, you’ll maximize PowerPoint to cover the
whole desktop.
•
The Close icon has an X. You can use this button to exit PowerPoint
quickly.
D The horizontal group of commands stretching across the screen beneath
the Quick Access Toolbar is called the Ribbon. The Ribbon contains tabs,
such as File, Home, Insert, Design, and Transitions. When you click on a
tab, you’ll access a group of related tools. The default tab is the Home
tab. In the Home tab, you’ll see various groups of commands, such as
the Clipboard, Slides, and Font. We’ll learn more about these command
groups a little later in this guide.
E On the far right, you’ll see your Microsoft username, where you can access
your account.
F The left pane is the Slide Navigation pane. This pane allows you to easily
access and work with the slides in your presentation. Because this is a
new presentation, there’s only one slide in this pane at the moment.
However, as you add slides to your presentation, they appear here.
G The white space in the middle of the screen is the slide pane. This
is where you add content to create each individual slide in the
presentation.
H The red bar along the bottom of the window displays a number of icons
you can use as you create your presentation. From left to right, they are
4
•
Slide Numbers
•
Spellcheck
•
Insert Notes
•
Insert Comments
•
Normal View
•
Slide Sorter View
•
Reading View
•
Begin Slide Show
•
Zoom Controls
•
Fit Slideshow into Current Window
USING MICROSOFT POWERPOINT
To enter information into the slide, type into one of the boxes in the white
content area. Because this first slide is meant as a title slide, this is the place
where you’ll replace the text placeholders with the title and subtitle of the
presentation—or you can delete these options by pressing the Delete key. We’ll
discuss how to format the presentation later in this guide.
è Click the File tab. This view is the Backstage view (Figure 4).
You can access several PowerPoint features from the Backstage view. Clicking
each option will display tools related to that feature. Click each feature now to
see a quick overview of these features.
è After reviewing the features, click the arrow at the top of the list to return the
presentation.
FIGURE 4—In Backstage view, you can access several features as shown in the
colored pane on the left.
Save Documents
Once you’ve begun to work on a presentation, you should save your work.
PowerPoint offers different save options, depending on where you’d like to store
the file.
è Click the File tab and click Save As. (The first time you save a presentation,
you need to name it.)
USING MICROSOFT POWERPOINT
5
è Navigate to the location and the folder where you’d like to save your
presentation.
•
OneDrive is Microsoft’s online storage space (“the Cloud”). You can save
your files on OneDrive and access them from any computer or device with
an Internet connection, once you’ve signed into your account. You can also
use OneDrive to share files with others and collaborate with them in realtime. Learn more about OneDrive at https://onedrive.live.com.
•
Computer refers to locations on your computer’s hard drive or any
attached storage devices.
è For now, let’s save your file on your hard drive. Click Browse if you don’t see
the specific folder where you want to save the file.
è Navigate to the folder, enter a filename, and click Save (Figure 5).
FIGURE 5—Save Options in PowerPoint
6
USING MICROSOFT POWERPOINT
PRESENTATION BASICS
Add and Format Text
Use your keyboard to add text to your slide. The insertion point in the slide is
indicated by the blinking vertical line. As you type text into your slide, you can
press the Enter key to move to a new line.
You can use your mouse to navigate to other locations in the slide. You can also
use your mouse to select text that you wish to format. Formatting allows you
to change the appearance of text. This makes your slideshow more appealing
to viewers (or readers) and also helps to call attention to different parts of the
presentation. This can make a critical difference in communicating your message.
Some of the text formatting options including font size, font style, and font color,
boldface, italics, and underlining. You can also highlight text and change the case.
To format text that’s already in a document, you must first select that text. You
can use your mouse to do this.
è Select the text with your mouse.
è When you release the mouse button, a mini-toolbar with common functions
appears (Figure 6). You can select any of the options in the mini-toolbar to
change the appearance of the text.
FIGURE 6—The mini-toolbar offers quick access to common formatting options.
You can also format text using the tools in the Ribbon. Let’s review the different
groupings in the Ribbon.
è Click the Home tab and hover over the options in the different groups
(Figure 7).
FIGURE 7—The Home tab of the Ribbon displays many tools to format text and
paragraphs.
USING MICROSOFT POWERPOINT
7
The Home tab includes the Font group, which includes font style, size, bold,
italics, underline, text effects, highlight, and color. It’s easy to experiment and try
different formatting for your slides. Select the text and click the formatting tool of
your choice. Your change is made right onscreen.
è If you don’t like how a change looks, click the Undo button in the Quick
Access toolbar (or press the Ctrl + Z keys at the same time).
Here’s a review of the various options on the Home tab.
•
The clipboard displays options for copying, cutting, and pasting text.
•
T he Slides group displays options for adding slides, adding sections, or
changing the layout of the slides.
•
The Font group displays options to format fonts, such as bold, italics,
underline, and highlighting.
•
The Paragraph group displays options for formatting paragraphs, such as
bulleting or numbering text; adjusting spacing, indents, and alignment;
and adding shading or borders.
•
The Drawing group displays options for adding shapes and modifying the
formatting.
•
The Editing group displays options to find, replace, or select text.
Delete Text
You can also delete text that you don’t want.
è Select the text to be deleted and then click the Delete key.
è OR position your insertion point at the end of the text you entered and use
the Backspace key to remove it.
Use the Clipboard
To cut or copy the contents of a PowerPoint slide from one location to another,
you can use the clipboard (Figure 8). The clipboard is an Office feature that allows
you to store up to 24 entries, such as blocks of text, which you can then insert in
other locations (called pasting).
To use the clipboard, simply select the text and click Cut to remove it from the
document or Copy to make a copy of the text. Then use your mouse to move to
another location or even a different slide. Click Paste. The contents you copied
will appear here.
8
USING MICROSOFT POWERPOINT
The clipboard also contains a useful formatting feature called Format Painter. If
you want to copy the formatting from one piece of text to another, select the text
with the formatting you want to reuse, then click Format Painter. Carefully select
the text to which you’d like to apply the formatting. When you release the mouse
button, the text will now be formatted.
FIGURE 8—The clipboard allows you to easily copy and paste blocks of text.
Share Documents
You can use OneDrive to share presentations and/or collaborate with others on
them. To share a file using OneDrive, navigate to Backstage view.
è Click File and then click Share. Several options display (Figure 9).
è Choose the option that matches what you wish to do and follow the prompts.
•
Invite one or more contacts to access your file online via OneDrive.
•
Email your presentation to one or more contacts.
•
Present your slideshow online.
•
Publish your slideshow to a shared location, such as a SharePoint site.
USING MICROSOFT POWERPOINT
9
FIGURE 9—You can share presentations a number of ways via the Share feature.
Use the AutoRecover Feature
If PowerPoint crashes, or if you forget to save a file before exiting the program,
you can use the AutoRecover feature to restore the file. When you reopen
PowerPoint, files that have been recovered appear in the Document Recovery
pane.
You can also restore unsaved changes by following this process:
è Click File, Open, Recover Unsaved Presentations. This last option displays at
the bottom of the screen (Figure 10).
è Click to open the file and save it.
10
USING MICROSOFT POWERPOINT
FIGURE 10—You may be able to restore unsaved changes from the recovered files.
Save as PDF
You can save your presentation as an Adobe Acrobat Reader document, known
as “portable document format,” or PDF. PDF is a popular format because it can
be easily viewed by others; you don’t have to worry if the viewer is using the
same version of a program that you are. Additionally, PDF files aren’t easy to edit,
which makes them useful when you’re sharing information that you want to keep
secure. Note that when you save a presentation as a PDF, it becomes a static text
document; your animations, transitions, and other elements won’t be saved.
To save a presentation as PDF, follow these steps:
è Click File, Export, Create PDF/XPS (Figure 11).
è Navigate to the folder location where you’d like to save the file. Click Publish.
Tip: You can use the Export feature to save your presentation as other kinds of
files, too.
USING MICROSOFT POWERPOINT
11
FIGURE 11—You can save files in PDF—or other formats—using the Export
feature.
Close and Exist Presentations
When you’re finished working on a presentation, you can exit out of it.
è Click File, then click Close.
If you have unsaved changes in the document, PowerPoint will prompt you
with a dialog box asking if you’d like to save your changes (Figure 12). You can
click Save to save the changes, Don’t Save to exit without saving the changes, or
Cancel to stay in the document.
è Click Save. The file will close and your changes will be saved.
FIGURE 12—If you have unsaved changes, PowerPoint will prompt you to save
them.
12
USING MICROSOFT POWERPOINT
Another way to exit out of PowerPoint is to click the X icon in the upper righthand corner of the PowerPoint window (Figure 13).
FIGURE 13—Click the X icon to exit PowerPoint.
Open Documents
Once you’ve saved a presentation, PowerPoint offers you different options to
open that presentation.
è In Backstage view, click Open.
You’ll see a list of locations (Figure 14). Since you recently worked on this
presentation, you can use the Recent Presentations option to see a list of
documents you worked on recently.
è Click Recent Presentations.
Tip: You can also locate your presentation by clicking OneDrive if you saved
the file to the Cloud, or Computer if you saved the presentation to your
computer’s hard drive or another storage device. Then you can navigate to
the folder where you saved the file. Simply click Browse to see other folders if
the one you want isn’t displayed in the list.
è Click the filename to open the presentation.
Tip: You may have a few presentations that you work on frequently. To quickly
access such files, you can “Pin” them to Backstage view. This makes them more
readily available to you. To use the Pin option, click Open in Backstage view,
hover your mouse over the filename, then click the pushpin icon that appears
next to the presentation name. To unpin the file, follow the same process;
hover over the filename, then click the pushpin icon again.
USING MICROSOFT POWERPOINT
13
FIGURE 14—The Backstage view offers a variety of options for users.
OTHER FEATURES
Work with the Ribbon
Now that you’ve briefly worked with the Ribbon, we’re going to go over each tab.
Remember, each tab in the Ribbon displays groups of related commands. Mouse
over each icon in the Ribbon to view tool tips that describe each tool and how it
can be used.
Tip: The Ribbon will update with additional tabs depending on the tool in use.
For instance, if you’re inserting a picture, an additional tab will appear for you
to format your picture.
14
USING MICROSOFT POWERPOINT
•
Home—where you’ll find the tools you use most often (Figure 15), namely,
ââ
Clipboard
ââ
Slides
ââ
Font
ââ
Paragraph
ââ
Drawing
ââ
Editing
FIGURE 15—The Home Tab
•
Insert—use to insert a variety of objects, such as the following (Figure 16):
ââ
Slides
ââ
Tables
ââ
Images
ââ
I llustrations (pictures, online pictures, shapes, SmartArt, clipart,
screenshots, etc.)
ââ
Apps
ââ
Links
ââ
Comments
ââ
Text
ââ
Symbols
ââ
Media
FIGURE 16—The Insert Tab
USING MICROSOFT POWERPOINT
15
•
Design—use to apply themes and other types of formatting to your
presentation (Figure 17), namely,
ââ
Themes are predefined designs you can apply to your presentation.
ââ
Variants allow you to make modifications to themes.
ââ
ustomize allows you to make additional global design changes to
C
your slideshow.
FIGURE 17—The Design Tab
•
ransitions—use to work the special effects between slides, such as cuts or
T
fades, using the following groupings (Figure 18):
ââ
Preview allows you to try out the transition.
ââ
T ransition to this Slide allows you to create a relationship between
slides.
ââ
Timing allows you to customize how long the transition takes.
FIGURE 18—The Transitions Tab
•
Animations—use to add special effects within a slide, such as text fly-ins,
using these groupings (Figure 19):
ââ
Preview allows you to try out animated action.
ââ
nimation to this Slide allows you to create an action relationship
A
within a slide.
ââ
Advanced Animation gives access to more complex options.
ââ
Timing allows you to customize how long the animated action takes.
FIGURE 19—The Animations Tab
16
USING MICROSOFT POWERPOINT
•
lideshow—use to set up or preview a slideshow of your presentation
S
using these groups (Figure 20):
ââ
Start Slideshow
ââ
Set up
ââ
Monitors
FIGURE 20—The Slideshow Tab
•
Review—use to access tools for reviewing slides, such as proofing,
adding comments, or tracking changes, through these command groups
(Figure 21):
ââ
Proofing
ââ
Language
ââ
Comments
ââ
ompare (look at the differences between two versions of a
C
presentation)
FIGURE 21—The Review Tab
•
View—use to access different view options through these groups
(Figure 22):
ââ
resentations Views (such as print, outline, slides, notes, or read
P
mode)
ââ
Master Views (master slides, handouts, and notes)
ââ
Show (ruler, gridlines, guides, and notes)
ââ
Zoom (adjust view)
ââ
Color/Grayscale
ââ
indows (change view of windows, such as viewing two
W
presentations side by side)
ââ
Macros (create macros)
USING MICROSOFT POWERPOINT
17
FIGURE 22—The View Tab
Use Presentation Templates
You can save time when creating a new presentation in PowerPoint by using a
template. A template is a predefined presentation that includes formatting, styles,
and headings. Templates allow you to create a professional-looking presentation
very quickly.
è To browse available templates, click New to create a new PowerPoint
presentation (Figure 23). You’ll see a preview of several designs in the main
window and a list of Suggested Searches for popular templates.
è Browse the templates available and choose the one that appeals to you and
suits your needs.
FIGURE 23—PowerPoint comes with a number of preformatted templates already
installed.
è Add your content and make adjustments to your presentation as you wish.
You can also change the formatting and styles using the tools in the Ribbon.
18
USING MICROSOFT POWERPOINT
FIGURE 24—You can find templates to suit a variety of needs. This template is
designed to easily create an organizational chart.
Tip: You can also search for templates based on your needs by entering terms
in the search bar at the top of the templates screen. You can also visit http://
office.microsoft.com/en-us/templates to find additional templates.
Modify Slides
PowerPoint presentations are made up of slides. You can add different types of
content to each slide, such as text, images, charts, and multimedia. When you
create a new slide, placeholders for content appear by default (Figure 25).
FIGURE 25—A blank slide contains placeholders for content, such as a title and
subtitle.
USING MICROSOFT POWERPOINT
19
To change the layout of a slide, follow these instructions:
è Click the Home tab and locate the Slide group.
è Click Layout.
è Choose a theme that best suits your needs (Figure 26). Note that the theme
will update all slides to match.
FIGURE 26—Choose a theme to change the layout of the slides.
Tip: You can also choose the layout of your slide when adding new slides to
your presentation. Click New Slide in the Slides group, then choose the layout
of your choice. If you want the same layout as on your current slide, click
Duplicate Selected Slides (Figure 27).
20
USING MICROSOFT POWERPOINT
FIGURE 27—Create a New Slide
Insert Images and Objects
Use the Insert tab to insert a number of objects into your slides, namely,
•
New Slides
•
Tables
•
Pictures
•
Shapes
•
Charts
•
Videos
•
Links
•
Comments
•
Headers
•
Footers
•
Page Numbers
•
Text Boxes
USING MICROSOFT POWERPOINT
21
•
Equations
•
Symbols
To place an image on a slide, follow these steps:
è Position your cursor in the slide where you’d like to insert the image.
è From the Insert tab, click Pictures (Figure 28).
FIGURE 28—You can insert a variety of objects, such as pictures, from the Insert
tab.
è Navigate to the folder where the image can be found. Click the filename, then
click Insert.
The image is inserted into the slide. Notice that a new Picture Tools Format tab
appears in the Ribbon.
Once you’ve inserted an image, you can drag it around the slide using your
mouse. You can also use the mouse to resize the image by clicking and dragging
the sizing handles on the borders of the image (Figure 29).
FIGURE 29—You can quickly resize an image by dragging the sizing handles. Your
cursor will change to a double-sided arrow when you hover over the handles.
è Make any other adjustments if you wish, using the tools in the Ribbon.
Tip: Follow these steps to insert other types of objects into your slide; simply
make the correct choice from the menu and follow the prompts.
22
USING MICROSOFT POWERPOINT
Modify Slide Designs
The Design tab offers features to visually change the slides. Adding a theme
allows you to add a predesigned set of colors, fonts, and effects to adjust the
overall appearance of your presentation. Click the Design tab and view the
themes by clicking the drop-down arrow in the Themes group (Figure 30).
FIGURE 30—Click the Themes drop-down arrow to view different presentation
themes.
To the right of the Themes icon is something called Variants (Figure 31). This
option allows you to customize a theme. To use Variants, you must first select
a theme. Then, hover over the Variant options to preview how each change
would impact the presentation. Click the icon to apply the change, if you wish.
Experiment now, and click the Undo button in the Quick Access toolbar to
remove the change.
FIGURE 31—Customize your theme by selecting variants from the Variants group.
Tip: You can also change the size of slides or change the background by
selecting options in the Customize tab of the Design tab.
Add Animations
You can add animation—movement—to text and objects with the Animations
tab. The four main options related to animations follow:
•
Entrance—controls how the object enters the slide
•
Exit—controls how the object exits the slide
•
Emphasis—controls what happens to the object while on a slide
USING MICROSOFT POWERPOINT
23
•
Motion Paths—controls how certain objects move on a predetermined
path on a slide
To add an animation to a slide, follow these steps:
è Select the object to animate.
è Click the Animation tab on the Ribbon.
è Click the drop-down arrow for More Animations in the Animations group
(Figure 32).
FIGURE 32—Click More Animations to see additional animations.
è Select the animation of your choice, or choose from additional options at the
bottom of the pane (Figure 33).
FIGURE 33—Select the animation you want to add to the object.
The animation will be added and indicated by a number on the slide. A star will
appear next to the slide in the Outline pane to show that it includes animation.
è You can preview the animation by clicking the Preview button in the Preview
group.
24
USING MICROSOFT POWERPOINT
è You can make changes to your animation settings using the Advanced
Animation and Timing groups.
Tip: To remove an animation, select the button number for the animation and
press the Delete key.
Add Transitions
You can add special effects between slides in a slideshow using transitions
that are available on the Transitions tab. This tab gives you three main types of
transitions, as follows:
•
Subtle—to use simple animations
•
Exciting—to use more complex transitions
•
Dynamic Content—to move placeholders between slides of similar layouts
Follow these steps to add an animation:
è From the Slide Navigation pane, select the slide from the Slide Navigation
pane that will appear after the transition (Figure 34). In other words, this is the
slide you want to transition to.
FIGURE 34—Select the slide from the Slide Navigation pane.
è Click the Transitions tab on the Ribbon.
è Click the drop-down arrow for More Transitions in the Transition To This Slide
group (Figure 35).
USING MICROSOFT POWERPOINT
25
FIGURE 35—Click More Transitions to view additional transitions.
è Select the transition you want to apply (Figure 36). The transition is added
and a preview is shown.
FIGURE 36—Select the transition to add to the slide.
è Modify your transitions, if you wish, using the Effect Options and Timing
groups.
Tips: To apply the same transition to all slides, click Apply To All in the Timing
group. To remove a transition from a slide, select the slide and click None
from the Transitions group.
Work with Views
PowerPoint also allows you to view your presentation in different ways. Open a
presentation to see how this works.
è Click the View tab in the Ribbon (Figure 37). By default, the selected icon is
Normal view.
26
USING MICROSOFT POWERPOINT
FIGURE 37—The View tab gives you different ways to look at your presentation.
è Click the other views to see additional options:
•
Outline View—use to view an outline of your slides.
•
Slide Sorter—use to view a layout of slides. You can rearrange the order of
slides by dragging and dropping the slides with your mouse.
•
Reading View—use to view a full screen of slides. You can navigate with the
arrow buttons. Click the Normal icon (Figure 38) to return to Normal view.
FIGURE 38—Icons to change the view also appear at the bottom of slides.
Tip: The View tab also offers other options to view your slides, such as
zooming in or out with the Zoom group or changing the color in the Color/
Grayscale group.
Note: Slide Master is a tool you can use to adjust every slide in your presentation.
This feature also allows you to view handouts or notes for your presentation.
These won’t appear onscreen when you’re actually running your slideshow. After
reviewing the features, click Close Master View.
Present Slideshows
If you’re presenting your slideshow to an audience, you can use PowerPoint’s
slideshow tools. To present a slideshow, follow these steps:
è Choose one of the following ways to start the show (Figures 39 and 40):
•
Click the Start From Beginning icon on the Quick Access toolbar.
•
Click the Start From Beginning icon in the Start Slideshow group on the
Slideshow tab. The Slideshow tab displays several more options to view
your presentation, such as starting the slide show from the current slide,
adjusting timings, or recording your slideshow.
•
Press the F5 key.
•
Click the Play Slideshow icon at the bottom of the window.
USING MICROSOFT POWERPOINT
27
FIGURE 39—You can view your slideshow by clicking one of the icons shown here.
FIGURE 40—Here are additional options for viewing your slideshow.
Once your slideshow is running, you can navigate through the slides in the
following ways:
•
Click the mouse to move to the next slide.
•
Press the spacebar to move to the next slide.
•
ress the arrow keys on the keyboard to move backward and forward
P
between slides.
When you’re done reviewing your slideshow, you can end the slideshow by
taking one of the following actions:
•
Press the Esc key on the keyboard.
•
Click End Show in the Slide Show Options button in the bottom left corner
of the window (Figure 41).
•
llow the slides to continue to the last slide; then click the mouse or press
A
the spacebar to return to Normal view.
FIGURE 41—While in Presentation mode, you can use the icons on the bottom left
of the window to move through the slideshow. Click End Show to end presentation mode.
Tip: PowerPoint allows users to use a pen, highlighter, or laser pointer to mark
up slides and call attention to elements on slides as they’re being presented
to an audience. To access these tools, click the Pen tool. Then select pen,
highlighter, or laser pointer. This is a great way to draw attention to important
elements on your slides.
28
USING MICROSOFT POWERPOINT
Use the Find and Replace Features
If you’d like to quickly find a word or phrase in your document, you can use
PowerPoint’s Find feature. To replace a word or phrase with another one, use the
Replace feature. Access the Find and Replace tools from the Home tab’s editing
group (Figure 42).
FIGURE 42—Use the Find and Replace tools to quickly find and replace words or
phrases in a presentation.
è With your presentation open, click Find. The Find dialog box appears
(Figure 43).
è Type the word or phrase you want to find and press the Enter key. The
locations where the word or phrase is found will appear in the pane on the
left. The word or phrase will be highlighted in the presentation.
FIGURE 43—You can use the Find feature to search for a word or phrase.
è When you click Replace, the Replace dialog box opens (Figure 44).
è Type the word or phrase you’d like to replace in the “Find What” text box and
type the word you’d like to replace in the “Replace With” text box. You can then
use the buttons in the dialog box to find and replace each instance of the
word or phrase individually (Find Next) or all at once (Replace All).
USING MICROSOFT POWERPOINT
29
FIGURE 44—Use the Replace feature to quickly replace particular words or
phrases in the presentation.
Check Spelling
Before you finalize your presentation, you should make sure it’s free of errors.
PowerPoint makes this easy for you by providing a spelling tool to catch errors. To
use this feature, open your presentation.
è From the Review tab, click Spelling in the Proofing group (Figure 45).
è As the spell checker runs, click Change to accept any suggested changes.
Alternately, click Change All to fix all similar misspellings; click Ignore to ignore
the suggestion (or Ignore All to ignore all remaining instances); or click Add to
add your spelled version of the word to the dictionary. Work through each error
until a dialog box appears indicating that the spelling check is complete.
è Click OK.
FIGURE 45—The Spelling Tool
Tip: If a word is flagged as an error but no suggestions are given, you can
manually type the correct spelling into your presentation.
30
USING MICROSOFT POWERPOINT
Print Presentations
Of course, you’ll also want to print your presentation at times, either as slides or
as handouts. Let’s review how to do so.
è Click the File tab and click Print.
The left pane displays the printer selected and the options. Make any changes
here. The right pane displays a preview of how your presentation will look when
it’s printed (Figure 46). You can choose to print a single slide per page or multiple
slides per page, which is useful for printing audience handouts.
è When you’ve made your printing choices, click the Print icon.
FIGURE 46—Printing a Presentation in PowerPoint
ADDITIONAL RESOURCES
Get Help with PowerPoint
It’s easy to access help at any time when you’re using PowerPoint. Just follow
these instructions:
è Click the Help icon in the upper right-hand corner of the PowerPoint screen
(Figure 47).
USING MICROSOFT POWERPOINT
31
FIGURE 47—PowerPoint’s Help Icon
è OR press the F1 key.
Once the Help dialog box has opened, enter search terms or navigate through
the suggestions displayed to find more information on the topic (Figure 48).
FIGURE 48—PowerPoint’s Help Screen
Tip: If you right-click with your mouse anywhere in your presentation, you
can access a shortcut to common PowerPoint features, such as formatting,
cutting and pasting, inserting comments, and more.
32
USING MICROSOFT POWERPOINT
Review Other Resources
Now that you’ve learned about the basics of PowerPoint, the best way to enhance
your learning is to practice. Use different templates. Create slides and add
content, animations, and transitions. Apply styles and themes. Insert images and
charts. Preview your slideshows. To undo any change, simply click the Undo icon
in the Quick Access Toolbar (or press the Ctrl + Z keys).
If you wish to learn more about PowerPoint, review some free resources that are
available. Follow the links to learn more:
•
et Started with PowerPoint 2013
G
http://office.microsoft.com/en-us/support/getting-started-withpowerpoint-2013-FX102828000.aspx
•
PowerPoint 2013
http://www.gcflearnfree.org/powerpoint2013
Good luck!
USING MICROSOFT POWERPOINT
33