1
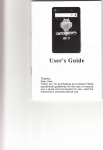
User Manual
Precaution and Notice
Itr the Box
Bsric Introdiction
1. Over Mew
2:
Accessory
2. I Charging by AC adaprer
2.2 Charging by Ca Charger
2.3 USB Cable usage
2.4 Install the Ca Mout Svstem
-
Main function iotroduction
l. Starting up
2. Power saving
3. Main Fuctions
3.1cPs
3,2 Muic
3.2.1 Music Play
3.2.2 Music List
3.2.3 Eqtalizer
3.3 Movie
3.3.1 video
3.3.2 Yideo list
3.4 Photo
3.4.1 photo
3.4.2 photo tist
3.4.3 firll soeen
3.5 Ebook
3.5.1 Ebook
3.5.2 Ebmk List
3.5.3 Font Setting
3.5.4 Cotor Setting
3.5.5 bmknrk
3.5.6 bookmrk tist
3.6 Ft6h
3.6.1 Flsh List
3.7 Blretooth
3.7.1Dial
3.7.2 Dail Record
3.7.3Pair
3.7.4 SettiDg
3.7.5 Pair Deyices
3.7.6 Outgoing catl
3.7.1 callfill
3.7.8 incoming call
3.7.9 rctive call
Gmes
3.8.1Memory
3.8
l. Overview
3.8.2 Linlink
3.8.3 Rwia Blck
3.8.4 JawBreaker
3.8.5 BoxMe
i-8.6 Breakout
3.8.7
Soake
.1.9 T@ls
3-9. I Calculator
i.9.2 Uait
3.10 Seaing
i.l0-lVolme
3-10.2 Backlight
3.10.3 Laguage
3 - I 0-4 FM Tnnsmiter
i.10.5 DateTime
i.10.6 Catibntion
i-10.7 System lnfo
usB
3.10.8
i-10-9 Factory Reset
3.10.10 Nav Path
3.tl
GPS
Info
Pre€utiotr ild Notice
> GPS is operuted md controlled mder the sole responsibility of the Govemment of the United
Sates of America, who are responsible for its availabitity md accuacy. Aay chmges in GPS
availabitity and rccuracy, or in envirotrmental conditions, may impact the operation of your
device .We cm not accept my liability for the availability md accuacy of GPS.
> The PND is used only as a navigation aid. It is not for precise measuement of direction, distmce,
location or topogaphy. The user must follow all tlaffic signs md local rcgulations along the roads.
> GPS satellite signals camot pass through solid materials (except glass). Wlen you re inside a
mel or building, GPS position is not available.
> A minimm of 4 GPS satellit€ signals ae needed to detemine cwent locatiotr. Sigla1 reception
ca be affected by situations such as bad weather or wireless devices or dense overhead obstacles
(e-9. hll buildiDgs).
When you get out of the car, do not leave your PND on the dashboard or subject to direct smlighr.
The overheating ofthe battery may cause malfunctions md./or da.gerous conditions.
) For you om safery do not operate the aontlols of the PND while driving. Do not mout where the
driver's field ofvision is blocked
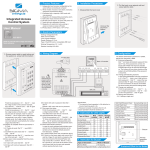
In the Box
h the box you will find
>
(l)
Charger lndicator
(2) Power Switch
(3) Speaker
(4) SD Cad Slot
(5) Earphone Jack
(6) Reset Ke1
(7) USB Comector
2.
Light
Accessory
2.1 Charging by AC adapter
Please use the AC adapter to chtrge the device for the fist time. To muimize the
device must be full of chrge for the first time.
Plug the adapter's DC port into the device's USB port otr its right-side pmel
Plug the adapter into the main supply socket.
The charging indicator witl light. When the uit is tutly chdged, the red indicator
life ofthe battery the
witt hrm blue.
Pomble mngation device (PND)
accessones
2.2 Chargitrg by Car Charger
The cr chager supplies power to your device when you are using the device in a cm,
Caution: To protect you device against sudden surges in cunent, comect the cu chilger only after the
cu engine hc been shrted. Connect one end ofthe car chuger to the power comector ofyour device.
Com@t the other end to thc cigarette lighter in the car to power and charge your device.
vacuum seal.
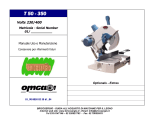
Step
l:
Rotate screw
to lock it onto cerghss
Ir1j
to adiust the
.ngle and direction ofth€ PND
Use the two screw
l[
2.3 USB Cable usage
Instrll the holder into lh€
rhe sockets
Main function introduction
l. Starting up
The USB cable is provided for system upgrades. This USB cable will work on the PC either with
Microsoft Active Sltc@ or as a Mss storage media. You can select the mode in the "Sefting-UsB"
Insert the supplied SD card (optional) into the slot at the bottom
menu.
l
ofdevice
m-n
For upgade and more informtion about Micrcsoft Active Sync, please visit Microsoft web.
Stafring up then enter lnto lhe main function operalion screen as below.
2.4 Instdl the Car Mount System
Take ofthe protected fitm on the bottom of the suction. Then put the bracket onto a suitable location
of you windscreen or side window, make sure the window or the suction or windscreen is clean and
without water atrd some dirty things inside, fixing the stand on that position. Never place the stand
where the driver's field ofvision is blocked.
If the car's windshield is tinted with a rcflective coating, an extemal antema (optional) my be needed
to rcute the roads. The extemal utema is stick to the top of the car through a window. When closing
the cil window, be careful not to pinch the mtema cable (Cars with an mti-jam window design may
automtically leave adequate
Saep2:
Crr crrdle bv
Device powcr connector
2. Vehicle power connector
1.
ffi
2. Power saving
spaae as needed.).
Install PND into the holder
To remove the bmcket, three steps as below:
Press 2 side button, pull left lightly md then take offthe suction. Ifthe bmcket still doesn't detach from
your windscrcen, tug gently on the clear plastic tab at the edge of the suction mount, to break the
4
Press the power
button
4.
"
on the top side ofyour deyice to tum offyour device, the device actually
enters a suspend state and the system stops operation. Once you tum on the system again, it resumes.
3. \IaiD Futrctiotrs
Press the power buron to tum on the GPS unit. The Main Menu screen will be displayed as below:
3.2.1 Music Play
'r;;,;:-:;;:',""n
El
o.
EX on,h..u'n mmu
$ll
agarn and cnter
B
#
fapthcreon Z or --\ (anchi,osefunclion
FGHIJX
A: rctum to the main nlcnu
B: minimize
C: order ofplay: random, repeat, single. pla) all. rcpeal all
D: equalizer
E: previous
F: speed bar
3.1 GPS
Double tap the "GPS" icon
to start program.
G: pause/play
H: next
I: stop
J: music list
K: volume control
3.2-2 Music List
Tap the "Music List" icon and enter into the
3.2 llusic
Tap the icon
"Music" on the min menu and enter into following interface
A: prevlous
B: increase single
C: increase all
D: delete single
folloNing interface
rnb rblr()wing intert'acc
E: delete all
3.2.3 Equalizer
fap the "Equalizer" icon and enler inlo the
following intcrface
A:pausc/play
I
C
D
E
F
B: speed bar
C: stop
A: previous
I): video list
B: kp it and can select play style as blcw interface
C: tap tr and can use rhe equalizer
D: reset the equalizer
-1.3.2
E: retum to the main menu
lj: volumc control
video list
Tup
tl" GJ
icon and enter into the following interface.
3.3 iuovie
Tap lhc icon "Video" on rhe main menu and enter inro lbllowing interfacc
3.4 Photo
Tap thc icon "Photo" on the main menu and enter into
3.3.1 video
Tap rhe
"video" icon
tttt
o, F,
on thc main menu again and enter into
following interface
3.4.1 photo
following interfacc
Tap the
"Photo icon
rs) o, S
,h" ,uin menu again and enter into follos'ing interlacc
AB.CDEF
-A: pre\ious
B: ne\I
C: zom in
D: z@m out
E:
on
A: set time lbr playing picture,
1s-10s.
A
Previous: tap the screen once more
3.5 Ebook
Tap the icon "Ebook" on the main menu and enter into following interface
route
F: full screen
G: photo list
H: reum to the main menu
3.4.2
Tap
photo list
rhe
a-J
rcon and enler rnlo lhe
following inlerface.
-i.5.1 Ebook
Tap thc
icon
El
".
El
on the main menu again and enter into fbllowing interface
3.43 full screen
Tap the "photo list" icon and enter into the full screen.
Then tap the scren again and enter into the following interface
TIJTT(
ll
A: retum to the min menu
A: previous
B: previous
C: nexl
D: font sening
E: color sening
3.5.5
F:
Br saving
hookmark
Choose to add as pan
bokmrk
Choose
G: bookmart list
H: eb@k list
3.5.2 Eb@k List
Tap the icon "ebmk list" and enter into following interface
of the bookmark text, click on the
/
i"on. urdenter into following
"OK" or "Cancel"
E
> m{D
3.5.6 bookmark list
Tap the icon "bookmark list" and enter into following interface
3.53 Font Setting
Tap the icon "font setting" and enter into
following interface
A: prevrous
+
A: previous
B: sving
3.5.4 Color Sefting
Tap the icon "color sefting" and enter into
following interface
B: enter into bookmark
C: delete bookmark
3.6 Flash
Tap the icon "Flash" on the main menu and enter into following interface.
interface.
menu
Tap the icon A or B or C on the main
Trp the icon
E
and enter into
interface
3.7.1 Dial
Tap the
AB
icon
ffil
on the Bluetooth
-"nt
und
"oret
i'to
the
follou'ing interface
l
-{: pause'Pla1'
B: stop
C: speed bar
D: flash list
relm
"tttAyowing
following interface
i
E:
F:
ugut u"d
B
to the main menu
lolume control
3.6.1 Flash List
Tap the icon "flash list" 91q
c
rggl]lig
D
Ai retum to the Bluetooth menu
B: backspace
you sanl
C. parr and eonnect u tth the lnoblle
D: call Record
3.?.2
3.7
''
Bluetooth
r"o,i"
"""'tt"tooth"
on the
min
menu and enter into
following interface
1
)
Dail Record
Tap the
icon
K
on
interface
th" Bl'"tooth menu and enler into the following
H
E
F
B
C
D
d
I
A: rctum to lhc Biueft)oth menu
B: connect $.ith the rnobile you want
C: dc'lete the rccorded nunlber you chose
D: dcl.lc all thc call rccords
E: incoming call rccord
F: oulgoing call rccord
C: nrrssed call record
Hr prc'\ tous
li n!-\t
3.7J Pair
Tap
El
lh('rcon
on the Bluerooth rnenu aDd enter into the
foilowing interl.ace
-1,7.5
Pair Devices
Tap the
icon
BI
on ,t
"
Bluetooth menu and entcr into the lollowing intcrfacc
3.7.,1 Setting
Tap the
icon
Hl
o, th" etr.t,*,th
nlenu and enter into the
following intcri.ace
\: rctum to thc Bluckxilh mcnu
B: connect the Deviccs you chosc
( r disconncct thc Deviccs you clrose
D: dcletc all thc Deviccs
3.7.6
A: PIN seting
B: music selecting
Tap PIN setting" bunon
and entcr into the l'ollowins inlerl.ace
-
Outgoing call
infomation
3.7.7
ffi.3
call fail
3.7.8 incoming call
3.7.9 active
call
0}.
O,(D,O,OO,O,O,()t]
.1OrDv)Oulr)tlr)
Cc)OO,()tlQO,o
,s
i:lt."ffi"
"Games" r,n rhe main menu anrl crrrcr inro lollowing inlerface
:l
-r,"tll-fl
'o
'ouowing
=-
ti.1"tri
.x!
or --:
Tap thc icon
intcr'rce
and cnler inkr
on the main nrcnu again and enter into
lbllowing interface
@
-1.8.3
Russia Block
t"5l
hp thc rc,'n liJ
3.8.1 Memon'
Tirp rhe
icon
iH
urd
"nt",
irtu following inrerlhcc
3.8,4
JawBreaker
and enter int.r tbllowrnB interlacc
Tap the
-1.8.5
t&l
E
K
und
"nt",
into fullowing rntcrtacc
3.9 Tools
Tap the icon "Tools" on thc main mcnu and enter into the
Bo\lla n
Tap the icon
icon
and cntcr into
following interface
Tap the
icon
&
".
m
on the main menu again and enter inro
3.8.6 Breakout
Tap the
icon
and cntcr into
following irterface
Tap
3.8.7
Snake
following intcrface
the icon
ffil
ond
"nt.,
into foJlowing interface
lbllowing inrertace
K
0 1 2 3 4 . : ,.i.
$&5A.78r:./..
.41
. Y+
3.9.2
c
C
..i.,M
Unit
Tap the icon A on the main
I
mem or B on the sy$em
JO)
anci enter into ,bllowing,nterlaLe.
lap rhe tcon lil
Uf,it:Length, weight Mass, Cubic Capacity, Square Area, Circular Angular, Power, Prcssure. Speed
Temperafure
3.10 Setting
Tap the icon "Sefting" on the main menu and enter into the following interface
o
iry
And enter into following interface.
Tap the
icon
,*!.'
f"-!.t
' " ot -*X*&
on the
min
again menu and eoter into
following interface
6 hlo\\
A: prevrous
B: saving
1
{
C: volume control
D: can select "Enable sounds for taps" or not
E: star-up music
3.10.2 Backlight
n
rap rne rcon
!t
on,n" aya,"a meun and enrer rnro lollourng lnrerlace
BA
A: prevlous
B: saving
C: backlight control
D: select auto off time
And enter into following interface.
3,10.3 Language
Tap the
3.10.4
icon
Bl
on the syste,n meun and enter into
following interl'ace
A: previous
B: saving
C: select use FM
D: select emissive liequency ofFM
tr-' icon to increase or decrease the emissive frequency ofFM
Er tap "+,or
FM Transmitter
Iap the icon A on the main meun or B on the system meun
as
below
3.10.5 DateTime
Tap the icon A on the main
mem or B on the system mem
.'-:+;::t ; ;1t:.:'
as
Xtiiii*iiii,r
ffi
w
below
Tap the
icon
Sl
o. th"
,yrt"-
3.10.7 System Info
Tap the icon A on the main
*
and
ater ioto following interface
meu or icon B m
n+-5=---{E
tbe
Systm rem
c
below
fr,r3
And enter into following intedace.
And enter into the follovzing display
A: prevlous
B: saving
C:tap XX or Ml
icontoadjustthetime
H
"d
D: tap iJ or L!
icon to adjusr the dare
E: tap
"<" or'>" icon to adjust
3.I0.6 Calibration
the time zone.
3.10.8 USB
Tap the
icon
ffil
on the System
meu , to set
the U,sB working mode.
3.10.9
Tap the icon A or B or C on the maiD
Factory Reset
fap the icon
n
IilI
on the System
meu md enter irto lollowing
mem N belos
rnterface
And enter into the following inerface
;, ,- i*" &
on the system
mew md enter into fottowins interface
change without notice.
3.11 GPS Info
Tap the icon "GPS
Info" on the main menu and enter into the following intedace.