1
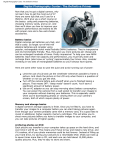
2690 Cash Reg GUD RVMP2
9/25/07
3:53 PM
Page 1
LER 2690
FCC Requirements
This equipment has been tested and found to comply with the limits for a
Class B digital device, pursuant to Part 15 of the FCC Rules. These limits
are designed to provide reasonable protection against harmful
interference in a residential installation. This equipment generates, uses
and can radiate radio frequency energy and, if not installed and used in
accordance with the instructions, may cause harmful interference to radio
communications. However, there is no guarantee that interference will
not occur in a particular installation. If this equipment does cause harmful
interference to radio or television reception, which can be determined by
turning the equipment off and on, the user is encouraged to try to
correct the interference by one or more of the following measures:
®
Use and Care Guide
• Reorient or relocate the receiving antenna.
• Increase the separation between the equipment and receiver.
• Consult the dealer or an experienced radio/TV technician for help.
Note: Changes or modifications not expressly approved by the
manufacturer responsible for compliance could void the user’s authority
to operate the equipment.
For a dealer near you, call:
(847) 573-8400 (U.S. & Int’l)
(800) 222-3909 (U.S. & Canada)
+44 (0)1553 762276 (U.K. & Europe)
© Learning Resources, Inc., Vernon Hills, IL (U.S.A.)
Learning Resources Ltd., King’s Lynn, Norfolk (U.K.)
Please retain our address for future reference.
Made in China.
LPK2690-TG1
Smart Toys for Today’s Kids®!
2690 Cash Reg GUD RVMP2
9/25/07
3:53 PM
Page 2
Teaching Cash Register
TABLE OF CONTENTS
TEACHING CASH REGISTER INFORMATION . . . . . . . . . . . . . . . 1
GETTING STARTED . . . . . . . . . . . . . . . . . . . . . . . . . . . . . . . . . . . . 3
LET’S PLAY! . . . . . . . . . . . . . . . . . . . . . . . . . . . . . . . . . . . . . . . . . . 4
LEARNING ACTIVITIES . . . . . . . . . . . . . . . . . . . . . . . . . . . . . . . . . 6
The Teaching Cash Register is a fun and exciting way for
children to explore the concept of money while using their
imaginations. This unique educational toy features games
and play patterns that familiarize children, from pre-school
on up, with the size and value of certain coins.
Children will naturally begin learning to add and subtract
when they use the Teaching Cash Register for pretend play,
as they buy and sell items from their pretend store.
Below is a picture of the Teaching Cash Register. All of the
important features have been labeled to make it easy to
learn how to use this exciting toy. Please take a moment to
look at the drawing and become familiar with the function
keys and what they do. Each of the activities is described in
detail later in this manual.
SCALE
USE AND CARE . . . . . . . . . . . . . . . . . . . . . . . . . . . . . . . . . . . . . . . 8
LCD DISPLAY
IMPORTANT BATTERY INFORMATION . . . . . . . . . . . . . . . . . . . . 9
COIN SLOT
CALIBRATION
WHEEL
(ON BACK)
FUNCTION
KEYS
SCANNER
CREDIT
CARD
COIN BANK
CARD SLOT
VOLUME
CONTROL
3 LEVELS
RESET
BUTTON
(located on
bottom)
SPEAKER
PRETEND
MONEY
CASH
DRAWER
1
2690 Cash Reg GUD RVMP2
9/25/07
3:53 PM
Page 3
ON/C – This button is used to turn ON the cash register. Press and
hold to clear line items and transactions from the LCD DISPLAY.
GETTING STARTED
OFF – This button will shut down the Teaching Cash Register at the
You will need:
end of play. There is also an automatic shutoff after five minutes of
inactivity to conserve battery life.
3 C batteries
Phillips screwdriver
RESET – If the register begins to behave erratically, press the RESET
First, press the OPEN key on the cash register.
When the drawer pops open, you will find the
pretend money as well as the COUPON and
CREDIT cards. Remove them from the drawer
and close the drawer.
button located just above the battery compartment on the bottom of
the unit. Use the tip of a paperclip or pen to depress the button. If this
doesn’t solve the problem, please refer to the USE AND CARE section of
this manual.
NUMBER KEYS – These are the main buttons that your child will use
during play and learning activities.
FUNCTION KEYS – These keys are used to add or subtract items or
amounts of money, to multiply amounts when buying several of one
item, or to divide if an item is “2 for 1” and you only want one item.
ENTER KEY – Press this key to accept an entry.
LEARNING ACTIVITIES KEYS – Press any one of these keys to begin
a learning activity.
COINS – Press this button to display the total of the coins
in the COIN BANK.
COIN QUIZ – Play this fun game to learn the different coins
and their values.
+ ADD – This game features three levels of addition activities.
- SUB – This game features three levels of subtraction activities.
MONEY MATCH – Play this game by listening to the amount
and entering it with the number keys.
PHILLIPS
SCREWDRIVER
Installing the batteries:
Turn the Teaching Cash Register upside down. Using the
Phillips screwdriver, turn the screw on the battery door in a
counterclockwise direction to loosen the screw. Remove the screw
and open the door. Insert the three C batteries, being careful to
match the + and – ends of the batteries to the diagram inside the
battery compartment. Replace the battery-compartment door and
insert the screw. Tighten the screw by using the Phillips screwdriver
to turn the screw in a clockwise direction until secure. Please read
and understand the other important battery usage instructions
later in this manual.
Calibrate the scale so that the indicator bar is lined up with the
zero on the scale graph. Find the calibration wheel on the back of
the unit. Turn the wheel until the bar is in the correct position.
Press the ON key to begin the learning activities. Now we are
ready for learning fun!
OPEN – This button opens the drawer on the Teaching Cash Register.
PAY $ - Press this button after “ringing up” all your purchases to
select how you want to pay.
COINS slot – A coin can be inserted into the slot at any time to hear it
identified. See how much the coin is worth on the LCD DISPLAY.
COIN BANK – Lift this door to release all the coins and continue play.
SCALE CALIBRATION WHEEL – This wheel is located on the back
of the register. Turn the dial until the guideline on the scale aligns
with the first line on the graph. NOTE: This is a pretend scale and
is not accurate.
2
3
2690 Cash Reg GUD RVMP2
9/25/07
3:53 PM
Page 4
LET’S PLAY!
Press the ON key. The Teaching Cash Register will greet you with a big
WELCOME, lights and sounds!
Using the Teaching Cash Register for pretend play is not only fun, but
also educational. Read the instructions for each activity and game to
understand how each one plays. This will allow you to explain them to
your child in a way that he or she will easily understand. Please note
that Levels 2 and 3 of each activity become increasingly difficult. All
the games are intended to encourage your child to expand his
knowledge, but please allow him to move ahead at his own pace,
as too much pressure is sometimes counterproductive.
Using the Teaching Cash Register to Scan and Enter Items
Quick Steps to Playing Store
1)
Scan items.
2)
Press =/TOTAL key.
3)
Press $PAY key.
4)
Use the number keys to enter the amount paid or use
the CREDIT CARD.
5)
Press OPEN to open the drawer.
There are two ways to “ring up” items for sale. The first way is to pass
them over the SCANNER for an automatic price. To do this, select any
item to scan and drag it slowly across the scanner button. The button
will light up as the item passes over it. Be sure you press down on the
item firmly enough to depress the button. As you pass the item over
the button, the cash register will display and say a price for that item.
If you pass the same item over the scanner twice, it will not ring up the
same price each time. The scanner is only for pretend play.
To add an amount using the number keys, press the + sign, a number
key to enter the amount, and then the ENTER key. If you wish to
subtract an amount, such as a coupon or an item that your customer
doesn’t want, press the – first, the amount you wish to subtract, and
the ENTER key. That amount will be subtracted from your total.
When you finish “ringing up” your order, press the = / TOTAL key. The
total amount of the items (less anything you subtracted) is displayed on
the screen. Now it is time to pay for your items.
4
Press the PAY$ key and you’ll be asked “Cash or Charge.” If a COUPON
CARD is used, now is a good time to pass it into the slot, although you
can use it at any time. An amount for the coupon will be displayed and
that amount will be subtracted from your total bill. If you wish to
charge a purchase, insert the CREDIT CARD into the slot. To pay cash
for a purchase (this is great practice), enter an amount of money and
press the ENTER key to accept the amount. The Teaching Cash Register
will display any change to give back, or if not enough money was
received, the register will announce how much more is owed. Try it!
Helpful Hints to Understanding the Teaching Cash Register
IMPORTANT NOTES:
• Wait for the Teaching Cash Register to stop speaking before
inserting coins. Coins will not be recognized if you insert them
while the register is speaking.
• When "CB OPEN" is displayed on the screen, this means that the
door to the COIN BANK is not latched properly. Press down firmly
on the latch to close the door. The unit will not respond when the
door is open.
• The register rounds numbers during division to two decimal places.
• To make the play pattern intuitive for younger shopkeepers, the
register is programmed to recognize any single button press as a
total dollar amount. For instance, when you press the number "5"
and ENTER, the register will show the amount as $5.00. As your
child grows and learns, he or she can use the decimal key to enter
any amount desired, including cents!
• Although this cash register has addition, subtraction, multiplication
and division keys, it is not intended for use as a full-function
calculator. The multiplication key and the division key only work for
very specific functions and at certain times during play. You can use
them to multiply or divide an item, or amount, before you press the
ENTER key if you are buying more than one of an item, or buying a
single item that is priced two-for-one. To do this you would either
enter the price of the item or scan the price, and then press the x
key. The top line of the display will indicate that the cash register
is ready to multiply. Now enter the number of like items you have
and press the ENTER key. The register will then tell you the total
for all the items. The method is the same for division. Once an
item is scanned or a price is entered, press the ÷ key. The top line
of the display will indicate that the cash register is ready to divide.
Enter the number of items that you are buying and the correct
total will display.
5
2690 Cash Reg GUD RVMP2
9/25/07
3:53 PM
Page 5
LEARNING ACTIVITIES
There are four learning activities built in to the Teaching Cash Register.
Each of the activities features three levels of difficulty to keep the
learning stimulating and fresh. Play and explore each of the activities
so that you can determine which level is right for your child. Please
remember these activities are to encourage your child to learn new
skills, so don’t push them if a level seems too difficult. The concepts
presented in Levels 2 and 3 are for older children.
As your child explores the activities, the Teaching Cash Register will
offer positive reinforcement for correct answers and gently encourage
him or her to try again for incorrect answers in addition, SUBTRACTION
& MONEY MATCH games. If an incorrect answer is entered two times in
a row, the Teaching Cash Register will give your child the correct
answer and move on to the next question.
COIN QUIZ – This activity will help children learn to identify different
coins and their value. There are three levels of difficulty. The game will
always start in Level 1. If your child is already familiar with coins and
needs more of a challenge, press the COIN QUIZ key twice to reach
Level 2. For the most difficult challenge, press the COIN QUIZ key three
times to reach Level 3. Press the ENTER key to begin the activity.
IMPORTANT NOTE: Please wait for the Teaching Cash Register to stop
speaking before you insert coins. Coins will not be recognized if you
insert them while the register is speaking.
Level 1 – At this level, the Teaching Cash Register will ask your
child to find and insert a specific coin.
Level 2 – At this level, the register will ask your child to insert a
specific amount of money. For example, it might ask for
$0.37. The child would need to find the correct
combination of coins to add up to $0.37. Coins can be in
any combination that the child likes as long as they add
up to the amount on the screen. When your child feels
confident of the amount, press the ENTER button to
compare. If the incorrect amount is inserted, he or she
will be given another chance. The Teaching Cash Register
will give positive reinforcement for the correct answer
and move to the next question.
Level 3 – In this level, the register will ask your child to insert a
specific amount of money, but it will specify a coin that
cannot be used.
The following activities reinforce basic math skills. Please select the
appropriate level for your child.
ADD +
Random addition problems will appear on the screen. Press the number
keys and then the ENTER key to answer the problems. When you are
finished playing the game, press the =/TOTAL key to see how many
correct answers you achieved. Pressing the =/TOTAL key again ends
the game.
Level 1 – Practice adding single-digit numbers.
Level 2 – Practice adding double-digit numbers without carrying.
Level 3 – Practice adding double-digit numbers with carrying
SUB –
Random subtraction problems will appear on the screen. Press the
number keys and then the ENTER key to answer the problems. When
you are finished playing the game, press the =/TOTAL key to see how
many correct answers you achieved. Pressing the =/TOTAL key again
ends the game.
Level 1 – Practice subtracting single-digit numbers.
Level 2 – Practice subtracting double-digit numbers. No borrowing
is necessary in this level.
Level 3 – Practice subtracting double-digit numbers and borrowing
may be necessary.
MONEY MATCH
Listen for the amount, press the number keys to match the amount,
using a decimal where necessary, and then press the ENTER key to
check your answer.
Level 1 – Practice entering whole-dollar amounts.
Level 2 – Practice entering cents using the decimal key.
Level 3 – Practice entering dollar and cent amounts using
the decimal key.
6
7
2690 Cash Reg GUD RVMP2
9/25/07
3:53 PM
Page 6
USE AND CARE
To protect your Teaching Cash Register, follow these instructions:
✓ Prevent spills of food and beverages on the unit.
✓ Do not submerge the product in water. If the product needs
to be cleaned, wipe gently with a barely damp soft cloth.
✓ Do not throw or kick the product, and do not push sharp
objects through the speaker opening or LCD screen.
✓ Do not press the liquid crystal display and avoid heavy
shock or the display may fail.
Using the RESET button
If the register begins to act in a strange manner, press the RESET
button located just above the battery compartment. To press, use
the tip of a paperclip or a pen to depress the button. If the problem
persists, try fresh batteries.
• Use 3C (1.5V) batteries only.
• Be sure to insert batteries correctly (with adult supervision) and
always follow the toy and battery manufacturer’s instructions.
• Do not mix alkaline, standard (carbon-zinc), or rechargeable
(nickel-cadmium) batteries.
• Insert batteries with the correct polarity.
• Do not recharge non-rechargeable batteries.
• Only charge rechargeable batteries under adult supervision.
• Remove rechargeable batteries from the toy before charging.
• Only use batteries of the same or equivalent type.
• Do not short-circuit the supply terminals.
Battery Replacement
• Always remove weak or dead batteries from the product.
Change the batteries when the sound becomes garbled or seems to be
slowing down during play, or when pressing a button does not trigger
a response from the unit.
• Remove batteries if product will be stored for an extended
period of time.
To replace batteries:
Open the drawer and remove all the contents. Turn the Teaching Cash
Register upside down. Using the Phillips screwdriver, turn the screw on
the battery door in a counterclockwise direction to loosen the screw.
Remove the screw and open the door. Insert three (1.5V) C batteries,
being careful to match the + and – ends of the batteries to the diagram
inside the battery compartment. Replace the battery-compartment
door and insert screw. Tighten screw by using your Phillips screwdriver
to turn the screw in a clockwise direction until secure.
8
BATTERY CARE AND MAINTENANCE TIPS:
• Store at room temperature.
• Do not mix new and used batteries.
• Replace batteries at the first sign of erratic operation.
• Please retain these instructions for future reference.
9