1
Predictive Analytics Client
ONE Automation Platform
Installation Guide
Version: 10.0
Publication Date: 2015-07
Automic Software GmbH
2
Chapter
Policy Orchestrator and Predictive Analytics Installation Guide 3
Copyright
Automic® and the Automic logo® are trademarks owned by Automic Software GmbH (Automic). All
such trademarks can be used by permission only and are subject to the written license terms. This
software/computer program is proprietary and confidential to Automic Software and is only available
for access and use under approved written license terms. This software/computer program is further protected by copyright laws, international treaties and
other domestic and international laws and any unauthorized access or use gives rise to civil and
criminal penalties. Unauthorized copying or other reproduction of any form (in whole or in part),
disassembly, decompilation, reverse engineering, modification, and development of any derivative
works are all strictly prohibited, and any party or person engaging in such will be prosecuted by
Automic.
No liability is accepted for any changes, mistakes, printing or production errors. Reproduction in
whole or in part without permission is prohibited.
© Copyright Automic Software GmbH. All rights reserved.
4
Chapter
Policy Orchestrator and Predictive Analytics Installation Guide v
Contents
1 Introduction to the PCO/PDA Installation
2 System Requirements
2.1 System Requirements
2.1.1 Requirements for the PCO Server Components
9
11
11
11
Hardware Requirements
11
Software Requirements
12
2.1.2 Database Requirements
12
MS SQL Server
12
Oracle Database
13
2.1.3 Requirements for the Frontend Tools
13
Hardware Requirements
13
Software Requirements
14
2.1.4 Automic Product Requirements
3 Installation Preparation
3.1 Preparing for Installation: General Tasks
14
15
15
3.1.1 Install DirectX
15
3.1.2 Start MS DTC and Modify Its Security Settings
15
3.1.3 Deactivate User Access Control
16
3.2 Preparing MS SQL Databases
16
3.3 Preparing Oracle Databases
17
3.3.1 Prepare the Hardware and Infrastructure for Oracle
18
3.3.2 Install OraMTS
20
3.3.3 Install the Database: Steps for PCO/PDA
20
3.3.4 Configure Oracle DB Parameter Settings
20
Define the Database Parameters for the PCO Server
21
Define the Database Parameters for a PCO/PDA Client
24
3.3.5 Optimize an Applications Manager Source Database
25
3.3.6 Create Databases in Oracle
25
3.3.7 Create Oracle Users
26
Create a user for accessing an OM/AE database
27
Create a User for Accessing an AM database
27
Create a User/Schema for the Admin Database
28
vi
Chapter
Create Users/Schemas for an EventBase Database
3.3.8 Installation with Oracle: Overview
28
30
Oracle Scenario 1: One PCO Database
30
Oracle Scenario 2: Multiple PCO Databases
31
4 Full Installation of Policy Orchestrator & Predictive Analytics
33
4.1 Download the PCO Package
33
4.2 Step 1 - Starting the Installation
33
4.3 Step 2 - Configuring the Settings
34
4.3.1 Defining the Admin Database Settings for an MS SQL Database Server
35
4.3.2 Defining the Admin Database Settings for an Oracle Database Server
37
4.3.3 Defining Services Settings
39
4.3.4 Defining User Management Settings
40
4.4 Step 3 - Connecting the Data Sources and Configuring the EventBases
42
4.4.1 Configuring the Source Connection (UC4 System)
42
4.4.2 Configuring an EventBase for an MS SQL Database
45
4.4.3 Configuring an EventBase for an Oracle Database
47
4.4.4 Defining the Data Extraction Settings
48
4.4.5 Defining the General Settings
50
4.5 Step 4 - Applying the Configuration
51
4.6 Step 5 - Initial Login
52
5 Installation with Oracle: Overview
55
5.1 Oracle Scenario 1: One PCO Database
55
5.2 Oracle Scenario 2: Multiple PCO Databases
56
6 Managing Configurations via the Command Prompt
59
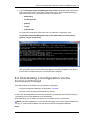
6.1 Deploying a Configuration via the Command Prompt
59
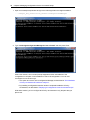
6.2 Uninstalling a Configuration via the Command Prompt
61
7 Configuring the Online Help
63
8 Upgrading an Existing Installation
65
8.1 For Remote Adapters When Upgrading from Version 9.0 to 9.5
65
8.2 Configuring the Online Help
66
9 Migrating Previous Versions
69
9.1 Migrating User-Defined Assemblies
70
10 Attaching Additional Databases
71
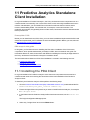
11 Predictive Analytics Standalone Client Installation
73
Policy Orchestrator and Predictive Analytics Installation Guide vii
11.1 Installing the PDA Client
73
11.2 Upgrading a PDA Client
74
11.3 Configuring the PDA Online Help
75
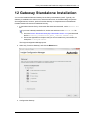
12 Gateway Standalone Installation
77
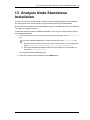
13 Analysis Node Standalone Installation
79
14 Login and User Management
83
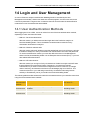
14.1 User Authentication Methods
83
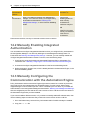
14.2 Manually Enabling Integrated Authentication
84
14.3 Manually Configuring the Communication with the Automation Engine
84
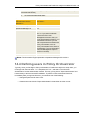
14.4 Defining users in Policy Orchestrator
85
15 Uninstall
89
16 Installing and Setting Up ECC Web Components for Policy Orchestrator
91
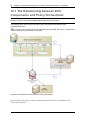
16.1 The Relationship between ECC Components and Policy Orchestrator
92
16.2 Installing the PCO Plug-In for ECC
93
16.2.1 System Requirements for the PCO Plug-In
94
16.2.2 Configuring the ECC for the Policy Orchestrator Plug-In
94
16.2.3 Installing the Policy Orchestrator Plug-In
95
16.3 PDA Plug-In Installation for ECC
96
16.3.1 System Requirements for the PDA Plug-In
96
16.3.2 Configuring ECC for the PDA Plug-In
97
16.3.3 Installing the PDA Plug-in
98
16.4 Setting Up SSL for Communication with ECC Components
16.4.1 Overview of the SSL Setup Steps
98
99
16.4.2 Configuring the Policy Orchestrator Gateway for SSL
100
16.4.3 Adding Truststore Certificates for SSL
101
16.4.4 Enabling SSL for the Policy Orchestrator Plug-in
101
16.4.5 Enabling SSL for the Service Orchestrator
102
16.5 Login and User Management for ECC Components for Policy Orchestrator
17 FAQ
102
105
viii
Chapter
Policy Orchestrator and Predictive Analytics Installation Guide 9
1 Introduction to the
PCO/PDA Installation
This guide provides all the steps that you need to install the following:
l
l
Policy Orchestrator (PCO) version 10.0.x
This is comprised of two parts, which you can install at the same time on the same server, or
separately:
l
The PCO server components. These are necessary regardless of which frontend
you want to use.
l
The Modelling Studio. This is the PCO frontend for defining and managing event
definitions and behaviors.
Predictive Analytics (PDA) version 10.0.x
This is the frontend for creating visualizations and graphics to analyze the event data that is
stored in the EventBases of the PCO. Typically, you install this on a separate clients from
the PCO server.
The full installation
You will find the information for a complete installation in the following topics:
l
l
l
System Requirements
Installation Preparation
Full Installation of Policy Orchestrator & Predictive Analytics
Component installations
In the full installation, you install and configure all components for PCO and PDA as the same time.
Alternatively, you can install individual components separately. You will need to do this when you
install components on different servers. For instructions, see the related topics:
l
l
l
l
The Analysis Node
The Gateway
Additional EventBases
A PDA client
Also in this guide
In addition to the installation instructions, you can find additional instructions and information for
supporting tasks such as:
l
l
l
l
l
l
l
l
Oracle installation scenarios
Managing configurations via the command prompt
Configuring the online help
Upgrading to new versions
Migrating previous versions
Login and user management
Uninstalling
Installing and Setting üp ECC web components
10
Chapter 1 Introduction to the PCO/PDA Installation
Policy Orchestrator and Predictive Analytics Installation Guide 11
2 System Requirements
2.1 System Requirements
To install and use Policy Orchestrator (PCO) and/or Predictive Analytics (PDA) you need to be sure
to have various components installed and available. These are described in the following topics:
l
l
l
l
Requirements for the PCO Server Components
Database Requirements
Requirements for the Frontend Tools
Automic Product Requirements
2.1.1 Requirements for the PCO Server Components
The machine on which you install the PCO server components must have the required hardware
and software before you begin the installation.
These requirements also cover installing the PCO server and its frontend tools, the Modelling Studio
and Predictive Analytics (PDA). Typically, you would install PDA and maybe even the Modelling
Studio on a different machine than the PCO server. You would do this partly because the client
products must be installed locally and partly for better performance. However, you could install
them on the same machine, for example, for a test environment. In this case, the requirements here
will also cover the needs of installing all three on the same machine.
For database specifications, see Database Requirements.
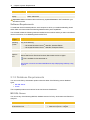
Hardware Requirements
The machine where you want to install the Policy Orchestrator server components must have at
least the hardware and system capabilities that are listed in the following table. These requirements
also apply if you install the PCO Modelling Studio and PDA on the same machine as the PCO
server components.
Requirement Type
Requirement Specifications
Processor (CPU)
Minimum: 2.7 GHz 64-bit dual-core processor
Recommended: 2.7 GHz 64-bit quad-core processor
RAM
Minimum: 8 Gigabytes
Recommended: 16 Gigabytes
Hard Disk
20 GB
Display
1280 x 1024 24-bit
Requirement Type
Requirement Specifications
Processor (CPU)
Minimum: 2.7 GHz 64-bit dual-core processor
Recommended: 2.7 GHz 64-bit quad-core processor
RAM
Minimum: 8 Gigabytes
Recommended: 16 Gigabytes
12
Chapter 2 System Requirements
Requirement Type
Requirement Specifications
Hard Disk
20 GB
Display
1280 x 1024 24-bit
Important: Make sure that the Microsoft Security Update KB928365 is NOT installed on your
Windows machine.
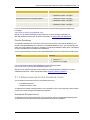
Software Requirements
To install and use the frontend products, each computer on which you install the Modelling Studio
and/or PDA must have at least the following hardware and system capabilities.
You will need at least the following software installed on the machines where you want to install and
use the PCO Server, PCO Modelling Studio and/or PDA.
Requireme
nt Type
Requirement Specifications
Operating
System
Any of the following:
l
l
Microsoft® Windows Server™ 2008 R2, Standard Edition
Microsoft® Windows Server™ 2008 R2, Enterprise Edition
Framework
Microsoft .NET Framework 4.0
Microsoft
Graphics
APIs
This applies only to machines with PDA installations:
Microsoft® DirectX End-User Runtime, March 2009 version or higher
This is available for free download on: http://www.microsoft.com/downloads/Browse.aspx?displaylang=en&categ
oryid=2
2.1.2 Database Requirements
You can run the Policy Orchestrator product suite with either of the following source database
types:
l
l
MS SQL Server
Oracle
The compatible products and versions for each of these are listed below.
MS SQL Server
You can use any of the following MS SQL database servers for Policy Orchestrator and Predictive
Analytics:
Product
Microsoft® SQL Server Express Edition with
Advanced Services
Versions
l
l
2005 service pack 3 or higher
2008 service pack 1 or higher
Policy Orchestrator and Predictive Analytics Installation Guide 13
Product
Microsoft® SQL Server Standard Edition
Versions
l
l
Microsoft® SQL Server Developer Edition
l
l
Microsoft® SQL Server Enterprise Edition
l
l
2005 service pack 3 or higher
2008 service pack 1 or higher
2005 service pack 3 or higher
2008 service pack 1 or higher
2005 service pack 3 or higher
2008 service pack 1 or higher
For more information about Microsoft® SQL Servers, see the following page of the Microsoft
homepage:
http://www.microsoft.com/sql/default.mspx
Before you can install PCO/PDA you will need to do a number of tasks to prepare your
MS SQL database environment. These are described in "Preparing MS SQL Databases."
Oracle Database
To optimally install and run a production environment of PCO/PDA using Oracle databases, you
should create the databases for PCO/PDA on a dedicated database server. This is especially true
when your source data is coming from a medium- to large-sized AE/OM or AM system. This applies
to both a standalone and clustered Oracle databases.
You can use the following versions of an Oracle database for the Policy Orchestrator product suite:
Product
Oracle
Versions
l
l
l
Version 10 (10.2.0.4 or higher)
Version 11.1
Version 11.2 / 11gR2
For more information about Oracle databases see the following website:
http://www.oracle.com/us/products/database/index.htm
Before you can install PCO/PDA you will need to do a number of tasks to prepare your Oracle
database environment. These are described under "Preparing Oracle Databases."
2.1.3 Requirements for the Frontend Tools
The frontend tools that use the Policy Orchestrator server are:
l
l
PCO Modelling Studio
Predictive Analytics client
To install and use these frontend products, each computer on which you install one or both of these
frontend must have the required hardware and software.
Hardware Requirements
To install and use the frontend products, each computer on which you install the Modelling Studio
and/or PDA must have at least the following hardware and system capabilities.
14
Chapter 2 System Requirements
Requirement Type
Requirement Specifications
Processor (CPU)
Minimum: 2.7 GHz 64-bit dual-core processor
Recommended: 2.7 GHz 64-bit quad-core processor
RAM
8 Gigabytes
Display
1280 x 1024 24-bit
Important: Make sure that the Microsoft Security Update KB928365 is not installed on your
Windows machine.
Software Requirements
Each computer on which you install the Modelling Studio and/or PDA must have the following
software.
Requireme
nt Type
Requirement Specifications
Operating
System
Any of the following:
l
l
Microsoft® Windows Server™ 2008 R2, Standard Edition
Microsoft® Windows Server™ 2008 R2, Enterprise Edition
Framework
Microsoft .NET Framework 4.0
Microsoft
Graphics
APIs
This applies only to machines with PDA installations:
Microsoft® DirectX End-User Runtime, March 2009 version or higher
This is available for free download on: http://www.microsoft.com/downloads/Browse.aspx?displaylang=en&categ
oryid=2
2.1.4 Automic Product Requirements
The following table lists the Automic products and versions that you need before you can install and
use Policy Orchestrator 10.0.x and/or Predictive Analytics 10.0.x:
Product
Versions
Automation Engine
10.0 .x
Applications Manager
The latest service pack for version 8.0
Optional: Applies if you want to work with
data from its database.
Enterprise Control Center
2.0 .x
Policy Orchestrator and Predictive Analytics Installation Guide 15
3 Installation Preparation
Before installing Policy Orchestrator and/or Predictive Analytics, you need to complete some
general preparation steps and then prepare your database management tool, MS SQL or Oracle.
You find these steps in the following sections:
1.
2.
3.
4.
Install DirectX (only for PDA installations)
Start MSDTC and Modify Its Security Settings
Deactivate User Access Control
Prepare databases for your database management system
l
MS SQL
l
Oracle
3.1 Preparing for Installation: General Tasks
Before installing Policy Orchestrator and/or Predictive Analytics, you need to complete the following
preparation tasks:
1. Install DirectX (only for PDA installations)
2. Start MSDTC and Modify Its Security Settings
3. Deactivate User Access Control
After these, you need to prepare your database management tool, using the steps that apply:
3.1.1 Install DirectX
This is required only for machines on which Predictive Analytics (PDA) runs.
DirectX End-User Runtime is required to start and run PDA. If Direct X End-User Runtime is not
already installed on the machine, do this using the following steps:
1. Execute 'directx_mar2009_redist.exe'.
2. Enter a temporary path for extracting the files (e.g. 'C:\temp\directX').
3. If the setup does not start automatically, open the temporary path in your Explorer and
execute 'DXSETUP.exe'.
4. Follow the installation instructions and install DirectX End-User Runtime with the default
settings.
3.1.2 Start MS DTC and Modify Its Security Settings
You can skip this step when you plan to have all PCO server components and all databases (the
Admin database and all EventBase databases) on the same computer. Otherwise, you must start
the Windows-MS DTC (Microsoft Distributed Transaction Coordinator) Service and be sure that
specific security options are activated. You must do this on all computers where you want to install
or use any PCO or PDA component.
Steps...
16
Chapter 3 Installation Preparation
Use the following steps to modify the necessary security settings for MSDTC and to start the
Windows service in Windows 7 or Windows 2008:
1. Open the Component Services Console by going to the Windows Start menu and opening
the Run program, and then running the command "dcomcnfg".
2. Navigate to Component Services > Computer > My Computer > Distributed
Transaction Coordinator.
3. Right-click Local DTC and from the context menu select Properties.
4. On the Security tab, select the following settings:
l
l
l
Network DTC Access
o Allow Remote Clients
o Allow Inbound
o Allow Outbound
o No Authentication Required
Enable XA Transactions
Enable SNA LU 6.2 Transactions
5. Click OK.
6. Check that a Windows Service exists for the Distributed Transaction Coordinator
(Control Panel -> Administrative Tools -> Services). Make sure that the service hast the
following settings:
l
l
Status: Started
Startup Type: Automatic
3.1.3 Deactivate User Access Control
'User Access Control' must be deactivated in order to use Predictive Analytics (PDA).
3.2 Preparing MS SQL Databases
If you are using MS SQL as the database management system for Policy Orchestrator, then you
need to prepare your MS SQL system using the steps that follow.
Steps...
1. Start your MS SQL system.
2. Start the "Full-Text Indexing" Windows Service.
3. Enable remote connections for the database. Without this, the Configuration Manager will
not be able to find the selected database.
For MS SQL Server 2005:
a. Go to the Configuration Tools and open the SQL Server Surface Area
Configuration.
b. In the menu item Database Engine > Remote Connection, select the setting Local
and Remote Connections.
Policy Orchestrator and Predictive Analytics Installation Guide 17
For MS SQL Server 2008:
a. Open the SQL Server Configuration Manager.
b. From SQL Server Network Configuration, select 'Protocols for
MSSQLSERVER'. Then select Named Pipes and TCP/IP.
4. Define a database system user with necessary roles. You will need this regardless of
whether you define the databases now or during the installation process.
When you define an EventBase, you need to specify an MS SQL system user for the
EventBase. This user needs to be defined in your MS SQL Server database. You can use the
same user for more than one EventBase, but each MS SQL system user must have at least
the following roles assigned to it:
User Role
Purpose
DBOWNER
Always mandatory.
This user role is needed to complete the installation process.
DBCREATOR Only mandatory for creating databases during installation.
This role is needed when you want to be able to create the database from
within the installation process.
5. Recommendation: Define at least two databases.
l
l
One for the Admin database for metadata
One EventBase database for each data source system (OM/AE or AM).
You can have the installation process create the databases, but it is recommended to
prepare them beforehand in MS SQL yourself.
Considerations for the Admin database
For performance reasons, in a production environment, you should define a separate
database user for the Admin database.
Considerations for the EventBase databases
Typically, you define one EventBase for each source system database. You could also
define more than one EventBase for a single source system database. In this case, all
EventBases are loaded with the relevant data from the source database. What you should
NOT do is to have more than one source database write to the same EventBase, because
then the data will be mixed and provide irrelevant results.
If you have multiple source systems, give each database that will be used for an EventBase
a unique name across your PCO environment.This will prevent unwanted data mix-ups.
3.3 Preparing Oracle Databases
If you are using Oracle the database management system, then you need to do several tasks to
prepare your Oracle system. You must do these before you can begin the installation process.
Later, during the installation, you configure PCO to find and access the databases that you have
prepared.
18
Chapter 3 Installation Preparation
To optimally run a production environment of PCO/PDA, you should run the databases on a
dedicated Oracle server. On this server, you need to prepare databases to be used for the following
PCO databases:
l
l
The Admin database
The EventBase database(s)
Overview of preparation tasks
The following table lists the tasks for preparing your Oracle database environment to install the full
PCO/PDA package.
Step
Notes
1.
Prepare the Hardware and Infrastructure for Oracle
2.
Install OraMTS
3.
Install the Database: Steps for PCO/PDA
5.
Configure Oracle DB Parameter Settings
6.
Optimize an Applications Manager Source Database
Only needed when the source data comes from an
AM database.
4.
Create Databases in Oracle
7.
Download the PCO Package
8.
Create Oracle Users
l
l
l
A user to access the source data in your
source system (OM/AE or AM database)
A user for the Admin database
A user for each EventBase database
After these steps you can continue with the installation of PCO/PDA. For an overview of all steps,
based on the database installation scenario that your are implementing, see "Installation with
Oracle: Overview."
3.3.1 Prepare the Hardware and Infrastructure for
Oracle
This section refers to preparing an Oracle production environment. To optimally install and run a
production environment of PCO/PDA using Oracle databases, you should create the databases for
PCO/PDA on a dedicated database server. This is especially true when your source data is coming
from a medium- to large-sized AE/OM or AM system. This applies to both a standalone and
clustered Oracle databases.
Important: Get Automic support during planning
The hardware and software configurations include recommendations for running the PCO and PDA
on their own database server. The required hardware resources depend on your particular
implementation and the installation requirements of your database provider. Therefore, to help plan
your PCO/PDA database environment, please contact Automic Support Site
Policy Orchestrator and Predictive Analytics Installation Guide 19
(https://automationpassion.com/) or an Automic expert to discuss the specifics of your individual
implementation.
Requirements
Requirement Type
Requirement Specifications
Processors (CPUs)
Minimum: 2.7 GHz 64-bit quad-core processor
Make sure that the database system(s) include enough CPUs.
You can use the length of the run queue of available processors under a
heavy load as a bench value. If the run queue often exceeds 1, you
should consider adding more CPUs.
RUN QUEUE LENGTH <= COUNT of CORES
RAM
Minimum: 16 Gigabytes
Recommended: 20 Gigabytes
The database server must have an adequate SWAP area on the local
disk:
l
l
l
For RAM <= 2 GB, then SWAP = RAM
For RAM > 2 GB, then SWAP = RAM
No SWAP IN
Connection optimization:
l
For the data files, we recommend that you use an external disk subsystem with a connection
by a fiber channel, or for Oracle versions 11gR2 or higher, Direct NFS over a 10-GBit
Ethernet.
Warning: Never use local disks with RAID software because it negatively affects the
performance of your databases and the whole system.
l
l
Keep the number of active components (such as the routers, switches or firewalls) on the
path between the Decision Worker, the AnalysisNode or Predictive Analytics(PDA) and the
database to a minimum in order to avoid decelerated access and single points of failure.
Avoid high latency times when the database is accessed by the Decision Worker,
AnalysisNode or PDA (ping response with an 8k package size should be <1ms). The same
applies when you use RAC or Data Guard for the communication between database nodes.
Clustered environment: Not recommended
Automic does not recommend installing the PCO/PDA databases in a clustered environment. To
set up your PCO/PDA databases in an Oracle clustered environment, you would need to use the
Oracle's RAC cluster technology. However, PCO and PDA are not fully RAC compatible. Although
they can benefit from a RAC system’s high availability, you will not have any performance
improvements with RAC technology. Furthermore, setup can be tricky.
If, however, you want to try using a RAC cluster in your environment, keep the following in hardware
and infrastructure guidelines in mind:
20
Chapter 3 Installation Preparation
l
l
l
Use the same hardware recommendation for a single database also for the cluster nodes.
When the PCO Server also runs on the same cluster, parameterize the DB client in a way
that you can reconnect to the new DB instance after the cluster has been switched.
For the Cluster Interconnect, you must select a high-performance connection of at least Gbit.
According to Oracle, you can operate RAC nodes "problem-free" within a 3km distance.
Longer distances pose high demands on the infrastructure and the protocols in use.
3.3.2 Install OraMTS
You must install Oracle Services for Microsoft Transaction Server 11.1 (OraMTS) on computers
where Policy Orchestrator (PCO) server components run.
Oracle Services for Microsoft Transaction Server (OraMTS) is part of Oracle Database 11g Release
2 Client (11.2.0.1.0) for Microsoft Windows (x64). You can download it from
http://www.oracle.com/technetwork/database/enterprise-edition/downloads/112010-win64soft094461.html.
The only component that you must install is the OraMTS. However, if you choose to install the full
Oracle Client, make sure that the database client and server have the same Oracle version.
3.3.3 Install the Database: Steps for PCO/PDA
When installing your Oracle database environment, be sure to also do the following:
1. Set the database block size to 8192 bytes. (This setting should be the default value for
Oracle 10g.)
2. When you install the database, specify the character set to be used when running PCO or
PDA.
To be able to use the full text indexing feature in PDA, you need to have Oracle Text on the
database that is used for PCO/PDA.
You can specify one of the following NLS character sets:
NLS_LANGUAGE
NLS_TERRITORY
NLS_CHARACTERSET
GERMAN
GERMANY
WE8ISO8859P15
GERMAN
GERMANY
WE8ISO8859P1
AMERICAN
AMERICA
WE8ISO8859P15
AMERICAN
AMERICA
WE8ISO8859P1
3.3.4 Configure Oracle DB Parameter Settings
After ensuring that the requirements are covered as described in "Prepare the Hardware and
Infrastructure for Oracle," you need to prepare the parameter settings for your database(s) as
described in the following sections:
l
l
Define the Database Parameters for the PCO Server
Define the Database Parameters for a PCO/PDA Client
Policy Orchestrator and Predictive Analytics Installation Guide 21
Important Prerequisite: Make sure that both the database server and clients have the same
Oracle version installed.
Define the Database Parameters for the PCO Server
After you install your Oracle server(s), check and set the following parameters and settings:
1. Verify the character set used.
This should be one of the NLS character sets that support the fulltext indexing. See the table
in the related step in "Install the Database: Steps for PCO/PDA."
After the installation process, you can use the SQL statement to verify which setting is being
used:
select * from sys.nls_database_parameters;
Sample output:
PARAMETER
VALUE
NLS_LANGUAGE
AMERICAN
NLS_TERRITORY
AMERICA
NLS_CURRENCY
$
NLS_ISO_CURRENCY
AMERICA
NLS_NUMERIC_CHARACTERS .,
NLS_CHARACTERSET
WE8ISO8859P1
...
2. Update the SQLNET.ORA file with the following parameter values:
l
TCP.NODELAY = YES (applies to the DB Server and DB client)
Setting this parameter improves system performance because it ensures that the
system does not wait for an acknowledgment of a packet before sending the next.
l
SQLNET.EXPIRE_TIME <= 5 minutes (applies to the DB Server)
Recommended value: 1
This parameter applies to the "Dead Connection Detection". This is the amount of
time that the database server checks whether existing client sessions have reacted.
The Server ends sessions that do not respond.
3. Create tablespaces
Tablespaces for the PCO/PDA must be created using ASSM (Automatic Segment Space
Management). ASSM provides improved performance for data inserts and provides
transparency of table reaorganizations.
4. Reorganize with DB tools
Automic recommends using the Oracle SEGMENT ADVISOR because it generates a list of
all tables and indexes that must be reorganized. You could also reorganize your data
manually, but this would require extensive manual changes in the PCO databases.
Example of an online index reorganization:
22
Chapter 3 Installation Preparation
sqlplus> alter index <index_name> rebuild online;
5. Configure the statistics update.
You should regularly update the access statistics of the database tables. A daily job is
automatically scheduled when you install the database (GATHER_STATS_JOB) unless you
deactivate this option. You can specify the time when the job should run.
Another way to update your database statistics is to schedule the following SQL statement
in AE (line 1):
exec dbms_stats.gather_schema_stats
('PCO',options=>'GATHER AUTO', estimate_percent =>
DBMS_STATS.AUTO_SAMPLE_SIZE, method_opt =>
'FOR ALL COLUMNS SIZE AUTO', cascade => TRUE);
Alternatively, you can use the following statement. In some cases it may generate more
useful statistical results.
exec dbms_stats.gather_schema_stats
('PCO',options=>'GATHER AUTO', estimate_percent =>
DBMS_STATS.AUTO_SAMPLE_SIZE, method_opt =>
'FOR ALL INDEXED COLUMNS SIZE AUTO', cascade => TRUE);
To verify whether and when the statistics have last been updated, you can use the SQL view
"USER_TABLES", as you see in the following example:
sqlplus>select TABLE_NAME, NUM_ROWS, LAST_ANALYZED from
USER_TABLES;
6. Tune the database parameters.
Buffer Cache Hit Rate
The buffer cache hit rate should be higher than 99%. The following example script retrieves
the current value.
-- DB_BLOCK_BUFFERS: 'buffer cache hit rate %' should
be > 99%
execute dbms_output.put_line(chr(9));
execute dbms_output.put_line(chr(9));
execute dbms_output.put_line('>>>>>> DB_BLOCK_BUFFERS:
"buffer cache hit rate %" should be > 99%');
execute dbms_output.put_line(chr(9));
declare dbg number;
cg number;
pr number;
begin
select value into dbg
from v$sysstat
where name = 'db block gets';
select value into cg from v$sysstat
where name = 'consistent gets';
select value into pr from v$sysstat
where name = 'physical reads';
dbms_output.put_line('db block gets
|'||to_char(dbg,'999G999G999G999'));
dbms_output.put_line('consistent gets
|'||to_char(cg,'999G999G999G999'));
Policy Orchestrator and Predictive Analytics Installation Guide 23
dbms_output.put_line('physical reads
|'||to_char(pr,'999G999G999G999'));
dbms_output.put_line('--------------------------------------');
dbms_output.put_line('buffer cache hit rate in % |'||
to_char (round(100*(1-(pr/(dbg+cg))),2),'999D00'));
end;
/
Retrieving the buffer cache hit rate
Memory Hit Rate
The memory hit rate of the sort area should be higher than 99%. The following example script
retrieves the current value.
-- SORT_AREA_SIZE: memory hit rate % should be > 99%
execute dbms_output.put_line(chr(9));
execute dbms_output.put_line(chr(9));
execute dbms_output.put_line('>>>>>> SORT_AREA_SIZE:
"memory hit rate %" should be > 99%');
execute dbms_output.put_line(chr(9));
declare sm number;
sd number;
begin
select value into sm
from v$sysstat
where name = 'sorts (memory)';
select value into sd from v$sysstat
where name = 'sorts (disk)';
dbms_output.put_line('sorts (memory)
|'||to_char(sm,'999G999G999'));
dbms_output.put_line('sorts (disk)
|'||to_char(sd,'999G999G999'));
dbms_output.put_line('------------------------------');
dbms_output.put_line('memory hit Rate % |'|| to_char
(round(100-(100*sd/sm),2),'999D00')); end;
/
Retrieving the memory hit rate
Size of the Shared Pool
The percentage of non-successful library cache accesses within the shared pool as
compared to the total number of all accesses should be much lower than 1%. The following
example script retrieves the current value.
-- SHARED_POOL_SIZE: 'Misses %' should be << 1%
execute dbms_output.put_line(chr(9));
execute dbms_output.put_line(chr(9));
execute dbms_output.put_line('>>>>>> SHARED_POOL_SIZE:
"Misses
%" should be << 1%');
column 'misses %' format a10
select sum(pins) "Executions",
24
Chapter 3 Installation Preparation
sum(reloads) "Cache Misses while Executing",
to_char(sum(reloads)/(sum(pins)+sum(reloads))
*100,'990D0000') "Misses %"
from v$librarycache;
Retrieving the library cache misses
Note: Alternatively, you can use the Memory Advisor to retrieve the
library cache misses. Make sure to use the PGA_AGREGATE_TARGET
parameter.
Define the Database Parameters for a PCO/PDA Client
For an Oracle database for the PCO Modelling Studio or Predictive Analytics, you must also do the
following.
1. Verify the character set used.
This should be one of the NLS character sets that support the fulltext indexing. See the table
in the related step in "Install the Database: Steps for PCO/PDA."
After the installation process, you can use the SQL statement to verify which setting is being
used:
select * from sys.nls_database_parameters;
Sample output:
PARAMETER
VALUE
NLS_LANGUAGE
AMERICAN
NLS_TERRITORY
AMERICA
NLS_CURRENCY
$
NLS_ISO_CURRENCY
AMERICA
NLS_NUMERIC_CHARACTERS .,
NLS_CHARACTERSET
WE8ISO8859P1
...
2. Update the SQLNET.ORA file with the following parameter values:
l
TCP.NODELAY = YES
Setting this parameter improves system performance because it ensures that the
system does not wait for an acknowledgment of a packet before sending the next.
3. If you connect the Admin database to the source system database over a TNS service, then
you need to do the following in the client databases:
a. In SQLNET.ORA check whether the entry NAMES.DIRECTORY_PATH exists and
make sure it contains the value TNSNAMES. A valid line would look something like
this:
NAMES.DIRECTORY_PATH= (TNSNAMES, EZCONNECT)
b. Update the TNSNAMES.ORA file with the following parameter value:
Policy Orchestrator and Predictive Analytics Installation Guide 25
o
ENABLE=BROKEN
This parameter must be the first part of the TNSNAME entry, as you see in the
following example:
PCOP =
(DESCRIPTION =
(ENABLE=BROKEN)
(ADDRESS = (PROTOCOL = TCP)(HOST = dbhost)(PORT =
1521))
(CONNECT_DATA =
(SERVER = DEDICATED)
(SERVICE_NAME = PCOP))
)
Example of tnsnames.ora
c. In Windows, create an environment variable named TNS_ADMIN that points to the
directory of the file TNSNAMES.ORA.
To add an environment variable, open the Control Panel and search for "environment
variable." Then add a new variable in the Environment Variables dialog box.
3.3.5 Optimize an Applications Manager Source
Database
If you use PDA for analyzing and monitoring the Applications Manager, you should create an
additional index in your Oracle databases with the following SQL statement:
CREATE INDEX "SO_JOB_HISTORY_START_DATE" ON "SO_JOB_HISTORY"
(
"SO_START_DATE"
);
3.3.6 Create Databases in Oracle
When using Oracle as your database management system, you need define the databases for
PCO before you begin the installation process. Specifically, you need to create the following:
l
l
One database for the Admin database
One database for each EventBase that you want to implement
Two possible scenarios
There are two main scenarios for installing PCO/PDA with Oracle. The difference between the two
scenarios is whether you define the database for the EventBases in the same or a separate
database as the Admin database. The choice depends on the purpose of the installation.
l
Oracle Scenario 1—One PCO Database:
In this scenario you configure the EventBase to be stored in the same database as the
Admin database.
26
Chapter 3 Installation Preparation
o
o
l
Use this approach only for test and demonstration environments.
Attention! You cannot create more than one EventBase with this approach.
Oracle Scenario 2—Multiple PCO Databases:
In this scenario you install one or more EventBases on separate databases as the Admin
database.
o This is the most common installation scenario.
o Use this approach in a production environment, especially if your source data is
coming from at least one medium- to large-sized OM/AE or AM system
o This scenario allows you to integrate multiple source systems
(OM/AE and/or AM systems, which are called "U4 systems" on the Configuration
Manager screens).
Considerations for the Admin database
For performance reasons, in a production environment, you should have a separate schema defined
just for the Admin database.
Considerations for the EventBase databases
Typically, you define one EventBase for each source system database. You could also define more
than one EventBase for a single source system database. In this case, all EventBases are loaded
with the relevant data from the source database. What you should NOT do is to have more than one
source database write to the same EventBase, because then the data will be mixed and provide
irrelevant results.
If you have multiple source systems, give each database that will be used for an EventBase a
unique name across your PCO environment.This will prevent unwanted data mix-ups.
3.3.7 Create Oracle Users
Before you begin the full PCO/PDA installation, you need to define several Oracle user schemas to
You need several Oracle user schemas to access the various databases that are required to work
with PCO and PDA. Specifically, you need all the following:
l
l
l
A user to access the source data in your source system (OM/AE or AM database).
A user for the Admin database.
A user for each EventBase database.
If you plan to set up additional EventBases that connect to an additional source systems
(OM/AE or AM databases), you need additional users for each combination of EventBase
and source system.
SQL Scripts for creating users
SQL scripts for creating the necessary Oracle users are included in the PCO/PDA package, which
you extracted in the steps "Download the PCO Package." To find the scripts:
1. Go to the folder where you extracted the Policy Orchestrator files.
2. Open the folder Tools\Oracle.
Instructions for creating each user using the related scripts are described below.
Policy Orchestrator and Predictive Analytics Installation Guide 27
Prerequisite privilege
To run the scripts, you must have a user with the SYSDBA privilege on the various Oracle systems.
Create a user for accessing an OM/AE database
Use these steps when your the system with the source data is in an OM or AE database and the
database is an Oracle database. If your source data is an Oracle database for Applications
Manager, see the steps "Create a User for Accessing an AM database."
1. Go to the folder where you extracted the Policy Orchestrator files.
2. Open the folder Tools\Oracle.
3. Run the script CreateUserAndSynonyms.sql with the following parameters:
l
l
l
l
User: The name of the new user.
Password: The password of the user.
UC4-schema: The schema of the database on which the AE system is running.
DB host: Name of the physical database host This will create a user with read-only access to the OM/AE database.
Example:To create a user called AEREADER with the password mypassword
that can read data from the schema AE_SCHEMA on the host PCOINSTANCE ,
you would run sqlplus with this statement:
sqlplus sys@PCOINSTANCE as sysdba
CreateUserAndSynonyms.sql AEREADER mypassword AE_SCHEMA
4. In Oracle, assign the user the CONNECT role.
Create a User for Accessing an AM database
Use these steps when your the system with the source data is in an Applications Manager database
and the database is an Oracle database. If your source data is an Oracle database for Automation
Engine, see the steps "Create a user for accessing an OM/AE database."
1. Go to the folder where you extracted the Policy Orchestrator files.
2. Open the folder Tools\Oracle.
3. Run the script CreateUserAndSynonymsForAM.sql with the following parameters:
l
l
l
l
User: The name of the new user.
Password: The password of the user.
UC4-schema: The schema of the database on which the AM system is running.
DB host: Name of the physical database host This will create a user with read-only access to the Applications Manager database.
Example:To create a user called AMREADER with the password mypassword that can read
data from the schema AM_SCHEMA on the host PCOINSTANCE , you would run sqlplus with
this statement:
sqlplus sys@PCOINSTANCE as sysdba CreateUserAndSynonymsForAM.sql
AMREADER mypassword AM_SCHEMA
4. In Oracle, assign the user the CONNECT role.
28
Chapter 3 Installation Preparation
Create a User/Schema for the Admin Database
To create the user to access the Admin database, use the following steps.
1. Go to the folder where you extracted the Policy Orchestrator files.
2. Open the folder Tools\Oracle.
3. Run the script CreateOracleUser.sql with the following parameters:
l
l
l
User: The name of the new user that will have read and write access to the database.
Password: The password of the user.
DB host: Name of the physical database host This will create a user with read and write access for the Admin database.
Example:To create a user called PCOADMIN with the password mypassword on the host
PCOINSTANCE , you would run sqlplus to connect the user to the database instance for
PCO/PDA with the following statement:
sqlplus sys@PCOINSTANCE as sysdba CreateOracle.sql PCOADMIN
mypassword
Note: You use the same script if you want to create a user for the EventBase database,
who might need an additional role and privilege if you want to enable full text search. If
you want to create the schema with different settings (for example a different
tablespace), you can modify the script as you need.
4. In Oracle, assign the user the rights:
Roles:
l
l
l
CONNECT
RESOURCE
CTXAPP
Privileges
l
l
l
l
l
l
CREATE PROCEDURE; ALTER PROCEDURE; DROP PROCEDURE
CREATE SEQUENCE; ALTER SEQUENCE
CREATE TABLE; ALTER TABLE; DELETE TABLE; DROP TABLE
CREATE VIEW; DROP VIEW
CREATE SESSION
UNLIMITED TABLESPACE
Object privilege
Object Privilege Schema
EXECUTE
Object
CTXSYS CTX_CLS
Create Users/Schemas for an EventBase Database
You need one EventBase for each source system database (OM/AE and/or AM database).
When you install PCO/PDA, you define one EventBase for each source system database
(OM/AE and/or AM database). You need an Oracle user to access the EventBase databases. You
can use the same user for more than one EventBase or have individual users for each EventBase.
Policy Orchestrator and Predictive Analytics Installation Guide 29
Nevertheless, if you have multiple EventBases, then you have to run the script once for each
EventBase.
Note for a standalone installation: If your are installing the Admin database and the
EventBase(s) on the same Oracle database, then you need only one user. So, after running the
script for the Admin database in "Create a User/Schema for the Admin Database," you can skip
the steps below.
Use the following steps to create the access user for each EventBase.
1. Go to the folder where you extracted the Policy Orchestrator files.
2. Open the folder Tools\Oracle.
3. Run the script CreateOracleUser.sql with the following parameters:
l
l
l
User: The name of the new user that will have read and write access to the database.
Password: The password of the user.
DB host: Name of the physical database host This will create a user with read and write access to the related EventBase database.
Example:To create a user called PCOEVENTBASE with the password mypassword on the
host PCOINSTANCE , you would run sqlplus to connect the user to the database instance for
PCO/PDA with the following statement:
sqlplus sys@PCOINSTANCE as sysdba CreateOracle.sql PCOEVENTBASE
mypassword
Note: If you want to create the schema with different settings (for example a different
tablespace), you can modify the script as you need.
4. In Oracle, assign the user the rights:
Roles:
l
l
l
CONNECT
RESOURCE
CTXAPP (needed for fulltext indexing in PDA)
Privileges
l
l
l
l
l
l
CREATE PROCEDURE; ALTER PROCEDURE; DROP PROCEDURE
CREATE SEQUENCE; ALTER SEQUENCE
CREATE TABLE; ALTER TABLE; DELETE TABLE; DROP TABLE
CREATE VIEW; DROP VIEW
CREATE SESSION
UNLIMITED TABLESPACE
Object privilege (needed for fulltext indexing in PDA)
Object Privilege Schema
EXECUTE
Object
CTXSYS CTX_CLS
Next steps: You are now ready to install the full PCO and PDA package. Start with Step 1 - Starting
the Installation.
30
Chapter 3 Installation Preparation
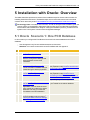
3.3.8 Installation with Oracle: Overview
The tables that follow provide an overview of the installation steps for the two main scenarios for
installing PCO/PDA with Oracle. The detailed steps are covered in the instructions in the linked
sections which are mostly under "Full Installation of Policy Orchestrator & Predictive Analytics".
Terminology Note: In the tables in this section, as well as throughout this installation guide, the
"source system" is the OM/AE or AM system that provides the source data that will be loaded
into the Admin and EventBases for analysis. During the installation process, you define source
system in the "UC4 System" section of the Configuration Manager.
Oracle Scenario 1: One PCO Database
In this scenario you configure the EventBase to be stored in the same database as the Admin
database.
o
o
Use this approach only for test and demonstration environments.
Attention! You cannot create more than one EventBase with this approach.
Steps and Links to Details
1.
Preparing Oracle Databases
2.
Step 1 - Starting the Installation.
Notes
Start the Configuration Manager and
select all options to start a full
installation.
3.
Step 2 - Configuring the Settings
Connect the Admin database that you
created during the Oracle preparation.
Here you use the user that you created in
the preparation step Create a User/Schema
for the Admin Database.
4.
Step 3: Configuring the Source
Connection (UC4 System)
Here you use the user that you created in
the preparation step Create a user for
accessing an OM/AE database or Create a
User for Accessing an AM database,
depending on your source system.
5.
Step 3: Configuring an EventBase for an Here you use the same user as the one
Oracle Database
your created for the Admin database.
Important: You must enter the exact
same values as you did for the Admin
database! This way you create the
EventBase in the same database.
6.
Step 3: Define the rest of the settings
for the EventBase with the steps in
Defining the Data Extraction Settings
and Defining the General Settings.
7.
Step 4 - Applying the Configuration
The PCO/PDA installation is finished and
the databases are all configured as needed.
You have the Admin database one
EventBase database on the same Oracle
server.
Policy Orchestrator and Predictive Analytics Installation Guide 31
Steps and Links to Details
8.
Log into PDA with the steps in Step 5 Initial Login.
9.
In PDA import the templates from the
folder in your full PCO/PDA installation
that corresponds to your source system
type:
l
l
Notes
For instructions, see the section "The
Import Wizard" in the Predictive Analytics
User Manual.
\Templates\OM
\Templates\AM
Oracle Scenario 2: Multiple PCO Databases
In this scenario you install one or more EventBases on separate databases as the Admin database.
o
o
o
This is the most common installation scenario.
Use this approach in a production environment, especially if your source data is coming from
at least one medium- to large-sized OM/AE or AM system
This scenario allows you to integrate multiple source systems(OM/AE and/or AM systems,
which are called "U4 systems" on the Configuration Manager screens).
Steps and Links to Details
1.
Preparing Oracle Databases
2.
Step 1 - Starting the Installation.
Notes
Start the Configuration Manager and
select all options to start a full
installation.
3.
Step 2 - Configuring the Settings
Connect the Admin database that you
created during the Oracle preparation.
Here you use the user that you created in
the preparation step Create a User/Schema
for the Admin Database.
4.
Step 3: Configuring the Source
Connection (UC4 System)
5.
Step 3: Configuring an EventBase for an Here you use the user that you created in
Oracle Database
the preparation step Create
Users/Schemas for an EventBase
Connect the EventBase database that
Database.
you created during the Oracle
preparation.
6.
If you have more than one source
system, repeat steps 4 and 5 in this
table to create a separate EventBase for
each system.
Again, you connect the EventBase
databases that you created during the
Oracle preparation
Here you use the user that you created in
the preparation step Create a user for
accessing an OM/AE database or Create a
User for Accessing an AM database,
depending on your source system.
Here you use the users that you created in
the preparation step Create
Users/Schemas for an EventBase
Database for each EventBase. The users
can have the same name, but the
EventBases must have different names, so
you had to run the script once for each
EventBase.
32
Chapter 3 Installation Preparation
Steps and Links to Details
Notes
7.
Here you use the users that you created in
the preparation step Create
Users/Schemas for an EventBase
Database for each EventBase. The users
can have the same name, but the
EventBases must have different names, so
you had to run the script once for each
EventBase.
If you want to create more than one
EventBase for the same source
system, repeat step 5 in this table to
create the extra EventBases.
Again, you connect the EventBase
databases that you created during the
Oracle preparation, and they must all
have different names.
8.
Step 3: Define the rest of the settings
for the EventBase with the steps in
Defining the Data Extraction Settings
and Defining the General Settings.
9.
Step 4 - Applying the Configuration
The PCO/PDA installation is finished and
the databases are all configured as needed.
You have the Admin database one
EventBase database on the same Oracle
server.
10.
Log into PDA with the steps in Step 5 Initial Login.
11.
In PDA, into only one EventBase,
import the templates from the folder in
your full PCO/PDA installation that
corresponds to your source system
type:
l
l
12.
For instructions, see the section "The
Import Wizard" in the Predictive Analytics
User Manual.
\Templates\OM
\Templates\AM
If you have additional EventBases, then
in PDA, map the imported templates
from the first EventBase to the other
EventBases.
For instructions, see the section "The
Template Mapping Dialog" in thePredictive
Analytics User Manual.
Policy Orchestrator and Predictive Analytics Installation Guide 33
4 Full Installation of Policy
Orchestrator & Predictive Analytics
After doing all the preparation steps described in Installation Preparation, you are ready to install the
full PCO and PDA package, which includes the PCO-server components as well as the
PCO Modelling Studio and PDA.
The instructions for the full installation are described in the following sections.
l
l
l
l
l
Step 1 - Starting the Installation
Step 2 - Configuring the Settings
Step 3 - Connecting the Data Sources and Configuring the EventBases
Step 4 - Applying the Configuration
Step 5 - Initial Login
To upgrade an existing installation, see the instructions in "Upgrading an Existing Installation".
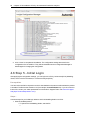
4.1 Download the PCO Package
1. Download the latest full package for Policy Orchestrator (PCO), which also contains
Predictive Analytics (PDA).
a. Go to the the Automic Download Center (http://downloads.automic.com/).
b. Select Policy Orchestrator, 10, and Full in the first three fields, leave the rest blank
and click Go.
c. Roll down to the bottom of the list of Patch Descriptions and click on the Downloads
section, and then download the latest version of the file
UC4.Policy.Orchestrator_Full_<version number>.zip.
2. Extract the zipped files to the place that you want to install Policy Orchestrator, for example
to C:\Program Files.
Next steps:
If you are installing the full package for the first time, the next step depends on the type of database
management system you are using:
l
l
For Oracle continue with creating users, as described in "Create Oracle Users."
For MS SQL continue with "Step 1 - Starting the Installation."
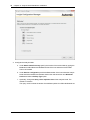
4.2 Step 1 - Starting the Installation
Before you begin here you need to have done all the steps in the following sections:
l
l
Steps:
Installation Preparation
Download the PCO Package
34
Chapter 4 Full Installation of Policy Orchestrator & Predictive Analytics
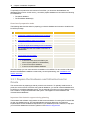
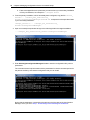
1. In the folder where the Policy Orchestrator files have been extracted, run the install.bat
file.
The Insight Configuration Manager opens.
Note: The first time you run the install.bat, it will take a few minutes before the
Configuration Manager appears.
2. If you have already installed and configured Policy Orchestrator somewhere else you can
continue in one of two ways:
l
l
Continue with the following steps here and define each of configuration settings in the
Configuration Manager.
Click the Close button here, and then carry over the installation configurations from
the other system to this one, as described in "Deploying a Configuration via the
Command Prompt".
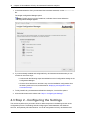
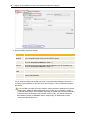
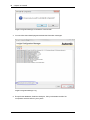
3. To fully install Policy Orchestrator and Predictive Analytics, check all five options.
4. Click the Next button and continue with "Step 2 - Configuring the Settings".
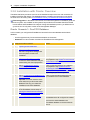
4.3 Step 2 - Configuring the Settings
This section explains what you need to know to define the options in the Settings section of the
configuration process. The Settings include configuring the Admin database, the Windows
services, and optionally AE Authentication. You do all configuration for Policy Orchestrator and
Policy Orchestrator and Predictive Analytics Installation Guide 35
Predictive Analytics in the Insight Configuration Manager, which opens as soon as you start the
installation, as described in "Step 1 - Downloading Files and Starting the Installation".
Instructions for defining the configuration settings are covered in the following sections:
l
l
l
l
Defining the Admin Database Settings for an MS SQL Database Server
Defining the Admin Database Settings for an Oracle Database Server
Defining Services Settings
Defining User Management Settings
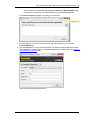
4.3.1 Defining the Admin Database Settings for an MS
SQL Database Server
The steps in this section describe how to define the settings for the Decision Admin database when
the source database is an MS SQL database. For an Oracle database, see "Defining Admin
Database Settings for an Oracle Database Server".
There are two approaches that you can use for creating databases for PCO/PDA when you are
using MS SQL databases. You can already have defined a database in MS SQL and then just
connect it during the installation process, or you can create and connect it during the installation
process with the steps that follow. (This option is not available for Oracle databases.)
Before you begin
Make sure to have completed the setup tasks described in "Preparing MS SQL Databases." For
example, when you define the Admin database, you need to specify a system user for it. This user
needs to be defined in your MS SQL Server database and must have at least the following roles
assigned to it:
User Role
Purpose
DBOWNER
Always mandatory.
This user role is needed to complete the installation process.
DBCREATOR Only mandatory for creating databases during installation.
This role is needed when you want to be able to create the database from within
the installation process.
Steps...
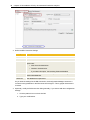
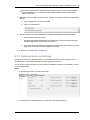
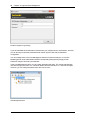
1. In the Settings section, click the Admin DB tab.
2. In the DB Type box under DB Connection Type, select "Microsoft SQL Server".
The Connection Type is automatically set to "SQL Native Client," which is the only option
here.
36
Chapter 4 Full Installation of Policy Orchestrator & Predictive Analytics
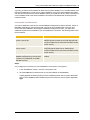
3. Define the DB Connection Settings
Setting
Description
Server Name
The host name of the server where the Admin database is installed.
DB-Name
The name of the Admin database.
Authentication The kind of authentication that is used to access the Admin database.
Options are:
l
SQL Server Authentication
l
Windows Authentication.
If you select this option, the remaining fields are disabled.
User Name
The database user name with which Policy Orchestrator can log into the
Admin Node database.
Password
The database user password.
As you enter the settings for the DB Connection, the Configuration Manager constructs a
connection string statement in the DB Connection String box. This is greyed out because it
is locked.
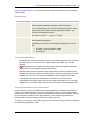
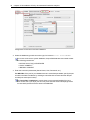
4. Optionally, modify the DB Connection String manually, if you want to add other configuration
settings.
1. Click the padlock icon to unlock the field.
2. Type your modifications.
Policy Orchestrator and Predictive Analytics Installation Guide 37
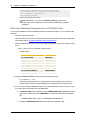
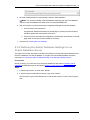
5. Click the Create DB button to automatically create the Admin database.
Note: You can also manually create the database and assign the user to the database.
In this case the database user needs to have only the DBOWNER role.
6. Test the connection to make sure that the Configuration Manager can find the database.
1. Click the Test Connection button.
A progress bar appears at the bottom of the tab page. If the test process finds errors,
a window appears with a description of the errors.
2. Correct any errors and retest the configuration until the Status at the bottom on the tab
page reads "Connection has been tested successfully."
7. Continue with "Defining Services Settings".
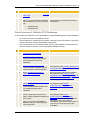
4.3.2 Defining the Admin Database Settings for an
Oracle Database Server
The steps in this section describe how to define the settings for the Decision Admin database when
the source database is an Oracle database. If you plan to use an MS SQL database, follow the
instructions in "Defining the Admin Database Settings for an MS SQL Database Server".
Prerequisites
Before you begin, you must have set up the Oracle database as described in Preparing Oracle
Databases and defined a user as described in Create a User/Schema for the Admin Database.
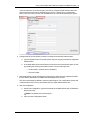
Steps...
1. In the Settings section, click the Admin DB tab.
2. In the DB Type box under DB Connection Type, select "Oracle".
The Connection Type is automatically set to "Oracle Native Client," which is the only option
here.
38
Chapter 4 Full Installation of Policy Orchestrator & Predictive Analytics
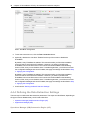
3. Define the DB Connection Settings
Setting
Description
Connection Choose between "Basic" and "TNS". If you choose TNS, the Network Alias
Method
box is enabled instead of the Host and Service boxes.
Host
The hostname where the Admin Node database is located. (Available only
when the Connection Method is "Basic".)
Service
The Oracle service that the Admin Node database runs on. (Available only
when the Connection Method is "Basic".)
Network
Alias
A TNS alias. (Available only when the Connection Method is "TNS".)
User Name The database user name with which Policy Orchestrator can log into the
Admin Node database.
Password
The database user password.
As you enter the settings for the DB Connection, the Configuration Manager constructs a
connection string statement in the DB Connection String box. This is locked and therefore
greyed out.
If you use TNS a your DB connection method, make sure that the Windows environment
variable TNS_ADMIN is defined and points to the location of your tnsnames.ora file. If
you already have Oracle client installed, depending on whether the Connection Method in
your DB Connection Settings is set to "Basic" and/or "TNS", you need to activate the
EZCONNECT and/or TNSNAMES options, respectively. By default both of these
connection methods are active.
Policy Orchestrator and Predictive Analytics Installation Guide 39
The Oracle Listener will be configured for the default port 1521. If your Oracle database
runs on a different port, you need to manually modify the DB connection string to the
correct port number.
4. Optionally, modify the DB Connection String manually, if you want to add other configuration
settings.
a. Click the padlock icon to unlock the field.
b. Type your modifications.
5. Test the connection to make sure that the Configuration Manager can find the database.
a. Click the Test Connection button.
A progress bar appears at the bottom of the tab page. If the test process finds errors,
a window appears with a description of the errors.
b. Correct any errors and retest the configuration until the Status at the bottom on the tab
page reads "Connection has been tested successfully."
6. Continue with "Defining Services Settings".
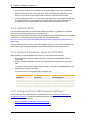
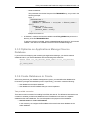
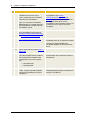
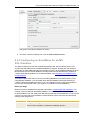
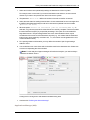
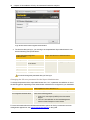
4.3.3 Defining Services Settings
On the Services tab of the Settings section, you can define which PCO services should run as a
Windows Service (the default option) and the start-up type for the service.
This is where you define the Port to access the Admin database, the Worker, the Gateway, as well
as the Analysis Node.
Steps...
1. In the Settings section, click the Services tab.
2. For each Policy Orchestrator service, provide the following specifications:
40
Chapter 4 Full Installation of Policy Orchestrator & Predictive Analytics
Field or Selection
Option
Description
The first box to the right of The port number to access the service
the service name
Install as Windows
Service check box
Check this if you want the Policy Orchestrator service to run
as a Windows service. This is the default.
Startup Type
Select what type of startup you want for the service:
Automatic or Manual.
Important
If all of the following is true:
l
l
l
You use an MS SQL database.
You want to use Windows Authentication to sign onto the Admin database. You
configure this in the Admin Settings, as described in "Defining the Admin Database
Settings for an MS SQL Database Server".
Your MS SQL database is located on a different server from the UC4DecisionAdmin
service (which is usually the case in an production environment).
Then the UC4DecisionAdmin service must not run over a local account. This means that you
must modify the properties for the UC4DecisionAdmin Windows service, so that it logs on to
a different account (not the "Local System account"). The account must be in the same
Windows domain as the SQL server.
3. Optionally, change the Query cache expiration time of the Analysis Node. The default is 5
minutes.
The query cache is where the results of eventBase queries from PDA dashboards are stored.
4. Continue with "Defining User Management Settings".
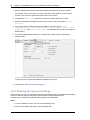
4.3.4 Defining User Management Settings
Defining User Management settings is optional. By defining these, you enable AE Authentication.
You need this when you want users that log into Policy Orchestrator to be authenticated by the
Automation Engine. Furthermore, you need to enable AE Authentication if you want to use the user
management functions in the Enterprise Control Center (ECC) Administration to manage users of
the Policy Orchestrator or the Service Orchestrator plug-ins of the ECC. This would supplement
rather than replace the user management functions in Policy Orchestrator and Predictive Analytics.
For more information about this, see "Login and User Management".
To configure Policy Orchestrator for AE Authentication, you need to establish the connection
between the Automation Engine and Policy Orchestrator and to define a Automation Engine user
that you will use to login to Policy Orchestrator the first time to maintain users. The configuration
process will give this user the "super administrator" role in Policy Orchestrator. To do these, use the
following steps:
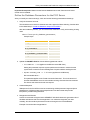
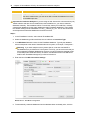
1. In the Settings section, click the User Management tab.
2. Select the Enable AE Authentication check box.
Policy Orchestrator and Predictive Analytics Installation Guide 41
You must select this if you are using any of the ECC components that interface with PCO.
These include the PCO plug-in and PDA plug-in for ECC, and the Service Orchestrator
(SVO). SVO only when you work with EventBase SLAs or the advanced analytics reports.
3. Configure the AE system where you want to maintain users with AE Authentication.
a. Type the System Name for the AE System that you are going to define for Integrated
Authentication.
b. In the table define the Communication Processes for the Automation Engine. Do this
by providing the following information for each communication process:
l
Under Host/IP, the hostname or IP address
l
The Port number
4. Define the Default User by providing the Client number, where the user is defined, and then
the user Name, Department, Full Name and Email address for the user.
This user must already be defined in the Automation Engine. This configuration process will
create the same user in Policy Orchestrator with the "Super Administrator" role.
5. Test the configuration.
a. Under Test Configuration, type the Password for the Default User that you defined in
the previous step.
Note: The password is case sensitive.
b. Click the Test Configuration button.
42
Chapter 4 Full Installation of Policy Orchestrator & Predictive Analytics
A progress bar appears at the bottom of the tab page. If the test process finds errors,
a window appears with a description of the errors.
c. Correct any errors and retest the configuration until the Status at the bottom on the tab
page reads "Configuration is valid."
6. Continue with "Step 3 - Connecting the Data Sources and Configuring the EventBases".
Later, when you apply the configuration settings in "Step 4 - Applying the Configuration", the
configuration process will do the following, based on the settings you defined on the User
Management tab page.
l
l
l
Configure the connection between the Automated Engine and Policy Orchestrator. This
involves copying the correct version of a DLL file to the right location in your installation. This
is described in "Manually configuring the communication with the Automation Engine".
Activate AE Authentication in Policy Orchestrator.
Create the default System User, which is already defined in the Automation Engine, in Policy
Orchestrator. This user has the "super administrator" role.
Note: If you did not use the Configuration Manager to set up AE Authentication, you can do it
manually by doing the previous steps yourself. Do items 2 and 3, you would do in the Decision
Modelling Studio.
4.4 Step 3 - Connecting the Data Sources
and Configuring the EventBases
In the "EventBases" section of the Configuration Manager you configure the connection to the
source database, then you define the EventBases to which PCO writes the relevant source data,
and then you define the data extraction settings and the general settings for how the data is loaded
and managed.
Instructions for defining these tasks are covered in the following sections:
l
l
l
l
l
Configuring the Source Connection (UC4 System)
Configuring an EventBase for an MS SQL Database
Configuring an EventBase for an Oracle Database
Defining the Data Extraction Settings
Defining the General Settings
4.4.1 Configuring the Source Connection (UC4 System)
The following steps describe how to configure connections to the databases of one or more source
systems. A source system database is the database that PCO will check for relevant events that it
sends to the EventBases, where the data is ready for analysis.
Both in the Configuration Manager and in the installed PCO/PDA products and documentation, the
source system and its database are referred to as the "UC4 System". The UC4 System database
can be either an OM/AE database or an Applications Manager (AM) database.
Relationship of source system database and Eventbase databases
Policy Orchestrator and Predictive Analytics Installation Guide 43
Typically, you define one EventBase for each source system database. You could also define more
than one EventBase for a single source system database. In this case, all EventBases are loaded
with the relevant data from the source database. What you should NOT do is to have more than one
source database write to the same EventBase, because then the data will be mixed and provide
irrelevant results.
Prerequisite considerations
Your source database could use one of three database management systems: MS SQL, Oracle, or
IBM DB2. Depending on the technology that you want to use to establish the connection from
PCO to the source database, and the type of database management system, you might have
additional requirements to fulfill before you can establish the connection. The following table covers
these situations.
Consideration/Situation
Additional Requirement
To establish a connection to the source
system via OLE DB
An appropriate OLE DB Provider is required for the
database (Oracle Provider for OLE DB, IBM OLE DB
Provider for DB2 Servers, Microsoft OLE DB Provider
for SQL Server).
To use ODBC for the connection to the
source system,
An appropriate ODBC Driver for the relevant database
is required (Oracle ODBC Driver, IBM OLE DB
Provider for DB2 Servers, Microsoft OLE DB Provider
for SQL Server).
The source system uses an IBM DB2
database management system and the
connection is established via an IBM
DB2 Native Client
The IBM DB2 .Net Framework Data Provider must be
installed.
Steps:
You configure the connections to source databases in the section "UC4 System".
1. In the "EventBases" section, click the "UC4 System" tab.
2. Click the Add button to attach a new UC4 System (OM/AE or AM database).
A dialog appears for entering a name for the EventBase that the source system data will be
sent to. Enter a Name for the EventBase system and select the source system application
Type.
44
Chapter 4 Full Installation of Policy Orchestrator & Predictive Analytics
Configuration: Connection to the Source Database
3. Select the database type and connection type, for instance Native client or ODBC.
For access to the source system database, the specified data base user needs at least
the following permissions:
l
l
l
MS SQL Server: DB_DATAREADER
Oracle: CONNECT
IBM DB2: CONNECT
4. Enter the connection parameters (Server Name, User, Password, etc.).
For IMB DB2: If the port for your database server is not default port 50000, specify the port
number in the field 'Host Name' by entering a colon after the host name and then the port
number (host name:port number).
For Oracle RAC installations: Automic does not recommend installing PCO on a
RAC cluster, but if you do (at your own risk), then enter the SCAN name (Single Client
Access Name) instead of a host name in the Host field.
Policy Orchestrator and Predictive Analytics Installation Guide 45
Configuration of the Source Database Connection
5. To test the connection settings now, click the Test Connection button.
4.4.2 Configuring an EventBase for an MS
SQL Database
The data is extracted from the source database (OM/AE or AM, which is defined on the "UC4
System" tab) and loaded into an EventBase database for analysis. By doing this, the analytical
queries do not create additional load on the operative systems. The EventBase database can be an
Microsoft SQL Server or Oracle database. The steps in this section describe how to create and
connect an MS SQL EventBase. For an Oracle database, see Configuring an EventBase for an
Oracle Database.
There are two approaches that you can use for creating databases for PCO/PDA when you are
using MS SQL databases. You can already have defined a database in MS SQL and then just
connect it during the installation process, or you can create and connect it during the installation
process with the steps that follow. (This option is not available for Oracle databases.)
Before you begin
Make sure to have completed the setup tasks described in "Preparing MS SQL Databases." For
example, when you define an EventBase database, you need to specify an MS SQL system user
for the EventBase. This user needs to be defined in your MS SQL Server database. You can use the
same user for more than one EventBase, but each MS SQL system user must have at least the
following roles assigned to it:
User Role
Purpose
DBOWNER
Always mandatory.
This user role is needed to complete the installation process.
46
Chapter 4 Full Installation of Policy Orchestrator & Predictive Analytics
User Role
Purpose
DBCREATOR Only mandatory for creating databases during installation.
This role is needed when you want to be able to create the database from within
the installation process.
Important for Predictive Analytics: If you are using an SQL Server with a case sensitive (CS)
default collation and also want to install PDA in this installation run, you cannot create the
databases manually. The installation will fail. To avoid this, before you install PDA, manually
create all the databases (for the Admin database and all EventBase databases). Then change
the collation settings for each database to "Latin_1_General_CI_AS". This is case insensitive
and will provide a trouble-free database environment for PDA.
Steps...
1. In the 'EventBases' section, select the tab 'EventBase DB'.
2. Select the database type 'Microsoft SQL Server' and then a Connection Type.
3. In the DB-Name field enter a name for the EventBase database. Typically the database
name corresponds to the name of the attached source system, for example, 'TestSystem.'
Warnung: If you have multiple source systems (that is, more than one OM/AE or
AM database that you define as a "UC4 System" for PCO), you have to be sure that you
have separate EventBase databases for the source systems (otherwise the data will be
mixed and produce irrelevant results). Therefore, use different names in the DB Name
field for each EventBase throughout your PCO environment.
4. Enter the rest of the DB Connection Settings.
MS SQL Server - EventBase Configuration
5. To automatically create the database when the database does not already exist, click the
Policy Orchestrator and Predictive Analytics Installation Guide 47
'Create DB' button.
Important for Predictive Analytics: See the note above in Before you begin.
6. To test the connection settings now, click the Test Connection button.
7. Optionally, deselect the checkbox "Enabled" at the top of the screen to disable the
EventBase.
By default, every EventBase is enabled. This means that after you finish the installation,
users can start to work with the EventBase. If however, you want to just define the
EventBase now but not allow users to see or work with the EventBase in the Modelling
Studio or PDA, then you can disable it here. To enable it again later, you will have to restart
the Configuration Manager and check Enabled, then apply the settings as described in Step
4 - Applying the Configuration.
8. Continue with "Defining the Data Extraction Settings".
4.4.3 Configuring an EventBase for an Oracle Database
The data is extracted from the source database (OM/AE or AM, which is defined on the "UC4
System" tab) and loaded into an EventBase database for analysis. By doing this, the analytical
queries do not create additional load on the operative systems. The EventBase database can be an
Microsoft SQL Server or Oracle database. The steps in this section describe how to create and
connect an Oracle EventBase. For an MS SQL database, see Configuring an EventBase for an MS
SQL Database.
Prerequisites
Before you begin, you must have set up the Oracle database as described in Preparing Oracle
Databases and defined a user as described in Create Users/Schemas for an EventBase Database.
Steps...
1. In the 'EventBases' section, select the tab 'EventBase DB'.
2. If you have not already done this, above the tab page, select the EventBase that you want to
configure.
3. Select the database type 'Oracle'.
4. Enter the connection parameters.
48
Chapter 4 Full Installation of Policy Orchestrator & Predictive Analytics
Oracle - EventBase Configuration
5. To test the connection now, click the Test Connection button.
6. Optionally, deselect the checkbox "Enabled" at the top of the screen to disable the
EventBase.
By default, every EventBase is enabled. This means that after you finish the installation,
users can start to work with the EventBase. If however, you want to just define the
EventBase now but not allow users to see or work with the EventBase in the Modelling
Studio or PDA, then you can disable it here. To enable it again later, you will have to restart
the Configuration Manager and check Enabled, then apply the settings as described in Step
4 - Applying the Configuration.
7. Continue with "Defining the Data Extraction Settings".
4.4.4 Defining the Data Extraction Settings
The next step is to define the data extraction parameters. The steps are a bit different, depending on
the type of source database that you will extract data from:
l
l
Operations Manager (OM)/Automation Engine (AE)
Applications Manager (AM)
Operations Manager (OM)/Automation Engine (AE):
Policy Orchestrator and Predictive Analytics Installation Guide 49
1. Select an time interval for periodically loading new data from the source system.
For example, enter 10 seconds if you want to load data in near real-time, or enter several
minutes if you want to run queries less often in the source system.
2. The parameter 'Bulk size' defines the number of records to load for an interval.
3. Select the start dates for loading historical data. Choose a start date for error messages from
the MELD table (Message Data) as well as for the historical job data from the AH table
(Historic Job Data).
4. When the option 'Filter out successful jobs not exceeding ERT by' is
selected, only jobs are stored which either did not successfully complete or which exceeded
the estimated runtime (ERT) by a specified percentage. This option is recommended for
large data volumes. The percentage defines how much the estimated runtime may be
exceeded until the event won't be filtered out anymore (e.g. 10% means that the estimated
runtime has to be exceeded by more than 10%, i.e., the runtime must be greater than 110%
of the estimated runtime).
5. For capturing statistical information you may define the number of jobs for generating a
statistics event.
6. You can define one or more clients which should be used for the data extraction. Please use
a comma for separating the client numbers.
Note: For the analysis of agent messages in Predictive Analytics you need to always
extract the data of client 0.
Loading-Process Configuration with OM Source Database being Used
7. Continue with "Defining the General Settings".
Applications Manager (AM):
50
Chapter 4 Full Installation of Policy Orchestrator & Predictive Analytics
1. Select an appropriate interval for periodically loading new data from the source system.
For example, enter 10 seconds if you want to load data in near real-time, or enter several
minutes if you want to run queries less often in the source system.
2. The parameter 'Bulk size' defines the number of records to load for an interval.
3. Select the start date for loading historical data from the SO_Job_History table (Historic
Job Data).
4. For choosing which jobs are stored in the EventBase, select the options 'Store
completed jobs', 'Store failed jobs', 'Store killed jobs', 'Store
skipped jobs' and 'Store other jobs'. For large data volumes we recommend the
default setting.
5. For capturing statistical information you can define the number of jobs for generating a
statistics event.
Loading-Process Configuration with AM Source Database being Used
6. Continue with "Defining the General Settings".
4.4.5 Defining the General Settings
In the last step, you may select a time zone into which the dates will be converted during the loading
process. Predictive Analytics will always show this data in the specified time zone.
Furthermore,you can define the fulltext update settings for this EventBase
Steps...
1. In the "EventBases" section, click the "General Settings" tab.
2. Select an EventBase Time Zone for the EventBase data.
Policy Orchestrator and Predictive Analytics Installation Guide 51
General Settings (Automation Engine EventBase)
3. Select a Fulltext Update Method.
The Fulltext Update
Method...
Means that the fulltext will updated...
Real-Time
In real-time, the latest event are immediately retrievable via the
keyword search in PDA.
Interval
Periodically as defined by a given interval.
Daily
Daily at a given time of day.
Manual
Manually in the database.
Off
Never. It will not be used.
4. Continue with "Defining User Management Settings".
4.5 Step 4 - Applying the Configuration
1. Click 'Apply' for applying the configuration settings.
The output window shows the installation log. If the installation is successful, you get the
Info log entry 'Changed configuration was successfully applied'.
52
Chapter 4 Full Installation of Policy Orchestrator & Predictive Analytics
2. Click 'Close' to complete the installation. The configuration settings are stored in the
configuration file 'UC4ICM.ini'. They will be reloaded when the Configuration Manager is
started again for changing the configuration.
4.6 Step 5 - Initial Login
After applying the configuration settings, you can login to the Policy Orchestrator(PCO) Modelling
Studio, which is the PCO frontend, or Predictive Analytics(PDA) .
Prerequisites
You have a license file for the product and it is downloaded on the same machine where the product
is installed. The file has the extension LIC (for example, licenseFileName.lic). If you do not have a
license file, contact your sales representative or the Automic Support Team over Automic Support
Site (https://automationpassion.com/).
Steps...
Use these steps for your initial login either to the PCO Modelling Studio or to PDA.
1. Start the installed product.
l
To open the PCO Modelling Studio, start the file
<
Policy Orchestrator and Predictive Analytics Installation Guide 53
l
PCOInstallation>\Frontends\ModellingStudio\UC4.Decision.ModellingStudio.exe
To open PDA, start the file <PCO/PDAInstallation>\Insight\UC4.Insight.exe
The License Form dialog appears, prompting you for a license.
2. Click the folder icon to browse to the license file, with the extension LIC (for example,
licenseFileName.lic).
3. Click the Finish button. The Login window opens. The fields that appear depend on whether
your installation is configured for UC4 Integrated Authentication, as described in the Defining
User Management Settingssteps.
Login window with Integrated Authentication
54
Chapter 4 Full Installation of Policy Orchestrator & Predictive Analytics
Login window without UC4 integrated authentication
4. The first time that you log in, you must log in as the predefined "Super Administrator" user
with the following user specifications:
Login with UC4 Integrated
Authentication
Login with Decision Authentication
UC4 System:
select one
User Name:
Client:
enter client number or "0" Password:
for all clients
User Name:
UC
Department:
blank
Password:
UC (uppercase!)
UC
UC (uppercase!)
You should change this password after you first log in.
Changing the UC user password for the Super Administrator
To change the password of the super administrator user, "UC", update the user definition in one of
the following places, depending on the authentication method that is configured for your installation.
FOR...
THEN update the user definition in...
Decision Authentication
The User Management function of the PCO Modelling Studio
UC4 Integrated Authentication
In one of the following places:
l
l
In the "UC" user object (USER) in the Automation
Engine
The "UC" user definition in the User Management
function of the Enterprise Control Center
For more information about the different authentication options for Policy Orchestrator and user
management approaches, see Login and User Management in this guide.
Policy Orchestrator and Predictive Analytics Installation Guide 55
5 Installation with Oracle: Overview
The tables that follow provide an overview of the installation steps for the two main scenarios for
installing PCO/PDA with Oracle. The detailed steps are covered in the instructions in the linked
sections which are mostly under "Full Installation of Policy Orchestrator & Predictive Analytics".
Terminology Note: In the tables in this section, as well as throughout this installation guide, the
"source system" is the OM/AE or AM system that provides the source data that will be loaded
into the Admin and EventBases for analysis. During the installation process, you define source
system in the "UC4 System" section of the Configuration Manager.
5.1 Oracle Scenario 1: One PCO Database
In this scenario you configure the EventBase to be stored in the same database as the Admin
database.
o
o
Use this approach only for test and demonstration environments.
Attention! You cannot create more than one EventBase with this approach.
Steps and Links to Details
1.
Preparing Oracle Databases
2.
Step 1 - Starting the Installation.
Notes
Start the Configuration Manager and
select all options to start a full
installation.
3.
Step 2 - Configuring the Settings
Connect the Admin database that you
created during the Oracle preparation.
Here you use the user that you created in
the preparation step Create a User/Schema
for the Admin Database.
4.
Step 3: Configuring the Source
Connection (UC4 System)
5.
Step 3: Configuring an EventBase for an Here you use the same user as the one
Oracle Database
your created for the Admin database.
Important: You must enter the exact
same values as you did for the Admin
database! This way you create the
EventBase in the same database.
6.
Step 3: Define the rest of the settings
for the EventBase with the steps in
Defining the Data Extraction Settings
and Defining the General Settings.
Here you use the user that you created in
the preparation step Create a user for
accessing an OM/AE database or Create a
User for Accessing an AM database,
depending on your source system.
56
Chapter 5 Installation with Oracle: Overview
Steps and Links to Details
Notes
7.
The PCO/PDA installation is finished and
the databases are all configured as needed.
Step 4 - Applying the Configuration
You have the Admin database one
EventBase database on the same Oracle
server.
8.
Log into PDA with the steps in Step 5 Initial Login.
9.
In PDA import the templates from the
folder in your full PCO/PDA installation
that corresponds to your source system
type:
l
l
For instructions, see the section "The
Import Wizard" in the Predictive Analytics
User Manual.
\Templates\OM
\Templates\AM
5.2 Oracle Scenario 2: Multiple PCO
Databases
In this scenario you install one or more EventBases on separate databases as the Admin database.
o
o
o
This is the most common installation scenario.
Use this approach in a production environment, especially if your source data is coming from
at least one medium- to large-sized OM/AE or AM system
This scenario allows you to integrate multiple source systems(OM/AE and/or AM systems,
which are called "U4 systems" on the Configuration Manager screens).
Steps and Links to Details
1.
Preparing Oracle Databases
2.
Step 1 - Starting the Installation.
Notes
Start the Configuration Manager and
select all options to start a full
installation.
3.
Step 2 - Configuring the Settings
Connect the Admin database that you
created during the Oracle preparation.
4.
Step 3: Configuring the Source
Connection (UC4 System)
Here you use the user that you created in
the preparation step Create a User/Schema
for the Admin Database.
Here you use the user that you created in
the preparation step Create a user for
accessing an OM/AE database or Create a
User for Accessing an AM database,
depending on your source system.
Policy Orchestrator and Predictive Analytics Installation Guide 57
Steps and Links to Details
Notes
5.
Step 3: Configuring an EventBase for an Here you use the user that you created in
Oracle Database
the preparation step Create
Users/Schemas for an EventBase
Connect the EventBase database that
Database.
you created during the Oracle
preparation.
6.
If you have more than one source
system, repeat steps 4 and 5 in this
table to create a separate EventBase for
each system.
Again, you connect the EventBase
databases that you created during the
Oracle preparation
7.
If you want to create more than one
EventBase for the same source
system, repeat step 5 in this table to
create the extra EventBases.
Again, you connect the EventBase
databases that you created during the
Oracle preparation, and they must all
have different names.
8.
Step 3: Define the rest of the settings
for the EventBase with the steps in
Defining the Data Extraction Settings
and Defining the General Settings.
9.
Step 4 - Applying the Configuration
Here you use the users that you created in
the preparation step Create
Users/Schemas for an EventBase
Database for each EventBase. The users
can have the same name, but the
EventBases must have different names, so
you had to run the script once for each
EventBase.
Here you use the users that you created in
the preparation step Create
Users/Schemas for an EventBase
Database for each EventBase. The users
can have the same name, but the
EventBases must have different names, so
you had to run the script once for each
EventBase.
The PCO/PDA installation is finished and
the databases are all configured as needed.
You have the Admin database one
EventBase database on the same Oracle
server.
10.
Log into PDA with the steps in Step 5 Initial Login.
11.
In PDA, into only one EventBase,
import the templates from the folder in
your full PCO/PDA installation that
corresponds to your source system
type:
l
l
12.
For instructions, see the section "The
Import Wizard" in the Predictive Analytics
User Manual.
\Templates\OM
\Templates\AM
If you have additional EventBases, then
in PDA, map the imported templates
from the first EventBase to the other
EventBases.
For instructions, see the section "The
Template Mapping Dialog" in thePredictive
Analytics User Manual.
58
Chapter 5 Installation with Oracle: Overview
Policy Orchestrator and Predictive Analytics Installation Guide 59
6 Managing Configurations via the
Command Prompt
The standard way to install and configure or uninstall Policy Orchestrator and its components is
using the Configuration Manager, as described in the other installation-related chapters of this
guide. This chapter describes an alternative approach to these tasks, in which you work from the
command prompt. For a complete description and instructions see:
l
"Deploying a Configuration via the Command Prompt"
l
"Uninstalling a Configuration via the Command Prompt"
By building the steps described here into a batch file, you can create a headless installation process
to rollout to users in your organization.
6.1 Deploying a Configuration via the
Command Prompt
This section describes an alternative approach to installing and configuring a Policy Orchestrator
installation. You can use it when you have already configured one installation using the
Configuration Manager and you want to deploy the configuration to other installations, for example
from the main server installation to the client installations. This approach makes deploying a
configuration quicker and more consistent than manually entering all the configuration options at
each client.
How this works
After you configure Policy Orchestrator with the Configuration Manager, the configuration process
creates the file UC4ICM.ini where it stores the configuration options that you selected. To
configure an additional Policy Orchestrator installation, you can use a utitlity that deploys the same
configuration settings in the new installation.
Prerequisite
You have installed Policy Orchestrator on at least one server and fully configured it using the
Configuration Manager as described in the previous sections in this chapter. This is your "source
installation." The configuration steps are described in the following sections:
l
Step 1 - Downloading Files and Starting the Installation
l
Step 2 - Configuring the Settings
l
Step 3 - Connecting the Data Sources and Configuring the EventBases
l
Step 4 - Applying the Configuration
Steps:
1. Download Policy Orchestrator to the target server for the second installation.
a. Go to the Automic Download Center (http://downloads.automic.com/) and download
the file UC4.Policy.Orchestrator_Full_<version number>.zip.
60
Chapter 6 Managing Configurations via the Command Prompt
b. Extract the zipped files to the place that you want to have your secondary installation
of Policy Orchestrator, for example to C:\Program Files.
2. From the primary installation, which has already been configured, copy the file <Source_
Server>... \<Source_PCO_Installation_
Folder>\ConfigurationManager\UC4ICM.ini and paste it to the equivalent folder
in your secondary installation:
<Target_Server>:\... \<Target_PCO_Installation_
Folder>\ConfigurationManager\
3. Open a command prompt window and go to the following folder in the target installation:
...\<Target_PCO_Installation_Folder>\ConfigurationManager
4. Enter UC4InsightConfigurationManagerCLI.exe to start the configuration utility with no
parameters.
The command returns help information with the parameters for the the command options for
the parts of the Policy Orchestrator configuration that you can install.
Notice that the parameters correspond to the options on the first page of the Configuration
Manager, which you see in Step 1 - Downloading Files and Starting the Installation.
Policy Orchestrator and Predictive Analytics Installation Guide 61
5. Type "UC4InsightConfigurationManagerCLI.exe install" followed by each of the options
for the areas of the Policy Orchestrator configuration that you want to install and putting a
space before each option, and then press Enter. The options are:
l
-dataloading
l
-modellingstudio
l
-gateway
l
-insight
l
-analysisnode
For example to install all the areas of the Policy Orchestrator configuration, enter:
UC4InsightConfigurationManagerCLI.exe install -dataloading -modellingstudio gateway -insight -analysisnode
The configuration options for those areas are applied to the target installation. This takes a
few minutes to complete and for the command prompt to reappear.
6.2 Uninstalling a Configuration via the
Command Prompt
There are two ways to uninstall a Policy Orchestrator configuration:
l
Using the Configuration Manager, as described in "Uninstall".
l
From the command prompt as described in this section.
In both cases the uninstallation process removes all Policy Orchestrator and Predictive Analytics
components except for the databases for the EventBases.
After uninstalling, you can safely reconfigure some or all parts of Policy Orchestrator.
Note: For the reconfiguration, you can use this utility again if you have a ready configuration to
copy, or configure the installation one step at a time with the Configuration Manager.
Steps:
62
Chapter 6 Managing Configurations via the Command Prompt
1. Open a command prompt window and go to the following folder in the target installation:
...\<Target_PCO_Installation_Folder>\ConfigurationManager
2. Type "UC4InsightConfigurationManagerCLI.exe unínstall" and then press Enter.
After a few minutes, the command prompt reappears and the uninstallation of the
configuration is complete. Your installation is clear of all configurations. You can now
reconfigure it in one of two ways:
l
l
One option at a time for in the Configuration Manager, as described in "Full Installation
of Policy Orchestrator & Predictive Analytics".
By installing a configuration based on another completed installation of Policy
Orchestrator, as described in "Deploying a Configuration via the Command Prompt".
With either method, you can configure all of Policy Orchestrator or only the parts that you
plan to use.
Policy Orchestrator and Predictive Analytics Installation Guide 63
7 Configuring the Online Help
Documentation for the Policy Orchestrator (PCO) and Predictive Analytics (PDA) is available from
the Automic Download Center (http://downloads.automic.com/) in both PDF and webhelp (html5)
formats.You can configure PCO and PDA to call the online help directly from the Help menu in the
Modelling Studio or PDA.
For instructions see the related steps below:
l
l
Configuring the PCO Online Help
Configuring the PDA Online Help
Note: Starting with Version 10.0, the help text for PCO and PDA is in HTML5 format. This
replaces the CHM help format, but the content is identical and includes V10 feature updates.
This change is part of the ongoing work to integrate and standardize the documentation for
Automic products.
Configuring the PCO Online Help
1. Unpack the Help files.
a. Download and unpack the files for the documentation. Do this by downloading and
unpacking the following file from the Automic Download Center
(http://downloads.automic.com/):
"Policy.Orchestrator_Documentation_Guides_<version number>.zip"
b. In the unpacked files, go to the folder "Documentation\Guides\webhelp".
c. Unpack "Policy.Orchestrator_USER_GUIDE_en.zip".
At this point, you can start the help manually by clicking the "help.htm" file.
d. Move the folder "Policy.Orchestrator_USER_GUIDE_en" to the place you want to
store the help documentation so that it is accessible to PCO users.
2. Configure PCO to make the help accessible from the Help menu in the Modelling Studio.
a. Go to where you have PCO installed, and open the folder
<PCO-Installation>\Frontends\ModellingStudio
b. Open the file "UC4.Decision.ModellingStudio.Modules.xml" and search for the
element "<component id="HelpModule">".
c. In the HelpFile parameter, set the path and file name for the start file for the help,
"help.htm", for example:
<HelpFile>..\..\Policy.Orchestrator_USER_GUIDE_en\help.htm</HelpFile>
Configuring the PDA Online Help
1. Unpack the Help files.
a. Download and unpack the files for the documentation. Do this by downloading and
unpacking the following file from the Automic Download Center
(http://downloads.automic.com/):
"UC4.Predictive.Analytics_Documentation_Guides_<version number>.zip"
b. In the unpacked files, go to the folder "Documentation\Guides\webhelp".
64
Chapter 7 Configuring the Online Help
c. Unpack "UC4.Predictive.Analytics_USER_GUIDE_en.zip".
At this point, you can start the help manually by clicking the "help.htm" file.
d. Move the folder "Predictive.Analytics_USER_GUIDE_en" to the place you want to
store the help documentation so that it is accessible to PDA users.
2. Configure PDA to make the help accessible from the PDA Help menu.
a. Go to where you have PDA installed, and open the folder
<PDA-Installation>\Insight
b. Open the file "UC4.Insight.Modules.xml" and search for the element "<component
id="HelpModule">".
c. In the HelpFile parameter, set the path and file name for the start file for the help,
"help.htm", for example:
<HelpFile>..\..\Predictive.Analytics_USER_GUIDE_en\help.htm</HelpFile>
Policy Orchestrator and Predictive Analytics Installation Guide 65
8 Upgrading an Existing Installation
This section describes the steps for upgrading an existing Policy Orchestrator installation to the
current version.
Important: You must be using version 4.0 of the Microsoft .NET Framework.
1. Copy the contents of the following two directories into the new installation path. This will
overwrite any existing files with the same name:
l
Copy FROM <old install path>\Runtime\AdminNode\adminNodeCache
TO <new install path>\Runtime\AdminNode\adminNodeCache
l
Copy FROM <old install
path>\Runtime\AdminNode\adminNodeResources
TO <new install path>\Runtime\AdminNode\adminNodeResources
2. Do all steps that are described in "Full Installation of Policy Orchestrator & Predictive
Analytics".
When you configure the Admin DB, make sure to select the Admin database that is
specified in your configuration. See "Step 2 - Configuring the Settings".
3. If you want to reuse existing perspective configurations, snapshots and templates, then
copy the contents of the previous user settings directories to the new user settings
directories:
l
Copy FROM <user home directory>\AppData\Local\UC4 Senactive
Software GmbH\Insight\<previous version number>
TO <user home directory>\AppData\Local\UC4 Senactive Software
GmbH\Insight\<version number>
l
Copy FROM <user home directory>\AppData\Local\UC4 Senactive
Software GmbH\Decision\<previous version number>
TO <user home directory>\AppData\Local\UC4 Senactive Software
GmbH\Decision\<version number>
Note: Perspectives from versions older than 9.3 cannot be migrated.
8.1 For Remote Adapters When Upgrading
from Version 9.0 to 9.5
When you upgrade from Version 9.0 to Version 9.5, follow all the instructions in the previous
sections and then also update the configurations and policy files for remote adapters. You can do
this in either one of these ways:
l
Copy the policy files from the Remote Adapter of Version 9.0 to the Remote Adapter of
Version 9.5.
66
Chapter 8 Upgrading an Existing Installation
– OR –
l
Configure the Remote Adapter from Version 9.5 to use an existing configuration.
For detailed information, see the section "Configuration" in the chapter "Policy Orchestrator Remote
Components" in the Policy Orchestrator User Guide.
8.2 Configuring the Online Help
Documentation for the Policy Orchestrator (PCO) and Predictive Analytics (PDA) is available from
the Automic Download Center (http://downloads.automic.com/) in both PDF and webhelp (html5)
formats.You can configure PCO and PDA to call the online help directly from the Help menu in the
Modelling Studio or PDA.
For instructions see the related steps below:
l
l
Configuring the PCO Online Help
Configuring the PDA Online Help
Note: Starting with Version 10.0, the help text for PCO and PDA is in HTML5 format. This
replaces the CHM help format, but the content is identical and includes V10 feature updates.
This change is part of the ongoing work to integrate and standardize the documentation for
Automic products.
Configuring the PCO Online Help
1. Unpack the Help files.
a. Download and unpack the files for the documentation. Do this by downloading and
unpacking the following file from the Automic Download Center
(http://downloads.automic.com/):
"Policy.Orchestrator_Documentation_Guides_<version number>.zip"
b. In the unpacked files, go to the folder "Documentation\Guides\webhelp".
c. Unpack "Policy.Orchestrator_USER_GUIDE_en.zip".
At this point, you can start the help manually by clicking the "help.htm" file.
d. Move the folder "Policy.Orchestrator_USER_GUIDE_en" to the place you want to
store the help documentation so that it is accessible to PCO users.
2. Configure PCO to make the help accessible from the Help menu in the Modelling Studio.
a. Go to where you have PCO installed, and open the folder
<PCO-Installation>\Frontends\ModellingStudio
b. Open the file "UC4.Decision.ModellingStudio.Modules.xml" and search for the
element "<component id="HelpModule">".
c. In the HelpFile parameter, set the path and file name for the start file for the help,
"help.htm", for example:
<HelpFile>..\..\Policy.Orchestrator_USER_GUIDE_en\help.htm</HelpFile>
Configuring the PDA Online Help
Policy Orchestrator and Predictive Analytics Installation Guide 67
1. Unpack the Help files.
a. Download and unpack the files for the documentation. Do this by downloading and
unpacking the following file from the Automic Download Center
(http://downloads.automic.com/):
"UC4.Predictive.Analytics_Documentation_Guides_<version number>.zip"
b. In the unpacked files, go to the folder "Documentation\Guides\webhelp".
c. Unpack "UC4.Predictive.Analytics_USER_GUIDE_en.zip".
At this point, you can start the help manually by clicking the "help.htm" file.
d. Move the folder "Predictive.Analytics_USER_GUIDE_en" to the place you want to
store the help documentation so that it is accessible to PDA users.
2. Configure PDA to make the help accessible from the PDA Help menu.
a. Go to where you have PDA installed, and open the folder
<PDA-Installation>\Insight
b. Open the file "UC4.Insight.Modules.xml" and search for the element "<component
id="HelpModule">".
c. In the HelpFile parameter, set the path and file name for the start file for the help,
"help.htm", for example:
<HelpFile>..\..\Predictive.Analytics_USER_GUIDE_en\help.htm</HelpFile>
68
Chapter 8 Upgrading an Existing Installation
Policy Orchestrator and Predictive Analytics Installation Guide 69
9 Migrating Previous Versions
If an Predictive Analytics or Policy Orchestrator system was installed with version 3.7 or
higher, the Configuration Manager will upgrade the existing system.
Before starting the migration, you should create a backup copy of the following:
l
The existing Predictive Analytics or Policy Orchestrator installation
l
The Decision Admin database
l
All your EventBase databases
For the new installation, copy the installation files into a new directory. Do NOT use the same
installation directory that you used for the old installation.
To migrate he migrating process is made up of the following steps:
1. Start the Predictive Analytics Configuration Manager.
2. When configuring the AdminNode, use the database configuration that you used for the
previous installation.
The Predictive Analytics Configuration Manager will automatically show all EventBases
which have been available in the old system.
3. Click the Apply button.
The following message appears:
Select 'Yes' if the EventBase data should be reloaded from the source system. This is the
default option. Press 'No' if you want to ignore previously loaded data. Selecting 'Cancel'
aborts the migration process.
After selecting the migration option the Predictive Analytics Configuration Manager starts
migrating the existing installation and continues with the normal installation process.
Important:
Additional Steps:
70
Chapter 9 Migrating Previous Versions
l
l
When installing Predictive Analytics, the templates for migrated EventBases need to be reimported. The templates can be found in the directories Templates\OM (for Operations
Manager) and Templates\AM (for Applications Manager).
Installed sample EventBases are not migrated and must be re-installed.
9.1 Migrating User-Defined Assemblies
User-defined assemblies which are not shipped with the Predictive Analytics or Policy Orchestrator
product need to be manually migrated to the new system. For migrating user-defined assemblies,
the following steps are required:
1. Stop the AdminNode and the Worker service.
2. Copy the user-defined assemblies from the Runtime\AdminNode\adminNodeCache
directory of the old installation into the Runtime\AdminNode\adminNodeCache directory of
the new installation.
3. Start the AdminNode and the Worker service.
After restarting the AdminNode and Worker service, the user-defined assemblies are available for
the new Predictive Analytics or Policy Orchestrator installation.
Policy Orchestrator and Predictive Analytics Installation Guide 71
10 Attaching Additional Databases
After a successful installation you can attach further AE source databases to the system at a later
point in time.
1. In the folder where the Policy Orchestrator files have been extracted, run the install.bat
file.
The Insight Configuration Manager opens.
2. Click 'Next' to begin with the configuration.
3. Do not change the configuration of "Step 1 - Downloading Files and Starting the Installation."
4. In step 2 - EventBases, click Add for attaching additional AE databases. For changing a
database configuration, select the EventBase and the existing configuration will be displayed
(see also "Step 3 - Connecting the Data Sources and Configuring the EventBases").
5. Click 'Next' and afterwards 'Apply' for applying the configuration.
72
Chapter 10 Attaching Additional Databases
Policy Orchestrator and Predictive Analytics Installation Guide 73
11 Predictive Analytics Standalone
Client Installation
In a typical installation of Predictive Analytics, the Policy Orchestrator server components run on a
central host that is accessed by one or more PDA clients, which are locally installed at each user's
machine. Nevertheless, you can install PDA on the same machine as the PCO server and its
frontend, the Modelling Studio. You would do this, for example, in a test environment. For a
production environment, this generally does not make sense, because the resource demands would
reduce performance.
Prerequisite: PCO
Before you can install and use a PDA client, you must have installed and implemented the PCO and
defined and implemented your EventBases in the PCO Modelling Studio. Before you start, also see
the Requirements for the Frontend Tools.
PDA scope in this guide
In this guide, you find instructions for installing the PDA client. Installation of the PCO server
components, which provide the data that you analyze in PDA, are not included in this guide. For
information about that, see the instructions and details for installing the PCO full package that are in
the Policy Orchestrator and Predictive Analytics Installation Guide.
The information about related to a PDA client installation is covered in the following sections:
l
l
l
Installing the PDA Client
Upgrading a PDA Client
Configuring the PDA Online Help
11.1 Installing the PDA Client
In a typical installation for Predictive Analytics users the server components are executed on a
central host and users are accessing the central host with a local installation of the Predictive
Analytics Client.
To install only the Predictive Analytics Client perform the following steps:
1. Go to the Automic Download Center (http://downloads.automic.com/) and download the file
Predictive.Analytics_Full_<version number>.zip.
2. Extract the zipped files to the place that you want to install Predictive Analytics, for example
to C:\Program Files.
3. In the folder where the Predictive Analyticsfiles have been extracted, run the install.bat
file.
The Insight Configuration Manager opens.
4. Select only "Insight Client" and click the Next button.
74
Chapter 11 Predictive Analytics Standalone Client Installation
Predictive Analytics client Installation (Insight Client)
5. In the Admin Node Discovery section, specify where the Admin Node Service is installed by
entering the host name or IP address in the Host field and the port number in the Port field.
Predictive Analytics Client Installation
6. Click the Apply button to apply the configuration settings to your installation.
11.2 Upgrading a PDA Client
To upgrade an existing Predictive Analytics client installation follow these steps:
Policy Orchestrator and Predictive Analytics Installation Guide 75
1. Execute Predictive Analytics Client Installation as described in Installing the PDA Client.
2. To reuse the existing perspective configuration, snapshots and templates, copy the contents
of the following to user settings directory:
<userHomeDirectory>\AppData\Local\UC4 Senactive Software
GmbH\Insight\<previousVersionNumber>
To
<userHomeDirectory>\AppData\Local\UC4 Senactive Software
GmbH\Insight\<newVersionNumber>
3. (Optional) Update the help text. See Configuring the PDA Online Help.
11.3 Configuring the PDA Online Help
Documentation for Predictive Analytics(PDA) is available from the Automic Download Center
(http://downloads.automic.com/) in both PDF and webhelp (html5) formats. If you want to be able to
call the online help directly from the Help menu in PDA, you need to configure PDA as described
below.
Note: Starting with Version 10.0, the help text for PCO and PDA is in HTML5 format. This
replaces the CHM help format, but the content is identical and includes V10 feature updates.
This change is part of the ongoing work to integrate and standardize the documentation for
Automic products.
Steps...
1. Unpack the Help files.
a. Download and unpack the files for the documentation. Do this by downloading and
unpacking the following file from the Automic Download Center
(http://downloads.automic.com/):
"UC4.Predictive.Analytics_Documentation_Guides_<version number>.zip"
b. In the unpacked files, go to the folder "Documentation\Guides\webhelp".
c. Unpack "UC4.Predictive.Analytics_USER_GUIDE_en.zip".
At this point, you can start the help manually by clicking the "help.htm" file.
d. Move the folder "Predictive.Analytics_USER_GUIDE_en" to the place you want to
store the help documentation so that it is accessible to PDA users.
2. Configure PDA to make the help accessible from the PDA Help menu.
a. Go to where you have PDA installed, and open the folder
<PDA-Installation>\Insight
b. Open the file "UC4.Insight.Modules.xml" and search for the element "<component
id="HelpModule">".
c. In the HelpFile parameter, set the path and file name for the start file for the help,
"help.htm", for example:
<HelpFile>..\..\Predictive.Analytics_USER_GUIDE_en\help.htm</HelpFile>
76
Chapter 11 Predictive Analytics Standalone Client Installation
Policy Orchestrator and Predictive Analytics Installation Guide 77
12 Gateway Standalone Installation
You can also install the Decision Gateway for the Policy Orchestrator by itself. Typically, the
Gateway is installed on the same server, and at the same time, as the data loading components.
Some organizations, however, prefer to have the Gateway on a separate server with additional
firewalls between the servers for additional security.
1. In the folder where the Policy Orchestrator files have been extracted, run the install.bat
file.
If you haven't already installed PCO, do that now and then run the install.bat file.
a. Go to the Automic Download Center (http://downloads.automic.com/) and download
the file UC4.Policy.Orchestrator_Full_<version number>.zip.
b. Extract the zipped files to the place that you want to install Policy Orchestrator, for
example to C:\Program Files.
The Insight Configuration Manager opens.
2. Select only "Decision Gateway" and click the Next button.
3. Configure the Gateway.
78
Chapter 12 Gateway Standalone Installation
a. Under Admin Node Discovery specify the location of the Admin Node by typing the
Host name or IP address and the Port number of the host where the Admin Node
Service is installed.
b. Under Service Configuration indicate whether the Gateway should run as a Windows
Service and select a Startup Type option.
4. Click the Apply button to apply the settings, and then click the Close button.
Policy Orchestrator and Predictive Analytics Installation Guide 79
13 Analysis Node Standalone
Installation
The Policy Orchestrator Analysis Node is the part of PCO that aggregates data from EventBases.
The main purpose of the Analysis Node is to process data queries from PDA dashboards.
Because the Analysis Node needs to handle large amounts of EventBase data, we recommend that
you install it on a separate machine.
To install the Analysis Node as a standalone installation, select only the "Analysis Node" option in
the Configuration Manager.
1. In the folder where the Policy Orchestrator files have been extracted, run the install.bat
file.
If you haven't already installed PCO, do that now and then run the install.bat file.
a. Go to the Automic Download Center (http://downloads.automic.com/) and download
the file UC4.Policy.Orchestrator_Full_<version number>.zip.
b. Extract the zipped files to the place that you want to install Policy Orchestrator, for
example to C:\Program Files.
The Insight Configuration Manager opens.
2. Select only "Analysis Node" and then click the Next button.
80
Chapter 13 Analysis Node Standalone Installation
3. Configure the Analysis Node.
a. Under Admin Node Discovery specify the location of the Admin Node by typing the
Host name or IP address and the Port number of the host where the Admin Node
Service is installed.
b. Under Service Configuration provide the Port number of the host where the Analyis
Node should be installed, and indicate whether the node should run as a Windows
Service and select a Startup Type option.
c. Optionally, change the Query cache expiration time of the Analysis Node. The
default is 5 minutes.
The query cache is where the results of eventBase queries from PDA dashboards are
Policy Orchestrator and Predictive Analytics Installation Guide 81
stored.
4. Click the Apply button to apply the settings, and then click the Close button.
82
Chapter 13 Analysis Node Standalone Installation
Policy Orchestrator and Predictive Analytics Installation Guide 83
14 Login and User Management
Access to Predictive Analytics and Decision Modeling Studio is controlled by the User
Management functionality. When a user starts one of these programs, the user must enter a user
name and a password in a login window. At that time the user can also select the authentification
method from one of the methods that are available.
14.1 User Authentication Methods
When logging into PCO or PDA, a user can select from one of the three authentication methods,
depending on which have been activated:
l
Method 1: Decision authentication
With this method, you define users and their login data in the Predictive Analytics or
Decision Modelling Studio. This is the default user authentication method in Policy
Orchestrator and Predictive Analytics.
l
Method 2: Windows authentication
With this method, Microsoft Windows users that are defined on an Active Directory can login
to Predictive Analytics or Policy Orchestrator with their Windows user name and password.
To use this authentication method, you must also define the users in User Management
either in the Decision Modelling Studio or in the Enterprise Control Center (ECC), if you have
also enabled AE Authentication.
l
Method 3: AE Authentication:
With this method you can login to Policy Orchestrator or Predictive Analytics with AE users
that are defined in the Automation Engine. Furthermore, you need to activate AE
Authentication if you want to use the user management functions in the ECC to manage
users of the Policy Orchestrator or the Service Level Manager plug-ins of the ECC. This
means that from ECC you could assign users Policy Orchestrator roles and give them
authority to EventBases, just as you would in the Decision Modelling Studio.
The following table describes where each method is activated and where you can define users when
using the various authentication methods.
THIS
Is ACTIVATED...
authentication
method...
And then you define
the users in...
Decision
Authentication
Always and automatically when Policy Orchestrator is
installed.
The Decision
Modelling Studio
Windows
Authentication
In the Decision Modelling Studio.
The Decision
Modelling Studio
84
Chapter 14 Login and User Management
THIS
Is ACTIVATED...
authentication
method...
And then you define
the users in...
AE
Authentication
The Decision
Modelling Studio for
users of Policy
Orchestrator or
Predictive Analytics.
When you enable it and define User Management
settings. You can do this when you configure Policy
Orchestrator as described in "Defining User
Management Settings", or in the Decision Modelling
Studio.
-OR
In the ECC for users
of Policy Orchestrator
or the Service
Orchestrator.
Authentication methods, how they are activated and where users are defined
14.2 Manually Enabling Integrated
Authentication
You can enable and configure Integrated Authentication when you configure Policy Orchestrator in
the Configuration Manager. You do this by defining the User Management settings there. For
instructions see"Defining User Management Settings". However, you can manually enable and
configure Integrated Authentication instead. To do this, user the following steps:
1. Configure the connection between the Automated Engine and Policy Orchestrator. For
instructions see "Manually configuring the communication with the Automation Engine".
2. Activate and configure Integrated Authentication in the Decision Modelling Studio.
3. Define the Automic System User, which is already defined in the Automation Engine, in the
Decision Modelling Studio.
14.3 Manually Configuring the
Communication with the Automation Engine
Policy Orchestrator and the Automation Engine might need to interact for a number of processes,
one of which is for user management with AE Authentication. For this to work, data must be
mapped during the communication process. This is controlled by the uc4.dll file. If you enable AE
Authentication in the Configuration Manager as described in "Defining User Management Settings",
then the configuration process selects the correct version of the uc4.dll file to match the version of
the Automation Engine that you have installed.
If you want to enable a different version, or if you want to manually enable AE Authentication, then
use the following steps to make sure that you have the correct version of the uc4.dll file:
1. Go to the folder where you have Policy Orchestrator and/or Predictive Analytics installed.
2. Copy the uc4.dll file
Policy Orchestrator and Predictive Analytics Installation Guide 85
F R OM : the \ConfigurationManager\uc4api\<v#>
folder for the version that you want (refer
to the table that follows)
T O : the \Runtime\AdminNode folder.
IF you want to use user
authentication that is
defined in...
THEN use the uc4.dll file from
the folder...
Operations Manager v6
v6
Operations Manager v8
v8
Automation Platform v9
v9
N OT E : If you want to maintain
users in the ECC User
Management function, then you
must use at least this version. You
would want to do this if you use
web components that interact with
Policy Orchestrator, such as
Policy Orchestrator or the Service
Orchestrator. For more information
see User Management topics in
the ECC user help.
Automation Platform v10
v10
Note: The Automation Engine replaced the Operations Manager with version 9.
14.4 Defining users in Policy Orchestrator
Typically, when you first login to Policy Orchestrator or Predictive Analytics to setup users, you
must login with the user name: "U C " and password: "U C ", and select "UC4 Decision
Authentication" as the authentication method. This way you log in as a "Super Administrator" and
have authority to all functions and EventBases. To protect access to advanced functions,
immediately after you login the first time, you should do one of the following:
l
Change the password for the uc user.
l
Create a new user with the "Super Administrator" role and then lock the uc user.
86
Chapter 14 Login and User Management
Predictive Analytics Login Dialog
If you have enabled AE Authentication method when you configured Policy Orchestrator, however,
you can also sign on with that method and with the AE System User that you defined at
configuration.
You can manage users in the User Management Panels in Predictive Analytics or Decision
Modelling Studio. User administration and the corresponding settings always apply to both
Predictive Analytics and Policy Orchestrator.
In the User Management Panel, you can create, delete and edit users. The "Super Administrator"
user with the login user name "uc" cannot be deleted, and the user name "uc" cannot be changed.
However, you can change the password for this user or lock it.
User Management Panel
Policy Orchestrator and Predictive Analytics Installation Guide 87
For further information about "User Management" refer to the related sections in the Policy
Orchestrator User Guide and the Predictive Analytics User Guide.
88
Chapter 14 Login and User Management
Policy Orchestrator and Predictive Analytics Installation Guide 89
15 Uninstall
There are two ways to uninstall a Policy Orchestrator configuration:
l
l
From the command prompt, as described in "Uninstalling a Configuration via the Command
Prompt".
With the Configuration Manager as described in this section.
Note: Data in EventBase databases will remain after the uninstall of AE products and
components.
1. Open the folder where the Policy Orchestratoris installed, and run the install.bat file.
The Insight Configuration Manager opens.
2. Select 'Uninstall all components' and click the Next button.
Insight Configuration Manager: Uninstall
3. Click 'Yes' to confirm the unistall process.
90
Chapter 15 Uninstall
Insight Configuration Manager: Confirmation of the uninstall
4. You can follow the uninstall progress and read the information messages.
Insight Configuration Manager: Log
5. Except for the databases, Predictive Analytics, Policy Orchestrator and all of its
components are removed from your system.
Policy Orchestrator and Predictive Analytics Installation Guide 91
16 Installing and Setting Up ECC
Web Components for Policy
Orchestrator
The Automic product suite includes the Enterprise Control Center (ECC) which is a Web server
application. The ECC gives users access to a number of Web frontend components, known in the
ECC as plug-ins or perspectives, that provide functionality which interfaces with Automic backend
products, including Policy Orchestrator (PCO).
The following are the ECC components that interact with PCO and its EventBases:
l
l
l
The Policy Orchestrator Plug-in (PCO Plug-in)
The Predictive Analytics Plug-in (PDA Plug-in)
The Service Orchestrator Plug-in (SVO)
The SVO needs to interact with Policy Orchestrator only if you want to create EventBase
SLAs or use its the advanced analytics capabilities. For more information refer to the topic
"Integration with Other Automic Products" in the Service Orchestrator user guide or help.
When you install the ECC, the plug-ins are automatically installed with it. However, to use the plugins, you have to do a few extra setup tasks that ensure the correct connection to PCO and its
EventBases. For complete information about the implementation of each plug-in, see the Enterprise
Control Center Installation Guide. Furthermore, to use the SVO, you must also install the
SVO Server component. For instructions, see the Service Orchestrator Installation Guide.
92
Chapter 16 Installing and Setting Up ECC Web Components for Policy Orchestrator
16.1 The Relationship between ECC
Components and Policy Orchestrator
This section describes how the ECC components and the Policy Orchestrator (PCO) interact to
allow ECC users to work with EventBase data and other PCO components.
The following figure shows you the structure of the communication lines between ECC
Components and PCO.
The communication with the Service Orchestrator is also described, but only the connections for
the PCO Plug-in (1) are relevant for this guide.
Overview of the Relationship between the ECC and Policy Orchestrator
Key concepts about the communication between the ECC components and
Policy Orchestrator
Policy Orchestrator and Predictive Analytics Installation Guide 93
l
l
All communication between any of the ECC components and Policy Orchestrator goes
through the PCO Gateway (A).
All communication in and out of an ECC plug-in goes through a Policy Orchestrator API
(PCO API). There are two places that this API can be present in your installations:
o One instance of the PCO API is in the ECC (B).
This handles the communication between the ECC perspectives (the PCO Plug-in,
the PDA Plug-in, and the Service Orchestrator Plug-in) and the PCO Gateway.
o If you install the Service Orchestrator, a second instance of the PCO API (C) is
included in the backend server component to handle the communication between it
and the PCO Gateway.
The communication channels
Depending on what you install, different connections for the communication channels between the
ECC component and Policy Orchestrator (actually the PCO Gateway) are established.
THIS
Is established WHEN you install and configure...
connection...
(1)
The Policy Orchestrator Plug-in of the ECC.
(2), (3), (4)
The Service Orchestrator (SVO), which has three communication channels:
l
l
l
(2) is the channel between the SVO frontend component in the ECC and
Policy Orchestrator. This runs over the PCO API in the ECC and the PCO
Gateway.
(3) is the channel between the SVO frontend and backend components.
(4) is the channel between the SVO backend component and Policy
Orchestrator. This runs over the PCO API in the SVO backend
component and the PCO Gateway.
16.2 Installing the PCO Plug-In for ECC
The Policy Orchestrator Plug-in component of the Enterprise Command Center (ECC) platform that
is a tool for business rule management. With it users have a simple interface for building business
rules based on rule templates and patterns that are either already delivered from or created in the
Modelling Studio.
For an understanding of how ECC components interact with Policy Orchestrator (PCO), see The
Relationship between ECC Components and Policy Orchestrator.
Prerequisites
Before you can begin the steps in this guide, you have to have at least installed and implemented
the Policy Orchestrator and the ECC. For the versions of these that you need to install, see the
section System Requirements for the PCO Plug-In Version 10.0.
Overview of the installation and configuration steps
To prepare the ECC and then install the Policy Orchestrator Plug-in, use the instructions in the
following sections:
l
l
Configuring the ECC for the Policy Orchestrator Plug-in
Installing the Policy Orchestrator Plug-in
94
Chapter 16 Installing and Setting Up ECC Web Components for Policy Orchestrator
l
Optionally, if you want to secure the communication between the PCO Plug-in and Policy
Orchestrator with an SSL connection, see Setting Up SSL for Communication with
ECC Components.
16.2.1 System Requirements for the PCO Plug-In
This topic describes the system requirements for installing and running version 10.0 of the Policy
Orchestrator (PCO) Plug-In of the ECC.
Required Automic Products
To install and run the PCO plug-in, you need to have installed and implemented the following
Automic products:
Automic Product
Required
Version
Enterprise Control Center
2.0
Policy Orchestrator (including the Decision Gateway)
10.0
Automation Engine
10.0
This is optional but is required if you want to use ECC integrated authentication when
a user logs into the ECC. For more information see Login and User Management for
ECC Components for Policy Orchestrator.
You can find these products and/or their installation guides from the Automic Download Center
(http://downloads.automic.com/).
16.2.2 Configuring the ECC for the Policy Orchestrator
Plug-In
If you want to implement the Policy Orchestrator Plug-in component in the Enterprise Control
Center (ECC), then you need to configure the ECC to communicate with Policy Orchestrator. This
section describes how you do that.
Prerequisite
You must have installed and setup the ECC as described in the Enterprise Control Center
Installation Guide, which you can find on the Automic Download Center
(http://downloads.automic.com/).
The Policy Orchestrator Gateway Gateway manages all communication
The ECC communicates with Policy Orchestrator via its Gateway, so you need to configure the
ECC so that it can locate the gateway. You do this in the decision.properties file, as described in the
following steps:
1. In your Tomcat web server go to the folder …\webapps\<ECC>\config, and rename the
decision.properties.sample file to "decision.properties".
Policy Orchestrator and Predictive Analytics Installation Guide 95
2. Open the renamed file and update the configurations to describe the gateway that is to be
used for the Policy Orchestrator Plug-in in the ECC.
Parameter Description
host
The host where the PCO Gateway Gateway is running.
Default: hostname
Note for SSL: This must match the hostname with the certificate CN and
gateway hostname that is defined in the
UC4.Decision.Gateway.exe.config for the PCO Gateway.
port
The port for the PCO Gateway
Default: 9898
Note for SSL: If the enableSSL parameter in this file is set to "true" then
change this to "9900". For more information, see Setting Up SSL for
Communication with ECC Components..
path
The base path of your PCO Gateway installation, which is essentially the
root path in the PCO Gateway URL.
Most installations use the default value.
enableSSL Indicates whether SSL is used to access PCO
Valid values: "true" or "false"
For complete information about using SSL to secure the connection between
the ECC and PCO, see Setting Up SSL for Communication with
ECC Components.
3. Restart the Apache Tomcat service so that the configuration changes go into effect.
Next step: Installing the Policy Orchestrator Plug-in
16.2.3 Installing the Policy Orchestrator Plug-In
This section contains instructions for installing the Policy Orchestrator Plug-In.
The Policy Orchestrator Plug-in for the ECC (also referred to as a "perspective" in the ECC) is
delivered in a ZIP file. To install it you have to unpack the contents and move them to your
ECC installation.
Steps...
1. Go to the Automic Download Center (http://downloads.automic.com/) and download the
following :
UC4.Policy.Orchestrator_UI.Plug-in_API_<version_number>.zip
2. Unpack (unzip) the file.
3. Move the file UC4.Policy.Orchestrator_UI.Plug-in_API.jar to the folder
\webapps\<ECC>\WEB-INF\autoinstall directory of your ECC Tomcat directory.
(<ECC> stands for the folder of your ECC installation.)
96
Chapter 16 Installing and Setting Up ECC Web Components for Policy Orchestrator
You do not have to do anything else. When the ECC autoinstall programs register a new JAR
file in their folder, they execute the installation of the related plug-in automatically.
Next step: Optionally enable SSL secure connection between the PCO Plug-in and Policy
Orchestrator. For information see Setting Up SSL for Communication with ECC Components.
16.3 PDA Plug-In Installation for ECC
The Predictive Analytics Plug-in component of the Enterprise Command Center (ECC) platform
adds the "Predictive Analytics" category to the ECC widget catalog and allows you to add and view
published PDA charts in ECC dashboards.
For an understanding of how ECC components interact with Policy Orchestrator (PCO), see
"The Relationship between ECC Components and Policy Orchestrator".
Prerequisites
Before you can begin the steps in this guide, you have to have at least installed and implemented
the Predictive Analytics and the Enterprise Command Center (ECC). For the versions of these that
you need to install, see the section System Requirements for the PDA Plug-In Version 10.0.
Overview of the installation and configuration steps
To prepare the ECC and then install the Predictive Analytics Plug-in, use the instructions in the
following sections:
l
l
Configuring the ECC for the Predictive Analytics Plug-in
Installing the Predictive Analytics Plug-in
16.3.1 System Requirements for the PDA Plug-In
This topic describes the system requirements for installing and running version 10.0 of the
Predictive Analytics (PDA) Plug-In of the ECC.
Required Automic Products
To install and run the PDA plug-in, you need to have installed and implemented the following
Automic products:
Automic Product
Required
Version
Enterprise Control Center
2.0
Policy Orchestrator (including the Decision Gateway)
10.0
You can find these products and/or their installation guides from the Automic Download Center
(http://downloads.automic.com/).
Policy Orchestrator and Predictive Analytics Installation Guide 97
16.3.2 Configuring ECC for the PDA Plug-In
If you want to implement the PDA Plug-in component in the Enterprise Control Center (ECC), then
you need to configure the ECC to communicate with Policy Orchestrator. This section describes
where you do that.
Prerequisite
You must have installed and setup the ECC as described in the Enterprise Control Center
Installation Guide, which you can find on the Automic Download Center
(http://downloads.automic.com/).
The Decision Gateway manages all communication
The ECC communicates with Policy Orchestrator via the Decision Gateway, so you need to
configure the ECC so that it can locate the gateway. You do this in the decision.properties file, as
described in the following steps:
1. In your Tomcat web server go to the folder …\webapps\<ECC>\config, and rename the
decision.properties.sample file to "decision.properties".
2. Open the renamed file and update the configurations to describe the gateway that is to be
used for the Predictive Analytics Plug-in in the ECC.
Parameter Description
host
The host where the Decision Gateway is running.
Default: hostname
Note for SSL: This must match the hostname with the certificate CN and
gateway hostname that is defined in the
UC4.Decision.Gateway.exe.config for the Decision Gateway.
port
The port for the Decision Gateway
Default: 9898
Note for SSL: If the enableSSL parameter in this file is set to "true" then
change this to "9900". For more information, see "Setting Up SSL for
Communication with ECC Components".
path
The base path of your Decision Gateway installation, which is essentially the
root path in the Decision Gateway URL.
Most installations use the default value.
enableSSL Indicates whether SSL is used to access Policy Orchestrator.
Valid values: "true" or "false"
For complete information about using SSL to secure the connection between
the ECC and Policy Orchestrator, see "Setting Up SSL for Communication
with ECC Components".
3. Restart the Apache Tomcat service so that the configuration changes go into effect.
Next step: Installing the Predictive Analytics Plug-in
98
Chapter 16 Installing and Setting Up ECC Web Components for Policy Orchestrator
16.3.3 Installing the PDA Plug-in
This section contains instructions for installing the Predictive Analytics Plug-In.
The Predictive Analytics Plug-in for the ECC (also referred to as a "perspective" in the ECC) is
delivered in a ZIP file. To install it you have to unpack the contents and move them to your
ECC installation.
Steps...
1. Go to the Automic Download Center (http://downloads.automic.com/) and download the
following :
UC4.Predictive.Analytics_UI.Plug-in_<version number>.zip.
2. Unpack (unzip) the file.
3. Move the file uc4.predictive.analytics_ui.plug-in.jar to the folder
\webapps\<ECC>\WEB-INF\autoinstall directory of your ECC Tomcat directory.
(<ECC> stands for the folder of your ECC installation.)
You do not have to do anything else. When the ECC autoinstall programs register a new JAR
file in their folder, they execute the installation of the related plug-in automatically.
16.4 Setting Up SSL for Communication with
ECC Components
You can secure any of the communication channels between the ECC-related components and
Policy Orchestrator by running them over an SSL connection. You setup for SSL connections in
various configuration files. This topic describes the connections that you can secure with SSL and
which configuration files ensure the SSL connection at each of these junctions.
The following figure shows you all the places that you can secure with an SSL connection and the
configuration files that control the SSL connections.
Policy Orchestrator and Predictive Analytics Installation Guide 99
Overview of SSL connection options between the ECC and Policy Orchestrator
16.4.1 Overview of the SSL Setup Steps
This topic gives you an overview of the steps you need to take to secure the connection between
ECC and PCO with an SSL connection, and provides links to the instructions for each step.
To set up any SSL connection for ECC-related components, you have to do the following:
1. Configure the Policy Orchestrator Gateway Gateway for SSL
2. Add Truststore Certificates for SSL
3. Configure the connection points that you want to secure with SSL
l
Enable SSL for the Policy Orchestrator Plug-in
l
Enable SSL for the Service Orchestrator
For instructions for each of these steps, see the related sections that follow.
100
Chapter 16 Installing and Setting Up ECC Web Components for Policy Orchestrator
16.4.2 Configuring the Policy Orchestrator Gateway for
SSL
If you want to use SSL to secure any communication connection between an ECC-related
component and the Policy Orchestrator, then you need to configure the PCO Gateway for
SSL using the steps here.
Prerequisite:
Before you set up the PCO Gateway for SSL, make sure that your target machine already has a
certificate and password that are available to use for SSL. For more information, consult your
system administrator.
Steps...
1. Get the signature of your certificate by opening its properties and copying its thumbprint.
In the following screen you see certificate details including the Thumbprint value.
Certificate properties dialog
2. Configure a port with an SSL certificate.
For more information and instructions see
http://msdn.microsoft.com/en-us/library/ms733791.aspx
3. Overwrite the existing UC4.Decision.Gateway.exe.config in the PCO Gateway directory
Policy Orchestrator and Predictive Analytics Installation Guide 101
with UC4.Decision.Gateway.exe-ssl.config in the same directory.
4. Restart the PCO Gateway.
Next step: Adding Truststore Certificates for SSL.
16.4.3 Adding Truststore Certificates for SSL
An SSL connection between any ECC components and/the Decision Gateway need truststore
certificates. The steps here describe how to add the truststore certificates that you need for the
connections that you want to secure.
1. Go to the command line (CMD).
2. Enter the following command to add a certificate to the truststore that is specified in the ECC
configuration.properties file (in the folder ...\<ECC>\config...):
keytool -import -v -trustcacerts -alias <alias> -file
<certificate> -keystore <ECC>\config\truststore.jks –password
<bundle>
In this string:
l
l
l
l
<alias> should be the hostname of your PC.
<certificate> is the exported certificate file that you should already have.
<ECC> is the path to your ECC installation.
<password> is the truststorePassword that is specified in your ECC
configuration.properties file.
Next step: Enabling SSL for the Policy Orchestrator Plug-in
16.4.4 Enabling SSL for the Policy Orchestrator Plug-in
Use these steps to configure ECC for an SSL secured connection between the PCO Plug-in
component in the ECC and Policy Orchestrator.
Steps...
1. Modify the configuration of the decision.properties file for SSL.
a. In your Tomcat web server, go to the folder …\webapps\<ECC>\config, where
<ECC> stands for your ECC installation folder.
b. Rename the decision.properties.sample file to decision.properties.
c. Open the decision.properties file and update the following parameters:
Parameter Description
port
The port for the PCO Gateway.
The default port for the PCO Gateway when SSL is enabled is "9900".
If yours is different, change it here.
enableSSL Change this to "true"
This indicates that SSL is used to control the access to Policy
Orchestrator.
102
Chapter 16 Installing and Setting Up ECC Web Components for Policy Orchestrator
2. Restart the Apache Tomcat service so that the configuration changes go into effect.
This is communication path that begins with (1) in the illustration in Setting Up SSL for
Communication with ECC Components.
16.4.5 Enabling SSL for the Service Orchestrator
There are three connection points that you can choose to secure for the Service Orchestrator (SVO)
with SSL. The table in this section explains in which configuration file you enable SSL for each
connection point.
In the table, the connection number refers to the illustration in "Setting Up SSL for Policy
Orchestrator and Its Web Client Components."
For information about the specific configuration file settings, see the related information in the
Service Orchestrator Installation Guide.
IF you want to use SSL between...
THEN enable SSL in this
file…
This is
connection...
SVO plug-in component in the ECC
framework
and
the Decision Gateway.*
configuration.properties for the
plug-in side
(2)
SVO server
and
the Decision Gateway.*
decision.properties
(4)
SVO server
and
the SVO plug-in component in the ECC
framework.**
slgbackendconnection.properties (3)
* First you must add a truststore certificate as described in Step 3 of "Adding Truststore Certificates for
SSL."
** First you must add a truststore certificate as described in Step 4 of "Adding Truststore Certificates for
SSL."
16.5 Login and User Management for ECC
Components for Policy Orchestrator
For access to Policy Orchestrator from one of the related ECC frontend components (the Policy
Orchestrator Plug-in, Predictive Analytics Plug-In or the Service Orchestrator), you must ensure
that users who log into the ECC can access the parts they need in Policy Orchestrator. This means
they need to be authenticated at login and then have rights to the Policy Orchestrator eventbases
and components.
User Authentication at Login
There are two ways that a user can login to the ECC:
l
With Policy Orchestrator authentication
The user logs in with a user name and password that are defined in Policy Orchestrator.
Policy Orchestrator and Predictive Analytics Installation Guide 103
l
With Automation Engine authentication
The user logs in with a user name and password that are defined in the Automation Engine.
To see and work with PCO eventbases and components, you have to have PCO configured
for integrated authentication.
Requirements and considerations for integrated authentication
If you want to use integrated authentication to verify users at login, then you have to do the
following:
l
Configure PCO for integrated authentication.
You do this in the Configuration Manager, as described in "Defining User Management
Settings" in the Policy Orchestrator and Predictive Analytics Installation Guide.
Important: When you configure the integrated authentication, make sure to configure the
Automation Engine system name for the system that the users will log into the ECC. The
ECC system is defined in the uc4config.xml file in the "config" folder of your
ECC installation.
l
Use the following steps to prepare PCO for mapping of data with the Automation Engine:
1. Go to the folder where you have PCO installed.
2. From the \ConfigurationManager\uc4api\v10 folder, copy the uc4.dll file.
3. Paste it into the Runtime\AdminNode folder.
For more details about integrated authentication, see the chapter "Login and User
Management" in the Policy Orchestrator and Predictive Analytics Installation Guide.
User Access Rights to Eventbases and Rules
The user definition of each user who is going to work with business rules in the PCO plug-in of the
ECC must have the following:
l
l
Roles
One or both of the following roles:
o Rule Administrator (for users who will create and maintain business rules)
o Rule Operator (for users who will view rules and will need to activate/deactivate rules)
Authorizations
Rights to all eventbases that store rule management specifications.
Administrators define users in the Decision Modelling Studio or, if you have integrated
authentication set up, in the ECC User Management functions. For more about creating and
maintaining user definitions, see the user management information in the Policy Orchestrator User
Guide or the Enterprise Control Center User Guide (or ECC online help).
104
Chapter 16 Installing and Setting Up ECC Web Components for Policy Orchestrator
Policy Orchestrator and Predictive Analytics Installation Guide 105
17 FAQ
Q: When Oracle is used as source database ("EventBase Configuration - AE System"), why do
we obtain the error message "Table or view does not exist" although the Oracle user had read
access to the database?
A: Make sure when using a separate database user (e.g., with read access), that this user may
access the schema of the AE's database user. If access is denied, the Configuration
Manager will display the message "table or view does not exist". Where appropriate, you
may solve this problem using synonyms. The following example assumes that "AE01" is the
name of the AE's database user. If this user logs in as a separate user for Predictive
Analytics or Policy Orchestrator, the following required synonyms may be created :
create synonym ah for AE01.ah;
create synonym oh for AE01.oh;
create synonym meld for AE01.meld;
create synonym a_versi for AE01.a_versi;
Q: When using an MS SQL database, why can't we create a database using the Insight
Configuration Manager?
A: To be able to create a new database, the specified MS SQL database user requires the role
"DBCREATOR".
The specified MS SQL Server only allows Windows authentication mode. The Configuration
Manager tries to use SQL Server authentication by default.
Q: Are there any limitations when using MS SQL Server Express?
A: The Express version is limited regarding database size and usable main memory. Regarding
functions, there are no limitations for Predictive Analytics and Policy Orchestrator. All
product functions may be used. Make sure to use the version "SQL Express with advanced
services" as it includes the service full-text indexing.
Q: The connection test to a database server within another domain fails. How can we avoid
this?
A: Try to change the MSDTC connection timeout to a higher value (for example to 60 seconds),
as described in http://support.microsoft.com/kb/922430.
Q: Installation fails because the AdminNode is not starting up fast enough. How can the
Installation still succeed?
A: If the AdminNode is to be installed as a console application as opposed to a windows
service, it may happen on very slow machines that the AdminNode is still not completely
available after a given interval (1 minute) during the installation procedure which results in a
failed installation. In this case, the AdminNode needs to be installed as a service since it is
possible even on very slow machines to wait until a windows service started completely.
Q: If I use Oracle as database connection type, I get the error message 'ORA-12154' when
testing the settings. Why?
106
Chapter 17 FAQ
A: This can be caused by several reasons. If you use TNS a your DB connection method, make
sure that the Windows environment variable TNS_ADMIN is defined and points to the
location of your tnsnames.ora file. If you already have Oracle client installed, depending on
whether the Connection Method in your DB Connection Settings is set to "Basic" and/or
"TNS", you need to activate the EZCONNECT and/or TNSNAMES options, respectively.
By default both of these connection methods are active.
Q: I use Glassfish as web server for the Policy Orchestrator Web-Application and get an
'Access Denied' after the log in. Which configuration is incorrect?
A: Access rights have to be configured for Glassfish. Make sure to have the following entry in
the Glassfish server policy file:
grant codeBase "file:${com.sun.aas.installRoot}/domains/<YOUR_DOMAIN>/
applications/decision-web/-" { permission java.lang.reflect.ReflectPer mission
"suppressAccessChecks"; };