1
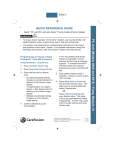
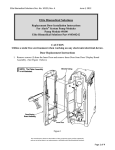
Text - PMS 294U
222 U
+
QUICK REFERENCE GUIDE
WARNINGS:
•
To ensure proper operation of the Alaris™ System, you must be familiar with related features,
disposables, administration sets, set-up and programming.
•
This guide is not intended to be comprehensive instructions for the setup and operation of the
Alaris™ System. For complete instructions along with Warnings and Cautions, refer to Alaris™
System User Manual (v9).
Syringe Loading and Set-Up
WARNING:
Loading:
•
1.
Priming:
2. Raise drive head (gray) to fully
extended position.
3. Insert syringe barrel flange
between barrel flange grippers.
4. Lock syringe in place by closing
barrel clamp.
5. Twist gripper control clockwise,
lower drive head, lock plunger in
place with plunger grippers.
Removal:
1.
Close tubing clamp.
2. Unlock door with key, open plunger
grippers and syringe barrel clamp.
(Silence safety alarm).
1.
2. If priming manually, express air
from administration tubing set.
3. If priming using Alaris™ PCA
Module (PCA Module), this feature
is available when viewing Infusion
Mode screen during programming
of PCA Module. At this screen
Press OPTIONS, then press
PRIME SET WITH SYRINGE.
4. Once tubing set is primed, close
slide clamp.
Detaching Module:
Use key to unlock door. Inside
locate lever and depress. At the
same time holding the module and
moving the bottom of the module
sideways and away from Alaris™
PC Point-of-Care Unit (PC Unit).
3. Remove syringe.
Note: At the start of an infusion
program,the system prompts to
select and confirm syringe type
and size. Ensure displayed syringe
manufacturer and size correctly
identifies the installed approved
syringe.
Select administration set and
attach set to syringe.
WARNING:
•
To prevent uncontrolled flow, close set
tubing clamp before loading or unloading
syringe.
San Diego, CA, 800.854.7128
© 2004 - 2014 CareFusion Corporation or one of its
affiliates. All rights reserved.
Alaris™ PCA Module v8
Open syringe barrel clamp (clear
piece) until it clears syringe
chamber.
Do not prime while attached to patient.
Drive Head
+
Gripper Control/
Drive Head
Release
(closed position)
9. Choose correct medication and
concentration.
Plunger Grippers
(closed position)
10. Respond to appropriate clinical
advisory.
11. Review monitoring alarm limits (if
applicable).
Barrel
Flange
Grippers
12. At “Infusion Mode” screen: To
Prime, press OPTIONS key.
2
oz
60
55
50
14. Press and hold PRIME key to
prime tubing.
45
1½
40
35
1
oz
30
25
20
15
10
5
Syringe
Barrel
Clamp
Syringe
Barrel
Flange
Programming an Infusion using
Guardrails™ Suite MX Protection
Initial Set-Up:
1.
WARNING:
•
Do not prime while attached to patient.
½
Alaris™ PCA Module v8
13. Press PRIME SET WITH
SYRINGE.
Load syringe with administration
set attached.
2. Press SYSTEM ON key.
15. Press EXIT when prime is
complete.
16. Choose desired Infusion Mode and
follow on-screen prompts.
17. Close and lock door.
18. Attach administration set tubing set
to patient.
19. Review settings and press START.
Change Syringe:
1.
Press PAUSE.
3. Select YES or NO to “New
Patient”.
2. Close tubing clamp.
4. Select appropriate profile.
4. Remove old syringe.
5. Press CHANNEL SELECT key.
5. Press SILENCE.
6. Set key to Program position.
6. Attach new syringe to tubing.
7.
7.
Press CONFIRM time setting.
8. Choose correct syringe type and
size. (if syringe selection is not
displayed press ALL SYRINGES)
3. Use key and unlock door.
Load new syringe.
8. Set key to Program position,close
door.
9. Press CHANNEL SELECT.
+
10. Choose correct syringe type and
size. (if syringe selection is not
displayed press ALL SYRINGES).
11. Press CONFIRM.
12. Press RESTORE if same drug and
concentration.
13. Verify drug and concentration.
14. Verify current settings.
15. Lock door and open tubing clamp.
Change Program/Mode:
1.
Press CHANNEL SELECT key.
5. Press CONFIRM and START.
Beginning of Shift/Summary
Review:
1.
Press CHANNEL SELECT key.
2. Verify syringe type/size, drug/
concentration and settings.
3. Press START key.
Patient History/End of Shift/24hr
History
2. Press PROGRAM.
1.
3. Set key to “Program” position
or enter authorization code (if
enabled).
2. Press OPTIONS.
4. Press CHANGE MODE soft key.
5. Choose desired infusion mode and
follow onscreen prompts.
Reviewing or Changing PCA Pause
Alarm Limits:
1.
Press CHANNEL SELECT key.
Press CHANNEL SELECT key.
3. Press PATIENT HISTORY.
4. Review drug totals.
5. Press ZOOM key (time interval) as
appropriate.
6. To clear patient history press
CLEAR HISTORY.
7.
Press YES or NO.
2. Press OPTIONS key.
8. To view 24 hour totals: Press 24 h
Totals.
3. Select PCA Pause Limits.
9. Press EXIT.
4. Review change limits per hospital
protocol.
10. Press START.
5. Press CONFIRM and START.
Note: This function requires use of
monitoring module(s).
Disabling PCA Pause Alarm:
1.
Press CHANNEL SELECT key.
2. Press OPTIONS key.
3. Select PCA Pause Limits.
Alaris™ PCA Module v8
16. Review settings and press START.
4. Press Disable SpO2/Disable
EtCO2.
+
PCA/Monitoring Trend Data
Note: This function requires use of
monitoring module(s)
1.
Press CHANNEL SELECT on the
Monitoring Module.
5. Press CONFIRM.
6. Press START.
2. Press OPTIONS.
Attach Dose Request Cord
3. Press PCA/Monitoring Trend
data.
1.
4. To exit: Press MAIN.
Alaris™ PCA Module v8
4. Choose desired Dose Cord Profile.
(1=light flashes, 2=light on, 3=light
off)
5. Press Main Screen.
Give a Bolus Dose
1.
Press CHANNEL SELECT.
2. Press Bolus Dose.
3. Set key to Program position
or enter authorization code (if
enabled).
Align red mark on latching
connector with red mark on Dose
Request Cord attachment.
2. Insert latching connector on the
cord into Dose Request Cord
attachment on PCA Module.
Detach Dose Request Cord
Hold body of latching connector
on the cord and pull straight
away from Dose Request Cord
attachment on the PCA Module.
4. Enter bolus dose amount.
5. Lock door.
6. Press CONFIRM.
7.
Review settings and press START.
Stopping Bolus, Loading or PCA
Dose
1.
Red alignment marks
Press CHANNEL SELECT key.
Pull straight away
without turning or
twisting
2. Press Stop Bolus/Loading or
PCA.
3. Press YES or NO.
Note: Programmed settings will
resume.
Change Dose Request Cord Setting
1.
Press CHANNEL SELECT key.
2. Press OPTIONS.
3. Press Dose Request Set-up.
Latching Connnector
Dose Request
Cord Attachment
+
Alarms and Troubleshooting: Alarms
Alarm
Check Syringe
Meaning
Response
Plunger grippers opened
during infusion and then
closed. Infusion stops on
affected channel.
Securely lock plunger grippers,
press CHANNEL SELECT key,
and reselect syringe.
•
Syringe barrel clamp
opened during infusion and
then closed.
Securely lock syringe barrel
clamp and press RESTART key.
•
Syringe plunger not
captured while in idle mode.
System alarms immediately
to indicate potential
siphoning condition. If
security door is closed
and syringe plunger is not
captured, the system will
immediately alarm.
Check for potential siphoning.
Ensure administration set clamp
(roller/slide) is in closed position.
Securely lock plunger grippers
over syringe plunger.
PCA Pause Alarm
PCA infusion has paused due to
a decline in respiratory status.
Assess patient status per
hospital policy. Press CONFIRM
once patient status and
monitoring values have been
addressed. Press RESTART
key per hospital policy. To view
trigger of PCA Pause Alarm,
Press CHANNEL SELECT,
Press, OPTIONS, Press DRUG
EVENT HISTORY, Press Up/
Down key to view text for
monitoring value causing PCA
Module to pause. Press EXIT
and then START..
Drive Not Engaged
Drive system disengaged during Open and close plunger
operation.
grippers. Ensure syringe is
properly installed.
Alaris™ PCA Module v8
•
+
Alarms and Troubleshooting: Alarms
Alaris™ PCA Module v8
Alarm
Meaning
Response
Channel Error
Error detected on infusing
channel. Infusion stops on
affected channel.
To silence alarm and continue
operation of unaffected
channels, press CONFIRM
soft key. Replace channel with
an operational instrument, as
required. Service by qualified
personnel is required.
Syringe Driver
Head Error
Noninfusing channel, with plunger To silence alarm and continue
grippers open, senses excessive normal operation, press
pressure being applied downward CONFIRM soft key.
on Drive Head. OCCLUSION
scrolls in Channel Message
Display..
+
Messages
Messages
Meaning
Max Limit Reached Programmed Max Limit has
been reached over time period
specified. Infusion paused until
time limit has expired.
Response
To silence alarm, press
SILENCE key.
To change Max Limit, press
CHANNEL SELECT, press
SETUP soft key and unlock door
or enter Authorization Code
applicable for current Security
Access Level.
Detach PCA Module from
PCA Module is not in preferred
location to allow locking to the PC current position and reattach to
Unit. Device is not in a tamper
immediate right of the PC Unit.
evident position.
Syringe Not
Recognized
Installed syringe of unknown
type and size.
Select and confirm correct
syringe type and size, and
then press CONFIRM; or use
a syringe type and size that
system can automatically
and correctly identify. Ensure
compatible syringe is loaded.
For a list of compatible syringes,
refer to Compatible Sets section
of this Directions for Use.
Near End of
Infusion (NEOI)
Syringe almost empty. This is a
timed event that can be set. To
set or change this option, see
the Alaris System User Guide
v9 "General Information,"
"Configurable Settings."
This is a timed event that can be
set. To set or change this option,
see the Alaris System User
Guide v9 "General Information,"
"Configurable Settings."To
silence alarm, press SILENCE
key. Syringe module remains
functional and continues
infusion.
P00000065
Alaris™ PCA Module v8
PCA Not In Secure
Location