1
PowerHouse 2.5
User Manual
Copyright 2012 Realtime Technology AG
License conditions and copyright
This documentation and the software it describes are distributed only
under license and must not be used or copied except in accordance with
the conditions of the associated license agreement. The contents of the
manual are for information only and may be modified at any time.
Realtime Technology AG bears no liability. Realtime Technology AG is not
responsible or liable for any errors or impreciseness in this documentation.
This documentation may only be copied in part or whole, stored in a
retrieval system, or transmitted in any other form, in compliance with the
license agreement. The documentation must not be transmitted
electronically, mechanically, as a recording, or in any other form, without
the previous written permission of Realtime Technology AG.
Note that graphics you wish to integrate into a project may in certain
circumstances be subject to copyright conditions. The unauthorized
integration of graphics into your documents may represent an
infringement of the owner's copyright. Ensure that you first obtain the
copyright owner's permission. Microsoft, MS-DOS, Windows and Windows
NT are registered trade marks of the Microsoft Corporation in the USA and
other countries. Apple, PowerBook, QuickTime, Macintosh and Power
Macintosh are registered trade marks of Apple Computer, Inc. in the USA
and other countries. Adobe, the Adobe logo, Acrobat and Acrobat Reader
are registered trade marks of Adobe Systems Incorporated. All other
product names are registered trade marks of other companies.
Realtime Technology AG gives no guarantee other than in the
accompanying license agreement, either expressly or implicitly, for the
sales suitability or competence of a specific application of these materials
and provides these materials exclusively in their current form. Realtime
Technology AG cannot be held liable to any person for accidental or
indirect loss or damage arising from the purchase or use of these
materials.
All rights for the translation of this publication are held by Realtime
Technology AG. Realtime Technology AG reserves the right to revise or
change its products according to its own discretion.
This publication describes the state of this product at the time of its
publication and is under no liability to agree with future versions of the
product.
Table of Contents
System Requirements....................................................................... 1
Hardware minimum requirements................................................................................ 1
Supported OS....................................................................................................................... 1
Matrix Compatibility ........................................................................ 3
Introduction ....................................................................................... 4
Application Layer...............................................................................................................4
RTT Service Interface .......................................................................................................4
Services Layer ..................................................................................................................... 5
Business cases ................................................................................... 7
Installation and Configuration ....................................................... 8
Hardware resources and Network configuration .................................................. 8
Install PowerHouse............................................................................................................ 8
Check the installation ..................................................................................................... 10
General Configuration .....................................................................................................13
Multicast Grouping Configuration.......................................................................13
Render Backend Configuration........................................................................... 14
Render Backend How to load the DeltaGen Plugin .................................... 16
Render Backend as a Windows service............................................................17
Picturebook Composer ..................................................................21
Install Picturebook............................................................................................................21
Install PowerHouse...........................................................................................................21
Mediastore access password generation ...............................................................22
Modify the PowerHouse streamer url configuration ......................................... 24
Load the Render Backend plugin in DeltaGen .....................................................25
Picturebook Composer and general topic ...............................26
Realtime Technology AG 2012
User Manual
iii
Suggested configuration for a DMZ ........................................................................ 26
Apache HTTPS frontend ...............................................................................................27
Apache and SSL Configuration ...........................................................................27
Modification needed on the PowerHouse configuration ......................... 29
Troubleshooting ..............................................................................31
Network Tweaks................................................................................................................31
Multicast Troubleshooting & Configuration............................................................31
Network helper multiple NICS ................................................................................... 34
Low Disk Space impact on Mediastore ...................................................................37
General issues....................................................................................................................37
Per Service troubleshooting................................................................................ 39
Installation Checklist...................................................................................................... 40
Troubleshooting Checklist............................................................................................ 41
Port list used in PowerHouse Context.................................................................... 45
Port used from PowerHouse services ............................................................. 45
Common Multicast groups used by PowerHouse services ..................... 46
Realtime Technology AG 2012
User Manual
iv
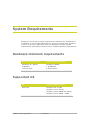
System Requirements
Below you can find the system requirements related to the PowerHouse
installation, if you install PowerHouse in conjunction with other products,
the O.S. choice has to be taken into consideration for both system
requirements, PowerHouse and the other Software product requirements.
Hardware minimum requirements
Minimum Requirements
Suggested Requirements
Windows XP - 64 bit
8 GB Ram
1 CPU 4 cores
Windows 7 64Bit
> 16 GB Ram
2 CPU 8 Cores
Supported OS
OS
Suggested Requirements
Microsoft
Windows XP - 64 bit
Windows 7 Pro - 64 bit
Windows Server 2008 R2 - 64 bit
Windows Server 2003 - 64 Bit
Realtime Technology AG 2012
User Manual
1
System Requirements
PowerHouse clustering solution requires a network switch, 1 Gbit
bandwidth. In case the available switch is layer 2 or layer 3 please
check the Installation checklist
Installation Checklist, page 40
and the Troubleshooting paragraphs
Troubleshooting ,
page 31.
Realtime Technology AG 2012
User Manual
2
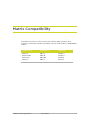
Matrix Compatibility
PowerHouse works in conjunction with specific RTT Products and
therefore cannot be mixed. Here below you can find the RTT Compatibility
matrix.
PowerHouse
Picturebook
DeltaGen
PWH
PWH
PWH
PWH
PB
PB
PB
PB
DG
DG
DG
DG
1.5
2.0.0.1
2.0.1
2.5
Realtime Technology AG 2012
5.5
6.0
6.0.2
6.5
User Manual
9.5.1
9.6.1
10.X
11.0
3
Introduction
PowerHouse is a service abstraction and distribution system of 3 layers. It
includes an underlying set of RTT service modules, a scalable SOA
distribution layer and a set of Web applications making use of this. It can
be deployed inside an enterprise IT infrastructure.
PowerHouse will make both existing and new internal RTT services
available to the user in a transparent manner, thus being a frontend to
Service Oriented Architecture (SOA).
Application Layer
The Application Layer consists of any kind of applications both web and
standalone that sport usage of the underlying RTT Service Interface Layer.
RTT frontends
A set of modular web applications built upon the RTT Service Interface to
offer a specific web suite. This includes frontends for backend rendering
and batch processing.
Customer’s frontend
A web application a customer creates employing the RTT Service
Interface via SeCls.
RTT Service Interface
PowerHouse web frontends are applications of a new set of client
components called RTT Service Clients or simply "SeCls". A web frontend
assembles these SeCls to provide services to the customer. In their
entirety the SeCls are forming the ''Service Facade''. Together with
Realtime Technology AG 2012
User Manual
4
Introduction
a distribution, allocation and dispatching system they form ''RTT Service
Interface''.
RTT Service Clients
One component of RTT Service Interfaces ''Service Facade'', also
called ''SeCl''.
Service Facade
The complete API formed out of the SeCls.
RTT Service Interface
A collection of SeCls bundled with distribution and allocation systems as
API library for C++, Java and Python. Accessible by custom applications,
the RTT Service Interface allows creation of a scalable distributed system
to access both RTT Modules and existing corporate services. This is also
called the RTT Service Interface Layer.
A RTT Service Client (''SeCl'') is a client implementation of an RTT service.
Any such service can be described by a unique URI identifier. It may
manifest as a library to be closely embedded into an application such
as Render into DeltaGen but also as a RPC network service. Both
manifestations use the same interface and are able to provide a detailed
description of this very interface.
Currently known services in detail are:
1.
Ram
2. Task
3. Stream
4. Render
5. Image
6. Echo
7. MediaStore
8. PictureBook
9. HID
10. FileStore
11. FlashCompiler
12. HMI
Services Layer
Each SeCl can be configured to access one or more specific underlying
services. These services form the ''Services Layer''. All services that are
Realtime Technology AG 2012
User Manual
5
Introduction
implemented and provided by RTT are the ''RTT Modules'' they can be
offered as optional components.
RTT Modules
Is an underlying system within the Services Layer, serving functionality
using a SeCl.
Services Layer
The down most layer of the PowerHouse system, being a collection of
both accessed existing corporate structures such as file systems and
LDAP servers and deployed RTT server binaries called ''RTT Modules''.
Thus a SeCl encapsulates an underlying service with a generic abstract
interface.
Realtime Technology AG 2012
User Manual
6
Business cases
Powerhouse found its business cases in offline rendering in conjunction
with DeltaGen as Renderer for example, with RenderFarm script and
StillProducer script, in Realtime streaming in conjunction with DeltaGen
and Picturebook Composer.
PowerHouse functionalities as standalone without DeltaGen are Image
conversions using the Image service and SWF file production out of
pictures sequence. Moreover data distribution using the Mediastore
distributed Ram file system that could be used to share data between
cluster nodes without using file system sharing and other operating
system facilities.
In this manual we will see how to install PowerHouse, how to configure the
PowerHouse in combination with Picturebook Composer. Moreover in the
Advanced section will be shown a simple example using python and the
PowerHouse API, about how to render a picture and how to stream in
RealTime.
Realtime Technology AG 2012
User Manual
7
Installation and Configuration
In this section we will learn how to install PowerHouse and how to
configure it.
The prerequisites for the installation of PowerHouse is to ensure you have
local administrator rights and have a network connection available,
without these prerequisites the installation will not be successful.
Hardware resources and Network
configuration
To proceed with the installation you need to plan the Hardware resources
and the network configuration. Let’s start with the simplest scenario a
single Node installation.
A Node is a single machine that participates in a cluster, in case a
cluster is composed from one single node, the node corresponds
to a single instance cluster.
You don’t need in advance to know how many nodes you will deploy
because PowerHouse is capable of adding more nodes to the cluster
without shutdown or reconfigure the other running nodes.
You will instead need to have a switch that is gigabit Ethernet capable and
with the possibility to forward the multicast packets without any filtering.
Install PowerHouse
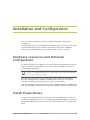
In order to install PowerHouse, close any running application, locate the
installer and double click on it. The following dialog will appear, select the
destination directory where you like to install PowerHouse and then click
Next.
Realtime Technology AG 2012
User Manual
8
Installation and Configuration
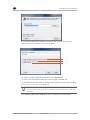
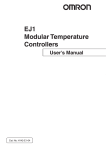
The following dialog will appear and there you need to check if the
Hostname is correct then you can click Next.
(1)
(2)
(3)
(1) AHM is used to register external services; default off
(2) This is will install the interactive texture agent; default off
(3) Install PWH Render Service; default off. In order to use it check chapter
Render Backend Configuration, page 14.
The above checkbox are for advanced users, leave this
unchecked if you are not sure about the functionality they will
expose.
The following dialog will appear and the installation will take place
Realtime Technology AG 2012
User Manual
9
Installation and Configuration
Once the installation is completed click close.
You have successfully installed PowerHouse node. Now you can check the
configuration file and modify it in order to set your new configuration
parameter accordingly with the infrastructure available on your IT
environment.
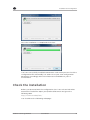
Check the installation
Before you proceed with the configuration, let’s have a short look what
Powerhouse looks like. Open your preferred browser and go to the
following URL:
http://localhost:2080/ram/
You should see the following web page:
Realtime Technology AG 2012
User Manual
10
Installation and Configuration
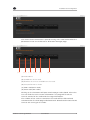
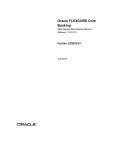
This means that PowerHouse is up and running. Let’s now look at what the
parameters mean on the Resource Allocation Manager page.
(1)
(2)
(3)
(4)
(5)
(6)
(1) Node Name
(2) Ip Address of the node
(3) Number of services available on the node
(4) CPU performance index
(5) CPU Load (Unix node)
(6) CPU Load (Win node)
Clicking on the hostname will open another page node related, where the
user can find the service status information. The page will show the
services started on the node and the usage information.
The number of the services started on the node will be reflected and
summarized on the main page under backends. 10 backends means that 10
services are running on the node.
Realtime Technology AG 2012
User Manual
11
Installation and Configuration
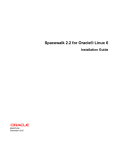
The nodes belonging to a cluster can have different backend numbers, this
mean that different types of services has started among the nodes. The
page below shows the services running on the node, and the services
started on the node and the usage information. The number of the
services started on the node will be reflected and summarized on the main
page.
(1)
(2) (3)
(4)
(5)
(6)
(1) Service Name running on the node
(2) Node name (hostname)
(3) Port were the service is listening
(4) Service Payload
(5) Max number of user supported by the service
(6) Service usage status
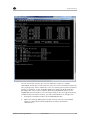
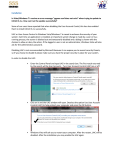
Another check is to open the windows service manager in order to locate
and check the services. Go to Start, and then enter services.msc. A dialog
will pop up, then scroll through the window and locate the PowerHouse
Services:
Realtime Technology AG 2012
User Manual
12
Installation and Configuration
There you can see that PowerHouse has 5 services, PWH Ram, PWH
Streamer, PWH Image, PWH Mediastore and PWH HID. The HID is not
automatically started, this is a special service that works in conjunction
with an Immersive device. Contact RTT Support if you need further
information. The 4 other services are automatically started once
PowerHouse is installed. From these 4 you can observe 3 of those in the
PowerHouse Resource Allocation Manager web page under the host page;
these are PWH Mediastore, PWH Ram and PWH Image. The streamer is
not shown on the PowerHouse RAM page; this is a separate service that
streams the content from DeltaGen or from a source that is sharing a
Shared Memory Buffer throughout a http server using Mjpeg encoding.
You can start and stop the services using the command console in
windows or using the services.msc dialog. The services have
dependencies, the right startup sequence is;
_
Start the PWH Ram before you start the other services
_
Stop the PWH Services (Mediastore, Streamer, Image) then stop the
PWH Ram
If the machine you are using is not connected to the network, the
Ram will not start. Please check the chapter troubleshooting for
more details
Troubleshooting , page 31.
General Configuration
Now that you’ve installed PowerHouse you can configure it in order to run
your solution.
Multicast Grouping Configuration
Locate the configuration file powerhouse.conf using windows explorer
pointing the following path %POWERHOUSE_HOME%/etc. The file is a
json description, there are several parts where you can tweak and
optimize the configuration. Let us first look at the basics and then move
on to the advanced configuration.
Realtime Technology AG 2012
User Manual
13
Installation and Configuration
First you need to know that PowerHouse uses multicast strategy to live
deploy the cluster node, the single node listens and talks to a multicast
port. The configuration of the multicast port per default is 3333, you can
modify it as per your needs. To do this, locate the section below and
modify the port, after that you need to restart the PWH services.
I.E: powerhouse.conf – mcast section
…..
"mcast":
{
"listen_address" : "0.0.0.0",
"port" : 3333,
"ttl" : 2
},
…..
In case your network environment has particular IT limits imposed on it for
the multicast groups, please check the Troubleshooting paragraph
Multicast Troubleshooting & Configuration, page 31.
Since PowerHouse version 2.0.0.1 the master configuration does
not need to be done, the master is automatically elected using a
PowerHouse Election Protocol, therefore in the configuration file
the flag related to the master has been deleted.
Render Backend Configuration
Other important configuration parameters set, are the ones regarding the
Renderbackend. Here you will see how to configure the render backend. In
the next chapter you will see how to load the render backend in DeltaGen.
…..
"render":
{
"port" : 4203,
"backlog" : 128,
"timeout" : 60,
"max_users" : 1,
"sessiontimeout" : 180,
"scenetimeout" : 300,
"max_transfer_buffer_size" : 104857600,
Realtime Technology AG 2012
User Manual
14
Installation and Configuration
"watchdog_timeout": 10,
"disable_live_rendering": false,
"disable_viewer_rendering": true,
"clone_scenes": true,
"disable_renderer_reuse": false,
"max_cached_renderers": 10,
"max_sessions": 0
},
…..
The highlighted parameters are new since PowerHouse 2.1. These
parameters are default and cover the standard basic configuration. In case
additional performance or debug investigation is required, the user can
tweak the parameters by following the table below
Option
Description
Default
disable_live_rendering
The streamer asynchronous buffer
is filled and affects the
performances. In the case of still
rendering, the real-time stream
rendering is performed twice, once
for the still picture and once for the
real-time streaming,
Note: In case of composer this
parameter must be set to false
false
disable_viewer_rendering
The RenderBackend will not render
in the viewport, one rendering time
will be saved and the performance
is improved by 1/3rd. These
parameters will influence the still
production, and the real-time
streaming of the default value is
already set for the max
performance. If the user needs to
debug what’s happening in the
backend the parameter can be set
to false.
true
Realtime Technology AG 2012
User Manual
15
Installation and Configuration
Option
Description
Default
clone_scenes
The scene once loaded are cloned,
this is because the RenderBackend
has a global state on the Scene, and
therefore if the user wants to have
clean settings every time on the
scene this will help to have a clean
startup every time. This parameter if
set to true, will affect the
performance of the loading time.
The loading time will be increased
about 30-60 seconds depending on
the scene.
true
disable_renderer_reuse
Caching, still for offline production,
if set to true the picture will be
cached. This is used to improve the
performance for offline production.
In case you don’t know which
application you are going to have as
a frontend, leave this parameter
untouched.
false
max_cached_renderers
Caching parameters that works in
conjunction with the
disable_render_reuse flag.
10
max_sessions
After the number of specified
sessions, the RenderBackend will kill
DeltaGen: If it is used in conjunction
with the DGService, DeltaGen will
be restarted automatically. Setting
this default to 0, means ignoring the
number of sessions and DeltaGen
will never be killed.
Note: This works in conjunction with
DGService. If the DeltaGen is started
in standalone mode leave this
parameter with its default settings:
0
0
Render Backend How to load the DeltaGen Plugin
When the render parameters have been configured, you can load the
RenderBackend plugin for DeltaGen. Shown below are the steps
required:
1.
Start Deltagen
2. Go to Tools > Modules
Realtime Technology AG 2012
User Manual
16
Installation and Configuration
3. Click on the browse icon
4. Navigate to <Powerhouse installation Folder>/ bin
5. Select Open RenderBackendPlugin.xml and click Open.
6. In the Modules Dialog there is now an entry PWH Renderbackend.
7. Click "Autoload" and "Unloaded" to activate it.
Now check in the PowerHouse Ram web page under the host resources
and you should see the render service available.
Render Service available
Render Backend as a Windows service
Since PowerHouse 2.0.1 there is the possibility to start the RenderBackend
(in this case DeltaGen) as a windows service. In order to do this the user
has to follow these steps.
1.
Install the PWH Render Service
2. Modify the PowerHouse configuration file
3. Copy the DeltaGen ini file in the system user directory
4. Reboot the machine.
The PWH Render service will run as system user, therefore a special
wrapper has been built in order to replicate the window desktop token
and to give the OpenGL space access to DeltaGen. With the PWH Render
service the user will be able to login into the node with the Windows
Remote desktop without damaging the DeltaGen process.
1.
Install the PWH Render Service
Open the windows command prompt: Start cmd
Go into the PowerHouse bin directory: cd %POWERHOUSE_HOME%/
bin
Issue the following command: dgservice.exe –i
Realtime Technology AG 2012
User Manual
17
Installation and Configuration
If the service is correctly installed the following message should
appear:
Service installed successfully
Now you should be able to see the service in the services.msc open it
and check.
The service should be in stop state. Do not start the service, you will
first need to modify the configuration.
2. Modify the PowerHouse configuration file.
Before you restart the service you need to modify the configuration
file. With your preferred text editor, open the powerhouse.conf file
located in the following directory, %POWERHOUSE_HOME%etc;
locate the related json DeltaGen section.
.....
"deltagen":
{
"location": "c:\\RTTSoftware\\Release11.0\\rttDeltagen.exe ",
"reserve" : 12,
"restart_on_crash" : true,
"create_desktop" : true,
"username" : "",
"password" : "",
"domain" : ""
}
.....
Modify the location accordingly to your DeltaGen installation path and
the ‘reserve’ accordingly to the number of cores available on your
machine; the value you should give to ‘reserve’ should be number of
Realtime Technology AG 2012
User Manual
18
Installation and Configuration
cores – 2 (minus two) because one core is needed for the operating
system and one is needed by the PWH Streamer.
Option
Description
Default
location
File system location of
DeltaGen executable
none
reserve
Percentage of CPU power
which should be reserved
for other things than DG
12
restart_on_crash
Restart DG if it crashes
true
create_desktop
Start DG on a separate
desktop - no user
interaction possible
true
username
Start DG as a different user –
Not used
none
password
Start DG as a different user –
Not used
none
domain
Start DG as a different user –
Not used
none
The PWH Render service will be actived after the next
machine reboot.
3. Copy the DeltaGen ini file in the system user directory
Once you have setup the PowerHouse configuration file, you need to
copy the RTTSoftware\Release11.0 directory under the Local System
user profile directory.
This is the trickiest step because each operating system version has a
different location for the Local System user profile.
For Windows XP x64 the Local system user directory is located here :
C:\Documents and Settings\Default User\Application
Data\RTTSoftware\Release11.0\
For Windows 7 x64 the Local System user directory is located here:
C:\Users\Default\AppData\Local\RTTSoftware\Release11.0\
For Windows 2008 R2 the Local System user directory is located here:
C:\Windows\System32\config\systemprofile\AppData\Roaming\RTTSoftware\Rel
ease11.0\
In other hands you need to start DeltaGen with your user account, then
follow the steps how to load the RenderBackend plugin available at
the chapter
Render Backend How to load the DeltaGen Plugin,
page 16 then close DeltaGen, open the windows explorer and issue the
Realtime Technology AG 2012
User Manual
19
Installation and Configuration
following path %APPDATA% then you will locate on the following
directory
C:\user\<username>\AppData\Roaming\
You now need to select the RTTSoftware directory and issue CTRL+C
and open the above listed Local System profile directory depending
on your operating system and issue the command CTRL+V (paste the
content copied in the destination directory).
4. Reboot the machine.
Now you can reboot the machine, if the operation is successful after
the reboot you should see on the PWH Ram page the render service
available. If not check the Troubleshooting section
Troubleshooting
, page 31.
Realtime Technology AG 2012
User Manual
20
Picturebook Composer
In order to install and configure the Picturebook Composer you need to
fulfill these preconditions:
1.
Have license for Picturebook with PowerHouse functionality (
composer )
2. Have a license for DeltaGen
3. Have the software requirements satisfied and your Hardware with the
supported O.S. Installed.
Once you have the above pre requisites, you can then move on with the
following steps:
1.
Install Picturebook
2. Install PowerHouse
3. Generate the Mediastore access password
4. Modify the PowerHouse streamer url configuration
5. Add the mediastore user to picturebook
6. Load the Render Backend plugin in Deltagen
Install Picturebook
This is out of scope in this manual. Please follow the setup and instruction
manual for PictureBook server, how to setup and configure it. “Technical
Documentation.pdf” – this is located in the PictureBook server doc folder.
Install PowerHouse
This has been described in this manual at the following section
PowerHouse, page 8.
Realtime Technology AG 2012
User Manual
Install
21
Picturebook Composer
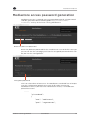
Mediastore access password generation
Mediastore access is granted using encrypted passwords. The password
shall be generated at the following URL http://localhost:4282/
mediastore/ on any of the hosts running MediaStore.
Enter the plain text password
Enter the plaintext password for the "mediastore" user and click "encrypt
password". On the next page you'll see the encrypted password which can
be put into the configuration.
Encrypted password
This has to be done at least once. The Mediastore credential has to be put
into the configuration powerhouse.conf of all nodes running the
MediaStore service (all hosts of a PowerHouse cluster). i.e. mediastore
powerhouse.conf:
.....
"picturebook":
{
"user": "mediastore",
"pass": "rEgSzrRYtY8x",
Realtime Technology AG 2012
User Manual
22
Picturebook Composer
"threads": 2
}
.....
In Picturebook server configuration you need to modify the mediastore
user password. Since the release of Picturebook v6.5, a new modification
has been introduced. The administrator no longer needs to add a specific
mediastore user in to Picturebook. Within Picturebook v6.5 the
administrator needs only modify the configuration in the Picturebook v6.5
Admin console as shown in the next picture.
Moreover, in Picturebook v6.5 the user can choose another user to modify
the configuration file for PowerHouse and Picturebook using the same
user name. For instance, instead of a user named ‘mediastore’ we want a
user named ‘administrator’. The steps needed to modify to user
‘administrator’ are the following:
Change the user in PowerHouse config file:
"picturebook":
{
"user": "administrator",
.....
Then in the Picturebook v6.5 Admin console, use ‘administrator’ instead of
‘mediastore’. The password generation procedure does not change, and is
not been affected from the username change.
Below you can see where the user can be found for the mediastore user
parameter.
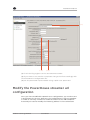
For PB Composer to work, it needs to be registered at the
PowerHouse Ram. To do this, tick the checkbox as shown on the
picture below.
Realtime Technology AG 2012
User Manual
23
Picturebook Composer
(1)
(2)
(3)
(1) Check the flag register service at PowerHouse Ram.
(2) If you want to use another user please change this file accordingly with
the PowerHouse configuration file.
(3) Set the password in picturebook using a ‘plain text’ password.
Modify the PowerHouse streamer url
configuration
Once you have modified the powerhouse configuration, you need to save
it and restart the services. However, the configuration is still not complete.
In order to correctly stream the rendered content to the PB Composer
frontend you need to modify the inbound_address in the PowerHouse
Realtime Technology AG 2012
User Manual
24
Picturebook Composer
configuration file; Identify the stream object in the configuration file and
change the inbound_address in order to match the proxy settings.
.....
"stream":
{
"port" : 4204,
"backlog" : 128,
"timeout" : 60,
"inbound_address" : "http://<PB-Server-FQDN>:8888"
},
.....
The Url you need to enter in the case of PB Composer is the Fully Qualified
Domain Name of your Picturebook server followed by :8888 the streamer
port.
The StreamerIpAddress should be changed in order to match the
Application server ip, the Hostname can be used, in this case the
user has to take care that the machines along the cluster are able
to resolve the name correctly. (Use homogeneous configuration
parameter i.e. Hostname or ipaddress in every configuration file)
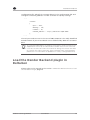
Load the Render Backend plugin in
DeltaGen
Please refer to this manual at the section
the DeltaGen Plugin, page 16.
Realtime Technology AG 2012
User Manual
Render Backend How to load
25
Picturebook Composer and
general topic
After the above steps the user should be able to use the PB Composer.
However there is no standard use case for the PB Composer setup
environment, each IT environment has its own infrastructure and safety
measure. What we can list here is the most generic case, that has to be
adapted each time by an experienced System Administrator in order to
match the required security requirements the Company impose.
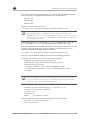
Suggested configuration for a DMZ
Below is depicted the most generic configuration about a DMZ setup. We
can see the two network levels; the first level is related to the connection
to the external firewall the second level is related to the Render Backend.
The above configuration is the suggested configuration in order to
overcome the most common security problem and to avoid trouble
related to the Picturebook Flash frontend Sandboxing.
Realtime Technology AG 2012
User Manual
26
Picturebook Composer and general topic
The solution to the above described problem is to install and configure an
Apache HTTPD web server as frontend for Picturebook Server.
Below you will find the following steps to install the above depicted
configuration.
Apache HTTPS frontend
The user can setup the Apache Fronted for standard HTTPS. HTTP, is
strongly discouraged in the open internet environment due to the plain
text communication for password and login. Therefore we will explain how
to install the Apache server and configure it for the HTTPS. Adding an
Apache HTTPD server as frontend will also increase the HTTPS
performances.
Apache and SSL Configuration
In order to setup the described environment, the user has to follow these
steps and use this Software:
1.
Install Apache server
2. Install Openssl package
3. Install mod_jk-1.2.30-httpd-2.2.3.so
See the Appendix for download details.
Install the Apache web server on the Picturebook server, then install the
VC+ redistributable, followed with the openssl package. The openssl
package is used only to generate the certificate; no other particular
integration with Apache is needed because Apache already has the ssl
module included into the distribution.
The next step is to generate the certificate. In a windows environment you
have to follow these steps:
cd C:\OpenSSL-Win32\bin
openssl genrsa 1024 > server.key
openssl req -new -x509 -nodes -sha1 -days 365 -key server.key >
server.crt
openssl x509 -noout -fingerprint -text < server.crt > server.info
type server.crt server.key > server.pem
Use as CN the Picturebook server machine name; otherwise the
certificate will not be correctly installed on the browser side.
Realtime Technology AG 2012
User Manual
27
Picturebook Composer and general topic
Once the certificate is generated the user has to copy the following files
into the Apache configuration directory. Files to be copied:
server.crt
server.key
server.pem
Apache configuration directory:
C:\Program Files (x86)\Apache Software Foundation\Apache2.2\conf
When Apache is to be installed onto a 64bit machine the software
will be located into “Program Files (x86)“ directory, the
Apache does not correctly understand the path, so the user has to
create a link in the root “c:\Apache2.2“ and modify accordingly
the configuration files.
Download mod_jk-1.2.30-httpd-2.2.3.so and copy the mod_jk1.2.30-httpd-2.2.3.so into the Apache2.2/modules directory .
The next step will be to modify the Apache configuration file, there we will
include the proxy directives and the httpd-ssl configuration file. The
Apache config file is httpd.conf located into
C:\Program Files (x86)\Apache Software Foundation\Apache2.2\conf
This has to be modified, adding at the end the following sections:
To proxy the streamer we use the http proxy module:
LoadModule proxy_module modules/mod_proxy.so
LoadModule proxy_http_module modules/mod_proxy_http.so
<IfModule proxy_http_module>
ProxyPass /streamer/ https://<StreamerIpAddress>:8888/
ProxyPassReverse /streamer/ https://<StreamerIpAddress>:8888/
</IfModule>
The user has to change the <StreamerIpAddress> accordingly
with the ip address of the Picturebook server; the user can also
use the Hostname. In any case remember that the DNS must be
setup correctly on all cluster’s machines.
To proxy the ajp requests we use the mod_jk module:
LoadModule jk_module modules/mod_jk-1.2.30-httpd-2.2.3.so
JkWorkersFile conf/worker.properties
JkLogLevel error
JkMountCopy On
JkMount /picturebook* worker1
Add the following file in the Apache2.2/conf for the workers:
# Define 1 real worker using ajp13
worker.list=worker1
Realtime Technology AG 2012
User Manual
28
Picturebook Composer and general topic
# Set properties for worker1 (ajp13)
worker.worker1.type=ajp13
worker.worker1.host=localhost
worker.worker1.port=8009
Comment out the following entry
# Secure (SSL/TLS) connections
Include conf/extra/httpd-ssl.conf
And load the ssl_module commenting out the following entry in the
configuration file:
LoadModule ssl_module modules/mod_ssl.so
The user has to modify the http configuration file in order to
match the Apache2.2 path; identify the Inter-Process section and
change accordingly with your Apache directory link.
#
Inter-Process Session Cache:
#
Configure the SSL Session Cache: First the mechanism
#
to use and second the expiring timeout (in seconds).
SSLSessionCache
SSLSessionCache
SSLSessionCacheTimeout
"dbm:C:/Apache2.2/logs/ssl_scache"
"shmcb:C:/Apache2.2/logs/ssl_scache(512000)"
300
Then change the virtual host section in httpd-ssl.conf and add the
JkMountCopy On and
…
JkMountCopy On
…
Modification needed on the PowerHouse
configuration
The user after the above settings also has to modify the powerhouse
configuration file. The modification consists in the inbound_address. This
should match with the external FQDN address for the Picturebook.
The inbound_address has to match the external exposed FQDN and the
streamer Apache proxy address. The streamer in this case is forwarded
toward a https proxy, therefore the inbound_address has to point the
https url exposed from the Apache httpd server.
.....
"stream":
{
"port" : 4204,
"backlog" : 128,
Realtime Technology AG 2012
User Manual
29
Picturebook Composer and general topic
"timeout" : 60,
"inbound_address" : "https://<PB-Extern-FQDN>/streamer"
},
.....
The above configuration has to be applied to all nodes on the cluster.
Realtime Technology AG 2012
User Manual
30
Troubleshooting
Network Tweaks
In order to avoid a huge amount of time waiting for a connection and to
keep the TCP/IP stack from taking all resources on the computer, there
are different parameters that control how many connections it can handle.
Shown below is what is reported the registry entries the user shall apply.
Cut and paste the paragraph below in a file called TcpTweaks.reg and
double click on it.
Windows Registry Editor Version 5.00
[HKEY_LOCAL_MACHINE\SYSTEM\CurrentControlSet\Services\Tcpip\Parameters]
"TcpTimedWaitDelay"=dword:0000001e
"MaxFreeTcbs"=dword:00000fa0
"MaxHashTableSize"=dword:00000fa0
"MaxUserPort"=dword:00002710
Multicast Troubleshooting &
Configuration
The Multicast communication channel used on the pwh cluster are listed in
the configuration file under the following json object ( the PWH
configuration file is reachable under the following path
%POWERHOUSE_HOME%etc/powerhouse.conf )
Locate the rpc section and modify the parameters as per your needs. Note
that the exposed default parameters on the configuration file are only 3.
Host, backend and reservation. The other parameters are hidden. Shown
below you can find the complete configuration discovering the hidden
parameters. This example configures the 5 multicast groups to the 239.0.0
Realtime Technology AG 2012
User Manual
31
Troubleshooting
net addresses. You can choose the appropriate groups allowed from your
IT infrastructure.
The multicast groups listed here below are an example. You can
find the default value at the following paragraph
Port list used
in PowerHouse Context, page 45.
"rpc": {
"log_level": "NOTICE",
"max_age": 5,
"max_retries": 5,
"max_load": 0.55,
"max_cpuload": 101,
"host": {
"channel": "239.0.0.10"
},
"backend": {
"channel": "239.0.0.11"
},
"reservation": {
"channel": "239.0.0.12"
},
"election": {
"channel": "239.0.0.13"
},
"block": {
"channel": "239.0.0.14"
},
"resolver": {
"port": 4301,
"timeout": 2
},
"heartbeat_delay": 3
}
The multicast communication along the PowerHouse cluster is used to
transfer short messages between the nodes, No heavy load traffic and no
data streaming is performed between the nodes.
Realtime Technology AG 2012
User Manual
32
Troubleshooting
Shown below depicts how the services are communicating with each
other and it describes the multicast group function.
Multicast communication between RAMs is used to transport datagrams
related to:
_
Host Information -> 239.0.0.11
_
Block Information -> 239.0.0.14
_
Master Protocol Information -> 239.0.0.13
Multicast communication from Service Point of view is used to publish
information related to:
_
Backends ( service name, i.e. Mediastore, Render, etc...) -> 239.0.0.13
_
Payloads for backends ( payload type, i.e. Picturebook repo=repo1
repo=repo2) -> 239.0.0.11
_
Block goes directly through the localhost (i.e. RAM locally block the
service)
The multicast listener uses a predetermined port to bind the listener to the
group, the port is specified fromm the user in the configuration file under
the rpc json section.
The communication between the SeCl (service client) and the services
uses the following protocols:
_
Httprpc
_
Http
_
Https
The multicast communication in PowerHouse cluster is IGMP
Snooping sensitive, this means if the IGMP Snooping or filtering
is activated the PowerHouse cluster might not work correctly
due to the optimization of Snooping. IGMP snooping is the
process of listening to Internet Group Management
Protocol (IGMP) network traffic. IGMP snooping, as implied by
the name, is a feature that allows a network switch to listen in
on the IGMP conversation between hosts and routers. By
listening to these conversations the switch maintains a map of
which links need which IP multicast streams. Multicasts may be
filtered from the links which do not need them. In a
PowerHouse cluster case, we need an unswitched multicast
communication due the PowerHouse Master Election protocol
that needs to check simultaneously the availability of the
cluster node.
Realtime Technology AG 2012
User Manual
33
Troubleshooting
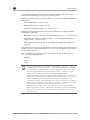
Network helper multiple NICS
If your system has more than one NIC, you may also run into some issues
regarding multicast routing.
First of all you should discover which one of your interfaces is used to
connect to the remote RAM instance. Then check your routing table by
using the windows command shell.
Z:\>route print
Realtime Technology AG 2012
User Manual
34
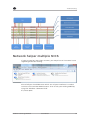
Troubleshooting
At the end of the list you can see the multicast routes (i.e. target
224.0.0.0) and at the end of each line you can see the interface metric for
this routing entry. When a packet is sent, the routing entry with the lowest
metric is used first. In the example above this means that all multicast
packages are sent via the interface bound to 10.10.55.66 which is the
Gigabit Ethernet Interface. If the wrong interface has the highest priority
(respectively the lowest metric) you have two options to change this:
1.
Change the interface metric of the appropriate NIC.
2. Open the settings dialog for the NIC used to connect to the RAM,
select the TCP/IP protocol properties and click the button
"Advanced..."
Realtime Technology AG 2012
User Manual
35
Troubleshooting
3. Uncheck the box "Automatic metric" and enter an interface metric
which is lower than the metric of the other interface.
4. Create special multicast routes for RAM.
_
RAM uses 5 different multicast addresses to communicate
_
225.10.10.10 – to broadcast host information
_
225.10.10.11 – to broadcast backend information
_
225.10.10.12 – to broadcast reservations
_
225.10.10.13 – to broadcast master election protocol
_
225.10.10.14 – to broadcast service block
Open a command shell and execute the following commands to create
persistent routes to send the multicast packages via the correct
interface - replace <INTERFACE_IP> by the IP address of the NIC
_
Z:\>route -p add 225.10.10.10 mask 255.255.255.255
<INTERFACE_IP>
_
Z:\>route -p add 225.10.10.11 mask 255.255.255.255
<INTERFACE_IP>
_
Z:\>route -p add 225.10.10.12 mask 255.255.255.255
<INTERFACE_IP>
_
Z:\>route -p add 225.10.10.13 mask 255.255.255.255
<INTERFACE_IP>
_
Z:\>route -p add 225.10.10.14 mask 255.255.255.255
<INTERFACE_IP>
In this case you avoid spreading the multicast traffic to the other
network interface.
The above configuration reflects the default configuration, in
case you have changed the standard port you need to
configure the right multicast group in your routing table, this
means that instead of “route –p add 225.10.10.10 … “ you need
to use your custom address.
Reflecting the groups used in the chapter
Multicast
Troubleshooting & Configuration, page 31 I.E:
_
Z:\>route -p add 239.0.0.10 mask 255.255.255.255
<INTERFACE_IP>
_
Z:\>route -p add 239.0.0.11 mask 255.255.255.255
<INTERFACE_IP>
_
Z:\>route -p add 239.0.0.12 mask 255.255.255.255
<INTERFACE_IP>
_
Z:\>route -p add 239.0.0.13 mask 255.255.255.255
<INTERFACE_IP>
_
Z:\>route -p add 239.0.0.14 mask 255.255.255.255
<INTERFACE_IP>
Realtime Technology AG 2012
User Manual
36
Troubleshooting
Low Disk Space impact on Mediastore
Mediastore service is a memory greedy process; this is used as a
temporary store for the assets, for example when the user accesses an
asset through the RTT Compose (2D Art, or AH) the asset will be
temporary loaded to the mediastore and served to the RenderBackend.
The memory usage depends on the assets size.
In the case of assets that are less than 400 Mb the HW memory can be
sized around min 4GB and 8GB, in the case of assets that are bigger that
900Mb, the memory should be equal or greater than 16GB.
If the user does not have enough space on the drive C: the tidloader
temppath has to be moved to another drive i.e. D: if not we can experience
a virtual memory problem in DeltaGen. (Virtual Memory problem)
If possible, keep the Picturebook data repository in a physical disk
different form the C:\\. and possibly dedicated only to the storage of the
picturebook data. This will improve the data throughput, avoiding disk
resource sharing.
General issues
Shown below is a checklist table listed with the basic information, and the
references between the checklist and the services for possible
troubleshooting.
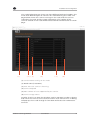
PowerHouse Resource Allocation Manager Page, shown in the picture
below underlines the services, and in the next table are referenced per
service category, and therefore relative troubleshooting is available.
Realtime Technology AG 2012
User Manual
37
Troubleshooting
Realtime Technology AG 2012
User Manual
38
Troubleshooting
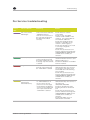
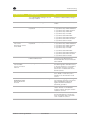
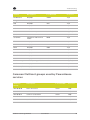
Per Service troubleshooting
Color
Ref.
Service Name
Meaning
ram, echo, stream,
hidmanager
These services are related to
“PWH RAM” if those
services are not present on
the host page means that
the RAM is not started
correctly.
Check if there is network
connectivity
Check (in case of multiple
network cards available on the
machine) the routing table for
the multicast addresses
Check if the multicast group
239.0.0.X is available on the
network ( switching layer )
Check if the firewall on the node
is correctly configured (
deactivated )
Check if the powerhouse.conf
present under the following path
%POWERHOUSE_HOME/etc% is
available and is a valid json
structure.
flashcompiler, task
These services are deployed
on the Tomcat server and
this will be published on the
host page only if the tomcat
is started.
Check if the tomcat address is
used from another services ( port
8080 should be free )
Check if the database is reachable
from the network.
image
This service is “PWH Image”
and can only be started if
the “PWH RAM” is started
Check if the “PWH RAM” is
started and if any other services
are using the port 4224, check
the firewall rules if are blocking
the port 4224
Check if the powerhouse.conf
present under the following path
%POWERHOUSE_HOME/etc% is
available and is a valid json
structure.
These services are related
to “PWH Mediastore” if
those services are not
present on the host page
means that the mediastore
services is not started, and
can only be started if the
“PWH RAM” is started
Check if the “PWH RAM” is
started and if any other service is
using the port
4220,4230,4288,4480
Check the firewall rules if are
blocking the above mentioned
port
Check if the powerhouse.conf
present under the following path
%POWERHOUSE_HOME/etc% is
available and is a valid json
structure.
Check that Zabbix server is
started and is reachable.
mediastore, filestore,
transienstore,
transientdirectory
Realtime Technology AG 2012
User Manual
Check
39
Troubleshooting
Color
Ref.
Service Name
Meaning
render
This service is related to
“PWH Render”, this service
can be started
independently form “PWH
RAM”. The program related
to this service is Deltagen
Check
Check if the licenses for Deltagen
are available.
Check if the port 4203 is not
blocked by the firewall.
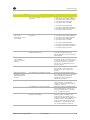
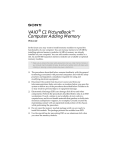
Installation Checklist
Description
Check
Test Result
dns name the machine shall
have the dns correctly set
ping the machine from each other with
fqdn name and ip
the machines have to
reply correctly
install the redistributable
package on the render node
and on the PB server
check in the Control Panel/Add Remove
Program if the redistributable are
installed - redistributable needed for
PWH are :
-
the pwh installation has to
be done on all the cluster
node - PB - Render Node
start the installer for the proper
architecture 64 bit
the correct PWH release
is 2.5 release
backup the PWH
configuration after the initial
setup
-
-
configure the PB multicast
address in order to avoid
the overlap with other
existing cluster, this has to
be done on all render nodes
check if the render nodes are active.
check pointing the render node ram
http://render_node_ip_address:2080/
ram/
the user will see the
correct Ram web page black page with RTT logo
on the top left corner
restart the PHW services on
all the machines PB server
and render nodes
check the services are properly running
looking at the powerhouse ram
http://render_node_ip_address:2080/
ram/
number of backend in the
ram pwhmaster will be 9
and in the render node
shall be 7
generate the mediastore
password and configure the
mediastore entry in the
configuration: http://
render_ip_address:4282/
mediastore/
check that the password generated is
correctly entered and there are no
trailing spaces
the password should be
present on all the
machines running a
mediastore instance
configure the streamer
inbound_address in the
PWH configuration, it shall
point to the PB machine
name
check that the inbound_address is
correctly written, it should be as: "http:/
/picturebook_machine_name:8888"
the inbound_address
should be reachable from
the web browser
install along the render node
the DG release 9.5.1 load the
render backend plugin in DG
check that the renderbackend plugin is
correctly loaded
number of backend in the
ram pwhmaster will 9 and
in the render node shall
be 8
Realtime Technology AG 2012
User Manual
40
Troubleshooting
Description
Check
Test Result
restart the Cluster
check the services are properly running
looking at the service console and look
at the ram
http://render_node_ip_address:2080/
ram/
number of backend in the
ram pwhmaster shall be 9
and in the render node
shall be 8
install picturebook following
the installer, during the
installation checkbox on the
postgreSQL
after the installation check that
postgreSQL is installed as a service and
the user account for PostreSQL has the
correct credential to start the service, in
case the PostgreSQL service is down
Picturebook WILL NOT START
ping the postgreSQL port
using the PB admin
program
install the license
check the given hostid and the machine
number are that one installed on the
machine. When the user installs the
license any active check on the license
are performed, the check is done when
the picturebook is started
check against the mac
address and the host
name, the host name shall
contain only allowed
chars. The _ is not and
allowed char.
Configure PB as service
check that the service is correctly
installed and check the service
sequence.
the correct startup
sequence is PWH before
PB
sc \\localhost stop PWH
Mediastore
sc \\localhost stop PWH
Streamer
sc \\localhost stop PWH
Ram
sc \\localhost stop
Tomcat6
sc \\localhost
Ram
sc \\localhost
Mediastore
sc \\localhost
Streamer
sc \\localhost
Tomcat6
Configure PB mediastore
user
create an account with mediastore
access and add the plain text password
to this user, then apply the PWH
checkbox, mediastore user shall be a
PWH user
start PWH
start PWH
start PWH
start
count the password char
and double check that the
password is correctly
entered. You can login
with the mediastore user
in PB
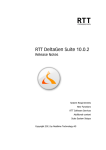
Troubleshooting Checklist
Problem Issue
PowerHouse
installation
completed
successfully but
services are not
starting
Possible Cause
Fix
The configuration sintax is wrong,
missing " or , in the Json object
Realtime Technology AG 2012
User Manual
validate the configuration sintax,
and in case restore the backup
configuration double checking the
sintax correctness
41
Troubleshooting
Problem Issue
Possible Cause
Fix
"
The redistributable packages are not
correctly installed
Install the redistributable packages
"
The network is not plugged
Plug the network interface in Hub or
switch
"
The service startup sequence is not
respected
Sequence the services as follow:
sc \\localhost stop PWH Mediastore
sc \\localhost stop PWH Streamer
sc \\localhost stop PWH Ram
sc \\localhost stop Tomcat6
sc \\localhost start PWH Ram
sc \\localhost start PWH Mediastore
sc \\localhost start PWH Streamer
sc \\localhost start Tomcat6
Powerhouse does
not see the
picturebook service
on the RAM
The service startup sequence is not
respected
Sequence the services as follow:
sc \\localhost stop PWH Mediastore
sc \\localhost stop PWH Streamer
sc \\localhost stop PWH Ram
sc \\localhost stop Tomcat6
sc \\localhost start PWH Ram
sc \\localhost start PWH Mediastore
sc \\localhost start PWH Streamer
sc \\localhost start Tomcat6
"
A firewall block the port related to the
PWH and PB services
Check the windows firewall and
check the logs. Deactivate the
firewall and allow the port related to
PWH and PB
Picturebook url is
not reachable.
Server connection
refused
The postgreSQL is not started
Check the postgreSQL log, user has
the admin rights to start the service,
in case the machine is connected to
the domain check the local user
policies are not affected from the
domain policies
The PB Tomcat does not start
Check the PB log, check the tomcat
port ( 8080 ) in case the port is
already in use from another local
service
The mediastore credential is wrong
Check the PB logs against wrong
user logging, check the correctness
PWH configuration password
against the PWH mediastore
password generator.
The mediastore service is not started
Check the PWH service along the
cluster at least one mediastore
instance shall run along the cluster restart the services
The mediastore service is started
Check the machine load and reduce
the thread numbers. Increase the
max_cpu load to 100 on the PWH
conf - restart the services
Failed to load asset
00000000_0000
appear after few a
seconds
Realtime Technology AG 2012
User Manual
42
Troubleshooting
Problem Issue
Possible Cause
Fix
The mediastore service is started machine overloaded
Check the machine CPUs usage, and
Memory usage, mediastore is a
memory and cpu greedy service,
reduce the number of threads and if
multiple machine are available i.e.
many render nodes deactivate the
mediastore on the PB server and
use other mediastore instances.
Failed to load asset
00000000_0000
appear after a few
minutes
The session ( PWH ) expired and the
asset is not anymore loaded in DG
Check the session timeout, if the
asset take more that the session
timeout, this will lead to a cut off
behavior, DG will close the scene
and the content is not anymore
available, change the session
timeout in PWH config to overcome
the loading time of the asset
Secl already in use
failed to init pwh
content
The render nodes are busy
Check if the render node is busy
using the PWH RAM web interface.
In case the user browser is crashed
when loading the asset the secl will
be not freed until the user session
expires . 30 minute tomcat session
timeout
Error #2032 - or
Security Error
#2028
There is a mismatch between the host
ip address and dns name - DMZ - DNS
forwarding
Check the correctness of the DNS
naming and the ip addresses, in case
of dns forwarding install the Apache
proxy - the instruction to install
apache are provided in a separated
document - RTT RTTPowerHouseShortInstallNote.do
c
Picturebook is not
saving the rendered
still images on the
file store, the
rendered jobs are
lost
Problem is that the certificate is
wrong or the pdata file system is not
correctly mounted
Check the pdata file system is
correctly mounted and check the
certificate - this has to be generated
accordingly with the fully qualified
host name. i.e.
hostname.domain.com - if it’s a self
signed cert shall also be signed from
a certification authority (i.e.
VeriSign)
PowerHouse
installation
completed
successfully but
services are not
starting
The configuration sintax is wrong,
missing " or , in the Json object
validate the configuration sintax,
and in case restore the backup
configuration double checking the
sintax correctness
"
The redistributable packages are not
correctly installed
Install the redistributable packages
"
The network is not plugged
Plug the network interface in Hub or
switch
Realtime Technology AG 2012
User Manual
43
Troubleshooting
Problem Issue
"
Possible Cause
Fix
The service startup sequence is not
respected
Sequence the services as follow:
sc \\localhost stop PWH Mediastore
sc \\localhost stop PWH Streamer
sc \\localhost stop PWH Ram
sc \\localhost stop Tomcat6
sc \\localhost start PWH Ram
sc \\localhost start PWH Mediastore
sc \\localhost start PWH Streamer
sc \\localhost start Tomcat6
Powerhouse does
not see the
picturebook service
on the RAM
The service startup sequence is not
respected
Sequence the services as follow:
sc \\localhost stop PWH Mediastore
sc \\localhost stop PWH Streamer
sc \\localhost stop PWH Ram
sc \\localhost stop Tomcat6
sc \\localhost start PWH Ram
sc \\localhost start PWH Mediastore
sc \\localhost start PWH Streamer
sc \\localhost start Tomcat6
"
A firewall block the port related to the
PWH and PB services
Check the windows firewall and
check the logs deactivate the
firewall and allow the port related to
PWH and PB
Picturebook url is
not reachable.
Server connection
refused
The postgreSQL is not started
Check the postgreSQL log, user has
the admin rights to start the service,
in case the machine is connected to
the domain check the local user
policies are not affected from the
domain policies
The PB Tomcat does not start
Check the PB log, check the tomcat
port ( 8080 ) in case the port is
already in use from other local
service
The mediastore credential is wrong
Check the PB logs against wrong
user logging, check the correctness
PWH configuration password
against the PWH mediastore
password generator.
The mediastore service is not started
Check the PWH service along the
cluster at least one mediastore
instance shall run along the cluster restart the services
The mediastore service is started
Check the machine load and reduce
the thread numbers. Increase the
max_cpu load to 100 on the PWH
conf - restart the services
The mediastore service is started machine overloaded
Check the machine CPUs usage, and
Memory usage, mediastore is a
memory and cpu greedy service,
reduce the number of threads and if
multiple machine are available i.e.
many render nodes deactivate the
mediastore on the PB server and
use other mediastore instances.
Failed to load asset
00000000_0000
appear after a few
seconds
Realtime Technology AG 2012
User Manual
44
Troubleshooting
Problem Issue
Possible Cause
Fix
Failed to load asset
00000000_0000
appear after a few
minutes
The session ( PWH ) expired and the
asset is not anymore loaded in DG
Check the session timeout, if the
asset take more that the session
timeout, this will lead to a cut off
behavior, DG will close the scene
and the content is not anymore
available, change the session
timeout in PWH config to overcome
the loading time of the asset
Secl already in use
failed to init pwh
content
The render nodes are busy
Check if the render node are busy
using the PWH RAM web interface.
In case the user browser is crashed
when loading the asset the secl will
be not freed until the user session
expires . 30 minute tomcat session
timeout
Error #2032 - or
Security Error
#2028
There is a mismatch between the host
ip address and dns name - DMZ - DNS
forwarding
Check the correctness of the DNS
naming and the ip addresses, in case
of dns forwarding install the Apache
proxy - the instruction to install
apache are provided in a separated
document - RTT RTTPowerHouseShortInstallNote.do
c
Picturebook is not
saving the rendered
still images on the
file store, the
rendered jobs are
lost
Problem is that the certificate is
wrong or the pdata file system is not
correctly mounted
Check the pdata file system is
correctly mounted and check the
certificate - this has to be generated
accordingly with the fully qualified
host name. i.e.
hostname.domain.com - if it’s a self
signed cert shall also be signed from
a certification authority (i.e.
VeriSign)
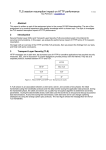
Port list used in PowerHouse Context
Port used from PowerHouse services
Service
Description
Port Number
Protocol
Ram
Remote announce
4301
Udp
Ram
Ram web page
2080
Tcp
Mediastore
Httprpc
4230
Tcp
Mediastore
Httprpc
4220
Tcp
Mediastore
Mediastore web page
4282
Tcp
Realtime Technology AG 2012
User Manual
45
Troubleshooting
Service
Description
Port Number
Protocol
Mediastore
Httprpc
4480
Tcp
Image
Httprpc
4224
Tcp
Hid
Httprpc
4211
Tcp
Hid
Httprpc
3080
Tcp
Hid
Httprpc
4210
Tcp
Streamer
RTSP server port
554
Tcp/Udp
Streamer
Streamer Server
8888
Tcp
Streamer
Streamer web Server
htdoc
2083
Tcp
Ahm
Httprpc
2084
Tcp
Hmi
Httprpc
4212
Tcp
Ram
Httprpc
4301
Tcp
Ram
Httprpc
4201
Tcp
Ram
Httprpc
4202
Tcp
Renderbackend
Httprpc
4203
Tcp
Ram
Httprpc
4204
Tcp
Zabbix Proxy
Zabbix proxy publisher
10051
Tcp/Udp
Task
Httprpc
8080
Tcp
FlashCompiler
Httprpc
8080
Tcp
Common Multicast groups used by PowerHouse
services
Multicast
Group
Description
Port Number
Protocol
225.10.10.10
Host announce
3333
Udp
225.10.10.11
Backend Service announce
3333
Udp
225.10.10.12
Service reservation
3333
Udp
225.10.10.13
Master election protocol
3333
Udp
225.10.10.14
Service block
3333
Udp
Realtime Technology AG 2012
User Manual
46
Troubleshooting
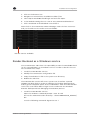
In order to check if the multicast group in your network is open, you can
use a multicast test sender and receiver. This utility is provided by
Microsoft at the following link:
http://technet.microsoft.com/en-us/library/cc787891(v=ws.10).aspx.
Alternatively, you can search in the Microsoft Library for “Ip Multicasting
Tools”. You will usually need to test the multicast communication in both
directions, as depicted below.
oduldummy
Realtime Technology AG 2012
User Manual
47