1
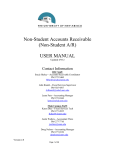
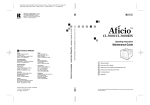
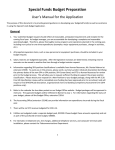
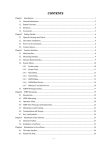
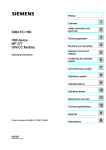
Non-Student Accounts Receivable
(Non-Student A/R)
Main Campus
USER MANUAL
Version 2.0
Updated 8/25/15
Contact Information
Unrestricted Accounting – Main Campus
MSC 01 1260
Fax# 277-7662
STAFF:
Karen Diaz – Fiscal Services Tech
Ph. # 277-2055
[email protected]
Justin Walters – Supervisor of Fiscal Services
Ph. # 277-0057
[email protected]
Doug Nelson – Accounting Manager
Ph. # 277-0156
[email protected]
Version 2.0
Page 1 of 27
Non-Student Accounts Receivable User Manual
Heading:
Page
Non-Student Accounts Receivable Overview ................................................................................ 3
Banner Terminology ................................................................................................................... 3
Basic Process Overview .............................................................................................................. 5
Invoicing, Aging Reports, and the Collection Process ............................................................... 5
Adding New Customers .............................................................................................................. 6
Adding New Detail Codes .......................................................................................................... 6
Monthly Deadlines ...................................................................................................................... 7
Procedures for Entering New Customer Charges ........................................................................... 8
Identify the Customer Number ................................................................................................... 8
Select Proper Detail Code ........................................................................................................... 9
Enter Charges ............................................................................................................................ 11
Enter Document Text ................................................................................................................ 12
Entering Another Charge Record.............................................................................................. 12
Close the Session ...................................................................................................................... 13
Payment Processing ...................................................................................................................... 15
Where to send payments for depositing .................................................................................... 15
Application of payments ........................................................................................................... 15
Accounts Receivable Aging Reports & Collection Process ......................................................... 16
Sample Aging Report ................................................................................................................ 16
“Past Due” Collection Letter process ....................................................................................... 17
Departmental Role in Collection Process ................................................................................. 17
Bad Debt Calculation and Policy .............................................................................................. 17
Contracted Collections and Legal action .................................................................................. 18
Researching Items in Banner ........................................................................................................ 18
Departmental Procedures and Recordkeeping .............................................................................. 19
Customer Dispute Resolution ....................................................................................................... 19
Customer Adjustments, Credits and Refunds ............................................................................... 19
Instructions for Entering Credits in Banner .............................................................................. 20
Reference Materials ...................................................................................................................... 20
Banner Access Roles Needed ................................................................................................... 20
Quick List of Banner Forms (Screens): .................................................................................... 21
MyReports – A/R Aging Report ............................................................................................... 22
Sample Invoice 1....................................................................................................................... 23
Sample Invoice 2....................................................................................................................... 23
Sample 1st Collection Letter...................................................................................................... 25
Sample 2nd Collection Letter..................................................................................................... 26
Sample 3rd Collection Letter ..................................................................................................... 27
Version 2.0
Page 2 of 27
Non-Student Accounts Receivable Overview
Banner Terminology
Aging Report – lists the outstanding invoices due for each customer, with a total balance due for the
customer. The Aging report is broken into categories that indicate how long each invoice has been
outstanding.
Apply Payment – process of matching up a payment from a customer with one or more of their
specific outstanding invoices.
Billing Address – customer address to which UNM sends invoices and any required collection
correspondence. A customer may have more than one billing address.
Block – a collection of records in a Banner form that are grouped together for ease of entry and
review.
Charge – a single Non-Student A/R transaction that will both create an invoice (billing) for a
customer and generate revenue for a UNM Department.
Collection – process of formally contacting a customer to request payment because an invoice has
remained unpaid past a specified time limit.
Customer – a person or entity from outside UNM, for whom a UNM department has provided a
service. In Banner, each customer has at least one customer number, but some customers may have
more than one customer number.
Customer ID Number – a unique 9-digit identifier that is related to the company’s billing
information. For Non-Student A/R, this number will begin with “N”, which represents Main
Campus or a branch campus. An example is N01601605.
Detail Code – a unique 4-digit identifier that represents the specific Banner index and account
where a transaction will be posted. In Non-Student A/R, detail codes always start with a letter.
Main Campus detail codes begin with the letter “N”. Examples are N001 or N117. All charges
must have a detail code, which prints an associated description on the invoice.
Form – the different screens available in Banner. Each form has a 7-letter name, such as
TFADETL. Forms may be used for reviewing information or for data entry and are organized to
present similar information together on the screen to create a convenient “view” of the data.
Field – one piece of data contained within a Banner record. For example, the detail code is one
field in each transaction record, another field is the amount.
Record – a set of fields containing information about one Banner transaction. For example, a
record could represent a charge from the bookstore, which contains many fields such as
description, date and amount.
Version 2.0
Page 3 of 27
TFADETL – Form for entering charges in Non-Student A/R Module
Rollback
Save
Query
Balance
Only- Must
scroll to end
Insert
Record
Enter
Customer
Number
Status Line:
Provides Field
Information
Version 2.0
Next
Block
Enter
Query
Execute
Query
Account
Balance Due
Enter
Detail
Code
Print
Outstanding
Balance Due
Page 4 of 27
Basic Process Overview
Financial Services uses the Non-Student Accounts Receivable (Non-Student A/R) process in Banner as
the only accepted method for departments to bill outside entities. Departments should not mail any other
types of invoices to customers. If a department only occasionally bills outside entities, they should send a
mock invoice to Unrestricted Accounting – Main Campus to have a Banner invoice created. A
centralized A/R billing function also creates one central place for all University billings to external
entities to be documented for recordkeeping and audit purposes.
In order for the Non-Student A/R process to correctly reflect the balance due for each customer, all
payments on invoices must be centrally processed by a Financial Services Office, where the payment can
be properly applied against the correct outstanding invoice. Centralized payment processing also allows
for timely reporting of amounts due from customers and accurate aging reports that enable departments to
monitor their progress in collecting payment from their customers.
Much of the correspondence between Financial Services and departments that create Non-Student A/R
invoices happens through e-mail. When there are changes in staffing or assignment of duties, please
contact Unrestricted Accounting so that the e-mail address contact for your department can be updated.
Invoicing, Aging Reports, and the Collection Process
o Invoicing Customers
1. On the last business day of each month, the Non-Student A/R system will close for one day to
allow for invoices to be printed on the following day. By the third day following the A/R system
close, all invoices will be mailed to the customers by Unrestricted Accounting.
2. Each department that submitted invoices through Non-Student A/R will receive an electronic
copy of their invoices plus any backup that was mailed, as a .pdf file by the third day following
the A/R close.
3. All invoices with a credit balance, a zero balance, as well as those with notes stating “Do Not
Send,” will automatically be rejected and not mailed. Those rejected invoices are for department
and Financial Services office records.
4. If a credit needs to be mailed to the customer, please work closely with Unrestricted Accounting
to provide the correct information; a special letter will be created to be sent to the customer.
o Aging Reports
5. By the third business day of the month, each department will receive an aging report via e-mail.
Aging reports can also be obtained on your own through MyReports – see the Reference
Materials section for more information.
6. Review your aging report. Compare the aging report to the current invoices that were received
to ensure that the department received copies of all invoices sent to customers. If the department
is missing an invoice stated on the aging report, please request a copy from Unrestricted
Accounting by e-mail.
o Collection Process
7. Departments should initiate contact with a customer to inquire about the status of any
invoice older than 60 days.
8. Collection letters will be focused on invoices older than 60 days.
Version 2.0
Page 5 of 27
9. At various times throughout the month, the Unrestricted Accounting will draft collection
letters, and e-mail those to the department for review. The department will be given a
deadline for replying with any changes.
10. The collection letter, along with a copy of the original invoice and any backup, will be
mailed on the day following the deadline for changes, with a copy also e-mailed to the
department for their records.
Adding New Customers
o How do you get a Customer ID number?
Send an e-mail to the Accountant 3 in Unrestricted Accounting with the following information:
●Company’s Name
●Attention to (if any)
●Billing Address
●Company’s phone number
●If the customer is federally funded—if federally funded will need to go through
Pre-Award
The Accountant 3 will reply by return e-mail with the Company’s new customer number. All
Customer numbers are nine digits. For Main Campus, all start with the letter “N”, for example
N00000001.
o What does the “N” stand for in the customer number?
Those that start with the letter “N” represent the Non-Student Accounts Receivable customers on
Main Campus. There are many different types of customers – for example, those beginning with
a number “1” are for Accounts Payable’s use. Always use a customer number that begins with
“N.” Contact the Accountant 3 by e-mail to create a new customer number if needed.
o What is the difference between a BI address and a BU address?
The “BI” address is the “Billing” address used by the Non-Student A/R module to produce
invoices that are mailed to that company’s billing address with the current charges. Accounts
Payable uses the “BU” address for generating payments to vendors, and Banner will not produce
invoices for charges with a “BU” address. This choice is made in the “Address Type” field in
the TFADETL form; always use the “BI” address.
Adding New Detail Codes
o Do I have to have a Detail Code to post charges?
Yes, all charges must have a detail code to provide an automatic description on the invoice
and to determine which index and account code to credit for the department’s revenue.
o Can I change the description when I’m posting?
Yes, you can add or delete information that is in the description field by moving the cursor
into the description field and typing what you want to appear on the invoice.
Version 2.0
Page 6 of 27
o How do I obtain a Detail Code?
By contacting the Accountant 3 by e-mail and providing an index number for revenue and a
description of the type of charges to be posted, such as “printing copies” or “membership
fee”
o Can I have more than one Detail Code?
Yes, each major charge description can have its own detail code, though it is not suggested
for a one-time use. Multiple detail codes can have the same index number or different index
numbers. It depends on the needs of the department. Discuss your department’s needs with
the Accounts Receivable Coordinator.
Monthly Deadlines
The following schedule shows the proposed deadlines, which will be adjusted to avoid weekends
and holidays.
NSAR Processing Deadlines
Day of Month
29th
Last day
1st , 15th
3rd, 18th
3rd, 18th
3rd, 18th
Version 2.0
Function to be completed
Deadline for entering invoices to process
Non-Student A/R Invoices closed for month
Customer invoices printed
Customer invoices mailed out
Scanned copies of invoices e-mailed to Department
Departments receive monthly aging report
via e-mail
Completed by
Department Staff
A/R Coordinator
A/R Coordinator
A/R Coordinator
A/R Coordinator
A/R Coordinator
Page 7 of 27
Procedures for Entering New Customer Charges
Identify the Customer Number
1. From the Banner main menu, type in the form name TFADETL. Bypass any unneeded screens by
closing them until you get to the form TFADETL.
2. Type the Customer ID # in the “ID” Field. The company’s name will automatically populate in the
next field, if it does not, hit the <enter> key.
3. If the Customer ID # is unknown:
a. Click on the drop down arrow next to “ID” field.
b. An option box will appear. Place your cursor on the “Non-person Search” and click only
once.
c. The FOICOMP form will appear, click cursor into the field under “Name” and type in a key
word and % sign on the end or on both ends. The % sign is a wildcard character in Banner
and Hyperion. (Example: University% or %University%).
d. Click on “Execute Query” button.
e. Find the correct title and look for the 9 digit number that starts with an “N”. Note: the letter
“N” is used to identify Main Campus customers – you should not use a customer that does
not have an “N” ID number. Contact the Accounts Receivable Coordinator by e-mail with
customer name and billing address.
f. Double click on the “N” number in the left hand column; this will automatically take you
back to the previous TFADETL form and will bring the customer ID number with it.
g. If you want to query a different Customer ID number, click on the “Query” button and it will
clear your screen to start over.
Drop Down
Arrow
Version 2.0
Option BoxWill Appear
Select “NonPerson Search”
Page 8 of 27
FOICOMP Screen
Type in N%- to
query NSAR
Customers
Type %Customer Name% to see
all NSAR customers’ names
Select Proper Detail Code
4. Click on the “Next Block” button. This will jump to the second section (block) of the form, where
you can review or enter records.
5. If it’s a new customer this record will be blank. If this customer has been invoiced before, postings
will appear as in the next example.
6. The most recent posting will always appear on top and the oldest posting will always appear on the
bottom (use scroll bar).
7. The highlighted section is the focused record. Use the up and down arrow keys to move between
records. There will always be two records in view; the highlight indicates the record being worked
on.
8. To create a new charge record (posting):
a. Click the “Insert Record” icon.
b. This will create a blank highlighted field where you can key in a new charge (posting).
c. Type the correct detail code into the “Detail Code” field; the description for that detail code
will automatically populate. You can type over this if you want to create your own
description for this charge, or you can add more information about this charge in Document
Text, which is described later. Note:
d. Hit the tab key to move to the next field. In the “Address type” field make sure this states
“BI” for Billing address. Note: If it does not, you have the wrong customer or the wrong
address. Sometimes you will see a BU address, do not use this address as it will not generate
an invoice.
Version 2.0
Page 9 of 27
Insert Record
First Record in View- Most Recent
Second Record in View
Enter- Detail
Code
Version 2.0
New “Highlighted” field
appears; when inserting a
new record
Page 10 of 27
Enter Charges
9. There are two options to post charges: by unit cost or in total.
a. Option #1- Quantity multiplied by unit cost. Tab to the “Units” field and enter the number of
units (quantity). Then, tab to the “Rate” field and enter the unit cost (cost of single item). If
you tab to the “Amount” field, Banner will automatically populate the total amount.
b. Option #2 – Total amount only. Tab through all fields to the “Amount” field, type in dollar
amount.
10. Tab to “Doc Number” field. This is an optional field that will print on the left side of an invoice for
each charge. Enter a document # or reference to something, for example, a PO number.
11. Tab through or click on the “Invoice number” field on the far right side of the form and select one of
the options below:
a. Option A – New Invoice number. Type in the word “NEXT”, and hit the tab key. This will
generate a new number.
b. Option B – Multiple postings/charges on the same invoice number. Type in the exact invoice
# that you want this charge to be displayed on (used when adding to or crediting an existing
invoice).
12. Check your work. Either make corrections now, or start over by clicking on the Record Menu,
then click Clear to erase all fields in this record.
13. Click the “SAVE” button (once you click on “save,” it will remain in Banner forever, regardless of
whether it is correct or an error).
Charge Amount Option #1 – Units & Rate (Here is 5 units @ $20.00) = Automatic Total
Doc Num – Your
Document reference #, will
appear on the invoice
Version 2.0
Invoice Number - type
either NEXT or existing
invoice #
Page 11 of 27
Charge Amount Option #2 – Enter amount only
After saving, click this button to
enter Document Text
Enter Document Text
14. Document Text is the part of a record that allows you to insert comments on the invoice below the
charge/posting information.
15. Click on the yellow icon, next to the “Text” field in the center of the record.
16. This will open a new form. Type in your comments. Note: if you need to type multiple lines, you
will need to click on each line to move down.
17. Click on “save” icon. Click on “return” button on bottom right of screen, this will return you to the
previous TFADETL form. Once you have completed all of your invoices, exit the screen by clicking
on the small “X” in the upper right hand corner of your screen.
(There is a sample of the Document text screen on the next page.)
Entering Another Charge Record
18. If you need to continue with other invoices, select one of these options:
a. If using the same customer number, start with instruction #8 above, to enter a new record.
b. If the invoice is for a different customer, select the “Roll Back” button. This will take you to
the top block (section) where you will input a different Customer ID number and follow same
instructions.
Version 2.0
Page 12 of 27
Document Text Screen
Type in Text
(Optional)
Check box is no
longer available
“Return”- to
TFADETL form
Close the Session
1. When all charges have been entered for the day, you must close out your session (batch) so
that it will post the revenue. From the Banner main menu, type in the form name
TGACREV
2. Type in your NetId in the “Session User” field, tab to “Session Number” field, this number
should be zero, if not, change it to zero.
3. Click on “Save” icon
4. Click the “Next Block” icon twice to move your cursor to the bottom block that shows the
summary information for your session’s charges.
5. Click on the “Options” menu to look at more information about this session:
a. Review Cashier Session Detail – A review of what you have posted for this session;
you can print the screen if you want a copy for your records.
b. Display Totals – A total of the closing session. Compare your totals to your total
invoice amounts to catch any errors.
c. Display User Sessions – Listing of all the previous sessions closed under the user’s
name. You can view any previous session by using the number to the left, click on
rollback, and go back to step 2 above and input the session number in the “Session
Number” field, click “save” and it will pull the information only from that session.
6. On the Options menu, click on “Close Session.”
7. Check the status line on the bottom left corner for confirmation that your session was closed.
Exit form by the “X” button in the inner screen.
Version 2.0
Page 13 of 27
TGACREV Form – to close a session:
Step 3:
Save
Step 5:
Options
Step 1:
Enter
NetID
Step 4: Next
Block (twice)
Step 6:
Close
Session
Step 2: Session
Number (Always 0)
Step 8: Exit
Screen
Step 7: View
Status line for
confirmation
that session
was closed
Version 2.0
Page 14 of 27
Payment Processing
Where to send payments for depositing
All checks must be delivered to the Financial Services office, located in the Perovich Business
Center, suite 3000. No checks should be left unattended at any time. Do not forward checks via
inter-campus mail. All checks must be delivered in person. University policy states that any
monies received shall be deposited the next business day unless the funds total less than $50, in
which case they must be deposited within a week.
Application of payments
o How do invoices go from Unpaid to Paid? When a department receives funds (check,
electronic wire, etc.) for payment on Non-Student A/R invoices, those funds must be applied
(deposited) by the Financial Services office in order for the payment and the invoice to be
matched up.
o What if the check amount is different than the invoice amount? A payment that cannot
be matched up with a specific invoice will be “generally applied,” meaning that it will be
shown as a general payment on account and will reduce the customer’s overall balance due.
However, if a payment is not matched up with the correct invoice, that invoice remains on
the aging report as unpaid and the department is charged for the bad debt percentage on any
outstanding invoices.
There are three possible scenarios when payments are applied:
1. Direct application: The amount of the check exactly matches the invoice.
2. Over-payment: The amount of the check exceeds the invoice indicated. The remaining
amount is applied as a general payment on account, not to a specific invoice.
3. Short-payment: The amount of the check is less than the amount of the indicated invoice.
The balance of the invoice remains outstanding.
o How do you determine where the funds will be applied? The application of payments is
first based on any instructions received from the customer. If there is no clear indication of
which invoice the check is supposed to pay, then the payment is just applied as a general
payment on account and the department is asked to contact their customer for instructions on
where to apply they funds. Once the department has instructions from the customer, then the
department must send those instructions to the Accounts Receivable Coordinator, who will
ensure that another member of the Financial Services office corrects the application of the
payment. Paying multiple invoices on one check is acceptable. It is also acceptable to
combine payments for several customers on one check.
o What if the funds are applied to the wrong invoice in error? Contact the Accounts
Receivable Coordinator if you have found that the funds were applied incorrectly, or if you
need a copy of the check to discuss with the customer if they have a question about how the
funds were applied. It is possible to make corrections to where payments have been applied.
Version 2.0
Page 15 of 27
Accounts Receivable Aging Reports & Collection Process
Sample Aging Report
Aging Report Descriptions
(1) The date will reflect actions from the day before, for example, this date states October 27, 2014. The
activity reflects from October 26, 2014.
(2) Department Name
(3) Customer Name and ID number
(4) Invoice numbers with blank Invoice dates, means that the charges have been posted in the Banner
module, but not yet mailed to the customer.
(5) The first collection letter is reviewed and prepared from the 61-90 day column.
Version 2.0
Page 16 of 27
“Past Due” Collection Letter process
1. The collection letters will be focused on the invoices with past-due balances over 90 days
old.
2. At various times though out the month, collection letters will be generated and e-mailed to
the department for approval.
3. These letters are not for the customers at this time, please do not mail, fax or scan letters,
they are for department approval only.
4. If you do not want a collection letter generated for a specific invoice, you will need to contact
the Accounts Receivable Coordinator by e-mail with specific reasons why. Departments
requesting that collection letters NOT be sent must contact the Accounts Receivable
Coordinator by the deadline that is provided when the letters are sent for approval.
5. If you do not notify us by the deadline, we will assume that the letters are correct, thus
indicating your silent approval. The collection letter, along with a copy of the original
invoice and any backup, will be mailed on the business day following the deadline.
6. An exact copy of the customer’s collection letter will be kept on file in the Financial Services
Office and will be e-mailed to the department for their records.
Departmental Role in Collection Process
Since charges originate within the individual departments, each department is ultimately
responsible for collecting funds owed to them. While the Financial Services office can help
departments to identify needed information and be a resource, the best customer service will
come from the department. The department staff members are the ones who understand the
customer’s issues and concerns. Ideally the final outcome should be due to the efforts of the
department in resolving any issues.
Please review the columns of the aging report for any invoices over 60 days old and resolve them
with your customers. Being especially aware of these past-due balances will help identify nonpayment issues in the early stages of the collection effort.
Bad Debt Calculation and Policy
Because customers sometimes do not pay their debts, the University must create a reserve for
uncollectible charges called the Bad Debt Reserve. Each quarter, the Financial Services office
will calculate the amount that each department will be charged for their share of the Bad Debt
Reserve based on the department’s unpaid customer invoices. The calculation is based on a
combination of the amount and how long the invoice has gone unpaid (its age). An invoice
entered on May 1st and unpaid on May 31st is 31 days old.
Version 2.0
Page 17 of 27
The Bad Debt calculation formula is as follows:
Age of invoice:
% of Amount Reserved in Bad Debt
0-30 days
2%
31-60 days
25%
61-90 days
50%
91-120 days
75%
Over 120 days
100%
When a charge is moved to the Bad Debt Reserve, it is assumed that this charge is still owed to
the University, but that collection on the debt is unlikely. If there is a collection on the debt once
the charge has been moved to the bad debt reserve, the department’s bad debt expense will be
credited in the next quarter.
Contracted Collections and Legal action
If the Department, in conjunction with Financial Services, has exhausted all avenues to collect
outstanding amounts owed via collection letters, phone calls, etc., then the involvement of a
collection agency and/or legal action by the University’s attorneys will be implemented on a
progressive basis.
First, if the invoice or invoices in question have been outstanding longer than 150 days, then a
contracted collection agency will be employed to take over collection efforts.
Second, as a last resort, if the collection agency’s efforts fail, attorneys from UNM or a
contracted firm will be utilized for legal proceedings if deemed necessary.
Researching Items in Banner
There are several ways to find out if an invoice as been paid, as discussed in the following
sections defined by the Banner form used. Payments using detail code “NP01” are payments
applied directly to an invoice. “NP08” payments belong to that customer, but Financial Services
couldn’t find one specific invoice to apply it against, so it was applied only as a general payment
on account.
Query Invoices in TGIACCD: (when you have one data element, like Invoice #)
From the main Banner menu, go to the TGIACCD form and scroll across to the “Invoice
Number” column. Click in the field and type in your invoice number. Click on the “Execute
Query” icon. Scrolling across the form will display information on this invoice. If the amount
and balance columns are the same, then a payment or a deduction has not been made. If the
balance column is zero or the amount has been reduced, then it reflects that either a payment or a
credit has been applied towards that invoice.
Query in TFIAREV: (when you have the customer ID number)
From the main Banner menu, go to the TFIAREV form. Enter customer ID number, and click
“next block.” This will give you a full listing of the invoices created and payments applied for
that customer ID number. You can also enter and execute a query here if you are looking for
more specific information, such as payment details (Detail code NP%)
Version 2.0
Page 18 of 27
Query in TFADETL: (when you have the customer ID number)
From the main Banner menu, go to the TFADETL form. Input the customer ID number and
click “next block”. Click on the “Enter Query” icon. You can query by detail code, amount,
check number, invoice number, transaction number, or any combination of these. Click the
field(s) you want to query on, and type in the information. Click the “Execute Query” icon.
That record’s information will be displayed. Look in the balance field, if there is an amount then
money is still owed; if it is zero then the payment has been received or credit issued.
Departmental Procedures and Recordkeeping
1. Keep a list of the customer numbers and detail codes that your department uses. Each time
you request a new customer number or detail code, be sure to add that to your list.
2. Set up a file for each customer. Keep departmental copies of your Non-Student A/R billings
and any correspondence in the customer’s file.
3. The Financial Services office uses webxtender to store information for each customer:
i. Copies of checks
ii. Copies of invoices
iii. Log of correspondence regarding collection letters
iv. Copies of collection letters
v.
Copies of credits
vi. Internal Correspondence
Customer Dispute Resolution
Department members need to respond quickly to any customer’s questions about their invoices
from UNM. If the customer disputes a charge, and the department does not settle the dispute
with the customer and notify the Accounts Receivable Coordinator in a timely fashion, then the
department’s revenue will be reversed and the invoice will be moved to the Bad Debt Reserve
account. If the disputed billing issue is subsequently resolved and the invoice is paid, the
correction can be made and the department’s revenue will be restored.
Customer Adjustments, Credits and Refunds
Every credit must be connected to another invoice, so you will need to have the invoice
transaction number (“Trans Num”) that you want to apply the credit to. Credits are not normally
sent to customers, so if you want a copy of the credit mailed, you must contact the Accounts
Receivable Coordinator.
Refunds are issued only by the Financial Services office. If a refund needs to be sent to a
customer, you must contact the Accounts Receivable Coordinator.
Version 2.0
Page 19 of 27
Instructions for entering credits in Banner:
If you do not apply the credit to the correct invoice in steps #5 & #6 below, it will apply against
the oldest outstanding invoice and create more of a problem. This is very important – call the
Accounts Receivable Coordinator for help if you have questions!
1. From the main Banner menu, go to the TFADETL form. Enter the customer ID number and
click next block.
2. Look for the original charge where you are going to apply the credit and note the detail code,
the invoice number and the Trans Num.
3. Insert a record, and enter the same detail code as the original charge.
4. Tab to the amount field, and enter the amount of the credit as a negative number, such as “10.00”
5. Tab to the Trans Paid field and enter the Trans Num of the original transaction that you want
to apply this credit towards.
6. Tab over to the Invoice Number field on the far right side of the screen and enter the invoice
number from the original charge – do NOT create a new invoice number by typing NEXT.
7. Click Save. Click on the Document text box and type in a reason for the credit, making sure
that there is a checkmark in the “PRINT” column on the right side.
8. Send an e-mail to the Accounts Receivable Coordinator to inform her that you have entered a
credit that needs to be sent to the customer.
a. If you absolutely do not want the customer to receive the credit, type “DO NOT
MAIL” in the top of the document text. Make sure there is a checkmark in the
PRINT column to the right.
9. Click the Save icon, the click return at the bottom right of the screen. Exit the form.
Reference Materials
Banner Access Roles Needed
1. Log in to my.unm.edu and select the Employee Life tab. In the Banner Applications channel
(box), there is a link under the Banner Resources section to the “Banner Authorization
Requests.”
2. Log in to the Banner Authorization Requests using your NetID and password, then locate and
be sure that you have selected the roles for:
o Department Accounts Receivable Processor – to enter new charges
o Department General Inquiry– to access reports in E-print and Hyperion.
Version 2.0
Page 20 of 27
Quick List of Banner Forms (Screens):
Non-Student accounts receivable module forms:
Form
TFADETL
Form Name
Account Detail Form
Purpose
Enter new charges
TGACREV
Cashier Session Review Form
Close your session
TGIACCD
Account Detail Query Form
Query invoice or detail code
TFIAREV
Account Detail Review Form
Query customer activity
TFAACCT
Account Review Form
Current customer balance due
(Billing Date Aging info only!)
Finance forms:
Form
Form Name
Presents view of:
FGIBDST
Budget Status
Year to date revenue and expense balances
FGITRND
Detail Transactions
Individual revenue and expense transactions
Version 2.0
Page 21 of 27
MyReports Reports – A/R Aging Report (This Report is now only available on
MyReports)
MyReports is one of the reporting tools for Banner and is the application that creates the A/R
aging report. The information in MyReports is exactly the same as what appears in Banner,
except that MyReports data comes from a central database, the ODS, that is only refreshed at
night. MyReports reflects the prior day’s information, whereas Banner is real-time.
Log in to my.unm.edu and select the Employee Life tab. In the Banner Applications channel,
there is a link under the Reporting section for “MyReports.”
Log in with your NetID and password. The report “FARUNAG Unrestricted Aging by
Department – Main” is located in the “All Campus Reports” folder, which is a sub-folder to
“Finance” (see below). Select your NSAR department, “no selection” on the year because you
want the most current data available.
If you do not see your department’s name on the available drop down list, please call the
Accounts Receivable Coordinator. The print option is under the File menu. The report can also
be converted to a PDF file or EXCEL spreadsheet
Version 2.0
Page 22 of 27
Sample Invoices
Version 2.0
Page 23 of 27
Version 2.0
Page 24 of 27
Sample Collection Letters
First letter:
Version 2.0
Page 25 of 27
Sample Collection Letters
Second letter:
Version 2.0
Page 26 of 27
Sample Collection Letters
Third letter:
Version 2.0
Page 27 of 27