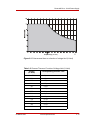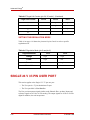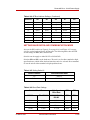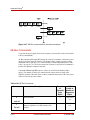
1
Pinnacle® Plus+ 10 kW Power Supply 325 VDC – 800 VDC July 2010 57000097-00B User Manual User Manual Pinnacle® Plus+ 10 kW Power Supply 57000097-00B Advanced Energy® COPYRIGHT This manual and the information contained herein is the proprietary property of Advanced Energy Industries, Inc. No part of this manual may be reproduced or copied without the express written permission of Advanced Energy Industries, Inc. Any unauthorized use of this manual or its contents is strictly prohibited. Copyright© 2010 Advanced Energy Industries, Inc. All Rights Reserved. DISCLAIMER AND LIMITATION OF LIABILITY The information contained in this manual is subject to change by Advanced Energy Industries, Inc. without prior notice. Advanced Energy Industries, Inc. makes no warranty of any kind whatsoever, either expressed or implied, with respect to the information contained herein. Advanced Energy Industries, Inc. shall not be liable in damages, of whatever kind, as a result of the reliance on or use of the information contained herein. PRODUCT USAGE STATEMENT Read this entire manual and all other publications pertaining to the work to be performed before you install, operate, or maintain this equipment. Practice all plant and product safety instructions and precautions. Failure to follow instructions can cause personal injury and/or property damage. If the equipment is used in a manner not specified by the manufacturer, the protection provided by the equipment may be impaired. All personnel who work with or who are exposed to this equipment must take precautions to protect themselves against serious or possibly fatal bodily injury. Advanced Energy Industries, Inc., (AE) provides information on its products and associated hazards, but it assumes no responsibility for the after-sale operation of the equipment or the safety practices of the owner or user. NEVER DEFEAT INTERLOCKS OR GROUNDS. iv 57000097-00B Pinnacle® Plus+ 10 kW Power Supply TRADEMARKS ® is a registered trademark of Advanced Energy Industries, Inc. Bird® is a registered trademark of Bird Electronic Corporation Pinnacle® is a registered trademark of Advanced Energy Industries, Inc. CUSTOMER FEEDBACK Advanced Energy’s technical writing staff has carefully developed this manual using research-based document design principles. However, improvement is ongoing, and the writing staff welcomes and appreciates customer feedback. Please send any comments on the content, organization, or format of this user manual to: • [email protected] To order a manual, please contact Technical Support: • [email protected] 57000097-00B v Advanced Energy® vi 57000097-00B Pinnacle® Plus+ 10 kW Power Supply Table of Contents Chapter 1. Safety and Product Compliance Guidelines Important Safety Information . . . . . . . . . . . . . . . . . . . . . . . . . . . . . . . . . . . . . . . . . 1-1 Danger, Warning, and Caution Boxes in the Manual . . . . . . . . . . . . . . . . . . . . . . . 1-2 Safety Guidelines . . . . . . . . . . . . . . . . . . . . . . . . . . . . . . . . . . . . . . . . . . . . . . . . . . 1-2 Rules for Safe Installation and Operation . . . . . . . . . . . . . . . . . . . . . . . . . . . . 1-2 Interpreting Product Labels . . . . . . . . . . . . . . . . . . . . . . . . . . . . . . . . . . . . . . . . . . 1-3 Product Compliance . . . . . . . . . . . . . . . . . . . . . . . . . . . . . . . . . . . . . . . . . . . . . . . . 1-5 Product Certification . . . . . . . . . . . . . . . . . . . . . . . . . . . . . . . . . . . . . . . . . . . . 1-5 Safety and EMC Directives and Standards . . . . . . . . . . . . . . . . . . . . . . . . . . . 1-6 Electromagnetic Compatibility (EMC) Directives and Standards . . . . . . . 1-6 Safety Directives and Standards . . . . . . . . . . . . . . . . . . . . . . . . . . . . . . . 1-6 Conditions of Use . . . . . . . . . . . . . . . . . . . . . . . . . . . . . . . . . . . . . . . . . . . . . . 1-7 Chapter 2. Theory of Operation General Description . . . . . . . . . . . . . . . . . . . . . . . . . . . . . . . . . . . . . . . . . . . . . . . . 2-1 Output Impedance Range . . . . . . . . . . . . . . . . . . . . . . . . . . . . . . . . . . . . . . . . 2-1 Output Regulation . . . . . . . . . . . . . . . . . . . . . . . . . . . . . . . . . . . . . . . . . . . . . . 2-1 Interfaces . . . . . . . . . . . . . . . . . . . . . . . . . . . . . . . . . . . . . . . . . . . . . . . . . . . . 2-1 Microprocessor Advantages . . . . . . . . . . . . . . . . . . . . . . . . . . . . . . . . . . . . . . 2-2 Displays . . . . . . . . . . . . . . . . . . . . . . . . . . . . . . . . . . . . . . . . . . . . . . . . . . . . . 2-2 Arc-suppression Feature . . . . . . . . . . . . . . . . . . . . . . . . . . . . . . . . . . . . . . . . . 2-2 Theory of Operation . . . . . . . . . . . . . . . . . . . . . . . . . . . . . . . . . . . . . . . . . . . . . . . . 2-2 Input . . . . . . . . . . . . . . . . . . . . . . . . . . . . . . . . . . . . . . . . . . . . . . . . . . . . . . . . 2-3 Housekeeping Supply . . . . . . . . . . . . . . . . . . . . . . . . . . . . . . . . . . . . . . . . . . . 2-3 Inverter . . . . . . . . . . . . . . . . . . . . . . . . . . . . . . . . . . . . . . . . . . . . . . . . . . . . . . 2-3 Output . . . . . . . . . . . . . . . . . . . . . . . . . . . . . . . . . . . . . . . . . . . . . . . . . . . . . . . 2-3 Output Measurement . . . . . . . . . . . . . . . . . . . . . . . . . . . . . . . . . . . . . . . . . . . 2-3 DC Chopper Section . . . . . . . . . . . . . . . . . . . . . . . . . . . . . . . . . . . . . . . . . . . . 2-3 Logic Control . . . . . . . . . . . . . . . . . . . . . . . . . . . . . . . . . . . . . . . . . . . . . . . . . . 2-3 Remote Interfaces . . . . . . . . . . . . . . . . . . . . . . . . . . . . . . . . . . . . . . . . . . . . . . 2-4 Chapter 3. Product Specifications Functional Specifications . . . . . . . . . . . . . . . . . . . . . . . . . . . . . . . . . . . . . . . . . . . . 3-1 Physical Specifications . . . . . . . . . . . . . . . . . . . . . . . . . . . . . . . . . . . . . . . . . . . . . 3-3 Dimensional Drawings . . . . . . . . . . . . . . . . . . . . . . . . . . . . . . . . . . . . . . . . . . 3-5 Electrical Specifications . . . . . . . . . . . . . . . . . . . . . . . . . . . . . . . . . . . . . . . . . . . . . 3-6 Maximum Allowable Reverse Time For a Given Frequency . . . . . . . . . . . . . . 3-9 Reverse Time As A Function of Voltage Limit . . . . . . . . . . . . . . . . . . . . . . . 3-12 57000097-00B Table of Contents vii Advanced Energy® Operating and Impedance Range Illustrations . . . . . . . . . . . . . . . . . . . . . . . 3-16 Environmental Specifications . . . . . . . . . . . . . . . . . . . . . . . . . . . . . . . . . . . . . . . . 3-18 Coolant Specifications . . . . . . . . . . . . . . . . . . . . . . . . . . . . . . . . . . . . . . . . . . . . . 3-19 Chapter 4. Communication Interfaces Identifying the User Port On a Pinnacle Plus+ Unit . . . . . . . . . . . . . . . . . . . . . . . . 4-1 Single 15 V 37-Pin User Port . . . . . . . . . . . . . . . . . . . . . . . . . . . . . . . . . . . . . . . . . 4-2 Installation . . . . . . . . . . . . . . . . . . . . . . . . . . . . . . . . . . . . . . . . . . . . . . . . . . . . 4-3 Signals . . . . . . . . . . . . . . . . . . . . . . . . . . . . . . . . . . . . . . . . . . . . . . . . . . . . . . 4-3 Analog signals . . . . . . . . . . . . . . . . . . . . . . . . . . . . . . . . . . . . . . . . . . . . . 4-3 Digital signals . . . . . . . . . . . . . . . . . . . . . . . . . . . . . . . . . . . . . . . . . . . . . . 4-5 Pin Description Table . . . . . . . . . . . . . . . . . . . . . . . . . . . . . . . . . . . . . . . . . . . 4-5 User Port Output Enable/Disable Behavior and Signal States . . . . . . . 4-14 Reporting the Active Target Setting to an External Device . . . . . . . . . . 4-15 Setting the Active Target-Life Counter . . . . . . . . . . . . . . . . . . . . . . . . . . 4-15 Setting the Regulation Mode . . . . . . . . . . . . . . . . . . . . . . . . . . . . . . . . . 4-16 Single 24 V 37-Pin User Port . . . . . . . . . . . . . . . . . . . . . . . . . . . . . . . . . . . . . . . . 4-16 Connector . . . . . . . . . . . . . . . . . . . . . . . . . . . . . . . . . . . . . . . . . . . . . . . . . . . 4-17 Interlock Requirements . . . . . . . . . . . . . . . . . . . . . . . . . . . . . . . . . . . . . 4-18 User-Supplied Power Requirements . . . . . . . . . . . . . . . . . . . . . . . . . . . 4-18 Signals . . . . . . . . . . . . . . . . . . . . . . . . . . . . . . . . . . . . . . . . . . . . . . . . . . . . . 4-18 Analog signals . . . . . . . . . . . . . . . . . . . . . . . . . . . . . . . . . . . . . . . . . . . . 4-18 Digital signals . . . . . . . . . . . . . . . . . . . . . . . . . . . . . . . . . . . . . . . . . . . . . 4-19 Pin Descriptions . . . . . . . . . . . . . . . . . . . . . . . . . . . . . . . . . . . . . . . . . . . . . . 4-19 Single 15 V 25-Pin User Port . . . . . . . . . . . . . . . . . . . . . . . . . . . . . . . . . . . . . . . . 4-24 Overview . . . . . . . . . . . . . . . . . . . . . . . . . . . . . . . . . . . . . . . . . . . . . . . . . . . . 4-24 Interlock Requirements . . . . . . . . . . . . . . . . . . . . . . . . . . . . . . . . . . . . . . . . . 4-25 Cabling Requirements . . . . . . . . . . . . . . . . . . . . . . . . . . . . . . . . . . . . . . . . . 4-25 Signals . . . . . . . . . . . . . . . . . . . . . . . . . . . . . . . . . . . . . . . . . . . . . . . . . . . . . 4-26 Analog signals . . . . . . . . . . . . . . . . . . . . . . . . . . . . . . . . . . . . . . . . . . . . 4-26 Digital signals . . . . . . . . . . . . . . . . . . . . . . . . . . . . . . . . . . . . . . . . . . . . . 4-26 Connector and Rear-Panel Switch . . . . . . . . . . . . . . . . . . . . . . . . . . . . . . . . 4-26 Using the Connector with the REar-Panel Switch . . . . . . . . . . . . . . . . . 4-26 Connector Pin Descriptions . . . . . . . . . . . . . . . . . . . . . . . . . . . . . . . . . . 4-27 Rear-Panel Switch Settings . . . . . . . . . . . . . . . . . . . . . . . . . . . . . . . . . . 4-33 Single 15-Pin User Port . . . . . . . . . . . . . . . . . . . . . . . . . . . . . . . . . . . . . . . . . . . . 4-36 Installation . . . . . . . . . . . . . . . . . . . . . . . . . . . . . . . . . . . . . . . . . . . . . . . . . . . 4-36 Signals . . . . . . . . . . . . . . . . . . . . . . . . . . . . . . . . . . . . . . . . . . . . . . . . . . . . . 4-37 Pin Descriptions . . . . . . . . . . . . . . . . . . . . . . . . . . . . . . . . . . . . . . . . . . . . . . 4-37 Dual 24 V 37-Pin User Port . . . . . . . . . . . . . . . . . . . . . . . . . . . . . . . . . . . . . . . . . 4-39 Installation . . . . . . . . . . . . . . . . . . . . . . . . . . . . . . . . . . . . . . . . . . . . . . . . . . . 4-40 Signals . . . . . . . . . . . . . . . . . . . . . . . . . . . . . . . . . . . . . . . . . . . . . . . . . . . . . 4-41 Analog signals . . . . . . . . . . . . . . . . . . . . . . . . . . . . . . . . . . . . . . . . . . . . 4-41 Digital signals . . . . . . . . . . . . . . . . . . . . . . . . . . . . . . . . . . . . . . . . . . . . . 4-41 Pin Description Table . . . . . . . . . . . . . . . . . . . . . . . . . . . . . . . . . . . . . . . . . . 4-42 Master/Slave Pulse Port . . . . . . . . . . . . . . . . . . . . . . . . . . . . . . . . . . . . . . . . . . . 4-50 viii Table of Contents 57000097-00B Pinnacle® Plus+ 10 kW Power Supply Connector . . . . . . . . . . . . . . . . . . . . . . . . . . . . . . . . . . . . . . . . . . . . . . . . . . . 4-50 Pin Descriptions . . . . . . . . . . . . . . . . . . . . . . . . . . . . . . . . . . . . . . . . . . . . . . 4-51 Cable Configuration . . . . . . . . . . . . . . . . . . . . . . . . . . . . . . . . . . . . . . . . . . . 4-52 Sync Pulse Port . . . . . . . . . . . . . . . . . . . . . . . . . . . . . . . . . . . . . . . . . . . . . . . . . . 4-52 Connector . . . . . . . . . . . . . . . . . . . . . . . . . . . . . . . . . . . . . . . . . . . . . . . . . . . 4-52 Pin Descriptions . . . . . . . . . . . . . . . . . . . . . . . . . . . . . . . . . . . . . . . . . . . . . . 4-53 Cable Configuration . . . . . . . . . . . . . . . . . . . . . . . . . . . . . . . . . . . . . . . . . . . 4-53 DeviceNet™ Port . . . . . . . . . . . . . . . . . . . . . . . . . . . . . . . . . . . . . . . . . . . . . . . . . 4-54 Installation . . . . . . . . . . . . . . . . . . . . . . . . . . . . . . . . . . . . . . . . . . . . . . . . . . . 4-54 Pin Descriptions . . . . . . . . . . . . . . . . . . . . . . . . . . . . . . . . . . . . . . . . . . . 4-54 Rotary Switches: Baud Rate and Addressing . . . . . . . . . . . . . . . . . . . . 4-55 Operation . . . . . . . . . . . . . . . . . . . . . . . . . . . . . . . . . . . . . . . . . . . . . . . . . . . 4-55 Poll Command Message . . . . . . . . . . . . . . . . . . . . . . . . . . . . . . . . . . . . 4-56 Response Message . . . . . . . . . . . . . . . . . . . . . . . . . . . . . . . . . . . . . . . . 4-59 Explicit Messaging . . . . . . . . . . . . . . . . . . . . . . . . . . . . . . . . . . . . . . . . . 4-63 Rear Panel LEDs . . . . . . . . . . . . . . . . . . . . . . . . . . . . . . . . . . . . . . . . . . . . . 4-70 Module Status LED . . . . . . . . . . . . . . . . . . . . . . . . . . . . . . . . . . . . . . . . 4-70 Network Status LED . . . . . . . . . . . . . . . . . . . . . . . . . . . . . . . . . . . . . . . . 4-71 AE PROFIBUS Protocol . . . . . . . . . . . . . . . . . . . . . . . . . . . . . . . . . . . . . . . . . . . . 4-72 Type Files (GSD Files) . . . . . . . . . . . . . . . . . . . . . . . . . . . . . . . . . . . . . . . . . 4-73 Setting the Pinnacle Plus+ Unit’s Network Address . . . . . . . . . . . . . . . . . . . 4-73 Termination . . . . . . . . . . . . . . . . . . . . . . . . . . . . . . . . . . . . . . . . . . . . . . . . . . 4-73 Baud Rate . . . . . . . . . . . . . . . . . . . . . . . . . . . . . . . . . . . . . . . . . . . . . . . . . . . 4-73 Master Reset Command . . . . . . . . . . . . . . . . . . . . . . . . . . . . . . . . . . . . . . . . 4-74 Watch Dog Timer . . . . . . . . . . . . . . . . . . . . . . . . . . . . . . . . . . . . . . . . . . . . . 4-74 PROFIBUS-Specific Errors . . . . . . . . . . . . . . . . . . . . . . . . . . . . . . . . . . . . . . 4-74 Data Consistency . . . . . . . . . . . . . . . . . . . . . . . . . . . . . . . . . . . . . . . . . . . . . 4-75 PROFIBUS Software Commands . . . . . . . . . . . . . . . . . . . . . . . . . . . . . . . . . . . . 4-75 Transmission Rates and the Handshake Feature . . . . . . . . . . . . . . . . . . . . . 4-76 Download Packet . . . . . . . . . . . . . . . . . . . . . . . . . . . . . . . . . . . . . . . . . . . . . 4-76 Upload Packet . . . . . . . . . . . . . . . . . . . . . . . . . . . . . . . . . . . . . . . . . . . . . . . . 4-77 Status Flag Bytes . . . . . . . . . . . . . . . . . . . . . . . . . . . . . . . . . . . . . . . . . . 4-77 Output Readback Bytes (Bytes 2 Through 7) . . . . . . . . . . . . . . . . . . . . 4-80 Response/Data Bytes . . . . . . . . . . . . . . . . . . . . . . . . . . . . . . . . . . . . . . 4-80 Refresh Rates in the Upload Packet . . . . . . . . . . . . . . . . . . . . . . . . . . . 4-80 Interpreting Command Status Response (CSR) Codes . . . . . . . . . . . . . . . . 4-81 Commands 0 through 127 . . . . . . . . . . . . . . . . . . . . . . . . . . . . . . . . . . . . . . 4-82 Commands 128 through 255 . . . . . . . . . . . . . . . . . . . . . . . . . . . . . . . . . . . 4-101 Example Command Sequences . . . . . . . . . . . . . . . . . . . . . . . . . . . . . . . . . 4-121 Example 1 . . . . . . . . . . . . . . . . . . . . . . . . . . . . . . . . . . . . . . . . . . . . . . 4-121 Example 2 . . . . . . . . . . . . . . . . . . . . . . . . . . . . . . . . . . . . . . . . . . . . . . 4-121 Example 3 . . . . . . . . . . . . . . . . . . . . . . . . . . . . . . . . . . . . . . . . . . . . . . 4-121 Example 4 . . . . . . . . . . . . . . . . . . . . . . . . . . . . . . . . . . . . . . . . . . . . . . 4-122 Example 5 . . . . . . . . . . . . . . . . . . . . . . . . . . . . . . . . . . . . . . . . . . . . . . 4-122 Example 6 . . . . . . . . . . . . . . . . . . . . . . . . . . . . . . . . . . . . . . . . . . . . . . 4-122 Example 7 . . . . . . . . . . . . . . . . . . . . . . . . . . . . . . . . . . . . . . . . . . . . . . 4-122 Example 8 . . . . . . . . . . . . . . . . . . . . . . . . . . . . . . . . . . . . . . . . . . . . . . 4-123 57000097-00B Table of Contents ix Advanced Energy® Example 9 . . . . . . . . . . . . . . . . . . . . . . . . . . . . . . . . . . . . . . . . . . . . . . 4-123 Example 10 . . . . . . . . . . . . . . . . . . . . . . . . . . . . . . . . . . . . . . . . . . . . . 4-123 Passive Display Panel . . . . . . . . . . . . . . . . . . . . . . . . . . . . . . . . . . . . . . . . . . . . 4-123 Display . . . . . . . . . . . . . . . . . . . . . . . . . . . . . . . . . . . . . . . . . . . . . . . . . . . . 4-123 LEDs . . . . . . . . . . . . . . . . . . . . . . . . . . . . . . . . . . . . . . . . . . . . . . . . . . . . . . 4-124 Active Front Panel/ Pinnacle Remote Panel . . . . . . . . . . . . . . . . . . . . . . . . . . . 4-125 Connecting to the Remote Active Panel . . . . . . . . . . . . . . . . . . . . . . . . . . . 4-125 Understanding the Panel . . . . . . . . . . . . . . . . . . . . . . . . . . . . . . . . . . . . . . 4-126 Control Key . . . . . . . . . . . . . . . . . . . . . . . . . . . . . . . . . . . . . . . . . . . . . 4-126 Output Display Screen . . . . . . . . . . . . . . . . . . . . . . . . . . . . . . . . . . . . . 4-126 Soft Keys . . . . . . . . . . . . . . . . . . . . . . . . . . . . . . . . . . . . . . . . . . . . . . . 4-127 MODIFY Knob . . . . . . . . . . . . . . . . . . . . . . . . . . . . . . . . . . . . . . . . . . . 4-127 Regulation Key . . . . . . . . . . . . . . . . . . . . . . . . . . . . . . . . . . . . . . . . . . 4-127 On/Off Buttons & LEDs . . . . . . . . . . . . . . . . . . . . . . . . . . . . . . . . . . . . 4-127 Arc LED . . . . . . . . . . . . . . . . . . . . . . . . . . . . . . . . . . . . . . . . . . . . . . . . 4-127 Control Panel Interface . . . . . . . . . . . . . . . . . . . . . . . . . . . . . . . . . . . . . . . . . . . 4-128 Output Power Key . . . . . . . . . . . . . . . . . . . . . . . . . . . . . . . . . . . . . . . . . . . . 4-128 Control Key . . . . . . . . . . . . . . . . . . . . . . . . . . . . . . . . . . . . . . . . . . . . . . . . . 4-128 Regulation Key . . . . . . . . . . . . . . . . . . . . . . . . . . . . . . . . . . . . . . . . . . . . . . 4-129 Two-Line Output Display Screen . . . . . . . . . . . . . . . . . . . . . . . . . . . . . . . . 4-129 Setting the Reverse Time, Frequency, and Set point . . . . . . . . . . . . . 4-131 Soft Keys . . . . . . . . . . . . . . . . . . . . . . . . . . . . . . . . . . . . . . . . . . . . . . . . . . 4-131 MODIFY Knob . . . . . . . . . . . . . . . . . . . . . . . . . . . . . . . . . . . . . . . . . . . . . . 4-131 Control Panel Controls . . . . . . . . . . . . . . . . . . . . . . . . . . . . . . . . . . . . . . . . . . . 4-131 Understanding the Menu Options . . . . . . . . . . . . . . . . . . . . . . . . . . . . . . . . . . . 4-132 Using the Service Functions . . . . . . . . . . . . . . . . . . . . . . . . . . . . . . . . . . . . . . . 4-134 Checking Service-type Statistics . . . . . . . . . . . . . . . . . . . . . . . . . . . . . . . . 4-135 Checking the Total Energy Output . . . . . . . . . . . . . . . . . . . . . . . . . . . . 4-135 Checking the Amount of Idle Run Time . . . . . . . . . . . . . . . . . . . . . . . . 4-135 Checking the Number of Faults . . . . . . . . . . . . . . . . . . . . . . . . . . . . . . 4-135 Checking the Number of Cycles . . . . . . . . . . . . . . . . . . . . . . . . . . . . . 4-136 Debugging Your Unit . . . . . . . . . . . . . . . . . . . . . . . . . . . . . . . . . . . . . . . . . 4-136 Checking Your Hardware Configuration . . . . . . . . . . . . . . . . . . . . . . . 4-136 Checking Your Software Logic . . . . . . . . . . . . . . . . . . . . . . . . . . . . . . 4-136 Checking Your ROM . . . . . . . . . . . . . . . . . . . . . . . . . . . . . . . . . . . . . . . . . . 4-138 Checking Your Software Versions . . . . . . . . . . . . . . . . . . . . . . . . . . . . . . . 4-138 Using the Supply Functions . . . . . . . . . . . . . . . . . . . . . . . . . . . . . . . . . . . . . . . . 4-138 Setting the AE Bus Timeout . . . . . . . . . . . . . . . . . . . . . . . . . . . . . . . . . . . . 4-139 Setting the Supply Parameters . . . . . . . . . . . . . . . . . . . . . . . . . . . . . . . . . . 4-139 Setting Pulse Parameters . . . . . . . . . . . . . . . . . . . . . . . . . . . . . . . . . . . . . . 4-139 Enabling Pulsing MOde . . . . . . . . . . . . . . . . . . . . . . . . . . . . . . . . . . . . 4-139 Selecting Constant Duty Cycle . . . . . . . . . . . . . . . . . . . . . . . . . . . . . . 4-140 Setting Sync Pulse Hard Arc Detection Broadcast . . . . . . . . . . . . . . . 4-140 Setting The Unit as a Sync Pulse Transmitter, Receiver, or StandAlone . 4141 Setting the Voltage Threshold . . . . . . . . . . . . . . . . . . . . . . . . . . . . . . . 4-141 Setting the Program Source . . . . . . . . . . . . . . . . . . . . . . . . . . . . . . . . . . . . 4-141 x Table of Contents 57000097-00B Pinnacle® Plus+ 10 kW Power Supply Setting the Panel Mode . . . . . . . . . . . . . . . . . . . . . . . . . . . . . . . . . . . . . . . . 4-142 Selecting Remote or Local Mode . . . . . . . . . . . . . . . . . . . . . . . . . . . . . 4-142 Selecting a Lock Code . . . . . . . . . . . . . . . . . . . . . . . . . . . . . . . . . . . . . 4-142 Selecting the Number of Clicks . . . . . . . . . . . . . . . . . . . . . . . . . . . . . . 4-142 Using Process Functions . . . . . . . . . . . . . . . . . . . . . . . . . . . . . . . . . . . . . . . . . . 4-143 Monitoring Your Process . . . . . . . . . . . . . . . . . . . . . . . . . . . . . . . . . . . . . . . 4-143 Viewing the Over-Voltage Density . . . . . . . . . . . . . . . . . . . . . . . . . . . . 4-143 Resetting the over-Voltage Density . . . . . . . . . . . . . . . . . . . . . . . . . . . 4-144 Setting the Over-Voltage Timer . . . . . . . . . . . . . . . . . . . . . . . . . . . . . . 4-144 Viewing the Over-Current Density . . . . . . . . . . . . . . . . . . . . . . . . . . . . 4-144 Resetting the Over-Current Density . . . . . . . . . . . . . . . . . . . . . . . . . . . 4-145 Setting the Over-Current Timer . . . . . . . . . . . . . . . . . . . . . . . . . . . . . . 4-145 Setting the Out-of-Set point Timer . . . . . . . . . . . . . . . . . . . . . . . . . . . . 4-145 Changing the Target Functions . . . . . . . . . . . . . . . . . . . . . . . . . . . . . . 4-146 Setting Process Limits . . . . . . . . . . . . . . . . . . . . . . . . . . . . . . . . . . . . . . . . 4-147 Setting a Strike Voltage Limit . . . . . . . . . . . . . . . . . . . . . . . . . . . . . . . . 4-147 Setting a Maximum Limit for Output Voltage . . . . . . . . . . . . . . . . . . . . 4-148 Setting the Maximum Limit for Output Current . . . . . . . . . . . . . . . . . . . 4-148 Setting the Maximum Limit for Output Power . . . . . . . . . . . . . . . . . . . 4-148 Setting the Gross Short Circuit Current Limit . . . . . . . . . . . . . . . . . . . . 4-149 Setting Arc Handling . . . . . . . . . . . . . . . . . . . . . . . . . . . . . . . . . . . . . . . . . . 4-149 Setting the Micro Arc Trip Level . . . . . . . . . . . . . . . . . . . . . . . . . . . . . . 4-149 Setting the Arc Count Limit . . . . . . . . . . . . . . . . . . . . . . . . . . . . . . . . . 4-150 Setting the Hard Arc Shutdown Time . . . . . . . . . . . . . . . . . . . . . . . . . . 4-150 Viewing the Arc Density . . . . . . . . . . . . . . . . . . . . . . . . . . . . . . . . . . . . 4-150 Setting the Sequential Micro Arc Count and Time . . . . . . . . . . . . . . . . 4-151 Enabling Arc Handling . . . . . . . . . . . . . . . . . . . . . . . . . . . . . . . . . . . . . 4-151 Setting Control Parameters . . . . . . . . . . . . . . . . . . . . . . . . . . . . . . . . . . . . . 4-152 Setting Recipes . . . . . . . . . . . . . . . . . . . . . . . . . . . . . . . . . . . . . . . . . . . . . . 4-152 Setting Joule Mode . . . . . . . . . . . . . . . . . . . . . . . . . . . . . . . . . . . . . . . . . . . 4-155 Setting the Joule Set point . . . . . . . . . . . . . . . . . . . . . . . . . . . . . . . . . . 4-155 Setting the Joule Threshold . . . . . . . . . . . . . . . . . . . . . . . . . . . . . . . . . 4-155 Setting the Ramp . . . . . . . . . . . . . . . . . . . . . . . . . . . . . . . . . . . . . . . . . . . . 4-156 Standard Serial (Flash) Port . . . . . . . . . . . . . . . . . . . . . . . . . . . . . . . . . . . . . . . 4-157 Standard Serial Port Description . . . . . . . . . . . . . . . . . . . . . . . . . . . . . . . . . 4-157 Standard Serial Port Pin Descriptions . . . . . . . . . . . . . . . . . . . . . . . . . 4-158 Transmission Parameters . . . . . . . . . . . . . . . . . . . . . . . . . . . . . . . . . . . . . . 4-158 AE Bus (Host) Port . . . . . . . . . . . . . . . . . . . . . . . . . . . . . . . . . . . . . . . . . . . . . . . 4-159 Pin Descriptions . . . . . . . . . . . . . . . . . . . . . . . . . . . . . . . . . . . . . . . . . . . . . 4-159 Transmission Parameters . . . . . . . . . . . . . . . . . . . . . . . . . . . . . . . . . . . . . . 4-160 Switch Settings . . . . . . . . . . . . . . . . . . . . . . . . . . . . . . . . . . . . . . . . . . . . . . 4-161 Setting the Pinnacle Plus+ Unit’s AE BUS Address . . . . . . . . . . . . . . 4-164 Setting Baud Rates and Communication Mode . . . . . . . . . . . . . . . . . . 4-165 AE Bus Communications . . . . . . . . . . . . . . . . . . . . . . . . . . . . . . . . . . . . . . . . . . 4-166 AE Bus Protocol . . . . . . . . . . . . . . . . . . . . . . . . . . . . . . . . . . . . . . . . . . . . . 4-166 Header . . . . . . . . . . . . . . . . . . . . . . . . . . . . . . . . . . . . . . . . . . . . . . . . . 4-167 Command . . . . . . . . . . . . . . . . . . . . . . . . . . . . . . . . . . . . . . . . . . . . . . 4-167 57000097-00B Table of Contents xi Advanced Energy® Optional Length Byte . . . . . . . . . . . . . . . . . . . . . . . . . . . . . . . . . . . . . . 4-167 Data (Data Bytes) . . . . . . . . . . . . . . . . . . . . . . . . . . . . . . . . . . . . . . . . 4-167 Checksum . . . . . . . . . . . . . . . . . . . . . . . . . . . . . . . . . . . . . . . . . . . . . . 4-168 Creating an Ideal AE Bus Communications Transaction . . . . . . . . . . . . . . 4-168 Understanding Command Status Response (CSR) Codes . . . . . . . . . . . . 4-170 AE Bus Commands . . . . . . . . . . . . . . . . . . . . . . . . . . . . . . . . . . . . . . . . . . 4-172 Chapter 5. Installation and Operation Preparing to Install the Unit . . . . . . . . . . . . . . . . . . . . . . . . . . . . . . . . . . . . . . . . . . 5-1 Meeting Spacing Requirements . . . . . . . . . . . . . . . . . . . . . . . . . . . . . . . . . . . 5-1 Cooling Requirements . . . . . . . . . . . . . . . . . . . . . . . . . . . . . . . . . . . . . . . . . . 5-1 Cabinet Design . . . . . . . . . . . . . . . . . . . . . . . . . . . . . . . . . . . . . . . . . . . . 5-2 Installation Requirements . . . . . . . . . . . . . . . . . . . . . . . . . . . . . . . . . . . . . . . . 5-5 Unpacking the Unit . . . . . . . . . . . . . . . . . . . . . . . . . . . . . . . . . . . . . . . . . . . . . 5-5 Installing the Unit . . . . . . . . . . . . . . . . . . . . . . . . . . . . . . . . . . . . . . . . . . . . . . . . . . 5-5 Grounding . . . . . . . . . . . . . . . . . . . . . . . . . . . . . . . . . . . . . . . . . . . . . . . . . . . . 5-6 Connecting the Contactor Intlk Port . . . . . . . . . . . . . . . . . . . . . . . . . . . . . . . . 5-7 Connecting a Remote Passive Panel . . . . . . . . . . . . . . . . . . . . . . . . . . . . . . . 5-8 Connecting a Pinnacle Remote Active Panel . . . . . . . . . . . . . . . . . . . . . . . . . 5-8 Connecting to the Standard Serial Port . . . . . . . . . . . . . . . . . . . . . . . . . . . . . 5-8 Connecting for Serial (Host) Port Control . . . . . . . . . . . . . . . . . . . . . . . . . . . . 5-8 Connecting for DeviceNet™ Control . . . . . . . . . . . . . . . . . . . . . . . . . . . . . . . . 5-9 Connecting for User Port Control . . . . . . . . . . . . . . . . . . . . . . . . . . . . . . . . . . 5-9 Connecting Input Power . . . . . . . . . . . . . . . . . . . . . . . . . . . . . . . . . . . . . . . . . 5-9 Input Power Cable Requirements . . . . . . . . . . . . . . . . . . . . . . . . . . . . . 5-10 Five-Terminal Input Connector . . . . . . . . . . . . . . . . . . . . . . . . . . . . . . . 5-10 Connecting Output Power . . . . . . . . . . . . . . . . . . . . . . . . . . . . . . . . . . . . . . . 5-10 Output Power Cable Recommendations . . . . . . . . . . . . . . . . . . . . . . . . 5-11 Two-Terminal, Multicontact Output Connector . . . . . . . . . . . . . . . . . . . 5-12 Three-Terminal, Multicontact Output Connector . . . . . . . . . . . . . . . . . . 5-17 UHF Output Connector . . . . . . . . . . . . . . . . . . . . . . . . . . . . . . . . . . . . . 5-19 Connecting for Master/Slave Operation . . . . . . . . . . . . . . . . . . . . . . . . . . . . 5-21 Understanding Master/Slave Operation . . . . . . . . . . . . . . . . . . . . . . . . . 5-22 Master/Slave Host Card Interface . . . . . . . . . . . . . . . . . . . . . . . . . . . . . 5-22 Configuring a Master/Slave System . . . . . . . . . . . . . . . . . . . . . . . . . . . 5-23 Master/Slave Configuration Example . . . . . . . . . . . . . . . . . . . . . . . . . . 5-24 Connecting for Sync Pulse Operation . . . . . . . . . . . . . . . . . . . . . . . . . . . . . . 5-25 Understanding Sync Pulse Operation . . . . . . . . . . . . . . . . . . . . . . . . . . 5-25 Configuring for Sync Pulse Operation . . . . . . . . . . . . . . . . . . . . . . . . . . 5-26 Sync Pulse Configuration Examples . . . . . . . . . . . . . . . . . . . . . . . . . . . 5-26 Rear Panel Drawing . . . . . . . . . . . . . . . . . . . . . . . . . . . . . . . . . . . . . . . . . . . 5-29 Operating the Unit . . . . . . . . . . . . . . . . . . . . . . . . . . . . . . . . . . . . . . . . . . . . . . . . 5-30 Normal Operation . . . . . . . . . . . . . . . . . . . . . . . . . . . . . . . . . . . . . . . . . . . . . 5-30 Understanding Pulsing Modes . . . . . . . . . . . . . . . . . . . . . . . . . . . . . . . . . . . 5-32 Pulsing Behavior When Using Voltage . . . . . . . . . . . . . . . . . . . . . . . . . 5-32 Modes of Operation: Low Power Versus High Power . . . . . . . . . . . . . . . . . . 5-34 xii Table of Contents 57000097-00B Pinnacle® Plus+ 10 kW Power Supply Low Power Operation . . . . . . . . . . . . . . . . . . . . . . . . . . . . . . . . . . . . . . 5-35 High Power Operation . . . . . . . . . . . . . . . . . . . . . . . . . . . . . . . . . . . . . . 5-36 Understanding Arc Handling . . . . . . . . . . . . . . . . . . . . . . . . . . . . . . . . . . . . . 5-37 Voltage Arc (V-Arc) Trip Level . . . . . . . . . . . . . . . . . . . . . . . . . . . . . . . . 5-37 Understanding Frequency and Reverse Time Settings . . . . . . . . . . . . . . . . 5-37 Master/Slave System Operation . . . . . . . . . . . . . . . . . . . . . . . . . . . . . . . . . . . . . 5-38 Master/Slave Input On/Off Combinations . . . . . . . . . . . . . . . . . . . . . . . . . . . 5-39 Monitoring the Master/Slave System . . . . . . . . . . . . . . . . . . . . . . . . . . . . . . 5-39 Clearing Faults in a Master/Slave System . . . . . . . . . . . . . . . . . . . . . . . . . . 5-39 Sync Pulse Operation . . . . . . . . . . . . . . . . . . . . . . . . . . . . . . . . . . . . . . . . . . . . . 5-40 Monitoring the Sync Pulse System . . . . . . . . . . . . . . . . . . . . . . . . . . . . . . . . 5-40 Clearing Faults in a Sync Pulse System . . . . . . . . . . . . . . . . . . . . . . . . . . . . 5-41 Maintenance . . . . . . . . . . . . . . . . . . . . . . . . . . . . . . . . . . . . . . . . . . . . . . . . . . . . 5-41 Consumable Parts . . . . . . . . . . . . . . . . . . . . . . . . . . . . . . . . . . . . . . . . . . . . 5-41 Chapter 6. Troubleshooting and Global Services Before Calling AE Global Services . . . . . . . . . . . . . . . . . . . . . . . . . . . . . . . . . . . . 6-1 First Check . . . . . . . . . . . . . . . . . . . . . . . . . . . . . . . . . . . . . . . . . . . . . . . . . . . 6-1 Checks with the Unit Powered Off . . . . . . . . . . . . . . . . . . . . . . . . . . . . . . . . . 6-2 Checks with the Unit Powered On . . . . . . . . . . . . . . . . . . . . . . . . . . . . . . . . . 6-2 Pinnacle Plus+ Basic Functionality Test . . . . . . . . . . . . . . . . . . . . . . . . . . . . . 6-3 Equipment Needed . . . . . . . . . . . . . . . . . . . . . . . . . . . . . . . . . . . . . . . . . 6-4 Equipment Setup . . . . . . . . . . . . . . . . . . . . . . . . . . . . . . . . . . . . . . . . . . . 6-5 To Check Basic Unit Functionality . . . . . . . . . . . . . . . . . . . . . . . . . . . . . . 6-5 Passive Front Panel Help Codes . . . . . . . . . . . . . . . . . . . . . . . . . . . . . . . . . . 6-7 Troubleshooting LEDs . . . . . . . . . . . . . . . . . . . . . . . . . . . . . . . . . . . . . . . . . . 6-7 Checks if the Output Does Not Turn On . . . . . . . . . . . . . . . . . . . . . . . . . . . . . 6-9 Help Code Troubleshooting Table . . . . . . . . . . . . . . . . . . . . . . . . . . . . . . . . . 6-9 Clearing the Error Code . . . . . . . . . . . . . . . . . . . . . . . . . . . . . . . . . . . . . . . . 6-15 Error Code Troubleshooting . . . . . . . . . . . . . . . . . . . . . . . . . . . . . . . . . . . . . 6-16 Contacting AE Global Services . . . . . . . . . . . . . . . . . . . . . . . . . . . . . . . . . . . . . . 6-26 Advanced Energy World Headquarters, 24 x 7 Technical Support . . . . . . . . 6-27 Returning Units for Repair . . . . . . . . . . . . . . . . . . . . . . . . . . . . . . . . . . . . . . . . . . 6-27 57000097-00B 1-xiii Advanced Energy® 1-xiv 57000097-00B Pinnacle® Plus+ 10 kW Power Supply List of Figures Figure 2-1. Pinnacle Plus+ functional block diagram. . . . . . . . . . . . . . . . . . . . . . . . . . . 2-2 Figure 3-1. Dimensional drawing . . . . . . . . . . . . . . . . . . . . . . . . . . . . . . . . . . . . . . . . . 3-5 Figure 3-2. Pulse reversal times and self-run frequencies . . . . . . . . . . . . . . . . . . . . . . 3-9 Figure 3-3. Pulse reversal time as a function of voltage limit (V-Limit) . . . . . . . . . . . . 3-13 Figure 3-4. Operating range . . . . . . . . . . . . . . . . . . . . . . . . . . . . . . . . . . . . . . . . . . . . 3-17 Figure 3-5. Impedance range . . . . . . . . . . . . . . . . . . . . . . . . . . . . . . . . . . . . . . . . . . . 3-17 Figure 4-1. 37-pin subminiature-D female connector . . . . . . . . . . . . . . . . . . . . . . . . . . 4-2 Figure 4-2. 37-pin subminiature-D male and female connector . . . . . . . . . . . . . . . . . 4-17 Figure 4-3. 25-pin subminiature-D female connector . . . . . . . . . . . . . . . . . . . . . . . . . 4-27 Figure 4-4. Rear-panel switch . . . . . . . . . . . . . . . . . . . . . . . . . . . . . . . . . . . . . . . . . . . 4-27 Figure 4-5. 15-pin User port . . . . . . . . . . . . . . . . . . . . . . . . . . . . . . . . . . . . . . . . . . . . 4-36 Figure 4-6. 37-pin subminiature-D male and female connector . . . . . . . . . . . . . . . . . 4-39 Figure 4-7. Master/Slave Pulse port connector . . . . . . . . . . . . . . . . . . . . . . . . . . . . . 4-50 Figure 4-8. Master/Slave Pulse port cable . . . . . . . . . . . . . . . . . . . . . . . . . . . . . . . . 4-52 Figure 4-9. Sync Pulse connector . . . . . . . . . . . . . . . . . . . . . . . . . . . . . . . . . . . . . . . . 4-52 Figure 4-10. Sync Pulse cable . . . . . . . . . . . . . . . . . . . . . . . . . . . . . . . . . . . . . . . . . . 4-53 Figure 4-11. DeviceNet™ port with pin designations . . . . . . . . . . . . . . . . . . . . . . . . . 4-54 Figure 4-12. DeviceNet rotary switches and LEDs . . . . . . . . . . . . . . . . . . . . . . . . . . . 4-55 Figure 4-13. Remote active panel connector . . . . . . . . . . . . . . . . . . . . . . . . . . . . . . 4-125 Figure 4-14. Control panel . . . . . . . . . . . . . . . . . . . . . . . . . . . . . . . . . . . . . . . . . . . . 4-128 Figure 4-15. Two-line output display screen . . . . . . . . . . . . . . . . . . . . . . . . . . . . . . . 4-130 Figure 4-16. Control panel main menu functions . . . . . . . . . . . . . . . . . . . . . . . . . . . 4-132 Figure 4-17. Service menu map . . . . . . . . . . . . . . . . . . . . . . . . . . . . . . . . . . . . . . . . 4-133 Figure 4-18. Supply menu map . . . . . . . . . . . . . . . . . . . . . . . . . . . . . . . . . . . . . . . . . 4-133 Figure 4-19. Process menu map . . . . . . . . . . . . . . . . . . . . . . . . . . . . . . . . . . . . . . . . 4-134 Figure 4-20. Standard Serial port . . . . . . . . . . . . . . . . . . . . . . . . . . . . . . . . . . . . . . . 4-158 Figure 4-21. AE Bus port connector . . . . . . . . . . . . . . . . . . . . . . . . . . . . . . . . . . . . . 4-159 Figure 4-22. Rocker DIP switch . . . . . . . . . . . . . . . . . . . . . . . . . . . . . . . . . . . . . . . . 4-161 Figure 4-23. Slide DIP switch . . . . . . . . . . . . . . . . . . . . . . . . . . . . . . . . . . . . . . . . . . 4-162 Figure 4-24. Orientation of the AE Bus port and external DIP switch on the back panel 4162 Figure 4-25. Graphic representation of an AE Bus message packet . . . . . . . . . . . . 4-166 Figure 4-26. AE Bus communications transaction . . . . . . . . . . . . . . . . . . . . . . . . . . 4-169 Figure 4-27. AE Bus communications transaction example . . . . . . . . . . . . . . . . . . . 4-172 Figure 5-1. Clearances for Pinnacle Plus+ power supplies stacked in a cabinet . . . . . 5-4 Figure 5-2. Contactor Intlk port connector . . . . . . . . . . . . . . . . . . . . . . . . . . . . . . . . . . . 5-7 Figure 5-3. Actual size of PG-11 style strain relief fitting (28 mm diameter) . . . . . . . . 5-12 Figure 5-4. Actual size PG-16 style strain relief fitting (34 mm diameter) . . . . . . . . . . 5-12 Figure 5-5. PG-style output box and connector . . . . . . . . . . . . . . . . . . . . . . . . . . . . . 5-13 Figure 5-6. M32-style output box and connector . . . . . . . . . . . . . . . . . . . . . . . . . . . . . 5-14 Figure 5-7. Optimal output connection . . . . . . . . . . . . . . . . . . . . . . . . . . . . . . . . . . . . 5-16 Figure 5-8. PG-36-style strain relief fitting . . . . . . . . . . . . . . . . . . . . . . . . . . . . . . . . . . 5-18 57000097-00B List of Figures xv Advanced Energy® Figure 5-9. PG-36-style output box and connector . . . . . . . . . . . . . . . . . . . . . . . . . . . 5-19 Figure 5-10. UHF connector and sleeve assembly . . . . . . . . . . . . . . . . . . . . . . . . . . . 5-20 Figure 5-11. Rear view of UHF housing without interlock (back plate removed) . . . . 5-21 Figure 5-12. Rear view of UHF housing with interlock (back plate removed) . . . . . . . 5-21 Figure 5-13. Master/slave Host card interface . . . . . . . . . . . . . . . . . . . . . . . . . . . . . . 5-23 Figure 5-14. Master/slave system configuration example . . . . . . . . . . . . . . . . . . . . . . 5-25 Figure 5-15. Sync Pulse system . . . . . . . . . . . . . . . . . . . . . . . . . . . . . . . . . . . . . . . . . 5-27 Figure 5-16. Sync Pulse master/slave configuration . . . . . . . . . . . . . . . . . . . . . . . . . . 5-28 Figure 5-17. Rear view . . . . . . . . . . . . . . . . . . . . . . . . . . . . . . . . . . . . . . . . . . . . . . . . 5-29 Figure 5-18. Pulsing begins after a 300 ms filter time (if below threshold) . . . . . . . . . 5-33 Figure 5-19. Ignition cycle if unit remains above threshold . . . . . . . . . . . . . . . . . . . . . 5-33 Figure 5-20. Pulsing behavior when using voltage threshold . . . . . . . . . . . . . . . . . . . 5-34 Figure 6-1. Equipment setup for Pinnacle Plus+ basic functionality test . . . . . . . . . . . 6-5 xvi List of Figures 57000097-00B Pinnacle® Plus+ 10 kW Power Supply List of Tables Table 3-1. Functional Specifications . . . . . . . . . . . . . . . . . . . . . . . . . . . . . . . . . . . . . . . 3-1 Table 3-2. Physical Specifications . . . . . . . . . . . . . . . . . . . . . . . . . . . . . . . . . . . . . . . . 3-3 Table 3-3. Electrical Specifications . . . . . . . . . . . . . . . . . . . . . . . . . . . . . . . . . . . . . . . . 3-6 Table 3-4. Reverse Time Given a Self-Run Frequency . . . . . . . . . . . . . . . . . . . . . . . . 3-9 Table 3-5. Reverse Time as a Function of Voltage Limit (V-Limit) . . . . . . . . . . . . . . . 3-13 Table 3-6. Climatic Specifications (per EN50178) . . . . . . . . . . . . . . . . . . . . . . . . . . . 3-18 Table 3-7. Environmental standard specifications . . . . . . . . . . . . . . . . . . . . . . . . . . . 3-18 Table 3-8. Coolant Specifications . . . . . . . . . . . . . . . . . . . . . . . . . . . . . . . . . . . . . . . . 3-19 Table 4-1. Identifying the User port . . . . . . . . . . . . . . . . . . . . . . . . . . . . . . . . . . . . . . . . 4-1 Table 4-2. Single 15 V 37-Pin User Port Pin Descriptions . . . . . . . . . . . . . . . . . . . . . . 4-5 Table 4-3. User Port Output Enable/Disable Behavior and Signal States . . . . . . . . . . . . . . . . . . . . . . . . . . . . . . . . . . . . . . . 4-14 Table 4-4. Cathode Switch (pin 20 and pin 1) . . . . . . . . . . . . . . . . . . . . . . . . . . . . . . . 4-15 Table 4-5. Target Life Counter (pin 34, 35, and 4) . . . . . . . . . . . . . . . . . . . . . . . . . . . 4-15 Table 4-6. Regulation Mode (pin 5 and pin 6) . . . . . . . . . . . . . . . . . . . . . . . . . . . . . . . 4-16 Table 4-7. Single 24 V 37-pin User Port Pin Description . . . . . . . . . . . . . . . . . . . . . . 4-19 Table 4-8. Target Life Counter Check (Pin 20 and Pin 1) . . . . . . . . . . . . . . . . . . . . . . 4-23 Table 4-9. Select Target Life Counter (Pin 34, Pin 35, and Pin 4) . . . . . . . . . . . . . . . 4-23 Table 4-10. Regulation Mode (pin 5 and pin 6) . . . . . . . . . . . . . . . . . . . . . . . . . . . . . . 4-24 Table 4-11. Single 15 V 25-Pin User Port Pin Description . . . . . . . . . . . . . . . . . . . . . 4-28 Table 4-12. Rear-Panel Switch Setting Descriptions . . . . . . . . . . . . . . . . . . . . . . . . . 4-34 Table 4-13. Single 15-Pin User Port Pin Descriptions . . . . . . . . . . . . . . . . . . . . . . . . 4-37 Table 4-14. Dual 24 V 37-Pin User Port Pin Descriptions . . . . . . . . . . . . . . . . . . . . . . 4-42 Table 4-15. Regulation Mode (pin 7 and pin 25) Controlling Unit A . . . . . . . . . . . . . . 4-49 Table 4-16. Regulation Mode (pin 13 and 32) Controlling Unit B . . . . . . . . . . . . . . . . 4-49 Table 4-17. Master/Slave Pulse Port Pin and Signal Descriptions . . . . . . . . . . . . . . 4-51 Table 4-18. Sync Pulse Port Pin and Signal Descriptions . . . . . . . . . . . . . . . . . . . . . 4-53 Table 4-19. DeviceNet™ Pin Descriptions . . . . . . . . . . . . . . . . . . . . . . . . . . . . . . . . . 4-54 Table 4-20. Assembly object data poll, instance 1 . . . . . . . . . . . . . . . . . . . . . . . . . . . 4-57 Table 4-21. Assembly object data poll, optional instance 1 and instance 101 . . . . . . 4-58 Table 4-22. Assembly object data poll, legacy instance 1 . . . . . . . . . . . . . . . . . . . . . 4-58 Table 4-23. Assembly object, data response (instance 2) . . . . . . . . . . . . . . . . . . . . . 4-59 Table 4-24. Assembly object, data response (optional instance 2) . . . . . . . . . . . . . . . 4-60 Table 4-25. Assembly object, data response (instance 102) . . . . . . . . . . . . . . . . . . . 4-61 Table 4-26. Instance 1 attributes . . . . . . . . . . . . . . . . . . . . . . . . . . . . . . . . . . . . . . . . . 4-63 Table 4-27. Common services codes . . . . . . . . . . . . . . . . . . . . . . . . . . . . . . . . . . . . . 4-70 Table 4-28. MOD Status LED . . . . . . . . . . . . . . . . . . . . . . . . . . . . . . . . . . . . . . . . . . . 4-70 Table 4-29. Network Status LED . . . . . . . . . . . . . . . . . . . . . . . . . . . . . . . . . . . . . . . . . 4-71 Table 4-30. Configuration of Download Bytes (Outbytes) . . . . . . . . . . . . . . . . . . . . . . 4-76 Table 4-31. Configuration of Upload packet (inbytes) . . . . . . . . . . . . . . . . . . . . . . . . . 4-77 Table 4-32. Upload Status Bytes . . . . . . . . . . . . . . . . . . . . . . . . . . . . . . . . . . . . . . . . 4-78 Table 4-33. Upload status bytes (joule recipe configuration) . . . . . . . . . . . . . . . . . . . 4-79 57000097-00B List of Tables xvii Advanced Energy® Table 4-34. Command Status Response (CSR) Codes . . . . . . . . . . . . . . . . . . . . . . . 4-81 Table 4-35. PROFIBUS Commands 0 to 127 . . . . . . . . . . . . . . . . . . . . . . . . . . . . . . . 4-83 Table 4-36. PROFIBUS Commands 128 to 255 . . . . . . . . . . . . . . . . . . . . . . . . . . . . 4-102 Table 4-37. Display Panel LEDs . . . . . . . . . . . . . . . . . . . . . . . . . . . . . . . . . . . . . . . . 4-124 Table 4-38. Remote Panel Pin Descriptions . . . . . . . . . . . . . . . . . . . . . . . . . . . . . . . 4-125 Table 4-42. Serial Port Pin Descriptions . . . . . . . . . . . . . . . . . . . . . . . . . . . . . . . . . . 4-158 Table 4-43. AE Bus Host Port Pin Descriptions . . . . . . . . . . . . . . . . . . . . . . . . . . . . 4-159 Table 4-44. AE Bus Address Settings . . . . . . . . . . . . . . . . . . . . . . . . . . . . . . . . . . . . 4-164 Table 4-45. Setting Switch 8 . . . . . . . . . . . . . . . . . . . . . . . . . . . . . . . . . . . . . . . . . . . 4-165 Table 4-46. Baud Rate Settings . . . . . . . . . . . . . . . . . . . . . . . . . . . . . . . . . . . . . . . . 4-165 Table 4-47. Command Status Response (CSR) Codes . . . . . . . . . . . . . . . . . . . . . . 4-170 Table 4-48. AE Bus Commands . . . . . . . . . . . . . . . . . . . . . . . . . . . . . . . . . . . . . . . . 4-172 Table 5-1. Minimum CFM Required for a Pinnacle Plus+ Power Supply . . . . . . . . . . . 5-3 Table 5-2. Approximate Cooling Requirements for Three Pinnacle Plus+ Power Supplies Mounted in a Cabinet . . . . . . . . . . . . . . . . . . . . . . . . . . . . . . . . . . . . . . . . . . . . 5-3 Table 5-3. Low power operation mode . . . . . . . . . . . . . . . . . . . . . . . . . . . . . . . . . . . . 5-35 Table 5-4. High power operation mode . . . . . . . . . . . . . . . . . . . . . . . . . . . . . . . . . . . . 5-36 Table 5-5. Errors Associated with the Master/Slave System . . . . . . . . . . . . . . . . . . . 5-40 Table 5-6. Errors Associated With The Pinnacle Plus+ Sync Pulse System . . . . . . . 5-41 Table 6-1. Passive Front Panel Help Codes . . . . . . . . . . . . . . . . . . . . . . . . . . . . . . . . . 6-7 Table 6-2. Troubleshooting LEDs for . . . . . . . . . . . . . . . . . . . . . . . . . . . . . . . . . . . . . . 6-8 Table 6-3. Help Code Troubleshooting Table . . . . . . . . . . . . . . . . . . . . . . . . . . . . . . . 6-10 Table 6-4. Error Code Troubleshooting Table . . . . . . . . . . . . . . . . . . . . . . . . . . . . . . 6-16 Table 6-5. AE Global Services contact information . . . . . . . . . . . . . . . . . . . . . . . . . . 6-27 xviii List of Tables 57000097-00B Pinnacle® Plus+ 10 kW Power Supply Chapter 1 Safety and Product Compliance Guidelines IMPORTANT SAFETY INFORMATION To ensure safe installation and operation of the Advanced Energy® Pinnacle Plus+, read and understand this manual before attempting to install and operate this unit. At a minimum, read and follow the safety instructions and practices documented under “Safety Guidelines” on page 1-2. 57000097-00B Safety and Product Compliance Guidelines 1-1 Advanced Energy® DANGER, WARNING, AND CAUTION BOXES IN THE MANUAL This symbol represents important notes concerning potential harm to people, this unit, or associated equipment. Advanced Energy® includes this symbol in Danger, Warning, and Caution boxes to identify specific levels of hazard seriousness. DANGER indicates an imminently hazardous situation that, if not avoided, will result in death or serious injury. DANGER is limited to the most extreme situations. WARNING indicates a potentially hazardous situation that, if not avoided, could result in death or serious injury, and/or property damage. CAUTION indicates a potentially hazardous situation that, if not avoided, could result in minor or moderate injury, and/or damage to property. CAUTION is also used for property-damage-only accidents. SAFETY GUIDELINES Review the following information before attempting to install and operate the product. Rules for Safe Installation and Operation Please note the following rules: • Do not attempt to install or operate this equipment without proper training. • Ensure that this unit is properly grounded (see also “Grounding” on page 5-6). • Ensure that all cables are properly connected. 1-2 Safety and Product Compliance Guidelines 57000097-00B Pinnacle® Plus+ 10 kW Power Supply • Verify that input line voltage and current capacity are within specifications before turning on the power supplies (see the “Electrical Specifications” section in Chapter 3). • Use proper electrostatic discharge (ESD) and lockout/tagout precautions. • Always be careful around this equipment. INTERPRETING PRODUCT LABELS The following labels may appear on your unit: The product warranty is void if you remove the power supply box cover. Contact AE Global Services for more information. Capacitor discharge warning (5 minutes) Capacitor discharge warning (10 minutes) CE label Earth ground 57000097-00B Safety and Product Compliance Guidelines 1-3 Advanced Energy® Protective earth ground Hazardous voltage Hazardous voltage Hot surface No user-serviceable parts Nonionizing radiation NRTL: Nationally Recognized Testing Laboratory Refer to manual for more information 1-4 Safety and Product Compliance Guidelines 57000097-00B Pinnacle® Plus+ 10 kW Power Supply SEMI F47 compliant Short circuit protected PRODUCT COMPLIANCE The following sections include information about unit compliance and certification, including the conditions of use required to be in compliance with the standards and directives. Product Certification Certain options of this product may be certified by: • CE Marking – Self-declaration, assessed by AE Corporate Compliance • EMC measurements – Verified by the AE Corporate Compliance Lab and/or an accredited third party lab • NRTL – Safety certified by CSA International, a Nationally Recognized Testing Laboratory For more information, refer to the Certificate or Letter of Conformity (US) or Declaration of Conformity (EU) accompanying the product. 57000097-00B Safety and Product Compliance Guidelines 1-5 Advanced Energy® Safety and EMC Directives and Standards Certain options of this unit may have been tested for and comply with the following electromagnetic compatibility (EMC) and safety directives and standards and industry guidelines. Note: This device must be installed and used only in compliance with the directives and standards listed in addition to EN 60204 (IEC 60204) and applicable requirements. Note: This equipment must be installed and used in accordance with the Conditions of Use described in this manual. If this equipment is expanded, modified, or installed into a larger system, the user is responsible to guarantee the compliance of the overall system. If this equipment is used with external components, the user must ensure that the Safety and EMC requirements are not violated. ELECTROMAGNETIC COMPATIBILITY (EMC) DIRECTIVES AND STANDARDS • 89/336/EEC EC Council directive on the approximation of the laws of the Member States relating to electromagnetic compatibility (EMC Directive) • 47 CFR Part 18 Code of Federal Regulations—Limits and methods of measurement of radio interference characteristics of industrial, scientific, and medical equipment • EN 55011 Limits and methods of measurement of radio disturbance characteristics of industrial, scientific, medical (ISM) radio frequency equipment (Class A, Group 2) (CISPR 11) • EN 61000-6-2 Electromagnetic Compatibility—Generic Standards— Immunity for Industrial Environments SAFETY DIRECTIVES AND STANDARDS • 2006/95/EC EC Council directive on the harmonization of the laws of the Member States relating to electrical equipment designed or use within certain voltage limits (LVD - Low Voltage Directive) 1-6 Safety and Product Compliance Guidelines 57000097-00B Pinnacle® Plus+ 10 kW Power Supply • CAN/CSA-C22.2 No. 61010-1-04 Safety requirements for electrical equipment for measurement, control, and laboratory use • EN 61010-1 Safety requirements for electrical equipment for measurement, control, and laboratory use Conditions of Use To comply with the stated directives and standards, you must meet the following conditions of use: • Before making any other connection to this device, connect the secondary Protective Earth (ground) terminal to a local earth (ground) terminal with a copper wire that is sized according to the applicable requirements. • For delta-connected mains, the primary and secondary Protective Earth (ground) wire must be connected. • Install and operate this device in an overvoltage category II or better installation only. • Install and operate this device only in a pollution degree 2 or better environment, which means an indoor location such as a computer room, office, or factory floor where only nonconductive pollution occurs during operation. Occasionally, condensation causes temporary conductivity when the device is not operating. Note: To maintain CE certification for units with the M32 output connector, the output terminal block mounting screws must be filled with RTV adhesive to the top of the hole. • If this device does not have a circuit breaker, install and operate it with an AEapproved circuit breaker on the AC input to provide the required overcurrent protection. In addition, you must provide the primary circuit protection (such as the branch circuit backup fuse). • Advanced Energy Industries, Inc., may provide a supplementary protection circuit breaker in the power supply. You must provide a branch circuit backup fuse with a UL LISTED Type K5 or RK5 fuse or equivalent that is rated 15 A minimum and no more than four times full-load amps (not to exceed 125 A for 50 A or less rated breaker, and not to exceed 175 A for 51 to 100 A rated breaker). • Use only a shielded power cable on the output power connector. • Non-standard connectors for input and/or output power must be inaccessible to the user. 57000097-00B Safety and Product Compliance Guidelines 1-7 Advanced Energy® 1-8 Safety and Product Compliance Guidelines 57000097-00B Pinnacle® Plus+ 10 kW Power Supply Chapter 2 Theory of Operation GENERAL DESCRIPTION The Advanced Energy Pinnacle Plus+ series of DC power supplies provide the ultimate advantages in DC power. They... • Are light and compact • Are highly efficient (low internal heat dissipation) • Provide excellent regulation and stability • Have a highly reliable solid state design • Store very little energy in the output filter • Quickly extinguish and recover from arcs • Deliver full power over a 4:1 impedance range (with no taps) • Provide a very high power factor Output Impedance Range No taps, mechanical or electrical, exist in the Pinnacle Plus+ supply. The unit delivers full power over a 4:1 range of impedance without the need for tap changes. You never need to open the unit or generate signals to control taps. Output Regulation The Pinnacle Plus+ supply can be used as a power, current, or voltage source, depending on the method of output regulation selected. Since set point levels are stored in nonvolatile memory, you can use them to recover from input power interruptions and to ensure repeatability from run to run. Interfaces The Pinnacle Plus+ series of power supplies can be configured with a variety of interfaces. Your Pinnacle Plus+ supply can be controlled from an active front panel, the Pinnacle Remote Active Panel, an analog/digital connector (User port), or a serial 57000097-00B Theory of Operation 2-1 Advanced Energy® communications (Host) port. The serial communications port, the active front panel, and the Pinnacle Remote Panel provide access to all operating parameters and control functions. The User port provides limited access to operating parameters and control functions. Microprocessor Advantages The internal microprocessor checks for proper circuit operation while supervising all operating parameters. System diagnostics run when the unit is initially powered up. The most recent power settings and conditions (such as producing output) are retained in non-volatile memory. Displays The displays on the passive panels as well as the control panels show power, current, or voltage levels. (The displays show levels for unit A and unit B if this is a dual unit.) They also display information about output, pulsing, set point, interlock, bus fault, overtemp, arcs, and error codes. Arc-suppression Feature The Pinnacle Plus+ supply's arc-handling feature ensures the shortest arc recovery time in the industry. You can implement user-defined arc-handling functions during your normal process cycle. Parameters, including hard arc count limit, voltage trip level, enable, and disable, are selectable through the unit’s active control panel (optional), Pinnacle Remote Active Panel, or a serial (Host) communications port. THEORY OF OPERATION The Pinnacle Plus+ power supply is a sophisticated and intelligent DC pulse power supply designed exclusively for use in vacuum environments. Figure 2-1 on page 2-2 and the following paragraphs outline the theory of operation. Figure 2-1. Pinnacle Plus+ functional block diagram. 2-2 Theory of Operation 57000097-00B Pinnacle® Plus+ 10 kW Power Supply Input In the input section, AC line voltage is applied through the circuit breaker to a threephase contactor. The contactor, when closed, delivers the line voltage to a rectifier bridge, where it is converted to DC. This bus provides DC voltage to the inverter section. The input section also provides power to the housekeeping section. Housekeeping Supply The housekeeping supply section provides low voltage to power the electronic circuits within the Pinnacle Plus+ unit. Inverter The inverter section converts DC to high-frequency voltage by alternating the current through switching transistors. Output In the output section, an isolation transformer steps up the high-frequency voltage from the inverter section and sends it to a full-wave rectifier bridge. Output Measurement The output measurement section measures current, and voltage. These signals are typically scaled to 0 to 10 VDC and sent to the logic, control, and interfaces. DC Chopper Section This section uses a patented circuit with a tapped inductor and a shunt switch to chop or pulse the DC before being sent to the output. Logic Control The microprocessor in the logic control section uses operator-supplied parameters and set points to control the output. This section is also responsible for providing status information to the operator through all interfaces and for controlling the input section. 57000097-00B Theory of Operation 2-3 Advanced Energy® Remote Interfaces The Pinnacle Plus+ unit supports four types of interfaces: a User port (Analog/ Digital), a serial (Host) port (RS-232/422/485), an active front panel, and a Pinnacle Remote Panel interface. All four interfaces communicate operator-supplied inputs to the logic control section and provide the operator with status information. 2-4 Theory of Operation 57000097-00B Pinnacle® Plus+ 10 kW Power Supply Chapter 3 Product Specifications FUNCTIONAL SPECIFICATIONS Table 3-1. Functional Specifications Description Specification Modes of Control Serial communications (Host) port, User port (analog/digital interface), active front panel, and/ or Pinnacle Remote Active Panel Passive Panel Options Your unit also may feature either a passive front panel, remote active panel, blank panel, or an active front panel. Method of Output Regulation The regulation mode is the parameter that remains constant when the Pinnacle Plus+ is producing output; it can be power, or current, or voltage. Select one of these regulation modes from the optional Pinnacle Remote Active Panel, the active front panel, the User port, or the serial (Host) port. Note: Output power must be off (that is, output must be deenergized) to switch between regulation modes. Programmable Set Points You can program an output level (from low values up to the unit's maximum rate of output) for power, current, or voltage. You can also program the chopper output frequency and reverse time. Select these values from the optional Pinnacle Remote Active Panel, the active front panel, the User port, or the serial (Host) port. Note: The User port does not have access to the chopper. Output Limits 57000097-00B You may set maximum output limits for power, voltage, and current. Select these values from the optional Pinnacle Remote Active Panel, the active front panel, or the serial (Host) port. Product Specifications 3-1 Advanced Energy® Table 3-1. Functional Specifications (Continued) Description Specification Process Control You can control the process with the following features: joule mode, ramping, and recipes. Process Monitoring You can monitor process values for the following: target life timer, out-of-set point timer; overvoltage timer, and over-current timer. Sync Pulse Functionality You can control the synchronization of multiple independent units with the Pinnacle Plus+ Sync Pulse source controls. With this feature, multiple units may be synchronized at 0º. Additionally, units connected for Sync Pulse operation can share hard arcs. Master/Slave Operation By having your Pinnacle Plus+ supply reconfigured at the factory, the unit can become a building block in a master/slave system, thereby allowing Pinnacle Plus+ power installations of greater size than 10 kW. Target Supervision You can select one of eight target-life counters from the active front panel, Pinnacle Remote Active Panel, User port, or serial (Host) port. Target life can be monitored from the Pinnacle Remote Active Panel, the active front panel, and the serial port. Note: The User port has priority when selecting targets. Arc Control 3-2 • You can monitor micro arc density and hard arc density from the Pinnacle Remote Panel, the active front panel, and the serial (Host) port. • You can change arc trip level voltage. You can enable or disable micro arc handling but hard arc handling is always enabled. • Monitoring options include: arc count per second and arc count per run. Additionally, you can have the unit indicate when a set number of hard arcs have occurred in the process run. Arc Energy 200 µJ/ kW with micro arc handling active. Cooling Air-cooled Product Specifications 57000097-00B Pinnacle® Plus+ 10 kW Power Supply Table 3-1. Functional Specifications (Continued) Description Specification Fault Conditions Several fault conditions either cause the Pinnacle Plus+ supply to shut off output or prevent output from being turned on. These conditions include open interlock loops, input power failure, overtemperature, and user-controlled timers. Gross Short Circuit Detection When this feature is factory enabled, it will operate in power and voltage regulation modes. With this feature, the gross short circuit algorithm starts if the following condition exists: • Output readback is less than the out-of-setpoint lower limit. • The unit has detected no hard arcs. • The current (A) is greater than the gross short circuit current limit. • This condition has existed for the detection time. If the algorithm determines that a gross short circuit exists, “SC” flashes on the front panel, and then error E088 Short Circuit Fault or E089 Fatal Short Circuit Fault appears on the front panel. PHYSICAL SPECIFICATIONS Table 3-2. Physical Specifications Description Size Specification 133 mm (H) x 483 mm (W) x 639 mm (D), including connectors (5.22 in (H) x 19 in (W) x 25.18 in (D)) Weight 30 kg (66 lb) Output Connector Two terminal, multi-contact, pluggable connector or UHF connector 57000097-00B Product Specifications 3-3 Advanced Energy® Table 3-2. Physical Specifications (Continued) Description Specification For optimal performance, it is recommended that you use an output power cable 32.8 feet (10 m) in length—or shorter. Output Power Cable Note: The output power cable must not exceed 32.8 feet (10 m) or you may damage your power supply. 3-4 Input Power Connector Five terminal, DIN compression terminal block. Maximum wire size #6AWG User Port Connector Please reference Chapter 4, “Communication Interfaces.” Serial (Host) Port Connector Please reference Chapter 4, “Communication Interfaces.” Product Specifications 57000097-00B Pinnacle® Plus+ 10 kW Power Supply Dimensional Drawings Figure 3-1. Dimensional drawing 57000097-00B Product Specifications 3-5 Advanced Energy® ELECTRICAL SPECIFICATIONS Table 3-3. Electrical Specifications Description Specification 208 VAC Input Voltage (wye or delta connection) 180 to 229 VAC, 3-phase, 4-wire, 50 to 60 Hz, no neutral required. Leakage current less than 3.5 mA. Maximum phase to phase voltage: 208 V + 10% Maximum phase to ground/chassis voltage: 250 V RISK OF DEATH OR BODILY INJURY: For delta connections, considerably more leakage current will exist. You must connect the primary and supplemental Protective Earth (ground) wires. 208 VAC Input Current 32 A nominal per phase, at least 90% EFF; 50 A circuit breaker 400 VAC Input Voltage 360 to 440 VAC, 3-phase, 4-wire, 50 to 60 Hz, no neutral required. Leakage current less than 3.5 mA. (wye connection only) Maximum phase to phase voltage: 400 V +10% Maximum phase to ground/chassis voltage: 230 V ± 10% 400 VAC Input Current 17 A nominal per phase, at least 90% EFF; 20 A circuit breaker 480 VAC Input Voltage Not available for this configuration (wye connection only) 480 VAC Input Current 3-6 Not available for this configuration Product Specifications 57000097-00B Pinnacle® Plus+ 10 kW Power Supply Table 3-3. Electrical Specifications (Continued) Description Specification Output Accuracy Accuracy of actual output value to set point at 25ºC is ±1% of the actual value (V, kW, or A) or ±0.2% of the full rated output (whichever is greater) for the full input voltage range and within the output impedance range Load Regulation ±1% for 4:1 load change Line Regulation ±1% for 10% line voltage change or ±2% frequency change Repeatability Output power repeatability from run to run at a constant set point is 0.1% from 10% to 100% of rated power. Temperature Coefficient <0.05%/°C (<150 ppm/°C) variation in the regulated output parameter over 20°C to 40°C ambient temperature range Output Ripple Voltage (360 Hz / 300 Hz) The component of output voltage ripple as related to input line frequency is less than 2% rms. Accuracy of All Analog Signals ±1% of the actual value (V, kW, or A) or ±0.2% of the full scale value, whichever is greater Power Factor > 0.95 for 10 kW Standard Output Range (full power) 10 kW over the 325-to-800-Vdc range in DC mode, with a maximum current of 30.8 A Note: Output is measured at the DC inverter output (Figure 2-1 on page 2-2). Note: Do not use an output cable longer than 32.8 feet (10 m). Usable Output Range See Figure 3-4 on page 3-17. Impedance Range See Figure 3-5 on page 3-17. Accuracy of User-defined Limits Current 0 to 5% over the limit from 10 to 100% of full rated output Voltage 0 to 5% over the limit from 10 to 100% of full rated output Power 0 to 10% over the limit from 2 kW to 10 kW 57000097-00B Product Specifications 3-7 Advanced Energy® Table 3-3. Electrical Specifications (Continued) Description Specification Ignition Capability Ignition cycle runs at 1350 VDC for 100 ms, then at the user-selected maximum output voltage limit for 900 ms. Analog Interface Scaling Depending on the choice and configuration of your User port, the analog input and output signals are either 0 to 5 V or 0 to 10 V full scale. If your supply does not contain a User port that emulates another supply, full scale for set point input and readback output is as follows: for power, 0 to 10 kW; for current, 0 to 40 A; for voltage, 0 to 1500 V. Output Polarities The two terminal connection allows a floating output. The maximum voltage at either terminal relative to ground should not exceed 1700 V (peak). The UHF connector body is securely connected to chassis ground; therefore, the center connector is configured for negative output. Output Frequency (self-run) 5 kHz to 350 kHz, 5 kHz increments When operating a master/slave system in voltage regulation mode, the maximum pulsing frequency is 250 kHz. Note: The PNCL PLUS+ self-run frequency has a granularity of 50 ns. Therefore, the maximum difference from set point-toactual is always <1% (never exceeding ± 2.6 kHz) maximum, with an average difference across the frequency range of <0.1%. Reverse Time 0.4 µs to 10.0 µs, 0.1 µs increments, up to a 45% reverse duty cycle for a given frequency Some units are configured for a maximum of 5.0 µs reverse time. See “Maximum Allowable Reverse Time For a Given Frequency” on page 3-9 and “Understanding Frequency and Reverse Time Settings” on page 5-37 for more information. Reverse Voltage 3-8 Approximately 10% of the operating voltage (voltage readback shown on the active front panel interface). Product Specifications 57000097-00B Pinnacle® Plus+ 10 kW Power Supply Maximum Allowable Reverse Time For a Given Frequency Note: Frequency is limited to 150 kHz when the pulsing enabled mode is set to be enabled always. maximum allowable reverse time (usec) 12 10 8 6 4 2 5 0 34 5 33 5 0 31 30 0 28 0 5 27 25 5 24 0 22 21 90 10 5 12 0 13 5 15 0 16 5 18 0 19 5 75 60 45 30 15 0 0 s elf-run frequency (kHz) Figure 3-2. Pulse reversal times and self-run frequencies Table 3-4. Reverse Time Given a Self-Run Frequency Requested Frequency (kHz) Actual Frequency (kHz) Pulse Reversal Time Maximum (µs) Duty Cycle (min%) Reverse/ Period Duty Cycle (max%) Reverse/ Period 5 5 10 0.20 5.0 10 10 10 0.40 10.0 15 15.004 10 0.60 15.0 20 20 10 0.80 20.0 25 25 10 1.00 25.0 30 29.985 10 1.20 30.0 57000097-00B Product Specifications 3-9 Advanced Energy® Table 3-4. Reverse Time Given a Self-Run Frequency (Continued) Requested Frequency (kHz) Actual Frequency (kHz) Pulse Reversal Time Maximum (µs) Duty Cycle (min%) Reverse/ Period Duty Cycle (max%) Reverse/ Period 35 35.026 10 1.40 35.0 40 40 10 1.60 40.0 45 45.045 9.9 1.80 44.6 50 50 9.0 2.00 45.0 55 54.945 8.1 2.20 44.5 60 60.06 7.4 2.40 44.4 65 64.935 6.9 2.60 44.8 70 69.93 6.4 2.80 44.8 75 74.906 6.0 3.00 44.9 80 80 5.6 3.20 44.8 85 85.106 5.2 3.40 44.3 90 90.09 4.9 3.60 44.1 95 94.787 4.7 3.79 44.5 100 100 4.5 4.00 45 105 105.263 4.2 4.21 44.2 110 109.89 4 4.40 44 115 114.943 3.9 4.60 44.8 120 119.76 3.7 4.79 44.3 125 125 3.6 5.00 45 130 129.87 3.4 5.19 44.2 135 135.135 3.3 5.41 44.6 140 139.86 3.2 5.59 44.8 145 144.928 3.1 5.80 44.9 150 150.376 2.9 6.02 43.6 155 155.039 2.9 6.20 45 160 160 2.8 6.4 44.8 3-10 Product Specifications 57000097-00B Pinnacle® Plus+ 10 kW Power Supply Table 3-4. Reverse Time Given a Self-Run Frequency (Continued) Requested Frequency (kHz) Actual Frequency (kHz) Pulse Reversal Time Maximum (µs) Duty Cycle (min%) Reverse/ Period Duty Cycle (max%) Reverse/ Period 165 165.289 2.7 6.61 44.6 170 169.492 2.6 6.78 44.1 175 175.439 2.5 7.02 43.9 180 180.18 2.4 7.21 43.2 185 183.486 2.4 7.41 44 190 190.476 2.3 7.62 43.8 195 194.175 2.3 7.77 44.7 200 200 2.2 8 44 205 204.082 2.2 8.16 44.9 210 210.526 2.1 8.42 44.2 215 215.054 2 8.6 43 220 219.78 2 8.79 44 225 224.719 2 8.99 44.9 230 229.885 1.9 9.2 43.7 235 235.294 1.9 9.41 44.7 240 240.964 1.8 9.64 43.4 245 243.902 1.8 9.76 43.9 250 250 1.6 10 40 255 256.41 1.5 10.26 38.5 260 259.74 1.5 10.39 39 265 266.667 1.5 10.67 40 270 270.27 1.4 10.81 37.8 275 273.973 1.4 10.96 38.4 280 281.69 1.4 11.27 39.4 285 285.714 1.4 11.43 40 290 289.855 1.3 11.59 37.7 57000097-00B Product Specifications 3-11 Advanced Energy® Table 3-4. Reverse Time Given a Self-Run Frequency (Continued) Requested Frequency (kHz) Actual Frequency (kHz) Pulse Reversal Time Maximum (µs) Duty Cycle (min%) Reverse/ Period Duty Cycle (max%) Reverse/ Period 295 294.118 1.3 11.76 38.2 300 298.507 1.3 11.94 38.8 305 303.03 1.3 12.12 39.4 310 307.692 1.3 12.31 40 315 312.5 1.2 12.50 37.5 320 317.46 1.2 12.70 38.1 325 322.581 1.2 12.90 38.7 330 327.869 1.2 13.11 39.3 335 333.333 1.2 13.33 40 340 338.983 1.1 13.56 37.3 345 344.828 1.1 13.79 37.9 350 350.877 1.1 14.04 38.6 Reverse Time As A Function of Voltage Limit Note: Not all Pinnacle Plus+ units are shipped with reverse time as a function of voltage limit. This is a special feature that your power supply must be configured for at the factory. Some processes require that the Pinnacle Plus+ power supply allow a longer duration when reversing the voltage. By utilizing the V-Limit function of your power supply, you may be able to increase the reverse time to a maximum of 10 µs (when voltage is limited to 325 V). When the unit is set for 650 V (or higher in Hi-Z models), the maximum reverse time is 5 µs. As you decrease process voltage using the V-Limit function, the reverse time increases linearly until it reaches the maximum allowable value of 10 µs. Note: The maximum reverse time duty cycle is still 45%. Figure 3-3 on page 3-13 is a graph of pulse reversal times as a function of the user voltage limit. Table 3-5 on page 3-13 provides a detailed list of reverse times and the corresponding user voltage limit. 3-12 Product Specifications 57000097-00B Pinnacle® Plus+ 10 kW Power Supply Output voltage (in volts) Figure 3-3. Pulse reversal time as a function of voltage limit (V-Limit) Table 3-5. Reverse Time as a Function of Voltage Limit (V-Limit) V-Limit (in Volts) 57000097-00B Corresponding Reverse Time 0 to 325 10 µs 330 9.8 µs 335 9.7 µs 340 9.5 µs 345 9.4 µs 350 9.2 µs 355 9.1 µs 360 9 µs 365 8.9 µs 370 8.7 µs 375 8.6 µs 380 8.5 µs 385 8.4 µs Product Specifications 3-13 Advanced Energy® Table 3-5. Reverse Time as a Function of Voltage Limit (V-Limit) V-Limit (in Volts) 3-14 Corresponding Reverse Time 390 8.3 µs 395 8.2 µs 400 8.1 µs 405 8 µs 410 7.9 µs 415 7.8 µs 420 7.7 µs 425 7.6 µs 430 7.5 µs 435 7.4 µs 440 7.3 µs 445 7.3 µs 450 7.2 µs 455 7.1 µs 460 7 µs 465 6.9 µs 470 6.9 µs 475 6.8 µs 480 6.7 µs 485 6.7 µs 490 6.6 µs 495 6.5 µs 500 6.5 µs 505 6.4 µs 510 6.3 µs 515 6.3 µs 520 6.2 µs 525 6.1 µs 530 6.1 µs 535 6 µs 540 6 µs 545 5.9 µs 550 5.9 µs Product Specifications 57000097-00B Pinnacle® Plus+ 10 kW Power Supply Table 3-5. Reverse Time as a Function of Voltage Limit (V-Limit) V-Limit (in Volts) 57000097-00B Corresponding Reverse Time 555 5.8 µs 560 5.8 µs 565 5.7 µs 570 5.7 µs 575 5.6 µs 580 5.6 µs 585 5.5 µs 590 5.5 µs 595 5.4 µs 600 5.4 µs 605 5.3 µs 610 5.3 µs 615 5.2 µs 620 5.2 µs 625 5.2 µs 630 5.1 µs 635 5.1 µs 640 5 µs 645 5 µs 650 5 µs 655 4.9 µs 660 4.9 µs 665 4.8 µs 670 4.8 µs 675 4.8 µs 680 4.7 µs 685 4.7 µs 690 4.7 µs 695 4.6 µs 700 4.6 µs 705 4.6 µs 710 4.5 µs 715 4.5 µs Product Specifications 3-15 Advanced Energy® Table 3-5. Reverse Time as a Function of Voltage Limit (V-Limit) V-Limit (in Volts) Corresponding Reverse Time 720 4.5 µs 725 4.4 µs 730 4.4 µs 735 4.4 µs 740 4.3 µs 745 4.3 µs 750 4.3 µs 755 4.3 µs 760 4.2 µs 765 4.2 µs 770 4.2 µs 775 4.1 µs 780 4.1 µs 785 4.1 µs 790 4.1 µs 795 4 µs 800 4 µs Operating and Impedance Range Illustrations The following graphs illustrate the output power operation range and output impedance range for your Pinnacle Plus+ power supply. 3-16 Product Specifications 57000097-00B Pinnacle® Plus+ 10 kW Power Supply Figure 3-4. Operating range Figure 3-5. Impedance range 57000097-00B Product Specifications 3-17 Advanced Energy® ENVIRONMENTAL SPECIFICATIONS Table 3-6. Climatic Specifications (per EN50178) Temperature Operating Relative Humidity Air Pressure 0°C to +40°C 5% to 85%note 1 78.8 kPa to 106 kPa +32°F to +104°F +1 g/m3 to +25 g/m3 788 mbar to 1060 mbar Equivalent altitude: 2000 m to -500 m (6562 ft to -1640 ft) Storage -25°C to +55°C 5% to 95% 78.8 kPa to 106 kPa -13°F to +131°F +1 g/m3 to +29 g/m 3 788 mbar to 1060 mbar Equivalent altitude: 2000 m to -500 m (6562 ft to -1640 ft) Transportation -25°C to +70°C 95%note 2 65.6 kPa to 106 kPa -13°F to +158°F +60 g/m3 note 3 656 mbar to 1060 mbar Equivalent altitude: 3500 m to -500 m (11480 ft to -1640 ft) note 1 Non-condensing, no formation of ice Maximum relative humidity when the unit temperature slowly increases, or when the unit temperature directly increases from -25°C to +30°C note 3 Maximum absolute humidity when the unit temperature directly decreases from +70°C to +15°C note 2 Table 3-7. Environmental standard specifications 3-18 Description Specification Overvoltage Category II Pollution degree 2 Product Specifications 57000097-00B Pinnacle® Plus+ 10 kW Power Supply COOLANT SPECIFICATIONS Table 3-8. Coolant Specifications Description Specification Coolant Temperature Air (gas) minimum 0°C, maximum 40°C Note: See “Cooling Requirements” on page 5-1 for more information. Pollution Degree CE Marked devices: install and operate this device in a pollution degree 2 or better environment, which means an indoor location such as a computer room, office, or factory floor where only non-conductive pollution occurs during operation. Occasionally, condensation causes temporary conductivity when the device is not operating. EMI/EMC Tested for electromagnetic compatibility. Note: See “Safety Guidelines” on page 1-2 and the declaring letter for specific standards. Acoustic Noise 57000097-00B Noise generated by this unit is 75.6 dB (A) at a 1 m distance from the front of the unit. Product Specifications 3-19 Advanced Energy® 3-20 Product Specifications 57000097-00B Pinnacle® Plus+ 10 kW Power Supply Chapter 4 Communication Interfaces This chapter provides information on a variety of communication interfaces. Not all of the information will apply to a given Pinnacle Plus+ unit. If you are unsure about which interfaces are on a particular unit, you can identify the interfaces by looking at the back panel of the unit. The interfaces are labeled and most of the labels clearly identify the interface. For User port identification, please see the following section. IDENTIFYING THE USER PORT ON A PINNACLE PLUS+ UNIT Pinnacle Plus+ units can come with a variety of User ports. This manual covers several of those options. Use the following table to find the information for the User port on a unit. Table 4-1. Identifying the User port User Port Single 15 V 37 Pin The Unit Has This User Port If: For Information, See This Section • The User port is a 37-pin subminiature-D port. “Single 15 V 37-Pin User Port” on page 4-2 • The User port label is either 15v User Port or 15v Sng Iso User Port. Single 24 V 37 Pin • The User port is a 37-pin subminiature-D port. “Single 24 V 37-Pin User Port” on page 4-16 • The User port label is User Port Iso. Single 15 V 25 Pin 57000097-00B • The User port is a 25-pin subminiature-D port. Communication Interfaces “Single 15 V 25-Pin User Port” on page 4-24 4-1 Advanced Energy® Table 4-1. Identifying the User port (Continued) User Port The Unit Has This User Port If: For Information, See This Section Single 15 pin • The User port is a 15-pin subminiature-D port and is on a single output unit that also has a DeviceNet interface. “Single 15-Pin User Port” on page 4-36 Dual 24 V 37 pin • The User port is a 37-pin subminiature-D port. “Dual 24 V 37-Pin User Port” on page 4-39 • The User port label is Dual Iso User Port. SINGLE 15 V 37-PIN USER PORT This section applies to Single 15 V 37-pin user ports. • The User port is a 37-pin subminiature-D port. • The User port label is either 15v User Port or 15v Sng Iso User Port. The User port (analog/ digital interface) is a 15 V isolated or non-isolated interface card with a 37-pin, subminiature-D, female connector. This interface emulates the MDX User port and a subset of the MDXII User port. Figure 4-1. 37-pin subminiature-D female connector 4-2 Communication Interfaces 57000097-00B Pinnacle® Plus+ 10 kW Power Supply Installation Disconnect all sources of input power before working on this unit or anything connected to it. Note: Signals at the User port can be sensitive to noise. We recommend that you take standard preventative measures against electro-magnetic interference (EMI), including using shielded cabling on the User port. Note: Turn off ac input power to the Pinnacle Plus+ unit before connecting a cable to the user port connector. Note that we recommend taking standard preventative measures against electro-static discharge (ESD) around all Pinnacle Plus+ units. Note: Grounding the User port at the power supply reduces noise interference. To avoid ground loop problems, you should typically ground only one end. If you have a remote panel and you want to operate the Pinnacle Plus+ supply from the User port, you must set the control mode for User on the Pinnacle Active Remote Panel. See the “Main Menu” section in the “Display and Standard Serial Controls” chapter of this manual. Signals The following paragraphs give general information about the User port's analog and digital signals. The subsequent table provides information about each pin. ANALOG SIGNALS A “.A” suffix appended to a pin name indicates an analog signal. Analog common lines are denoted by the “COM.A” suffix. 57000097-00B Communication Interfaces 4-3 Advanced Energy® You can configure your unit's analog signals to be either 5 V or 10 V (full-scale) via three jumpers. The following lists indicate where you must place the jumpers to achieve either a 0 to 5 V scaling or a 0 to 10 V scaling. RISK OF DEATH OR BODILY INJURY. Disconnect and lockout/tagout all sources of input power before working on this unit or anything connected to it. Power down the Pinnacle Plus+ and take proper ESD precautions before removing the unit's top cover to position jumpers. Failing to take proper ESD precautions in this case could result in damage to the unit. If the product has a “Warranty Void if Seal is Broken” label, you must receive prior approval from AE before you can remove the power supply box cover. If you remove the box cover before receiving approval from AE, the product warranty is no longer valid. Contact AE Global Services for more information. To provide for a 0 to 5V scaling: • Place the P1 jumper (level-in signal) across pins 2 and 3. • Place the P5 jumper (voltage, current, and power read-backs) across pins 1 and 2. • Place the P4 jumper (level-out signal) across pins 1 and 2. • Place the P3 jumper (REF.A) across pins 2 and 3. To provide for a 0 to 10V scaling: • Place the P1 jumper (level-in signal) across pins 1 and 2. • Place the P5 jumper (voltage, current, and power readbacks) across pins 2 and 3. • Place the P4 jumper (level-out signal) across pins 2 and 3. • Place the P3 jumper (REF.A) across pins 1 and 2. Analog outputs source or sink up to 3.0 mA and have an output impedance of 100 . The input impedance of the analog input is 200k. 4-4 Communication Interfaces 57000097-00B Pinnacle® Plus+ 10 kW Power Supply DIGITAL SIGNALS A “.D” suffix appended to the pin name indicates a digital signal. Digital commons are denoted by the “COM.D” suffix. Digital signals that are active when low are indicated with an overline on the pin name (ARC.D). Digital outputs are 0 to 15 V, are internally pulled up to 15 V through a 10 k resistor, and have an output impedance of 100 . When low, each digital output line will sink up to 35 mA. Digital inputs are also 0 to 15 V, with a low input being less than 0.5 V. An open input defaults high via a 4.32 k pull-up to 15 V. A low input will source up to 3.3 mA. All digital lines incorporate a low-pass filter that rejects signals less than 1 ms. Pin Description Table The User port has priority for selecting targets, even when the unit is in local or host control. Thus to select targets from the active front panel, the Pinnacle Active Remote Panel, or a host computer connected to the host port, you must set the target to 1 at the User port. Leaving the target bits open or leaving the User port pins unconnected causes the target selection at the User port to default to 1. Table 4-2. Single 15 V 37-Pin User Port Pin Descriptions Signal Pin Return Pin 1 37 Pin Name CS1.D Signal Type Description digital output This signal, with pin 20 (CS2.D), tells an external device (such as a cathode switch box) which of the Pinnacle Plus+ supply's target-life counters is active. See Table 4-4 on page 4-15 for more information. 57000097-00B 2 37 OUTPUT.D digital output This signal indicates that the contactor is closed and output power is on. 3 37 SETPOINT.D digital output This signal indicates that the output is within specified tolerance of the requested set point. Communication Interfaces 4-5 Advanced Energy® Table 4-2. Single 15 V 37-Pin User Port Pin Descriptions (Continued) Signal Pin Return Pin 4 36 5 36 Pin Name Signal Type Description TARGET0.D digital input This signal is used with TARGET1.D (pin 35) and TARGET2.D (pin 34) to select the active target-life counter. See “Setting the Active Target-Life Counter” on page 4-15 for more information. IREG.D digital input This signal is used with PREG.D (pin 6) to set the regulation mode. See Table 4-6 on page 4-16 for more information. 6 36 PREG.D digital input This signal is used with IREG.D (pin 5) to set the regulation mode. See the description of pin 5 for the logic table associated with this signal. 4-6 Communication Interfaces 57000097-00B Pinnacle® Plus+ 10 kW Power Supply Table 4-2. Single 15 V 37-Pin User Port Pin Descriptions (Continued) Signal Pin Return Pin 7 36 Pin Name ON.D Signal Type digital input Description This signal is used with OFF.D (pin 14) to enable/ disable output power. Pin 14 must be low to turn the unit on. If OFF.D (pin 14) is low, a momentary low on pin 7 turns output power on. If pin 14 is high, pin 7 cannot enable output. Once the on is issued via ON.D (pin 7), pin 14 has priority to override all commands to turn the unit off. When pin 14 transitions high after the unit is turned on, it forces a power off. If pin 14 transitions low when pin 7 is low, pin 14 will enable output power. For more information on these two signals, see “User Port Output Enable/Disable Behavior and Signal States” on page 4-14. 8 n/a unassigned n/a n/a 9 n/a OUTCOM.A n/a Dedicated return for analog output. Reference pins 23, 24, 25, 31, and 32 to this pin. 10 n/a INCOM.A n/a Dedicated return for analog input. Reference pin 27 to this pin. 57000097-00B Communication Interfaces 4-7 Advanced Energy® Table 4-2. Single 15 V 37-Pin User Port Pin Descriptions (Continued) Signal Pin Return Pin 11 19 12 Pin Name Signal Type Description AUX.D digital input This signal, with VAC.D (pin 12) and WATER.D (pin 13) monitors the system interlock string. If the interlock conditions are not all satisfied, either the main contactor will not close or it will open (if it is already closed) when the interlock string is interrupted. 19 VAC.D digital input See description of pin 11 (AUX.D). 13 19 WATER.D digital input See description of pin 11 (AUX.D). 14 36 OFF.D digital input This signal is used with ON.D (pin 7) to enable/ disable output power. See Pin 7 description and “User Port Output Enable/Disable Behavior and Signal States” on page 4-14 for more information. Pin 14 also resets the Pinnacle Plus+ unit after all fault conditions, except interlock, over-temperature, and A/D conversion faults. Pin 14 does not reset an “end of target life” signal. 4-8 15 19 SPARE1.D digital input spare input 16 19 SPARE2.D digital input spare input 17 19 SPARE4.D digital input spare input 18 n/a 15 V output This protected 15 V dc supply (output) provides a maximum of 100 mA. Communication Interfaces 57000097-00B Pinnacle® Plus+ 10 kW Power Supply Table 4-2. Single 15 V 37-Pin User Port Pin Descriptions (Continued) Signal Pin Return Pin Pin Name Signal Type 19 n/a INTLKCOM.D n/a Description Dedicated return for interlocks. Reference pins 11, 12, and 13 to this pin. 20 37 CS2.D digital output This signal is used with pin 1 (CS1.D) to tell an external device (such as a cathode switch box) which of the Pinnacle Plus+ supply's target-life counters is active. See description of pin 1 for the logic table. 57000097-00B Communication Interfaces 4-9 Advanced Energy® Table 4-2. Single 15 V 37-Pin User Port Pin Descriptions (Continued) Signal Pin Return Pin 21 37 Pin Name ARC.D Signal Type Description output A pulse of a predetermined width (normally 100 ms—a few units are configured for 10 ms) will be seen on this pin under two different conditions: 1. If the hard arc count limit is non-zero and the number of hard arcs seen exceeded this limit during the last run, the pulse will occur when the output is turned off. 2. If you set the hard arc count limit to zero, this signal will pulse for a predetermined time for every hard arc seen by the unit. If another hard arc is seen before the last pulse is complete, the pulse width will be refreshed to the full width. These conditions will also be indicated through the ARC LED on a Passive Display Panel. 4-10 Communication Interfaces 57000097-00B Pinnacle® Plus+ 10 kW Power Supply Table 4-2. Single 15 V 37-Pin User Port Pin Descriptions (Continued) Signal Pin Return Pin 22 37 Pin Name EOTL.D or Signal Type Description digital output Normally, this pin is configured to signal the end of target life (EOTL.D), but if your unit was ordered (and configured) for use with an Advanced Energy Varian® interface unit, see READY.D below: READY.D • EOTL.D: This signal goes low when the active target-life counter reaches zero, thus indicating that target life has ended. • READY.D : If your unit is configured for use with an Advanced Energy Varian Interface unit, a high on this pin indicates faults are active (ready bit is de-asserted) and the unit is not ready to output power. A low on this pin indicates no faults are active and the unit is ready to output power—provided all other necessary conditions have been met. 23 9 VOUT.A analog output This signal represents output voltage. Full scale represents the rating of the supply (see the “Specifications” chapter of this manual for more information). 57000097-00B Communication Interfaces 4-11 Advanced Energy® Table 4-2. Single 15 V 37-Pin User Port Pin Descriptions (Continued) Signal Pin Return Pin 24 9 Pin Name POUT.A Signal Type Description analog output This signal represents output power. Full scale represents the rating of the supply (see the “Specifications” chapter of this manual for more information.) 25 9 IOUT.A analog output This signal represents output current. Full scale represents the rating of the supply (see the "Specifications" chapter of this manual for more information). 26 n/a unassigned n/a LEVELIN.A 27 n/a This signal is used to program the output level. Full scale represents the rating of the supply for the active regulation mode (see the “Specifications” chapter of this manual for more information). 28 n/a unassigned n/a 29 19 SPARE3.D digital input 30 n/a unassigned n/a 31 9 LEVELOUT.A analog output n/a Spare input n/a This signal represents the programmed set point level. Full scale represents the rating of the supply (see the “Specifications” chapter of this manual for more information). 4-12 Communication Interfaces 57000097-00B Pinnacle® Plus+ 10 kW Power Supply Table 4-2. Single 15 V 37-Pin User Port Pin Descriptions (Continued) Signal Pin Return Pin 32 9 Pin Name REF.A Signal Type Description analog output This signal provides an accurate 5 V or 10 V reference (10 V at 10 mV). The P2 jumper controls the level of this pin's reference signal. • To set the reference to 10 V, place the jumper across pins 1 and 2 • To reference to 5 V, place the jumper across pins 2 and 3 33 n/a unassigned 34 36 TARGET2.D n/a digital input n/a This signal is used with TARGET0.D (pin 4) and TARGET1.D (pin 35) to select the active target-life counter. See “Setting the Active Target-Life Counter” on page 4-15 for more information. 35 36 TARGET1.D digital input This signal is used with TARGET0.D (pin 4) and TARGET2.D (pin 34) to select the active target-life counter. See “Setting the Active Target-Life Counter” on page 4-15 for more information. 57000097-00B Communication Interfaces 4-13 Advanced Energy® Table 4-2. Single 15 V 37-Pin User Port Pin Descriptions (Continued) Signal Pin Return Pin 36 n/a Pin Name Signal Type Description n/a Dedicated return for digital inputs. INCOM.D Pins 4, 5, 6, 7, 14, 34, and 35 should be referenced to this pin. 37 OUTCOM.D n/a n/a Dedicated return for digital outputs. Pins 1, 2, 3, 20, 21, and 22 should be referenced to this pin. USER PORT OUTPUT ENABLE/DISABLE BEHAVIOR AND SIGNAL STATES As described in the preceding table, pins 7 (ON.D) and 14 (OFF.D) are used to enable/disable output power. The following table illustrates the output enabled/ disabled behavior of the unit, depending on the state of these two pins. In the table: • H = High state • L = Low state • The lines represent transitions between high and low Note that these state changes apply only when the User port is the active control interface and is the only interface used to enable and disable the unit output. Table 4-3. User Port Output Enable/Disable Behavior and Signal States ON.D (Pin 7) 4-14 OFF.D (Pin 14) Unit State H Output disabled H Output disabled L Output disabled L Output enabled L Output enabled L No change H Output disabled H Output disabled Communication Interfaces 57000097-00B Pinnacle® Plus+ 10 kW Power Supply REPORTING THE ACTIVE TARGET SETTING TO AN EXTERNAL DEVICE Table 4-4 on page 4-15 shows the pin state for pins 20 and 1 for a specific target-life counter setting. This information is used to communicate the active target setting to an external device, such as a cathode switch box. For more information on setting an active target, see “Setting the Active Target-Life Counter” on page 4-15. Table 4-4. Cathode Switch (pin 20 and pin 1) Target-Life Counter Pin 20 Pin 1 1 or 5 high high 2 or 6 high low 3 or 7 low high 4 or 8 low low SETTING THE ACTIVE TARGET-LIFE COUNTER Table 4-5 on page 4-15 shows the pin state for pins 34, 35, and 4 to select a specific target-life counter as the active target. When a User card is installed in a unit, the User card has priority for setting the active target. If the target selection pins are left floating, or are inactive, the default setting for the target is set to target 1. If the pins are set to any other setting than 1, this setting overrides any other control source to set the active target. To enable target selection from the Host port or active front panel, a User card must not be installed in the unit or you must actively set the target to target 1 via the User port or leave the User port pins 34, 35, and 4 floating. After a power cycle, if a User card is installed the unit defaults to the User port target settings. If you have set the target settings through the Host port or active front panel, you must reset the target settings after a power cycle through the appropriate interface. Table 4-5. Target Life Counter (pin 34, 35, and 4) 57000097-00B Target-Life Counter Pin 34 Pin 35 Pin 4 1 high high high 2 high high low 3 high low high 4 high low low Communication Interfaces 4-15 Advanced Energy® Table 4-5. Target Life Counter (pin 34, 35, and 4) (Continued) Target-Life Counter Pin 34 Pin 35 Pin 4 5 low high high 6 low high low 7 low low high 8 low low low SETTING THE REGULATION MODE Table 4-6 on page 4-16 shows the pin state for pins 5 and 6 to select a specific regulation mode. Table 4-6. Regulation Mode (pin 5 and pin 6) Regulation Mode Pin 5 Pin 6 Voltage high high Power high low Current low high Not valid low low SINGLE 24 V 37-PIN USER PORT This section applies to the Single 15 V 37-pin user port. • The User port is a 37-pin subminiature-D port. • The User port label is User Port Iso. The User port incorporates signals similar to the Pinnacle Plus+ product. Inputs and reference signals are 0 Vdc to 10 Vdc analog. The output signals are 0 Vdc to 24 Vdc digital. In addition, the unit incorporates: 4-16 Communication Interfaces 57000097-00B Pinnacle® Plus+ 10 kW Power Supply • A fast response set point input (0 Vdc to10 Vdc); the unit shall respond to the set point signal and adjust the output of the power supply in 50 milliseconds or less • Regulation mode selection (voltage, current, power) • User reference signals for voltage, current, and power (0 Vdc to10 Vdc) • Arc counter • Outputs (same as Pinnacle) • Compatiblity with Allen Bradley, Siemens, and Mitsubishi PLC’s Connector The User port is an analog interface that allows the use of a remote controller. It is a 24 V interface card with a 37-pin, subminiature-D connector. This connector will be male or female, depending on which options you specified at the time you ordered your unit. Figure 4-2. 37-pin subminiature-D male and female connector Note: If you have an isolated 24 V User port card, your card provides isolation of more than 500 Vrms from the logic and control circuitry to all 37 pins on the connector. Note: Signals at the User port can be sensitive to noise. We recommend that you take standard preventative measures against electro-magnetic interference (EMI), including using shielded cabling on the User port. Note: Grounding the User port at the power supply reduces noise interference. To avoid ground loop problems, you should typically ground only one end. If you have a Pinnacle Remote Active Panel or an active front panel and you want to operate the Pinnacle Plus+ unit from the User port, you must set the control mode for USER using the panel. (See "Control Key" in the "Understanding the Control Panel" section of this chapter for more information.) 57000097-00B Communication Interfaces 4-17 Advanced Energy® Turn off ac input power to the Pinnacle Plus+ unit before connecting a cable to the User port connector. Note that we recommend taking standard preventative measures against electro-static discharge (ESD) around all Pinnacle Plus+ units. Note: You need to set the pulse frequency and reverse time through the Remote Active Panel, the Active Front Panel, or the serial interface (Host port). INTERLOCK REQUIREMENTS Turn off the 24 V supply before making connections to the User port. To satisfy the User port interlock: • Your system's 24 V supply must be connected to pin 18 on the Pinnacle Plus+ supply's User port (see below for power requirements) • Pin 18 must be connected to pin 11 (AUX.D INTLK) Note: A pull-up resistor is not necessary. USER-SUPPLIED POWER REQUIREMENTS Your 24 V supply must meet the following requirements: • • • • • Voltage (nominal): 24 V dc Ripple: 3.6 Vac maximum Permissible voltage range: 20 V to 30 V V surge (t < 0.5 s): 35 V Current (depends on loading of outputs): 5.0 A maximum; 1.0 A minimum Signals Figure 4-7 on page 4-19 provides information about each pin. The following paragraphs give general information about the analog and digital signals. ANALOG SIGNALS A “.A” suffix appended to a pin name indicates an analog signal. Analog common lines are denoted by the “COM.A” suffix. Analog outputs can source or sink up to 3.0 mA. The input impedance of the analog inputs is 200 k. 4-18 Communication Interfaces 57000097-00B Pinnacle® Plus+ 10 kW Power Supply DIGITAL SIGNALS A “.D” appended to a pin name indicates a digital signal. Digital commons are denoted by the “COM.D” suffix. Digital outputs are short-circuit protected. The signal levels for digital outputs are as follows: • Logical “0”: +3 V maximum with 1.0 mA maximum leakage • Logical “1”: Vpos less 1.5 V minimum (Vpos refers to the 24 V supply); output current may range from 0.5 mA to 0.5 A The signal levels for digital inputs are as follows: • Logical “0”: -30 V to +5 V with 0.5 mA maximum leakage • Logical “1”: +13 V to +30 V, and 8.5 mA typical All digital input lines incorporate a low pass filter that rejects signals less than 10 ms. Pin Descriptions The following table list the pin descriptions for the User port. Table 4-7. Single 24 V 37-pin User Port Pin Description Signal Pin Return Pin 1 37 Name CS1.D Signal Type Description output This signal, along with pin 20 (CS2.D), tells an external device (such as a cathode switch box) which of the Pinnacle Plus+ supply's target-life counters is active. See Table 4-9 on page 4-23 for a list of signal conditions relative to target-life counters. 2 37 OUTPUT.D output When high, this signal indicates that the contactor is closed and output power is on. 3 37 SETPOINT.D output When high, this signal indicates that the output is equal to the requested set point. 4 36 TARGET0.D input This signal is used with TARGET1.D (pin 35) and TARGET2.D (pin 34) to select the active target-life counter. Table 4-9 on page 4-23 for a list of the signal conditions for each target selection. 57000097-00B Communication Interfaces 4-19 Advanced Energy® Table 4-7. Single 24 V 37-pin User Port Pin Description (Continued) Signal Pin Return Pin 5 36 Name IREG.D Signal Type Description input This signal is used with PREG.D (pin 6) to set the regulation mode. See Table 4-10 on page 4-24 for a list of signal conditions for each regulation mode. 6 36 PREG.D input This signal is used with IREG.D (pin 5) to set the regulation mode. See the description of pin 5 for the logic table associated with this signal. 7 36 ON.D input A high on this pin turns on output power. A low signal turns output power off. 8 n/a unassigned n/a n/a 9 n/a OUTCOM.A n/a This pin is a dedicated return for analog outputs. Reference pins 23, 24, 25, and 31 to this pin. 10 n/a INCOM.A n/a This signal is a dedicated return for analog inputs. Reference pin 27 to this pin. 11 19 AUX.D INTLK 12 n/a unassigned n/a n/a 13 n/a unassigned n/a n/a 14 36 RESET.D input 15 n/a unassigned n/a n/a 16 n/a unassigned n/a n/a 17 n/a unassigned n/a n/a 4-20 input This signal monitors the system interlock string. If the conditions are not all satisfied, the main contactor is affected in one of two ways: it will not close; or if it is already closed, it will open when the interlock string is interrupted. A high on this pin will reset active explicit-clear faults, provided that the fault conditions are no longer present. This pin must be returned to the inactive state (low) to enable the unit output. Communication Interfaces 57000097-00B Pinnacle® Plus+ 10 kW Power Supply Table 4-7. Single 24 V 37-pin User Port Pin Description (Continued) Signal Pin Return Pin 18 36 Name Signal Type INCOM.D input Description Connect your system's 24 V power supply to this pin. See “Connector” on page 4-17 for additional information. Must be connected to AUX.D INTLK (pin 11) in order to satisfy the interlock. A pull-up resistor of no more than 5 k can be used. 19 n/a INTLKCOM.D 20 37 CS2.D n/a output This pin is the dedicated return for the AUX.D INTLK pin (pin 11). This signal is used with pin 1 (CS1.D) to tell an external device (such as a cathode switch box) which of the Pinnacle Plus+ supply's target-life counters is active. See the description of pin 1 for the logic table. 21 37 ARC.D output A pulse of a predetermined width (normally 100 ms) will be seen on this pin under 2 different conditions. Note: Both conditions can be active during the same run. • If the hard arc count limit is non-zero and the number of hard arcs seen exceeded this limit during the last run, the pulse will occur when the output is turned off. • If you set the hard arc count limit to zero, this signal will pulse for a predetermined time for every hard arc seen by the unit. If another hard arc is seen before the last pulse is complete, the pulse width will be refreshed to the full width. These conditions will also be indicated through the ARC LED on a Passive Display Panel. 22 57000097-00B 37 EOTL.D output This signal goes high when the active target-life counter reaches zero, thus indicating that target life has ended. Communication Interfaces 4-21 Advanced Energy® Table 4-7. Single 24 V 37-pin User Port Pin Description (Continued) Signal Pin Return Pin 23 9 Name Signal Type VOUT.A output Description This signal represents output voltage. Full scale (10V) represents 1500 V output voltage. 24 9 POUT.A output This signal represents output power. Full scale (10 V) represents the maximum output of the supply (see the “Specifications” chapter of this manual for information specific to your unit). 25 9 IOUT.A output This signal represents output current. • 5 kW units: Full scale (10V) represents 20 A output current • 10 kW units: Full scale (10V) represents 40 A output current • Master/Slave systems: (40 A) x (number of units) = Total output current 26 n/a unassigned n/a 27 10 LEVELIN.A input n/a This signal programs the output level. Full scale (10 V) represents the rating of the supply (see the “Specifications” chapter of this manual for more information). 28 n/a unassigned n/a n/a 29 n/a unassigned n/a n/a 30 n/a unassigned n/a n/a 31 9 LEVELOUT.A output This signal represents the programmed set point level. Full scale (10 V) represents the rating of the supply (see the “Specifications” chapter of this manual for more information). 32 n/a unassigned n/a n/a 33 n/a unassigned n/a n/a 4-22 Communication Interfaces 57000097-00B Pinnacle® Plus+ 10 kW Power Supply Table 4-7. Single 24 V 37-pin User Port Pin Description (Continued) Signal Pin Return Pin 34 36 Name Signal Type Description input This signal is used with TARGET0.D (pin 4) and TARGET1.D (pin 35) to select the active target-life counter. TARGET2.D See the description of pin 4 for the logic table associated with this signal. 35 TARGET1.D 36 input This signal is used with TARGET0.D (pin 4) and TARGET2.D (pin 34) to select the active target-life counter. See the description of pin 4 for the logic table associated with this signal. 36 INCOM.D n/a n/a This pin is a dedicated return for digital inputs. Pins 4, 5, 6, 7, 14, 34, and 35 should be referenced to this pin. 37 OUTCOM.D n/a n/a This signal is a dedicated return for digital outputs. Pins 1, 2, 3, 20, 21, and 22 should be referenced to this pin. Table 4-8. Target Life Counter Check (Pin 20 and Pin 1) Counter Pin 20 Pin 1 1 or 5 low low 2 or 6 low high 3 or 7 high low 4 or 8 high high Table 4-9. Select Target Life Counter (Pin 34, Pin 35, and Pin 4) 57000097-00B Target Pin 34 Pin 35 Pin 4 1 low low low 2 low low high 3 low high low 4 low high high Communication Interfaces 4-23 Advanced Energy® Table 4-9. Select Target Life Counter (Pin 34, Pin 35, and Pin 4) (Continued) Target Pin 34 Pin 35 Pin 4 5 high low low 6 high low high 7 high high low 8 high high high Table 4-10. Regulation Mode (pin 5 and pin 6) Regulation Mode Pin 5 Pin 6 Voltage low low Power low high Current high low Invalid Setting high high SINGLE 15 V 25-PIN USER PORT This section applies to the Single 15 V 25-pin User port. • The User port is a 25-pin subminiature-D port. Overview Turn off AC input power to the Pinnacle Plus+ unit before connecting a cable to the User port connector. The User port is a 15 V interface card with a 25-pin, female, subminiature-D connector. It has an analog interface that allows you to use a remote controller. All anolog input and output signals are between 0 Vdc to 10 Vdc. All digital input and output signals are between 0 Vdc to 15 Vdc. In addition, the unit incorporates the following features: 4-24 Communication Interfaces 57000097-00B Pinnacle® Plus+ 10 kW Power Supply • A fast-response set point input (0 Vdc to 10 Vdc) • Power regulation mode • User reference signals for voltage, current, and power (0 Vdc to10 Vdc) • Fault status digital output • Flexible grounding selection for noise source separation • "Pulsing on/off" control input • Selectable analog output scaling • Compatibility with Allen Bradley, Siemens, and Mitsubishi PLCs. If you are using a Pinnacle Remote Active Panel or an active front panel, you need to set the control mode to USER to operate the Pinnacle Plus+ unit from the User port. (See "Control Key" in the "Understanding the Control Panel" section of this chapter for more information.) Note: Advanced Energy recommends taking standard preventative measures against electro-static discharge (ESD) around all Pinnacle Plus+ units. Note: Grounding the user port at the power supply reduces noise interference. To avoid ground loop problems, you should typically ground only one end. Note: You need to set the pulse frequency and reverse time through the Remote Active Panel, the Active Front Panel, or the serial interface (Host port). Interlock Requirements No user interlock is provided. Cabling Requirements The cable used to connect the Pinnacle Plus+ 25-pin User port to the system controller must be a shielded, 25-wire, 22 AWG, jacketed cable (type UL 2343) or equivalent. Twisted-pair wiring may be used but is not mandatory. To minimize signal losses , keep the cable length as short as possible. The maximum recommended cable length between the Pinnacle Plus+ unit and the controller is 10 meters (33 feet). To minimize interference from adjacent electrical equipment, the EMI shield in the cable must be terminated to the metal shells of the cable’s connectors. Additionally, the chassis of the Pinnacle Plus+ must be tied to a local earth ground through an adequately sized, copper grounding strap. Note: Advanced Energy Industries, Inc. does not include the User port cable with the power supply. You are required to supply the cable for the User port connection. 57000097-00B Communication Interfaces 4-25 Advanced Energy® Signals Following is general information about the analog and digital signals. For more specific information about each pin on your User port, see Figure 4-11 on page 4-28. ANALOG SIGNALS A pin name with a “.A” suffix indicates an analog signal. Analog common lines are denoted by the “COM.A” suffix. Analog outputs can source or sink up to 3.0 mA. The input impedance of the analog inputs is 20 k. DIGITAL SIGNALS A pin name with a “.D” suffix indicates a digital signal. Digital commons are denoted by the “COM.D” suffix. Digital outputs are short-circuit protected. Digital signals that are active when low are indicated with an overline on a signal name (for example, OUTPUT ENABLE.D). The signal levels for digital outputs are the following: • Logical “0”: +3 V maximum with 1.0 mA maximum leakage • Logical “1”: Vpos less 1.5 V minimum (Vpos refers to the 15 V supply); output current may range from 0.5 mA to 0.1 A The signal levels for digital inputs are the following: • Logical “0”: -30 V to +5 V with 0.5 mA maximum leakage • Logical “1”: +13 V to +30 V, and 8.5 mA typical All digital input lines incorporate a low pass filter that rejects signals less than 10 ms. Connector and Rear-Panel Switch USING THE CONNECTOR WITH THE REAR-PANEL SWITCH The following figures show the User port connector and the rear-panel switch. The User port connector and rear-panel switch work in conjunction with each other in setting specific connector pin signals. Note: Refer to Table 4-11 on page 4-28 for more information on the pin signals affected by the switch settings. Table 4-12 on page 4-34 provides information on the switch settings and how they affect specific pin signals. 4-26 Communication Interfaces 57000097-00B Pinnacle® Plus+ 10 kW Power Supply Figure 4-3. 25-pin subminiature-D female connector Figure 4-4. Rear-panel switch Note: Signals at the User port can be sensitive to noise. We recommend that you take standard preventative measures against electro-magnetic interference (EMI), including using shielded cabling on the User port. CONNECTOR PIN DESCRIPTIONS Table 4-11 on page 4-28 provides detailed information about the 15 V, 25-Pin User port connector pins. Note: Some pin signals require specific switch settings (on the rear-panel switch) to produce certain results. See Table 4-12 on page 4-34 for more information on these switch settings. 57000097-00B Communication Interfaces 4-27 Advanced Energy® Table 4-11. Single 15 V 25-Pin User Port Pin Description Signal Pin 1 Name POUT.A Signal Type Analog output Description This signal represents output power. Full scale (10 V) represents the maximum output of the supply (see the "Specifications" chapter of this manual for information specific to your unit). Note: Pins 5, 8, 14, 15, and 16 are the dedicated returns for this pin. 2 VOUT.A Analog output This signal represents output voltage. The scaling of this pin is switch selectable. To set the analog output signal, refer to Table 4-12 on page 4-34 (Switch 1 and 2 descriptions). Note: Pins 5, 8, 14, 15, and 16 are the dedicated returns for this pin. 3 IOUT.A Analog output This signal represents output current. (See the "Specifications" chapter of this manual for information specific to your unit). The scaling of this pin is switch selectable. To set the analog output signal, refer to Table 4-12 on page 4-34 (Switch 3 description). Note: Pins 5, 8, 14, 15, and 16 are the dedicated returns for this pin. 4 4-28 unassigned n/a n/a Communication Interfaces 57000097-00B Pinnacle® Plus+ 10 kW Power Supply Table 4-11. Single 15 V 25-Pin User Port Pin Description (Continued) Signal Pin 5 Name COM.A Signal Type Description Analog common This signal is used as a remote analog common. VOUT.A (pin 2), POUT.A (pin 1), and IOUT.A (pin 3) should be referenced to this pin. This pin is switch connectable to COM.D for previously wired systems. Refer to Table 4-12 on page 4-34 (Switch 8 description) for more information. Note: This pin is internally connected to User port pins 8, 14, 15, and 16. 6 LEVELIN.A Analog input This 0 to 10 V signal programs the power output set point (in kW). Full scale represents the rating of the supply. See the "Specifications" chapter of this manual for information specific to your unit. The setting of Switch 7 affects this pin. Refer to Table 4-12 on page 4-34 for more information. Note: Pin 19 is the dedicated return for this pin. 7 unassigned n/a n/a 8 COM.A Analog common This signal is used as a remote analog common. VOUT.A (pin 2), POUT.A (pin 1), and IOUT.A (pin 3) should be referenced to this pin. This pin is switch connectable to COM.D for previously wired systems. Refer to Table 4-12 on page 4-34 (Switch 8 description) for more information. Note: This pin is internally connected to User port pins 5, 14, 15, and 16. 57000097-00B Communication Interfaces 4-29 Advanced Energy® Table 4-11. Single 15 V 25-Pin User Port Pin Description (Continued) Signal Pin 9 Name Signal Type Digital output FLT.D Description This signal provides fault indication. A low logic level on this pin indicates a fault with the Pinnacle Plus+ unit. See the "Troubleshooting and Global Support" chapter for information regarding error recovery. Note: Pins 17, 18, 20, 21, and 24 are the dedicated returns for this pin. 10 OUTPUT.D Digital output This signal provides an indication of the status of output power. A low logic level on this pin indicates the contactor is closed and output is on. Note: Pins 17, 18, 20, 21, and 24 are the dedicated returns for this pin. 11 Digital input ON.D A low logic level on this pin sets DC output on. Note: Pins 17, 18, 20, 21, and 24 are the dedicated returns for this pin. 12 PULSEON.D Digital input This signal provides control of the pulse mode. A high logic level on this pin sets pulse mode on. A low logic level on this pin sets pulse mode off. This pin is switch selectable to reverse sense to PULSEON.D active low. See Table 4-12 on page 4-34 (Switch 6 description) for more information. Note: Pins 17, 18, 20, 21, and 24 are the dedicated returns for this pin. 13 4-30 unassigned n/a n/a Communication Interfaces 57000097-00B Pinnacle® Plus+ 10 kW Power Supply Table 4-11. Single 15 V 25-Pin User Port Pin Description (Continued) Signal Pin 14 Name COM.A Signal Type Description Analog common This signal is used as a remote analog common. VOUT.A (pin 2), POUT.A (pin 1), and IOUT.A (pin 3) should be referenced to this pin. This pin is switch connectable to COM.D for previously wired systems. Refer to Table 4-12 on page 4-34 (Switch 8 description) for more information. Note: This pin is internally connected to User port pins 5,8, 15, and 16. 15 COM.A Analog common This signal is used as a remote analog common. VOUT.A (pin 2), POUT.A (pin 1), and IOUT.A (pin 3) should be referenced to this pin. This pin is switch connectable to COM.D for previously wired systems. Refer to Table 4-12 on page 4-34 (Switch 8 description) for more information. Note: This pin is internally connected to User port pins 5, 8, 14, and 16. 16 COM.A Analog common This signal is used as a remote analog common. VOUT.A (pin 2), POUT.A (pin 1), and IOUT.A (pin 3) should be referenced to this pin. This pin is switch connectable to COM.D for previously wired systems. Refer to Table 4-12 on page 4-34 (Switch 8 description) for more information. Note: This pin is internally connected to User port pins 5, 8, 14, and 15. 57000097-00B Communication Interfaces 4-31 Advanced Energy® Table 4-11. Single 15 V 25-Pin User Port Pin Description (Continued) Signal Pin 17 Name COM.D Signal Type Description Digital common This signal is used as a remote digital common. FLT.D (pin 9), OUTPUT.D (pin 10), ON.D (pin 11), PULSEON.D (pin 12), and STPOK.D (pin 22) should be referenced to this pin. Note: This pin is internally connected to User port pins 18, 20, 21, and 24. 18 COM.D Digital common This signal is used as a remote digital common. FLT.D (pin 9), OUTPUT.D (pin 10), ON.D (pin 11), PULSEON.D (pin 12), and STPOK.D (pin 22) should be referenced to this pin. Note: This pin is internally connected to User port pins 17, 20, 21, and 24. 19 20 LEVELIN_RET.A COM.D Analog return Dedicated return for LEVELIN.A. Digital common This signal is used as a remote digital common. FLT.D (pin 9), OUTPUT.D (pin 10), ON.D (pin 11), PULSEON.D (pin 12), and STPOK.D (pin 22) should be referenced to this pin. This pin is switch connectable to COM.A for single-ended inputs in previously wired systems. See Table 4-12 on page 4-34 (Switch 7 description) for more information. Note: This pin is internally connected to User port pins 17, 18, 21, and 24. 21 COM.D Digital common This signal is used as a remote digital common. FLT.D (pin 9), OUTPUT.D (pin 10), ON.D (pin 11), PULSEON.D (pin 12), and STPOK.D (pin 22) should be referenced to this pin. Note: This pin is internally connected to User port pins 17, 18, 20, and 24. 4-32 Communication Interfaces 57000097-00B Pinnacle® Plus+ 10 kW Power Supply Table 4-11. Single 15 V 25-Pin User Port Pin Description (Continued) Signal Pin 22 Name STPOK.D Signal Type Digital output Description This signal provides an indication of when the set point is reached. A logic-low indicates set point has been reached. Note: Pins 17, 18, 20, 21, and 24 are the dedicated returns for this pin. 23 unassigned n/a n/a 24 COM.D Digital common This signal is used as a remote digital common. FLT.D (pin 9), OUTPUT.D (pin 10), ON.D (pin 11), PULSEON.D (pin 12), and STPOK.D (pin 22) should be referenced to this pin. Note: This pin is internally connected to User port pins 17, 18, 20, and 21. 25 unassigned n/a n/a REAR-PANEL SWITCH SETTINGS The following information illustrates the rear-panel switch and its available settings. The figure below shows the rear-panel switch with Switch 6 set ON. A switch is considered ON when the switch (lever) is set towards the number. A switch is OFF when the switch (lever) is set away from the number. A switch set towards the number is ON. A switch set away from the number is OFF. The following table provides detailed information on the function of each switch as it relates to setting specific pin signals for the User port connection. 57000097-00B Communication Interfaces 4-33 Advanced Energy® Table 4-12. Rear-Panel Switch Setting Descriptions Switch Description 1 This switch works in conjunction with Switch 2 to set the analog output signal scaling for VOUT.A. See the description for Switch 2 below for more information. 2 This switch sets the analog output signal scaling for VOUT.A. Its function relates to the setting of Switch 1. See Pin 2 description in Table 4-11 on page 4-28 for more information. If Switch 2 is ON... ...and Switch 1 is ON, VOUT.A = 10V/1500V output ...and Switch 1 is OFF, VOUT.A = 10V/750V output If Switch 2 is OFF... ...and Switch 1 is ON, VOUT.A = 10V/1000V output ...and Switch 1 is OFF, VOUT.A = 10V/500V output 3 This switch sets the analog output signal scaling for IOUT.A. Switch 3 settings vary depending on the output power of your Pinnacle Plus+ product. See Pin 3 description in Table 4-11 on page 4-28 for more information. If you’re running a 10kW Pinnacle Plus+ unit... ...and Switch 3 is ON, IOUT.A = 10V/40A output ...and Switch 3 is OFF, IOUT.A = 10V/20A output If you’re running a 5kW Pinnacle Plus+ unit... ...and Switch 3 is ON, IOUT.A = 10V/20A output. Note: The 5kW unit has only one setting for the analog output signal scaling for IOUT.A. If the switch is left OFF, you could have incorrect scaling. 4-34 4 This switch is unassigned. 5 This switch is unassigned. Communication Interfaces 57000097-00B Pinnacle® Plus+ 10 kW Power Supply Table 4-12. Rear-Panel Switch Setting Descriptions (Continued) Switch Description 6 This switch sets the pulse polarity status of PULSEON.D. See Pin 12 description in Table 4-11 on page 4-28 for more information. If Switch 6 is ON... A-PULSEON.D is an active high digital input signal If Switch 6 is OFF... A-PULSEON.D is an active low digital input signal 7 This switch affects the input signal of LEVELIN.A. See descriptions for Pins 6 and 19 in Table 4-11 on page 4-28 for more information. Switch 7 in ON position... Connects LEVELIN_RET.A to COM.A (analog common). (This connection creates LEVELIN.A as single-ended input.) Switch 7 in OFF position... Floats LEVELIN_RET.A (which provides LEVELIN.A as differential input). 8 This switch affects how you set your remote common pins. For analog common pin descriptions, see Pins 5, 8, 14, 15, and 16 in Table 4-11 on page 4-28. For digital common pin descriptions, see Pins 17, 18, 20, 21, and 24 in Table 4-11 on page 4-28. Switch 8 in ON position... Connects COM.A (analog common) to COM.D (digital common). (This connection simplifies interfacing to existing cabling.) Switch 8 in OFF position... Separates COM.A (analog common) from COM.D (digital common). You must wire COM.A and COM.D separately. 57000097-00B Communication Interfaces 4-35 Advanced Energy® SINGLE 15-PIN USER PORT This section applies to Single 15-pin User port. You can identify this port using the following characteristics: • The User port is a 15-pin subminiature-D port and is on a single output unit that also has a DeviceNet interface. The User port allows you to control the Pinnacle unit through a remote controller. The connector is a 15-pin, subminiature-D, female connector (see the following illustration). Figure 4-5. 15-pin User port You may operate the Pinnacle unit solely through the 15-pin User port. User port operation does not require connection to a DeviceNet network. Installation Disconnect all sources of input power before working on this unit or anything connected to it. Note: Signals at the User port can be sensitive to environmental noise. We recommend that you take standard preventative measures against electromagnetic interference (EMI), including using shielded cabling on the User port Note: Grounding the User port at the power supply reduces noise interference. To avoid ground loop problems, you should typically ground only one end. Refer to the pin descriptions on the following pages when connecting your remote controller to the User port. Use shielded cabling to avoid EMI problems. If you have a Pinnacle Active Remote Panel and you want to operate the Pinnacle supply from the User port, you must set the control mode for USER on the control panel. 4-36 Communication Interfaces 57000097-00B Pinnacle® Plus+ 10 kW Power Supply Signals The User port is primarily an “analog” interface. Signal descriptions appear in the following table. Note that a “.A” suffix appended to a pin name indicates an analog signal; a “.D” suffix appended to a pin name indicates a digital signal. An overline on a signal name (for example, OUTPUT ENABLE.D) indicates that the signal is true when low. Pin Descriptions The User port has priority for selecting targets, even when the unit is in local or host control. Thus to select targets from the active front panel, the Pinnacle Active Remote Panel, or a host computer connected to the host port, you must set the target to 1 at the User port. Leaving the target bits open or leaving the User port pins unconnected causes the target selection at the User port to default to 1. Table 4-13. Single 15-Pin User Port Pin Descriptions Signal Pin Return Pin 1 10, 13, 14, 15 2 6 3 6 57000097-00B Pin Name Signal Type Description Input This pin is the collector side of the opto-couplers for status LEDs VOUT.A Output This pin provides a fully buffered 0 to 10 V signal representing output voltage: 10 V = 1000 Vdc. When the open circuit output voltage is 1500 Vdc, the voltage on pin 2 is 12 Vdc. It will sink and source to 10 mA; its impedance is 100 POUT.A Output This pin provides a fully buffered 0 to 10 V signal representing output power: 10 V +/- 1% = 20,000 W in a single unit system (that is, without any slaves connected). It will sink and source to 10mA; its impedance is 100 +24V Communication Interfaces 4-37 Advanced Energy® Table 4-13. Single 15-Pin User Port Pin Descriptions (Continued) 4-38 Signal Pin Return Pin 4 9 5 6 6 n/a 7 8 8 n/a 9 Pin Name Signal Type Description OUTPUT ENABLE.D Input This signal is used to turn on output power from the 15pin User port. Closure between OUTPUT ENABLE.D and OUT ENABLE COM.D (pin 9) will turn on output power. XPROG.A Input This signal is the 0 to 10 V analog set point input which is sent through the custom CMR buffer. 1 to 10 V = 0 to full scale for each regulation mode. n/a This signal is used as a remote ground. VOUT.A (pin 2), POUT.A (pin 3), and XPROG.A (pin 5) should be referenced to this pin. digital output When output power is enabled, a contact closure between pin 7 and pin 8 occurs. Use 0.5 A maximum for this readback. PWRON COM.D n/a This signal is the return for pin 7. n/a OUT ENABLE COM.D n/a This signal is the return reference for SETPOINT.D, OUTPUT ENABLE.D, and OUTPUT.D (pins 1, 4, and 13). 10 n/a MOD GREEN Output This pin is the emitter side of an opto-coupler (for MOD LED). 11 12 INTERLOCK. D Input This digital signal provides a safety interlock. Closure between pins 11 and 12 enables the ac input power contactor. 12 n/a INTLK COM.D n/a COM.A PWRON.D Communication Interfaces This signal is the return reference for the interlock signal on pin 11. 57000097-00B Pinnacle® Plus+ 10 kW Power Supply Table 4-13. Single 15-Pin User Port Pin Descriptions (Continued) Signal Pin Return Pin Pin Name Signal Type Description 13 n/a NET GREEN Output This pin is the emitter side of an opto-coupler (for NET LED). 14 n/a MOD AMBER Output This pin is the emitter side of an opto-coupler (for the MOD LED). 15 n/a NET AMBER Output This pin is the emitter side of an opto-coupler (for the NET LED). DUAL 24 V 37-PIN USER PORT This section applies to the dual 24 V 37-pin User port. • The User port is a 37-pin subminiature-D port. • The User port label is Dual Iso User Port. The User port is an analog interface that allows the use of a remote controller. It is a 24 V interface card with a 37-pin, subminiature-D connector. This connector will be male or female, depending on which options you specified at the time you ordered your Pinnacle Plus+ unit. Figure 4-6. 37-pin subminiature-D male and female connector Note: If you have an isolated 24 V User port card, your card provides isolation of more than 500 Vrms from the Pinnacle Plus+ unit's SELV logic and control circuitry to all 37 pins on the connector. 57000097-00B Communication Interfaces 4-39 Advanced Energy® Installation Disconnect all sources of input power before working on this unit or anything connected to it. Connecting to the User port does not require removing the Pinnacle Plus+ unit's cover. Removing the cover from any power supply could result in severe personal injury and/or damage to the unit. Do not attempt to change any of the potentiometers or jumpers on the User port board. Note: Signals at the User port can be sensitive to noise. We recommend that you take standard preventative measures against electro-magnetic interference (EMI), including using shielded cabling on the User port. Note: Turn off ac input power to the Pinnacle Plus+ unit before connecting a cable to the User port connector. Note that we recommend taking standard preventative measures against electro-static discharge (ESD) around all Pinnacle Plus+ units. Note: Grounding the User port at the power supply reduces noise interference. To avoid ground loop problems, you should typically ground only one end. Connect your system's 24 V supply to pins 10, 26, and 31 on the Pinnacle Plus+ supply's User port. Your 24 V supply must meet the following requirements: • • • • • Voltage (nominal): 24 V dc Ripple: 3.6 V ac maximum Permissible voltage range: 20 V to 30 V V surge (t < 0.5 s): 35 V Current (depends on loading of outputs): 5.0 A maximum Before operating your unit from the User port, ensure that the control mode is set to the User port. (The default is User port on units which feature the User port as the sole interface.) If you have been using another control mode, reset the control mode to the User port before attempting to send User port signals. 4-40 Communication Interfaces 57000097-00B Pinnacle® Plus+ 10 kW Power Supply Signals The table on the next page provides information about each pin. The following paragraphs give general information about the analog and digital signals. Note that signals that have the prefix “A_” control Side A, and signals that have the prefix “B_” control Side B. ANALOG SIGNALS A “.A” suffix appended to a pin name indicates an analog signal. Analog common lines are denoted by the “COM.A” suffix. Analog outputs can source or sink up to 3.0 mA. The input impedance of the analog inputs is 200 k. DIGITAL SIGNALS A “.D” suffix appended to a pin name indicates a digital signal. Digital commons are denoted by the “COM.D” suffix. Digital outputs are short-circuit protected. The signal levels for digital outputs are as follows: • Logical “0”: V maximum with 1.0 mA maximum leakage • Logical “1”: Vpos less 1.5 V minimum (Vpos refers to the 24 V supply). Output current may range from 0.5 mA to 0.5 A The signal levels for digital inputs are as follows: • Logical “0”: -35 V to +5 V with 0.5 mA maximum leakage • Logical “1”: +13 V to +30 V, and 8.5 mA typical 57000097-00B Communication Interfaces 4-41 Advanced Energy® Pin Description Table The following table provides pin and signal descriptions for the User port. Table 4-14. Dual 24 V 37-Pin User Port Pin Descriptions Signal Pin Return Pin 1 20 2 n/a Pin Name Signal Type Description A_INTLK.D digital input A low on this pin inhibits the main contactor from closing or opens the main contactor if it is already closed. The pin needs to be pulled up to 24 V by between 100 and 5 k. The fault condition is shown on the front panel. A_INCOM.A n/a This line is a dedicated return for analog inputs. Reference A_LEVELIN.A (pin 21) to this pin. 3 23 A_POUT.A analog output This 0 to 10 V signal represents output power. Full scale (10 V) represents the rating of the supply (see the “Specifications” chapter of this manual for more information). 4 23 A_IOUT.A analog output This 0 to 10 V signal represents output current. Full scale (10 V) represents the rating of the supply (see the “Specifications” chapter of this manual for more information). 4-42 Communication Interfaces 57000097-00B Pinnacle® Plus+ 10 kW Power Supply Table 4-14. Dual 24 V 37-Pin User Port Pin Descriptions (Continued) Signal Pin Return Pin 5 n/a Pin Name A_INCOM.D Signal Type Description n/a This line is a dedicated return for digital inputs. Reference A_ON.D (pin 6), A_PREG.D (pin7), A_RESET.D (pin 24), and A_IREG.D (pin 25) to this pin. You also may reference the 24 V supply (pins 10, 26, 31) to this return. 6 5 A_ON.D digital input When operating in analog control mode, a low to high transition on this pin turns on the output; a high to low transition shuts off the output. 7 5 A_PREG.D digital input This pin is used with A_IREG.D (pin 25) to set the regulation mode for Side A. See Table 4-16 on page 4-49 for more information. 57000097-00B Communication Interfaces 4-43 Advanced Energy® Table 4-14. Dual 24 V 37-Pin User Port Pin Descriptions (Continued) Signal Pin Return Pin 8 28 Pin Name A_ARC.D Signal Type Description output A pulse of a predetermined width (normally 100 ms) will be seen on this pin under 2 different conditions. Note: Both conditions can be active during the same run. 1. If the hard arc count limit is non-zero and the number of hard arcs seen exceeded this limit during the last run, the pulse will occur when the output is turned off. 2. If you set the hard arc count limit to zero, this signal will pulse for a predetermined time for every hard arc seen by the unit. If another hard arc is seen before the last pulse is complete, the pulse width will be refreshed to the full width. These conditions will also be indicated through the ARC LED on a Passive Display Panel. 4-44 9 28 A_SETPOINT.D digital output A high on this signal indicates that the output is equal to the requested set point (within the specified accuracy). 10 5 24 V SUPPLY input Connect your system's 24 V power supply to this pin. Communication Interfaces 57000097-00B Pinnacle® Plus+ 10 kW Power Supply Table 4-14. Dual 24 V 37-Pin User Port Pin Descriptions (Continued) Signal Pin Return Pin Pin Name Signal Type Description 11 29 B_SETPOINT.D digital output A high on this signal indicates that the output is equal to the requested set point (within the specified accuracy). 12 29 B_ARC.D output A pulse of a predetermined width (normally 100 ms) will be seen on this pin under two different conditions. Note: Both conditions can be active during the same run. 1. If the hard arc count limit is non-zero and the number of hard arcs seen exceeded this limit during the last run, the pulse will occur when the output is turned off. 2. If your unit has been configured for signaling on every hard arc, this signal will pulse for a predetermined time for every hard arc seen by the unit. If another hard arc is seen before the last pulse is complete, the pulse width will be refreshed to the full width. 13 15 B_PREG.D digital input This pin is used with B_IREG.D (pin 32) to set the regulation mode for Side B. See Table 4-16 on page 4-49 for more information. 57000097-00B Communication Interfaces 4-45 Advanced Energy® Table 4-14. Dual 24 V 37-Pin User Port Pin Descriptions (Continued) Signal Pin Return Pin Pin Name 14 15 B_ON.D 15 n/a B_INCOM.D Signal Type Description digital input When operating in analog control mode, a low to high transition on this signal turns on the output, and a high to low transition shuts off the output. n/a This line is a dedicated return for digital inputs. Reference B_PREG.D (pin 13), B_ON.D (pin 14), B_IREG.D (pin 32), and B_RESET.D (pin 33) to this pin. 16 34 B_IOUT.A analog output This 0 to 10 V signal represents output current. Full scale (10 V) represents the maximum current of the supply. See the “Specifications” chapter of this manual. 17 34 B_POUT.A analog output This 0 to 10 V signal representing output power. Full scale (10 V) represents the rating of the supply. See the “Specifications” chapter of this manual. 18 n/a B_INCOMA n/a This line is a dedicated return for analog inputs. Reference B_LEVELIN.A (pin 36) to this pin. 19 4-46 37 B_INTLK.D digital input Communication Interfaces A low on this signal inhibits the main contactor from closing or opens the main contactor if it is already closed. This pin needs to be pulled up to 24 by between 100 and 5 k. The fault condition is shown on the front panel. 57000097-00B Pinnacle® Plus+ 10 kW Power Supply Table 4-14. Dual 24 V 37-Pin User Port Pin Descriptions (Continued) Signal Pin Return Pin Pin Name Signal Type Description 20 n/a A_INTLKCOM.D n/a This line is a dedicated return for A_INTLK.D (pin 1). 21 2 A_LEVELIN.A analog input This signal is used to program the output level. Full scale (10 V) represents the maximum power, current, or voltage of the supply. See the “Specifications” chapter of this manual for more information. 22 23 A_VOUT.A n/a This 0 to 10 V signal represents output voltage. Full scale (10 V) represents the rating of the supply. See the “Specifications” chapter of this manual for more information. 23 n/a A_OUTCOM.A n/a This line is a dedicated return for analog output. Reference A_POUT.A (pin 3), A_IOUT.A (pin 4), and A_VOUT.A (pin 22) to this pin. 24 5 A_RESET.D digital input A high on this pin will reset active explicit-clear faults for unit A, provided that the fault conditions are no longer present. This pin must be returned to the inactive state (low) to enable the unit output. 25 5 A_IREG.D digital input This pin is used with A_PREG.D (pin 7) to set the regulation mode. See description of pin 7 for the logic table associated with this pin. 57000097-00B Communication Interfaces 4-47 Advanced Energy® Table 4-14. Dual 24 V 37-Pin User Port Pin Descriptions (Continued) Signal Pin Return Pin Pin Name Signal Type Description 26 5 24 V SUPPLY input Connect your system's 24 V power supply to this pin. 27 28 A_OUTPUT.D digital output When high, this signal indicates that the contactor is closed and output power is on. 28 n/a A_OUTCOM.D n/a This signal is a dedicated return for digital outputs. Reference A_ARC.D (pin 8), A_SETPOINT.D (pin 9), and A_OUTPUT.D (pin 27) to this pin. 29 n/a B_OUTCOM.D n/a This signal is a dedicated return for digital outputs. Reference B_SETPOINT.D (pin 11), B_ARC.D (pin 12), and B_OUTPUT.D (pin 30) to this pin. 30 29 B_OUTPUT.D digital output When high, this signal indicates that the contactor is closed and output power is on. 31 5 24 V SUPPLY input Connect your system's 24 V power supply to this pin. 32 15 B_IREG.D digital input This pin is used with B_PREG.D (pin 13) to set the regulation mode. See description of pin 13 for logic table associated with this signal. 33 4-48 15 B_RESET.D digital input Communication Interfaces A high on this pin will reset active explicit-clear faults for unit B, provided that the fault conditions are no longer present. This pin must be returned to the inactive state (low) to enable the unit output. 57000097-00B Pinnacle® Plus+ 10 kW Power Supply Table 4-14. Dual 24 V 37-Pin User Port Pin Descriptions (Continued) Signal Pin Return Pin 34 n/a Pin Name Signal Type Description n/a This line is a dedicated return for analog outputs. B_OUTCOM.A Reference B_IOUT.A (pin 16), B_POUT.A (pin 17), and B_VOUT.A (pin 35) to this pin. 35 34 B_VOUT.A analog output This signal provides a fully buffered 0 to 10 V signal representing output voltage. Full scale (10 V) represents the rating of the supply. See the “Specifications” chapter of this manual. 36 n/a B_LEVELIN.A analog input This signal is used to program the output level. Full scale (10 V) represents the rating of the supply. See the “Specifications” chapter of this manual. 37 n/a B_INTLKCOM.D n/a This signal is a dedicated return for B_INTLK.D (pin19). Table 4-15. Regulation Mode (pin 7 and pin 25) Controlling Unit A Regulation Mode Pin 7 Pin 25 Voltage low low Power high low Current low high Invalid State high high Table 4-16. Regulation Mode (pin 13 and 32) Controlling Unit B 57000097-00B Regulation Mode Pin 13 Pin32 Voltage low low Power high low Communication Interfaces 4-49 Advanced Energy® Table 4-16. Regulation Mode (pin 13 and 32) Controlling Unit B (Continued) Regulation Mode Pin 13 Pin32 Current low high Invalid State high high MASTER/SLAVE PULSE PORT Note: The master/slave feature is only available on Pinnacle Plus+ 10 kW units. This feature is not available on Pinnacle Plus+ 5 kW or dual units. Connector The Master/Slave Pulse port is a 15-pin, subminiature-D connector that is used for master/slave operations. Figure 4-7. Master/Slave Pulse port connector 4-50 Communication Interfaces 57000097-00B Pinnacle® Plus+ 10 kW Power Supply Pin Descriptions Table 4-17 provides pin and signal descriptions for the Master/Slave Pulse port. Table 4-17. Master/Slave Pulse Port Pin and Signal Descriptions 57000097-00B Pin Associated Pin Pin Name 1 n/a unassigned unassigned 2 n/a unassigned unassigned 3 n/a unassigned unassigned 4 5 POFF-MSP Pulse Off signal 5 4 POFF-MSP Return 6 7 PON-MSP 7 6 PON-MSP Return Pulse On signal return 8 Cable shield SYNC_POWER_SENSE Verifies all units have logic control power 9 n/a unassigned unassigned 10 n/a unassigned unassigned 11 12 OC-MSP Overcurrent signal 12 11 OC-MSP Return Overcurrent signal return 13 14 OV-MSP Overvoltage signal 14 13 OV-MSP return Overvoltage signal return 15 n/a unassigned Communication Interfaces Description Pulse Off signal return Pulse On signal unassigned 4-51 Advanced Energy® Cable Configuration Figure 4-8 illustrates the Master/Slave Pulse port cable configuration. 15" lead 5" lead Figure 4-8. Master/Slave Pulse port cable SYNC PULSE PORT Connector Figure 4-9 illustrates the 9-pin subminiature-D Sync Pulse port connector. Figure 4-9. Sync Pulse connector 4-52 Communication Interfaces 57000097-00B Pinnacle® Plus+ 10 kW Power Supply Pin Descriptions Table 4-18 provides pin and signal descriptions for the Sync Pulse port. Table 4-18. Sync Pulse Port Pin and Signal Descriptions Pin Associated Pin Pin Name Description 1 6 SYNC_POWER_SE NSE 2 6 +8V 3 7 HARC-SP 4 8 PON-SP Pulse On—350 ns pulse, pulsing switch close 5 9 POFF-SP Pulse Off—300 ns pulse, pulsing switch open 6 1 and 2 GND 7 3 HARC return Hard Arc signal return 8 4 PON-SP return Pulse On signal return 9 5 POFF-SP return Pulse Off signal return Verifies all units have logic control power +8V for future distribution box Hard Arc—100 ns pulse at beginning of each event Ground (chassis) Cable Configuration Figure 4-10 illustrates the Sync Pulse port cable configuration. 57" lead 4" lead Figure 4-10. Sync Pulse cable 57000097-00B Communication Interfaces 4-53 Advanced Energy® DEVICENET™ PORT The rear panel of your Pinnacle Plus+ power supply features a DeviceNet™ port for interfacing with a DeviceNet network. The DeviceNet port is a round, five-pin, male micro connector, which is electrically isolated from the power supply (see Figure 4-11). Note: Dual Pinnacle Plus+ units (units containing two separate inverters) share the common DeviceNet network micro connector, but each side is controlled and operated independently through this port. The following discussion describes the operation of one side of the unit. The other side operates the same way. Figure 4-11. DeviceNet™ port with pin designations Installation Use the appropriate female, micro connector and cable to connect to the DeviceNet port connector. See the DeviceNet Specification (revision 2.0) from the Open DeviceNet Vendor Association, Inc. for specifics on the mating connector and cable. Use the rotary switches to select a baud rate and set the unit address (MAC ID). PIN DESCRIPTIONS This table lists the pin numbers and DeviceNet pin names. See the DeviceNet Specification (revision 2.0) for definitions of these pin names. Table 4-19. DeviceNet™ Pin Descriptions 4-54 Pin Number Pin Name 1 Drain 2 V+ 3 V- 4 CAN_H 5 CAN_L Communication Interfaces 57000097-00B Pinnacle® Plus+ 10 kW Power Supply ROTARY SWITCHES: BAUD RATE AND ADDRESSING The DeviceNet interface features three rotary switches, located on the rear of the Pinnacle Plus+ unit, which are read each time the DeviceNet interface powers up (see Figure 4-12). Use the DATA RATE switch to select a baud rate: 125, 250, or 500 kbaud. A switch setting in the “PGM” region lets you configure the baud rate via DeviceNet. Note: If your Pinnacle Plus+ unit is a dual output unit and if it has two DeviceNet cards (one for each side), it is important that you set the DATA RATE for both sides to the same setting as the DeviceNet network setting. Any card not set to the network setting will fault when the network boots up. Figure 4-12. DeviceNet rotary switches and LEDs Use the NODE ADDRESS rotary switches, MSD and LSD, to select the unit’s address (MAC ID). MAC IDs 0 through 63 are valid. Use the MSD switch to select the MAC ID’s most significant digit; use the LSD switch to select the MAC ID’s least significant digit. Switch settings greater than 63 (or in the “PGM” region of the MSD switch) let you configure the MAC ID via DeviceNet. Note: If your Pinnacle Plus+ unit is a dual output unit and if it has DeviceNet cards (one for each side), it is important that you set the NODE ADDRESS of the first card to a different setting than the NODE ADDRESS of the second card. If you do not, one side will fault when the network boots up. Operation You may operate your Pinnacle Plus+ unit either through the 15-pin User port (user control mode) or through the DeviceNet port (host control mode). To operate your Pinnacle Plus+ unit through the DeviceNet port, you must also close the interlock on User port pins 11 and 12. For best results during DeviceNet operation, do not create a connection between pins 4 and 9 on the 15-pin User port. Closing and opening a connection between these two pins overrides output on and off signals from DeviceNet. When the Pinnacle Plus+ unit powers up, it defaults to user control mode. Engaging DeviceNet places the unit in host control mode and power regulation mode. 57000097-00B Communication Interfaces 4-55 Advanced Energy® Before operating your Pinnacle Plus+ unit through the DeviceNet port, ensure that your system controls the interlock on User port pins 11 and 12 as well as with the DeviceNet port. (But ensure that no connection exists between pins 4 and 9 on the User port.) Also ensure that you have selected an appropriate MAC ID and baud rate. Finally, ensure that you have read the following information about command and respond messages and the DeviceNet LEDs. When setting parameters in the Pinnacle unit via the DeviceNet controller, send the “Set_attribute_single” command and then send the “Get_attribute_single” command to ensure the data was received. To maintain proper timing of the application code, the DeviceNet interface is given a low priority. Therefore, if you do not verify the receipt of the data by the Pinnacle Plus+ unit, you may be required to wait up to 500 ms before sending the next explicit command to ensure proper receipt of each explicit set command. The DeviceNet controller should be set to monitor the status of the unit and DeviceNet communications. If the DeviceNet communication fails or the power to the power supply fails, the DeviceNet controller must go into a safe mode. If the DeviceNet controller is only reading and sending the poll commands, it is possible for the power supply to restart immediately and output power when communication is reestablished or power is restored to the Pinnacle Plus+ unit. POLL COMMAND MESSAGE The Pinnacle Plus+ DeviceNet interface operates as a slave on the DeviceNet network. The interface supports the Explicit Messages and Polled I/O Messges of the predefined master/slave connection set. The DeviceNet interface responds to poll requests in less than one millisecond and responds to explicit requests in less than 2 milliseconds. The DeviceNet interface uses DeviceNet’s Group 2 I/O Poll Command message (and the associated Group 1 I/O Poll Response message) to transfer low-level I/O data between the device (slave) and the master. For more information about this message, refer to section 7-6 of the DeviceNet specification (revision 2.0 or later). Depending on your DeviceNet configuration, some features may not be available in the Pinnacle Plus+ power supply. For ordering information, contact AE Global Services. 4-56 Communication Interfaces 57000097-00B Pinnacle® Plus+ 10 kW Power Supply One of three types of poll request in available on your unit. The poll request available to you depends on your unit’s configuration. If you do not know the unit configuration, contact AE Global Services. Table 4-20. Assembly object data poll, instance 1 Byte Bit 7 Bit 6 0 1 Bit 5 Bit 4 Bit 3 Bit 2 Bit 1 Power Output Setpoint AO (LSB) 0* 0* 0* 0* Power Output Setpoint AO (MSB) 2 Unused—Write with 0s for future compatibility 3 Unused—Write with 0s for future compatibility 4 Bit 0 ** ** ** ** ** Clear Run Micro Arcs Clear Run Hard Arcs PO Note: In Bit 0 of Byte 4, PO refers to Power On. In this bit, 1 = turns on the unit’s output; 0 = turns off the unit’s output. Note: The 16-bit Power Output value (AI/AO) is shifted right four bits, and the remaining four bits are filled with 0s. This changes the 16-bit AO to a 12-bit AO with a value of 10 V = 0x0FFF. Note: ** = Reserved. Write Reserved bits with a 0 for future compatibility. 57000097-00B Communication Interfaces 4-57 Advanced Energy® Table 4-21. Assembly object data poll, optional instance 1 and instance 101 Byte Bit 7 Bit 6 0 1 Bit 5 Bit 4 Bit 3 Bit 2 Bit 1 Bit 0 Power Output Setpoint AO (LSB) 0* 0* 0* 2 0* Power Output Setpoint AO (MSB) Ramp Rate AO (LSB) 3 0 0 0 0 4 ** ** ** ** Ramp Rate AO (MSB) ** Clear Run Micro Arcs Clear Run Hard Arcs PO Note: In Bit 0 of Byte 4, PO refers to Power On. In this bit, 1 = turns on the unit’s output; 0 = turns off the unit’s output. Note: The 16-bit Power Output value (AI/AO) is shifted right four bits, and the remaining four bits are filled with 0s. This changes the 16-bit AO to a 12-bit AO with a value of 10 V = 0x0FFF. Note: ** = Reserved. Write Reserved bits with a 0 for future compatibility. Table 4-22. Assembly object data poll, legacy instance 1 Byte Bit 7 Bit 6 0 1 Bit 5 Bit 4 Bit 3 Bit 2 Bit 1 Bit 0 Power Output Setpoint AO (LSB) 0* 0* 0* 2 0* Power Output Setpoint AO (MSB) Ramp Rate AO (LSB) 3 0 0 0 0 4 ** ** ** ** Ramp Rate AO (MSB) ** ** ** PO Note: In Bit 0 of Byte 4, PO refers to Power On. In this bit, 1 = turns on the unit’s output; 0 = turns off the unit’s output. Note: The 16-bit Power Output value (AI/AO) is shifted right four bits, and the remaining four bits are filled with 0s. This changes the 16-bit AO to a 12-bit AO with a value of 10 V = 0x0FFF. Note: ** = Reserved. Write Reserved bits with a 0 for future compatibility. 4-58 Communication Interfaces 57000097-00B Pinnacle® Plus+ 10 kW Power Supply Scaling Parts of the message structure are based on binary representations of analog voltages. Thus, they have analog scaling associated with them. The scaling for Power Output is 0 to 10 V, where 10 V equals the full rated output power capability of the Pinnacle Plus+ power system (master and slave units). For information about determining your power system’s maximum output capability, see “Explicit Messaging” on page 4-63 . RESPONSE MESSAGE The following tables present the structure of the response message. The structure of the response message varies depending on your DeviceNet configuration. Table 4-23. Assembly object, data response (instance 2) Byte Bit 7 Bit 6 Bit 5 0 1 0* 0* 0* 57000097-00B 0* Bit 1 Bit 0 Power Output AI (MSB) 0* 0* 0* 0* Voltage Output AI (MSB) Current Output AI (LSB) 0* 0* 0* 0* Current Output AI (MSB) 6 Run Micro Arc Count 7 Run Hard Arc Count 8 Bit 2 Voltage Output AI (LSB) 4 5 Bit 3 Power Output AI (LSB) 2 3 Bit 4 RMP CMode 0* INTS ARCD Communication Interfaces TS SPS POS 4-59 Advanced Energy® Note: The 16-bit Power Output value (AI) is shifted right four bits, and the remaining four bits are filled with 0s. This changes the 16-bit AI to a 12-bit AI with a value of 10 V = 0x0FFF. Note: Bytes 6 and 7 = The number of micro or hard arcs detected since the last time that output was turned on. The count is set to 0 when the DeviceNet interface is energized. These values stop incrementing at 255. If the count exceeds 255, the readback will be 255. Note: For Byte 8, the abbreviations have the following meanings: • POS stands for Power On Status: 1 = output on; 0 = output off • SPS stands for Setpoint Status: 1 = setpoint reached; 0 = setpoint not reached • TS stands for Temperature Status: 1 = good; 0 = over-temperature condition • ARCD stands for Arc Detected: 1 = on; 0 = off • INTS stands for Interlock Status: 1 = satisfied; 0 = open • 0* = Reserved • CMode stands for Control Mode: 1 = Host; 0 = local or User (not all units support this feature) • RMP stands for Ramp Status: 1 = Set point ramping; 0 = Set point not ramping (not all units support this feature) Table 4-24. Assembly object, data response (optional instance 2) Byte Bit 7 Bit 6 Bit 5 0 1 0* 0* 0* 0* 0* 0* Bit 1 Bit 0 0* Power Output AI (MSB) 0* Voltage Output AI (MSB) Current Output AI (LSB) 0* 0* 0* 6 4-60 Bit 2 Voltage Output AI (LSB) 4 5 Bit 3 Power Output AI (LSB) 2 3 Bit 4 0* Current Output AI (MSB) Ramp Rate AI (LSB) 7 0* 0* 0* 0* 8 RMP CMode 0* INTS Ramp Rate AI (MSB) ARCD Communication Interfaces TS SPS POS 57000097-00B Pinnacle® Plus+ 10 kW Power Supply Note: The 16-bit Power Output value (AI) is shifted right four bits, and the remaining four bits are filled with 0s. This changes the 16-bit AI to a 12-bit AI with a value of 10 V = 0x0FFF. Note: For Byte 8, the abbreviations have the following meanings: • POS stands for Power On Status: 1 = output on; 0 = output off • SPS stands for Setpoint Status: 1 = setpoint reached; 0 = setpoint not reached • TS stands for Temperature Status: 1 = good; 0 = over-temperature condition • ARCD stands for Arc Detected: 1 = on; 0 = off • INTS stands for Interlock Status: 1 = satisfied; 0 = open • 0* = Reserved • CMode stands for Control Mode: 1 = Host; 0 = local or User (not all units support this feature) • RMP stands for Ramp Status: 1 = Set point ramping; 0 = Set point not ramping (not all units support this feature) Table 4-25. Assembly object, data response (instance 102) Byte Bit 7 Bit 6 Bit 5 0 1 0* 0* 0* 57000097-00B Bit 2 Bit 1 Bit 0 0* Power Output AI (MSB) Voltage Output AI (LSB) 0* 0* 0* 4 5 Bit 3 Power Output AI (LSB) 2 3 Bit 4 0* Voltage Output AI (MSB) Current Output AI (LSB) 0* 0* 0* 0* Current Output AI (MSB) 6 Run Micro Arc Count 7 Run Hard Arc Count 8 Ramp Rate AI (LSB) 9 0* 0* 0* 0* 10 RMP CMode 0* INTS Ramp Rate AI (MSB) ARCD Communication Interfaces TS SPS POS 4-61 Advanced Energy® Note: The 16-bit Power Output value (AI) is shifted right four bits, and the remaining four bits are filled with 0s. This changes the 16-bit AI to a 12-bit AI with a value of 10 V = 0x0FFF. Note: Bytes 6 and 7 = The number of micro or hard arcs detected since the last time that output was turned on. The count is set to 0 when the DeviceNet interface is energized. These values stop incrementing at 255. If the count exceeds 255, the readback will be 255. Note: For Byte 8, the abbreviations have the following meanings: • POS stands for Power On Status: 1 = output on; 0 = output off • SPS stands for Setpoint Status: 1 = setpoint reached; 0 = setpoint not reached • TS stands for Temperature Status: 1 = good; 0 = over-temperature condition • ARCD stands for Arc Detected: 1 = on; 0 = off • INTS stands for Interlock Status: 1 = satisfied; 0 = open • 0* = Reserved • CMode stands for Control Mode: 1 = Host; 0 = local or User (not all units support this feature) • RMP stands for Ramp Status: 1 = Set point ramping; 0 = Set point not ramping (not all units support this feature) Scaling Parts of the Message structure are based on binary representation of analog voltages. Thus they have analog scaling associated with them. The scaling for power output is 0 to 10 V, where 10 V = the full-rated output power capability of the Pinnacle Plus+ power system (master and slave units). The read back is limited to 10 V (0x0FFF), even in those cases where output may temporarily exceed the maximum output capability of the power system. The scaling for voltage output is 0 to 10 V. Depending on the DeviceNet configuration, 10 V equals 1000 V or the maximum output voltage capability of the unit. The read back is limited to 10 V (0x0FFF), even in those cases where output may temporarily exceed 1000 V or the maximum output voltage capability. The scaling for current output is 0 to 10 V. Depending on the DeviceNet configuration, 10 V equals the maximum output current capability of the unit or the maximum output current capability of the transducers. The read back is limited to 10 V (0x0FFF), even in those cases where output may temporarily exceed the maximum output current capability. 4-62 Communication Interfaces 57000097-00B Pinnacle® Plus+ 10 kW Power Supply EXPLICIT MESSAGING The DeviceNet interface provides a vendor-specific Application Object so that you can receive information about the power system parameters. Depending on the DeviceNet configuration, you must use Class Code 100 (0x64), Instance 1 attributes to send the explicit messages in Table 4-26. Note: Table 4-26 shows the Class Code 100 (0x64), Instance 1 attributes used to retrieve this information. Depending on your DeviceNet configuration, some features may not be available in the Pinnacle Plus+ power supply. For ordering information, contact AE Global Services. Table 4-26. Instance 1 attributes Attribute Access Name Type Value 1 Get Power UINT Power output expressed in 12-bit A/D units with upper 4 bits equaling 0. 2 Get Voltage UINT Voltage output expressed in 12-bit A/D units with upper 4 bits equaling 0. 3 Get Current UINT Current output expressed in 12-bit A/D units with upper 4 bits equaling 0. 4 Set/Get Ramp Rate Set Point UINT Ramp rate set point expressed in 12-bit A/D units with upper 4 bits equaling 0. 57000097-00B Communication Interfaces 4-63 Advanced Energy® Table 4-26. Instance 1 attributes Attribute 5 Access Get Name Status Type USINT Value Returns 1 (8-bit) data byte: • Bit 0 = POS (0 = Power Off; 1 = Power On) • Bit 1 = SPS (0 = Not At Set Point; 1 = At Set Point) • Bit 2 = TS (0 = Temp Not OK; 1 = Temp OK) • Bit 3 = ARCD (0 = No Arc Detected; 1 = Arc Detected) • Bit 4 = INTS (0 = Interlock Not Satisfied; 1 = Interlock Satisfied) • Bit 5 is not used. • Bit 6 = Control Mode 0 = Unit not in host mode 1 = Unit in host mode • Bit 7= Ramping State (not all units support this feature) 0 = Not ramping 1 = Set point ramping 6 4-64 Get Max Power UINT Communication Interfaces The Max Power attribute returns a value in Watts if the unit is operating stand alone. For example, a value of 20,000 equates to 20,000 W. The Max Power attribute scaling is Watts x 10 if the unit is operating as a master in a Master/Slave system. In this case, a value of 2,000 equates to 20,000 W. Use the internal status attribute to determine if the unit is in master/slave mode. 57000097-00B Pinnacle® Plus+ 10 kW Power Supply Table 4-26. Instance 1 attributes Attribute Access Name Type Value 7 Get Max Current UINT The Max Current attribute returns a value in Amperes. For example, a value of 80 equates to 80 A. Depending on your DeviceNet configuration, this value is the maximum output current of the transducers, not the maximum output current of the unit. 8 Get Internal Status USINT Returns 1 (8-bit) data byte: • Bit 0 = Operation Mode 0 = Stand Alone 1 = Master/Slave • Bits 1 through 7 not used. 13 14 15 Get Get Get 57000097-00B DeviceNet Application SW Part Number SHORT_ STRING (Returns 14 characters) DeviceNet application software part number. DeviceNet Configuration SW Part Number SHORT_ STRING (Returns 14 characters) DeviceNet configuration software part number. Pinnacle Plus+ Firmware Application Part Number SHORT_ STRING (Returns 14 characters) Pinnacle Plus+ application software part number. Communication Interfaces Note: If the attribute is not supported, the unit responds with the DeviceNet ‘‘Attribute Not Supported’’ error code (14 hexadecimal). Note: If the attribute is not supported, the unit responds with the DeviceNet ‘‘Attribute Not Supported’’ error code (14 hexadecimal). Note: If the attribute is not supported, the unit responds with the DeviceNet ‘‘Attribute Not Supported’’ error code (14 hexadecimal). 4-65 Advanced Energy® Table 4-26. Instance 1 attributes Attribute 16 81 Access Get Set/Get Name Type Value Pinnacle Plus+ Firmware Configuration Part Number SHORT_ STRING (Returns 14 characters) Pinnacle Plus+ configuration software part number. Joule Mode Enable BOOL The following parameters apply for the Joule Mode Enable attribute: 0 = Disable and 1 = Enable. If you attempt to change the enable status while output power is on, the unit returns a Device_State_Conflict error. If you send a value outside the allowable range for the attribute, the unit returns an Invalid_Attribute_Value error. Note: If the attribute is not supported, the unit responds with the DeviceNet ‘‘Attribute Not Supported’’ error code (14 hexadecimal). Note: If the attribute is not supported, the unit responds with the DeviceNet ‘‘Attribute Not Supported’’ error code (14 hexadecimal). 82 Set/Get Joule Set Point UDINT You can set the joule set point to any value between 0 and 9999999 in 1 joule increments. If you attempt to change the joule set point while output power is on, the unit returns a Device_State_Conflict error. If you send a value outside the allowable range for the attribute, the unit returns an Invalid_Attribute_Value error. Note: If the attribute is not supported, the unit responds with the DeviceNet ‘‘Attribute Not Supported’’ error code (14 hexadecimal). 4-66 Communication Interfaces 57000097-00B Pinnacle® Plus+ 10 kW Power Supply Table 4-26. Instance 1 attributes Attribute 90 Access Set/Get Name Hard Arc Count History Type UDINT Value The number of hard arcs detected. The default is 0 when the DeviceNet interface is energized. Writing a 0 to this attribute sets all hard arc history to 0. Note: If the attribute is not supported, the unit responds with the DeviceNet ‘‘Attribute Not Supported’’ error code (14 hexadecimal). 91 Set/Get Micro Arc Count History UDINT The number of micro arcs detected. The default is 0 when the DeviceNet interface is energized. Writing a 0 to this attribute sets all micro arc history to 0. Note: If the attribute is not supported, the unit responds with the DeviceNet ‘‘Attribute Not Supported’’ error code (14 hexadecimal). 93 Set/Get Arc Trip Limit Voltage UDINT Get or set the arc trip limit voltage (in V). Allowed values are 25 V to 400 V (in 1 V increments), but may vary depending on your unit configuration. Note: If the attribute is not supported, the unit responds with the DeviceNet ‘‘Attribute Not Supported’’ error code (14 hexadecimal). 57000097-00B Communication Interfaces 4-67 Advanced Energy® Table 4-26. Instance 1 attributes Attribute 94 Access Set/Get Name Run Arc Count Clear Type USINT Value Set to clear the run hard arc counts and run micro arc counts. • Bit 0 = Clear run micro arc count (0 = No effect; 1 = Clear) • Bit 1 = Clear run hard arc count (0 = No effect; 1 = Clear) • Bits 2 through 7 = Not used Note: If the attribute is not supported, the unit responds with the DeviceNet ‘‘Attribute Not Supported’’ error code (14 hexadecimal). 95 Set/Get Run Hard Arc Count (8-bit) USINT Get the run hard arc counts. When the counter reaches 255, it remains 255 until you clear the count. Write a 0 to clear the Hard Arc Run Count. Note: If the attribute is not supported, the unit responds with the DeviceNet ‘‘Attribute Not Supported’’ error code (14 hexadecimal). 96 Set/Get Run Micro Arc Count (8-bit) USINT Get the run micro arc counts. When the counter reaches 255, it remains 255 until you clear the count. Write a 0 to clear the Micro Arc Run Count. Note: If the attribute is not supported, the unit responds with the DeviceNet ‘‘Attribute Not Supported’’ error code (14 hexadecimal). 4-68 Communication Interfaces 57000097-00B Pinnacle® Plus+ 10 kW Power Supply Table 4-26. Instance 1 attributes Attribute 97 Access Set/Get Name Arc Shutdown Time Type UDINT Value Get or set the arc shutdown time. Send/returns an index value identifying the shutdown time in µs. The times may vary depending on your unit configuration. If the attribute is not supported, the unit responds with the DeviceNet ‘‘Attribute Not Supported’’ error code (14 hexadecimal). 100 Get Max Voltage UINT Index Shutdown Time (µs) 0 10 1 20 2 30 3 40 4 50 5 100 6 200 7 500 8 1000 9 2500 The Max Voltage attribute returns a value in volts. Depending on your DeviceNet configuration, this value is 1000 V or the maximum output voltage capability of the unit. This value is the scale used in the poll message. Note: If the attribute is not supported, the unit responds with the DeviceNet ‘‘Attribute Not Supported’’ error code (14 hexadecimal). 57000097-00B Communication Interfaces 4-69 Advanced Energy® For more information about this type of messaging, refer to section 4-2 of the DeviceNet Specification (version 2.0 or later). Table 4-27. Common services codes Service Code Class Instance Service Name 14 (0x0E) Yes Yes Get_Attribute_Single 16 (0x10) No Yes Set_Attribute_Single Rear Panel LEDs The rear panel of the Pinnacle Plus+ unit features two bi-color LEDs (see Figure 4-12). One is labeled MOD and indicates module status. The other is labeled NET and indicates network status. MODULE STATUS LED The MOD bi-color (amber/green) LED provides device status. It indicates whether the device has power and is operating properly. Table 4-28. MOD Status LED If the LED is the state indicated is Off Green (steady) No power The unit is not receiving power. Operational The unit is operating normally. Standby The unit needs maintenance because the configuration is missing, incomplete, or incorrect. Unrecoverable Fault The unit has experienced a fault from which it cannot recover; you may need to replace the unit. Device Self-Testing The unit is running self diagnostics Flashing Green Amber Flashing Amber/ Green which means that For information on LED flash rates, refer to section 8.2.8 of the DeviceNet Specification (revision 2.0). 4-70 Communication Interfaces 57000097-00B Pinnacle® Plus+ 10 kW Power Supply For information about Module Status LED indications during power-up, refer to Section 8.2.4 of the DeviceNet Specification (revision 2.0). NETWORK STATUS LED The NET bi-color (amber/green) LED indicates the status of the communication link. Table 4-29. Network Status LED If the LED is the state indicated is No power The unit is not on-line because: 1) it has not completed the Dup_MAC_ID test yet; or 2) it is not receiving power (check the MOD LED). Link Okay The unit is on-line and allocated to the master. On-line, Not Connected The unit is on-line but has no connections in its existing state because: 1) the unit has no established connections to other nodes; or 2) the unit is not allocated to the master. Off Green (steady) Flashing Green 57000097-00B which means that Communication Interfaces 4-71 Advanced Energy® Table 4-29. Network Status LED (Continued) If the LED is the state indicated is Flashing Amber which means that Connection Time-out, Critical Link Failure One or more I/O connections are in the timed-out state. Critical Link Failure Communication has failed; that is, the unit has detected an error that has made it incapable of communicating on the network. Note: If you have a dual Pinnacle Plus+ unit, the causes of this failure may be 1) the two DeviceNet cards are not set to the same Data Rate as the network; or 2) the two DeviceNet cards have the same Node Address. Amber For information about Module Status LED indications during power-up, refer to Section 8.2.4 of the DeviceNet Specification (revision 2.0). AE PROFIBUS PROTOCOL PROFIBUS (Process Field Bus) is an interface that lets you communicate with your Pinnacle Plus+ unit from a host (master). AE manufactures a PROFIBUS interface compliant with PROFIBUS masters described in the DIN 19245 PROFIBUS Standard DP, part III. Any PROFIBUS master that complies with this standard can communicate with AE's PROFIBUS interface. The PROFIBUS connection on the Pinnacle Plus+ unit is a 9-pin, female subminiature-D connector next to an eight-switch DIP on the rear panel. The following sections describe this DIP and aspects of the PROFIBUS protocol. Note: AE's PROFIBUS protocol does not support the following functions: address changing, freeze/unfreeze modes, or sync modes. 4-72 Communication Interfaces 57000097-00B Pinnacle® Plus+ 10 kW Power Supply Type Files (GSD Files) Type files are computer files that some Programmable Logic Controllers (PLCs) use to compile their PROFIBUS programs. These files are device-specific and contain information on features found in that device. Thus a different type file should be defined for each PROFIBUS device. You can download type files from the World Wide Web. Support is available on the PROFIBUS Trade Organization web site at www.profibus.com. Setting the Pinnacle Plus+ Unit’s Network Address Use the DIP switch next to the PROFIBUS port on the rear panel to set the Pinnacle Plus+ unit’s address. Allowable addresses are even addresses between 0 and 126, selected in binary format. To enter the unit’s address, set the switch positions for binary representation, starting with the switch on the left and proceeding to the right (descending order of significance). The switches are numbered 1 through 8. Switch 1 is the most significant bit (msb), and switch 8 is the least significant bit (lsb). Placing a switch in the “up” position, toward the number, is the same as indicating “1” binary. The following example demonstrates switch settings for an address of 12: 0000 1100 = 0x0Ch = 12. Note: You cannot change the unit’s address from the PROFIBUS master. Termination Please ensure that you follow proper termination procedures if your Pinnacle Plus+ is the last slave on the PROFIBUS cable. The termination resistors should be on the connector housing of the PROFIBUS cable (not included). Baud Rate The auto-baud feature of AE's PROFIBUS interface adjusts automatically to the rate of the PROFIBUS master system. Baud rates are available in discrete steps from 9600 bits (9.6 kbits) to 12 Mbits. The auto-baud feature operates much like a modem or FAX machine in that, at startup, there is a small delay while the interface “traverses” the different baud rates and then locks in. Please ensure that your PROFIBUS master allows for this delay. 57000097-00B Communication Interfaces 4-73 Advanced Energy® Master Reset Command Send the master reset command, Command 119, when the Pinnacle Plus+ supply has experienced a non-recoverable (“explicit clear”) fault (that is, a configuration fault or a PROFIBUS error fault). We recommend sending this command upon the startup of PROFIBUS communications so that any existing fault indications will be cleared. Watch Dog Timer As a safety feature, the PROFIBUS maintains a watch dog timer that shuts off the Pinnacle Plus+ supply's output if the PROFIBUS master stops communicating. The watch dog timer maintains a value for time (between 10ms and 10 minutes) that the Pinnacle Plus+ supply waits between commands from the master. The timer counts down this time in 10 ms increments. If your PROFIBUS system does not calculate the watch dog timer value for you or if you want to modify the existing watch dog timer value, then you may enter a timer value by using the PROFIBUS Set_Prm function call (see DIN 19245 PROFIBUS Standard Part III). To get the actual wait time value, the Pinnacle microprocessor uses the numbers you enter to octet 2 and 3 of the Set_Prm, multiplies them together, and then multiplies the result by 10 ms. Therefore, when using the Set_Prm function call, calculate the numbers for octet 2 and 3 accordingly. Remember, the values for octet 2 and 3 must not be equal or be zero. Note: You can disable the watch dog timer via the PROFIBUS master. Note: Commands 0, 1, and 119 will also turn off the power supply’s output. PROFIBUS-Specific Errors With AE's PROFIBUS interface, if an error occurs, you will see a numeric code displayed on a passive front panel or a numeric code and message displayed on an active control panel. For more information about these error codes and how to respond to them, please refer to the “Troubleshooting” chapter. In the event of a PROFIBUS error, the Pinnacle Plus+ unit turns output power off and displays the appropriate error message. All PROFIBUS errors are treated as “explicit clear” type faults; thus you must send command 119 (the “master reset” command) in the next download packet to clear them. Once all faults have been cleared, the Pinnacle Plus+ unit is ready to continue operation. 4-74 Communication Interfaces 57000097-00B Pinnacle® Plus+ 10 kW Power Supply Data Consistency Some PLCs using PROFIBUS interfaces have a problem with data consistency. (We define “data consistency” as the ability to complete the message packet construction before sending the packet to the Pinnacle Plus+ unit.) This problem most often manifests as mysteriously changed values. That is, values at the Pinnacle Plus+ unit seem to have changed automatically even though no command has executed, or they appear changed because one data byte contained the data that another data byte should have contained. The root of the problem is a shared memory block. Most PLCs share a memory block with the PROFIBUS interface. The PLC places data/packet information in the memory block, and the PROFIBUS interface reads the memory block for the next data/packet to transmit. The problem occurs when the PLC updates the data from High to Low memory locations and does not signal the PROFIBUS interface when the update is complete. (If the PLC were to notify the PROFIBUS Interface, then there would be “data consistency.”) As a result, the PROFIBUS interface sends the memory block regardless of where the PLC is in its update of that memory block. You can create a “work around” to this problem with a command sequence. (For more information about PROFIBUS commands, see the “Host/Pinnacle Software Commands” section later in this chapter.) Here is an example procedure: 1. Update the packet with the desired command. 2. Update the download packet with data for the desired command. 3. Send the download packet. 4. Repeat step 1, and continue as needed. By creating a procedure like this one, you can ensure the data for a command will not be changed before the next download packet is received. PROFIBUS SOFTWARE COMMANDS The command-based AE PROFIBUS protocol is designed to take advantage of the high transmission rates provided by the PROFIBUS standard. The download packet (outbytes) and the upload packet (inbytes) as well as the AE PROFIBUS “handshake” feature are described in the sections that follow. A complete command list follows. Note: The execution time of all individual PROFIBUS commands is less than 200 µs. If you choose not to use the handshake feature described in “Transmission Rates and the Handshake Feature” on page 4-76, commands should not be sent to the Pinnacle Plus+ power supply faster than a rate of one command per 10 ms. 57000097-00B Communication Interfaces 4-75 Advanced Energy® Transmission Rates and the Handshake Feature Recent technological improvements have made it possible for some PLCs to send commands faster than the Pinnacle Plus+ unit can respond. This situation can cause intermittent failures to respond to or execute commands. In response to this issue, AE has developed a handshake feature, which echoes back the last sent command and Command Status Response (CSR) code (when applicable). This feature allows you to send a command and wait for verification that the command was accepted before sending the next command. The handshake feature has several benefits for users. • It simplifies the programming of PLCs that interact with AE products. • It increases the bandwidth of the PROFIBUS channel by eliminating wasted time. • It provides immediate feedback regarding command execution. • It increases the reliability of PROFIBUS/Pinnacle communications. Note: You can choose not to use the handshake feature, but if you do so, commands should not be sent to the Pinnacle Plus+ power supply faster than a rate of one command per 20 ms. Download Packet The download packet for the AE PROFIBUS contains four bytes, as the following table shows. Table 4-30. Configuration of Download Bytes (Outbytes) Byte Description 0 Command 1 Data byte (LSB) 2 Data byte 3 Data byte (MSB) In the packet, Bytes 1, 2, and 3 comprise the “data field” and contain information defined by the command. Note that when the information extends over more than one byte, the packet sends the least significant byte (LSB) before the most significant byte (MSB); this arrangement is a departure from previous PROFIBUS options we have offered. 4-76 Communication Interfaces 57000097-00B Pinnacle® Plus+ 10 kW Power Supply Upload Packet During every PROFIBUS data exchange, the Pinnacle Plus+ unit supplies a 14-byte response to a download (“outbytes”) packet. The following list shows the response or “upload packet.” These bytes are also known as “inbytes.” Table 4-31. Configuration of Upload packet (inbytes) Byte Description 0 Status flags--first byte 1 Status flags--second byte 2 Actual power low 3 Actual power high 4 Actual voltage low 5 Actual voltage high 6 Actual current low 7 Actual current high 8 Data byte (LSB) 9 Data byte 10 Data byte 11 Data byte 12 Data byte (MSB) 13 Data field definition STATUS FLAG BYTES Bytes 0 and 1 of the upload packet contain information about the Pinnacle Plus+ unit; this information appears as status bits (or status “flags”). Table 4-32 defines these status bits for units with a standard configuration. Table 4-33 defines the status bits for units configured to run joule recipes. (In general, if the bit is set (=1), the condition is true). 57000097-00B Communication Interfaces 4-77 Advanced Energy® Table 4-32. Upload Status Bytes 4-78 First Status Byte 0 = Control mode (with bit 9) 1 = Control mode (00=User, 01=Local, 10=PROFIBUS) 2 = Set point status OK 3 = Unused 4 = End of Target Life (EOTL) 5 = Active toggle bit 6 = Bus fault (high or low) 7 = Inverter low Second Status Byte 0 = Fault active (1=fault exists) 1 = Overtemperature condition 2 = Interlock mechanism open 3 = Momentary power failure 4 = Joule mode enabled 5 = Contactor open 6 = Joules reached 7 = Output is on Communication Interfaces 57000097-00B Pinnacle® Plus+ 10 kW Power Supply Table 4-33. Upload status bytes (joule recipe configuration) Status Byte Byte 0 Status Bit Definitions • Bit 0 = Plasma ignited (see explanation below for more information) • Bits 1, 2, and 3 = Joule recipe active step (read the binary bit pattern and interpret as follows): 4 000b = step 1 (while the recipe step is running) 4 001b = step 2 (while the recipe step is running) 4 010b = step 3 (while the recipe step is running) 4 011b = step 4 (while the recipe step is running) 4 100b = step 5 (while the recipe step is running) 4 101b = step 6 (while the recipe step is running) 4 110b = step 7 (while the recipe step is running) Note: 111b = step 8 (while the recipe step is running) • • • • Byte 1 Bit 4 = End of target life (EOTL) Bit 5 = Active toggle bit Bit 6 = Set point OK Bit 7 = Always set • Bit 0 = Fault active 4 When this bit is set (= 1) faults exist • Bit 1 = Overtemperature condition • Bit 2 = Interlock open • Bit 3 = Nearly end of recipe step (see explanation below for more information) • Bit 4 = Joule mode enabled • Bit 5 = Contactor open • Bit 6 = Joules reached • Bit 7 = Output on Plasma Ignited Bit: In the first status byte, bit 0 indicates if plasma is ignited. As soon as output is turned on and plasma is ignited (joule count is started) bit 0 is set (that is, = 1). As long as output is off, or output is turned on but no plasma is ignited (no joule count), bit 0 is not set (that is = 0). Nearly End of Recipe Step Bit: In the second status byte, bit 3 indicates the recipe step is nearly ending. When this bit is set (that is, equals 1), the joule counter/run timer is down to the value set with command 72. The bit will reset to 0 at the start of the next recipe step. Your product may function with the end of joule recipe indicator versus the end of each step indicator. 57000097-00B Communication Interfaces 4-79 Advanced Energy® In the first status byte, bit 5 (the active toggle bit) indicates the status of the PROFIBUS interface. After the Pinnacle Plus+ unit has powered up, this bit's continuous change indicates that the PROFIBUS interface is ready. During operation, a cessation of this change indicates that a communication problem exists. OUTPUT READBACK BYTES (BYTES 2 THROUGH 7) Upload bytes 2 through 7 give readback information for output levels in power, voltage, and current. RESPONSE/DATA BYTES Upload bytes 8 through 13 represent the response for all commands. Byte 13 always echoes the last command sent to the Pinnacle Plus+ supply. Depending on the command number, data bytes 8 through 13 are used in two different ways: • For commands 0 through 127, the response is a Command Status Response (CSR) code contained in byte 8. Bytes 9 through 12 are not applicable. • For commands 128 through 230, the response is usually data. Data lengths vary from one byte to five bytes depending on the type of data requested. When the data extends over more than on byte, the PROFIBUS sends the least significant byte (LSB) before the most significant byte (MSB). If one of these commands is not accepted, it may return a CSR code. REFRESH RATES IN THE UPLOAD PACKET Due to the speed with which data is exchanged, attempting to refresh all the data in any given upload packet would consume too much of the Pinnacle Plus+ processing resources. Therefore, data is refreshed and returned in the upload packet at timed intervals. These intervals vary depending on the relative importance of the data. The list below shows which data are refreshed at each rate. In all cases, the times shown are the longest possible (that is, the worst possible); the average rate will be shorter. • 10 ms handshake refresh (timer is reset with every received command) This refresh rate is reserved for echoing back the last command sent (commands 0 through 127) and, when applicable, its CSR code. • 20 ms refresh (timer is reset with every received command) This refresh rate is reserved for the three high priority signals in the status bytes: joules reached, output on, and faults active. • 100 ms refresh (timer is reset with every received command) This refresh rate is used for the following information: 4 output readback data 4 command echo and data for commands 128 through 230 4-80 Communication Interfaces 57000097-00B Pinnacle® Plus+ 10 kW Power Supply 4 low priority signals in the status bytes: control mode bits 4 live update commands For example, commands 157, 172, 188, 189, and 190 are refreshed at this rate provided that no other commands are sent. Once another command is sent, the upload data field will represent the response to the new command. Interpreting Command Status Response (CSR) Codes The Pinnacle Plus+ unit sends a Command Status Response (CSR) code in response to many commands. CSR codes are one-byte responses containing a value that can be interpreted according to the following table. Table 4-34. Command Status Response (CSR) Codes Code 0 Meaning Command accepted The following CSR codes are sent in response to a command that was not accepted and provide an indication of why the command was not accepted. 57000097-00B 1 Control mode is incorrect 2 Output is on, change not allowed 3 Output is off, change not allowed 4 Data is out of range 5 Invalid parameter 6 Program source is incorrect 7 Active fault(s) exist 9 Data byte count is incorrect 10 User port has priority 11 Bus is not ready 12 This feature is not available on your unit 16 Target life has been consumed 17 Output OFF timer active (minimum off time is 50 ms) 19 Recipe is active (change not allowed) Communication Interfaces 4-81 Advanced Energy® Table 4-34. Command Status Response (CSR) Codes (Continued) 21 Joule set point has not been reached 25 Unit is configured as a slave 28 Set point exceeds user limit 29 Regulation mode is locked (you cannot switch between regulation modes while output power is on) 31 The User port reset is active (you must de-assert the reset line on the User port) 33 Pulsing disabled (frequency = 0) 34 Unit is a Sync Pulse receiver 36 User set point out of range 99 Command not accepted (there is no such command) Commands 0 through 127 Commands 0 through 127 change the value of a parameter or direct the power supply to perform a specific function. Most of these commands require that the Pinnacle Plus+ unit be in host control mode. Exceptions are noted in the “Description” column in the following table. The last column in the following list indicates how many data bytes (of the download packet) are needed to support the command. For example, a “1” in the last column indicates that you must insert data in the first data byte. Likewise, a “3” would indicate that you must insert data in all three data bytes. If a data byte is not defined as containing data, its contents will be ignored. Thus you do not need to “zero” data bytes that are not used. 4-82 Communication Interfaces 57000097-00B Pinnacle® Plus+ 10 kW Power Supply Table 4-35. PROFIBUS Commands 0 to 127 Command 0 null 1 dc off 2 dc on 3 regulation method Description Null command. Sets DC output off. Number of Sent Data Bytes Number of Response Data Bytes 0 CSR only 0 CSR only 0 CSR only 1 CSR only 3 CSR only 1 CSR only Note: This request is always honored, regardless of which interface has control. Sets DC output off. This request is always honored, regardless of which interface has control. Sets DC output on; host control must be selected (see command 14). Read back the status of the last output on event with command 161. Sets the method of output regulation (power, current or voltage). Send 1 data byte (8-bit value): • 6 = Power • 7 = Voltage • 8 = Current Read back this value with command 154. 4 joule set point Specifies the number of joules to be delivered. Send a 3-byte (24-bit value); the value must be between 0 and 9,999,999. Read back this value with command 173. 5 joule mode enable Enables or disables joule mode. Note: If a timed recipe is active, the timed recipe overrides the joule feature. Send 1 data byte (8-bit value): • 0 = Disable • Non-zero value = Enable Read back this value with command 153. 57000097-00B Communication Interfaces 4-83 Advanced Energy® Table 4-35. PROFIBUS Commands 0 to 127 (Continued) Command 6 set point Description Specifies the output set point level for whichever method of regulation mode has been selected. Number of Sent Data Bytes Number of Response Data Bytes 2 CSR only Send 2 data bytes (16-bit value). An output power value should imply 3 decimal places for a stand-alone unit and 2 decimal places for a master/slave system. An output current value should imply 2 decimal places, and an output voltage value should imply 0 decimal places. For example, for a 6 kW, standard-Z, stand-alone supply, send a value between 0 and 6000 (6.000 kW, decimal is implied), or 0 and 1500 (15.00 A, decimal is implied), or 0 and 800 (maximum output voltage). Note: Please refer to the “Specifications” chapter of this manual for your unit's capabilities. Read back this value with command 164. 4-84 Communication Interfaces 57000097-00B Pinnacle® Plus+ 10 kW Power Supply Table 4-35. PROFIBUS Commands 0 to 127 (Continued) Command Description Number of Sent Data Bytes Number of Response Data Bytes 8 arc shutdown time Send 2 data bytes to set the arc shutdown time. 2 CSR only 3 CSR only • Byte 1 = Unused • Byte 2 = Send the index value that represents the arc shutdown time (in µs). The list below shows standard index values. Your unit may be configured with different values. For information about a specific unit, contact AE Global Services. 4 0 = 200 4 1 = 500 4 2 = 1000 4 3 = 1500 4 4 = 2000 4 5 = 2500 4 6 = 3000 4 7 = 4000 4 8 = 5000 Readback this value with command 170. 9 hard arc count limit Sets the number of hard arcs required for the power supply to provide an arc indication. If the limit is reached during a process cycle, then after output shuts off, the ARC LED lights and, if applicable, a signal is sent to the User port. Send 3 data bytes (a 24-bit value) indicating the number of arcs; the value must be at least 0 but no greater than the maximum set for your unit. Note: If you set the hard arc count limit to 0, the ARC LED lights for a predetermined time and, if applicable, a signal is sent to the User port for every hard arc seen by the unit. Read back this value with command 178. 57000097-00B Communication Interfaces 4-85 Advanced Energy® Table 4-35. PROFIBUS Commands 0 to 127 (Continued) Command Description Number of Sent Data Bytes Number of Response Data Bytes 10 Specifies the voltage level at which the unit indicates an arc is occurring. Sixteen discrete levels are available. These levels are represented by the index numbers in the following table. 1 CSR only voltage arc trip level Send one data byte (8-bit value) identifying the appropriate index value for the desired trip level. The table below shows standard index values. Your unit may be configured with different values. For information about a specific unit, contact AE Global Services. Index (data byte) Trip Level (result in volts) 0 10 1 20 2 30 3 40 4 50 5 60 6 70 7 80 8 90 9 100 10 125 11 150 12 175 13 200 14 225 15 250 Read back this value with command 171. 4-86 Communication Interfaces 57000097-00B Pinnacle® Plus+ 10 kW Power Supply Table 4-35. PROFIBUS Commands 0 to 127 (Continued) Command 11 active target Description Specifies which target will be active. Number of Sent Data Bytes Number of Response Data Bytes 1 CSR only 3 CSR only 1 CSR only Send 1 data byte (8-bit value); the value must be at least 1 but no greater than 8. Note: The User port has priority for target selection. Thus to select targets from a serial port, the active front panel or from the Pinnacle Remote Panel (that is, when the Pinnacle Plus+ unit is in local or host control mode), you must set the target to 1 at the User port. Leaving the target bits open or leaving the User port pins unconnected causes the target selection at the User port to default to 1. Read back this value with command 156. 12 target life Sets the life (in kilowatt-hours) of a target. Send 3 data bytes (24-bit value), indicating target life for the active target specified with command 11. Note: Two decimal places are implied (that is, to get 1 kWh, send a value of 100). Read back this value with command 157. 13 target enable Enables or disables the target life counter. Send 1 data byte (8-bit value): • 0 = Target life is inactive • Non-zero value = Target life is active Read back this value with command 163. 57000097-00B Communication Interfaces 4-87 Advanced Energy® Table 4-35. PROFIBUS Commands 0 to 127 (Continued) Command Description Number of Sent Data Bytes Number of Response Data Bytes 14 Chooses the mode of control for the Pinnacle Plus+ supply. This request is always honored, regardless of which interface has control. 1 CSR only 1 CSR only 2 CSR only control mode Send 1 data byte: • 2 = Serial (Host) port • 4 = User port • 6 = A control panel. Read back this value with command 155. 15 ramp enable Enables or disables the ramp feature. Send 1 data byte (8-bit value): • 0 = Disable • Non-zero = Enable Read back this value with command 163. 16 ramp time Sets the ramp time in 10 ms increments. Range is 50 ms to 600.00 s. Send a 2-byte value between 5 and 60,000. Two decimal places are implied, That is, to get 1 s, send a value of 100. Note: If your unit has 100 ms ramp feature enabled, one decimal is implied. The range is 0.5 s to 6000.0 s. Read back this value with command 158. 4-88 Communication Interfaces 57000097-00B Pinnacle® Plus+ 10 kW Power Supply Table 4-35. PROFIBUS Commands 0 to 127 (Continued) Command Description Number of Sent Data Bytes Number of Response Data Bytes 17 Tells the Pinnacle Plus+ supply whether the source of information for regulation mode and set points is internal or external (the source can be set independently for each of the three control modes). 3 CSR only 1 CSR only program source Send 3 data bytes, arranged as follows: • First byte = Program source—if the serial (Host) port is active • Second byte = Program source—if a control panel is the active interface • Third byte = Program source—if the User port is active For each mode, send an 8-bit value as follows: • 0 = Program source is internal • Non-zero value = Program source is external (that is, the program source for the regulation mode and the set point is an analog signal from the User port). Read back these values with command 163. 19 recipe steps Specifies the number of recipe steps in a recipe. Send 1 data byte (8-bit value): • The value must be between 0 and 8 • A value of 0 disables the recipe feature Note: For each recipe step, you must also set the regulation mode, set point, ramping time, and run time (commands 21, 22, and 23). Read back this value with command 180. 57000097-00B Communication Interfaces 4-89 Advanced Energy® Table 4-35. PROFIBUS Commands 0 to 127 (Continued) Command Description Number of Sent Data Bytes Number of Response Data Bytes 21 Specifies the length of ramping time for a recipe step (that is, how long the unit will take to reach the set point you have defined for the selected recipe step). 3 CSR only 3 CSR only recipe ramp time Send three data bytes arranged as follows: • First byte = Recipe step (a value between 1 and 8) • Second and third bytes = Value between 5 and 60,000 with two decimal places implied (that is, between 0.05 s and 600 s). Note: If your unit has 100 ms ramp feature enabled, one decimal is implied. The range is between 0.5 s to 6000.0 s. Read back these values with command 181. 22 recipe set point Specifies the set point for a recipe step. Send three data bytes arranged as follows: • First byte = Recipe step (a value between 1 and 8) • Second and third bytes = Value between 0 and the full rated output of the supply. Note: See the “Specifications” chapter for your unit's capabilities, and see command 6 for the format of the value. Read back these values with command 182. 4-90 Communication Interfaces 57000097-00B Pinnacle® Plus+ 10 kW Power Supply Table 4-35. PROFIBUS Commands 0 to 127 (Continued) Command Description Number of Sent Data Bytes Number of Response Data Bytes 23 Specifies the length of time the unit will run at set point for a recipe step. If you enable joule recipe, use this command to set the joule set point. 3 CSR only recipe run time or joule set point Send 3 data bytes arranged as follows: • First byte = Recipe step (a value between 1 and 8) Note: When joule recipes are enabled, recipe step numbers 1 through 8 use the value in the second and third bytes to set the LSW of the joule set point. Step numbers 129 through 136 set the MSW of the joule set point, where step 129 sets MSW of step 1, step 130 sets MSW of step 2, and so on. When command 23 is sent with step numbers 1 through 8, the MSW is cleared. To set joule set points greater than 65535, first send command 23 with steps 1 through 8, then send command 23 with steps 129 through 136. • Second and third bytes = Value between 0 and 60,000 (or between 0 and 600 s); two decimal places implied. Note: If you assign 0 run time for the final recipe step, the unit will switch to continuous output when it reaches set point for this step. In this situation, to turn off output, you must send an off command (using the OFF button or the appropriate User port signal or serial port command) or you must have already enabled joule mode and programmed a joule set point. Read back these values with command 183. 57000097-00B Communication Interfaces 4-91 Advanced Energy® Table 4-35. PROFIBUS Commands 0 to 127 (Continued) Command Description Number of Sent Data Bytes Number of Response Data Bytes 24 Requests the Pinnacle Plus+ supply to calculate its logic CRC. This request is always honored, regardless of which interface has control. 0 CSR only 2 CSR only calculate logic CRC Note: During the approximately 2 s it takes to calculate the CRC, the Pinnacle Plus+ unit will not respond to any other commands. Read this value back with command 230. 26 joule threshold Specifies the output power level that needs to be met before the Joule output energy calculation begins (the joule threshold). The joule threshold type (power, voltage, or current) is set with command 64. If the threshold type is set in Watts, send 2 bytes (16-bit value) between 10 and maximum power divided by 8. This value represents watts in a stand-alone system and decawatts in a master/slave system. For threshold types set in Volts or Amps, send 2 bytes (16-bit value) between 0 and the maximum output limit. Note: The Joule energy calculation begins after (n) mS, regardless of the output power level. The time value, (n) mS, is set in the configuration and cannot be changed. If the output power level meets the joule energy threshold prior to the time expiration, the joule energy calculation will begin. Read back this value with command 136. 4-92 Communication Interfaces 57000097-00B Pinnacle® Plus+ 10 kW Power Supply Table 4-35. PROFIBUS Commands 0 to 127 (Continued) Command Description Number of Sent Data Bytes Number of Response Data Bytes 31 Enables or disables an out-of-set point timer and specifies how long you want the power supply to tolerate an out-of-set point condition before shutting off output. 2 CSR only 1 CSR only 1 CSR only 2 CSR only out of set point timer • To enable the timer send a value (2 bytes) between 1 and 9999 (0.1 to 999.9 s) • To disable the timer, send a value of 0 Read back this value with command 187. 32 ramp start point (percentage of set point) For ramp mode, sets the ramp start point as a percentage of setpoint when output is turned on. Range is 0 to 95%. Note: This setting only applies to regular ramp mode. It does not apply to ramp mode in a timed recipe. Send 1 byte with a value of 0 to 95. Read back this value with command 152. 33 recipe type Set the type of recipe. The default is “Timed.” Send 1 data byte: • 1 = Timed • 2 = Joule continuous • 3 = Joule discrete Read back with command 196. 34 over-voltage timer Enables or disables an over-voltage timer and specifies how long you want the power supply to tolerate an over-voltage condition before shutting off output. • To enable the timer, send a value (2 bytes) between 1 and 9999 (0.1 to 999.9 s). • To disable the timer, send a value of 0. Read back with command 174. 57000097-00B Communication Interfaces 4-93 Advanced Energy® Table 4-35. PROFIBUS Commands 0 to 127 (Continued) Command Description Number of Sent Data Bytes Number of Response Data Bytes 35 Enables or disables an over-current timer and specifies how long you want the power supply to tolerate an over-current condition before shutting off output. 2 CSR only 1 CSR only 0 CSR only 1 CSR codes: 0,1,2,9 over-current timer • To enable the timer, send a value (2 bytes) between 1 and 9999 (0.1 - 999.9 s). • To disable the timer, send a value of 0. Read back with command 186. 36 constant duty cycle Enables or disables the constant duty cycle feature. Send 1 byte: • 0 = Disable • Non-zero = Enable Read back with command 163. 38 reset arc density/run counters 43 sets synch pulse as transmitter, receiver, or standalone Resets micro-arcs-per-run and hard-arcs-perrun counters to 0. These counters can be reset at any time, and resetting them can be useful for measuring arcs over a specific period of time. Sets the unit’s synch pulse feature as a transmitter, a receiver, or a standalone. Send 1 data byte: • 0 = Receiver • 1 = Transmitter • 2 = Standalone Read back with command 163. 4-94 Communication Interfaces 57000097-00B Pinnacle® Plus+ 10 kW Power Supply Table 4-35. PROFIBUS Commands 0 to 127 (Continued) Command 49 user power limit Description Sets a maximum limit for output power. Assume 2 decimal places for a master/slave units and 3 decimal places for a non master/ slave unit. Number of Sent Data Bytes Number of Response Data Bytes 2 CSR only 2 CSR only 2 CSR only Send 2 data bytes (16-bit value); the value must be between 0 and the maximum rated output power for the supply. Note: You may set values for all three User output limits (commands 49, 50, and 51). However, the Pinnacle Plus+ unit responds to the first limit value that impacts output. Note: You cannot change the power limit when output is on. This is because the power limit is used to establish the type of operation: low power or high power. For values at 10 % or less, the operation mode is low power; for values greater than 10 %, the operation is mode is high power. Read back this value with command 141. 50 user voltage limit Sets a maximum limit for output voltage. Send 2 data bytes (16-bit value); value must be between 0 and the maximum rated output voltage for the supply. Read back this value with command 142. 51 user current limit Sets a maximum limit for output current. Send 2 data bytes (16-bit value); the value must be between 0 and the maximum rated output current for the supply. Assume 2 decimal places (5000 = 50.00 A). Read back this value with command 143. 57000097-00B Communication Interfaces 4-95 Advanced Energy® Table 4-35. PROFIBUS Commands 0 to 127 (Continued) Command 52 user strike voltage limit Description Number of Sent Data Bytes Number of Response Data Bytes 1 CSR only Sets a maximum strike voltage. Send 1 data byte representing a strike voltage range: • 0 = low • 1 = medium • 2 = high The values associated with each range depend on the output impedance range of your unit. Strike Voltage Setting Standard-Z Unit 325 - 650 V High-Z Unit 325 - 800 V Low 800 V + 100 V 1,000 V + 100 V Medium 1,100 +/- 100 V 1,200 V +/- 100 V High 1,450 +/- 150 V 1,450 V +/- 150 V Read back this value with command 144. 59 joule recipe repetition Sets the number of times a continuous jole recipe repeats before turning output off and completing. 2 CSR only 1 CSR only Note: This command is only valid when you set the continuous joule recipe type. Send 2 data bytes (16-bit value). Valid input for the joule recipe repetitions are 1 through 65535. Readback this value with command 233. 61 enable/ disable micro arc handling Enables or disables micro arc handling feature. Hard arc handling is always enabled. Send 1 data byte (8-bit value): • 0 = Disable • Non-zero = Enable Read back this value with command 163. 4-96 Communication Interfaces 57000097-00B Pinnacle® Plus+ 10 kW Power Supply Table 4-35. PROFIBUS Commands 0 to 127 (Continued) Command 64 threshold type Description Sets the joule mode counter threshold type. Number of Sent Data Bytes Number of Response Data Bytes 1 CSR only 1 CSR only 1 CSR only 2 CSR only 0 CSR only Send one data byte (8-bit value): • 0 = Power • 1 = Voltage • 2 = Current Read back this setting with command 163. 65 pulsing enabled mode Enables pulsing at the current threshold (default setting) or enables pulsing always. Note: Frequency is limited to 150 kHz when the pulse mode is set to be enabled always. Send one data byte (8-bit value): • 0 = Pulsing enabled at current threshold • 1 = Pulsing enabled always Read back this setting with command 163. 66 enable or disable hard-arc broadcast Enable or disable the hard-arc broadcast feature. Send 1 data byte: • 0 = Disable • Non-zero = Enable Read back this setting with command 163. 72 near end (joule) indication Set a joule value to indicate the joule down counter is near expiration. Send 2 data bytes (16-bit value). Read back this setting with command 232. 73 joule count reset 57000097-00B Resets the joules remaining counter to its initial value while the output is on. Communication Interfaces 4-97 Advanced Energy® Table 4-35. PROFIBUS Commands 0 to 127 (Continued) Command 74 enable/ disable joule countdown Description Enable or disable the joule countdown hold feature, which waits for command 73 before beginning the joule countdown. Number of Sent Data Bytes Number of Response Data Bytes 1 CSR only 3 CSR code: 4 This setting reverts to disabled when the unit powers up. Send 1 data byte: • 0 = Disable • Non-zero = Enable Read back this setting with command 163. 82 set advanced process parameters Sets the voltage ignition threshold and the gross short circuit amp limit. Send 3 data bytes. The first data byte is the index of the parameter to be set. The second and third data bytes are the value to set for the parameter. • First data byte 4 0 = voltage ignition threshold 4 3 = gross short circuit amp limit • 2nd data byte and 3rd data bytes (16-bit value): 4 Voltage ignition threshold: valid entries are 325 to maximum user voltage allowed less 50 V (For example, if the maximum voltage set point is 650 V, the maximum threshold is 600 V). 4 Gross short circuit amp limit: valid values are 15.40 to 30.80 (in hundredths of amps). Read back this setting with command 235. 4-98 Communication Interfaces 57000097-00B Pinnacle® Plus+ 10 kW Power Supply Table 4-35. PROFIBUS Commands 0 to 127 (Continued) Command 84 redefine PROFIBUS status bits Description Redefines the PROFIBUS status bits. Number of Sent Data Bytes Number of Response Data Bytes 1 CSR only 2 CSR only Send 1 data byte: • 0 = Normal format • Non-zero = Joule recipe definition Read back this setting with command 163. 85 change configuration option bit Changes the configuration option bit. Requires 2 data bytes. 1st data byte - Bit setting: • 0 = Clear bit • Non-zero = Set bit 2nd data byte - Configuration option bit number (valid entries = 0-31): • 7 = RAMP RESOLUTION bit clear = 10ms ramp resolution; bit set = 100ms ramp resolution • 8 = JOULE RECIPE STATUS bit clear = Normal PROFIBUS status bytes; bit set = Joule recipe definition PROFIBUS status bytes • 18 = USER-PORT EOTL DEFINED AS READY SIGNAL bit clear = User Port EOTL defined as EOTL; bit set = User Port EOTL defined as Ready Signal • 19 = HIGH SPEED AEBUS bit clear = Standard AE Bus baud rates; bit set = High Speed AE Bus baud rates • 25 = EXPLICIT FAULT CLEARING bit clear = enables - OFF or reset command clears faults; bit set = disables - requires power cycle to recover from fault 57000097-00B Communication Interfaces 4-99 Advanced Energy® Table 4-35. PROFIBUS Commands 0 to 127 (Continued) Command Description Number of Sent Data Bytes Number of Response Data Bytes 87 set maximum on timer Sets the maximum amount of time that output will stay on (in seconds), if this feature is enabled. If the length of time since the last output on event exceeds this setting, the unit will turn output off. The timer is reset at each output on event. You can set a time in whole seconds from 0 to 65535. A value of zero disables this feature. 2 CSR codes: 0,1,4,9,12 1 CSR only 1 CSR only Not all units have this feature available. Send 2 data bytes (16-bit value) indicating the timer value in seconds. Read back this setting with command 243. 92 pulse frequency index Sets pulse frequency between 0 and 350 kHz (in 5 kHZ increments). Note: Frequency is limited to 150 kHz when the pulse mode is set to be enabled always. Send 1 data byte (an 8-bit value): • • • • 0 = Pulsing disabled 1 = 5 kHz 2 = 10 kHz 3 to 69 = 15 kHZ to 345 kHZ (in 5 kHZ increments) • 70 = 350 kHz Read back this value with command 146. 93 pulse reverse time Sets pulse reverse time in 0.1 µs intervals. Send 1 data byte (an 8-bit value): • 04 = 0.4 us • 05 to 49 follow the same format • 50 = 5.0 us Note: You cannot set a reverse time that is greater than a 45% duty cycle. Read back this value with command 147. 4-100 Communication Interfaces 57000097-00B Pinnacle® Plus+ 10 kW Power Supply Table 4-35. PROFIBUS Commands 0 to 127 (Continued) Command Description Number of Sent Data Bytes Number of Response Data Bytes 119 Send this command to clear the fault indication when the Pinnacle Plus+ supply has experienced a non-recoverable (“explicit clear”) fault. This request is always honored, regardless of which interface has control. 0 CSR only Sets all user-definable values to their defaults and stores them in non-volatile memory. (User-definable limits are always set to their maximum values.) 1 CSR only master reset 126 reset default settings Send 1 data byte with a value of zero. Commands 128 through 255 Commands 128 through 255 request a value to be read from the Pinnacle Plus+ unit. None of these commands require the unit to be in host control mode. Some of these commands (for example, command 220) require you to include data in the download packet. In this case, the “Number of Transmit Data Bytes” column in the following list indicates how many data bytes (of the download packet) are needed to support the command. Response bytes will appear in upload bytes 8 through 12 when ready (see “Upload Packet” in this chapter). 57000097-00B Communication Interfaces 4-101 Advanced Energy® Table 4-36. PROFIBUS Commands 128 to 255 Command Description Number of Sent Data Bytes Number of Response Data Bytes 128 Requests the power supply type; the returning packet contains 4 ASCII characters: “PLUS.” 0 4 Requests the output capacity of the power supply; the returning packet contains 5 ASCII characters indicating capacity in kilowatts. 0 5 0 4 0 2 0 2 request supply type 129 request supply size 130 request maximum voltage and current 136 request joule threshold 141 request user power limit The data string implies 3 decimal places for a stand-alone unit (10000 = 10.000 kW) and implies 2 decimal places for a master/slave system (2000 = 20.00 kW). Requests the maximum voltage and current levels. The returning packet contains four data bytes (two 16-bit values). • Bytes 0 and 1 = Voltage level in volts • Bytes 2 and 3 = Current level in hundredths of amps Requests the output power level that needs to be met before the Joule output energy calculation begins. This value is set with command 26. The joule threshold type (power, voltage, or current) is set with command 64. Requests the output power limit. Accuracy is +0.3% of the full rated output power for the supply. The returning packet contains 2 data bytes (16-bit value) indicating the limit in kilowatts. The value implies 3 decimal places for a nonmaster/slave unit and 2 decimal places for a master/slave system. This value is set with command 49. 4-102 Communication Interfaces 57000097-00B Pinnacle® Plus+ 10 kW Power Supply Table 4-36. PROFIBUS Commands 128 to 255 (Continued) Command 142 request user voltage limit Description Requests the output voltage limit. Number of Sent Data Bytes Number of Response Data Bytes 0 2 0 2 0 1 0 1 Accuracy is +0.3% of the full rated output voltage for the supply. The returning packet contains 2 data bytes (16-bit value) indicating the limit in voltage. This value is set with command 50. 143 request user current limit Requests the output current limit. Accuracy is +0.3% of the full rated output current for the supply. The returning packet contains 2 data bytes (16-bit value) indicating the limit in amperes. This value implies 2 decimal places. This value is set with command 51. 144 request user strike voltage limit Requests the strike voltage limit. The returning packet contains 1 data byte indicating a strike voltage • 0 = low • 1 = medium • 2 = high This value set with command 52. 146 request pulse frequency index 57000097-00B Requests pulse frequency index; the returning packet contains 1 byte: • • • • • 0 = 0 kHz (pulsing disabled) 1 = 5 kHz 2 = 10 kHz 3 to 69 = follow the same format 70 = 350 kHz Communication Interfaces 4-103 Advanced Energy® Table 4-36. PROFIBUS Commands 128 to 255 (Continued) Command 147 request pulse reverse time Description Requests pulse reverse time; the returning packet contains 1 byte: • • • • Number of Sent Data Bytes Number of Response Data Bytes 0 1 0 1 0 1 0 1 0 1 04 = 0.4 us 05 = 0.5 us 06 to 49 = follow the same format 50 = 5.0 us 152 Requests the ramp start set point percentage. request ramp start set point percentage Returning packet contains 1 data byte (8-bit) between 0 and 95 (%). Note: This setting only applies to regular ramp mode. It does not apply to ramp mode in a timed recipe. This value is set with command 32. 153 request joules status Requests joule mode status; the returning packet contains 1 byte: • 0 = Inactive • Non-zero value = Active See also command 163. 154 request regulation mode Requests the output regulation mode (set by command 3); the returning packet contains 1 data byte (8-bit value): • 6 = Power • 7 = Voltage • 8 = Current See also command 164. 155 request control mode Requests control mode. The returning packet contains 1 data byte (8-bit value): • 2 = Serial (Host) port • 3 = A control panel • 4 = User port This value is set with command 14. 4-104 Communication Interfaces 57000097-00B Pinnacle® Plus+ 10 kW Power Supply Table 4-36. PROFIBUS Commands 128 to 255 (Continued) Command 156 request active target number 157 request target life Description Requests an indication of the active target. The returning packet contains 1 data byte indicating target 1, 2, 3, 4, 5, 6, 7, or 8. Number of Sent Data Bytes Number of Response Data Bytes 0 1 1 4 This value is set with command 11. Requests the amount of target life time remaining for the target you specify. May return CSR code 4 Send 1 data byte indicating which target; the returning packet contains 4 data bytes (32-bit value) indicating the time remaining in kilowatt hours. Two decimal places are implied. For example, a value of 100 indicates 1 kWh. This value is set with command 12. 158 request ramp time Requests ramp time. Returns a 2-byte value (16 bits) indicating a ramp time of 5 (50ms) to 60,000 (600.00 s). 0 2 0 2 Note: If your unit has 100 ms ramp feature enabled, one decimal is implied. The range is 0.5 s to 6000.0 s. This value is set with command 16. 159 ramp time remaining Requests how much ramp time is remaining. Returning packet contains 2 data bytes (16 bits), indicating how many 10 ms intervals remain. Note: If your unit has 100 ms ramp feature enabled, the data indicates how many 100 ms intervals remain. 57000097-00B Communication Interfaces 4-105 Advanced Energy® Table 4-36. PROFIBUS Commands 128 to 255 (Continued) Command Description Number of Sent Data Bytes Number of Response Data Bytes 160 Requests the status of the logic board. The information in the returning packet is used by AE Global Services. 0 5 request status The returning packet contains 6 data bytes: 1st and 2nd bytes - SW_OPTS1 (16-bit value): • Bit 0 = Single Inverter Unit (read only) • Bit 5 = 500 ns Gate Drive Unit (read only) • Bit 7 = 100 ms ramp; bit clear = 10 ms ramp • Bit 8 = Joule recipe definition; bit clear = normal • Bit 12 = Measurement balance; bit set = feature enabled 3rd and 4th bytes - SW_OPTS2 (16-bit value): • Bit 1 = Voltage ignition; bit set = feature enabled • Bit 2 = User port End of Target Life (EOTL) indicator is READY signal; bit set = feature enabled • Bit 3 = High Speed Baud Rate = 19200, 38400, 57600, 115200; bit clear = normal • Bit 9 = No explicit fault clearing (requires power cycle to clear); bit clear = off and reset command clears fault • Bit 11 = Maximum on timer; bit set = feature enabled 5th byte: Always 0 4-106 Communication Interfaces 57000097-00B Pinnacle® Plus+ 10 kW Power Supply Table 4-36. PROFIBUS Commands 128 to 255 (Continued) Command Description Number of Sent Data Bytes Number of Response Data Bytes 161 Reports the status of the most recent output on request, since the last power up event on the unit. The returning packet contains 1 data byte (8-bit value): 0 1 request output on status • • • • • • • • • 0 = Output on sequence OK 1 = Control mode invalid 2 = Unit is already on 7 = Active fault exists 11 = Bus not ready 16 = End of target life reached 17 = Minimum off time was active 31 = User port reset line is active 32 = Contactor is open due to fault condition • 44 = The Pinnacle Plus+ unit has not received a request to turn output on since power up. 57000097-00B Communication Interfaces 4-107 Advanced Energy® Table 4-36. PROFIBUS Commands 128 to 255 (Continued) Command 162 request process status Description Requests a report on process status. Number of Sent Data Bytes Number of Response Data Bytes 0 4 Returns 4 data bytes. 1st status byte: • • • • • • • • 0 = Unassigned 1 = Ramp active 2 = Run active 3 = Output power (0 = off, 1 = on) 4 = Illegal regulation mode 5 = Cable interlock open 6 = End-of-target-life event 7 = Set point status (0 = within tolerance, 1 = out-of-tolerance) 2nd status byte: • • • • • • • • 0 = Over-voltage condition exists 1 = Over-current condition exists 2 = unassigned 3 = Control circuit fault 4 = Heat sink over-temperature event 5 = User interlock open 6 = User port reset active 7 = Main contactor interlock open 3rd status byte: • 0 = Momentary power failure • 1 = Unassigned • 2 = Near end joule value setting has been reached • 3 = Joule Threshold achieved • 4 = Unit A inverter low • 5 = Unit B inverter low • 6 = Unassigned interrupt event • 7 = PROFIBUS error 4-108 Communication Interfaces 57000097-00B Pinnacle® Plus+ 10 kW Power Supply Table 4-36. PROFIBUS Commands 128 to 255 (Continued) Command 162 request process status (continued) 57000097-00B Description 4th status byte: Number of Sent Data Bytes Number of Response Data Bytes 0 4 • • • • • • 0 = Hard bus fault 1 = Fault active 2 = Joules reached 3 = Fatal fault active 4 = Out-of-set point timer expired 5 = Ground fault detected (if your Pinnacle Plus+ supports this feature) • 6 = Short circuit fault active • 7 = Fatal short circuit active Communication Interfaces 4-109 Advanced Energy® Table 4-36. PROFIBUS Commands 128 to 255 (Continued) Command 163 request config status Description Requests the system configuration status. Number of Sent Data Bytes Number of Response Data Bytes 0 4 Returns 4 data bytes. 1st status byte: • 0 = Host program source (0 = internal, 1 = external) • 1 = Local program source (0 = internal, 1 = external) • 2 = Analog program source (0 = internal, 1 = external) • 3 = Master • 4 = Slave • 5 = Unassigned • 6 = Program source (0 = internal, 1 = external) • 7 = Target life status (0 = inactive, 1 = active) 2nd status byte: • 0 = Profibus Status Bit Definition (0 = normal, 1 = Joule Recipe) • 1 = Front panel access (0 = unlocked, 1 = locked) • 2 = Joule mode (0 = disabled, 1 = enabled) • 3 = Contactor status (0 = open, 1 = closed) • 4 = Unassigned • 5 = Ramp mode (0 = disabled, 1 = enabled) • 6 = Unassigned • 7 = Pulsing enabled (0 = disabled, 1 = enabled) 4-110 Communication Interfaces 57000097-00B Pinnacle® Plus+ 10 kW Power Supply Table 4-36. PROFIBUS Commands 128 to 255 (Continued) Command 163 request config status (continued from previous page) Description 3rd status byte: Number of Sent Data Bytes Number of Response Data Bytes 0 4 • 0 = Transmitter/Receiver mode (0 = Receiver, 1 = Transmitter) • 1 = Over-voltage timer active • 2 = Over-current timer active • 3 = Constant duty cycle active • 4 = Micro arc handling (0 = disabled, 1 = enabled) • 5 = Pulsing mode (also see 4th status byte, bit 2; the setting on that bit overrides this bit) (0 = at current threshold, 1 = always) • 6 and 7 = Joule threshold type Type Bit 7 Bit 6 Power 0 0 Voltage 0 1 Current 1 0 4th status byte: • 0 = Hard-arc broadcast (0 = disabled, 1 = enabled) • 1 = Joule countdown hold (0 = disabled, 1 = enabled) • 2 = Pulsing mode (also see 3rd status byte, bit 5; the setting on this bit overrides that bit) (0 = uses setting on 3rd status byte, bit 5; 1 = voltage pulsing type) • 3 = Sync Pulse standalone unit • 4 through 7 = Unassigned 57000097-00B Communication Interfaces 4-111 Advanced Energy® Table 4-36. PROFIBUS Commands 128 to 255 (Continued) Command Description Number of Sent Data Bytes Number of Response Data Bytes 164 Requests the set point level by whichever method of output regulation has been selected (set by command 3); the returning packet contains 3 data bytes: 0 3 0 2 0 1 Requests how many joules remain in the current run; the returning packet contains 4 data bytes (32-bit value) indicating the number of joules. 0 4 Requests the joules set point set with command 4; the returning packet contains 4 data bytes (32-bit value) indicating the set point level in joules. 0 4 request set point/ regulation mode • First/second byte = Set point level (16-bit value) • Third data byte = Regulation mode (8-bit value): • 6 = Power • 7= Voltage • 8 = Current This value is set with command 6. 170 request arc shutdown 171 request voltage arc trip level Requests the arc shutdown time. The returning packet contains 2 data bytes. • Byte 1 = Unused • Byte 2 = Index value set with command 8 (refer to command 8 for the shutdown index values). Requests the index for the voltage level at which the unit indicates an arc is occurring. For a list of the voltage levels indicated by the index values, see command 10 text. The returning packet contains 1 data byte indicating the trip level index. This value is set with command 10. 172 request joules remaining 173 request joules set point 4-112 Communication Interfaces 57000097-00B Pinnacle® Plus+ 10 kW Power Supply Table 4-36. PROFIBUS Commands 128 to 255 (Continued) Command Description Number of Sent Data Bytes Number of Response Data Bytes 174 Requests the over-voltage timer value; the returning packet contains 2 data bytes (16-bit value) indicating the value. 0 2 0 3 0 4 0 4 0 1 request overvoltage timer value 175 request time output on 178 request hard arc count limit 179 request active recipe step, ramp/run status, and ramp/run time remaining 180 request recipe steps This value is set with command 34. Requests how much time has elapsed since output power was turned on; the returning packet contains 3 data bytes: • First byte = Number of hours • Second byte = Number of minutes • Third byte = Number of seconds Requests the hard arc count limit. The returning packet contains 4 data bytes (a 32bit value) indicating the limit. This value is set with command 9. Requests the active recipe step number, the ramp/run status, and the ramp/run time remaining; the returning packet contains 4 data bytes (32-bit value) indicating the following: • First byte = Active recipe step number • Second byte = Ramp/run status (1 = ramp, 2 = run) • Third and fourth bytes = Ramp/run time remaining (in tens of milliseconds). Requests the number of recipe steps. The returning packet contains 1 data byte (8-bit value) indicating the number of steps. Note: Recall that a value of 0 sent with command 19 disables the recipe feature. This value is set with command 19. 57000097-00B Communication Interfaces 4-113 Advanced Energy® Table 4-36. PROFIBUS Commands 128 to 255 (Continued) Command 181 request recipe ramp time Description Requests the amount of ramp time you have set for a specific recipe step. Number of Sent Data Bytes Number of Response Data Bytes 1 2 May return CSR code 4 Send 1 data byte (8-bit value) indicating the recipe step. The returning packet contains 2 data bytes (16-bit value) indicating the time in seconds. Two decimal places are implied. For example, a value of 5 would indicate 0.05 s. This value is set with command 21. 182 Requests the set point level you have set for a specific recipe step. request recipe set point and regulation mode Send 1 data byte (8-bit value) indicating the recipe step. 1 3 May return CSR code 4 The returning packet contains 3 data bytes: • First and second bytes = Value of set point in the mode indicated • Third byte = Regulation mode • 6 = Power • 7 = Voltage • 8 = Current This value is set with command 22. 183 request recipe step run time or joule set point Requests the run time you set for a specific recipe step or, if joule recipe is enabled, this command requests the joule set point. 1 2 or 4 May return CSR code 4 Send 1 data byte (8-bit value) indicating the recipe step. The returning packet contains 2 data bytes indicating the run time in seconds. Or, if joule recipe is enabled, returns 4 data bytes (32-bit value) indicating the joule set point. With timed recipes, two decimal places are implied. For example, a value of 5 would indicate 0.05 s. This value is set with command 23. 4-114 Communication Interfaces 57000097-00B Pinnacle® Plus+ 10 kW Power Supply Table 4-36. PROFIBUS Commands 128 to 255 (Continued) Command Description Number of Sent Data Bytes Number of Response Data Bytes 184 Requests the amount of time remaining on the out-of-set point timer before an error condition occurs; the returning packet contains 2 data bytes (16-bit value) indicating the interval value in seconds. One decimal place is implied. For example, a value of 999 would indicate an interval of 99.9 s. 0 2 Requests the over-current timer value; the returning packet contains 2 data bytes (16-bit value) indicating the value. 0 2 0 2 0 4 0 4 request out-ofset point interval 186 request overcurrent timer value 187 request out-ofset point timer This value is set with command 35. Requests the out-of-set point timer value. The returning packet contains 2 data bytes (16-bit value) indicating the timer value in seconds. One decimal place is implied. For example, a value of 999 would indicate a timer value of 99.9 s. This value is set with command 31. 188 request arc density per second 189 request micro arc density per run 57000097-00B Requests the arc density that occurred in the previous second; returning packet contains 4 data bytes. • First/second bytes = Micro arcs (16-bit value) • Third/fourth bytes = Hard arcs (16-bit value) Requests how many micro arcs occurred in the previous run; returning packet contains 4 data bytes (32-bit value) indicating the total of micro arcs. Note: The unit records a micro arc each time the output voltage goes below the voltage arc trip level (set with command 10). All arc counters are updated every 100 ms or 10 times per second. Communication Interfaces 4-115 Advanced Energy® Table 4-36. PROFIBUS Commands 128 to 255 (Continued) Command Description Number of Sent Data Bytes Number of Response Data Bytes 190 Requests how many hard arcs occurred in the previous run; returning packet contains 4 data bytes (32-bit value) indicating the total of hard arcs. 0 4 1 4 request hard arc density per run 191 report overvoltage and overcurrent events Note: The unit records a hard arc every time the output voltage goes below the voltage arc trip level for longer than the arc detect time. The unit then shuts down for the arc shutdown time period. All arc counters are updated every 100 ms or 10 times per second. Reports the number of overvoltage or overcurrent events that occurred since the counter was last reset. Send 1 data byte (8-bit value) indicating the desired report: • 1 = overcurrent events • 2 = overvoltage events Returns 4 data bytes (32-bit value) indicating the number of requested events. 4-116 Communication Interfaces 57000097-00B Pinnacle® Plus+ 10 kW Power Supply Table 4-36. PROFIBUS Commands 128 to 255 (Continued) Command Description Number of Sent Data Bytes Number of Response Data Bytes 195 Requests the identity of the unit's personality cards. 0 2 0 1 Requests the revision of the unit's flash configuration. The returning packet contains the last five characters of the revision name. 0 5 Requests the revision of the unit’s flash mainframe software; the returning packet contains the last five characters of the revision name. 0 5 request personality card Returns 2 data bytes: First byte = Identity of card in slot 1: • • • • • • 0 = Card not present 01 or 17 = Dual User port 03 or 26 = PROFIBUS 05 or 21= Single User port 18 or 28 = AE Bus 23 or 30 = DeviceNet Second byte = Identity of card in slot 2: • • • • • • 196 request recipe type 0 = Not present 03 or 26 = PROFIBUS 04 = Host Protocol Translator 05 or 21 = Single User port 18 or 28 = AE Bus 22 or 29 = Master/slave with AE Bus Requests the recipe type. Returns 1 data byte. • 1 = Timed • 2 = Joule continuous • 3 = Joule discrete This value is set with command 33. 197 request flash configuration 198 request flash mainframe software 57000097-00B Communication Interfaces 4-117 Advanced Energy® Table 4-36. PROFIBUS Commands 128 to 255 (Continued) Command 211 request FPGA revision 220 request customer service statistics Description Requests revision number of FPGA. Number of Response Data Bytes 0 4 1 4 Returns 4 ASCII characters. Allows AE Customer Service to access unit statistics. May return CSR code 5 Send 1 data byte (8-bit value): • • • • • • • • • • • • • • • • • • • • • 223 Number of Sent Data Bytes 0 = Total output in kilowatt-hours 1 = Total idle time 2 = Total run time 3 = Total unit on events 4 = Total output on events 5 = Total over-temperature events 6 = Total control circuit faults 7 = Total out-of-set point events 8 = Total hard bus fault events 9 = Total power fluctuation events 10 = Total process voltage low events 11 = Total Unit A inverter low events 12 = Total Unit B inverter low events 13 = Total user interlock open events 14 = Total cable interlock open events 15 = Total contactor interlock open events 18 = Total PROFIBUS fault events 19 = Total pre-defined interrupt events 20 = Total unassigned interrupt events 22 = Total DSP watchdog faults 24 = Total 10 ms Bus fault events AE service request 0 4 request unit’s fault status 4-118 Communication Interfaces 57000097-00B Pinnacle® Plus+ 10 kW Power Supply Table 4-36. PROFIBUS Commands 128 to 255 (Continued) Command Description Number of Sent Data Bytes Number of Response Data Bytes 230 Requests the crc of the logic, the front panel, or the DSP. 1 2 0 2 0 4 request logic, panel, or dsp crc • To receive the logic CRC, first send command 24, which calculates the value With command 230, send one data byte: • 0 = Logic • 2 = DSP 232 request near end joule setting 233 request number of recipe repititions Requests the near end joule setting. This value is set with command 72. Request the number of recipe repetitions. Returns 4 data bytes. • Bytes 1 and 2 = Number of repetitions set • Bytes 3 and 4 = Current repetition in process (reports 0 if output is off) This value is set with command 59. 57000097-00B Communication Interfaces 4-119 Advanced Energy® Table 4-36. PROFIBUS Commands 128 to 255 (Continued) Command Description Number of Sent Data Bytes Number of Response Data Bytes 235 request advanced process parameters Requests the operating parameter selected in the send data byte. 1 2 (May return CSR codes: 0, 5, 9, 12) 0 2 Send 1 data byte to identify the parameter to be read. • Send byte value = 0: Reports the voltage ignition threshold. • Send byte value = 1: Micro arc count— Reports the number of sequential micro arcs needed to trigger a hard arc count. • Send byte value = 2: Microsecond count—Reports the maximum elapsed time (in microseconds) between the end of one micro arc and the beginning of the next micro arc during which the unit considers the micro arcs to be sequential. Micro arcs that occur within this timeframe are sequential. • Send byte value = 3: Reports the gross short circuit current limit in hundredths of amps. • Send byte value = 4: Reports the gross short circuit time-out in tenths of seconds. 243 request maximum on timer Reports the maximum amount of time that output will stay on (in seconds), if this feature is enabled. If the length of time since the last output on event exceeds this setting, the unit will turn output off. The timer is reset at each output on event. You can set a time in whole seconds from 0 to 65535. A value of zero disables this feature. Not all units have this feature available. Returns 2 data bytes (16-bit value) indicating the timer value in seconds. This value is set with command 87. 4-120 Communication Interfaces 57000097-00B Pinnacle® Plus+ 10 kW Power Supply Example Command Sequences The following examples describe how specific values for selected parameters appear in the download (outbyte) packet from the PROFIBUS master to the Pinnacle Plus+ power supply. (See “Download Packet” on page 4-76 for more information.) Additionally, the examples (if executed in order presented) are a recommended startup sequence for users of the PROFIBUS interface. Note: Entries are given as hex numbers with decimal equivalents in parenthesis immediately after. EXAMPLE 1 Change control mode to HOST. Note: PROFIBUS commands 2 through 128 are only accepted if the control mode is HOST. Thus at startup it is good to force the unit to HOST control mode. • Byte 0 = Eh (14) • Byte 1 = 02h (2 = HOST control mode) • Byte 2 = (not applicable, values are ignored) • Byte 3 = n/a EXAMPLE 2 Explicit clear reset: clears any pre-existing faults that may be present after startup. Use this command for clearing PROFIBUS faults at the Pinnacle Plus+. Note: It will not clear “self-clearing” faults such as interlocks open. • Byte 0 = 77h (119) • Byte 1 = n/a • Byte 2 = n/a • Byte 3 = n/a EXAMPLE 3 To set the regulation mode to power: • Byte 0 = 03h (3) • Byte 1 = 06h (6 = Regulation mode Power) • Byte 2 = n/a • Byte 3 = n/a 57000097-00B Communication Interfaces 4-121 Advanced Energy® EXAMPLE 4 To set the set point to 5 kW (5000 Watts) on a stand-alone unit. Note: The least significant byte is followed by more significant bytes. • Byte 0 = 06h (6) • Byte 1 = 88h (136) (5000=1388h) • Byte 2 = 13h (19) • Byte 3 = n/a EXAMPLE 5 To enable a target life counter for target number 2, first you must enable target life counting: • Byte 0 = 0Dh (13) • Byte 1= 01h (any non-zero value will do) • Byte 2 = n/a • Byte 3 = n/a EXAMPLE 6 Select the target counter you want to load and have active. In this example, we used target 2: • Byte 0 = 0Bh (11) • Byte 1 = 02h (2) • Byte 2 = n/a • Byte 3 = n/a EXAMPLE 7 Select “load target life” command (will load target 2 since it is the current active target). In this example, we used 1000 kWh (2 implied decimal places). • Byte 0 = 0Ch (12) • Byte 1 = A0h (160) (1000.00 kWh = 100000 = 0186a0h) • Byte 2 = 86h (134) • Byte 3 = 01h or (1) 4-122 Communication Interfaces 57000097-00B Pinnacle® Plus+ 10 kW Power Supply EXAMPLE 8 Output ON. • Byte 0 = 02h (2) • Byte 1 = n/a • Byte 2 = n/a • Byte 3 = n/a EXAMPLE 9 Readback Hard Arc count per run. See upload (inbytes) for returned value. • Byte 0 = BEh (190) • Byte 1 = n/a • Byte 2 = n/a • Byte 3 = n/a EXAMPLE 10 Output OFF. • Byte 0 = 01h (1) • Byte 1 = n/a • Byte 2 = n/a • Byte 3 = n/a PASSIVE DISPLAY PANEL The passive front panel and remote passive panel let you monitor power, current, or voltage; receive error codes; and review several other conditions shown by the LEDs. Display At any time while the Pinnacle Plus+ supply is operating, you can press the DISPLAY button to the left of the four-digit display to find the number of kilowatts, volts, or amps being delivered or to display the frequency setting or the reverse time setting. The LEDs to the right of the screen indicate which value is being displayed. When both kW and V are lit, frequency is displayed (in kHz). When both V and A are lit, the 57000097-00B Communication Interfaces 4-123 Advanced Energy® reverse time is displayed (in µs). Repeatedly pressing the DISPLAY button will cause the display to cycle in the following order: kW, V, A, freq (frequency in kHz), and t-rev (reverse time in µs). When a fault or software error occurs, the error codes scroll across the display (for example, E004...E002...E004...E002). These codes scroll indefinitely until you correct the errors. For a detailed explanation of the error codes and other troubleshooting materials, see the “Troubleshooting” chapter. LEDs Table 4-37. Display Panel LEDs POWER ON Lights green when input power is on OUTPUT Lights green if output power is on SETPOINT Lights green if the Pinnacle Plus+ supply is operating within set point; accuracy is within 0.4% of full scale or 2% of set point, whichever is greater INTERLOCK Lights green if all interlock conditions have been met BUS FAULT Lights green when a bus fault occurs OVERTEMP Lights green if the Pinnacle Plus+ supply has exceeded the maximum operating temperature ARC After the output has been turned off, this LED lights green for a predetermined time if the hard arc count limit was reached during the previous run. You define this limit. The ARC LED will be activated under two different conditions: 1. If the hard arc count limit is non-zero and the number of hard arcs seen exceeded this limit during the last run, the pulse will occur when the output is turned off. 2. If the hard arc count limit is set to zero, this signal will pulse for a predetermined time for every hard arc seen by the unit. If another hard arc is seen before the last pulse is complete, the pulse width will be refreshed to the full width. 4-124 Communication Interfaces 57000097-00B Pinnacle® Plus+ 10 kW Power Supply ACTIVE FRONT PANEL/ PINNACLE REMOTE PANEL The Pinnacle Plus+ supply presents a broad array of features and settings that you can easily control through the Pinnacle Remote Active Panel. If you are using the Pinnacle Remote Active Panel, first ensure that it has been properly connected to the Pinnacle Plus+ supply; installation information appears in the following section. Connecting to the Remote Active Panel The 9-pin, male, subminiature-D connector labeled REMOTE ACTIVE PANEL on the rear of the Pinnacle Plus+ power supply lets you connect the supply to the Pinnacle Remote Active Panel. Figure 4-13. Remote active panel connector The pin descriptions for this connector appear in the following table; installation instructions follow the pin description table. Table 4-38. Remote Panel Pin Descriptions Pin 57000097-00B Description 1 Do not connect 2 Do not connect 3 Do not connect 4 Do not connect 5 Ground 6 TR- 7 TR+ Communication Interfaces 4-125 Advanced Energy® Table 4-38. Remote Panel Pin Descriptions (Continued) Pin Description 8 R- 9 R+ To connect your Pinnacle Plus+ power supply to the Pinnacle Remote Active Panel: 1. Connect the cable between the REMOTE ACTIVE PANEL connector on the Pinnacle Plus+ supply and the Pinnacle Remote Active Panel. Understanding the Panel CONTROL KEY To control your Pinnacle Plus+ supply from the panel, select local mode by pressing the CONTROL key on the panel until the Local LED lights. Placing the unit in local mode gives you full access to the front panel menu (see “Control Panel Interface” on page 4-128). To control the Pinnacle Plus+ supply from the Serial interfaces or the DeviceNet port, press the CONTROL key until the Host LED lights. To control the Pinnacle Plus+ supply from the User port, press the CONTROL key until the User LED lights. When the Pinnacle Plus+ unit is in host or user control mode, you can view all the menu items, but you cannot modify parameters or lock the display. OUTPUT DISPLAY SCREEN The first screen that appears on the panel's vacuum fluorescent display when you power up is the “output display screen.” See “Two-Line Output Display Screen” on page 4-129 for more information. Viewing Output Information The output display screen shows the actual output level in volts, amps, and watts. (See the front panel drawings at the end of the “Installation” chapter.) It also displays the set point. Selecting Set Point To program the set point level from an active control panel, use the panel's CONTROL key to select local control mode (the Local LED will light). (See “Setting Control Parameters” on page 4-152.) Press the set point soft key to to activate the set point value, turn the MODIFY knob until the set point you want is displayed, then press the set point soft key again. 4-126 Communication Interfaces 57000097-00B Pinnacle® Plus+ 10 kW Power Supply See below for more information about the MODIFY knob. SOFT KEYS The five unlabeled soft keys directly below the vacuum fluorescent display let you select menu choices. Menu choices appear on the second line of the display. Since different selections (different menu levels) are displayed at different times, this manual refers to the soft keys by whichever terms are displayed above them. For example, you are instructed to press the ARC soft key when ARC is the menu choice directly above that particular key. See Figure 4-14 on page 4-128 and Figure 4-16 on page 4-132. MODIFY KNOB Use the MODIFY knob to change values and move back through the menus. When the display screen shows a flashing value, you can change it by turning the MODIFY knob. In addition, you can use the MODIFY knob to move quickly through the menus. Pressing the MODIFY knob once moves you up one level in the menu. Pressing it twice quickly moves you all the way out of the menu to the output display screen. REGULATION KEY At the top menu level, choose one of three methods of output regulation (power, current, or voltage) by pressing the REGULATION key until the desired LED lights. Note: You cannot change regulation modes when output is on. ON/OFF BUTTONS & LEDS The ON and OFF keys on the control panel turn on and off the output power. The relevant LED lights to indicate output is on or off. ARC LED After the output has been turned off, this LED lights green for a predetermined time if the hard arc count limit was reached during the previous run. You define this limit through a control panel or with Command 9. You define the voltage trip level for arcs through a control panel or with Command 10. You can enable micro arc handling through a control panel or with Command 61. Note: If you set the hard arc count limit to zero, the ARC LED lights for a predetermined time and, if applicable, sends a signal to the User port for every hard arc seen by the unit. See “Enabling Arc Handling” on page 4-151 for more information. 57000097-00B Communication Interfaces 4-127 Advanced Energy® CONTROL PANEL INTERFACE Your Pinnacle Plus+ unit may have either an active front panel, which is an integrated part of the unit, or an active remote panel, which is connected to the DISPLAY port on the rear panel of the unit. This manual uses the term “control panel” to refer to either of these panels since they function identically. An active control panel has three main sections: • ON and OFF switches at the far left of the panel • CONTROL and REGULATION switches at the far right of the panel • A two-line display, five soft keys, and a MODIFY knob Two-line display Soft keys Figure 4-14. Control panel Output Power Key Use the following keys to turn output power on and off. Table 4-39. Output Power Keys ON Turns on output power if the control panel has control of the on/ off function and all interlock conditions are satisfied. OFF Turns off output power, no matter which interface is currently controlling the unit. Control Key To control your Pinnacle Plus+ supply from the panel, select local mode by pressing the CONTROL key on the panel until the Local LED lights. Placing the unit in local mode gives you full access to the front panel menu. 4-128 Communication Interfaces 57000097-00B Pinnacle® Plus+ 10 kW Power Supply To control the Pinnacle Plus+ supply from a serial interface or the DeviceNet port, press the CONTROL key until the Host LED lights. To control the Pinnacle Plus+ supply from the User port, press the CONTROL key until the User LED lights. When the Pinnacle Plus+ unit is in host or user control mode, you can view all the menu items, but you cannot modify parameters or lock the display. Note: You can not change control modes while output power is energized (on). Table 4-40. Control Key LEDs LOCAL Specifies that control of the Pinnacle Plus+ power supply has been assigned to the control panel. HOST Specifies that control of the Pinnacle Plus+ power supply has been assigned to a serial interface (that is, Host port, DeviceNet port, or standard serial port). USER Specifies that control of the Pinnacle Plus+ power supply has been assigned to the User port. Note: User control can only be selected when a User port interface card is installed in the unit. Regulation Key Use this key to select the method of output regulation when the control panel has control (local control). Note: You can not change regulation modes while output power is energized (on). Table 4-41. Regulation Key LEDs POWER Specifies that the method of output regulation is power. CURRENT Specifies that the method of output regulation is current. VOLTAGE Specifies that the method of output regulation is voltage. Two-Line Output Display Screen The display screen displays two lines of information. When you first power up, the display screen appears. 57000097-00B Communication Interfaces 4-129 Advanced Energy® Figure 4-15. Two-line output display screen The following information appears in the top line of the display (left to right): • Voltage readback • Current readback (in amps) • Power readback (in watts) • Clock ID: what the supply is doing 4 RMP = output is on and ramping 4 RUN = output is on and the clock shows the elapsed time 4 OFF = output is off and the clock shows the last run time 4 IGN = output is on; voltage threshold has not been reached • Clock Note: If the last run time is < 1 minute, the seconds will display in hundredths precision. That is, 12 1/2 s will display as 12.50 s. The following information appears in the bottom line of the display (left to right): • Reverse time • Frequency (of pulsing) • Set Point • Regulation mode (W = Power, A = Current, V = Volts) • Warning field: flashes the following codes 4 ARCLIM = arc limit reached Note: ARCLIM is only active when the Hard Arc Counting feature is enabled. 4 EOTL = end of target life 4 OC = over-current condition 4-130 Communication Interfaces 57000097-00B Pinnacle® Plus+ 10 kW Power Supply 4 OV = over-voltage condition 4 SC = short circuit • MENU soft key, which gives you direct access to the menu. SETTING THE REVERSE TIME, FREQUENCY, AND SET POINT To change the reverse time, frequency, or set point, press the soft key under the display. The units will flash, indicating that you can rotate the MODIFY knob to change the value. Once you select a value, it’s only active for editing (changing). You need to press the soft key again to enter the value. If you press another key before you press the soft key to enter the value, the new (edited) value will not be accepted. The one exception is the set point. The set point changes as you rotate the MODIFY knob. Soft Keys Use the soft keys to select whichever menu functions are shown immediately above them on the two-line display. “Understanding the Menu Options” on page 4-132 explains how to perform these operations from the Pinnacle control panel. Note: If you’re at the top level, press the MENU soft key to make the menus appear. MODIFY Knob Use the MODIFY knob to change values and move back through the menus. When the display screen shows a flashing value, you can change it by turning the MODIFY knob. In addition, you can use the MODIFY knob to move quickly through the menus. Pressing the MODIFY knob once moves you up one level in the menu. Pressing it twice quickly moves you all the way out of the menu to the output display screen. CONTROL PANEL CONTROLS Use the MODIFY knob and the five unlabeled soft keys that are directly below the display to select a parameter and modify its value. To change parameters using the menu, the Pinnacle Plus+ unit must be in local control mode (the Local LED will be illuminated). Note: When the Pinnacle Plus+ unit is in User or serial (Host) mode, you can view the value of all the menu items, but you cannot modify any of the items or lock the unit. If you switch the Pinnacle Plus+ unit to User mode while you are viewing an item in the menu, you are returned to the output display screen immediately. 57000097-00B Communication Interfaces 4-131 Advanced Energy® Press the MENU soft key when the top level display screen is displayed to cause the main menu to appear. The main menu contains three menu selections, which are shown in the figure below. Generally, pressing a soft key causes another level of menu choices to display (for example, MONITOR, LIMITS, ARC, and CONTROL display if you press the PROCESS soft key). SERVICE SUPPLY PROCESS Figure 4-16. Control panel main menu functions As you press soft keys and move through the menu levels, the top line of the output display screen displays the path of the menu in the upper, left-hand corner of the display screen. A parameter flashes if it can be modified; make such modifications with the MODIFY knob. Pressing the ENTER soft key enters the modification into nonvolatile memory. You can press the MODIFY knob at any time to cancel what you are doing (leave the parameter(s) unchanged) and return to the output display screen. If a fault exists or the panel is locked, the soft keys are locked out until you clear the fault. See “Troubleshooting and Global Services” on page 6-1 for a list of fault messages. UNDERSTANDING THE MENU OPTIONS Pressing the rightmost soft key will bring up the main menu tree. When at the top level, you have three menu options: • Service • Supply • Process From the Service menu, you can access diagnostic information. From the Supply menu, you can modify supply-specific parameters, and from the Process menu, you can access options that affect your process or monitor your process. To select a menu option, press the soft key below the menu option. See the menu maps for a graphical representation of the menu options. 4-132 Communication Interfaces 57000097-00B Pinnacle® Plus+ 10 kW Power Supply Figure 4-17. Service menu map Figure 4-18. Supply menu map 57000097-00B Communication Interfaces 4-133 Advanced Energy® Figure 4-19. Process menu map USING THE SERVICE FUNCTIONS Use this option to view diagnostics and software versions of your supply. The menu options are: 4-134 Communication Interfaces 57000097-00B Pinnacle® Plus+ 10 kW Power Supply • • • • STATS: supply statistics DEBUG: debug screens MEMORY: ROM CRC checksums SW_REV: software revision numbers Checking Service-type Statistics SERVICE STATS Use this option to check the service-type statistics. CHECKING THE TOTAL ENERGY OUTPUT SERVICE STATSENERGY To check the total energy output: • Press SERVICE STATS ENERGY. 4 The total energy output for the unit appears. CHECKING THE AMOUNT OF IDLE RUN TIME SERVICE STATSTIME To check the amount of time idle and the amount of time running: 1. Press SERVICE STATS TIME. 2. To display the amount of time idle, press the IDLE soft key. 4 The amount of time idle appears. 3. To display the amount of time running, press the RUN soft key. 4 The amount of time running appears. CHECKING THE NUMBER OF FAULTS SERVICE STATSEVENTS To check the number of faults: 1. Press SERVICE STATS EVENTS. 4 FAULTS and CYCLES options appear. 2. Press the FAULTS soft key. 3. MORE, INTRLOCK, IRQS, MONITOR, and DSP options appear. 4. If you press MORE, you can check the following faults: 4 POWER displays the number of line power faults. 57000097-00B Communication Interfaces 4-135 Advanced Energy® 4 OVRTMP displays the number of over temperature faults. 4 BUS displays the number of bus faults. 4 INVRTR displays the number of inverter faults. 5. If you press INTRLOCK, the number of contactor, user, and cable faults appears. 6. If you press IRQ, the number of predefined and unassigned IRQ faults appears. 7. If you press MONITOR, the number of set point timer faults appears. 8. If you press DSP, the number of DSP control and DSP watch dog faults appears. CHECKING THE NUMBER OF CYCLES To check the cycles: 1. Press SERVICE STATS EVENTS. 4 FAULTS and CYCLES options appear. 2. Press the CYCLES soft key. 4 OUTPUT and UNIT options appear. 3. To get a report of the number of output on events, press the OUTPUT soft key. 4. To get a report of the number of power on events, press UNIT. Debugging Your Unit SERVICE DEBUG Use this option to check the hardware configuration, installed cards, and logic software options CHECKING YOUR HARDWARE CONFIGURATION SERVICE DEBUGHW CONFIG To find out whether or not a card is installed in slot 1 or 2: 1. Press SERVICE DEBUG HW CONFIG. 4 A report of the personality cards installed in the supply in slot 1 and slot 2 appears. CHECKING YOUR SOFTWARE LOGIC SERVICE DEBUGLOGIC Use this option to find out what software logic options are installed. 1. Press SERVICE DEBUG LOGIC. 4-136 Communication Interfaces 57000097-00B Pinnacle® Plus+ 10 kW Power Supply 4 The configuration options display one at a time. Arrows above the first two soft keys allow you to move forward or backward. Selections that can be changed will appear with CHANGE on the 4th soft key. ENTER is on the 5th soft key in all cases. 2. Use the arrow keys to move to the selection you want. 3. Press the 4th soft key (CHANGE) to select the change, and then press the 5th soft key (ENTER). The change is accepted and you are returned to the Service_Debug level. Note: Pressing the MODIFY knob once also returns you to the Service_Debug level, but the change is not saved. The following are the available configuration options. Note that certain configuration options are reset immediately, while others require cycling power on the unit. RAMP RESOLUTION: 10ms to 100ms; changes immediately. JOULE RECIPE STATUS: Redefine the Profibus upload status bits; changes immediately. USER-PORT EOTL DEFINED AS: Changes the definition form indicating End of Target Life (EOTL) or a ready signal; changes immediately. INVERTERS: The number of inverters in the unit. GATE DRIVE: Inverter gate drive speed. GROSS SHORT CIRCUIT DETECTION (read only): Enabled by default. The factory-set configuration file can disable the feature. This feature operates only in power and voltage regulation modes. The gross short circuit algorithm starts if the following condition exists: • Output readback is less than the out-of-set-point lower limit. • The unit has detected no hard arcs. • The current (A) is greater than the gross short circuit current limit. • This condition has existed for the detection time. If the algorithm determines that a gross short circuit exists, “SC” flashes on the front panel, and then error E088 Short Circuit Fault or E089 Fatal Short Circuit Fault appears on the front panel. HIGH SPEED AEBUS: Changes the baud rates that are available for AE Bus communication between standard rates and high speed rates. For the available rates, see the AE Bus (Host) port information. EXPLICIT FAULT CLEARING: Changes the fault clearing method; changes immediately. When method is set to DISABLED, input power must be cycled on the unit to clear the fault. When method is set to ENABLED, the OFF or RESET command will clear the fault. 57000097-00B Communication Interfaces 4-137 Advanced Energy® VOLTAGE IGNITION: Allows you to set the voltage ignition threshold to enable pulsing. Set to ENABLED if the option is available through the installed configuration file. Checking Your ROM SERVICE MEMORY To perform ROM cyclic redundancy check (CRC) checking: Note: There is a momentary delay before the CRC will display. 1. To calculate and display the active panel (local or remote) CRC, press PANEL. 2. To calculate and display the DSP CRC, press DSP. 3. To calculate and display the logic board CRC, press LOGIC. Checking Your Software Versions SERVICE SW_REV To find out the software number and version of your system software components: 1. Press SERVICE SW_REV. 2. To display the software version of the configuration, press CONFIG. 3. To display the software version of the active panel software, press PANEL. 4. To display the software version of the DSP software, press DSP. 5. To display the software version of the logic, press LOGIC. USING THE SUPPLY FUNCTIONS This option lets you modify specific components and parameters of your supply. The menu options are: • AEBUS: • DEFAULTS: • PULSE: • PANEL: • PGM_SRC: 4-138 Communication Interfaces 57000097-00B Pinnacle® Plus+ 10 kW Power Supply Setting the AE Bus Timeout SUPPLY AE BUS Use this menu to set the AE Bus timeout setting on the Pinnacle Plus+ power supply. The AE Bus timeout is the amount of time the power supply waits between message bytes. A time that is too short results in communication errors and timeouts. To set your AE Bus timeout time: 1. Press SUPPLY AEBUS. 2. Rotate the MODIFY knob to adjust the AE Bus time out value (in 10 ms increments). 3. Press ENTER to accept and exit. Note: We recommend you use the default value of 200 ms. Setting the Supply Parameters SUPPLY DEFAULTS To set all your supply parameters to the defaults and then store them in nonvolatile memory: 1. Press SUPPLY DEFAULTS. 2. Rotate the MODIFY knob to display YES or NO. 3. Press ENTER to accept and exit. Setting Pulse Parameters SUPPLY PULSE Use this menu entry to change the pulsing parameters. ENABLING PULSING MODE SUPPLY PULSE ENABLE Use this menu function to enable pulsing at the current threshold (default setting), to enable pulsing always, or to enable pulsing using voltage. For additional information about the pulsing modes, see “Understanding Pulsing Modes” on page 5-32. To enable a pulsing mode: 1. Press SUPPLY PULSE ENABLE. 2. Rotate the MODIFY knob to display the following options: 4 AT CURRENT THRESHOLD 57000097-00B Communication Interfaces 4-139 Advanced Energy® 4 ALWAYS 4 USE VOLTAGE Note: If the unit is set to pulse using voltage, you must also set the voltage threshold. See “Setting the Voltage Threshold” on page 4-141 for more information. 3. Press ENTER to accept and exit. SELECTING CONSTANT DUTY CYCLE SUPPLY PULSE DUTY_CYC The constant duty cycle feature automatically updates the reverse time when you change frequency, allowing you to maintain the same duty cycle that was present before the change—within a limited frequency range. Note: To change the duty cycle, change the reverse time. To select the constant duty cycle feature: 1. Press SUPPLY PULSE DUTY_CYC. 2. Rotate the MODIFY knob to select YES or NO to enable or disable this function. SETTING SYNC PULSE HARD ARC DETECTION BROADCAST SUPPLY PULSE B’CAST Note: This feature is only available if your Pinnacle Plus+ unit was specifically configured at the factory for Sync Pulse. If Sync Pulse hard arc detection broadcast (B’CAST) is enabled, all units handle hard arcs in synchronization with each other no matter which unit detects the hard arc, or where the hard arc occurs. To set Sync Pulse hard arc detection broadcast: 1. Press SUPPLY PULSE B’CAST 2. Rotate the MODIFY knob to select YES or NO to enable or disable this function. If your unit is configured with a Sync Pulse port you may set up to six Pinnacle Plus+ units in a Sync Pulse system. See the section titled “Master/Slave Operation” near the end of chapter 5 of this manual for more information. 4-140 Communication Interfaces 57000097-00B Pinnacle® Plus+ 10 kW Power Supply SETTING THE UNIT AS A SYNC PULSE TRANSMITTER, RECEIVER, OR STANDALONE SUPPLY PULSE TX/RX Note: This feature is only available if your Pinnacle Plus+ unit was specifically configured at the factory for Sync Pulse. To set the unit as a Sync Pulse transmitter, receiver, or standalone: 1. Press SUPPLY PULSE TX/RX. 2. Rotate the MODIFY knob to select TRANSMIT, RECEIVE, or STANDALONE. Note: Within a system, there must be one and only one transmitter. All other units must be set to receive or standalone. If your unit is configured with a Sync Pulse port you may set up to six Pinnacle Plus+ units to operate in a Sync Pulse system. See the section titled “Master/Slave Operation” near the end of chapter 5 of this manual for more information. SETTING THE VOLTAGE THRESHOLD SUPPLY PULSE VTHRS Note: This feature is only available if your Pinnacle Plus+ unit was configured at the factory to have the voltage ignition option. To set the voltage threshold for pulsing: 1. Press SUPPLY PULSE VTHRS. 2. Rotate the MODIFY knob to set the appropriate voltage. The selectable voltage range is from 325 V to 50 V less than the maximum user voltage. For example, if the maximum allowable voltage is 650 V, the maximum threshold set point is 600 V. For more information about the pulsing behavior when using voltage, see “Pulsing Behavior When Using Voltage” on page 5-32. Setting the Program Source SUPPLY PGM_SRC The program source (PGM_SRC) feature specifies for each control mode the program source for regulation mode and set point information. For each control mode, if the program source is set to internal (INT), the Pinnacle Plus+ supply uses the information for output regulation mode and set point that has been established through the active front panel, the Pinnacle Remote Active Panel, or the standard serial port. If the program source is set to external (EXT), the Pinnacle Plus+ supply uses the set point and output regulation mode that has been established through the pins on the User port. 57000097-00B Communication Interfaces 4-141 Advanced Energy® To select the desired source and type: 1. Press SUPPLY PGM_SRC. HOST, LOCAL, and USER options appear. Press one of these buttons to toggle between internal and external for the selected type. 2. Press EXIT. Note: A user card must be installed in order for EXT to function correctly. Setting the Panel Mode SUPPLY PANEL Use this option to select between a remote and local control panel, lock the control panel, set the lock code, or set the encoder rate for the MODIFY knob clicks. SELECTING REMOTE OR LOCAL MODE SUPPLY PANELSELECT To switch between the remote active panel and the local active panel: 1. Press SUPPLY PANEL SELECT. 2. Rotate the MODIFY knob to display YES or NO, depending on whether or not you want to switch to a remote/local active panel. 3. Press ENTER to accept and exit. 4. Wait several seconds for verification of switch before using the other control panel. SELECTING A LOCK CODE SUPPLY PANELLOCK To enter a lock code for locking the active control panel: 1. Press SUPPLY PANEL LOCK. 4 SET CODE and LOCK UNIT options appear. 2. To set a lock code, press the SET CODE soft key. If a code is already entered, press LOCK UNIT. 4 Any further menu accesses will require entry of the code. Note: Cycling power on the supply resets the lock status to UNLOCKED. SELECTING THE NUMBER OF CLICKS SUPPLY PANELCLICKS 4-142 Communication Interfaces 57000097-00B Pinnacle® Plus+ 10 kW Power Supply The clicks feature specifies the number of high speed counts per click for the MODIFY knob. The value you enter is a multiplier for each click of the knob when you turn the knob quickly. When you turn the knob slowly, the multiplier does not take effect. Valid entries are 1 to 40. If you want a displayed value to change slowly as you turn the knob, set the number of counts per click to 1. If you want the value to change quickly, set the number of counts to 40. To change the number of counts per click: 1. Press SUPPLY PANEL CLICKS. 2. Rotate the MODIFY knob to set the number of counts per click. 3. Press ENTER to accept and exit. USING PROCESS FUNCTIONS Use this option to access parameters that control, limit, or monitor your process. The menu options are: • MONITOR: monitor your process • LIMITS: set limits • ARC: set arc parameters • CONTROL: set process control parameters Monitoring Your Process PROCESS MONITOR This menu allows you to monitor elements of your process such as the life of your target, how long the process is running out of set point, or whether the process voltage drops below its threshold. Note: In all cases, the voltage and current are measured at the DC inverter output. (See Figure 2-1 on page 2-2.) VIEWING THE OVER-VOLTAGE DENSITY PROCESS MONITOR OVER_V Use this menu to view the density of unit over-voltage responses per run (a response is an action taken by the Pinnacle Plus+ supply to minimize over-voltage conditions). When the unit detects an over-voltage condition, it triggers an algorithm that controls the user voltage limit in order to minimize and eliminate over-voltage events. To view the over-voltage density: 57000097-00B Communication Interfaces 4-143 Advanced Energy® 1. Press PROCESS MONITOR OVER_V Note: When you see the counter increment or “OV” flashing in the top level menu of the output display screen, the algorithm is active or has just run. For an illustration of the output display screen, see “Two-Line Output Display Screen” on page 4-129. RESETTING THE OVER-VOLTAGE DENSITY PROCESS MONITOR OVER_V RESET Use this option to reset the over-voltage density counter to zero. You can use this feature to characterize a process by recording the over-voltage counter over the same time period for every parameter change in the process. To use the over-voltage counter in this way, reset both the counter and the period timing at the start of a parameter change. Record the counter at the end of the timed period and repeat. To reset the over-voltage density counter: 1. Press PROCESS MONITOR OVER_V RESET. SETTING THE OVER-VOLTAGE TIMER PROCESS MONITOR OVER_V TIMER Use this option to enable and set the over-voltage timer. This function lets you indicate how long you want the power supply to tolerate an over-voltage condition before it shuts off output. When the timer expires, the unit shuts off output and displays error code E086 (see “Error Code Troubleshooting” on page 6-16) or passive front panel help code H026 (see “Help Code Troubleshooting Table” on page 6-9). To enable the over-voltage timer, follow these steps to select a value (in 0.1 s increments). To disable the timer, follow these steps and select a value of 0. 1. Press PROCESS MONITOROVER_V TIMER. 2. Rotate the MODIFY knob to adjust the value. 3. Press ENTER to accept and exit. VIEWING THE OVER-CURRENT DENSITY PROCESS MONITOR OVER_I Use this menu to view the density of unit over-current responses per run. To view the over-current density: 4-144 Communication Interfaces 57000097-00B Pinnacle® Plus+ 10 kW Power Supply 1. Press PROCESS MONITOR OVER_I. Note: When you see the counter increment or “OC” flashing in the top level menu of the output display screen, an over-current condition is active. For an illustration of the output display screen, see “Two-Line Output Display Screen” on page 4-129. RESETTING THE OVER-CURRENT DENSITY PROCESS MONITOR OVER_I RESET Use this option to reset the over-current density counter to zero. You can use this feature to characterize a process by recording the over-current counter over the same time period for every parameter change in the process. To use the over-current counter in this way, reset both the counter and the period timing at the start of a parameter change. Record the counter at the end of the timed period and repeat. To reset the over-current density counter: 1. Press PROCESS MONITOR OVER_I RESET. SETTING THE OVER-CURRENT TIMER PROCESS MONITOROVER_I TIMER Use this option to enable and set an over-current timer. This function lets you indicate how long you want the power supply to tolerate an over-current condition before it shuts off output. When the timer expires, the unit shuts off output and displays error code E087 (see “Error Code Troubleshooting” on page 6-16) or passive front panel help code H027 (see “Help Code Troubleshooting Table” on page 6-9). To enable the over-current timer, follow these steps to select a value (in 0.1 s increments). To disable the timer, follow these steps and select a value of 0. 1. Press PROCESS MONITOR OVER_I TIMER. 2. Rotate the MODIFY knob to adjust the value. 3. Press ENTER to accept and exit. SETTING THE OUT-OF-SET POINT TIMER PROCESS MONITORSETPT Use this option to enable and set an out-of-set point timer. This function lets you indicate how long you want the power supply to tolerate an out-of-set point condition before it shuts off output. An out-of-set point condition occurs whenever output moves out of a range determined by your selected set point (see page 4-152). 57000097-00B Communication Interfaces 4-145 Advanced Energy® Out-of-Set Point Tolerance Range = Set point ±0.4% of full scale or 2% of set point, whichever is greater. When an out-of-set point condition occurs, the unit shuts off output and displays error code E001. (See the “Error Codes” section of the “Troubleshooting” chapter for more information about error codes). To enable the out-of-set point timer, follow these steps to select a value (in 0.1 s increments). To disable the timer, follow these steps and select a value of 0. Note: Because the readbacks, which are compared to the set point, are filtered in the software, we recommend you do not use this feature for process runs that are less than 1 s. 1. Press PROCESS MONITORSETPT. 2. Rotate the MODIFY knob to adjust the value. 3. Press ENTER to accept and exit. CHANGING THE TARGET FUNCTIONS PROCESS MONITORTARGET The target functions let you enable or disable the target life counter (ENABLE), change the active target (SELECT), and set the target life (LIFE) in 0.01 KWh increments. PROCESS MONITORTARGET ENABLE To enable or disable the target life counter for the selected target: 1. Press PROCESS MONITOR TARGET ENABLE. 2. Rotate the MODIFY knob to select YES or NO. 3. Press ENTER to accept and exit. PROCESS MONITORTARGET SELECT To change the active target life counter: 1. Press PROCESS MONITOR TARGET SELECT. 2. Rotate the MODIFY knob to select the active target number. 3. Press ENTER to accept and exit. Note: The User port has priority in selecting targets. Thus, if your unit has a user card installed, you must set the target to 1 at the User port if you want to select targets from the serial port, active front panel, or Pinnacle Remote Active Panel (that is, when the Pinnacle Plus+ unit is in host or local control mode). Leaving the target bits open or leaving the User port pins unconnected causes the target selection at the User port to default to 1. When the User port is set to a target other than 1, the User port selection 4-146 Communication Interfaces 57000097-00B Pinnacle® Plus+ 10 kW Power Supply has priority. If a change to the target is attempted on the front panel, “User Port Has PRIORITY” displays, and you must depress the MODIFY knob to exit (ENTER is no longer displayed). PROCESS MONITORTARGET LIFE To set the target life in 0.01 kWh increments: 1. Press PROCESS MONITOR TARGET LIFE. 2. Rotate the MODIFY knob to select a target life between 0 and 99999.99 kWh (The default is 0). 4 If you are rotating the MODIFY knob slowly, press the appropriate soft key to indicate how quickly you want the display to increment the value (x1000, x100, x10 or x1). Note: If you turn the MODIFY knob quickly, the counts per click setting takes effect. 3. Press ENTER to accept and exit. This function will also display how much target life is left as the counter decreases. When the end-of-target-life is reached, the output display screen flashes “EOTL” and the Pinnacle Plus+ unit continues running until a normal off command is received. Note: The Pinnacle Plus+ unit cannot turn back on until the target life is reset or until the target status is disabled or a new active target is selected. Setting Process Limits PROCESS LIMITS This menu lets you control user-selectable operating limits for the Pinnacle Plus+ unit: strike voltage and maximum output (voltage, current, and power). Some considerations when setting limits are: • Before entering a maximum output limit, consider your system's output impedance and consider how your selected power limits will interact. The unit will limit output when output reaches the first applicable limit. • You cannot set a set point greater than the corresponding limit in that regulation mode. • If a master/slave card is installed in the unit, the system sets the power and current limits to default each time power is cycled. SETTING A STRIKE VOLTAGE LIMIT PROCESS LIMITS STRIKE This function lets you set a strike voltage limit. 57000097-00B Communication Interfaces 4-147 Advanced Energy® To set the strike voltage limit: 1. Press PROCESS LIMITS STRIKE. 2. Rotate the MODIFY knob to select a value: low, medium, or high. 3. Press ENTER to accept and exit. SETTING A MAXIMUM LIMIT FOR OUTPUT VOLTAGE PROCESS LIMITS VOLTAGE This function lets you set a maximum limit for output voltage as measured at the DC inverter output (see Figure 2-1 on page 2-2). The maximum allowable value is the maximum rated output for the supply. To set the user voltage limit: 1. Press PROCESS LIMITS VOLTAGE. 2. Rotate the MODIFY knob to select a value between 0 and the maximum rated output voltage for the supply. 3. Press ENTER to accept and exit. SETTING THE MAXIMUM LIMIT FOR OUTPUT CURRENT PROCESS LIMITS CURRENT This function lets you set a maximum limit for output current. The maximum allowable value is the maximum rated output for the supply. If a master/slave card is installed in the unit, you must reset the power and current limits each time you cycle power to the system. After a power cycle, the system returns the power and current limits to the default settings. To set the user current limit: 1. Press PROCESS LIMITS CURRENT. 2. Rotate the MODIFY knob to select a value between 0 and the maximum rated output current for the supply. 3. Press ENTER to accept and exit. SETTING THE MAXIMUM LIMIT FOR OUTPUT POWER PROCESS LIMITS POWER This function lets you set a maximum limit for output power. The maximum allowable value is the maximum rated output for the supply. If a master/slave card is installed in the unit, you must reset the power and current limits each time you cycle power to the system. After a power cycle, the system returns the power and current limits to the default settings. 4-148 Communication Interfaces 57000097-00B Pinnacle® Plus+ 10 kW Power Supply To set the user power limit: 1. Press PROCESS LIMITS POWER. 2. Rotate the MODIFY knob to select a value between 0 and the maximum rated output power. 3. Press ENTER to accept and exit. SETTING THE GROSS SHORT CIRCUIT CURRENT LIMIT This menu option sets the gross short circuit current limit. This value is used in the gross short circuit algorithm. This algorithm starts if the following condition exists: • Output readback is less than the out-of-set-point lower limit. • The unit has detected no hard arcs. • The current (A) is greater than the gross short circuit current limit. • This condition has existed for the detection time. If the algorithm determines that a gross short circuit exists, “SC” flashes on the front panel, and then error E088 Short Circuit Fault or E089 Fatal Short Circuit Fault appears on the front panel. PROCESS LIMITS SC_LIM To set the gross short circuit current limit: 1. Press PROCESS LIMITS SC_LIM. 2. Rotate the MODIFY knob to select the desired value in hundredths of amps. 3. Press ENTER to accept and exit. Setting Arc Handling PROCESS ARC Use the ARC menu to implement arc-handling during your normal process cycle or during standby. Selections in the ARC menu let you establish arc-handling parameters for normal process runs. In addition, the PROCESS menu lets you view arc density statistics. SETTING THE MICRO ARC TRIP LEVEL PROCESS RCMORELEVEL This function lets you set the micro arc trip level, that is, the output voltage level as measured at the output of the unit, at which the unit determines an arc is occurring. If the voltage level is changing below the specified trip level, the Pinnacle Plus+ supply reacts by shutting down the output. 57000097-00B Communication Interfaces 4-149 Advanced Energy® To set the arc trip level: 1. PROCESS RCMORELEVEL. 2. Rotate the MODIFY knob to select a micro arc trip level. 3. Press ENTER to accept and exit. SETTING THE ARC COUNT LIMIT PROCESS ARC COUNT This function lets you set a maximum limit of hard arcs that can occur during a run. If the limit is exceeded, the “ARCLIM” message appears in the warning field of the display, and the ARC LED lights and the “ARC.D” digital output line on the user card is toggled low for a predetermined time when output power is shut off (if applicable). To set the hard arc count limit: 1. Press PROCESS ARC COUNT. 2. Rotate the MODIFY knob to select a hard arc count limit. Note: To enable the arc count limit feature, you must enter a value greater than 0. If you set the limit to 0, the ARC LED lights (for a predetermined time) each time a hard arc is seen by the unit. 3. Press ENTER to accept and exit. SETTING THE HARD ARC SHUTDOWN TIME PROCESS ARC TIME To set the hard arc shutdown time: 1. Press PROCESS ARC TIME. 2. Rotate the MODIFY knob to select the hard arc shutdown value (in microseconds). 3. Press ENTER to save your selection and exit. VIEWING THE ARC DENSITY PROCESS ARC DENSITY The arc counter counts one arc every time the output is shut off due to a hard arc condition. The micro arc counter counts one arc every time a micro arc occurs. Both counters will reset the next time the Pinnacle Plus+ unit is powered on. To see the arc density of your process: 1. Press PROCESS ARC DENSITY. 4-150 Communication Interfaces 57000097-00B Pinnacle® Plus+ 10 kW Power Supply 4 SECOND and RUN options appear. 2. To see arcs per second, press SECOND. 3. To see arcs per run, press RUN. Note: This display is not zeroed until you turn the output on again, or reset the display. 4. Press EXIT to exit. Note: You may press RESET at any time at this menu level to clear the arc counters. SETTING THE SEQUENTIAL MICRO ARC COUNT AND TIME One micro arc may follow the end of the previous micro arc so closely that the unit never enters the hard arc handling routine; instead, the micro arcs can form an endless chain of sequential micro arcs. The time between micro arcs determines whether the arcs are sequential micro arcs or isolated micro arcs. This function allows you to set two parameters: • SEQCNT: The number of sequential micro arcs required to start the hard arc handling routine. The AE factory sets the valid range: 1 to 7. 0 disables the sequential micro arc feature. • SEQTIME: The time in µsec between the end of one micro arc and the beginning of the next micro arc. This time is the maximum elapsed time that may occur between micro arcs in order for the unit to consider the arcs to be part of a micro arc sequential series. Any micro arc that occurs within this time limit is a sequential micro arc. The AE factory sets the valid range: 1 µsec to 7 µsec. 0 disables the sequential micro arc feature. To set the sequential micro arc count and time: 1. Press PROCESS ARC MORE SEQCNT 2. Rotate the MODIFY knob to set the sequential micro arcs count. 3. Press ENTER. 4. Press SEQTIME. 5. Rotate the MODIFY knob to set the sequential micro arcs time in µsec. 6. Press ENTER to save your settings and exit. ENABLING ARC HANDLING PROCESS ARC ENABLE This function enables or disables the micro arc handling functions of the Pinnacle Plus+ supply. 57000097-00B Communication Interfaces 4-151 Advanced Energy® Default at power up is micro and hard arc handling enabled. If you choose to disable micro arc handling, your Pinnacle Plus+ unit will not respond to micro arcs, which could potentially affect your process. You cannot disable hard arc handling. To disable micro arc handling: 1. Press PROCESS ARC ENABLE. 2. Rotate the MODIFY knob to select YES or NO to enable or disable micro arc handling. 3. Press ENTER to accept and exit. Note: As an inherent safety feature, cycling power to the unit resets micro arc handling to enabled. Note: Hard arc handling is always enabled. Setting Control Parameters PROCESS CONTROL Use this menu option to set up Pinnacle parameters that directly control the output of your process. The menu options are: • RECIPE • JOULES • RAMP Setting Recipes PROCESS CONTROL RECIPE Note: If you are using recipes, you cannot use the standard joule mode. You can set up both recipes and joules; however, running recipes does not trigger the Joule mode. To use joules in recipes, you must use the JOULE CONTINUOUS or JOULE DISCRETE recipe types. Use the RECIPE menu to implement a ramping recipe or joule recipe. This function lets you program the Pinnacle Plus+ in incremental steps (1 to 8 steps are possible). For each step, you must set one of the following sequences: 4-152 Communication Interfaces 57000097-00B Pinnacle® Plus+ 10 kW Power Supply • Ramp time, set point, and run timer • Number of joules and set point. Ramp time is the amount of time (in seconds) that the Pinnacle Plus+ takes to ramp up to the set point for the specified step. Run timer is the amount of time (in seconds) for which the Pinnacle Plus+ unit runs at set point for the specified step. Note: To enable this function, set the number of steps to 1, 2, 3, 4, 5, 6, 7, or 8. To disable this function, set the number of steps to 0. To set the recipe type: 1. From the RECIPE menu options, press TYPE. 2. A screen displays TYPE. Rotate the MODIFY knob to show TIMED, JOULE CONTINOUS, or JOULE DISCRETE. 3. Press ENTER to save your selection. To set the number of recipe steps: 1. Press PROCESS CONTROL RECIPE. 2. Rotate the MODIFY knob to select a value from 1 through 8. 3. Press ENTER. The display progresses to a series of screens. Screen content depends on the recipe TYPE you set: • If you set TIME, the screens allow you to set ramp time, set point, and run timer for each step. • If you set JOULE CONTINUOUS or JOULE DISCRETE, the screen allows you to set the number of joules and a set point. To set the ramp time, set point, and run timer value for each step: 1. If you set the TYPE as TIME, after you have set the number of recipe steps, a screen that requests a RAMP TIME value displays. 2. Rotate the MODIFY knob to select a value from 0 to 600 s (in 0.01 s increments). 3. Press ENTER; the display progresses to a screen requesting a SETPOINT value. 4. Set the set point: a. Choose the regulation mode by using the REGULATION key to toggle between power, current, and voltage. b. Use the MODIFY knob to select a value between 0 and the full rated output of the supply. 5. Press ENTER; the display progresses to a screen requesting a RUN TIMER value. 57000097-00B Communication Interfaces 4-153 Advanced Energy® 6. Rotate the MODIFY knob to select a value between 0.00 s to 600 s (in 0.01 s increments). Note: If you turn the MODIFY knob quickly, the counts per click setting takes effect. 7. Press ENTER; if you have indicated that your recipe contains more than one step, the display returns to the RAMP TIMER screen so that you can enter recipe values for the next step. 8. Repeat Steps 2 through 7 as needed. Note: If you assign 0 run time for the final recipe step, the unit will switch to continuous output when it reaches set point for this step. In this situation, to turn off output, you must send an off command (using the OFF button or the appropriate User port signal or serial port command) or you must have already programmed a joules set point. To set the number of joules and the set point value for each step: 1. If you set the TYPE as JOULE CONTINUOUS or JOULE DISCRETE, after you have set the number of recipe steps, a screen that requests a JOULE value displays. 2. Rotate the MODIFY knob to select a value. Note: With JOULE CONTINUOUS or JOULE DISCRETE types, the display includes a multiplication factor button: 1X, 10X, 100X, or 1000X. Use it to multiply the JOULE value by the indicated factor. 3. Press ENTER; the display progresses to a screen requesting a SETPOINT value. 4. Set the set point: a. Choose the regulation mode by using the REGULATION key to toggle between power, current, and voltage. b. Use the MODIFY knob to select a value between 0 and the full rated output of the supply. 5. Press ENTER; if you have indicated that your recipe contains more than one step, the display returns to the JOULES screen so that you can enter recipe values for the next step. 6. Repeat Steps 2 through 5 as needed. To set the number of recipe repetitions: If you set the recipe type to JOULE CONTINOUS, a REPEAT menu option displays. It allows you to set the number of times you want the recipe to repeat itself. Note: The REPEAT feature is available only with the JOULE CONTINUOUS option. 1. Select REPEAT. 4-154 Communication Interfaces 57000097-00B Pinnacle® Plus+ 10 kW Power Supply 2. Rotate the MODIFY knob to enter a number between 1 and 65535. 3. Press ENTER to save your selection. Setting Joule Mode PROCESS CONTROL JOULES This option lets you use joule mode, a method of automatically delivering a specified number of joules to the target. Choose THRESHOLD to specify an output level to begin calculation and thereby enhance the accuracy of the calculation by disabling the calculation during ignition. Choose ENABLE to enable or disable joule mode. Choose SETPT to program the number of joules you want to be delivered. Note: If a timed recipe is active, the timed recipe overrides the joule feature. To enable joule mode: 1. Press PROCESS CONTROL JOULES ENABLE. 2. Rotate the MODIFY knob to select YES or NO, to enable or disable joule mode. 3. Press ENTER to accept and exit. SETTING THE JOULE SET POINT To program the number of joules you want to be delivered (joule set point): 1. Press PROCESS CONTROL JOULES SETPT. 2. Rotate the MODIFY knob to select a value between 0 and 9,999,999 joules (in 1 joule increments). 4 If you are rotating the MODIFY knob slowly, press the appropriate soft key to indicate how quickly you want the display to increment the value (x1000, x100, x10 or x1). Note: If you turn the MODIFY knob quickly, the counts per click setting takes effect. 3. Press ENTER to accept and exit. SETTING THE JOULE THRESHOLD PROCESS CONTROL JOULESTHRESHOLD This option allows you to set a level of output that must be met or exceeded before Joule calculation begins. You can use this feature to improve the accuracy for processes that have long ignition times. To set the joule threshold type: 1. Press PROCESS CONTROL JOULES THRESHOLD TYPE 57000097-00B Communication Interfaces 4-155 Advanced Energy® 2. Rotate the MODIFY knob to select POWER, CURRENT, or VOLTAGE. 3. Press ENTER to accept and exit. Note: If you select power or current, the joule counter counts when power or current (which ever you selected) is above the threshold and stops when this value drops below the threshold. If you select voltage, the joule counter counts while voltage is below the threshold and stops when voltage exceeds this limit. The Joule energy calculation begins after (n) mS, regardless of the output level. The time value, (n) mS, is set in the configuration and cannot be changed. If the output level meets the joule energy threshold prior to the time expiration, the joule energy calculation will begin. To set the joule threshold level: 1. Press PROCESS CONTROL JOULES THRESHOLD LEVEL 2. If you have selected power as your joule counter threshold type, then rotate the MODIFY knob to select a value between 10 W and maximum unit power divided by 8. Note: Value is in decawatts if unit is part of a master/slave system. 3. If you have selected current as your joule counter threshold type, then rotate the MODIFY knob to select a value between 0 and the maximum current set point for your unit. 4. If you have selected voltage as your joule counter threshold type, then rotate the MODIFY knob to select a value between 0 and 650 V. 5. Press ENTER to accept and exit. Setting the Ramp Use this option to ramp the output to a process set point. This option allows you to enable the feature, set a ramp start set point percentage, and set a ramp time. The ramp time is set in 10 ms increments. The minimum ramp time is 0.05 s. The maximum ramp time is 600.00 s. Note: If your unit has 100 ms ramp feature enabled, the range is 0.5 s to 6000.0 s. The out-of-set point timer is disabled while output is ramping. PROCESS CONTROL RAMP To enable ramp mode: 1. Press PROCESS CONTROL RAMP ENABLE. 2. Rotate the MODIFY knob to select Yes or No to enable or disable ramp mode. 3. Press ENTER to accept and exit. 4-156 Communication Interfaces 57000097-00B Pinnacle® Plus+ 10 kW Power Supply To select the ramp starting point (a percentage of the set point to begin ramping): Note: This setting only applies to regular ramp mode. It does not apply to ramp mode in a timed recipe. 1. Press PROCESS CONTROL RAMP START_PT. 2. Rotate the MODIFY knob to select a percent. 3. Press ENTER to accept and exit. To select the ramp time: 1. Press PROCESS CONTROL RAMP TIME. 2. Rotate the MODIFY knob to select a time. 3. Press ENTER to accept and exit. Note: Under “Host” control one can generate multiple ramps between set points by sending new set points while the output is on. STANDARD SERIAL (FLASH) PORT Your Pinnacle Plus+ supply contains a modified AE Bus serial (Host) communications interface accessible through the Standard Serial port. This allows the Pinnacle Plus+ unit to interface with a host computer. You can do everything from the host computer interfaced with the Pinnacle Plus+ supply that you can do from the active front panel or the Pinnacle Remote Panel. For a complete list of available functions, refer to the list of commands later in this chapter. Note: To obtain a diskette containing sample software as well as an executable version of the AE Bus Host software, please call AE Customer Support. Note: The flash port is not available for serial communications on Pinnacle Plus+ supplies with AE Bus cards installed. Standard Serial Port Description The Standard Serial port, or flash port, lets AE personnel program the internal flash function of the Pinnacle Plus+ unit. If the unit does not have an AE Bus card installed, the flash port also lets you use a type of AE Bus protocol to communicate with the Pinnacle Plus+ supply. (see “Transmission Parameters” on page 4-158). Located on the rear panel, the Standard Serial port is a shielded modular jack illustrated on page 4-158. (See also the rear panel illustration at the end of the “Installation” chapter.) 57000097-00B Communication Interfaces 4-157 Advanced Energy® Figure 4-20. Standard Serial port STANDARD SERIAL PORT PIN DESCRIPTIONS The pin descriptions for this port are as follows. Table 4-42. Serial Port Pin Descriptions Pin Description 1 Do not connect 2 Power supply transmit 3 Power supply receive 4 Ground Note: We recommend that for optimal performance, you use only shielded modular cable between the Pinnacle Plus+ unit's Standard Serial port and your host computer. Transmission Parameters The communications capability of the Standard Serial port is limited to the following parameters. Note: These transmission parameters do not apply for units with AE Bus cards installed. If your unit has an AE Bus card installed, see the AE Bus section of this manual for more information on transmission parameters. • RS-232 protocol • Baud rate of 19.2 kbps • Pinnacle Plus+ unit address of 1 • Odd parity • 1 start bit, 8 data bits, one stop bit • Low-order bytes are transmitted before high-order bytes 4-158 Communication Interfaces 57000097-00B Pinnacle® Plus+ 10 kW Power Supply Please note that the time-out period for the Pinnacle Plus+ is factory set at 0.02 s (that is, no more than 20 ms can elapse between bytes or the unit will reset and begin looking for a new message packet). This can be changed using command 40 or from the active front panel. AE BUS (HOST) PORT Your Pinnacle Plus+ supply features an AE Bus card with a 9-pin, female, subminiature-D connector for interfacing with a host computer. You can do everything from a host computer interfaced with the Pinnacle Plus+ supply that you can do from the active front panel or Pinnacle Plus+ Remote Active Panel. To obtain a diskette containing sample software with a limited command set, as well as an executable version of the AE Bus software, please call AE Customer Support. Note: If you have an isolated AE Bus card, your card provides isolation of more than 500 Vrms from the Pinnacle Plus+ unit's SELV logic and control circuitry to all nine pins on the connector. Make connections for the serial port through its 9-pin, female subminiature-D connector on the rear panel of the unit. Figure 4-21. AE Bus port connector Pin Descriptions Refer to the following table for pin descriptions. Table 4-43. AE Bus Host Port Pin Descriptions Pin 57000097-00B Pin Name 1 UNASSIGNED 2 TXD.D Description RS-232 transmit data Communication Interfaces 4-159 Advanced Energy® Table 4-43. AE Bus Host Port Pin Descriptions (Continued) Pin Pin Name Description 3 RXD.D RS-232 receive data 4 UNASSIGNED 5 COM.D Data common 6 TR- / R- RS-485 (-) transmit/receive data; RS-422 (-) received data 7 TR+ / + RS-485 (+) transmit/receive data; RS-422 (+) received data 8 T- RS-422 (-) transmit data 9 T+ RS-422 (+) transmit data Transmission Parameters The communications capability of the serial AE Bus port is limited to the following parameters: • RS-232, RS-422, or RS-485 transmission standard • Four baud rates (selected by the DIP switch)—The unit is set for either standard or high-speed baud rates, which define the baud rates that can be selected. You can use host command 85 to change between standard and high-speed baud rates. Standard baud rates: 4 RS-232: 1200, 4800, 9600, 19,200 4 RS-422, RS-485: 9600, 19,200, 38,400, 57,600 High-speed baud rates (same for RS-232-, RS-422, and RS-485) 4 19,200, 38,400, 57,600, 115,200 • Odd parity • 1 start bit, 8 data bits, one stop bit • Low-order bytes are transmitted before high-order bytes The time-out period for Pinnacle Plus+ units is factory set at 0.02 s (that is, no more than 0.02 s can elapse between bytes or the unit will reset and begin looking for a new message packet). This can be changed using Command 40. 4-160 Communication Interfaces 57000097-00B Pinnacle® Plus+ 10 kW Power Supply The host computer must finish one transaction with a Pinnacle Plus+ unit before it initiates another one, either with the same unit or any other unit. Note: If you have selected RS-232, the Pinnacle Plus+ unit sends data through pin 2 (TXD.D). This pin must be connected to the receive pin (RXD.D) on the host computer's PC serial connector. The receive pin is normally pin 2 for a standard 9-pin PC serial port and normally pin 3 for a standard 25-pin PC serial port. Note: If you are using RS-422 or RS-485, the Pinnacle Plus+ supply sends and receives data differentially. Thus pin 6 (TR- or R-) and pin 7 (TR+ or R+) are either RS-485 transmit and receiver lines or RS-422 receiver lines. Pins 8 and 9 are RS-422 transmit lines. Switch Settings The DIP switch (see Figure 4-22 on page 4-161 and Figure 4-23 on page 4-162) sets the AE Bus address for each Pinnacle Plus+ supply in a multi-drop configuration. The DIP switch is located on the rear panel of the Pinnacle Plus+ supply next to the AE Bus port. There are two types of DIP switches on AE Bus interfaces: “rocker” DIPs and “slide” DIPs (see Figure 4-22 on page 4-161 and Figure 4-23 on page 4-162). Your supply will have one of these types. While the switches on these DIPs are slightly different, they serve the same function. Both DIPs contain eight miniature switches (here called “min-switches”). In all units, setting a switch to the “up” position means setting it toward the numbers on the DIP, and setting a switch to the “down” position means setting it away from the numbers. On “rocker” DIPs, “up” means that the side of the switch toward the numbers is depressed. On “slide” DIPs, “up” means that the slide is pushed toward the numbers. Figure 4-22. Rocker DIP switch 57000097-00B Communication Interfaces 4-161 Advanced Energy® Figure 4-23. Slide DIP switch On units where the DIP switch is located externally on the rear panel, it can be difficult to see the numbers, and the orientation of the unit may change. However, the orientation of the DIP is always the same relative to the unit and, when the unit is sitting right side up, the numbers are at the top of the DIP. The following illustration shows the orientation of the AE Bus port and DIP switch on the back panel of the Pinnacle supply. Figure 4-24. Orientation of the AE Bus port and external DIP switch on the back panel 4-162 Communication Interfaces 57000097-00B Pinnacle® Plus+ 10 kW Power Supply The first five min-switches (A4 to A0) specify the address of a Pinnacle Plus+ unit (see Table 4-44 on page 4-164), which a host computer must include in the message packet it sends. Each Pinnacle Plus+ supply in a network must have a unique address. The next two min-switches (BR1 and BR0) specify the baud rate for the AE Bus port (see Table 4-44 on page 4-164). The last min-switch allows you to choose between RS-232 or differential communication (RS-485 or RS-422). RS-232 is selected when the switch is up. Differential communication is selected when the switch is down. RISK OF DEATH OR BODILY INJURY. Disconnect and lockout/tagout all sources of input power before working on this unit or anything connected to it. Power down the Pinnacle Plus+ and take proper ESD precautions before removing the unit's top cover to position jumpers. Failing to take proper ESD precautions in this case could result in damage to the unit. If the product has a “Warranty Void if Seal is Broken” label, you must receive prior approval from AE before you can remove the power supply box cover. If you remove the box cover before receiving approval from AE, the product warranty is no longer valid. Contact AE Global Services for more information. The mode of differential communication (that is, RS-485 or RS-422) is selected via the jumper labeled as such. Place the jumper across pins 1 and 2 for RS-485 (labeled 485). Place the jumper across pins 2 and 3 for RS-422 (labeled 422). If you have selected RS-422 or RS-485, you also have to set two terminator jumpers according to the following: • If have selected RS-422 or if your Pinnacle unit is the last device on an RS-485 multi-drop chain, place the jumpers across pins 1 and 2 (labeled Term). This setting is the factory default. • If you have selected RS-485 and your Pinnacle unit is not the last device on a multi-drop chain, place the jumpers across pins 2 and 3 for no termination. If you have questions about setting these jumpers, contact AE Global Services. 57000097-00B Communication Interfaces 4-163 Advanced Energy® SETTING THE PINNACLE PLUS+ UNIT’S AE BUS ADDRESS Use the DIP switch (see Figure 4-22 on page 4-161 and Figure 4-23 on page 4-162) to set the unit’s AE Bus address (see Table 4-44 on page 4-164). • For units with a single output, an allowable address is between 1 and 31. Table 4-44. AE Bus Address Settings Address A4 A3 A2 A1 A0 0 Don't assign this address to a unit; it is the AE Bus broadcast address—all Pinnacle Plus+ units receive a message sent to this address by the host, but will not reply. 4-164 1 up up up up down 2 up up up down up 3 up up up down down 4 up up down up up 5 up up down up down 6 up up down down up 7 up up down down down 8 up down up up up 9 up down up up down 10 up down up down up 11 up down up down down 12 up down down up up 13 up down down up down 14 up down down down up 15 up down down down down 16 down up up up up 17 down up up up down 18 down up up down up 19 down up up down down 20 down up down up up 21 down up down up down 22 down up down down up 23 down up down down down Communication Interfaces 57000097-00B Pinnacle® Plus+ 10 kW Power Supply Table 4-44. AE Bus Address Settings (Continued) Address A4 A3 A2 A1 A0 24 down down up up up 25 down down up up down 26 down down up down up 27 down down up down down 28 down down down up up 29 down down down up down 30 down down down down up 31 down down down down down SETTING BAUD RATES AND COMMUNICATION MODE Also use the DIP switch (see Figure 4-22 on page 4-161 and Figure 4-23 on page 4-162) to set the baud rate for the AE Bus port. The following tables show the DIP switch settings for BR0, BR1, and Switch 8. Switch 8 sets the supply to either RS-232 or RS-485/422. Switches BR0 and BR1 set the baud rates. The unit is set for either standard or highspeed baud rates, which define the baud rates that can be be selected. Host command 85 sets the unit for either standard or high-speed baud rates. Table 4-45. Setting Switch 8 Switch Position Communication Mode Up RS-232 Down RS-485/422 Table 4-46. Baud Rate Settings Standard Baud Rate 57000097-00B High-Speed Baud Rate BR0 BR1 RS-232 RS-485/422 RS-232,RS-422, RS-485 BR0 BR1 1200 9600 19,200 up up 4800 19,200 38,400 up down 9600 38,400 57,600 down up 19,200 57,600 115,200 down down Communication Interfaces 4-165 Advanced Energy® AE BUS COMMUNICATIONS The following sections describe communications between a host and the Pinnacle Plus+ supply. AE Bus Protocol The AE Bus protocol uses pure binary data (nothing is coded ASCII) and is designed to facilitate direct communications between a host computer and the Pinnacle Plus+ power supply. The AE Bus message packet combines chunks of information in such a way that much information can be sent over communication lines at one time. Five types of information (or “Fields”) make up message packets (Figure 4-25): • Header (address and length of data field) • Command (see the command list later in this chapter) • Optional length byte • Data • Checksum (error checking) Figure 4-25 shows the organization of these fields in the AE Bus message packet. The subsequent paragraphs describe each field. Note: The message packet features this structure whether the message originates at the host computer (master node) or the Pinnacle Plus+ unit. Data (0-255 bytes) Command 0-FFh 7 6 5 4 3 2 1 0 7 6 5 4 3 2 1 0 7 6 5 4 3 2 1 0 7 6 5 4 3 2 1 0 7 6 5 4 3 Header 5-bit address 3-bit length 1 0 7 6 5 4 3 2 1 0 7 6 5 4 3 2 1 0 7 6 5 4 3 2 1 0 Optional Checksum 1138 Figure 4-25. Graphic representation of an AE Bus message packet 4-166 Communication Interfaces 57000097-00B Pinnacle® Plus+ 10 kW Power Supply HEADER The first byte in each packet contains two pieces of information: five bits contain the packet address, and three bits contain the data byte count. If the message packet originates with the host computer (master), the address specifies the packet's destination (to a Pinnacle Plus+ unit, for example). If the packet is going to the host, the address specifies the packet's origin (from the Pinnacle Plus+ unit). The address section of the Header field is five bits long, which allows a total of 32 distinct addresses. Address 0 (zero) is reserved for the AE Bus broadcast address; when this address is used in a host-originated packet, all units execute the packet (but do not respond back to the host). For more information on setting the unit address, see “Setting the Pinnacle Plus+ Unit’s AE BUS Address” on page 4-164. The remaining three bits tell the receiving unit how long the Data field is so that the unit can determine when the entire message has been received. Note: The value in these bits should refer only to the number of actual data bytes. Do not include the checksum byte when calculating the value for these bits. The Header field (address and length) must be at the beginning of the message packet so that the receiving unit can compute the length of the packet after receiving the first byte. COMMAND This field contains a one-byte value: 00h to FFh (0 to 255). If the message packet originates with the host computer, this value specifies the purpose of the message packet. If the message originates with the Pinnacle Plus+ unit, the value specifies the command to which it is responding. See “AE Bus Commands” on page 4-172 for a complete list of AE Bus commands. OPTIONAL LENGTH BYTE This field supplements the Header field and exists only when the length bits in the Header field contain a value of 7. Under those circumstances, the Optional field contains a value only when the length bits in the Header field contain a value of 7. (A value of 7 indicates that the Data field contains more than 6 bytes of data.) Under those circumstances, the Optional field contains a one-byte value (between 0 and 255) indicating the number of data bytes. DATA (DATA BYTES) The Data field can contain from 0 to 255 bytes of binary data, which are interpreted in various ways, depending on the value that appears in the Command field. The Data field typically contains data or a CSR (see “Creating an Ideal AE Bus Communications Transaction” on page 4-168), depending on what was requested. Since some commands do not require data, sometimes the Data field is not present. 57000097-00B Communication Interfaces 4-167 Advanced Energy® If the value specified in the length bits of the Header field is 0 to 6, the Pinnacle Plus+ unit expects 0 to 6 bytes of data. However, if the value in the Header field is 7, the Pinnacle Plus+ unit looks for an additional eight-bit byte after the Command field (the Optional field) and uses this value for the data byte count. CHECKSUM This one-byte field is the last one in the packet. The content depends on the value of each of the preceding fields. The transmitting unit determines this value by accumulating the XOR (exclusive-or) of all bytes of the packet up to, but not including, the checksum value. The receiving unit accumulates the XOR of all bytes of the packet, including the checksum. If the result is zero, the packet has likely been received intact. Only after the checksum of a message packet is validated (having no parity errors, and the address is valid) will the Pinnacle Plus+ unit act on the message (which consists of the contents of the command, and if appropriate, the data fields). Creating an Ideal AE Bus Communications Transaction The figure below is a simplified graphic showing the steps in an ideal communications transaction between a host computer and a Pinnacle Plus+ unit. 4-168 Communication Interfaces 57000097-00B Pinnacle® Plus+ 10 kW Power Supply Host Pinnacle Plus+ Figure 4-26. AE Bus communications transaction First, the host computer sends a message packet to the Pinnacle Plus+ unit. The packet contains one of the following: • A command that requests data or status information • A command and data that change a parameter setting • An executable command Once the Pinnacle Plus+ unit receives the message packet, the Pinnacle Plus+ unit verifies that the message is intended for it and not for another unit in the network. At this time, the Pinnacle Plus+ unit also analyzes the checksum to verify that the message was received correctly. If the address does not match, the Pinnacle Plus+ unit does not respond to the host; the Pinnacle Plus+ unit resets and resumes waiting for a message addressed to it. If the address is correct but the exclusive-or sum of the bytes in the packet (including the checksum) is not zero, the Pinnacle Plus+ unit sends a NAK (negative acknowledgment, hex code 15h) to the host. If the address matches and the message is intact, the Pinnacle Plus+ unit sends an ACK (acknowledgment, hex code 06h) to the host. 57000097-00B Communication Interfaces 4-169 Advanced Energy® If the Pinnacle Plus+ unit receives a request for data or status information, it gathers and sends the requested information. Otherwise, it evaluates the incoming command and sends a message-packet that contains a 1-byte data value (CSR code) to the host ( see “Understanding Command Status Response (CSR) Codes” on page 4-170 ). CSR code 0 is sent when the command has been accepted. If the host receives a NAK from the Pinnacle Plus+ unit, the host either re-transmits the packet or does whatever else it has been programmed to do in this situation. If the host receives an ACK, it waits for the requested data or status information or for the CSR code telling it whether or not the new parameter was accepted. If the host receives no response within a reasonable period, it takes whatever action it has been programmed to take. Meanwhile, the Pinnacle Plus+ unit has prepared a message packet with the requested information or appropriate CSR code, which it then transmits to the host. The host determines by means of the checksum if the message is complete. If the host detects an error in the transmission (by using the Checksum), it can request the packet be sent again by transmitting a NAK. If the Pinnacle Plus+ unit receives an ACK, it returns to the normal waiting state. If the Pinnacle Plus+ unit receives a NAK, it re-transmits the message packet. The Pinnacle Plus+ unit continues to re-transmit in response to NAK transmissions until the host stops the cycle. If the Pinnacle Plus+ unit receives no response, it assumes an ACK and returns to the waiting state. Understanding Command Status Response (CSR) Codes When the Pinnacle Plus+ unit sends a Command Status Response (CSR) code in response to a command, interpret the CSR (a one-byte response) code in the following way: Table 4-47. Command Status Response (CSR) Codes Code 0 Meaning Command accepted The following CSR codes are sent in response to a command that was not accepted and provide an indication of why the command was not accepted. 4-170 1 Control mode is incorrect 2 Output is on, change not allowed 3 Output is off, change not allowed 4 Data is out of range Communication Interfaces 57000097-00B Pinnacle® Plus+ 10 kW Power Supply Table 4-47. Command Status Response (CSR) Codes (Continued) 57000097-00B 5 Invalid parameter 6 Program source is incorrect 7 Active fault(s) exist 9 Data byte count is incorrect 10 User port has priority 11 Bus is not ready 12 This feature is not available on your unit 16 Target life has been consumed 17 Output OFF timer active (minimum off time is 50 ms) 19 Recipe is active (change not allowed) 21 Joule set point has not been reached 25 Unit is configured as a slave 28 Set point exceeds user limit 29 Regulation mode is locked (you cannot switch between regulation modes while output power is on) 31 The User port reset is active (you must de-assert the reset line on the User port) 33 Pulsing disabled (frequency = 0) 34 Unit is a Sync Pulse receiver 36 User set point out of range 99 Command not accepted (there is no such command) Communication Interfaces 4-171 Advanced Energy® Figure 4-27. AE Bus communications transaction example AE Bus Commands To operate the power supply from a host computer, you must first set the control mode to host (command 14). AE Bus commands 1 through 127 change the value of a parameter or direct the power supply to perform a specific function. The Pinnacle Plus+ supply responds to these commands with a CSR code (see “Understanding Command Status Response (CSR) Codes” on page 4-170). The codes returned in response to each of these commands is listed in the rightmost column of the table. Commands 128 through 255 request a value to be read from the Pinnacle Plus+ supply. The number of data bytes contained in the return packet is listed in the rightmost column of the table. Some of these commands may return CSR codes; those codes are listed in the same column. Table 4-48. AE Bus Commands Command 0 Description Number of Transmit Data Bytes CSR Codes or Number of Response Bytes Null command. 0 CSR Codes: 0,9 Sets DC output off; this request is always honored, regardless of which interface has control. 0 CSR Codes: 0, 9 null off 1 DC off 4-172 Communication Interfaces 57000097-00B Pinnacle® Plus+ 10 kW Power Supply Table 4-48. AE Bus Commands (Continued) Command Description Number of Transmit Data Bytes CSR Codes or Number of Response Bytes 2 Sets DC output on; host control mode must be selected (see command 14). 0 CSR Codes: 0,1,2,7,9,16 17,31 1 CSR Codes: 0,1,2,5, 9,29 4 CSR codes: 0,1,4,9 1 CSR codes: 0,1,2,9 DC on 3 regulation method Read back the status of the last output on event with command 161. Sets the method of output regulation (power, current or voltage). Send 1 data byte (8-bit value): • 6 = Power • 7 = Voltage • 8 = Current Note: Output power must be off (that is, output must be deenergized) to switch between regulation modes. Read back this value with command 154. 4 Specifies the number of joules to be delivered. joule set point Send a 4-byte (32-bit value); the value must be between 0 and 9,999,999. Read back this value with command 173. 5 Enables or disables joule mode. joule mode enable Send 1 data byte (8-bit value): • 0 = Disable • Non-zero value = Enable Read back this value with command 153. 57000097-00B Communication Interfaces 4-173 Advanced Energy® Table 4-48. AE Bus Commands (Continued) Command Description Number of Transmit Data Bytes CSR Codes or Number of Response Bytes 6 Specifies the output set point level for whichever method of regulation mode has been selected. 2 CSR Codes: 0,1,4,6,9 19 set point Send 2 data bytes (16-bit value); an output power value implies 3 decimal places for a stand-alone unit and 2 decimals for a master/ slave unit. An output current value should imply 2 decimal places, and an output voltage value should imply 0 decimal places. For example, for a 6 kW, standard Z stand-alone supply, send a value between 0 and 6000 (6.000 kW, decimal is implied), or 0 and 1500 (15.00 A, decimal is implied), or 0 and 800 (maximum output voltage). Please refer to the “Specifications” chapter of this manual for your unit's capabilities. Note: If the ramp feature is enabled (commands 15 and 16), sending this command while the output is on will force the unit to ramp from the existing set point to the new requested set point over the time specified in command 16. Thus, by using this command and commands 15 and 16, you can generate an output wave form during a process. Read back this value with command 164. 4-174 Communication Interfaces 57000097-00B Pinnacle® Plus+ 10 kW Power Supply Table 4-48. AE Bus Commands (Continued) Command Description Number of Transmit Data Bytes CSR Codes or Number of Response Bytes 8 arc shutdown time Send 2 data bytes to set the arc shutdown time. 2 CSR only • Byte 1 = Unused • Byte 2 = Send the index value that represents the arc shutdown time (in µs). The list below shows standard index values. Your unit may be configured with different values. For information about a specific unit, contact AE Global Services. 4 0 = 200 4 1 = 500 4 2 = 1000 4 3 = 1500 4 4 = 2000 4 5 = 2500 4 6 = 3000 4 7 = 4000 4 8 = 5000 Readback this value with command 170. 57000097-00B Communication Interfaces 4-175 Advanced Energy® Table 4-48. AE Bus Commands (Continued) Command Description Number of Transmit Data Bytes CSR Codes or Number of Response Bytes 9 Sets the number of hard arcs required for the power supply to provide an arc indication. (If the limit is reached during a process cycle, then after output shuts off, the ARC LED on the passive panel or active control panel lights and, if applicable, a pulse is sent to the User port ARC.D output signal. For more information,“Communication Interfaces” on page 4-1. 4 CSR codes: 0,1,4,9 hard arc count limit Send 4 data bytes (a 32-bit value) indicating the number of arcs; the value must be at least 0 but no greater than the maximum set for your unit. Note: If you set the hard arc count limit to 0, each time a hard arc occurs the ARC LED lights for a predetermined time and, if applicable, a signal is sent to the User port. Read back this value with command 178. 4-176 Communication Interfaces 57000097-00B Pinnacle® Plus+ 10 kW Power Supply Table 4-48. AE Bus Commands (Continued) Command 10 voltage arc trip level Description Specifies the voltage level at which the unit indicates an arc is occurring. Sixteen discrete levels are available. These levels are represented by the index numbers in the following table. Number of Transmit Data Bytes CSR Codes or Number of Response Bytes 1 CSR codes: 0,1,4,9 Send one data byte (8-bit value) identifying the appropriate index value for the desired trip level. The table below shows standard index values. Your unit may be configured with different values. For information about a specific unit, contact AE Global Services. Index (data byte) Trip Level (result in volts) 0 10 1 20 2 30 3 40 4 50 5 60 6 70 7 80 8 90 9 100 10 125 11 150 12 175 13 200 14 225 15 250 Read back this value with command 171. 57000097-00B Communication Interfaces 4-177 Advanced Energy® Table 4-48. AE Bus Commands (Continued) Command 11 active target Description Specifies which target will be active. Number of Transmit Data Bytes CSR Codes or Number of Response Bytes 1 CSR codes: 0,1,2,4,9,10 5 CSR codes: 0,1,2,4,9 1 CSR codes: 0,1,2,9 Send 1 data byte (8-bit value); the value must be at least 1 but no greater than 8. Note: The User port has priority for target selection. Thus to select targets from the active front panel or from the Pinnacle Remote Panel (that is, when the Pinnacle Plus+ unit is in local or host control mode), you must set the target to 1 at the User port. Leaving the target bits open or leaving the User port pins unconnected causes the target selection at the User port to default to 1. Read back this value with command 156. 12 target life Sets the life (in kilowatt-hours) of the target you specify. Send 1 data byte (8-bit value) plus 4 data bytes (32-bit value), arranged as follows: • First byte = Target number • Second/third/fourth/fifth bytes = Target life (in kilowatt-hours); two decimal places are implied (that is, to get 1 kW, send a value of 100). Read back this value with command 157. 13 target enable Enables or disables the target life counter. Send 1 data byte (8-bit value): • 0 = Inactive • Non-zero value = Target life is active Read back this value with command 163. 4-178 Communication Interfaces 57000097-00B Pinnacle® Plus+ 10 kW Power Supply Table 4-48. AE Bus Commands (Continued) Command 14 control mode Description Chooses the mode of control for the Pinnacle Plus+ supply. Number of Transmit Data Bytes CSR Codes or Number of Response Bytes 1 CSR codes: 0,2,5,9,12 1 CSR codes: 0,1,2,9,19 2 CSR codes: 0,1,4,9 Send 1 data byte: • 2 = Serial (Host) port • 4 = User port • 6 = Active control panel Read back this value with command 155. 15 ramp enable Enables or disables the ramp feature. Send 1 data byte (8-bit value): • 0 = Disable • Non-zero = Enable Read back this value with command 163. 16 ramp time Sets the ramp time in 10 ms increments. Range is 50 ms to 600.00 s. Send a 2-byte value between 5 and 60,000. Two decimal places are implied. (To get 1 s, send a value of 100.) Note: If your unit has 100 ms ramp feature enabled, one decimal is implied. The range is 0.5 s to 6000.0 s. Read back this value with command 158. 57000097-00B Communication Interfaces 4-179 Advanced Energy® Table 4-48. AE Bus Commands (Continued) Command Description Number of Transmit Data Bytes CSR Codes or Number of Response Bytes 17 Tells the Pinnacle Plus+ supply whether the source of information for regulation mode and set points is internal or external (the source can be set independently for each of the three control modes). 3 CSR codes: 0,1,2,9 1 CSR codes: 0,1,2,4,9 program source Send 3 data bytes, arranged as follows: • First byte = Program source—if the serial (Host) port is active • Second byte = Program source—if a control panel is the active interface • Third byte = Program source—if the User port is active For each mode, send an 8-bit value as follows: • 0 = Program source is internal • Non-zero value = Program source is external (that is, the program source for the regulation mode and the set point is an analog signal from the User port). Note: A User card must be installed for this feature to be available. Read back these values with command 163. 19 recipe steps Specifies the number of recipe steps in your recipe. Send 1 data byte (8-bit value); the value must be at least 0 but no greater than 8. A value of 0 disables the recipe feature. Note: For each recipe step, you must also set the regulation mode, set point, ramping time, and run time (commands 21, 22, and 23). Read back this value with command 180. 4-180 Communication Interfaces 57000097-00B Pinnacle® Plus+ 10 kW Power Supply Table 4-48. AE Bus Commands (Continued) Command Description Number of Transmit Data Bytes CSR Codes or Number of Response Bytes 21 Specifies the length of ramping time for a recipe step (that is, how long the unit will take to reach the set point you have defined for the selected recipe step). 3 CSR codes: 0,1,2,4,9 3 CSR codes: 0,1,2,4,9 recipe ramp time Send three data bytes arranged as follows: • First byte = Recipe step (must be a value between 1 and 8) • Second and third bytes = Value between 0 and 60,000 (or between 0 s and 600 s); two decimal places implied. Note: If your unit has 100 ms ramp feature enabled, one decimal is implied. The range is 0 s to 6000.0 s. Read back these values with command 181. 22 recipe set point Specifies the set point for a recipe step. Send three data bytes arranged as follows: • First byte = Recipe step (must be a value greater than 0 but no greater than 8) • Second and third bytes = Value between 0 and the full rated output of the supply. Note: See the “Specifications” chapter for your unit's capabilities, and see command 6 for the format of the value. Read back these values with command 182. 57000097-00B Communication Interfaces 4-181 Advanced Energy® Table 4-48. AE Bus Commands (Continued) Command Description Number of Transmit Data Bytes CSR Codes or Number of Response Bytes 23 recipe run time or joule set point Specifies the length of time the unit will run at set point for a recipe step. If you enable joule recipe, use this command to set the joule set point. 3 CSR only Send 3 data bytes arranged as follows: • First byte = Recipe step (a value between 1 and 8) Note: When joule recipes are enabled, recipe step numbers 1 through 8 use the value in the second and third bytes to set the LSW of the joule set point. Step numbers 129 through 136 set the MSW of the joule set point, where step 129 sets MSW of step 1, step 130 sets MSW of step 2, and so on. When command 23 is sent with step numbers 1 through 8, the MSW is cleared. To set joule set points greater than 65535, first send command 23 with steps 1 through 8, then send command 23 with steps 129 through 136. • Second and third bytes = Value between 0 and 60,000 (or between 0 and 600 s); two decimal places implied. Note: If you assign 0 run time for the final recipe step, the unit will switch to continuous output when it reaches set point for this step. In this situation, to turn off output, you must send an off command (using the OFF button or the appropriate User port signal or serial port command) or you must have already enabled joule mode and programmed a joule set point. Read back these values with command 183. 4-182 Communication Interfaces 57000097-00B Pinnacle® Plus+ 10 kW Power Supply Table 4-48. AE Bus Commands (Continued) Command Description Number of Transmit Data Bytes CSR Codes or Number of Response Bytes 24 Tells the Pinnacle Plus+ supply to calculate its logic CRC. 0 CSR codes: 0,2,9 2 0, 1, 2, 4, 9 calculate logic CRC Note: During the approximately 2 seconds it takes to calculate the CRC, the Pinnacle Plus+ unit will not respond to any other commands. Read this value back with command 230. 26 joule threshold Specifies the output level that needs to be met before the Joule output energy calculation begins (the joule threshold). The joule threshold type (power, voltage, or current) is set with command 64. If the threshold type is set in Watts, send 2 bytes (16-bit value) between 10 and maximum power divided by 8. This value represents watts in a stand-alone system and decawatts in a master/slave system. For threshold types set in Volts or Amps, send 2 bytes (16-bit value) between 0 and the maximum output limit. Note: The Joule energy calculation begins after (n) mS, regardless of the output level. The time value, (n) mS, is set in the configuration and cannot be changed. If the output level meets the joule energy threshold prior to the time expiration, the joule energy calculation will begin. Read back this value with command 136. 57000097-00B Communication Interfaces 4-183 Advanced Energy® Table 4-48. AE Bus Commands (Continued) Command Description Number of Transmit Data Bytes CSR Codes or Number of Response Bytes 31 Enables or disables an out-of-set point timer and specifies how long you want the power supply to tolerate an out-of-set point condition before shutting off output. 2 CSR codes: 0,1,4,9 1 CSR codes: 0,1,4,9 1 CSR only 2 CSR codes: 0,1,4,9 out-of-set point timer • To enable the timer, send a value (2 bytes) between 1 and 9999 (0.1 to 999.9 s). • To disable the timer, send a value of 0. Read back this value with command 187. 32 ramp start point (percentage of set point) For ramp mode, sets the ramp start point as a percentage of setpoint when output is turned on. Range is 0 to 95%. Note: This setting only applies to regular ramp mode. It does not apply to ramp mode in a timed recipe. Send a 1 byte value of 0 to 95. Read back this value with command 152. 33 recipe type Set the type of recipe. The default is “Timed.” Send 1 data byte: • 1 = Timed • 2 = Joule continuous • 3 = Joule discrete Read back with command 196. 34 over-voltage timer Enables or disables an over-voltage timer and specifies how long you want the power supply to tolerate an over-voltage condition before shutting off output. • To enable the timer, send a value (2 bytes) between 1 and 9999 (0.1 to 999.9 s) • To disable the timer, send a value of 0 Read back with command 174. 4-184 Communication Interfaces 57000097-00B Pinnacle® Plus+ 10 kW Power Supply Table 4-48. AE Bus Commands (Continued) Command Description Number of Transmit Data Bytes CSR Codes or Number of Response Bytes 35 Enables or disables an over-current timer and specifies how long you want the power supply to tolerate an over-current condition before shutting off output. 2 CSR codes: 0,1,4,9 1 CSR codes: 0,1,9 Resets micro-arcs-per-run and hard-arcs-perrun counters to 0. These counters can be reset at any time, and resetting them can be useful for measuring arcs over a specific period of time. 0 CSR codes: 0,1,9 Specifies the amount of time the Pinnacle Plus+ supply waits between bytes from the host. 2 CSR codes: 0,1,4,9 over-current timer • To enable the timer, send a value (2 bytes) between 1 and 9999 (0.1 to 999.9 s) • To disable the timer, send a value of 0 Read back with command 186. 36 constant duty cycle Enables or disables the constant duty cycle feature. Send 1 byte: • 0 = Disable • Non-zero = Enable Read back with command 163. 38 reset arc density/run counters 40 AE Bus timeout value Send 2 data bytes (16-bit value); the value represents increments of 10 ms and must be at least 2 but no greater than 500 (20 ms to 5 s). That is, two decimal places are implied (enter 500 for 5.00). Read back this value with command 140. 57000097-00B Communication Interfaces 4-185 Advanced Energy® Table 4-48. AE Bus Commands (Continued) Command 43 sets synch pulse as transmitter, receiver, or standalone Description Number of Transmit Data Bytes CSR Codes or Number of Response Bytes 1 CSR codes: 0,1,2,9 Lets you write up to 40 characters of text to line one (top line) of an active control panel 0 to 40 CSR codes: 0,9 Lets you write up to 40 characters of text to line two (bottom line) of an active control panel. 0 to 40 CSR codes: 0,9 Erases text displayed with commands 44 and 45 and refreshes the display. 0 CSR codes: 0,9 Sets the unit’s synch pulse feature as a transmitter, a receiver, or a standalone. Send 1 data byte: • 0 = Receiver • 1 = Transmitter • 2 = Standalone Read back with command 163. 44 panel text line 1 45 panel text line 2 46 erase panel text You may set values for all three user output limits (commands 49, 50, and 51); however, the Pinnacle Plus+ unit responds to the first limit value that impacts output. 4-186 Communication Interfaces 57000097-00B Pinnacle® Plus+ 10 kW Power Supply Table 4-48. AE Bus Commands (Continued) Command 49 user power limit Description Sets a maximum limit for output power. Number of Transmit Data Bytes CSR Codes or Number of Response Bytes 2 CSR codes: 0,1,4,9 2 CSR codes: 0,1,4,9 2 CSR codes: 0,1,4,9 Send 2 data bytes (16-bit value); value must be between 0 and the maximum rated output power for the supply. 3 decimal places are implied for a stand-alone unit (10000 = 10.000 kW) and 2 decimal places are implied for a master/slave system (2000 = 20.00 kW). Note: You cannot change the power limit when output is on because this limit is used to establish the type of operation: low or high power. For values of 10% of the full power or less, the operation mode is low; for values greater than 10% of full power the operation mode is high. Read back this value with command 141. 50 user voltage limit Sets a maximum limit for output voltage as measured at the DC inverter output (see Figure 2-1 on page 2-2). Send 2 data bytes (16-bit value); value must be between 0 and the maximum rated output voltage for the supply. Read back this value with command 142. 51 user current limit Sets a maximum limit for output current. Send 2 data bytes (16-bit value); value must be between 0 and the maximum rated output current for the supply. Assume 2 decimal places (5000 = 50.00 A). Read back this value with command 143. 57000097-00B Communication Interfaces 4-187 Advanced Energy® Table 4-48. AE Bus Commands (Continued) Command 52 user strike voltage limit Description Number of Transmit Data Bytes CSR Codes or Number of Response Bytes 1 CSR only Sets a maximum strike voltage. Send 1 data byte representing a strike voltage range: • 0 = low • 1 = medium • 2 = high The values associated with each range depend on the output impedance range of your unit. Strike Voltage Setting Standard-Z Unit 325 - 650 V High-Z Unit 325 - 800 V Low 800 V + 100 V 1,000 V + 100 V Medium 1,100 +/- 100 V 1,200 V +/- 100 V High 1,450 +/- 150 V 1,450 V +/- 150 V Read back this value with command 144. 59 joule recipe repetition Sets the number of times a continuous jole recipe repeats before turning output off and completing. 2 CSR only Note: This command is only valid when you set the continuous joule recipe type. Send 2 data bytes (16-bit value). Valid input for the joule recipe repetitions are 1 through 65535. Readback this value with command 233. 4-188 Communication Interfaces 57000097-00B Pinnacle® Plus+ 10 kW Power Supply Table 4-48. AE Bus Commands (Continued) Command Description Number of Transmit Data Bytes CSR Codes or Number of Response Bytes 61 Enables or disables micro arc handling feature. Hard arc handling is always enabled. 1 CSR codes: 0,1 1 CSR codes: 0,1,2,4,9 1 CSR codes: 0,1,2,4,9 enable/ disable micro arc handling Send 1 data byte (8-bit value): • 0 = Disable • Non-zero = Enable Note: Cycling power to the unit resets arc handling mode to enabled. Read this value with command 163. 64 threshold type Sets the joule mode counter threshold type. Send one data byte (8-bit value): • 0 = Power • 1 = Voltage • 2 = Current Read back this setting with command 163. 65 pulsing enabled mode Enables pulsing at the current threshold (default setting), always, or use voltage. Note: Frequency is limited to 150 kHz when the pulse mode is set to be enabled always. Send one data byte (8-bit value): • 0 = Pulsing enabled at current threshold • 1 = Pulsing enabled always • 2 = Pulsing enabled using voltage If you choose to set pulsing to use voltage, you must also set the voltage threshold for this pulsing function with command 82. For more information about the pulsing modes, see “Understanding Pulsing Modes” on page 5-32. Read back this setting with command 163. 57000097-00B Communication Interfaces 4-189 Advanced Energy® Table 4-48. AE Bus Commands (Continued) Command 66 enable or disable hard-arc broadcast Description Number of Transmit Data Bytes CSR Codes or Number of Response Bytes 1 CSR codes: 0,1,2,9 2 CSR only Resets the joules remaining counter to its initial value while the output is on. 0 CSR only Enable or disable the joule countdown hold feature, which waits for command 73 before beginning the joule countdown. 1 CSR only Enable or disable the hard-arc broadcast feature. Send 1 data byte: • 0 = Disable • Non-zero = Enable Read back this setting with command 163. 72 near end (joule) indication Set a joule value to indicate the joule down counter is near expiration. Send 2 data bytes (16-bit value). Read back this setting with command 232. 73 joule count reset 74 enable/ disable joule countdown This setting reverts to disabled when the unit powers up. Send 1 data byte: • 0 = Disable • Non-zero = Enable Read back this setting with command 163. 4-190 Communication Interfaces 57000097-00B Pinnacle® Plus+ 10 kW Power Supply Table 4-48. AE Bus Commands (Continued) Command 82 set advanced process parameters Description Sets the voltage ignition threshold and the gross short circuit amp limit. Number of Transmit Data Bytes CSR Codes or Number of Response Bytes 3 CSR code: 0, 1, 2, 4, 5, 9 1 CSR only Send 3 data bytes. The first data byte is the index of the parameter to be set. The second and third data bytes are the value to set for the parameter. • First data byte 4 0 = voltage ignition threshold 4 3 = gross short circuit amp limit • 2nd data byte and 3rd data bytes (16-bit value): 4 Voltage ignition threshold: valid entries are 325 to maximum user voltage allowed less 50 V (For example, if the maximum voltage set point is 650 V, the maximum threshold is 600 V). 4 Gross short circuit amp limit: valid values are 15.40 to 30.80 (in hundredths of amps). For more information about pulsing behavior using the voltage threshold, see “Pulsing Behavior When Using Voltage” on page 5-32. Read back this setting with command 235. 84 redefine PROFIBUS status bits Redefines the PROFIBUS status bits. Send 1 data byte: • 0 = Normal format • Non-zero = Joule recipe definition Read back this setting with command 163. 57000097-00B Communication Interfaces 4-191 Advanced Energy® Table 4-48. AE Bus Commands (Continued) Command Description Number of Transmit Data Bytes CSR Codes or Number of Response Bytes 85 change configuration option bit Changes the configuration option bit. Requires 2 data bytes. 2 CSR only 1st data byte - Bit setting: • 0 = Clear bit • Non-zero = Set bit 2nd data byte - Configuration option bit number (valid entries = 0-31): • 7 = RAMP RESOLUTION bit clear = 10ms ramp resolution; bit set = 100ms ramp resolution • 8 = JOULE RECIPE STATUS bit clear = Normal PROFIBUS status bytes; bit set = Joule recipe definition PROFIBUS status bytes • 18 = USER-PORT EOTL DEFINED AS READY SIGNAL bit clear = User Port EOTL defined as EOTL; bit set = User Port EOTL defined as Ready Signal • 19 = HIGH SPEED AEBUS bit clear = Standard AE Bus baud rates; bit set = High Speed AE Bus baud rates • 25 = EXPLICIT FAULT CLEARING bit clear = enables - OFF or reset command clears faults; bit set = disables - requires power cycle to recover from faults 4-192 Communication Interfaces 57000097-00B Pinnacle® Plus+ 10 kW Power Supply Table 4-48. AE Bus Commands (Continued) Command Description Number of Transmit Data Bytes CSR Codes or Number of Response Bytes 87 set maximum on timer Sets the maximum amount of time that output will stay on (in seconds), if this feature is enabled. If the length of time since the last output on event exceeds this setting, the unit will turn output off. The timer is reset at each output on event. You can set a time in whole seconds from 0 to 65535. A value of zero disables this feature. 2 CSR codes: 0,1,4,9,12 1 CSR codes: 0,1,4,9 1 CSR codes: 0,1,4,9,33 Not all units have this feature available. Send 2 data bytes (16-bit value) indicating the timer value in seconds. Read back this setting with command 243. 92 pulse frequency index Sets pulse frequency from 0 to 350 kHz (in 5 kHz increments): Note: Frequency is limited to 150 kHz when the pulse mode is set to be enabled always. • • • • • • 0 = Pulsing disabled 1 = 5 kHz 2 = 10 kHz 3 = 15 kHz 4 to 69 = (follow the established pattern) 70 = 350 kHz Read back this setting with command 146. 93 pulse reverse time Sets pulse reverse time in 0.1 µs intervals. Send 1 data byte (an 8-bit value): • 04 = 0.4 us • 05 to 49 follow the same format • 50 = 5.0 us Read back this setting with command 147. 57000097-00B Communication Interfaces 4-193 Advanced Energy® Table 4-48. AE Bus Commands (Continued) Command 119 master reset Description Send this command to clear fault indication when the Pinnacle Plus+ supply has experienced a non-recoverable fault. Number of Transmit Data Bytes CSR Codes or Number of Response Bytes 0 CSR codes: 0,9 1 CSR codes: 0,1,2,9 0 to 40 CSR codes: 0,9 Note: Output will be turned off. This request is always honored, regardless of which interface has control. 126 reset default settings Resets all user-defined values to their factory defaults and stores them in non-volatile memory. Send one data byte with a value of 0. 127 Lets you write up to 40 ASCII characters to a scratch pad memory (non-volatile). write to scratch pad Retrieve this information with command 131. Commands 128 through 255 request a value to be read from the Pinnacle Plus+ unit. Some of these commands may return CSR codes. 128 Requests the power supply type; the returning packet contains 4 ASCII characters: “PLUS”. 0 4 Requests the output capacity of the power supply; the returning packet contains 6 characters indicating capacity in kilowatts. 0 6 request supply type 129 request supply size 4-194 The data string implies 3 decimal places for a stand-alone unit (10000 = 10.000 kW) and implies 2 decimal places for a master/slave system (120000 = 1200.00 kW). Communication Interfaces 57000097-00B Pinnacle® Plus+ 10 kW Power Supply Table 4-48. AE Bus Commands (Continued) Command 130 request maximum voltage and current Description Requests the maximum power, voltage, and current levels. The returning packet contains six data bytes (three 16-bit values). Number of Transmit Data Bytes CSR Codes or Number of Response Bytes 0 6 0 40 0 2 0 2 0 2 • Bytes 0 and 1 = Power level in watts • Bytes 2 and 3 = Voltage level in volts • Bytes 4 and 5 = Current level in hundredths of amps 131 request scratch pad memory 136 request joule threshold 140 request AE Bus timeout value 141 request user power limit Displays most recent entry (40 characters) to scratch pad memory. Set with command 127. Requests the output level that needs to be met before the Joule output energy calculation begins. This level is set with command 26. The joule threshold type (power, voltage, or current) is set with command 64. Requests the AE Bus time-out value; the returning packet contains 2 data bytes (16-bit value) indicating the time in ms (a value of 2 indicates 20 ms). This value is set with command 40. Requests the output power limit. Accuracy is +0.3% of the full rated output voltage for the supply. The returning packet contains 2 data bytes (16bit value) indicating the limit in kilowatts. The value implies 3 decimal places for a standalone unit (5000 = 5.000 kW) and 2 decimal places are implied for a master/slave unit (2000 = 20.00 kW). This value is set with command 49. 57000097-00B Communication Interfaces 4-195 Advanced Energy® Table 4-48. AE Bus Commands (Continued) Command Description Number of Transmit Data Bytes CSR Codes or Number of Response Bytes 142 Requests the output voltage limit. Accuracy is +0.3% of the full rated output voltage for the supply. 0 2 0 2 0 1 0 1 request user voltage limit The returning packet contains 2 data bytes (16bit value) indicating the limit in voltage. This value is set with command 50. 143 request user current limit Requests the output current limit. Accuracy is +0.3% of the full rated output current for the supply. The returning packet contains 2 data bytes (16bit value) indicating the limit in amperes. Assume 2 decimal places (5000 = 50.00 A). This value is set with command 51. 144 request user strike voltage limit Requests the strike voltage limit. The returning packet contains 1 data byte indicating a strike voltage • 0 = low • 1 = medium • 2 = high This value is set with command 52. 146 request pulse frequency index Requests pulse frequency index (read in 5 kHz increments); the returning packet contains 1 byte: • • • • • • 0 = 0 kHz (pulsing disabled) 1 = 5 kHz 2 = 10 kHz 3 = 15 kHz 4 to 69 = (follow the established pattern) 70 = 350 kHz This value is set with command 92. 4-196 Communication Interfaces 57000097-00B Pinnacle® Plus+ 10 kW Power Supply Table 4-48. AE Bus Commands (Continued) Command 147 request pulse reverse time Description Requests pulse reverse time (read in 0.1 µs increments); the returning packet contains 1 byte: • • • • • Number of Transmit Data Bytes CSR Codes or Number of Response Bytes 0 1 0 1 0 1 0 1 04 = 0.4 µs 05 = 0.5 µs 06 = 0.6 µs 07 to 49 (follow the established pattern) 50 = 5.0 µs This value is set with command 93. 152 request ramp start set point percentage Requests the ramp start set point percentage; returning packet contains 1 data byte (8-bit) between 0 and 95 (%). Note: This setting only applies to regular ramp mode. It does not apply to ramp mode in a timed recipe. This value is set with command 32. 153 request joules status Requests joule mode status; the returning packet contains 1 byte: • 0 = Inactive • Non-zero value = Active This value is set with command 5. 154 request regulation mode Requests the output regulation mode; the returning packet contains 1 data byte (8-bit value): • 6 = Power • 7 = Voltage • 8 = Current Note: Output power must be off (that is, output must be deenergized) to switch between regulation modes. This value is set with command 3. 57000097-00B Communication Interfaces 4-197 Advanced Energy® Table 4-48. AE Bus Commands (Continued) Command 155 request control mode Description Requests control mode; the returning packet contains 1 data byte (8-bit value): Number of Transmit Data Bytes CSR Codes or Number of Response Bytes 0 1 0 1 1 4 • 2 = Serial (Host) port • 3 = Active control panel (Local) • 4 = User port This value is set with command 14. 156 request active target number 157 request target life Requests an indication of the active target; the returning packet contains 1 data byte indicating target 1, 2, 3, 4, 5, 6, 7, or 8. This value is set with command 11. Requests the amount of target life time remaining for the target you specify. (May return CSR code 4) Send 1 data byte indicating which target; the returning packet contains 4 data bytes (32-bit value) indicating the time remaining in kilowatt-hours. Two decimal places are implied. For example, a value of 100 indicates 1 kWh. This value is set with command 12. 158 request ramp time Requests ramp time. Returns a 2-byte value (16 bits) indicating a ramp time of 5 (50ms) to 60,000 (600.00 s). 0 2 0 2 Note: If your unit has 100 ms ramp feature enabled, one decimal is implied. The range is 0.5 s to 6000.0 s. This value is set with command 16. 159 ramp time remaining Requests how much ramp time is remaining. Returning packet contains 2 data bytes (16 bits), indicating how many 10 ms intervals remain. Note: If your unit has 100 ms ramp feature enabled, the data indicates how many 100 ms intervals remain. 4-198 Communication Interfaces 57000097-00B Pinnacle® Plus+ 10 kW Power Supply Table 4-48. AE Bus Commands (Continued) Command 160 request status Description Requests the status of the logic board. The information in the returning packet is used by AE Global Services. Number of Transmit Data Bytes CSR Codes or Number of Response Bytes 0 6 The returning packet contains 6 data bytes: 1st and 2nd bytes - SW_OPTS1 (16-bit value): • Bit 0 = Single Inverter Unit (read only) • Bit 5 = 500ns Gate Drive Unit (read only) • Bit 7 = 100 ms ramp; bit clear = 10 ms ramp • Bit 8 = Joule recipe definition; bit clear = normal • Bit 12 = Measurement balance; bit set = feature enabled 3rd and 4th bytes - SW_OPTS2 (16-bit value): • Bit 1 = Voltage ignition; bit set = feature enabled • Bit 2 = User port End of Target Life (EOTL) indicator is READY signal; bit set = feature enabled • Bit 3 = High Speed Baud Rate = 19200, 38400, 57600, 115200; bit clear = normal • Bit 9 = No explicit fault clearing (requires power cycle to clear); bit clear = off and reset command clears fault • Bit 11 = Maximum on timer; bit set = feature enabled 5th and 6th bytes: Always 0 57000097-00B Communication Interfaces 4-199 Advanced Energy® Table 4-48. AE Bus Commands (Continued) Command Description Number of Transmit Data Bytes CSR Codes or Number of Response Bytes 161 Reports the status of the most recent output on request, since the last power up event on the unit. The returning packet contains 1 data byte (8-bit value): 0 1 request output on status • • • • • • • • • 0 = Output on sequence OK. 1 = Control mode invalid 2 = Unit is already on 7 = Active fault exists 11 = Bus is not ready 16 = End of target life event 17 = Minimum off time is active 31 = User port reset line active 32 = Contactor is open due to a fault condition • 44 = The Pinnacle Plus+ has not received a request to turn output on since power up Note: See “Understanding Command Status Response (CSR) Codes” on page 4-170 for more information on CSR codes. 4-200 Communication Interfaces 57000097-00B Pinnacle® Plus+ 10 kW Power Supply Table 4-48. AE Bus Commands (Continued) Command 162 request process status Description Requests a report on process status; the returning packet contains 4 data bytes: Number of Transmit Data Bytes CSR Codes or Number of Response Bytes 0 4 1st status byte: • • • • • • • • 0 = Unassigned 1 = Ramp active 2 = Run active 3 = Output power (0 = off, 1 = on) 4 = Illegal regulation mode 5 = Cable interlock open 6 = End-of-target-life event 7 = Set point status (0 = within tolerance, 1 = out-of-tolerance) 2nd status byte: • • • • • • • • 0 = Over-voltage condition exists 1 = Over-current condition exists 2 = Unassigned 3 = Control circuit fault 4 = Heat sink over-temperature event 5 = User interlock open 6 = User port reset active 7 = Main contactor interlock open 3rd status byte: • 0 = Momentary power failure • 1 = Unassigned • 2 = Near end joule value setting has been reached • 3 = Joule Threshold achieved • 4 = Side A inverter low • 5 =Side B inverter low • 6 = Unassigned interrupt event • 7 = PROFIBUS error (Continued on next page) 57000097-00B Communication Interfaces 4-201 Advanced Energy® Table 4-48. AE Bus Commands (Continued) Command 162 request process status (continued) 4-202 Description 4th status byte: Number of Transmit Data Bytes CSR Codes or Number of Response Bytes 0 4 • • • • • • 0 = Hard bus fault 1 = Fault active 2 = Joules reached 3 = Fatal fault active 4 = Out-of-set point timer expired 5 = Ground fault detected (if your Pinnacle Plus+ supports this feature) • 6 = Short circuit fault active • 7 = Fatal short circuit active Communication Interfaces 57000097-00B Pinnacle® Plus+ 10 kW Power Supply Table 4-48. AE Bus Commands (Continued) Command 163 request config status Description Requests the system configuration status; the returning packet contains 4 data bytes. Number of Transmit Data Bytes CSR Codes or Number of Response Bytes 0 4 1st status byte: • 0 = Host program source (0 = internal, 1 = external) • 1 = Local program source (0 = internal, 1 = external) • 2 = Analog program source (0 = internal, 1 = external) • 3 = Master • 4 = Slave • 5 = Unassigned • 6 = Program source (0 = internal, 1 = external) • 7 = Target life status (0 = inactive, 1 = active) 2nd status byte: • 0 = Profibus Status Bit Definition (0 = normal, 1 = Joule Recipe) • 1 = Active control panel access (0 = unlocked, 1 = locked) • 2 = Joule mode (0 = disabled, 1 = enabled) • 3 = Contactor status (0 = open, 1 = closed) • 4 = Unassigned • 5 = Ramp mode (0 = disabled, 1 = enabled) • 6 = Unassigned • 7 = Pulsing enabled (0 = disabled, 1 = enabled) (Continued on next page) 57000097-00B Communication Interfaces 4-203 Advanced Energy® Table 4-48. AE Bus Commands (Continued) Command 163 request config status (continued from previous page) Description 3rd status byte: Number of Transmit Data Bytes CSR Codes or Number of Response Bytes 0 4 • 0 = Transmitter/Receiver mode (0 = Receiver, 1 = Transmitter) • 1 = Over-voltage timer active • 2 = Over-current timer active • 3 = Constant duty cycle active • 4 = Micro arc handling (0 = disabled, 1 = enabled) • 5 = Pulsing mode (also see 4th status byte, bit 2; the setting on that bit overrides this bit) (0 = at current threshold, 1 = always) • 6 and 7 = Joule threshold type Type Bit 7 Bit 6 Power 0 0 Voltage 0 1 Current 1 0 4th status byte: • 0 = Hard-arc broadcast (0 = disabled, 1 = enabled) • 1 = Joule countdown hold (0 = disabled, 1 = enabled) • 2 = Pulsing mode (also see 3rd status byte, bit 5; the setting on this bit overrides that bit) (0 = uses setting on 3rd status byte, bit 5; 1 = voltage pulsing type) • 3 = Sync Pulse standalone unit • 4 through 7 = Unassigned 4-204 Communication Interfaces 57000097-00B Pinnacle® Plus+ 10 kW Power Supply Table 4-48. AE Bus Commands (Continued) Command Description Number of Transmit Data Bytes CSR Codes or Number of Response Bytes 164 Requests the set point level by whichever method of output regulation has been selected; the returning packet contains 3 data bytes: 0 3 0 2 Requests a snapshot of the output voltage level at that instant; the returning packet contains 2 data bytes (16-bit value), indicating the voltage level. For example a value of 800 would indicate 800 V (no implied decimal). 0 2 Requests a snapshot of the output current level at that instant; the returning packet contains 2 data bytes (16-bit value). Two decimal places are implied. For example, a value of 1500 indicates 15.00 A. 0 2 request set point/ regulation mode • First/second byte = Set point level (16-bit value) • Third data byte = Regulation mode (8-bit value) 4 6 = Power 4 7 = Voltage 4 8 = Current Note: Output power must be off (that is, output must be deenergized) to switch between regulation modes. These values are set with commands 3 and 6. 165 request actual power Requests a snapshot of the output power level at that instant; the returning packet contains 2 data bytes (16-bit value) indicating power level. Assume three decimal places for a standalone unit (6000 = 6.000 kW) and two decimal places for a master/slave unit (2000 = 20.00 kW). Note: Refer to the “Specifications” chapter of this manual for information regarding your unit's capabilities. 166 request actual voltage 167 request actual current 57000097-00B Communication Interfaces 4-205 Advanced Energy® Table 4-48. AE Bus Commands (Continued) Command 168 request actual power, voltage, current Description Requests a snapshot of the output power, voltage, and current at that instant; the returning packet contains 6 data bytes: Number of Transmit Data Bytes CSR Codes or Number of Response Bytes 0 6 0 6 0 2 0 1 0 4 • First/second byte = Power level • Third/fourth byte = Voltage level • Fifth/sixth byte = Current level See commands 165, 166, and 167 for the format of the reported output values. 169 request set points: power, voltage, and current Requests the set point levels for power, voltage, and current; the returning packet contains 6 data bytes (three 16-bit values). See commands 165, 166, and 167 for the format of the reported set point values. 170 request arc shutdown Requests the arc shutdown time. The returning packet contains 2 data bytes. 171 Requests the index for the voltage level at which the unit indicates an arc is occurring. For a list of the voltage levels indicated by the index values, see command 10 text. The returning packet contains 1 data byte indicating the trip level index. request voltage arc trip level • Byte 1 = Unused • Byte 2 = Index value set with command 8 (refer to command 8 for the shutdown index values). This value is set with command 10. 172 request joules remaining 4-206 Requests how many joules remain during a run; the returning packet contains 4 data bytes (32-bit value) indicating the number of joules. Communication Interfaces 57000097-00B Pinnacle® Plus+ 10 kW Power Supply Table 4-48. AE Bus Commands (Continued) Command 173 request joules set point 174 request overvoltage timer value 175 request time output on 178 request hard arc count limit 57000097-00B Description Requests the joules set point; the returning packet contains 4 data bytes (32-bit value) indicating the set point level in joules. Number of Transmit Data Bytes CSR Codes or Number of Response Bytes 0 4 0 2 0 3 0 4 This value is set with command 4. Requests the over-voltage timer value; the returning packet contains 2 data bytes (16-bit value) indicating the value. This value is set with command 34. Requests how much time has elapsed since output power was turned on; the returning packet contains 3 data bytes: • First byte = Number of hours • Second byte = Number of minutes • Third byte = Number of seconds Requests the hard arc count limit; the returning packet contains 4 data bytes (a 32-bit value) indicating the limit. This value is set with command 9. Communication Interfaces 4-207 Advanced Energy® Table 4-48. AE Bus Commands (Continued) Command Description Number of Transmit Data Bytes CSR Codes or Number of Response Bytes 179 Requests the active recipe step number, the ramp/run status, and the ramp/run time remaining; the returning packet contains 4 or 6 data bytes depending on the recipe type. 0 4 or 6 0 1 request active recipe step, ramp/ run status, and ramp/run time remaining • First byte = Active recipe step number • Second byte = Ramp/run or recipe type status (1 = ramp, 2 = run, 4 = continuous recipe, 5 = discrete recipe) • Third and fourth bytes = Ramp/run time remaining (in tens of milliseconds, or 0 if a ramp or recipe has run to completion) if timed recipe is running OR • Third, fourth, fifth, and sixth bytes = Joules remaining if discrete or continuous joule recipe is running Note: If output is shut off either through a fault or an off command, the active recipe step number, ramp/run status, and ramp/ run time remaining will all maintain their last value. A subsequent off command will set recipe step number to 1 (or 0 if recipes are not active) and set ramp/run time remaining to 65535 if the time is nonzero. If the run segment of the last recipe step is 0, ramp/run time remaining is set to 65534 and never counts down. 180 request recipe steps Requests the number of recipe steps; the returning packet contains 1 data byte (8-bit value) indicating the number of steps. Note: Recall that a value of 0 sent with command 19 disables the ramping recipe feature. This value is set with command 19. 4-208 Communication Interfaces 57000097-00B Pinnacle® Plus+ 10 kW Power Supply Table 4-48. AE Bus Commands (Continued) Command Description Number of Transmit Data Bytes CSR Codes or Number of Response Bytes 181 Requests the amount of ramping time you have set for a specific ramping recipe step. 1 2 (May return CSR code 4) 1 3 (May return CSR code 4) 1 2 or 4 (May return CSR code 4) request recipe step ramp time Send 1 data byte (8-bit value) indicating the recipe step. The returning packet contains 2 data bytes (16bit value) indicating the time in seconds. Two decimal places are implied. For example, a value of 5 would indicate 0.05 s. This value is set with command 21. 182 request recipe step set point and regulation mode Requests the set point level you have set for a specific ramping recipe step. Send 1 data byte (8-bit value) indicating the recipe step. The returning packet contains 3 data bytes: • First and second bytes = Value of set point in the mode indicated • Third byte = Regulation mode 4 6 = Power 4 7 = Voltage 4 8 = Current This value is set with command 22. 183 request recipe step run time or joule set point Requests the run time you set for a specific recipe step or, if joule recipe is enabled, this command requests the joule set point. Send 1 data byte (8-bit value) indicating the recipe step. The returning packet contains 2 data bytes indicating the run time in seconds. Or, if joule recipe is enabled, returns 4 data bytes (32-bit value) indicating the joule set point. With timed recipes, two decimal places are implied. For example, a value of 5 would indicate 0.05 s. This value is set with command 23. 57000097-00B Communication Interfaces 4-209 Advanced Energy® Table 4-48. AE Bus Commands (Continued) Command Description Number of Transmit Data Bytes CSR Codes or Number of Response Bytes 184 Requests the amount of time remaining on the out-of-set point timer before an error condition occurs; the returning packet contains 2 data bytes (16-bit value) indicating the interval value in seconds. One decimal place is implied. For example a value of 999 would indicate an interval of 99.9 s. 0 2 Requests the over-current timer value; the returning packet contains 2 data bytes (16-bit value) indicating the value. 0 2 0 2 0 4 0 4 request outof-set point interval 186 request overcurrent timer value 187 request outof-set point timer This value is set with command 35. Requests the out-of-set point timer value; the returning packet contains 2 data bytes (16-bit value) indicating the timer value in seconds. One decimal place is implied. For example, a value of 999 would indicate a timer value of 99.9 s. This value is set with command 31. 188 arc density per second 189 request micro arc density Requests the arc density that occurred in the previous second; returning packet contains 4 data bytes. • First/second byte = Micro arcs (16-bit value) • Third/fourth bytes = Hard arcs (16-bit value) Requests how many micro arcs occurred in the previous run; returning packet contains 4 data bytes (32-bit value) indicating the number of micro arcs in the previous run. Note: The unit records a micro arc each time the output voltage goes below the voltage arc trip level set with command 10. All arc counters are updated every 100 ms or 10 times per second. 4-210 Communication Interfaces 57000097-00B Pinnacle® Plus+ 10 kW Power Supply Table 4-48. AE Bus Commands (Continued) Command 190 request hard arc density Description Requests how many hard arcs occurred in the previous run; returning packet contains 4 data bytes (32-bit value) indicating the number of hard arcs in the previous run. Number of Transmit Data Bytes CSR Codes or Number of Response Bytes 0 4 1 4 Note: The unit records a hard arc every time the output voltage goes below the voltage arc trip level for longer than the arc detect time. The unit then shuts down for the arc shutdown time period. All arc counters are updated every 100 ms or 10 times per second. 191 report overvoltage and overcurrent events Reports the number of overvoltage or overcurrent events that occurred since the counter was last reset. Send 1 data byte (8-bit value) indicating the desired report: • 1 = overcurrent events • 2 = overvoltage events Returns 4 data bytes (32-bit value) indicating the number of requested events. 57000097-00B Communication Interfaces 4-211 Advanced Energy® Table 4-48. AE Bus Commands (Continued) Command 195 request personality card Description Number of Transmit Data Bytes CSR Codes or Number of Response Bytes 0 2 0 1 Requests the version level of the unit's flash memory; returning packet contains 32 data bytes. 0 32 Requests the revision level of the mainframe software; the returning packet contains 11 ASCII characters. 0 11 Requests the identity of the unit's personality cards. The returning packet contains 2 data bytes: • First byte = Identity of card in slot 1: 4 0 = Card not present 4 01 or 17 = Dual User port 4 03 or 26= PROFIBUS 4 05 or 21 = Single User port 4 18 or 28 = AE Bus 4 23 or 30 = DeviceNet • Second byte = Identity of card in slot 2: 4 0 = Card not present 4 03 or 26 = PROFIBUS 4 04 = Host Protocol Translator 4 05 or 21 = Single User port 4 18 or 28 = AE Bus 4 22 or 29 = Master/slave card with AE Bus 196 request recipe type 197 request flash configuration 198 request s/w rev level— mainframe 4-212 Requests the recipe type set with command 33. Returns 1 data byte. • 1 = Timed • 2 = Joule continuous • 3 = Joule discrete Communication Interfaces 57000097-00B Pinnacle® Plus+ 10 kW Power Supply Table 4-48. AE Bus Commands (Continued) Command Description Number of Transmit Data Bytes CSR Codes or Number of Response Bytes 208 request fault list Returns a list of fault codes representing active faults affecting the unit. 1 Variable 0 4 Send 1 data byte. • 0 = Returns all active fault codes The returning packet contains a variable amount of data bytes. A two-byte value represents each error code. If a single fault is active, the data length will be 2 data bytes. If two faults are active, the data length is 4 data bytes, and so on. If no faults are active, the data length is 0. If a CSR is returned, the data length is 1. 211 Requests the revision of the FPGA software. Returns 4 ASCII characters. FPGA software revision 57000097-00B Communication Interfaces 4-213 Advanced Energy® Table 4-48. AE Bus Commands (Continued) Command 220 request customer service statistics 223 Description Requests unit statistics; returning packet contains 4 data bytes (32-bit value). Number of Transmit Data Bytes CSR Codes or Number of Response Bytes 1 4 (May return CSR code 5) 0 4 Send 1 data byte (8-bit value): • • • • • • • • • • • • • • • • • • • • • 0 = Total output in kilowatt-hours 1 = Total idle time 2 = Total run time 3 = Total unit on events 4 = Total output on events 5 = Total over-temperature events 6 = Total control circuit faults 7 = Total out-of-set point events 8 = Total hard bus fault events 9 = Total power fluctuation events 10 = Unassigned 11 = Total Side A inverter low events 12 = Total Side B inverter low events 13 = Total user interlock open events 14 = Total cable interlock open events 15 = Total contactor interlock open events 18 = Total PROFIBUS fault events 19 = Total pre-defined interrupt events 20 = Total unassigned interrupt events 22 = Total dsp watchdog faults 24 = 10 ms bus fault events AE service request request unit fault status 4-214 Communication Interfaces 57000097-00B Pinnacle® Plus+ 10 kW Power Supply Table 4-48. AE Bus Commands (Continued) Command 230 request logic, panel, or DSP CRC Description Requests the crc of the logic, front panel or DSP. Number of Transmit Data Bytes CSR Codes or Number of Response Bytes 1 2 (May return CSR code 5) The returning packet contains 2 data bytes (16bit value). • To receive the logic CRC, first send command 24, which calculates the value. With command 230, send one data byte: • 0 = Logic • 2 = DSP 232 request near end joule setting Requests the near end joule setting, set with command 72. 0 2 233 request number of recipe repititions Request the number of recipe repetitions, set with command 59. Returns 4 data bytes. 0 4 57000097-00B • First and second data bytes = Number of repetitions set • Third and fourth data bytes = Current repetition in process (reports 0 if output is off) Communication Interfaces 4-215 Advanced Energy® Table 4-48. AE Bus Commands (Continued) Command 235 request advanced process parameters Description Requests the operating parameter selected in the send data byte. Number of Transmit Data Bytes CSR Codes or Number of Response Bytes 1 2 (May return CSR codes: 0, 5, 9, 12) 0 2 Send 1 data byte to identify the parameter to be read. • Send byte value = 0: Reports the voltage ignition threshold. • Send byte value = 1: Micro arc count— Reports the number of sequential micro arcs needed to trigger a hard arc count. • Send byte value = 2: Microsecond count— Reports the maximum elapsed time (in microseconds) between the end of one micro arc and the beginning of the next micro arc during which the unit considers the micro arcs to be sequential. Micro arcs that occur within this timeframe are sequential. • • Send byte value = 3: Reports the gross short circuit current limit in hundredths of amps. • Send byte value = 4: Reports the gross short circuit time-out in tenths of seconds. 243 request maximum on timer Reports the maximum amount of time that output will stay on (in seconds), if this feature is enabled. If the length of time since the last output on event exceeds this setting, the unit will turn output off. The timer is reset at each output on event. You can set a time in whole seconds from 0 to 65535. A value of zero disables this feature. Not all units have this feature available. Returns 2 data bytes (16-bit value) indicating the timer value in seconds. This value is set with command 87. 4-216 Communication Interfaces 57000097-00B Pinnacle® Plus+ 10 kW Power Supply Table 4-48. AE Bus Commands (Continued) Command Description Number of Transmit Data Bytes CSR Codes or Number of Response Bytes 251 special DeviceNet Requests the full-scale power for DeviceNet (32-bit value). 0 4 252 special DeviceNet Requests the full-scale current for DeviceNet (32-bit value). 0 4 253 special DeviceNet DeviceNet poll commands. The returning packet contains 8 data bytes. 0 8 57000097-00B Communication Interfaces 4-217 Advanced Energy® 4-218 Communication Interfaces 57000097-00B Pinnacle® Plus+ 10 kW Power Supply Chapter 5 Installation and Operation PREPARING TO INSTALL THE UNIT These sections provide information that you need to understand before installing the Pinnacle Plus+. Meeting Spacing Requirements See the dimensional drawings in Chapter 3 for more information on the spacing requirements of the Pinnacle Plus+ power supply. • The clearance between either side of the Pinnacle Plus+ power supply and the enclosure must be 76 mm (3 ). • The clearance between the top of the Pinnacle Plus+ power supply and the top of the enclosure must be 25 mm (1 ). • No clearance is required between power supplies. • The clearance between the rear of the Pinnacle Plus+ power supply and the enclosure must be 102 mm (4 ), with adequate ventilation. Cooling Requirements To sufficiently cool the Pinnacle Plus+ power supply, install the cabinet as follows: • Install and operate this device only in a pollution degree 2 or better environment, which means an indoor location such as a computer room, office, or factory floor where only nonconductive pollution occurs during operation. Occasionally, condensation causes temporary conductivity when the device is not operating. • Bring in sufficient coolant air of the correct temperature [0ºC to 40ºC (32ºF to 104ºF) maximum]. • Distribute coolant air to the power supplies. • Prevent air exhausted from the cabinet from circulating and becoming input air. • Exhaust the hot air from the cabinet with minimal airflow restriction. See Figure 5-1 on page 5-4 for a dimensional diagram. 57000097-00B Installation and Operation 5-1 Advanced Energy® CABINET DESIGN The following is a synopsis of the principles to follow when designing a cabinet containing a stack of Pinnacle Plus+ power supplies. Coolant air must be drawn easily into the cabinet; exhaust air must be able to pass unrestricted out of the cabinet. If some physical constraint restricts the flow of exhaust air out of the cabinet, we recommend mounting the fans or blowers so that the hot air is removed from the cabinet as quickly as possible. Each Pinnacle Plus+ power supply dissipates up to 10% of its maximum power at fullrated output. Table 5-1 shows the minimum air flow in cubic feet per minute (CFM) required by individual Pinnacle Plus+ power supplies. The static pressure (inches of water) of the empty cabinet should not exceed 0.1 inches of water at the CFM level obtained by adding together the minimum CFM values for all the power supplies that will be placed in the cabinet. 5-2 Installation and Operation 57000097-00B Pinnacle® Plus+ 10 kW Power Supply For example, if three Pinnacle Plus+ power supplies are mounted in a cabinet, the minimum CFM requirement would be three times the CFM of cabinet air volume compared to an individual supply. Table 5-2 shows the approximate cooling requirements for three Pinnacle Plus+ power supplies mounted in a cabinet. Table 5-1. Minimum CFM Required for a Pinnacle Plus+ Power Supply Power Supply CFM Required 5 kW 100 CFM (47.2 liters/second) 5x5 kW 200 CFM (94.4 liters/second) 10 kW 200 CFM (94.4 liters/second) Table 5-2. Approximate Cooling Requirements for Three Pinnacle Plus+ Power Supplies Mounted in a Cabinet Type of Power Supply 5 kW CFM for 3 Supplies 300 CFM (100+100+100=300) Total Power Dissipation Dif. in Temp. Between Coolant & Exhaust Air 1500 W (500+500+500=1500) 20ºC 3000 W (1000+1000+1000=3000) 20ºC 3000 W (1000+1000+1000=3000) 20ºC (141.6 liters/second) 5x5 kW 600 CFM (200+200+200=600) (283.2 liters/second) 10 kW 600 CFM (200+200+200=600) (283.2 liters/second) 57000097-00B Installation and Operation 5-3 Advanced Energy® Input Air Through Front Panel Minimum clearance between rear of rack and rear of enclosure Exhaust Air Minimum clearance between unit and top of rack Minimum clearance between units Minimum clearance from enclosure to rack, each side Figure 5-1. Clearances for Pinnacle Plus+ power supplies stacked in a cabinet 5-4 Installation and Operation 57000097-00B Pinnacle® Plus+ 10 kW Power Supply Installation Requirements Install this unit according to the following requirements. RISK OF DEATH OR BODILY INJURY. Disconnect and lockout/tagout all sources of input power before working on this unit or anything connected to it. Maintenance personnel must receive proper training before installing, troubleshooting, or maintaining high-energy electrical equipment. Potentially lethal voltages could cause death, serious personal injury, or damage to the equipment. Ensure that all appropriate safety precautions are taken. This equipment is intended for use with a single source of three-phase power with all phases vectored at 120o angles ±5o. If the equipment is used with an uninterruptable power supply (UPS), or other type of power conditioner, the user is responsible to guarantee the safety and EMC performance of the entire system. Unpacking the Unit Unpack and inspect the unit carefully, looking for obvious physical damage. If no damage is apparent, proceed with the unit installation and setup. If you do see signs of shipping damage, contact Advanced Energy Industries, Inc. and the carrier immediately. Save the shipping container for submitting necessary claims to the carrier. INSTALLING THE UNIT The following sections explain how to install the unit. 57000097-00B Installation and Operation 5-5 Advanced Energy® • “Grounding” on page 5-6 • “Connecting the Contactor Intlk Port” on page 5-7 • “Connecting a Remote Passive Panel” on page 5-8 • “Connecting a Pinnacle Remote Active Panel” on page 5-8 • “Connecting to the Standard Serial Port” on page 5-8 • “Connecting for Serial (Host) Port Control” on page 5-8 • “Connecting for DeviceNet™ Control” on page 5-9 • “Connecting for User Port Control” on page 5-9 • “Connecting Input Power” on page 5-9 • “Connecting Output Power” on page 5-10 • “Connecting for Master/Slave Operation” on page 5-21 • “Connecting for Sync Pulse Operation” on page 5-25 Grounding Before making any other connection, you must connect the secondary Protective Earth (ground) stud to the system ground terminal. This connection is a mandatory connection. The rear panel of the Pinnacle Plus+ power supply features two Protective Earth (ground) studs and one equi-potential (ground) stud: two M5 studs and a 10-32 stud. These are indicated on the rear panel by a ground symbol. See “Rear view” on page 5-29. You must ground the power supply as specified by the conditions of use. See “Conditions of Use” on page 1-7 for more information. Note: For optimal performance, ground the equi-potential ground stud to the system ground. If connecting a master/slave system, see “Connecting for Master/Slave Operation” on page 5-21 for the optimal grounding connection of the master and slave units. 5-6 Installation and Operation 57000097-00B Pinnacle® Plus+ 10 kW Power Supply Connecting the Contactor Intlk Port RISK OF DEATH OR BODILY INJURY. Disconnect and lockout/tagout all sources of input power before working on this unit or anything connected to it. Turn off power to the system before connecting a cable to the I/O port connector. I/O port connectors are not hot pluggable. Signals at the I/O port can be sensitive to noise. Take standard preventative measures against electro-magnetic interference (EMI), including using shielded cabling on this port. The Contactor Intlk port, located on the rear panel of the Pinnacle Plus+ (see “Rear view” on page 5-29 for location), is a 9-pin, male, subminiature-D connector. To enable the Pinnacle Plus+ to function, pins 3 and 4 of this connector must be shorted together (through a cheater plug, external switch, or relay). Pin 4 supplies the signal with 18 V, and it can source 60 mA. Pin 3 can sink 60 mA. The voltage on pins 3 and 4 should not exceed 20 V. Figure 5-2 shows the Contactor Intlk port. Figure 5-2. Contactor Intlk port connector Note: The mating connector, connector shell, and post screws are included in the hardware kit that accompanied the Pinnacle Plus+ unit. 57000097-00B Installation and Operation 5-7 Advanced Energy® Connecting a Remote Passive Panel Connect the remote passive panel at the female, 15-pin, subminiature-D connector labeled MONITOR on the rear panel of the Pinnacle Plus+ power supply. The rear of the remote passive panel features a male, 15-pin, subminiature-D connector. Use the cable provided with the remote passive panel to connect the panel to your Pinnacle Plus+ power supply. See Chapter 4 for more information. Connecting a Pinnacle Remote Active Panel Connect the AE Pinnacle Remote Active Panel at the 9-pin, male, subminiature-D connector labeled REMOTE on the rear panel of the Pinnacle Plus+ power supply. See Chapter 4 for more information. Note: To reduce EMI interference, we recommend using shielded cable to connect to the Remote Active Panel port. Connecting to the Standard Serial Port This interface lets you use most parameters of the AE Bus communications protocol during serial communications with a host computer. See Chapter 4 for more information. Note: To reduce EMI interference, we recommend using shielded cable to connect to the serial port. Connecting for Serial (Host) Port Control See Chapter 4 for instructions on connecting your serial communications (Host) port. Note: Any time you remove one Host card and replace it with another, you must restore all system defaults. Restoring defaults resets the User port limits and the front panel display. Additionally, restoring defaults will ensure the Pinnacle Plus+ power supply recognizes the new Host card (or lack of Host card). Note: To reduce EMI interference, we recommend using shielded cable to connect to the serial (Host) port. 5-8 Installation and Operation 57000097-00B Pinnacle® Plus+ 10 kW Power Supply Connecting for DeviceNet™ Control If you have a DeviceNet interface, please reference the DeviceNet section in Chapter 4 in the Pinnacle Plus+ power supply user manual for instructions on connecting to the port. Note: To reduce EMI interference, we recommend using shielded cable to connect to the serial port. Connecting for User Port Control See Chapter 4 for instructions on connecting your analog/digital interface. Note: To reduce EMI interference, we recommend using shielded cable to connect to the User port. Grounding the User port at the power supply reduces noise interference. To avoid ground loop problems, you should typically ground only one end. Connecting Input Power All power supplies leave the factory with their input voltages identified on the rear panel and on an enclosed test checklist. The Pinnacle Plus+ power supply provides the following input voltages (depending on your unit configuration): • 208 VAC (wye or delta connection) • 230/400 VAC (wye connection only) • 277/480 VAC (wye connection only). All input voltages are three-phase, 50/60 Hz. The AC line input connection is a five-terminal, DIN terminal block on the rear panel. On the terminal block connection, labels on the input terminal shield and below each terminal position on the rear panel show line (L3, L2, L1), neutral (N), and Protective Earth (ground) connections (GND). Note: No neutral connection is required. However, if neutral is present, connect it to the N terminal. 57000097-00B Installation and Operation 5-9 Advanced Energy® INPUT POWER CABLE REQUIREMENTS To connect your system to the power supply, you need stranded wire of a gauge consistent with your application and applicable requirements and the input power specification. See “Conditions of Use” on page 1-7 for more information on making the input power connection. If your unit does not have a circuit breaker, install and operate it with a circuit breaker on the AC input to provide over-current protection. The circuit breaker must have a trip value as specified in line current section of the electrical specifications of your unit. The circuit breaker switch must be easily accessible and near the device. Circuit breaker or disconnect device must lock-out/ tag-out all sources of input power. FIVE-TERMINAL INPUT CONNECTOR To Connect to the Five-Terminal Input Power Connector: 1. Strip approximately 60 mm (2.36 ) to 70 mm (2.76 ) of the insulation from the end of the power cord. 2. Separate the five wires and strip approximately 10 mm (0.40 ) of the insulation from each wire. 3. Ensure that the ground wire (the yellow and green wire) is approximately 7 mm (0.28 ) longer than the other wires. 4. Crimp a ferule of appropriate size on each lead. 5. Remove strain relief housing. 6. Pass the cable through the strain relief. 7. Connect each wire to the proper input terminal block according to the labels. 8. Replace the strain relief housing. Tighten the strain relief. Connecting Output Power See the following sections for information on how to connect your output connector for the Pinnacle Plus+ power supply. Each section contains a drawing of the output connector to help you determine your type of output connection. • “Output Power Cable Recommendations” on page 5-11 • “Two-Terminal, Multicontact Output Connector” on page 5-12 • “Three-Terminal, Multicontact Output Connector” on page 5-17 5-10 Installation and Operation 57000097-00B Pinnacle® Plus+ 10 kW Power Supply • “UHF Output Connector” on page 5-19. RISK OF DEATH OR BODILY INJURY. Disconnect and lockout/tagout all sources of input power before working on this unit or anything connected to it. Maintenance personnel must receive proper training before installing, troubleshooting, or maintaining high-energy electrical equipment. Potentially lethal voltages could cause death, serious personal injury, or damage to the equipment. Ensure that all appropriate safety precautions are taken. This device must be installed so that the output power connection is inaccessible to the user. OUTPUT POWER CABLE RECOMMENDATIONS Choosing the appropriate output power cable for your Pinnacle Plus+ power supply produces the best process results. In general, using the shortest possible cable gives you the widest process window and the best results. Cables should be no longer than 10 m (33 ft). Long cables may cause the power supply to turn off because of excessive reflected power. For Pinnacle Plus+ 5 kW and 5x5 kW units with UHF connectors, we recommend you use RG8U cable. For Pinnacle Plus+ 10 kW units with UHF connectors, we recommend you use RG393 cable. For two-pin pluggable connectors, we recommend you use twisted-pair cable with an external shield or RG393 for use with PG-11 style strain relief connectors. Never use an output power cable longer than 10 m (33´) or you may cause damage to your power supply. 57000097-00B Installation and Operation 5-11 Advanced Energy® TWO-TERMINAL, MULTICONTACT OUTPUT CONNECTOR Before making your output power connection, see “Connecting Output Power” on page 5-10 for safety information and requirements. Strain Relief Fitting The two terminal, multi-contact output connector for your Pinnacle Plus+ power supply includes a liquid-tight, grounded strain relief fitting. The fitting is either an M32-style fitting or a PG-style fitting that can vary in its dimensions depending on your power supply’s configuration. Figure 5-3 and Figure 5-4 show the dimensions of the different styles of PG fittings. While the dimensions are slightly different, all fittings function similarly. Figure 5-3. Actual size of PG-11 style strain relief fitting (28 mm diameter) Figure 5-4. Actual size PG-16 style strain relief fitting (34 mm diameter) Note: If your Pinnacle Plus+ power supply is a dual unit, it will have two strain relief fittings of the same size. 5-12 Installation and Operation 57000097-00B Pinnacle® Plus+ 10 kW Power Supply Output Box and Connector Figure 5-5 shows the output box and connector for the PG-style strain relief fitting and Figure 5-6 shows the output box and connector for the M32-style strain relief fitting. Note: For the M32 output connector, in order to maintain CE certification you must fill each output terminal block mounting screw hole with RTV adhesive to the top of the hole (see Figure 5-6 on page 5-14). Cover Lock Nut Output Box CD 16, PG11, or PG 16 Strain Relief Figure 5-5. PG-style output box and connector 57000097-00B Installation and Operation 5-13 Advanced Energy® Cover Lock Nut M32 Strain Relief Output Box Fill each output terminal block mounting screw hole with RTV adhesive to the top of the hole. Figure 5-6. M32-style output box and connector Negative Output Configuration The most common output configuration for sputtering applications is negative output (negative voltage with respect to ground). To achieve negative output, connect the Pinnacle Plus+ power supply's negative terminal on the output connector to the chamber's cathode. Connect the positive terminal on the power supply's output connector to the chamber's anode or ground. Connect the negative output to the center conductor of the coax cable (RG8U, RG393). If you do not connect the anode to ground, use a triax cable and connect the inner shield to the anode. The outer shield is connected to the chamber and the shell of the two terminal conductor. 5-14 Installation and Operation 57000097-00B Pinnacle® Plus+ 10 kW Power Supply Positive Output Configuration For special applications that require a positive output voltage (positive with respect to ground), connect the Pinnacle Plus+ power supply's positive terminal on the output connector to the load. Connect the negative terminal on the power supply's output connector to the load's common or ground. Use the ground terminal on the Pinnacle Plus+ power supply's output connector to terminate the output cable's shield only. Neither the terminal nor the outer shield of the output cable should carry load current. Do not use the power supply's ground terminal as a system ground. Do not connect a current-carrying conductor to the terminal, even if the conductor is a shield element of the cable. Floating Output Configuration You can configure the Pinnacle Plus+ power supply’s output such that neither the positive output terminal nor the negative output terminal have a direct connection to ground (floating output). To achieve the floating output configuration, connect either the positive or the negative terminal of the power supply’s output connector to the load, and connect the opposite polarity terminal to ground indirectly through a passive component or a second power source. For safety compliance, when configuring for floating output do not allow the maximum voltage at either connection of the output connector terminals to exceed ±1700 V with respect to ground. Optimal Output Connection To comply with EMI/RFI, you must meet the following conditions when connecting the Pinnacle Plus+ power supply to your chamber. • You should use RG393 or RG-8U type cable (Belden 8237) to connect the output to the chamber. You should use a good high quality cable with a minimum of 97% shield coverage. You can also use other types of cable (for example, RG-213) as long as they provide the same or higher density shielding and sufficient copper area. Note: Triax cable is recommended only if the output is floating. The outer shield in this case acts as the safety ground. 57000097-00B Installation and Operation 5-15 Advanced Energy® • RG393 is preferred in high temperature environments and for output currents above 15 A. • Inside the output connector shell, connect the center conductor to the negative terminal (labeled -), and connect the shield to the positive terminal (labeled +). Keep the loop area inside the shell. You should also make a low inductance connection from the shield of the cable to the connector shell. • At the chamber side, the center should go to the cathode while the shield connects to the chamber wall which must be a safety ground. This will give you a negative output. (See Figure 5-7 on page 5-16.) To Chamber Wall To Cathode Ensure spring contacts shield as well as the connector body Cable shielding Spring Figure 5-7. Optimal output connection 5-16 Installation and Operation 57000097-00B Pinnacle® Plus+ 10 kW Power Supply Connecting Output To Connect the Output Port: 1. Disconnect all sources of input power to the Pinnacle Plus+ power supply. 2. Prepare the appropriate output power cable. For optimal performance, we recommend using the shortest possible output power cable. The cable must not exceed 10 m (33´) or damage to your power supply may result. 3. Remove the output box (see Figure 5-5 on page 5-13 or Figure 5-6 on page 5-14). 4. Remove the cover from the output box, but note the relative positions of positive and negative (see Figure 5-5 on page 5-13 or Figure 5-6 on page 5-14). 5. Attach the output cable wires to the two terminals. Tighten the two small screws on each compression terminal. Note: For the M32 output connector, in order to maintain CE certification you must fill each output terminal block mounting screw hole with RTV adhesive to the top of the hole (see Figure 5-6 on page 5-14). 6. Tighten the strain relief. The strain relief needs to contact the outer shield. 7. Replace the output box and cover. THREE-TERMINAL, MULTICONTACT OUTPUT CONNECTOR Before making your output power connection, see “Connecting Output Power” on page 5-10 for safety information and requirements. Strain Relief Fitting The three terminal, multi-contact output connector for your Pinnacle Plus+ power supply includes a liquid-tight, PG-36-style, grounded strain relief fitting (see Figure 5-8). If your Pinnacle Plus+ unit is a dual unit, it will have two strain relief fittings of the same size. Use the following dimensions for working with the strain relief: • Wrenching Flats for Fitting: 50mm (1.97 ) 57000097-00B Installation and Operation 5-17 Advanced Energy® • Wrenching Flats for Locking Nut: 51 mm (2.01 ) Figure 5-8. PG-36-style strain relief fitting Connecting Output To Connect the Output Port: 1. Disconnect all sources of input power to the Pinnacle Plus+ unit. 2. Prepare the appropriate output cable. (We recommend triaxial cable. The cable should be between 22 mm and 32 mm (0.86 and 1.26 ) in diameter.) 3. Remove the output box (see Figure 5-9). 4. Remove the cover from the output box, but note the relative positions of positive, negative, and ground (see Figure 5-9). 5. Turn the braided shield up over the fitting’s sealing, insert the shield and clamp in place with the seal ring. 6. Attach the ouput cable wires to the three terminals for your selected mode of output (negative or positive). 7. Lock the strain relief fitting in place with the lock nut. 5-18 Installation and Operation 57000097-00B Pinnacle® Plus+ 10 kW Power Supply 8. Replace the output box and cover. Cover Lock Nut Output Box Strain Relief Figure 5-9. PG-36-style output box and connector UHF OUTPUT CONNECTOR Before making your output power connection, see “Connecting Output Power” on page 5-10 for safety information and requirements. To meet SELV (Safe Extra Low Voltage) requirements, you must tie the positive output to chamber ground. Do not allow either positive connection to exceed ±40 V with respect to ground. 57000097-00B Installation and Operation 5-19 Advanced Energy® The output connector for your Pinnacle Plus+ power supply is a female UHF connector as shown in Figure 5-10. If your unit is a dual unit, it features two of these connectors. Amphenol 83-822 Plastic Sleeve Sleeve Assembly (Not Provided) UHF, Female (Provided) Figure 5-10. UHF connector and sleeve assembly Note: We do not provide the sleeve assembly and male connector with your unit at the time of shipment, but you can order these parts separately through Advanced Energy using AE part number: 3052078. We do not provide the cable and you cannot purchase it through Advanced Energy. Military Spec Number The military specification number for this connector is SO-239. Select cables and tools appropriate for this mil-spec, and assemble connecting materials according to specifications. Also note that the connector housing may provide interlock capability (see “UHF Connection Interlock Capability” on page 5-21 for more information). 5-20 Installation and Operation 57000097-00B Pinnacle® Plus+ 10 kW Power Supply UHF Connection Interlock Capability Figure 5-11 illustrates an UHF connector without interlock capability. Figure 5-11. Rear view of UHF housing without interlock (back plate removed) Figure 5-12 illustrates a UHF connector with interlock capability. The interlock is closed when the connector housing's back plate (with its three interlock pins) is properly attached. When you remove the back plate, the interlock is open and output from your Pinnacle Plus+ power supply is turned off. Figure 5-12. Rear view of UHF housing with interlock (back plate removed) Connecting for Master/Slave Operation The following sections explain how to connect your Pinnacle Plus+ power supplies in a master/slave configuration. Note: The master/slave feature is only available on Pinnacle Plus+ 10 kW units. This feature is not available on Pinnacle Plus+ 5 kW or dual units. 57000097-00B Installation and Operation 5-21 Advanced Energy® UNDERSTANDING MASTER/SLAVE OPERATION You can configure up to six Pinnacle Plus+ power supplies to operate in a master/ slave system, allowing you to increase your total system power up to 60 kW. Any Pinnacle Plus+ power supply that features the master/slave Host card can function as either a master unit or a slave unit. A Pinnacle Plus+ power supply without a master/ slave Host card cannot function as a master or slave. When operating a master/slave system in voltage regulation mode, the maximum pulsing frequency is 250 kHz. To configure your power supply for master/slave operation, use the following connectors: • Master/slave Host card interface (see “Master/Slave Host Card Interface” on page 5-22) • Master/slave Pulse port connector (see “Master/Slave Pulse Port” in Chapter 4 of the Pinnacle Plus+ power supply user manual for more information) You can also configure your master/slave system for synchronized pulsing operation. Note: When running a master/slave system in voltage regulation, be aware that the Pinnacle Plus+ units may not share current or power. Note: To use the master/slave feature, the Pinnacle Plus+ power supply must be especially configured for master/slave operation at the factory and equipped with a master/slave Host card interface, a Master/Slave Pulse port, and a Sync Pulse port. MASTER/SLAVE HOST CARD INTERFACE The master/slave Host card is located near the top left side of the unit's rear panel (see Figure 5-13). The master/slave Host card includes the following ports: • A 9-pin, female, subminiature-D serial communications port for external serial control. See Chapter 4, “Communication Interfaces” for more information. • Two modular ports (P1 and P2) for connecting master and slave units with the master/slave cable. The P1 and P2 molded-plug ports connect (daisy-chain) a master unit to a slave unit and a slave unit to another slave unit. The master/slave Host card also includes a master/slave (MSTR/SLV) switch. This switch indicates whether the power supply is functioning as a master, stand-alone, or slave unit. When you connect your units for master/slave operation, you must connect 5-22 Installation and Operation 57000097-00B Pinnacle® Plus+ 10 kW Power Supply the Master/Slave Pulse port between master and slave units in addition to the ports on your Host card interface (see Chapter 4 of the Pinnacle Plus+ power supply user manual for more information). P1 P2 Figure 5-13. Master/slave Host card interface CONFIGURING A MASTER/SLAVE SYSTEM The following sections provide information on configuring and connecting your power supplies for master/slave operation. Note: The master/slave feature is only available on Pinnacle Plus+ 10 kW units. This feature is not available on Pinnacle Plus+ 5 kW or dual units. Configuring the Master Unit To Configure the Power Supply as a Master Unit: 1. Remove all input power from the power supplies in your master/slave system. 2. If the Pinnacle Plus+ power supply includes a User card, ensure that the interlock inputs are satisfied. Refer to the Chapter 4 in the Pinnacle Plus+ power supply user manual for specific User port pin descriptions and required voltage levels. 3. Set the MSTR/SLV switch in the "up" (MSTR) position. 4. Connect the master/slave interface cable (with the modular plug ends) between port P1 (the MSTR port) on the master unit and port P2 (the SLV port) on the first slave unit. The master/slave interface cable is included with the unit. Note: The master unit will not have an interface cable connected to port P2. 5. Connect the included master/slave pulse interface cable (with the 15-pin, subminiature-D plug ends) between the Master/Slave Pulse port on the master unit and the Master/Slave Pulse port on the associated slave units. 6. Use a grounding strap to connect an equi-potential ground stud on the master unit to an equi-potential ground stud on the first slave unit. To Configure a Master Unit as a Stand-Alone Unit: 1. Set the MSTR/SLV switch in the "up" (MSTR) position. 57000097-00B Installation and Operation 5-23 Advanced Energy® 2. Remove all master/slave interface cables from the master unit. Configuring the Slave Units To Configure a Power Supply as a Slave Unit: 1. Remove all input power from the power supplies in the master/slave system. 2. If the Pinnacle Plus+ power supply includes a User card, ensure that the interlock inputs are satisfied. Refer to Chapter 4 in the Pinnacle Plus+ power supply user manual for specific User port pin descriptions and required voltage levels. 3. Set the MSTR/SLV switch in the "down" (SLV) position. 4. Connect the master/slave interface cable (with the modular plug ends) between port P1 on the first slave unit and port P2 on the next slave unit. Continue cabling slave units together in this daisy-chain manner. The master/slave interface cables are included with the power supplies. Note: The last slave unit in the master/slave system will not have an interface cable connected to port P1. 5. Connect the included master/slave pulse interface cable (with the 15-pin, subminiature-D plug ends) between the Master/Slave Pulse port labeled on the master unit and the Master/Slave Pulse port on the associated slave units. 6. Use a grounding strap to connect an equi-potential ground stud on the first slave unit to an equi-potential ground stud of the next slave unit. Continue connecting together subsequent slave unit chassis in this manner. Note: We recommend you connect the ground stud on the master unit to system ground. MASTER/SLAVE CONFIGURATION EXAMPLE Figure 5-14 illustrates how to configure your Pinnacle Plus+ power supplies for master/slave operation. Note: The master/slave feature is only available on Pinnacle Plus+ 10 kW units. This feature is not available on Pinnacle Plus+ 5 kW or dual units. 5-24 Installation and Operation 57000097-00B Pinnacle® Plus+ 10 kW Power Supply Master To Rack Ground and Chamber Ground Slave 1 Slave 2 Figure 5-14. Master/slave system configuration example Connecting for Sync Pulse Operation The following sections include information about connecting and configuring your Pinnacle Plus+ power supplies for synchronized pulsing (Sync Pulse) operation. UNDERSTANDING SYNC PULSE OPERATION With the Sync Pulse (or synchronized pulsing) feature of the Pinnacle Plus+ power supply, you can synchronize up to six units to operate at the same frequency with independent set points and On/Off control. The Sync Pulse feature is useful for reducing arcing in multiple cathode applications. Additionally, the Sync Pulse feature 57000097-00B Installation and Operation 5-25 Advanced Energy® offers a broadcast mode in which a unit transmits hard arc detection signals to other units. The units receiving the hard arc signal will control its output in sync with all other units receiving the signal. Note: The synchronized pulsing function is only available on units specially configured for Sync Pulse operation at the factory. The Sync Pulse feature may be available even if your unit is not configured with a master/slave Host card. CONFIGURING FOR SYNC PULSE OPERATION To Configure a Unit for Sync Pulse Transmit or Receive: 1. Using the soft keys on the Active Front Panel or Remote Active Panel of a power supply, select: SUPPLY 4 PULSE 4 TX/RX. 2. Set the unit to TRANSMITTER or RECEIVER. Note: In a Sync Pulse configuration, you must set one power supply to transmit and set all other units to receive. 3. Repeat steps 2 and 3 for the rest of the units. Note: You cannot hot plug units for synchronized pulsing operation. To Enable/Disable Broadcast Hard Arc Detection: You can disable the broadcast hard arc detection feature from the active front panel or from a remote active panel of a power supply by using the Process menu. Press SUPPLY 4 PULSE 4 B’CAST SYNC PULSE CONFIGURATION EXAMPLES You can configure your power supplies as a simple Sync Pulse system or as a Sync Pulse master/slave system (if the power supply includes a master/slave Host card interface and Master/Slave Pulse port). For more information on connecting your units for master/slave operation, see “Connecting for Master/Slave Operation” on page 5-21. 5-26 Installation and Operation 57000097-00B Pinnacle® Plus+ 10 kW Power Supply Simple Sync Pulse System Figure 5-15 illustrates a simple Sync Pulse configuration that allows you to broadcast hard arcs or not broadcast hard arcs. In this configuration, hard arcs are the only detection shared between the network units. In this Sync Pulse system all units pulse at the same frequency, but may have their own unique output power set point. Additionally, all units must have the same duty cycle and reverse time. Note: If you need different duty cycles and reverse times for your process, operate the Pinnacle Plus+ power supplies as independent units. Transmit To Rack Ground and Chamber Ground Receiv e Receive Figure 5-15. Sync Pulse system 57000097-00B Installation and Operation 5-27 Advanced Energy® Sync Pulse Master/Slave System Slave 2 Slave 1 Slave 2 Slave 2 Slave 1 Slave 1 Master Master Master Figure 5-16 illustrates a Sync Pulse master/slave system configuration. In this configuration, you can connect a series of master/slave Pinnacle Plus+ systems together in a Sync Pulse system. This configuration allows for extraordinary control over hard arcs across a large network of power supplies. Figure 5-16. Sync Pulse master/slave configuration 5-28 Installation and Operation 57000097-00B 57000097-00B Output Customer Connector Installation and Operation Remote Active Panel Port Input Line Cord Optional Ports M5 Ground Stud 10-32 Ground Stud Master/Slave Host Card Shown Serial Port Optional Position for Second User Port M5 Ground Stud Standard Serial Port User Port Contactor Interlock Port Pinnacle® Plus+ 10 kW Power Supply Rear Panel Drawing Figure 5-17 illustrates the rear view of the Pinnacle Plus+ power supply. Figure 5-17. Rear view 5-29 Advanced Energy® OPERATING THE UNIT The following sections include information about operating the Pinnacle Plus+ power supply. Normal Operation The following list represents a general description of how to operate a Pinnacle Plus+ power supply. You will want to adapt this list to your power supply configuration and your application, environment, and requirements. 1. Turn on the Pinnacle Plus+ power supply. 2. Verify which power supply LEDs are lit. 4 If you are using a passive panel, verify that the POWER ON and INTERLOCK LEDs light. If the INTERLOCK LED does not light, an error code should appear (see Chapter 6 for more information). 4 If you are using an active front panel or a Pinnacle Remote Panel, verify that the display screen displays two messages in sequence: “Advanced Energy, Fort Collins, Colorado” and then “Power Up Sequence, Please Wait.” In addition, verify that an LED lights to show the control setting and another lights to show the regulation setting. Finally, verify that the OFF LED lights. Note: If an error code (that is, an “E nn” code) appears on the front panel or on the Pinnacle Remote Active Panel, refer to Chapter 6 for an explanation and troubleshooting suggestions. The unit defaults to the previously selected control and regulation settings. If the unit had been in LOCAL mode with a Pinnacle Remote Panel but the Remote Panel is removed, the unit will boot up in Host control mode. If there is no Host card, the unit will boot up in User control mode. An active DeviceNet card will act as a Host card (if applicable), but if the DeviceNet card is not active the unit will boot up in User control mode. 3. If the display screen shows no message and/or if no control or regulation LEDs light, ensure that the unit is properly installed and is receiving AC input power. 4. Verify which power supply LEDs are not lit. 4 If you are using the passive panel, verify that the BUS FAULT and OVERTEMP LEDs are not lit. If either or both is lit, power down the Pinnacle Plus+ power supply, clear the fault, and return to Step 1. (Refer to Chapter 6 for error code explanations and troubleshooting suggestions.) 5-30 Installation and Operation 57000097-00B Pinnacle® Plus+ 10 kW Power Supply 4 If you are using an active front panel or the Pinnacle Remote Panel, verify that the “output display screen” information shows on the display screen. (See Chapter 4 for details). If the display screen shows an error code and message, note the error code number. Refer to Chapter 6. 5. Select a method of control: Host (serial) port, User port, or Local (panel control). 6. Select a regulation mode: power, current, or voltage. Output power must be off (that is, output must be de-energized) to switch between regulation modes. 7. Enter a set point value. 8. If necessary, enter the following parameters: 4 Enter a pulse frequency and reverse time. 4 Enable joule mode and select a set point in joules (available only through the serial port, the active front panel, or the Pinnacle Remote Panel). 4 Enable target life counters and select a target life for each applicable target (available only through the serial port, the active front panel, or the Pinnacle Remote Panel). 4 Enable arc handling and enter appropriate arc-handling parameters (available only through the serial port, active front panel, or the Pinnacle Remote Panel). 4 Create a ramping recipe (available only through the serial port, active front panel, or Pinnacle Remote Panel). 4 Set the out-of-setpoint timer to a value other than 0 (available only through the serial port, active front panel, or Pinnacle Remote Panel). 9. If necessary, set limits for output power, output voltage, output current, and/or process voltage (available only through the serial port, active front panel, or Pinnacle Remote Panel). 10. Verify all output power load conditions and connections, and when the system is ready, enable the output. The output information on the output display screen should equal your requested set point. 11. Verify the status of the power supply LEDs. 4 If you are using a passive front panel, verify that the OUTPUT and SETPOINT LEDs light. If these LEDs do not light, see Chapter 6 for more information. 4 If you are using an active front panel or the Pinnacle Remote Panel, verify that the ON LED lights. Also, verify that the display screen shows values for output information. If the display screen shows an error code and message, see Chapter 6 for error code explanations and troubleshooting suggestions. 57000097-00B Installation and Operation 5-31 Advanced Energy® Understanding Pulsing Modes When you enable the pulsing feature of the Pinnacle Plus+ power supply, you can set one of the following pulsing modes: • At current threshold (default setting) If you set pulsing to enable at the current threshold, pulsing is disabled until the Pinnacle Plus+ power supply detects the current is above the current threshold. Once the current is above the threshold, pulsing begins. For more information, see “High Power Operation” on page 5-36. • Always If you set the pulsing to enable always, pulsing begins from the moment you energize the Pinnacle Plus+ power supply. This feature allows you to have the unit pulse at low current and low voltages while protecting the unit. For more information, see “Low Power Operation” on page 5-35. Note: If you choose to pulse always and set a high power operation power limit, the upper-end pulsing frequency limit is 150 kHz. See “High Power Operation” on page 5-36 for information about high power operation. • Use voltage (only available for certain configurations of the unit) If you set the pulsing to enable by using the voltage, pulsing begins when the Pinnacle Plus+ power supply goes below a user-specified voltage threshold. This feature allows you to have the unit pulse at low current and high voltages while protecting the unit. The voltage threshold range is from 325 V to 50 V below the maximum user voltage allowed for your unit. For example, if the maximum user voltage is 800 V, the maximum voltage threshold is 750 V. See “Pulsing Behavior When Using Voltage” on page 5-32 for more information about how the unit uses the voltage threshold to disable and enable pulsing. PULSING BEHAVIOR WHEN USING VOLTAGE If you set a unit to pulse using voltage, you must set a voltage threshold at which pulsing is enabled or disabled. The following information provides further information on how this pulsing feature functions, using a voltage threshold set to 750 V as an example. 5-32 Installation and Operation 57000097-00B Pinnacle® Plus+ 10 kW Power Supply Figure 5-18 illustrates how pulsing begins when you first enable output from the Pinnacle Plus+ power supply. When you first turn on output, the unit waits 300 ms to allow the voltage to climb above the voltage threshold if needed to ignite. After the 300 ms wait time, the unit starts pulsing if the voltage is below the threshold (750 V). 750 V (threshold) Y axis = Output voltage X axis = Time 300 ms wait time After the 300 ms wait time, pulsing begins because the voltage is below the threshold. Figure 5-18. Pulsing begins after a 300 ms filter time (if below threshold) If the Pinnacle Plus+ power supply is above the threshold at 300 ms after output on, the unit continues to try to ignite. The unit cycles from 1350 V for 100 ms to 800 V for 900 ms, until the unit goes below threshold at which point pulsing begins (see Figure 5-19). 1350 V 800 V 750 V Ignition detected, pulsing begins Y axis = Output voltage X axis = Time Figure 5-19. Ignition cycle if unit remains above threshold 57000097-00B Installation and Operation 5-33 Advanced Energy® Once the unit goes below threshold and pulsing begins, the unit monitors the voltage. If the voltage goes above the threshold (for example, 750 V), pulsing stops and the unit goes into the ignition profile until the voltage goes below the threshold to start pulsing again (see Figure 5-20). 1350 V 800 V 750 V Y axis = Output voltage X axis = Time Unit pulsing, unit operating below threshold Voltage goes above the threshold, pulsing stops and unit goes into ignition profile Unit detects ignition, voltage goes below threshold so pulsing begins Figure 5-20. Pulsing behavior when using voltage threshold Modes of Operation: Low Power Versus High Power The advanced-capability Pinnacle Plus+ power supply features two modes of operation: low power operation and high power operation. These operation modes allow you to manage better the varied process requirements of operating over a large range of power settings. Following is the definition of low power operation. • For 5 kW and 5x5 kW power supplies, low power operation is power at less than 500 W per 5 kW inverter. • For 10 kW power supplies, low power operation is power at less than 1000 W. Following is the definition of high power operation. • For 5 kW and 5x5 kW power supplies, high power operation is power at 500 W or greater per 5 kW inverter. • For 10 kW power supplies, high power operation is power at 1000 W or greater. To select the mode of operation, set the user power limit based on the 500 or 1000 W dividing line, depending on your power supply (as defined above). Because the unit cannot switch operation between the two modes while delivering power, selecting the power limit (and, hence, operation mode) is not allowed when output is on. 5-34 Installation and Operation 57000097-00B Pinnacle® Plus+ 10 kW Power Supply The operation modes differ in these specific conditions: • Initial output on or ignition • Arc shutdown extinguishing the plasma • Open load or circuit condition at output. Additionally, the operational mode voltage limits change slightly if you select voltage as the mode of regulation. LOW POWER OPERATION For low power operation, set the power limit according to the following, and the conditions shown in Table 5-3 are true. • Less than 500 W per 5 kW inverter (for 5 kW and 5x5 kW power supplies). • Less than 1000 W (for 10 kW power supplies). Table 5-3. Low power operation mode Mode Low Power Operation Ignition Strike voltage is limited to the user-defined voltage limit. The Pinnacle Plus+ power supply begins pulsing immediately. Hard and Micro Arc Shutdown Following the shutdown the unit continues to pulse regardless of plasma conditions. Open Load/Circuit The unit continues to pulse. 57000097-00B Installation and Operation 5-35 Advanced Energy® HIGH POWER OPERATION For high power operation, set the power limit according to the following, and the conditions shown in Table 5-4 are true. • 500 W or greater per 5 kW inverter (for 5 kW and 5x5 kW power supplies). • 1000 W or greater (for 10 kW power supplies). Table 5-4. High power operation mode Mode Ignition High Power Operation Under high power operation (Power or Current regulation), pulsing is disabled, the voltage jumps to maximum voltage (~1350 V) and is held until the current is detected flowing greater than the following values (depending on your power supply): • 0.25 A for 5 kW and 5x5 kW power supplies. • 2.0 A for 10 kW (325-650 VDC) power supplies. • 0.5 A for 10 kW (325-800 VDC) power supplies. When the current flows above the specified value for your unit, pulsing starts. Should 100 ms expire before pulsing begins, a duty cycle is imposed on the unit’s voltage limit to prevent unit damage. This duty cycle is 100 ms at maximum voltage and 900 ms at the user voltage limit. This cycle repeats until the current exceeds the threshold for the unit (listed above), at which time pulsing starts. Note: If the regulation mode is Voltage, the output on voltage jumps to a maximum of the set point plus 12.5% and no duty cycle is imposed. Hard Arc Shutdown Following the shutdown, if the unit detects the current has dropped below the following values (per your unit configuration), the unit returns to ignition state. • 0.25 A for 5 kW and 5x5 kW power supplies. • 2.0 A for 10 kW (325-650 VDC) power supplies. • 0.5 A for 10 kW (325-800 VDC) power supplies. Low current flow is a good indicator that the plasma has extinguished. Otherwise, the unit continues pulsing if current flow stays above the specified values (per your unit configuration). Open Load/Circuit 5-36 Should the unit detect an open circuit condition, the unit returns to ignition state; otherwise, the unit continues to pulse. Installation and Operation 57000097-00B Pinnacle® Plus+ 10 kW Power Supply Understanding Arc Handling AE ships the Pinnacle Plus+ power supply with micro arc handling enabled. Each time you power off then power on your unit, the arc handling feature returns to enabled. Note: You can disable micro arc handling if your process allows it. You should disable arc handling only if your system includes special post-process equipment that provides arc interruption. You cannot disable hard arc handling. Disabling the unit’s arc handling ability without providing external arc interruption could cause severe target damage. VOLTAGE ARC (V-ARC) TRIP LEVEL To set the V-arc trip level, use the ARC menu on an active front panel or the Pinnacle Remote Active Panel or AE Bus/PROFIBUS Command 10. See Chapter 4 for more information. By setting the voltage arc (V-arc) trip level, you are indicating the voltage threshold, as measured at the output of the unit, at which the Pinnacle Plus+ power supply recognizes an arc. The best value for a voltage arc trip level is somewhere between your process's normal operating voltage and the typical low voltage that occurs when your system experiences a hard arc. The latter depends on your target type, but typical low voltages for hard arcs are between 10 and 30 V. Thus a reasonable voltage arc trip level might be 50 V. Note: Some target types experience hard arcs at 100 V, so do not assume that 50 V is right for all processes. The recommeded V-arc trip level for low impedance metal targets is the default value of 70 V. For sputter applications, the V-arc trip level should be set above 60 V. For bias applications, the V-arc trip level can be set below 40 V. A trip level between 40 V to 60 V can cause the unit to become unstable at start up. Understanding Frequency and Reverse Time Settings Advanced Energy (AE) defines reverse time as the time that the pulsing switch is closed, or when no power is transferred to the plasma. By action of the pulsing switch and output inductor, output voltage is reversed. Reverse time is only relevant during pulsing operation. (See Table 3-4 on page 3-9 for reverse time specifications.) 57000097-00B Installation and Operation 5-37 Advanced Energy® Frequency and reverse time settings can affect the arc and process behavior of the Pinnacle Plus+ power supply in the following ways: • Higher frequencies reduce the tendency to arc. Note: Frequency is limited to 150 kHz when the pulse mode is set to be enabled always. • Short reverse times allow a higher pulsing rate, but may increase the number of micro arcs and possible hard arcs—especially if you are using a long output power cable. • Frequency and reverse time define the maximum peak voltage at the cathode. Setting high frequencies and long reverse times raise the plasma voltage during the sputter cycle. (Plasma voltage can be as much as double the DC voltage). • Depending on the cable length and the cathode size, certain frequencies may cause resonance with the pulsing frequency. This resonance can cause the Pinnacle Plus+ power supply to respond to a false arc or overcurrent event in excess. To determine if resonance is a problem, use an oscilloscope with an appropriate high voltage probe to measure if the voltage goes below the arc trip level after the cathode voltage is applied. Changing the frequency, output power cable length, and/or the reverse time settings can solve this problem. Note: AE recommends using a TEK 320, 380, 3054, 3012, 3032, or better, with a 1:100 P5100 voltage probe. • If you cannot reach a certain output power, increased reverse time increases the output power at a given maximum DC output voltage shown at the front panel. You need to adjust the ratio of sputter time and reverse time to optimize the rate and film properties for your process. To do so, you need a good oscilloscope and a high voltage probe (2000 V rated) that has been calibrated for the oscilloscope you are using. Note: AE recommends using a TEK 320, 380, 3054, 3012, 3032, or better, with a 1:100 P5100 voltage probe. MASTER/SLAVE SYSTEM OPERATION The following sections include information about operating and monitoring Pinnacle Plus+ power supplies in a master/slave configuration. 5-38 Installation and Operation 57000097-00B Pinnacle® Plus+ 10 kW Power Supply Master/Slave Input On/Off Combinations Unique logic in the Pinnacle Plus+ power supply lets you power on and off master and slave units independently of one another. During valid on and off sequences, the master unit "re-scales" the total output. That is, its I/O signals adjust to accommodate the most recent change in output capability of the combined units. Monitoring the Master/Slave System You can monitor the master/slave system using the following devices: • If you have a passive front panel or remote passive panel attached to your master unit, you can view the combined output of your master/slave system (power or current). The passive front panel of each slave unit displays the individual unit's output. • If you have an active front panel or Pinnacle Remote Active Panel attached to your master unit, you can monitor the output (power, current, or voltage) of your system and the output of each individual unit. • If you have a host computer connected to a serial port on your master unit, you can monitor the output (power, current, or voltage) of your system and the output of each individual unit. See Chapter 4 in the Pinnacle Plus+ power supply user manual for more information. Clearing Faults in a Master/Slave System If a slave unit experiences a self-clearing fault, both the master and slave units display an error code and the master unit shuts off output from all attached power supplies. When the fault condition clears, the master and slave units reset. You may then turn on output. If a slave unit experiences an explicit clear fault, both the master and slave units display an error code and the master unit shuts off output from all attached power supplies. When the fault condition clears, you must acknowledge the condition at the master unit before turning on output. (For example, you must press the OFF button to acknowledge the condition and then the ON button to turn on output.) 57000097-00B Installation and Operation 5-39 Advanced Energy® The following table describes some of the errors you might encounter with a Pinnacle Plus+ master/slave system. Table 5-5. Errors Associated with the Master/Slave System Condition Possible Cause(s) Master reports: “Master/Slave Fault” • The master/slave cable has been removed. • The master/slave pulse cable has been removed. • The master/slave cables or switches have been set incorrectly. Slave reports: “No Master Detected (Serial)” • The master/slave pulse cable has been removed. Any unit reports: "System Input Power Fault" • One of the units in the system is not energized (that is, does not have input power). Note: See the unit troubleshooting information for more error code information. SYNC PULSE OPERATION The following sections include information about operating and monitoring Pinnacle Plus+ power supplies connected for sync pulse operation. For information on how to connect and configure the Pinnacle Plus+ power supplies for sync pulse operation, see “Connecting for Sync Pulse Operation” on page 5-25. Monitoring the Sync Pulse System You can monitor the sync pulse system using the following devices: • If you have a passive front panel or remote passive panel attached to any unit in the system, you can view the output for the individual unit. • If you have an active front panel or remote active panel attached to any unit in the system, you can monitor the output (power, current, or voltage) and set point of the individual unit. • If you have a host computer connected to a serial port on any unit in the system, you can monitor the output (power, current, or voltage) and set point of the individual unit. 5-40 Installation and Operation 57000097-00B Pinnacle® Plus+ 10 kW Power Supply For more information on the above devices, see Chapter 4 in the Pinnacle Plus+ power supply user manual. Clearing Faults in a Sync Pulse System Table 5-6 describes some of the errors you might encounter with a Pinnacle Plus+ sync pulse system. Table 5-6. Errors Associated With The Pinnacle Plus+ Sync Pulse System Condition Possible Cause(s) Transmit unit reports: “Multiple Sync Pulse Transmitters Detected” • Two or more units have been designated as transmitters. Note: Multiple transmitter errors are detected only at power up or when changing port directions. Receive unit reports: “No Sync Pulse Transmitter Detected” • The sync pulse cable has been removed. • All units in the system are designated as receivers. Note: No transmitter errors are detected any time the unit is powered up. Any unit reports: "System Input Power Fault" • One of the units in the system is not energized (that is, does not have input power). MAINTENANCE Consumable Parts Some parts in the Pinnacle Plus+ unit are consumable and may wear out over time. For a current list of consumable and wear components in the Pinnacle Plus+ unit as well as for estimated lifetimes and recommended refurbishment schedules, please contact AE Global Services. 57000097-00B Installation and Operation 5-41 Advanced Energy® 5-42 Installation and Operation 57000097-00B Pinnacle® Plus+ 10 kW Power Supply Chapter 6 Troubleshooting and Global Services BEFORE CALLING AE GLOBAL SERVICES RISK OF DEATH OR BODILY INJURY. Disconnect all sources of input power before working on this unit or anything connected to it. The following pages contain the following types of troubleshooting sections: • A general checklist of potential problem areas • A Pinnacle Plus+ unit basic functionality test • A list of error codes and suggested responses Please consult the appropriate section(s) if you believe you are experiencing trouble with your Pinnacle Plus+ power supply. If the problem continues or if you cannot find an adequate solution in these pages, please call AE and ask to speak with a Global Services representative. Operating and maintenance personnel must have the correct training before setting up, maintaining, or troubleshooting high-energy electrical equipment. Potentially lethal voltages may cause serious personal injury or damage to equipment. Ensure that proper safety precautions are taken. First Check If you believe you are experiencing problems with a Pinnacle Plus+ power supply, check for obvious signs of damage to the unit itself, cables, and connectors. 57000097-00B Troubleshooting and Global Services 6-1 Advanced Energy® • If damage has occurred, power off the unit and call AE Global Services • If there are no obvious signs of damage, proceed to “Checks with the Unit Powered Off” on page 6-2 and “Checks with the Unit Powered On” on page 6-2. Checks with the Unit Powered Off Perform the following checks with the unit powered OFF. 1. Ensure the power to the unit is off. 2. Check for visible damage to the unit, cables, and connectors. 3. Ensure all unit connectors are installed correctly and are fastened tightly. 4. Check to determine whether any system-related circuit breakers have been tripped. 5. Ensure all phases of the main input power are applied to the appropriate power supply terminals. 6. Ensure there is input power to both the unit and the remote, and ensure the input power meets specifications. 7. Ensure ground connections are adequate and secure and comply with local safety codes. 8. Check the position of the switches on the DIP for the serial (Host) port (if your unit has a Host port) against the addressing information in the user manual. 9. Ensure that the interlock loop is closed both at the Contactor Interlock and at the User port. 10. Ensure that input power meets specifications. Checks with the Unit Powered On Perform the following checks with the unit powered ON. 1. Check the unit’s input and remote power connections to ensure the proper power is being supplied to the unit. 2. Check the LEDs on all units to determine that the proper ones are lit. 3. Note any error code (that is, any “Exxx”number) displayed on the front panel or Pinnacle Remote Active Panel. See “Error Code Troubleshooting” on page 6-16 for more information. 4. Working with the passive front panel, ensure that the front panel LEDs POWER ON, INTERLOCK, OUTPUT, and SETPOINT LEDs are lit (see “Troubleshooting LEDs” on page 6-7 for more information). 6-2 Troubleshooting and Global Services 57000097-00B Pinnacle® Plus+ 10 kW Power Supply Note which, if any, of the LEDS are not lit. If the INTERLOCK LED is not lit, error code E020, E022, or E023 should be displayed on the front panel. See “Error Code Troubleshooting” on page 6-16 for help in troubleshooting these errors. 5. If you suspect an LED is malfunctioning, cycle the Pinnacle Plus+ unit’s power on and off. If the problem reoccurs, call AE Global Services. 6. Working with the passive front panel, note whether the BUS FAULT or OVERTEMP LEDs on the front panel are illuminated (see “Error Code Troubleshooting” on page 6-16). If the BUS FAULT LED is lit, error code E002 should be displayed on the panel. If the OVERTEMP LED is displayed, E004 should be displayed. See “Error Code Troubleshooting” on page 6-16 for help in troubleshooting these errors. If no error code is displayed, cycle the Pinnacle Plus+ unit's power on and off to determine whether the LED is functioning properly. 7. Working with the Pinnacle Remote Active Panel, verify that the output display screen information is displayed. If the display screen shows an error message, see “Error Code Troubleshooting” on page 6-16. If the display remains blank, cycle the Pinnacle Plus+ unit’s power on and off. If the problem re-occurs, call AE Global Services. 8. Determine whether the cooling fans are functioning, and ensure your cabinet allows for adequate ventilation for all the units in the cabinet (see “Cooling Requirements” on page 5-1 for more information). If the fans are not functioning properly, call AE Global Services. 9. If the unit powers up well and communicates, you may restore the default settings of the unit through the Active or Remote Front Panel. You may also use the Host port. 10. Issuing command 0 through the serial communication (Host) port turns the unit off. 11. If the pulsing switch is defective the unit delivers current but not voltage. Pinnacle Plus+ Basic Functionality Test This procedure allows you to verify the basic functionality of the Pinnacle Plus+. Note that the accuracies listed in this procedure account for both the factory-calibrated accuracy of the Pinnacle Plus+ unit and the accuracy of the measurement equipment. These accuracies are not intended to imply unit specifications. 57000097-00B Troubleshooting and Global Services 6-3 Advanced Energy® If the results of field testing with this procedure are not within the expected tolerance noted in this procedure, contact AE Global Services. Maintenance personnel must receive proper training before installing, troubleshooting, or maintaining high-energy electrical equipment. Potentially lethal voltages could cause death, serious personal injury, or damage to the equipment. Ensure that all appropriate safety precautions are taken. Follow proper ESD precautions during this test. EQUIPMENT NEEDED You will need the following equipment to conduct the Pinnacle Plus+ basic functionality test. All quantities in the list are one unless noted otherwise. • Two Bird 8730 A 10 kW 50 loads • Tektronix TDS3032 oscilloscope or equivalent • Tektronix TCPA300 current amplifier • Tektronix TCP305 50 A current probe • Tektronix P5100 high voltage probe • RG393 load cable, 9 meters or less in length • For Pinnacle Plus+ units that do not have an active front panel, a Pinnacle Plus+ remote active panel (3152327-000) 6-4 Troubleshooting and Global Services 57000097-00B Pinnacle® Plus+ 10 kW Power Supply EQUIPMENT SETUP The following figure shows how to set up the equipment for the procedures that follow. For units without AFP Control Panel RG393 2 Bird loads in parallel = 20 kW load Pinnacle® Plus + P5100 probe TCP305 current probe Oscope TCPA300 3743 Figure 6-1. Equipment setup for Pinnacle Plus+ basic functionality test TO CHECK BASIC UNIT FUNCTIONALITY Use these two procedures to test basic unit functionality, first with pulsing disabled and then with pulsing enabled. If the results of these tests are not within the noted tolerances, contact AE Global Services. Maintenance personnel must receive proper training before installing, troubleshooting, or maintaining high-energy electrical equipment. Potentially lethal voltages could cause death, serious personal injury, or damage to the equipment. Ensure that all appropriate safety precautions are taken. Follow proper ESD precautions during this test. Test with pulsing disabled: 1. Ensure that the test equipment is set up as described in the preceding section. 57000097-00B Troubleshooting and Global Services 6-5 Advanced Energy® 2. Disable pulsing mode on the Pinnacle Plus+ unit. 3. Set up the oscilloscope to measure the low of the output voltage and the low of the output current. 4. Set the Pinnacle Plus+ unit to local control mode and power regulation mode. 5. Set the set point to 10% of full rated output power. 6. Turn output on. 7. On the Pinnacle Plus+ active front panel or the remote active panel, verify that the power readback is within 1% of the set point. 8. Verify that the actual power (measured from the oscilloscope, voltage x current) is within 6% of the set point. (The 6% range accounts for the accuracy of the oscilloscope probes.) 9. Repeat the previous two steps with the set point set to 25%, 50%, and 100% of full-rated output power. 10. Turn output off and set the set point to 0. Test with pulsing enabled: 1. Enable pulsing mode on the Pinnacle Plus+ unit. 2. Set the oscilloscope to measure the following: 4 The mean of the output voltage 4 The amplitude of the output current 4 The frequency of the output voltage 4 The positive pulse width of the output voltage 3. On the Pinnacle Plus+ unit, make the following settings: 4 Frequency = 100 kHz 4 Reverse time = 4 µs 4 Set point = 10% of full-rated output power 4. Turn on the output. 5. Verify the following measurements: 4 Measured frequency is within 3.5% of the frequency set point. 4 Measured output positive pulse width is within 3.5% of the reverse time set point. 4 The power readback on the Pinnacle active front panel or remote active panel is within 1% of the power set point. 4 The actual power is within 6% of the power set point (mean of output voltage x amplitude of output current). 6-6 Troubleshooting and Global Services 57000097-00B Pinnacle® Plus+ 10 kW Power Supply 6. Repeat the previous two steps with the set point set to 25%, 50%, and 100% of full-rated output power. 7. Change the following settings, then repeat the previous three steps. 4 Reduce the set point to 10%. 4 Change the frequency to 350 kHz. 4 Change the reverse time to 1.1 µs. 8. Turn off the output, and set the set point to 0. Passive Front Panel Help Codes When only a Passive Front Panel (PFP) is available, the Pinnacle Plus+ unit displays 4-character strings on start up to identify personality cards installed in the unit. A code flashes once for each card installed. The following table describes the strings. Table 6-1. Passive Front Panel Help Codes PFP Display String Personality Card P-0 No Cards P-01 or P-17 Dual User Card P-03 or P-26 PROFIBUS Card P-04 Host Protocol Translator Card P-05 or P-21 Single User Card P-18 or P-28 AE Bus Card P-22 or P-29 Master/Slave Card with AE Bus P-23 or P-30 DeviceNet Card P-32 Master/Slave Card with PROFIBUS Troubleshooting LEDs Use the following information to troubleshoot the unit based on the status of the unit LEDs. The table shows whether an LED state indicates normal status or indicates a problem. 57000097-00B Troubleshooting and Global Services 6-7 Advanced Energy® Table 6-2. Troubleshooting LEDs for LED POWER On Off X Normal X POWER Status The Pinnacle Plus+ unit is not receiving AC input power. Power the unit off. Using all applicable safety precautions, inspect your AC input power source to ensure that it is properly connected and that the specified voltage is being applied to the Pinnacle Plus+ unit. If the unit is damaged, the internal main fuses may be opened. Note: These fuses should only be accessed by AE personnel. See “Returning Units for Repair” on page 6-27 for information concerning the return of units for repair. OUTPUT X X OUTPUT SETPOINT X X BUS FAULT X OVERTEMP OVERTEMP 6-8 An interlock fault condition exists. Note the error code on the display and see “Error Code Troubleshooting” on page 6-16. A bus fault condition exists. Note the error code on the display and see “Error Code Troubleshooting” on page 6-16. X BUS FAULT The Pinnacle Plus+ unit is not operating within set point. Note the error code on the display and see “Error Code Troubleshooting” on page 6-16. Normal X INTERLOCK The Pinnacle Plus+ unit is not producing output. See “Checks if the Output Does Not Turn On” on page 6-9. Normal X SETPOINT INTERLOCK Normal X Normal An over-temperature fault condition exists. Note the error code on the display and see “Error Code Troubleshooting” on page 6-16. X Normal Troubleshooting and Global Services 57000097-00B Pinnacle® Plus+ 10 kW Power Supply Table 6-2. Troubleshooting LEDs for (Continued) LED ARC ARC On Off X Status After the output shuts off, this LED lights momentarily to indicate that the hard arc count limit was reached during the previous run. However, if the arc count limit was set to zero, this LED lights for a predetermined time for every hard arc seen by the unit during the process run. X During an on cycle, this LED remains unlit normally. After the output shuts off, if this LED remains unlit, the hard arc limit was not reached during the previous run. Checks if the Output Does Not Turn On Peform the following checks if output does not turn on. 1. Verify that the joules mode is disabled or has a valid set point value. 2. Verify that the target life counter is disabled or has a valid value. 3. For dual models, verify that both units are enabled. 4. Verify that the user-definable power, voltage, and current limits are set to values reasonable for the process application. 5. Check for interlock, bus fault, or over-temperature faults. 6. From the active front panel main menu, press SUPPLY DEFAULTS and reset the unit default settings. Or, send command 126 through the Host port to reset all defaults. 7. Try again to turn on output power. Help Code Troubleshooting Table If the output does not turn on, the active front panel on the unit or a remote panel may display one of the following help codes. 57000097-00B Troubleshooting and Global Services 6-9 Advanced Energy® Table 6-3. Help Code Troubleshooting Table Help Code Number Help Code Message Problem Indicated Suggested Action H001 Wrong Control Mode The action requested was not from the control source. For example, an AE Bus command was issued, but the unit is in Local control mode. Check the control mode. Set it to the desired control source. H002 Can’t Change While Output is On The action requested cannot be performed because the power supply output is on. Turn off output power and try again. Output is Already On You have attempted to turn on the output but output power is already on. Turn off output power and try again. 6-10 Troubleshooting and Global Services 57000097-00B Pinnacle® Plus+ 10 kW Power Supply Table 6-3. Help Code Troubleshooting Table Help Code Number Help Code Message Problem Indicated Suggested Action H004 User Limit Out of Range You have attempted to set a power, voltage or current limit to a value outside the allowable range. Retry setting the limit using an acceptable value. Timer Out of Range You have attempted to set a timer to a value outside the allowable range. Retry setting the timer using an acceptable value. Arc Count Limit Out of Range You have attempted to set the arc count limit to a value outside the allowable range. Retry setting the limit using an acceptable value. Arc Timer Out of Range You have attempted to set the arc timer to a value outside its allowable range. Retry setting the timer using an acceptable value. Arc Trip Level Out of Range You have attempted to set a trip level to a value outside the allowable range. Retry setting the trip level using an acceptable value. Frequency Out of Range You have attempted to set frequency to a value outside the allowable range. Retry setting the frequency using an acceptable value. Reverse Time Out of Range You have attempted to set reverse time to a value outside the allowable range. Retry setting the reverse time using an acceptable value. Continued on next page 57000097-00B Troubleshooting and Global Services 6-11 Advanced Energy® Table 6-3. Help Code Troubleshooting Table Help Code Number Help Code Message H004 Invalid Target Selection Continued from previous page 6-12 Problem Indicated Suggested Action You have attempted to select a target that is not available. Retry setting the target using an acceptable value. Target Life Out of Range You have attempted to set target life to a value outside the allowable range. Retry setting the target life using an acceptable value. See host command 12. Invalid Recipe Step You have attempted to enter a recipe step that is invalid. Retry setting the recipe step using an acceptable value. Ramp Start Point Out of Range You have attempted to set a ramp start point to a value outside the allowable range. Re-adjust the ramp start point by setting a smaller percentage. Ramp Time Out of Range You have attempted to set ramp time to a value outside the allowable range. Retry setting the ramp time using an acceptable value. Run Time Out of Range You have attempted to set run time to a value outside the allowable range. Retry setting the run time using an acceptable value. Joule Setpoint Out of Range You have attempted to set the joule set point to a value outside the allowable range. Retry setting the joule set point using an acceptable value. Joule Threshold Out of Range You have attempted to set the joule threshold to a value outside the allowable range. Retry setting the joule threshold using an acceptable value. Troubleshooting and Global Services 57000097-00B Pinnacle® Plus+ 10 kW Power Supply Table 6-3. Help Code Troubleshooting Table Help Code Number Help Code Message Problem Indicated Suggested Action H005 Invalid Control Mode You have attempted to set a control source other than Local, Host, or User. Set the control source to Local, Host, or User. Invalid Regulation Mode You have attempted to set the regulation mode to something other than power, current, or voltage. Set a valid mode for regulation (that is, power, current, or voltage). Note: Output power must be off (that is, output must be de-energized) to switch between regulation modes. Invalid Parameter You have attempted to set an operating parameter to a value outside its allowable range. Set a valid value for the parameter. H006 Analog Setpoint Selected You have attempted to change the regulation mode, or a set point, when the power supply has been set to respond to an external (analog) source. Check the program source setting. For more information see host command 17. H007 Faults Are Active You requested output On while fault was active. Clear fault and try again. H009 Data Byte Count Incorrect The number of data bytes sent does not match the number of data bytes required by the command. Check the command's requirements and resend the command. H010 User Port Has Priority After selecting a target other than 1 from the User port, you have attempted to select another target through another interface (that is, through either a serial port or a panel). Use the User port to select the target. Or, to select the target through another interface, select target 1 from the User port. 57000097-00B Note: When you have selected a target greater than 1 through the User port, the User port's target setting has priority. Troubleshooting and Global Services 6-13 Advanced Energy® Table 6-3. Help Code Troubleshooting Table Help Code Number Help Code Message Problem Indicated H012 Specified Interface Not Installed You have attempted switch to User control when your power supply model is not equipped with a User card. Select another interface (Local or Host). H016 Reset Target Life Target life counter is enabled and has expired. Reset the target life counter. H019 Can’t Change While Recipe is Active You have attempted to initiate a unit function that is not allowed while the power supply is executing a recipe. Delay initiating the desired function until the recipe is complete. Or turn off output and disable the recipe function before attempting to initiate the desired function again. H021 Joule Delivery Not Complete The joules delivered counter is enabled and running and you have turned off output power before the counter expired. Delay initiating the desired function until the joule counter expires, or disable the joule mode. H025 Configured as a Slave Unit You have attempted to initiate a unit function that is not allowed while the power supply is configured as a slave. De-assert the slave status of the unit and retry the function. For information regarding this procedure, see “Master/Slave System Operation” on page 5-38. H026 Can’t Change: in Master/Slave System You have attempted to initiate a unit function that is not allowed while the power supply is configured in a master/slave system. Disable the master/slave system and retry initiating the unit function. For more information on this procedure, see “Master/Slave System Operation” on page 5-38. H028 Setpoint Out of Range You have attempted to set a set point to a value outside the allowable range. Retry setting the set point using an acceptable value. H031 User Port Reset is Active The User port reset is asserted. De-assert the User port reset function. 6-14 Suggested Action Troubleshooting and Global Services 57000097-00B Pinnacle® Plus+ 10 kW Power Supply Table 6-3. Help Code Troubleshooting Table Help Code Number Help Code Message Problem Indicated Suggested Action H034 Unit Configured as Sync-Pulse Receiver You have attempted to initiate a unit function that is not allowed while the power supply is configured as a sync-pulse receiver. De-assert the receiver status of the unit and retry the function. For information regarding this procedure, see “Sync Pulse Operation” on page 5-40. H099 Command Not Implemented The Pinnacle Plus+ unit does not support the command most recently sent by the computer host. Review the list of commands. If by following the information in these checklists and this table, you fail to identify the problem, please call AE Global Services. If the unit's front panel or Pinnacle Plus+ Remote Panel displays an error code, please consult the following error codes table for further troubleshooting ideas. You can reset the unit’s user-selectable parameters to the factory defaults using the host commands. Clearing the Error Code Error codes (“Exxx” numbers) appear on the passive front panel, the remote passive panel, and the Pinnacle Remote Active Panel. These messages contain both the error code and a brief description of the problem. The following table explains more about error codes and messages and how to respond to them. Error codes are typically generated by two types of faults: self-clearing or explicit clear. When the unit experiences a self-clearing fault condition, the unit turns off output and displays an error code on the panel. When the fault condition is no longer present in the system, the panel ceases to display the error code. (You then can turn on the output.) When the unit experiences an explicit-clear fault condition, the unit turns off output and displays an error code. Once the fault condition is no longer in the system, you must acknowledge the condition from your controlling interface before turning on output. To reset the Pinnacle Plus+ unit, do one of the following: • From the front panel, press the OFF button to acknowledge the condition. Then press the ON button to turn on output. • Through the DeviceNet interface, send the Poll Command message twice: once to turn off output and once to turn on output (see the description of Byte 4). 57000097-00B Troubleshooting and Global Services 6-15 Advanced Energy® Error Code Troubleshooting Use the following information to troubleshoot error codes. Table 6-4. Error Code Troubleshooting Table Error Code Message Problem Indicated E000 The DSP failed to respond to the processor. 1. Power the unit off and then back on. The out-of-set point timer has expired. 1. Increase the set point timer value or disable the timer by setting it equal to 0. DSP Init Control Fault E001 Out of Setpoint Timer Expired Suggested Action 2. If the error code reappears, contact AE Global Services. 2. If the problem persists, check your process parameters for limiting factors. That is, ensure that your load impedance matches the impedance of the Pinnacle Plus+ unit. Bus Fault The DC bus has failed– probably due to an AC input power problem. Using all applicable safety precautions, inspect your AC input power source to ensure that it is properly connected and that the specified voltage is being applied to the Pinnacle Plus+ unit. (See the “Specifications” chapter for AC input power specifications.) E004 The unit is overheating. Inspect the unit's cooling system and review cooling specifications. Ensure that: E002 Heat Sink OverTemperature • The input air temperature is correct, • The Pinnacle Plus+ unit's fans are functioning properly • The cabinet allows for adequate ventilation for all the units in the cabinet. For more information, see the “Installation” chapter. 6-16 Troubleshooting and Global Services 57000097-00B Pinnacle® Plus+ 10 kW Power Supply Table 6-4. Error Code Troubleshooting Table Error Code Message Problem Indicated Suggested Action E005 The AC input power line dipped below required operating conditions. This condition may be due to an AC power black-out or brown-out. Using all applicable safety precautions, inspect your AC input power source to ensure that it is properly connected and that the specified voltage is being applied to the Pinnacle Plus+ unit. (See the “Specifications” chapter for AC input power specifications.) The DSP has failed. Call AE Global Services. Momentary Power Fluctuation E006 DSP Watch Dog Failure E007 Initialization Fault The unit has not been properly initialized. Note: This error is not reported by all units. 1. Some units will allow you to clear this error. To clear the error: For a active or remote panel, press the Off button. For a passive panel, press the Display button three times within one second. If the error does not clear, proceed to the next step. 2. Cycle power to the unit. 3. If the error recurs, call AE Global Services. E009 Output Ground Fault Detected 57000097-00B Output positive terminal is not PE grounded. Connect output positive terminal to PE ground (available only on certain options). Troubleshooting and Global Services 6-17 Advanced Energy® Table 6-4. Error Code Troubleshooting Table Error Code Message E011 Problem Indicated Unit A's power inverter cannot produce power. Side A: Inverter Fault Occurred Suggested Action 1. Using all applicable safety precautions, inspect your AC input power source to ensure that it is properly connected and that the specified voltage is being applied to the Pinnacle Plus+ unit. 2. Check the input power line voltage on all phases to ensure that it meets specifications (see the “Specifications” chapter). 3. Run the power supply to a dummy load to determine if it produces voltage or current. E012 Unit B’s power inverter cannot produce power. Side B: Inverter Fault Occurred 1. Using all applicable safety precautions, inspect your AC input power source to ensure that it is properly connected and that the specified voltage is being applied to the Pinnacle Plus+ unit. 2. Check the input power line voltage on all phases to ensure that it meets specifications (see the “Specifications” chapter). 3. Run the power supply to a dummy load to determine if it produces voltage or current. E020 Interlock Open: User The system interlock on the unit's analog User port has not been satisfied. 1. Power off the Pinnacle Plus+ unit. 2. Ensure that the interlock pin on the User port connector has been properly connected. 3. Ensure that all system interlocks have been satisfied. Power the unit back on. E021 Interlock Open: Cable 6-18 The ribbon cable between the logic card and the inverter board has come loose. Call AE Global Services. Troubleshooting and Global Services 57000097-00B Pinnacle® Plus+ 10 kW Power Supply Table 6-4. Error Code Troubleshooting Table Error Code Message E022 Interlock Open: Contactor Problem Indicated The unit's Contactor Interlock has not been satisfied. Suggested Action 1. Power off the Pinnacle Plus+ unit. 2. Ensure that the Contactor Interlock is properly connected. 3. Ensure that all system interlocks have been satisfied. 4. Power the unit back on. For more information about Contactor Interlock connector, see the “Installation” chapter. E024 Invalid Regulation Mode E027 Maximum On Timer Expired E033 Message Queue Overflow 57000097-00B The User port regulation mode for has been set to an invalid value. Set the User port regulation mode to a valid value. Note: Output power must be off (that is, output must be deenergized) to switch between regulation modes. The maximum on timer set with command 87 has expired. Either: The microprocessor has fallen behind and cannot keep up with events. De-energize the Pinnacle Plus+ unit and then restart. • Clear the fault, then turn output on again or • Disable the timer by setting it to zero. Troubleshooting and Global Services 6-19 Advanced Energy® Table 6-4. Error Code Troubleshooting Table Error Code Message E051 PROFIBUS Watch Dog Expired Problem Indicated The PROFIBUS master stopped talking to the Pinnacle Plus+ supply after establishing communications. Suggested Action Have the PROFIBUS master reestablish communications and send a “master reset” to clear the Pinnacle Plus+ unit's display. E051 indicates an error in the PROFIBUS card located in the left I/O slot located on the back panel of the power supply. E151 indicates the same error, but in the PROFIBUS card located in the right I/O slot of the unit (if applicable). E054 PROFIBUS MAC Reset or Offline The PROFIBUS interface has taken itself “off-line,” probably in response to another error. Cycle the Pinnacle Plus+ unit's power off and on and re-establish communications between the master and slave. If the error code reappears, call AE Global Services. E054 indicates an error in the PROFIBUS card located in the left I/O slot located on the back panel of the power supply. E154 indicates the same error, but in the PROFIBUS card located in the right I/O slot of the unit (if applicable). E055 PROFIBUS Command Buffer Overflow 6-20 A PROFIBUS command arrived before the last sent command was executed and cleared from memory. E055 indicates an error in the PROFIBUS card located in the left I/O slot located on the back panel of the power supply. E155 indicates the same error, but in the PROFIBUS card located in the right I/O slot of the unit (if applicable). 1. Slow down the PROFIBUS communication rate or the rate at which commands are sent. 2. Make sure data consistency (module consistency) is enabled in the PROFIBUS master. Troubleshooting and Global Services 57000097-00B Pinnacle® Plus+ 10 kW Power Supply Table 6-4. Error Code Troubleshooting Table Error Code Message Problem Indicated Suggested Action E059 The PROFIBUS master has stopped communicating with the Pinnacle Plus+ unit using the proper protocol. This “slave” is now available to be “owned” by another master. If output is on, the Pinnacle Plus+ unit turns off and fails safe. To recover from the “off state,” have a PROFIBUS master establish communication with the Pinnacle Plus+ unit and send a “master reset” to clear the Pinnacle Plus+ unit's display. PROFIBUS Master Released Unit E059 indicates an error in the PROFIBUS card located in the left I/O slot located on the back panel of the power supply. E159 indicates the same error, but in the PROFIBUS card located in the right I/O slot of the unit (if applicable). E060 AE Bus Command Buffer Overflow E070 Internal DeviceNet Communications Error 57000097-00B An AE Bus command arrived before the last sent command was executed and cleared from memory. Slow down the AE Bus communication rate or the rate at which commands are sent. E060 indicates an error in the AE Bus card located in the left I/O slot located on the back panel of the power supply. E160 indicates the same error, but in the AE Bus card located in the right I/O slot of the unit (if applicable). An internal communications error has occurred on the DeviceNet card. No suggested action. Troubleshooting and Global Services 6-21 Advanced Energy® Table 6-4. Error Code Troubleshooting Table Error Code Message Problem Indicated E081 This error occurs at startup in units that are configured with a master/slave Host interface card. Once the master/slave Host card has been successfully initialized, the fault selfclears. Ordinarily, if this fault does not clear automatically, there is a hardware problem. Check your master/slave cabling. The unit was in an overvoltage condition for longer than was set on the overvoltage timer. No suggested action. The unit was in an overcurrent condition for longer than was set on the overcurrent timer. No suggested action. Initializing Master Slave E086 Overvoltage E087 Overcurrent E088 Short Circuit Condition One of the following short circuit conditions occurred: a shorted chamber, shorted cable, or a failed pulsing switch. Suggested Action 1. Power the unit off and then back on. 2. If the error code reappears, contact AE Global Services. The unit detects a short circuit if the following conditions exist: • the power, current, or voltage limit is active (or enabled) • the current is above the current threshold of pulsing • the unit detects a hard arc. E089 Fatal Short Circuit Fault 6-22 A fatal short-circuit fault occurs when 10 or more short-circuit faults have occurred within a 40-second timeframe. Cycle AC power to the unit. Troubleshooting and Global Services 57000097-00B Pinnacle® Plus+ 10 kW Power Supply Table 6-4. Error Code Troubleshooting Table Error Code Message Problem Indicated E090 More than one unit is configured as a transmitter in your sync-pulse system. Multiple SyncPulse Transmitters Detected E091 No Sync-Pulse Transmitter Detected E092 No Master Detected E093 Invalid Frequency E094 Sync-pulse receivers are not receiving a transmitter synchronization signal. Reverse Time Limit Exceeded 57000097-00B Reconfigure units so only one unit is the transmitter. 1. Check the sync-pulse cable to ensure that it is plugged in. 2. Reconfigure one unit so that it operates as a sync-pulse transmitter. No master system is detected. At least one unit must be set as the master unit. Verify a unit is set as the master unit, or that the link to the master unit has not been broken. An invalid frequency has been set to properly operate the unit. Reset the frequency value. A unit on the sync pulse cable has lost input power. System Input Power Fault E095 Suggested Action 1. Check that all units have input power supplied and are in an on state. 2. Check the sync pulse cable for damage. The pulsing transmitter unit has a higher reverse time than is allowed in the receiver unit. This may be caused by a lower user voltage limit in the transmitter unit than in the receiver unit. The reverse time is inversely proportional to the user voltage limit. Reduce the reverse time set for the transmitter side, or lower the voltage limit in the receiver side. Troubleshooting and Global Services 6-23 Advanced Energy® Table 6-4. Error Code Troubleshooting Table Error Code Message Problem Indicated E112 The closure of the contactor has been delayed for because it has received requests for more than two closures within 6 seconds. The delay will last as long as it takes to maintain the limit of no more than 2 closures within a six second window. This problem can be caused by rapid cycling of any self-clearing error that opens the contactor. Check for and resolve these types of errors. For example: E151 is the same error documented for E051. For more information about troubleshooting this error, see E051. Contactor Delayed E151 PROFIBUS Watch Dog Expired E154 PROFIBUS MAC Reset of Offline 6-24 Suggested Action • Rapid cycling of the user interlock • Noise on the Sync Pulse cable, which the unit interprets as a Sync Pulse system error E151 indicates an error in the PROFIBUS card located in the right I/O slot located on the back panel of the power supply. E051 indicates an error in the PROFIBUS card located in the left I/O slot of the unit (if applicable). E154 is the same error documented for E051. For more information about troubleshooting this error, see E054. E154 indicates an error in the PROFIBUS card located in the right I/O slot located on the back panel of the power supply. E054 indicates an error in the PROFIBUS card located in the left I/O slot of the unit (if applicable). Troubleshooting and Global Services 57000097-00B Pinnacle® Plus+ 10 kW Power Supply Table 6-4. Error Code Troubleshooting Table Error Code Message E155 PROFIBUS Command Buffer Overflow E159 PROFIBUS Master Released Unit E160 AE BusCommand Buffer Overflow E181 Initializing Master Slave 57000097-00B Problem Indicated E155 is the same error documented for E051. Suggested Action For more information about troubleshooting this error, see E055. E155 indicates an error in the PROFIBUS card located in the right I/O slot located on the back panel of the power supply. E055 indicates an error in the PROFIBUS card located in the left I/O slot of the unit (if applicable). E159 is the same error documented for E059. For more information about troubleshooting this error, see E059. E159 indicates an error in the PROFIBUS card located in the right I/O slot located on the back panel of the power supply. E059 indicates an error in the PROFIBUS card located in the left I/O slot of the unit (if applicable). E160 is the same error documented for E060. For more information about troubleshooting this error, see E060. E160 indicates an error in the AE Bus card located in the right I/O slot located on the back panel of the power supply. E060 indicates an error in the AE Bus card located in the left I/O slot of the unit (if applicable). This error occurs at startup in units that are configured with a master/slave Host interface card. Once the master/slave Host card has been successfully initialized, the fault selfclears. Ordinarily, if this fault does not clear automatically, there is a hardware problem. Check your master/slave cabling. Troubleshooting and Global Services 6-25 Advanced Energy® Table 6-4. Error Code Troubleshooting Table Error Code Message Problem Indicated Suggested Action E182 A fault has occurred in the master/slave system. Check your master/slave cabling. No master unit detected. At least one unit must be set as the master unit. Verify a unit is set as the master unit, or that the link to the master unit has not been broken (see “Configuring a Master/ Slave System” on page 5-23 for more information). Incorrect system size Contact Global Services Master/Slave Fault E183 No Master Detected E 185 MASTER/SLAVE PARAM FLT CONTACTING AE GLOBAL SERVICES Please contact AE Global Services if you have questions or problems that cannot be resolved by working through the provided troubleshooting procedures. When you call Global Services, make sure to have the unit serial number and part number. These numbers are available on unit labels. 6-26 Troubleshooting and Global Services 57000097-00B Pinnacle® Plus+ 10 kW Power Supply Advanced Energy World Headquarters, 24 x 7 Technical Support Table 6-5. AE Global Services contact information Office AE, World Headquarters 1625 Sharp Point Drive Fort Collins, CO 80525 USA Contact Phone (24 hrs/day, 7 days/week): 800.446.9167 or + 1.970.221.0108 Fax (M–F, 7:00 am – 5:30 pm MST): + 1.970.407.5981 Email: [email protected] We will respond to email by the next business day. For Aera flow product support, call 800.MFC.AERA (800.632.2372) For Sekidenko thermal product support, contact [email protected] If you would prefer to contact a local or regional sales or service office, visit the Advanced Energy web site for current contact information: • http://www.advanced-energy.com and click on Sales & Support RETURNING UNITS FOR REPAIR Before returning any product for repair and/or adjustment, first follow all troubleshooting procedures. If, after following these procedures, you still have a problem, or if the procedure instructs you to, contact AE Global Services and discuss the problem with a representative. Be prepared to give them the model number and serial number of the unit as well as the reason for the proposed return. This consultation call will allow Global Services to determine if the unit must actually be returned for the problem to be corrected. Such technical consultation is always available at no charge. 57000097-00B Troubleshooting and Global Services 6-27 Advanced Energy® 6-28 Troubleshooting and Global Services 57000097-00B Pinnacle® Plus+ 10 kW Power Supply Index A active front panel. See control panel addressing AE bus 4-161 DeviceNet 4-55 AE bus checksum 4-168 communication mode 4-165 communications transaction example 4-172 connector 4-159 data bytes 4-167 DIP switch 4-161 isolated cards 4-159 message packet 4-166 setting addresses 4-161 setting baud rates 4-165 setting network address 4-164 setting timeout 4-139 timeout period 4-160 AE bus commands 4-172 AE bus host 4-159 AE Bus port pin descriptions 4-159 AE bus port transmission parameters 4-160 air cooling requirements 5-2 analog signals 4-3, 4-18, 4-41 User port 4-26 arc count limit, setting 4-150 arc density,viewing 4-150 arc handling overview 5-37 using 5-37 arc handling, enabling 4-151 ARC LED 4-127 arc suppression feature description 2-2 authorized returns 6-27 B baud rate setting (DeviceNet) 4-55 setting, AE bus 4-165 baud rates 57000097-00B setting 4-73 C cabinet design 5-2 cathode switch User port 4-15 CE marking 1-5 certification 1-5 changing target functions 4-146 checksum AE bus 4-168 command set PROFIBUS 4-82 command status response code table 4-81 codes 4-170 interpreting 4-81 commands AE bus 4-172 PROFIBUS 4-75 communication transaction example AE bus 4-172 communications DeviceNet 4-56 mode, setting 4-165 communications protocol standard serial port 4-166 compliance directives and standards 1-6 unit 1-5 conditions of use 1-7 connecting DeviceNet 4-54, 5-9 grounding connections 5-6 input power 5-9 master/slave 5-22 serial (Host) port 5-8 standard serial port 5-8 User port 5-9 connecting, see installation connections output power 5-10 remote panel 4-125 connector AE bus 4-159 Index i Advanced Energy® Host, AE bus 4-159 User port 4-2, 4-17, 4-26, 4-39 Contactor Intlk port connecting 5-7 CONTROL key 4-126 control modes, selecting 5-31 control panel 4-125 choosing regulation modes 4-127 CONTROL key 4-126 control mode switches 4-128 controls 4-131 CURRENT switch 4-129 HOST switch 4-129 interface 4-128 LOCAL switch 4-129 menu maps 4-133 options 4-132 selections 4-132 MODIFY knob 4-127, 4-131 monitoring your process 4-143 ON/OFF buttons 4-127 output display screen 4-126 output power switches 4-128 POWER switch 4-129 REGULATION key 4-127 regulation switches 4-129 selecting control mode 4-142 selecting functions 4-131 setting control parameters 4-152 setting panel mode 4-142 soft keys 4-127, 4-131 two-line display screen 4-129 VOLTAGE switch 4-129 control switches 4-128 coolant specifications 3-19 cooling requirements 5-1 CSR codes 4-170 CSR see command status response 4-81 CURRENT switch 4-129 customer support contacting 6-26 D data bytes AE bus 4-167 data consistency 4-75 debugging your unit 4-136 DeviceNet addressing 4-55 baud rate, setting 4-55 ii communication 4-56 connecting 5-9 explicit messaging 4-63 installation 4-54 LEDs 4-70 operation 4-55 pin descriptions 4-54 poll command message 4-56 port 4-54 response message 4-59 rotary switches 4-55 scaling (poll command) 4-59 scaling (response message) 4-62 digital signals 4-5, 4-19, 4-41 User port 4-26 dimensions, drawing 3-5 DIP switch AE bus 4-161 communication mode, setting 4-165 setting baud rates 4-165 directives 1-6 display passive panel 4-123 DISPLAY button 4-123 download packet PROFIBUS specific 4-76 E electrical specifications 3-6 electromagnetic compatability (EMC) directives and standards 1-6 EMI connecting serial (Host) port 5-8 connecting User port 5-9 DeviceNet connection 5-9 User port 4-36 enabling arc handling 4-151 environmental specifications 3-18 error codes clearing 6-15 clearing master/slave faults 5-39 errors PROFIBUS specific 4-74 example command sequences PROFIBUS 4-121 F faults clearing in a master/slave system 5-39 floating output configuration safety warning 5-15 Index 57000097-00B Pinnacle® Plus+ 10 kW Power Supply frequency setting 4-131 frequency time settings 5-37 functional specifications 3-1 G general description 2-1 grounding 5-6 GSD see type files 4-73 guidelines safety 1-2 H handshaking PROFIBUS 4-76 help codes passive front panel 6-7 troubleshooting 6-9 high power operation 5-34 Host AE bus isolated cards 4-159 Host connectors AE bus 4-159 Host port connecting 5-8 see also AE bus Host see also DeviceNet HOST switch 4-129 I icons in user manual 1-2 on unit 1-3 illustrations rear view 5-29 impedance range, output 3-17 inbytes 4-77 installation cabinet design 5-2 Contactor Intlk port 5-7 cooling requirements 5-1 DeviceNet 5-9 dimensional drawing 3-5 grounding the unit 5-6 input power 5-9 master/slave 5-22 preparing to install 5-1 remote active panel 5-8 remote passive panel 5-8 requirements 5-5 57000097-00B safety guidelines 1-2 serial (Host) port 5-8 spacing requirements 5-1 standard serial port 5-8 unpacking 5-5 User port 4-3, 4-40, 5-9 installing DeviceNet 4-54 User port 4-36 interfaces control panel 4-128 general description 2-1 types 2-4 interlock UHF connector without 5-21 internal microprocessor 2-2 IOUT.A signal incorrect output signal scaling 4-34 isolated AE bus 4-159 J joule mode, setting 4-155 L labels on unit 1-3 LEDs ARC 4-127 DeviceNet 4-70 passive display panel 4-124 troubleshooting 6-7 verifying 5-30 local control setting 4-142 LOCAL switch 4-129 low power operation 5-34 M marking, CE 1-5 master reset PROFIBUS 4-74 master/slave card 5-22 clearing faults 5-39 connecting 5-22 drawing of interface 5-23 master unit, configuring 5-23 monitoring 5-39 on/off combinations 5-39 slave units, configuring 5-24 master/slave termination 4-73 Index iii Advanced Energy® menu control panel options 4-132 control panel selections 4-132 functions selecting control panel functions 4-131 menu map 4-134 message packet AE bus 4-166 method, control selecting 5-31 microprocessor 2-2 military spec number UHF 5-20 mode, regulation 5-31 MODIFY knob 4-127, 4-131 monitoring master/slave system 5-39 monitoring your process 4-143 N network address AE bus 4-164 network address, setting PROFIBUS 4-73 O ON/OFF buttons 4-127, 4-128 on/off sequences (master/slave systems) 5-39 operation safety guidelines 1-2 turning the unit on 5-30 verifying LEDs 5-30 outbytes 4-76 out-of-set point timer, setting 4-145 output box and connector diagram 5-13 connecting 5-10 control panel power switches 4-128 impedance range 2-1, 3-17 negative 5-14 optimal connection 5-15 positive output voltage 5-15 range 3-17 regulation 2-1 setting current limits 4-148 setting power limits 4-148 setting voltage limits,setting output limits 4-148 iv strain relief connector 5-12 UHF connector 5-20 output display screen 4-129 output readback bytes, PROFIBUS 4-80 output signal scaling incorrect scaling 4-34 output, strain relief 5-17 over-current timer setting 4-145 over-voltage timer setting 4-144 overvoltage, specifications 3-18 P parameters setting for the supply 4-139 passive display panel 4-123 help codes 6-7 LEDs 4-124 physical specifications 3-3 pin descriptions AE Bus port 4-159 DeviceNet 4-54 remote panel 4-125 standard serial port 4-158 User port 4-5, 4-37, 4-42 Pinnacle Plus+ remote panel. See control panel poll command message 4-56 pollution degree, specifications 3-18 positive output 5-15 power connecting input 5-9 POWER switch 4-129 process menu map 4-134 process menu functions, using 4-143 product certification 1-5 compliance 1-5 labels 1-3 PROFIBUS command set 4-82 commands 4-75 data consistency 4-75 download packet 4-76 errors 4-74 example command sequences 4-121 handshaking 4-76 master reset command 4-74 setting baud rate 4-73 setting network address 4-73 Index 57000097-00B Pinnacle® Plus+ 10 kW Power Supply termination 4-73 transmission rates 4-76 type (GSD) files 4-73 upload packet 4-77 watch dog timer 4-74 work around 4-75 PROFIBUS Host 4-72 PROFIBUS protocol 4-72 program logic controllers (PLCs) 4-73 protocol PROFIBUS 4-72 standard serial port 4-166 Pulsar, see product pulse reversal times 3-9 R ramp, setting 4-156 rear view illustration 5-29 rear-panel switch description 4-26 switch settings 4-33 RECIPE menu 4-152 recipes setting 4-152 refresh rates upload packet 4-80 REGULATION key 4-127 regulation mode 5-31 User port 4-16, 4-24, 4-49 regulation switches 4-129 remote active panel connecting 5-8 remote control setting 4-142 remote panel connecting 4-125 pin descriptions 4-125 remote passive panel connecting 5-8 repair, authorized returns 6-27 replacing Host cards 5-8 requirements before installing 5-5 reset command 4-74 response/data bytes, PROFIBUS 4-80 returns authorized 6-27 reverse time 5-37 reverse time settings 5-37 reverse time, setting 4-131 57000097-00B reverse voltage 3-8 ROM, checking 4-138 RS-232, -422, -485 4-160 S safety conditions of use 1-7 directives and standards 1-6 guidelines 1-2 rules for installation 1-2 rules for operation 1-2 safety warnings floating output 5-15 grounding 5-6 scaling DeviceNet (poll command) 4-59 DeviceNet (response message) 4-62 selecting local/remote operation 4-142 self-run frequencies 3-9 SELV requirements 5-19 serial (Host) port connecting 5-8 serial communications AE bus 4-159 PROFIBUS Host 4-72 standard (flash) port 4-157 service menu checking statistics 4-135 debugging your unit 4-136 map 4-133 using functions 4-134 set point out-of-setp oint timer 4-145 setting 4-131, 5-31 setting arc count limit 4-150 setting control parameters 4-152 setting joule mode 4-155 setting out-of-set point timer 4-145 setting output current limits 4-148 setting over-current timer 4-145 setting over-voltage timer 4-144 setting power limits 4-148 setting ramp 4-156 setting supply parameters 4-139 setting voltage arc trip level 4-149 shared memory block 4-75 signals User port 4-37, 4-41 soft keys 4-127, 4-131 software checking your versions 4-138 Index v Advanced Energy® Host commands 4-172 PROFIBUS commands 4-75 spacing requirements 5-1 dimensions 3-5 stacked units 5-4 specifications coolant 3-19 electrical 3-6 environmental 3-18 functional 3-1 overvoltage category 3-18 physical 3-3 pollution degree 3-18 stacked power units spacing requirements 5-4 standard serial (flash) port connecting 5-8 standard serial port 4-157 communications protocol 4-166 CSR codes 4-170 pin descriptions 4-158 transmission parameters 4-158 standards 1-6 statistics service menu 4-135 status bytes, upload 4-79 status flag bytes, PROFIBUS 4-77 strain relief fittings 5-17 subminiature-D 4-159 supply menu functions 4-138 map 4-133 switches control panel control mode 4-128 control panel power 4-128 control panel regulation 4-129 switches, rotary (DeviceNet) 4-55 symbols in user manual 1-2 on unit 1-3 T target functions, changing 4-146 target life counter User port 4-15, 4-23 targets selection 4-37 termination procedure 4-73 theory of operation 2-2 functional diagram 2-2 timeout vi setting 4-139 setting for AE bus 4-160 timer watchdog 4-74 transmission parameters AE bus 4-160 standard serial port 4-158 transmission rates, PROFIBUS 4-76 troubleshooting checking software revision 4-138 checking your ROM 4-138 checks if output does not turn on 6-9 checks with the unit on 6-2 clearing master/slave faults 5-39 contacting customer support 6-26 debugging 4-136 help codes 6-9 LEDs 6-7 passive front panel help codes 6-7 two-line display 4-129 type files, PROFIBUS 4-73 U UHF output connector 5-20 interlock 5-21 military spec number 5-20 unit icons and symbols used 1-3 unpacking 5-5 unpacking 5-5 upload packet PROFIBUS specific 4-77 refresh rates 4-80 upload status bytes 4-79 profibus upload status bytes 4-78 user manual symbols and icons used 1-2 User port 4-2, 4-16, 4-24, 4-36, 4-39 cathode switch 4-15 connecting 5-9 connector 4-17, 4-26 EMI 4-36 installation 4-3, 4-36, 4-40 pin description table 4-5, 4-19, 4-27 pin descriptions 4-37, 4-42 rear-panel switch description 4-26 rear-panel switch settings 4-33 regulation mode 4-16, 4-24, 4-49 signals 4-3, 4-18, 4-26, 4-37, 4-41 target life counter 4-15, 4-23 Index 57000097-00B Pinnacle® Plus+ 10 kW Power Supply target selection 4-37 see also DeviceNet V viewing arc density 4-150 voltage arc trip level 5-37 voltage arc trip level, setting 4-149 VOLTAGE switch 4-129 W watch dog timer disabling 4-74 watchdog timer 4-74 work around command sequences 4-75 57000097-00B Index vii Advanced Energy® viii Index 57000097-00B