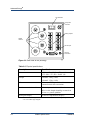
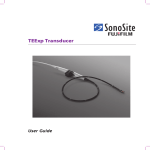
1
Optical Fiber Thermometer
Model OR2000F
September 2004 5709005-A
User Manual
User Manual
Optical Fiber Thermometer
Model OR2000F
5709005-A
Advanced Energy®
COPYRIGHT
This manual and the information contained herein is the proprietary property of
Advanced Energy Industries, Inc.
No part of this manual may be reproduced or copied without the express written
permission of Advanced Energy Industries, Inc. Any unauthorized use of this manual
or its contents is strictly prohibited. Copyright © 2004 Advanced Energy Industries,
Inc. All Rights Reserved.
DISCLAIMER AND LIMITATION OF LIABILITY
The information contained in this manual is subject to change by Advanced Energy
Industries, Inc. without prior notice. Advanced Energy Industries, Inc. makes no
warranty of any kind whatsoever, either expressed or implied, with respect to the
information contained herein. Advanced Energy Industries, Inc. shall not be liable in
damages, of whatever kind, as a result of the reliance on or use of the information
contained herein.
PRODUCT USAGE STATEMENT
Read this entire manual and all other publications pertaining to the work to be
performed before installing, operating, or maintaining this equipment. Practice all
plant and product safety instructions and precautions. Failure to follow instructions
can cause personal injury and/or property damage. If the equipment is used in a
manner not specified by the manufacturer, the protection provided by the equipment
may be impaired. All personnel who work with or who are exposed to this equipment
must take precautions to protect themselves against serious or possibly fatal bodily
injury.
Advanced Energy Industries, Inc., (AE) provides information on its products and
associated hazards, but it assumes no responsibility for the after-sale operation of
the equipment or the safety practices of the owner or user.
iv
5709005-A
Optical Fiber Thermometer Model OR2000F
TRADEMARKS
®
is a registered trademark of Advanced Energy Industries,
Inc.
Advanced Energy® is a registered trademark of Advanced Energy Industries,
Inc.
AE® is a registered trademark of Advanced Energy Industries, Inc.
AEDirect™ is a trademark of Advanced Energy Industries, Inc.
CLETOP® is a registered trademark of NTT-ME Corporation.
Delrin® is a registered trademark of E.I. du Pont de Nemours and Company
DeviceNet™ is a trademark of Open DeviceNet Vendor Association, Inc.
Excel® is a registered trademark of Microsoft Corporation
Lotus 123® is registered trademark of IBM® Corporation
Quattro Pro® is a registered trademark of Corel Corporation
Swagelok® is a registered trademark of the Swagelok Company
Ultra-Torr® is a registered trademark of the Swagelok Company
Viton® is a registered trademark of E.I. du Pont de Nemours and Company
Windows® is a registered trademark of Microsoft Corporation
Windows 95® is a registered trademark of Microsoft Corporation
Windows 98® is a registered trademark of Microsoft Corporation
CUSTOMER FEEDBACK
Advanced Energy’s technical writing staff has carefully developed this manual using
research-based document design principles. However, improvement is ongoing, and
the writing staff welcomes and appreciates customer feedback. Please send any
comments on the content, organization, or format of this user manual to:
• [email protected]
To order a manual, please contact Technical Support:
• [email protected]
5709005-A
1-v
Advanced Energy®
vi
5709005-A
Optical Fiber Thermometer Model OR2000F
Table of Contents
Chapter 1. Introduction
Read This Section! . . . . . . . . . . . . . . . . . . . . . . . . . . . . . . . . . . . . . . . . . . . . . . . 1-1
Interpreting the Manual . . . . . . . . . . . . . . . . . . . . . . . . . . . . . . . . . . . . . . . . . . . 1-1
Type Conventions . . . . . . . . . . . . . . . . . . . . . . . . . . . . . . . . . . . . . . . . . . . . 1-1
Icons (Symbols) . . . . . . . . . . . . . . . . . . . . . . . . . . . . . . . . . . . . . . . . . . . . . 1-2
Safety . . . . . . . . . . . . . . . . . . . . . . . . . . . . . . . . . . . . . . . . . . . . . . . . . . . . . . . . . 1-3
Product Compliance and Conditions of Use . . . . . . . . . . . . . . . . . . . . . . . . . . . 1-4
Safety and Compliance Directives and Standards . . . . . . . . . . . . . . . . . . . 1-4
Certification . . . . . . . . . . . . . . . . . . . . . . . . . . . . . . . . . . . . . . . . . . . . . . . . . 1-5
Conditions of Use . . . . . . . . . . . . . . . . . . . . . . . . . . . . . . . . . . . . . . . . . . . . 1-5
Chapter 2. Theory
Description . . . . . . . . . . . . . . . . . . . . . . . . . . . . . . . . . . . . . . . . . . . . . . . . . . . . . 2-1
Theory of Operation . . . . . . . . . . . . . . . . . . . . . . . . . . . . . . . . . . . . . . . . . . . . . . 2-1
Major Components . . . . . . . . . . . . . . . . . . . . . . . . . . . . . . . . . . . . . . . . . . . . . . . 2-4
OR2000F Controller . . . . . . . . . . . . . . . . . . . . . . . . . . . . . . . . . . . . . . . . . . 2-4
Communication . . . . . . . . . . . . . . . . . . . . . . . . . . . . . . . . . . . . . . . . . . 2-6
User Parameters . . . . . . . . . . . . . . . . . . . . . . . . . . . . . . . . . . . . . . . . . 2-6
Sensors . . . . . . . . . . . . . . . . . . . . . . . . . . . . . . . . . . . . . . . . . . . . . . . . . . . . 2-6
Lightpipe Sensors . . . . . . . . . . . . . . . . . . . . . . . . . . . . . . . . . . . . . . . . 2-7
Pyrometer Sensors . . . . . . . . . . . . . . . . . . . . . . . . . . . . . . . . . . . . . . . 2-7
Fiber Optic Cables . . . . . . . . . . . . . . . . . . . . . . . . . . . . . . . . . . . . . . . . . . . 2-8
Optical Columns . . . . . . . . . . . . . . . . . . . . . . . . . . . . . . . . . . . . . . . . . . . . . 2-8
Chapter 3. Product Specifications
System Specifications . . . . . . . . . . . . . . . . . . . . . . . . . . . . . . . . . . . . . . . . . . . . 3-1
Physical Specifications . . . . . . . . . . . . . . . . . . . . . . . . . . . . . . . . . . . . . . . . . . . 3-2
Electrical Specifications . . . . . . . . . . . . . . . . . . . . . . . . . . . . . . . . . . . . . . . . . . . 3-5
Operating and Performance Specifications . . . . . . . . . . . . . . . . . . . . . . . . . . . . 3-5
Environmental Specifications . . . . . . . . . . . . . . . . . . . . . . . . . . . . . . . . . . . . . . . 3-5
Chapter 4. Communication Interfaces and Controls
Communication . . . . . . . . . . . . . . . . . . . . . . . . . . . . . . . . . . . . . . . . . . . . . . . . . 4-1
Communication Port Signals . . . . . . . . . . . . . . . . . . . . . . . . . . . . . . . . . . . . 4-1
Remote Communications . . . . . . . . . . . . . . . . . . . . . . . . . . . . . . . . . . . . . . 4-1
Controls and Indicators . . . . . . . . . . . . . . . . . . . . . . . . . . . . . . . . . . . . . . . . . . . 4-1
CH Key . . . . . . . . . . . . . . . . . . . . . . . . . . . . . . . . . . . . . . . . . . . . . . . . . . . . 4-2
5709005-A
Table of Contents
vii
Advanced Energy®
INPUT Key . . . . . . . . . . . . . . . . . . . . . . . . . . . . . . . . . . . . . . . . . . . . . . . . .
OUTPUT Key . . . . . . . . . . . . . . . . . . . . . . . . . . . . . . . . . . . . . . . . . . . . . . .
RS-232 Interface . . . . . . . . . . . . . . . . . . . . . . . . . . . . . . . . . . . . . . . . . . . . . . . .
Serial Output Data . . . . . . . . . . . . . . . . . . . . . . . . . . . . . . . . . . . . . . . . . . . . . . .
4-7
4-10
4-16
4-20
Chapter 5. Installation, Startup, and Operation
Unpacking . . . . . . . . . . . . . . . . . . . . . . . . . . . . . . . . . . . . . . . . . . . . . . . . . . . . .
Installation . . . . . . . . . . . . . . . . . . . . . . . . . . . . . . . . . . . . . . . . . . . . . . . . . . . . .
Installing the Controller and Power Supply . . . . . . . . . . . . . . . . . . . . . . . . .
Installing Sensors . . . . . . . . . . . . . . . . . . . . . . . . . . . . . . . . . . . . . . . . . . . .
Installing Lightpipe Sensors . . . . . . . . . . . . . . . . . . . . . . . . . . . . . . . . .
Installing Pyrometer Sensors . . . . . . . . . . . . . . . . . . . . . . . . . . . . . . . .
Installing Fiber Optic Cables . . . . . . . . . . . . . . . . . . . . . . . . . . . . . . . . . . . .
Installing the RS-232 Cable . . . . . . . . . . . . . . . . . . . . . . . . . . . . . . . . . . . .
Startup and Checkout . . . . . . . . . . . . . . . . . . . . . . . . . . . . . . . . . . . . . . . . . . . .
Operation . . . . . . . . . . . . . . . . . . . . . . . . . . . . . . . . . . . . . . . . . . . . . . . . . . . . . .
Using Control Keys . . . . . . . . . . . . . . . . . . . . . . . . . . . . . . . . . . . . . . . . . . .
Selecting Channels . . . . . . . . . . . . . . . . . . . . . . . . . . . . . . . . . . . . . . . . . . .
Setting Defaults . . . . . . . . . . . . . . . . . . . . . . . . . . . . . . . . . . . . . . . . . . . . .
Setting Zero Cal . . . . . . . . . . . . . . . . . . . . . . . . . . . . . . . . . . . . . . . . . . . . .
Automatic Electrical Calibration . . . . . . . . . . . . . . . . . . . . . . . . . . . . . .
Activating Zero Cal . . . . . . . . . . . . . . . . . . . . . . . . . . . . . . . . . . . . . . .
Setting Emissivity . . . . . . . . . . . . . . . . . . . . . . . . . . . . . . . . . . . . . . . . . . . .
Setting Sensor Factors . . . . . . . . . . . . . . . . . . . . . . . . . . . . . . . . . . . . . . . .
Setting Temperature Factors . . . . . . . . . . . . . . . . . . . . . . . . . . . . . . . . . . .
Turning Channels On and Off . . . . . . . . . . . . . . . . . . . . . . . . . . . . . . . . . . .
Setting the Temperature Scale . . . . . . . . . . . . . . . . . . . . . . . . . . . . . . . . . .
Setting Readings Per Second Rate . . . . . . . . . . . . . . . . . . . . . . . . . . . . . .
Setting Minimum and Maximum Alarm Points . . . . . . . . . . . . . . . . . . . . . .
Setting the Range for Analog Output Voltage or Current . . . . . . . . . . . . . .
Maintenance . . . . . . . . . . . . . . . . . . . . . . . . . . . . . . . . . . . . . . . . . . . . . . . . . . .
Periodic Calibration . . . . . . . . . . . . . . . . . . . . . . . . . . . . . . . . . . . . . . . . . . .
Inspection and Cleaning . . . . . . . . . . . . . . . . . . . . . . . . . . . . . . . . . . . . . . .
5-1
5-2
5-2
5-2
5-2
5-3
5-4
5-5
5-5
5-6
5-6
5-6
5-6
5-7
5-7
5-7
5-7
5-8
5-8
5-9
5-9
5-9
5-9
5-10
5-10
5-11
5-11
Chapter 6. Troubleshooting and Worldwide Customer
Service
Troubleshooting . . . . . . . . . . . . . . . . . . . . . . . . . . . . . . . . . . . . . . . . . . . . . . . . .
Before Calling AE Customer Service . . . . . . . . . . . . . . . . . . . . . . . . . . . . .
AE World Wide Web Site . . . . . . . . . . . . . . . . . . . . . . . . . . . . . . . . . . . . . .
Global Customer Support . . . . . . . . . . . . . . . . . . . . . . . . . . . . . . . . . . . . . . . . .
Returning Units for Repair . . . . . . . . . . . . . . . . . . . . . . . . . . . . . . . . . . . . . . . . .
Warranty . . . . . . . . . . . . . . . . . . . . . . . . . . . . . . . . . . . . . . . . . . . . . . . . . . . . . .
Authorized Returns . . . . . . . . . . . . . . . . . . . . . . . . . . . . . . . . . . . . . . . . . . .
Warranty Statement . . . . . . . . . . . . . . . . . . . . . . . . . . . . . . . . . . . . . . . . . .
viii
6-1
6-1
6-3
6-4
6-5
6-5
6-6
6-6
5709005-A
Optical Fiber Thermometer Model OR2000F
List of Figures
OFT in a plasma chamber . . . . . . . . . . . . . . . . . . . . . . . . . . . . . . . . . . . . . . . . . . . . . 2-1
Main components of an OFT system . . . . . . . . . . . . . . . . . . . . . . . . . . . . . . . . . . . . 2-2
Theory of operation using power control or coolant flow control . . . . . . . . . . . . . . . . 2-3
Front view of an OR2000F . . . . . . . . . . . . . . . . . . . . . . . . . . . . . . . . . . . . . . . . . . . . 2-5
Rear view of an OR2000F . . . . . . . . . . . . . . . . . . . . . . . . . . . . . . . . . . . . . . . . . . . . . 2-5
Example lightpipe sensors . . . . . . . . . . . . . . . . . . . . . . . . . . . . . . . . . . . . . . . . . . . . 2-7
Sheathed lightpipe sensor . . . . . . . . . . . . . . . . . . . . . . . . . . . . . . . . . . . . . . . . . . . . . 2-7
Example pyrometer sensors . . . . . . . . . . . . . . . . . . . . . . . . . . . . . . . . . . . . . . . . . . . 2-8
Optical columns . . . . . . . . . . . . . . . . . . . . . . . . . . . . . . . . . . . . . . . . . . . . . . . . . . . . . 2-8
Unit dimensions . . . . . . . . . . . . . . . . . . . . . . . . . . . . . . . . . . . . . . . . . . . . . . . . . . . . . 3-3
Rear view of unit (drawing) . . . . . . . . . . . . . . . . . . . . . . . . . . . . . . . . . . . . . . . . . . . . 3-4
RS-232Communication port RS-232 connector . . . . . . . . . . . . . . . . . . . . . . . . . . . . 4-1
Front panel controls . . . . . . . . . . . . . . . . . . . . . . . . . . . . . . . . . . . . . . . . . . . . . . . . . 4-2
Example CHANNEL selection . . . . . . . . . . . . . . . . . . . . . . . . . . . . . . . . . . . . . . . . . . 4-3
Example DEFAULTS reading . . . . . . . . . . . . . . . . . . . . . . . . . . . . . . . . . . . . . . . . . . 4-4
Example ZERO CAL reading . . . . . . . . . . . . . . . . . . . . . . . . . . . . . . . . . . . . . . . . . . 4-5
Example TEMPERATURE reading . . . . . . . . . . . . . . . . . . . . . . . . . . . . . . . . . . . . . . 4-6
Example EMISSIVITY reading . . . . . . . . . . . . . . . . . . . . . . . . . . . . . . . . . . . . . . . . . 4-7
Example SENSOR FACTOR reading . . . . . . . . . . . . . . . . . . . . . . . . . . . . . . . . . . . . 4-8
Example TEMPERATURE reading . . . . . . . . . . . . . . . . . . . . . . . . . . . . . . . . . . . . . . 4-9
Example ON/OFF reading . . . . . . . . . . . . . . . . . . . . . . . . . . . . . . . . . . . . . . . . . . . . . 4-10
Example Celsius reading . . . . . . . . . . . . . . . . . . . . . . . . . . . . . . . . . . . . . . . . . . . . . 4-11
Example CURRENT reading . . . . . . . . . . . . . . . . . . . . . . . . . . . . . . . . . . . . . . . . . . . 4-12
Example READ/SEC reading . . . . . . . . . . . . . . . . . . . . . . . . . . . . . . . . . . . . . . . . . . 4-13
Example ALARM reading . . . . . . . . . . . . . . . . . . . . . . . . . . . . . . . . . . . . . . . . . . . . . 4-14
Example OUT LO reading . . . . . . . . . . . . . . . . . . . . . . . . . . . . . . . . . . . . . . . . . . . . . 4-15
Example OUT HI reading . . . . . . . . . . . . . . . . . . . . . . . . . . . . . . . . . . . . . . . . . . . . . 4-16
Analog output terminal designations . . . . . . . . . . . . . . . . . . . . . . . . . . . . . . . . . . . . . 5-10
5709005-A
List of Figures
ix
Advanced Energy®
1-x
5709005-A
Optical Fiber Thermometer Model OR2000F
List of Tables
Electromagnetic compatibility (EMC) directives . . . . . . . . . . . . . . . . . . . . . . . . . . . . 1-4
Electromagnetic compatibility (EMC) standards . . . . . . . . . . . . . . . . . . . . . . . . . . . . 1-4
Safety directives . . . . . . . . . . . . . . . . . . . . . . . . . . . . . . . . . . . . . . . . . . . . . . . . . . . . 1-4
Safety standards . . . . . . . . . . . . . . . . . . . . . . . . . . . . . . . . . . . . . . . . . . . . . . . . . . . . 1-5
Semiconductor industry guidelines . . . . . . . . . . . . . . . . . . . . . . . . . . . . . . . . . . . . . . 1-5
User parameters . . . . . . . . . . . . . . . . . . . . . . . . . . . . . . . . . . . . . . . . . . . . . . . . . . . . 2-6
General system specifications . . . . . . . . . . . . . . . . . . . . . . . . . . . . . . . . . . . . . . . . . 3-1
Physical specifications . . . . . . . . . . . . . . . . . . . . . . . . . . . . . . . . . . . . . . . . . . . . . . . 3-4
Electrical specifications . . . . . . . . . . . . . . . . . . . . . . . . . . . . . . . . . . . . . . . . . . . . . . . 3-5
Climatic specifications . . . . . . . . . . . . . . . . . . . . . . . . . . . . . . . . . . . . . . . . . . . . . . . . 3-6
Environmental specifications . . . . . . . . . . . . . . . . . . . . . . . . . . . . . . . . . . . . . . . . . . . 3-6
RS-232 communication settings . . . . . . . . . . . . . . . . . . . . . . . . . . . . . . . . . . . . . . . . 4-16
Software commands used with an RS-232 interface . . . . . . . . . . . . . . . . . . . . . . . . 4-17
Fiber optic cable bend radius for absolute long term use . . . . . . . . . . . . . . . . . . . . . 5-4
Factory default settings . . . . . . . . . . . . . . . . . . . . . . . . . . . . . . . . . . . . . . . . . . . . . . . 5-6
Troubleshooting . . . . . . . . . . . . . . . . . . . . . . . . . . . . . . . . . . . . . . . . . . . . . . . . . . . . 6-1
Global Customer Support locations . . . . . . . . . . . . . . . . . . . . . . . . . . . . . . . . . . . . . 6-4
5709005-A
List of Tables
xi
Advanced Energy®
1-xii
5709005-A
Optical Fiber Thermometer Model OR2000F
Chapter
1
Introduction
This manual documents how to install, operate, maintain, and troubleshoot the
Sekidenko Optical Fiber Thermometer (OFT) Model OR2000F. Retain this manual
for future reference.
READ THIS SECTION!
To ensure safe operation, read and understand this manual before attempting to install
or operate this unit. At a minimum, read the safety instructions and follow the safety
practices under the heading “Safety” on page 1-3.
INTERPRETING THE MANUAL
The following sections explain the type conventions, icons, and symbols that appear
in this manual.
Type Conventions
Please note the following type conventions:
• Pin and signal names appear in capitalized italics (POWER_ON).
• New terms appear in italicized text.
• Unit labels (switches, indicators, and so on) appear in boldface text (MODIFY).
• Commands (162) and command names (setpoint) appear in boldface, lowercase
text.
5709005-A
Introduction
1-1
Advanced Energy®
Icons (Symbols)
This symbol represents important notes concerning potential harm to people, this unit,
or associated equipment. Advanced Energy® includes this symbol in Danger,
Warning, and Caution boxes to identify specific levels of hazard seriousness.
This box identifies hazards that could result in severe personal injury or
death.
This box identifies hazards or unsafe practices that could result in
personal injury.
This box identifies hazards or unsafe practices that could result in
product or property damage.
The following labels may appear on the unit:
Protective Earth ground
Earth ground
1-2
Introduction
5709005-A
Optical Fiber Thermometer Model OR2000F
CE label
Nonionizing radiation
Laser radiation
NRTL (Nationally
Recognized Testing
Laboratory)
SEMI F47 compliant
SAFETY
Do not attempt to install or operate this equipment without proper training.
• Ensure that this unit is properly grounded.
• Ensure that all cables are properly connected.
• Verify that input line voltage and current capacity are within specifications before
turning on the power supplies.
• Use proper electrostatic discharge (ESD) precautions.
• BE CAREFUL AROUND THIS EQUIPMENT.
5709005-A
Introduction
1-3
Advanced Energy®
PRODUCT COMPLIANCE AND CONDITIONS
OF USE
The following sections include information about unit compliance and certification,
including the conditions of use and installation required to be in compliance with the
standards and directives.
Safety and Compliance Directives and Standards
Certain options of this unit have been tested for and comply with the following safety
and electromagnetic compatibility (EMC) directives and standards and semiconductor
industry guidelines:
Table 1-1. Electromagnetic compatibility (EMC) directives
Directive
Description
89/336/EEC
EMC Directive (Laws relating to electromagnetic compatibility)
Table 1-2. Electromagnetic compatibility (EMC) standards
Standard
Description
EN 61000-6-2
Electromagnetic Compatibility — Generic Standards —
Immunity for Industrial Environments.
47 CFR Part 18
Code of Federal Regulations - Limits and Methods of
Measurement of Radio Interference Characteristics of Industrial,
Scientific and Medical Equipment
EN 55011
Limits and methods of measurement of radio disturbance
characteristics of industrial, scientific and medical (ISM) radiofrequency equipment
Table 1-3. Safety directives
1-4
Directive
Description
73/23/EEC
Low Voltage Directive (Laws for electrical equipment within
certain voltage limits)
Introduction
5709005-A
Optical Fiber Thermometer Model OR2000F
Table 1-4. Safety standards
Standard
Description
EN 61010-1
Safety Requirements for Electrical Equipment for Measurement,
Control, and Laboratory Use
CSA C22.2
No.1010.1
Safety Requirements for Electrical Equipment for Measurement,
Control, and Laboratory Use
Table 1-5. Semiconductor industry guidelines
Guideline
Description
SEMI F47-0200
Specification for Semiconductor Processing Equipment Voltage
Sag Immunity
This device must be installed and used only in compliance with the directives and
standards listed in addition to VDE 0113, EN 60204 (IEC 60204), and applicable
requirements.
Certification
Certain options of this product are certified by:
• CE marking - Self-declaration by AE Corporate Compliance
• EMC measurements - Verified by the AE Corporate Compliance Lab and/or an
accredited third-party lab
• SEMI guidelines - Verified by AE Corporate Compliance and/or third-party
certification
For more information, refer to the Certificate or Letter of Conformity (US) or
Declaration of Conformity (EU) accompanying the product.
Conditions of Use
To comply with the stated directives and standards, the following conditions of use
must be met:
• Use only shielded cables on the RS-232 port connectors if you are using this port.
• Install this device so that the input power connection is inaccessible to the user.
• Install and operate this device in an overvoltage category II installation only.
5709005-A
Introduction
1-5
Advanced Energy®
• Install and operate this device only in a pollution degree 2 or better environment,
which means an indoor location such as a computer room, office, or factory floor
where only nonconductive pollution occurs during operation. Occasionally, a
temporary conductivity caused by condensation occurs when the device is not
operating.
1-6
Introduction
5709005-A
Optical Fiber Thermometer Model OR2000F
Chapter
2
Theory
DESCRIPTION
Optical Fiber Thermometers (OFTs) are noncontact temperature measurement
systems used in semiconductor processing equipment (for example, RTP, CVD, Etch,
Epitaxy, PVD), crystal growth and glass processes, and heat treatment furnace
applications. A typical configuration consists of a small sapphire probe (sensor)
located just behind the wafer in the chuck, which collects near infrared radiation from
the wafer. Refer to Figure 2-1.
to controller
Figure 2-1. OFT in a plasma chamber
THEORY OF OPERATION
OFT systems consist of four principal components. See Figure 2-2.
• A sensor for optically collecting thermal radiation
• A fiber optic cable for transmission of the light signal
• Optical column to filter and detect the light
5709005-A
Theory
2-1
Advanced Energy®
• A microprocessor based controller for electronic digitization of the optical signal
0 to 10V
or 4 to
20mA
analog
output
RS-232
serial
OR 2000F
Figure 2-2. Main components of an OFT system
Based on a microprocessor, the controller can perform digital signal processing such
as filtering and converting the signals to temperature values. A system using the
OR2000F is configured with one to four optical sensors and their associated cables.
The system is shielded from electromagnetic interference, and provides the
measurement results via an alphanumeric four panel display, an RS-232 serial port, or
optional analog outputs. Operating specifications are listed Chapter 3.
The simplified diagrams that follow show the relationship of the temperature
measurement system in two different applications. In Figure 2-3, power control, the
measurement system controller provides an input signal to the semiconductor
equipment controller to control power to the chamber. Also in Figure 2-3, coolant
flow control, the input signal is used to control coolant flow to the wafer chuck. In
both examples, the sensor (installed close to the bottom of the wafer) transmits the
thermal radiation through a fiber optic cable to the controller where the thermal signal
2-2
Theory
5709005-A
Optical Fiber Thermometer Model OR2000F
is converted to an electronic signal. The signal is then sent via an RS-232 cable or
analog outputs to the semiconductor equipment controller which adjusts the power
level or coolant flow to maintain the temperature set point.
OR 2000F
OR 2000F
Figure 2-3. Theory of operation using power control or coolant flow control
5709005-A
Theory
2-3
Advanced Energy®
MAJOR COMPONENTS
OR2000F Controller
The OR2000F controller sets monitoring parameters, processes near infrared signals
from the sensor into temperature values, and formats the data for output to the front
panel display and host computer (if coupled via an RS-232 connection or analog
output). The controller is equipped with an upgradable FLASH memory. Serial output
can be set to ASCII or binary mode. Analog output is accessed via a terminal block on
the back of the controller.
The front panel contains parameter selection buttons and alphanumeric displays. The
back panel contains an on/ off switch, an RS-232 9-pin connector, subminiature-D
male cable connector, power supply connector, ports for connecting fiber optic cables,
and analog output terminal blocks.
2-4
Theory
5709005-A
Optical Fiber Thermometer Model OR2000F
There are no serviceable components in the controller unit. Software is updated by
returning the unit to the factory.
Figure 2-4. Front view of an OR2000F
Input power
connector
On/ off
switch
Optical
columns
Analog
outputs
RS-232 port
Ground
connection
Figure 2-5. Rear view of an OR2000F
5709005-A
Theory
2-5
Advanced Energy®
COMMUNICATION
The OR2000F controller provides communication with an external device, for
example, the tool controller, via an RS-232 serial interface. The user can perform both
programming and diagnostic functions over this port.
Analog control and alarm relay outputs are provided on a terminal block on the back
of the controller.
USER PARAMETERS
Table 2-1 lists user parameters.
Table 2-1. User parameters
Description
Specifications
Units of measurement
ºC, ºK, or ºF
Emissivity
0 to 1.0
Sensor factor
0 to 20.0
Temperature
Match user-selected value
Readings per second
0.1, 0.2, 0.5, 1, 2, 5, 10, 20, 50, 60, 100, 200, ASAP ( up
to 600)
Analog output range
0 V to 10 V (4 to 20mA available), 12-bit resolution
Output alarm
High and Low setpoint configurable
The analog output range is configured by the user with the min (corresponding
to 0 V or 4 mA) and max (corresponding to 10 V or 20 mA). The voltage or current
resolution is 12 bits, scaled across the minimum to maximum temperature range.
Output alarms are set at low and high trip points, with a 1° resolution, and are OR’d
(combined channel alarms). If either channel passes the low alarm point, a low alarm
signal goes to the serial port to the analog output. (Refer to AE application notes for
more details.)
Sensors
Two basic sensor types can be used.
• Lightpipe
• Pyrometer
2-6
Theory
5709005-A
Optical Fiber Thermometer Model OR2000F
LIGHTPIPE SENSORS
A lightpipe type sensor is used for applications where the sensor can be within a few
millimeters of the wafer. The lightpipe can be either sapphire or quartz. The less
expensive quartz material has temperature and strength limitations and is therefore
recommended only for laboratory or prototype applications. Lightpipe sensors are
normally installed with the sensor tip close to the wafer backside.
Figure 2-6 shows two types of lightpipe sensors, a sheathed sensor with a gas
connection for purging, and an unsheathed sensor with a smooth ferrule.
Sheathed Sensor with Purge Body
Long Bare Rod Sensor
Figure 2-6. Example lightpipe sensors
The lightpipe probe assembly consists of a sapphire rod, with or without a protective
sheath, and a metal holder. The metal holder provides means to attach the probe to the
chamber, as well as providing a connector at the end for connecting to the fiber optic
cable. Design variables include length, diameter, protective sheath, purging, and
chamber-mating mechanism. The purge option allows a purge gas to flow through the
sheath to help keep the tip of the probe as clean as possible. Figure 2-7 identifies the
sheathing and purging areas.
Sheathing around sapphire rod
Purge air inlet
Figure 2-7. Sheathed lightpipe sensor
PYROMETER SENSORS
A pyrometer is used for applications where nonintrusive temperature measurement
methods are required, for example, at a distance or through a viewpoint. However, a
pyrometer sensor collects much less light from the emitting surface than a sapphire
lightpipe sensor, making the sapphire sensor preferable if an intrusive measurement is
5709005-A
Theory
2-7
Advanced Energy®
possible. Pyrometer design variables are length, diameter, field of view, and focal
distance. Pyrometer sensors are typically installed at a chamber viewport external to
the process. Figure 2-8 shows examples of pyrometer sensors.
Figure 2-8. Example pyrometer sensors
Fiber Optic Cables
Fiber optic cables range in length from a fraction of a meter to over 20 meters. Cable
diameters are 200, 300, 600, 1000, and 1500 microns. Multiple fiber cable assemblies
used in low temperature applications and bifurcated cable assemblies are also
available. All cables have SMA type connectors on each end.
The core diameter of the cable impacts the light transmission capability of the cable.
Optical fiber diameters range from 200 microns to 1500 microns; a 200 micron cable
is used for high temperature measurement where near infrared light is abundant. For
low temperature transmissions, a 1500 micron diameter cable is generally used to
maximize light transmission. Refer to Table 5-1 on page 5-4 for the minimum bend
radius for each core diameter.
Optical Columns
Optical columns receive a light signal that is collected by the sensor and transmitted
by the fiber optic cable. A filter (bandpass) passes only a narrow range of wave
lengths (λ), those that pass go to the photo detector and transform the light into
electrical signals. The controller digitizes these signals and converts them to
temperature values. Refer to Figure 2-9.
Figure 2-9. Optical columns
2-8
Theory
5709005-A
Optical Fiber Thermometer Model OR2000F
Chapter
3
Product Specifications
SYSTEM SPECIFICATIONS
Table 3-1 provides general system specifications.
Table 3-1. General system specifications
Description
Specification
Temperature range
50 ºC to 3500 ºC (122 ºF to 6332°F) in several ranges
Filter selection range
600 nm to 1600 nm for most filters with
> 10 nm bandpass
Accuracy
Better than ± 1.5ºC (NIST traceable)
Control and repeatability
± 0.1 ºC
< 0.2 ºC drift per year
Resolution
0.001 ºC (> 20 bits)
Response
up to 600 readings per second
Channels
1 to 4
(channels can be configured individually)
Data Port
RS-232 serial communications port, 9-pin,
subminiature-D male connector
Data Format
ASCII or Binary
Power Supply
Input:100 VAC to 240 VAC input, 47 Hz to 63 Hz
Output: 5 VDC, 5 Amps, 25 Watts maximum power
Options
0 V to 10 V (or 4 to 20 mA) analog output
(screw terminals with high and low alarm contacts)
Digital display with keypad
The signal level directly contributes to the measurable temperature range: the higher
the signal, the lower the temperature that can be measured. Factors affecting the signal
level include emissivity, type of fiber optic cable, sensor type, wavelength, and stray
light.
The sensors are insensitive to RF transmission. Also, the intrusion of a probe causes
little or no effect to a tuned RF plasma chamber since the fiber optic cable has no
metal braid or shield.
5709005-A
Product Specifications
3-1
Advanced Energy®
PHYSICAL SPECIFICATIONS
Figure 3-1 illustrates the physical dimensions of the OR2000F.
Table 3-2 lists physical specifications.
3-2
Product Specifications
5709005-A
Optical Fiber Thermometer Model OR2000F
Dimensional Drawings
Figure 3-1. Unit dimensions
5709005-A
Product Specifications
3-3
Advanced Energy®
On/ Off switch
Input power
connector
Analog outputs
Optical
columns
RS-232 port
Ground
connection
Figure 3-2. Rear view of unit (drawing)
Table 3-2. Physical specifications
Description
Specification
Size
9.525 cm (H) x 9.525 cm (W) x 26.988 cm (D)
3.75" (H) x 3.75" (W) x 10.625" (D)
Weight
4 channel: 1.6 kg (3.6 lb)
2 channel: 1.5 kg (3.4 lb)
Clearance
25.4 cm (>10″ ) required in back for
communication cable connections
Serial communication cable
RS-232, 9-pin, subminiature-D male connector.
RS-232 cable lengths should be no more than
25 feet as a general guideline.a
Front panel display
8-character alphanumeric displays
a. Cables can be as long as 50 feet in low noise environments but signal degradation
can occur with longer lengths.
3-4
Product Specifications
5709005-A
Optical Fiber Thermometer Model OR2000F
ELECTRICAL SPECIFICATIONS
A single controller is powered by a 25 watt power supply.
Table 3-3 describes the electrical specifications required for the OR2000F.
Table 3-3. Electrical specifications
Description
Specification
Input voltage
100 VAC to 240 VAC input
Input frequency
47 Hz to 63 Hz
Line input current
0.7 A RMS maximum on the power supply
Output voltage
Constant 5 VDC
Output current
Maximum 5.0 A
Output power
Maximum 25 W
Operating temperature
5ºC to 40ºC (41ºF to 104ºF)
Power consumption
OR2000F 1.3 A at 5 V with digital display
OR2000F 1.5 A at 5 V with digital display and
analog outputs
The power supply can withstand a continuous short circuit condition and restricts
output proportionally to the short circuit, that is, goes into current limiting mode.
OPERATING AND PERFORMANCE
SPECIFICATIONS
The maximum reading rate for the OR2000F is dependent on the number of optical
channels in a controller, data format, and the type of data stream.
Accuracy is better than ± 1.5ºC (NIST traceable) and resolution is 0.001 ºC
(> 20 bits).
ENVIRONMENTAL SPECIFICATIONS
Table 3-4 lists climatic specifications. Table 3-5 describes the environmental
specifications of the OR2000F.
5709005-A
Product Specifications
3-5
Advanced Energy®
Table 3-4. Climatic specifications
Relative Humidity1,2,3
Air Pressure
10% to 80% up to 31ºC,
decreasing linearly to 50%
41°F to + 104°F
at 40ºC
80 kPa to 106 kPa
Temperature
Operating
Storage
5°C to + 40°C
-25°C to + 55°C 5% to 95%
3
-13°F to + 131°F +1 g per m to +29 g per m
Transportation
800 mbar to 1060 mbar
(~2000 m or 6562 feet
above sea level)
-25°C to +70°C
95%
-13°F to +158°F +60 g per m3
80 kPa to 106 kPa
3
800 mbar to1060 mbar
(~ 2000 m or 6562 feet
above sea level)
66 kPa to 106 kPa
660 mbar to 1060 mbar
(~ 3265 m or 10172 feet
above sea level)
1) Non-condensing
2) Maximum relative humidity when unit temperature
slowly increases, or when the controller directly moves
from -25ºC to +30ºC
3) Maximum absolute humidity when the controller
directly moves from +70ºC to +15ºC
Table 3-5. Environmental specifications
3-6
Description
Specification
Overvoltage
Category II
Pollution degree
2
Product Specifications
5709005-A
Optical Fiber Thermometer Model OR2000F
Chapter
4
Communication Interfaces and
Controls
COMMUNICATION
The Communication port on the OR2000F is an RS-232 port with a 9-pin, male,
subminiature-D connector. Communication is bidirectional asynchronous with a
default baud rate of 115200 bps, 7 data bits, even parity, and one stop bit.
Figure 4-1 illustrates a standard 9-pin, subminiature-D male RS-232 connector.
Figure 4-1. RS-232Communication port RS-232 connector
Communication Port Signals
Values are temperatures. Data format can be ASCII or binary depending on how the
system is configured. (Binary provides a more secure data transfer.)
Remote Communications
Remote communications is especially useful when the controller must be installed in a
location where controls are hard to use or read. When using remote communications,
the controller is connected via the RS-232 port to the tool’s OEM software. The
controller can have a blank display panel if operated exclusively by remote.
The RS-232 interface allows data streaming to an external device for programming
monitoring and output parameters. The RS-232 interface supports both ASCII and
binary data formats.
CONTROLS AND INDICATORS
The front panel on the controller has six keys to set operating modes and values.
5709005-A
Communication Interfaces and Controls
4-1
Advanced Energy®
• Menu select keys (CH, INPUT, and OUTPUT)
• Directional up and down scroll keys
• A parameter ENTER key
Depending on the number of channels, the OR2000F has two to five 8-character
alphanumeric displays.
When the temperature reading is below or above the lower or upper limits for a
channel, the display value is truncated to two or three digits, for example, 50 or 1200
is displayed rather than 50.000 or 1200.00. A greater than or less than indicator is then
used to indicate magnitude (for example, <50ºC or >1200ºC).
It takes 60 minutes for the OR2000F to thermally stabilize after being turned on
before reaching specified performance levels.
Figure 4-2. Front panel controls
The menu select keys are CH, INPUT, and OUTPUT. Use the up and down direction
keys to increase and decrease values. Holding either key down increases the scroll
speed. Use the ENTER key to confirm and store set values.
CH Key
Use the CH key to toggle between the following parameters.
• Channel number
• DEFAULT
4-2
Communication Interfaces and Controls
5709005-A
Optical Fiber Thermometer Model OR2000F
• ZERO CAL
The alphanumeric display reads either CH #n; DEFAULTS; or ZERO CAL.
Pressing the CH key a second time returns the unit to normal operation and the
temperature (in ºC, units K, or ºF) or CURRENT (if enabled) appears on the bottom
line.
Pressing the ENTER key displays the selected channel. Once the channel is selected,
use the INPUT and OUTPUT keys to set other parameters. Figure 4-3 shows how the
display appears before enabling Channel #1.
Figure 4-3. Example CHANNEL selection
5709005-A
Communication Interfaces and Controls
4-3
Advanced Energy®
When the DEFAULTS is activated using the ENTER key, all programmable values
return to the values set at the factory. The display in Figure 4-4 shows how the display
looks before activating the DEFAULTS parameter.
Figure 4-4. Example DEFAULTS reading
4-4
Communication Interfaces and Controls
5709005-A
Optical Fiber Thermometer Model OR2000F
The ZERO CAL command disconnects inputs to the amplifier circuit and corrects for
offset. Non-temperature values appear briefly on the display during the ZERO CAL
operation. Once the operation is complete, normal operation resumes. See Figure 4-5.
Figure 4-5. Example ZERO CAL reading
5709005-A
Communication Interfaces and Controls
4-5
Advanced Energy®
Figure 4-6 is a typical display in normal operation for a TEMPERATURE setting
with degrees Celsius as the temperature scale.
Figure 4-6. Example TEMPERATURE reading
4-6
Communication Interfaces and Controls
5709005-A
Optical Fiber Thermometer Model OR2000F
INPUT Key
The INPUT key is used to toggle between the following parameters:
• EMISS
• SENSOR FACTOR
• TEMP
• ON or OFF.
The Channel 4 display shows the current value for the parameter.
Note: Before changing an INPUT parameter, be certain the correct channel is
enabled. Use the CH key to select the correct channel.
Note: The EMISS, SENSOR and TEMP parameters are all calibration commands.
Changing any of these parameters can impact the accuracy of the readings.
EMISS Parameter
When toggled to EMISS, the current emissivity value for the selected channel appears
on the fourth line of the display. Use the up or down keys to adjust the emissivity
level. The #n in the parameter display refers to the channel number. Pressing ENTER
confirms and stores the newly set value. See Figure 4-7.
Figure 4-7. Example EMISSIVITY reading
5709005-A
Communication Interfaces and Controls
4-7
Advanced Energy®
SENSOR FACTOR Parameter
When toggled to SENSOR, the current sensor factor value for the selected channel’s
fiber optic cable and probe appears on the fourth line of the display. Use the up or
down arrow keys to adjust the sensor factor value. The #n in the parameter display
refers to the channel number. Pressing ENTER confirms and stores the new sensor
factor value. See Figure 4-8.
Figure 4-8. Example SENSOR FACTOR reading
Note: This function is only required if a new sensor and cable are installed on the
system or if the value has been inadvertently changed in the controller memory.
TEMP Parameter
When toggled to TEMP, the fourth line of the display shows the maximum
temperature value possible for the selected channel, or the last temperature value used.
The direction keys set the temperature measured to agree with a known temperature, a
temperature measured by another instrument, a process temperature, a perceived
temperature, or any arbitrary temperature.
4-8
Communication Interfaces and Controls
5709005-A
Optical Fiber Thermometer Model OR2000F
The #n in the parameter display refers to the channel number. See Figure 4-9.
Figure 4-9. Example TEMPERATURE reading
Pressing ENTER confirms and stores the newly set value. You can them confirm the
associated change to the sensor factor by scrolling the INPUT parameter.
Note: Adjusting the TEMP parameter is a recalibration procedure and must be
performed with caution. Recalibration should only be performed as a
controlled procedure with known temperature standards. Abnormally low or
high sensor factors may result due to environmental conditions such as strong
light.
5709005-A
Communication Interfaces and Controls
4-9
Advanced Energy®
ON or OFF Parameter
When toggled to ON or OFF, the selected channel can be made active or inactive. The
default state for all channels is on. A channel is activated by pressing the up arrow
key; a channel is deactivated by pressing the down arrow key. When OFF is selected,
the output value is replaced by “--” for that channel. See Figure 4-10.
Figure 4-10. Example ON/OFF reading
OUTPUT Key
Output functions affect all channels; it is not possible to select different output formats
for individual channels. The OUTPUT key is used to toggle between the following
parameters:
• DEG C
• DEG K
• DEG F
• CURRENT (if enabled)
• READ/SEC
In addition, controllers configured for analog outputs with an optional analog
converter also have the following parameters:
• ALM LO #n
• ALM HI #n
4-10
Communication Interfaces and Controls
5709005-A
Optical Fiber Thermometer Model OR2000F
• OUT LO #n
• OUT HI #n
DEG Parameter
When toggled to DEG C, DEG K, or DEG F. pressing the ENTER key activates this
temperature scale. Data is displayed based on the selected units, degrees Celsius,
Kelvin, degrees Fahrenheit, or amperes in current. For example, if DEG C is selected,
the display reads in degrees Celsius. If DEG F is selected, the display reads in degrees
Fahrenheit. If DEG K is selected, the temperature is in units Kelvin. The output at the
RS-232 connector is adjusted to produce values in these units. See Figure 4-11.
Figure 4-11. Example Celsius reading
CURRENT Parameter
CURRENT output is a special mode used to examine the electrical output of the
photodetectors. When toggled to CURRENT, the box will display a value in scientific
notation which represents the measured photocurrent, in amperes, of each photodiode.
5709005-A
Communication Interfaces and Controls
4-11
Advanced Energy®
To return the box to normal temperature modes, select the DEG C option from the
OUTPUT menu. See “OUTPUT Key” on page 4-10 for information on setting the
DEG C parameter.
Figure 4-12. Example CURRENT reading
READ/SEC Parameter
When toggled to READ/SEC, use the up or down keys to set the rate for readings per
second. The rate will show on the fourth line of the display. The numerically
selectable range is from 0.1 to 200. Above 200, the unit reads in ASAP mode, which
4-12
Communication Interfaces and Controls
5709005-A
Optical Fiber Thermometer Model OR2000F
equals the maximum number of readings per second up to 600 readings. Pressing the
ENTER key confirms then stores the value. The READ/SEC selection is applied to
all channels on the controller. See Figure 4-13.
Figure 4-13. Example READ/SEC reading
When a high reading rate is selected (for example, ≥ 20 Hz for current mode or 50 Hz
for temperature mode), the display values are replace with “------”. The alphanumeric
display refresh rate cannot keep up with the read rate at these levels.
5709005-A
Communication Interfaces and Controls
4-13
Advanced Energy®
ALM LO and ALM HI Parameters
ALM LO # and ALM HI # are relay trip points. Toggling to ALM LO # or
ALM HI # sets the low or high temperature values used to trigger systems alarm
relays. Use the up or down arrow keys to set values and the ENTER key to store
values. See Figure 4-14.
Figure 4-14. Example ALARM reading
Note: This parameter is available only for controllers configured for analog outputs.
OUT LO or OUT HI Parameter
OUT LO or OUT HI set the analog output range. When toggled to OUT LO or OUT
HI, the respective low or high end of the temperature range of either an analog output
voltage or current can be set. The range is 12 bits, and the standard analog range is 0 V
4-14
Communication Interfaces and Controls
5709005-A
Optical Fiber Thermometer Model OR2000F
to 10 V. The digital display range does not change and continues to display the full
range of the controller. Use the up or down keys to set values and the ENTER key to
store them. See Figure 4-15 and Figure 4-16.
Note: This parameter is available only for controllers configured for analog output.
Figure 4-15. Example OUT LO reading
5709005-A
Communication Interfaces and Controls
4-15
Advanced Energy®
Figure 4-16. Example OUT HI reading
RS-232 INTERFACE
The RS-232 interface is used to command the controller from a remote location and
transmit measured temperature data to a host computer. Table 4-1 lists the
communication settings for the RS-232 interface.
Table 4-1. RS-232 communication settings
Setting
Values in
ASCII
Values in
Binary
Baud Rate
115,200
115,200
Data Bits
7
8
Parity
Even
None
Stop Bits
1
1
All the front panel controls on the controller are duplicated in the RS-232 interface.
Setting parameters on the controller front panel can take several steps, however the
same task is performed by a single RS-232 command.
4-16
Communication Interfaces and Controls
5709005-A
Optical Fiber Thermometer Model OR2000F
Table 4-2 describes RS-232 interface commands. A space is required between the
command and the associated parameter. Input parameters with standard base
nonexponential floating point format. Bracketed variables, such as <n> require an
entry. For example, EMISS <CH> <VALUE> can be Emiss 1 0.99. The command
can be upper or lower case, and can have one or two spaces but must have at least one
space between the variable and value.
.
Table 4-2. Software commands used with an RS-232 interface
Command
Action
Front Panel Menu
Equivalent
DEF
Resets controller to values set in factory.
DEFAULT
ZERO CAL
Measures and removes electrical offset and
measures detector temperature.
ZERO CAL
Input Menu Equivalent Commands
EMISS <CH>
<VALUE>
Sets the emissivity for selected channel.
Values can range between 0.0 and 1.0 with up
to 0.0001 precision.
EMISS
Example: EMISS 1 0.99
SENSOR <CH>
<VALUE>
Sets the sensor factor or coefficient for the
selected channel. The value can increment or
decrement in 0.001 steps and can vary from 0
to 20.
SENSOR
Example: SENSOR 2 1.2
TEMP <CH> >
<VALUE>
Enters a known or arbitrary temperature value.
The OFT changes the sensor factor internally
so that incoming signal is interpreted as the
entered value. Calculated sensor factor can
be seen with the QUERY SENSOR <CH>
command.
TEMP
Example: TEMP 2 1286
ON <CH>
Turns on indicated channel on digital display.
ON
Example: ON 1
OFF <CH>
Turns off indicated channel on digital display.
OFF
Example: OFF 1
Output Menu Equivalents
DEG C
Sets all displayed channels and RS-232 output
to degree Celsius mode.
5709005-A
Communication Interfaces and Controls
DEG C
4-17
Advanced Energy®
Table 4-2. Software commands used with an RS-232 interface (Continued)
Command
Action
Front Panel Menu
Equivalent
DEG K
Sets all values on displayed channels and RS232 output to degree Kelvin mode.
DEG K
DEG F
Sets all displayed channels and RS-232 output
to degree Fahrenheit mode.
DEG F
CURRENT
Reads the measured photocurrent in amperes
of each photodiode.
CURRENT
OUT <number of
readings>
Initiates transmission of several readings at
the current rate. Number of readings can vary
from 1 to 50,000. Transmission stops when set
value is reached. The command Out 0 stops
transmission.
No front panel action
for this command.
Example: OUT 10000
OUT 0 (stops transmission)
READINGS PER
SEC <VALUE>
Sets the readings per second and
RS-232 I/O rates.
READ/SEC
Example: READINGS PER SEC 10
READINGS PER
SEC ASAP
Sets the reading rate and RS-232 I/O rate to
maximum value of the unit.
RELAY MIN <CH>
<VALUE>
Sets the low alarm relay trip point for the
specified channel.
ALM LO#
RELAY MAX <CH>
<VALUE>
Sets the high alarm relay trip point for the
specified channel.
ALM HI#
ANALOG MIN
<CH> <VALUE>
Sets the temperature reading that corresponds
to the minimum output voltage or current for
the specified channel.
OUT LO
Example: ANALOG MIN 4 1000
ANALOG MAX
<CH> <VALUE>
Sets the temperature reading that corresponds
to the maximum output voltage or current for
the specified channel.
OUT HI
Example: ANALOG MAX 3 1500
NORMAL
DISPLAY
Resets front panel displays to show measured
temperature and current display mode.
Cancels any user input in process. Has same
effect as pressing key on front panel.
STREAMING
OUTPUT ON
Starts continuously sending output data.
4-18
Communication Interfaces and Controls
ENTER
5709005-A
Optical Fiber Thermometer Model OR2000F
Table 4-2. Software commands used with an RS-232 interface (Continued)
Command
Action
STREAMING
OUTPUT OFF
Stops streaming.
LOCK
Locks user out of front panel parameters. If a
user attempts to press a front panel key,
LOCKED appears on the display. Locked
mode can be disabled by either an RS-232
UNLOCK command or by turning the unit off
then back on.
UNLOCK
Reestablishes front panel control.
DUAL
Starts dual wavelength output if controller is
configured that way.
SINGLE
Starts single wavelength output if controller is
configured that way.
QUERY EMISS
<CH>
Returns emissivity reading for selected
channel.
QUERY SENSOR
<CH>
Returns sensor factor reading for selected
channel.
QUERY POWERON
HOURS
Returns the number of hours the OR2000F has
been powered on.
AUTOSAVE ON
Forces all settings to be stored in FLASH so
they are retained when the OR2000F is power
cycled (default).
AUTOSAVE OFF
Turns off storing parameters in FLASH. Use
this mode when sending a rapid sequence of
commands to the OR2000F.
5709005-A
Communication Interfaces and Controls
Front Panel Menu
Equivalent
4-19
Advanced Energy®
SERIAL OUTPUT DATA
Serial output data for ASCII is
435.2 512.3
435.8 500.9
and so on, one space between the numbers, followed by a carriage return and line feed
character.
In binary, the data is formatted with a four byte prefix 00 00 C0 FF, which is IEEE
code for "indeterminate," then four bytes for each channel in IEEE 754 floating point
format, then 2 bytes of checksum. For example, 10 bytes for a one-channel OR2000F,
14 bytes for a two-channel, total per message. The byte order is least significant bytes
first.
The following example is a response in binary after an OUT 1 command to a
2-channel OR2000F. (spaces added, bytes in hexadecimal format for clarity):
00 00 C0 FF 1E F0 DC 43 A5 D5 D6 43 35 4D
The following example is hex format. Channel 1 is 0x43DCF01E, which is IEEE 754
code for 441.8759. However, note that the channel 1 data is output with low byte first.
Channel 2 is 0x43D6D5A5, which is IEEE 754 code for 429.6691. The last two bytes,
0x4D35, are the last two bytes of the checksum.
0xFFC0 + 0x0000 + 0x43DC + 0xF01E + 0x43D6 + 0xD5A5 = 0x34D35, and
then the third byte is discarded, leaving 0x4D35
The 0x is C language syntax identifying the number as hexadecimal format. The data
is added together, 16 bits at a time, and must equal the checksum. A one-channel
OR2000F has one channel of data instead of two with only 10 bytes total instead of
14 bytes.
4-20
Communication Interfaces and Controls
5709005-A
Optical Fiber Thermometer Model OR2000F
Chapter
5
Installation, Startup, and
Operation
UNPACKING
Before unpacking the OR2000F, have the following supplies at hand:
• Isopropyl alcohol or methanol
• Clean room swabs
• Laser sighting tool for aligning pyrometer sensors
Use the following procedure to unpack and inspect OR2000F components.
1. Inspect the shipping carton for evidence of damage or abusive handling. If
damaged, contact Advanced Energy immediately.
When unpacking OR2000F components, be very careful when handling
the cartons containing fragile sensors and the controller. The controller
is a precision instrument with electro-optical components. Rough
handling can cause the sapphire rod on the sensor to break.
2. Packaging can contain the following items. (Sensors and cables are usually
ordered separately.)
a. Controller
b. Sensor(s)
c. Fiber optic cable(s)
d. Power supply
e. Power supply cable
f. RS-232 cable
g. Panel mounting brackets (2) for mounting the controller to a flat surface with
a 1/4 DIN opening
If a part is missing or damaged, contact Advanced Energy immediately.
5709005-A
Installation, Startup, and Operation
5-1
Advanced Energy®
INSTALLATION
Installing the Controller and Power Supply
Use the following procedure to install the controller and power supply. The controller
is packaged in a 1/4 DIN housing.
1. When installing the controller, choose a location that
4 Necessitates the fewest bends in the fiber optic cable and
4 Provides the largest radius for any bends in the cable. Sharp bends create a
mechanical stress on the cable. Bending radius is dependent on the fiber core
diameter. Refer to Table 5-1 on page 5-4 for the minimum bend radius for each
core diameter.
Sharp bends can also cause loss of optical transmission and invalidate the
factory calibration.
Review fiber optic cable installation instructions before selecting the location for
the controller.
2. Install the controller and power supply. Leave the protective caps on the controller
ports until the fiber optic cables are connected.
The power supply MUST be installed so it can dissipate heat. Ambient air
is sufficient to cool the unit provided the space is not confining.
Installing Sensors
The following instructions are general instructions to install both lightpipe and
pyrometer sensors. Because sensors are custom fabricated, every installation is unique
to the customer’s system; however, these instructions contain appropriate guidelines
and precautions for all installations.
INSTALLING LIGHTPIPE SENSORS
The installation of lightpipe sensors can vary significantly between chuck designs and
the physical arrangement of hardware adjacent to the chuck. Despite the differences,
three important factors must be observed when installing lightpipe sensors.
• The chuck and sensors must be clean.
• The sensors must be positioned as precisely as possible.
5-2
Installation, Startup, and Operation
5709005-A
Optical Fiber Thermometer Model OR2000F
• Fragile sensors must be handled with care. Leave the protective caps on as long
as possible.
Use the following procedure to install lightpipe sensors.
1. Verify that the sensor mounting opening in the chuck is free of all contaminants
and obstructions.
2. Clean the openings in the chuck with the appropriate agent or purge method.
The tip of the sensor is fragile. Be careful when handling the sensor. Any
chips or nicks in the tip render the sensor useless.
If a sensor must be replaced, the cable matched to the sensor must also
be returned to Advanced Energy so both the sensor and cable can be
recalibrated as a set.
3. Clean the sapphire sensor tip with isopropyl alcohol or methanol using clean room
swabs.
4. Install the sensors, positioning them as precisely as possible.
The sensor must be installed with the tip of the sensor no more than 2 mm from
the wafer without touching. Advanced Energy also recommends that the sensor
be installed as perpendicular to the wafer target as possible.
Sometimes it is difficult to see or measure the distance between the top of the
chuck and the tip of the sensor. In these cases, the gap must be determined by
calculating the value using dimensional data off the sensor and the chuck. Every
attempt must be made to use fixed reference points such as a land or collar. Poor
reference points include threads and should not be used.
INSTALLING PYROMETER SENSORS
Three important factors must be observed when installing pyrometer sensors.
• Both the viewport window through which the sensor views the object and the
sensors must be clean.
• Sensors must be positioned as precisely as possible.
• Although it does not affect sensor installation, viewport transmission data (at the
filter wavelength) is required for establishing sensor factors. Advanced Energy
recommends contacting the viewport manufacturer directly for this information.
Use the following procedure to install Pyrometer Sensors.
1. Clean the viewport window with the appropriate agent or purge method.
5709005-A
Installation, Startup, and Operation
5-3
Advanced Energy®
2. Clean the sensor lens with isopropyl alcohol or methanol using clean room swabs.
3. Install the sensors mounting them so they are pointed directly at and are as
perpendicular to the target as possible. Position the sensors as precisely as
possible. Sensors must have a clear line of sight with no obstructions.
To help align the sensor, connect the fiber optic cable to the sensor and shine a
light into the cable while viewing the light spot on the target. Align the sensor as
necessary.
Installing Fiber Optic Cables
Three important factors are involved when installing the fiber optic cables.
• Cables must connect to their matching sensors.
• Protective caps must remain on the cables until cleaned and connected.
• Cable ends must be clean.
• Make every attempt to minimize the number of bends in the fiber optic cables and,
even more important, ensure that bends have as large a radius as possible.
Sharp bends create a mechanical stress on the cable. Bending radius is dependent
on the fiber core diameter. Refer to Table 5-1 on page 5-4 for the minimum bend
radius for each core diameter. Sharp bends can also cause loss of optical
transmission and invalidate the factory calibration.
Use the following procedure to install fiber optic cables:
1. Clean cable ends with isopropyl alcohol or methanol using clean room swabs.
HANDLE CABLE ENDS CAREFULLY to prevent damage. The cable must
be replaced if damaged. Because the cable and sensors are calibrated as
a unit, the sensor must be returned to Advanced Energy so that a new
cable can be recalibrated to the sensor.
2. Connect the cables to the correct sensors and to the controller.
Table 5-1 lists the values for the minimum bend radius as a function of core diameter.
Table 5-1. Fiber optic cable bend radius for absolute long term use
5-4
Core Diameter
Minimum Bend Radius
300 µm
5 cm
600 µm
10 cm
Installation, Startup, and Operation
5709005-A
Optical Fiber Thermometer Model OR2000F
Table 5-1. Fiber optic cable bend radius for absolute long term use
Core Diameter
Minimum Bend Radius
1000 µm
17 cm
1500 µm
25 cm
Installing the RS-232 Cable
To install the RS-232 cable, connect the controller to the host computer using the
RS-232 cable provided with the shipment. The communications settings for the
OR2000F are 115200 Baud and no flow control; serial settings depend on the
configuration:
ASCII
7E1 for 7 data bits, Even parity, 1 stop bit
Binary
8N1 for 8 data bits, No parity, 1 stop bit
STARTUP AND CHECKOUT
Use the following procedure to start the OR2000F:
1. Allow at least 60 minutes for the controller to warm up after powering on.
Note: To review controls and indicators, refer to Chapter 4.
2. Press the CH key on the controller until the correct channel number appears on
alphanumeric display, then press ENTER.
3. Note the sensor factors for each cable.
4. Press the INPUT key on front panel until Sensor 1 is displayed and verify that
number agrees with the factor marked on the cable.
If the sensor factor is wrong, use the up or down arrow keys to set the correct
value, then press ENTER. If the sensor factor is correct, repeat this step for the
other channel, if applicable.
5. Set the Reading Rate to the desired level. See “Setting Readings Per Second Rate”
on page 5-9.
6. Monitor system operation. If a problem arises, refer to the Troubleshooting
section in Chapter 6.
7. Load a wafer, set all applicable parameters to create a typical heat situation and
begin measuring.
5709005-A
Installation, Startup, and Operation
5-5
Advanced Energy®
OPERATION
This section describes how to use the control keys and set operating parameters
including selecting channels and setting all input and output parameters.
Using Control Keys
With the exception of the ENTER key, all keys scroll rapidly through preset settings
when held down. Advanced Energy recommends pressing the CH, INPUT, and
OUTPUT keys repetitively to change the settings one position at a time rather than
holding these keys down.
Selecting Channels
All menu selections and some of the output selection parameters are specific to a
given channel. Therefore, the relevant channel must be selected first by pressing the
CH key until the correct channel number appears on the display. Then press the
ENTER key to confirm and store the change.
Setting Defaults
When setting defaults, all user-selected sensor factors including
emissivity, alarm, and analog output settings for all channels are lost and
MUST be reentered. Use this function with caution.
Setting defaults returns the controller settings to the following factory-set states. See
Table 5-2.
Table 5-2. Factory default settings
5-6
Default
Setting
Deg
C
Emissivity
1.0
Sensor
1.0
Channel
On
Readings per Second
5 to 20 depending upon customer requirements
Alarm Min
Temperature range minimum
Alarm Max
Temperature range maximum
Installation, Startup, and Operation
5709005-A
Optical Fiber Thermometer Model OR2000F
Table 5-2. Factory default settings (Continued)
Default
Setting
Analog Scale LO
Measurable minimum temperature range output
Analog Scale HI
Measurable maximum temperature range output
To set defaults, press the CH key until DEFAULTS appears on the display, then press
ENTER.
Setting Zero Cal
AUTOMATIC ELECTRICAL CALIBRATION
When the controller is first turned on, the controller automatically activates an
electrical calibration that removes as much background noise as possible.
To recalibrate the unit manually, refer to the “Activating Zero Cal” for information on
readings per second limitations.
The controller dissipates 6 to 10 watts. After about 60 minutes, the controller reaches
thermal stability. For optimum low temperature performance, Advanced Energy
recommends performing a Zero Cal once every hour.
ACTIVATING ZERO CAL
In situations when rapid measurement is required but there are pauses of 10 seconds or
greater in length between measurement cycles, the ZERO CAL function can be used
to recalibrate all channels in the controller.
To set ZERO CAL, press the CH key until ZERO CAL appears on the display, then
press ENTER. It takes approximately 12 seconds to perform the electrical offset
calibration.
Setting Emissivity
The emissivity of an object in view can vary from 0.0001 to 1.0000.
To set the emissivity value, press the INPUT key until EMISS appears on the display.
Use the direction keys to scroll to the correct value, then press ENTER to store the
new value.
Note: Note that emissivity values for blackbody objects are usually set at 1.000 and
are not adjusted.
5709005-A
Installation, Startup, and Operation
5-7
Advanced Energy®
Setting Sensor Factors
The sensor factor (fiber optic cable/sensor coefficient values) reflects the light
gathering ability of the sensor and the transmission from the sensor over the fiber
optic cable. The sensor factor is calculated at the factory and is marked on the fiber
optic cable tag. Remember that the cable is calibrated with the sensor as a unit.
Change the sensor factor only if a new sensor and cable have been changed, or if the
correct value was inadvertently changed, or if the defaults were reset.
Lightpipe sensors usually have coefficients near 1.0. Pyrometer sensor coefficients are
typically smaller with values ranging from 0.2 to 2.0.
To set the sensor value, locate and note the sensor factor on the fiber optic cable tag.
Use the CH key to select the appropriate channel. Press the INPUT key until
SENSOR appears on the display. Use the direction keys to increment or decrement
until the value noted on the cable tag appears. Values increment or decrement in 0.001
and usually vary from 0.2 to 2. Press ENTER to confirm and store the value.
Setting Temperature Factors
Setting temperature factors can make the measured temperature equal to any of the
following temperatures:
•
A known temperature
• The temperature measured by another instrument
• A process temperature
• A perceived temperature
• Any arbitrary temperature
Use the TEMP function with caution because the temperature factor can
be modified so the displayed value does NOT reflect the correct
temperature of the object being viewed. See “Setting Defaults” on
page 5-6.
To set the temperature value, press the INPUT key until TEMP appears on the
display. Use the direction keys to increment or decrement the displayed value. Note
that the value increments or decrements in 0.01 steps. Press ENTER to confirm and
store the value.
5-8
Installation, Startup, and Operation
5709005-A
Optical Fiber Thermometer Model OR2000F
Turning Channels On and Off
Channels can be turned on and off with the INPUT and direction keys.
When the INPUT key displays ON, pressing the down key followed by the ENTER
key turns the channel off. Conversely, when the INPUT key displays OFF, pressing
the up key followed by the ENTER key turns the channel on.
Setting the Temperature Scale
The controller displays measured temperature in either Celsius, Fahrenheit, or Kelvin.
Press the OUTPUT key to select the scale to DEG C, DEG K, DEG F, or
CURRENT (if enabled). Note that the scale set previously also appears on the
display. Press ENTER to confirm and store the new scale.
Setting Readings Per Second Rate
Set the Readings per second parameter using the OUTPUT key. The rate per second
can vary between 0.1 and ASAP, which equals the maximum (600) readings per
second.
The read rate is not equal to the measurement rate which is held constant by default at
200 Hz. The slower the read rate, the more measurements that are made and averaged.
Measurements are averaged between output readings.
When the readings per second parameter is set to a value faster than the display can
handle, C -> RS232 appears on the display. Readings are only available at the RS-232
output when the read rate is set to > 20 Hz.
To set the scale, press the OUTPUT key until READ/SEC appears on the display.
Use the direction keys to increment or decrement the value. Press ENTER to confirm
and store the value.
Setting Minimum and Maximum Alarm Points
To set alarm points, press the OUTPUT key until either ALM LO # or ALM HI #
appears on the display. Use the direction keys to increment or decrement the display
until the correct value appears. Press ENTER to confirm and store the value. Repeat
this step to set both the minimum and maximum values.
5709005-A
Installation, Startup, and Operation
5-9
Advanced Energy®
Setting the Range for Analog Output Voltage or Current
To set the temperature range for analog output voltage or current, use the OUTPUT
menu. The analog output voltage is available for a system that requires a 0 V to 10 V
input that is proportional to the measured temperature. Typically, this is a stripchart.
The analog output current is available for a system that requires a 4 mA to 20 mA
input that is proportional to the measured temperature.
Figure 5-1. Analog output terminal designations
To set the temperature range, press the OUTPUT key until either OUT LO or OUT
HI appears on the display. Use the direction keys to increment or decrement until the
correct value appears. Press ENTER to confirm and store the value. Repeat this step
until both low and high values are set.
Note: OUT LO may be set up to 100ºC lower than the instrument’s minimum
measurable temperature, and OUT HI up to 100ºC higher than the maximum
measurable temperature. This feature provides a means to identify when the
temperature is outside the measurable range.
MAINTENANCE
Maintenance on the OR2000F is limited to periodic calibration and inspection and
cleaning.
5-10
Installation, Startup, and Operation
5709005-A
Optical Fiber Thermometer Model OR2000F
Periodic Calibration
Advanced Energy recommends checking the OR2000F for proper calibration every
two years. Contact Advanced Energy for calibration recommendations. See “Global
Customer Support” on page 6-4.
Inspection and Cleaning
Contamination and damage to sensors or fiber optic cables can severely impact
measurement accuracy. Advanced Energy recommends cleaning with dry fiber
cleaners such as CLETOP.
Visually inspect the sensors and, if necessary, use some type of magnification to
determine if there are any scratches or nicks. This is especially important if the sensor
tip has been subjected to broken wafers.
If a sensor has damage, both the sensor and its companion cable must be returned to
Advanced Energy for repair or replacement. If a cable is damaged, both the cable and
its companion sensor must be returned to Advanced Energy for repair or replacement.
If a sensor must be cleaned, remove the sensor (reverse the installation instructions),
then clean with isopropyl alcohol or methanol using clean swabs, and replace.
5709005-A
Installation, Startup, and Operation
5-11
Advanced Energy®
5-12
Installation, Startup, and Operation
5709005-A
Optical Fiber Thermometer Model OR2000F
Chapter
6
Troubleshooting and Worldwide
Customer Service
This chapter contains basic troubleshooting information, as well as procedures for
returning a unit for repair.
TROUBLESHOOTING
The OR2000F controller is intelligent, rugged and rarely experiences malfunctions.
As a result, problems can usually be attributed to such things as not allowing the
controller to warm up completely, stray light picked up by the sensor, incorrect sensor
factor values, dirty or damaged sensors, bent or broken cables, etc.
Before Calling AE Customer Service
Before calling AE Customer Service, perform the following steps or procedures in the
troubleshooting guide in Table 6-1.
Table 6-1. Troubleshooting
Symptom
Probable Cause
Remedy
System is turned on and the
display shows at the top and
RS-232 at the bottom line.
System is set to read
measurements faster than can
be updated on display.
Change reading rate to a
slower value or view output in
software
Temperature reading does
not match the thermocouple
installed by the customer.
Controller not warmed up
Allow 60 minutes to warm up
Controller out of calibration
Use Zero Cal function and
recheck operation (See section
“Setting Zero Cal” on
page 5-7)
Incorrect emissivity
Check for correct target
emissivity, reenter value and
recheck operation
(Continued on next page)
5709005-A
Troubleshooting and Worldwide Customer Service
6-1
Advanced Energy®
Table 6-1. Troubleshooting (Continued)
Symptom
Probable Cause
Remedy
(Continued from previous
page)
Stray light in optical path
Check for stray light and
correct target environment
Incorrect sensor factors
Check sensor factor on fiber
optic cable, reenter value if
wrong. See “Setting Sensor
Factors” on page 5-8.
Wrong fiber optic cable
connected to sensor connector
on back of controller.
Contaminated sensor tip or
lens.
Follow cleaning instructions
found in “Inspection and
Cleaning” on page 5-11, then
re check operation.
Spot being measured has
nonuniform temperature or
emissivity.
Select different spot.
Inconsistent measurements
Numerical aperture altered by
extreme fiber optic cable
movement.
Fix cable to prevent extreme
movement, and provide
adequate strain relief.
Measurement value
trending downward
Contaminated sensor tip or
lens.
Follow cleaning instructions
then re-check operation. See
“Inspection and Cleaning” on
page 5-11.
Controller out of calibration.
Use Zero Cal function and
recheck operation. See
“Setting Zero Cal” on
page 5-7.
6-2
Troubleshooting and Worldwide Customer Service
5709005-A
Optical Fiber Thermometer Model OR2000F
Table 6-1. Troubleshooting (Continued)
Symptom
Probable Cause
Remedy
With new sensor and cable
installed, temperature
readings inconsistent with
old readings
New sensor factors not entered.
Check sensor factor on fiber
optic cable then reenter the
correct values. See “Setting
Sensor Factors” on page 5-8.
RS232 set up but not
functioning
Improper setup
Refer to RS232 setup. See
“RS-232 Interface” on
page 4-16.
System appears unstable at
bottom of temperature
range
This problem can be an artifact
at low levels of low
temperature (fluctuation of two
to three degrees can be normal
depending on system
configuration).
Set lower threshold to higher,
more stable value. See
“Setting Temperature
Factors” on page 5-8.
Chip or nick in sapphire tip
Current sensor factor not
usable; perform calibration if
known temperature source is
available.
Replace sensor and cable
AE World Wide Web Site
For additional product information and troubleshooting procedures, consult Advanced
Energy’s World Wide Web site at
http://www.advanced-energy.com
5709005-A
Troubleshooting and Worldwide Customer Service
6-3
Advanced Energy®
GLOBAL CUSTOMER SUPPORT
Please contact the Vancouver office or other AE Global Customer Support location
for technical support. Contact information is listed in Table 6-2.
Note: When calling AE Global Customer Support, make sure to have the unit serial
number and part number. These numbers are available on unit labels.
Table 6-2. Global Customer Support locations
Office
AE, World Headquarters
1625 Sharp Point Drive
Fort Collins, CO 80525 USA
Note: For returns and repairs,
please call Global
Customer Support to get
the correct shipping
address.
Contact
Phone (24 hrs/day, 7 days/week):
800.446.9167 or
970.221.0108
Fax (M–F, 7:00 am – 5:30 pm MST):
970.407.5981
Email: [email protected]
(We will respond to email by the next
business day.)
Note: For customers outside the US, please
contact your local AE office.
6-4
AE, GmbH
Phone: 49.711.779270
Raiffeisenstrasse 32
D-70794 Filderstadt
(Bonlanden) Germany
Fax: 49.711.7778700
AE, Japan KK
Phone: 81.3.32351511
TOWA Edogawabashi Bldg. 347
Yamabuki-cho Shinjuku-ku
Tokyo 162-0801 Japan
Fax: 81.3.32353580
AE, Korea Ltd.
Phone: +82.31.777.9191
#701 Sicox Tower
513-4, Sangdaewon-dong,
Chungwon-gu
Sungnam-si, Kyunggi-do
Korea, 462-120
Fax: +82.31.777.9195
AE, United Kingdom
Phone: 44.1869.320022
Unit 5, Minton Place,
Victoria Road
Bicester, Oxon
OX26 6QB UK
Fax: 44.1869.325004
Troubleshooting and Worldwide Customer Service
5709005-A
Optical Fiber Thermometer Model OR2000F
Table 6-2. Global Customer Support locations (Continued)
Office
Contact
AE, Taiwan, Ltd.
Phone: 886.2.82215599
10F, No. 110, Chung Shan Rd.,
Sec. 3
235 Chungho City, Taipei Hsien
Taiwan, R.O.C.
Fax: 886.2.82215050
AE China
Phone: 86.21.58579011
469 Huaxia Dong Road
Zhangjiang Town
Shanghai, China 201203
Fax: 86.21.58579003
RETURNING UNITS FOR REPAIR
BEFORE returning any product for repair or adjustment, follow all troubleshooting
procedures. If, after following these procedures, the problem still exists, or if the
procedure instruction advises contacting AE Worldwide Customer Service, call and
discuss the problem with a representative. Be prepared to give the model number and
serial number of the unit, as well as the reason for the proposed return. This
consultation call allows Global Support to determine whether the problem can be
corrected in the field or if the unit must be returned. Such technical consultation is
always free of charge.
If a unit is returned without first getting authorization from Global Support and
that unit is found to be functional, there is a re-test and calibration fee plus
shipping charges.
To ensure years of dependable service, Advanced Energy® products are thoroughly
tested and designed to be among the most reliable and highest quality systems
available worldwide.
WARRANTY
Advanced Energy® (AE) products are warranted to be free from failures due to defects
in material and workmanship for 12 months after they are shipped from the factory
(please see warranty statement below, for details).
To claim shipping or handling damage, inspect the delivered goods and report such
damage to AE within 30 days of receipt of the goods. Please note that failing to report
any damage within this period is the same as acknowledging that the goods were
received undamaged.
5709005-A
Troubleshooting and Worldwide Customer Service
6-5
Advanced Energy®
For a warranty claim to be valid, it must:
• Be made within the applicable warranty period
• Include the product serial number and a full description of the circumstances
giving rise to the claim
• Have been assigned return material authorization number (see below) by AE
Global Support
All warranty work will be performed at an authorized AE service center (see list of
contacts at the beginning of this chapter). You are responsible for obtaining
authorization (see details below) to return any defective units, prepaying the freight
costs, and ensuring that the units are returned to an authorized AE service center. AE
will return the repaired unit (freight prepaid) by second-day air shipment (or ground
carrier for local returns); repair parts and labor will be provided free of charge.
Whoever ships the unit (either you or AE) is responsible for properly packaging and
adequately insuring the unit.
Authorized Returns
Before returning any product for repair and/or adjustment, call AE Global Support and
discuss the problem with them. Be prepared to give them the model number and serial
number of the unit as well as the reason for the proposed return. This consultation call
will allow Global Support to determine if the unit must actually be returned for the
problem to be corrected. Such technical consultation is always available at no charge.
Units that are returned without authorization from AE Global Support and that are
found to be functional will not be covered under the warranty (see warranty statement,
below). That is, you will have to pay a retest and calibration fee, and all shipping
charges.
Warranty Statement
The seller makes no express or implied warranty that the goods are
merchantable or fit for any particular purpose except as specifically stated in
printed AE specifications. The sole responsibility of the Seller shall be that it will
manufacture the goods in accordance with its published specifications and that
the goods will be free from defects in material and workmanship. The seller's
liability for breach of an expressed warranty shall exist only if the goods are
installed, started in operation, and tested in conformity with the seller's
published instructions. The seller expressly excludes any warranty whatsoever
concerning goods that have been subject to misuse, negligence, or accident, or
that have been altered or repaired by anyone other than the seller or the seller's
duly authorized agent. This warranty is expressly made in lieu of any and all
other warranties, express or implied, unless otherwise agreed to in writing. The
warranty period is 12 months after the date the goods are shipped from AE. In
all cases, the seller has sole responsibility for determining the cause and nature of
6-6
Troubleshooting and Worldwide Customer Service
5709005-A
Optical Fiber Thermometer Model OR2000F
the failure, and the seller's determination with regard thereto shall be final. The
AE Warranty Statement may be superseded by a service agreement entered into
between AE and the buyer.
5709005-A
Troubleshooting and Worldwide Customer Service
6-7
Advanced Energy®
6-8
Troubleshooting and Worldwide Customer Service
5709005-A
Optical Fiber Thermometer Model OR2000F
Index
A
AE World Wide Web site 6-3
AE Worldwide Customer Service 6-4
before calling 6-1
repairs 6-5
alarm defaults 5-6
alarm relays 4-14
alarms 5-6
setting 5-9
alphanumeric display 4-2
analog output 4-10, 4-14, 4-15, 5-7
setting the range 5-10
ASCII output 2-4
authorized returns 6-6
B
back panel 2-4
binary output 2-4
C
cable
fiber optic 2-1
power supply 5-1
RS-232 5-1
cable diameter 2-8
cable, fiber optic 2-2
calibration 5-11
automatic 5-7
cable 5-4
sensor 5-4
calibration commands
emissivity 4-7
sensor 4-7
temperature 4-7
certification 1-5
CH key 4-2, 5-6
channel default 5-6
channel number 4-2
channels 5-9
cleaning sensors 5-3
climatic specifications 3-6
communication port 4-1
component of OFT 2-1
components 5-1
5709005-A
conditions of use 1-5
control keys 4-2, 5-6
controller 2-2, 2-4, 2-6, 2-8, 5-1
installation 5-2
semiconductor equipment 2-2
controls
back panel 2-4
front panel 2-4
coolant flow 2-2
current limiting 3-5
customer service, see AE Worldwide Customer
Service
D
data format 4-1
default values 4-2
defaults
alarm 5-6
alarms 5-6
analog output 5-7
channel 5-6
emissivity 5-6
reading per second 5-6
system 5-6
description, general 2-1
diagnostic functions 2-6
dimensions 3-2, 3-3
directives
89/336/EEC 1-4
display
blank 4-1
E
electrical specifications 3-5
electromagnetic compatibility (EMC)
certification 1-5
directives and standards 1-4
electromagnetic interference 2-2
EMC, see electromagnetic compatibility
emissivity 4-7, 5-6
setting 5-7
ENTER key 4-2
environmental specifications 3-5
Index
i
Advanced Energy®
F
fiber optic cable 2-1, 2-2, 2-4, 2-8, 5-1, 5-4, 511
bends 5-2
radius 5-2
filters 3-1
front panel 2-4, 2-5, 4-1
front panel controls 4-2
front panel display
specifications 3-4
G
general description 2-1
H
heat dissipation 5-2, 5-7
host computer 2-4
I
icons
on unit 1-2
illustrations
unit dimensions 3-3
INPUT key 4-7
installation 5-1
controller 5-2
fiber optic cable 5-2, 5-4
power supply 5-2
sensors 5-2
K
keys
control 4-2
parameter select 4-2
scroll 4-2
L
light transmission 2-8
lightpipe sensor 2-6, 2-7, 5-2, 5-8
low temperature transmissions 2-8
M
maintenance 5-10
min/max reading 4-14
mounting brackets 5-1
O
OFT 2-1
ii
principal components 2-1
typical configuration 2-1
OFT system 2-2
ON or OFF Parameter 4-10
operating modes 4-1
operating specifications 3-5
optical channels 3-5
optical columns 2-1, 2-8
optical fiber diameters 2-8
Optical Fiber Thermometers 2-1
optical sensor 2-1, 2-2
optical signal 2-2
OUTPUT key 4-10
overvoltage category
specifications 3-6
P
parameters
user 2-6
performance 3-5
photo detector 2-8
physical specifications 3-1
pollution degree
specifications 3-6
port
communication 4-1
RS-232 4-1
power supply 2-4, 3-5, 5-1
installation 5-2
process temperature 5-8
purge option 2-7
pyrometer sensor 2-6, 5-8
pyrometer sensors 5-1, 5-3
R
rate 4-12
readings per second 5-6
setting 5-9
remote communication 4-1, 4-16
repair 6-5
returning units for repair 6-5
returns
authorized 6-6
returning units for repair 6-5
warranty statement 6-6
RS-232 2-4
RS-232 cable 5-5
RS-232 communication settings 4-16
RS-232 connection 2-4
RS-232 connector 4-1
Index
5709005-A
Optical Fiber Thermometer Model OR2000F
RS-232 interface 4-16
RS-232 port 4-1
used in manual 1-2
system defaults 5-6
system specifications 3-1
S
safety
conditions of use 1-5
directives 1-4
see also directives
precautions 1-3
standards 1-4
see also standards
safety instructions 1-1
sapphire sensor tip 5-3
scroll speed 4-2
semiconductor equipment controller 2-2
sensor 2-2, 4-7, 5-11
calibration 5-4
elements 2-7
lightpipe 2-6, 2-7
pyrometer 2-6
sensor alignment 5-4
sensor factor 5-8
setting 5-8
sensor types 2-6
sensors 3-1, 5-2
cleaning 5-3
lightpipe 5-2
pyrometer 5-3
serial number 6-6
setpoint, temperature 2-3
setting defaults 5-6
software 2-5
specifications
climatic 3-5, 3-6
electrical 3-5
environmental 3-5
operating 3-5
overvoltage category 3-6
panel display 3-4
performance 3-5
physical 3-1
pollution degree 3-6
system 3-1
stabilize time 4-2
standards
EN 50082-2 1-4
EN 61010-1 1-5
startup 5-1
startup procedure 5-5
symbols 1-1
on unit 1-2
5709005-A
T
temperature 4-7, 4-8, 4-9
factors 5-8
setting 5-8
temperature measurement systems 2-2
temperature range 3-1
temperature scale 4-6, 4-11
setting 5-9
temperature setpoint 2-3
temperature values 2-8
troubleshooting 6-1
U
unpacking 5-1
updating software 2-5
user parameters 2-6
user port
analog and digital signals 4-1
signal types 4-1
W
warranty
authorized returns 6-6
filing a claim 6-5
returning units 6-6
warranty statement 6-6
Z
zero cal 4-3, 5-7
Index
iii
Advanced Energy®
iv
Index
5709005-A