1
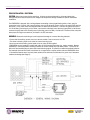
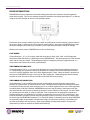
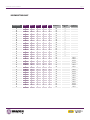
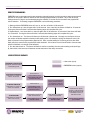
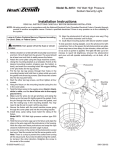
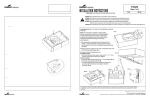
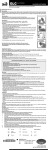
ENERGENI USER’S MANUAL
READ THOROUGHLY BEFORE INSTALLING
WARNING! Fixtures must be grounded and installed in accordance with the National Electrical Cole and all local
codes. Failure to do so may increase the RISK OF PERSONAL INJURY, PROPERTY DAMAGE, FIRE AND DEATH.
Install and use so fixture failures do not cause a hazard and use only in environments for which the product is
specifically marked.
WARNING! This product contains chemicals know to the State of California to cause cancer, birth defects, and/
or other reproductive harm. Thoroughly wash hands after installing, handling, cleaning, or otherwise touching this
product.
CAUTION! Follow ALL luminaire and control recommendations, product markings, instructions, restrictions and
warnings regarding luminaire operation and burning position. Luminaire label shows electrical and environmental
requirements and restrictions.
All electrical work must be done by a qualified electrician.
Turn off electric power to all affected circuits and allow to cool before servicing.
Carefully read these instructions before installing product. If you do not understand these instructions, before starting
any work, contact your Hubbell Lighting distributor or [email protected] or (864) 678-1000.
Give instructions to facility owner/manager for future reference.
INTRODUCTION
The Beacon Products ENERGENI is a compact control device that gives outdoor LED lighting owners a simple
way to save on energy costs, by dimming the host fixture at a time each evening when full light output is no longer
required. ENERGENI has flexible settings options to work with fixtures activated by photocontrols or time clocks.
The device connects to the 3-wire 0-10V dimming circuit of many commercial LED drivers/power supplies. The
delay and dimming level settings can be configured to order at the factory and re-configured at will in the field.
ORDERING LOGIC
Ordering as a stand-alone: GENI-XX, where ‘XX’ is the Routine Setting Code from Page 5.
Example - GENI-04 is ENERGENI preset to Routine #4 (dim to 20% brightness after 5 hours)
Ordering with a Beacon fixture (contact factory for availability): Add GENI-XX in the options field of fixture logic.
Example - VP-L/96NB-280/5K/T5W/UNV/GENI-04/SF2/BBT will include ENERGENI preset to Routine #4.
ENERGENI USER’S MANUAL
FIELD INSTALLATION – MECHANICAL
CAUTION: Disconnect power before servicing. All work must be performed by a licensed electrician.
The ENERGENI can be mounted with two screws (recommend #8-32 screws spaced 2 5/8”) or two
cable ties secured to the integral cable tie fittings. Note that the ambient temperature limit is 80˚ C.
page 2
ENERGENI USER’S MANUAL
page 3
FIELD INSTALLATION - ELECTRICAL
CAUTION: Disconnect power before servicing. All work must be performed by a licensed electrician.
Use appoved wire nuts/connectors with voltage and temperature ratings suitable for specific installation
conditions.
The ENERGENI is shipped with a wiring adapter terminating in three pigtail leads (yellow, violet, gray) for
connection to the 3-wire 0-10V output dimming circuit of the driver(s) (colors of driver conductors will often be
the same). In any case, follow the diagram below for electrical connections. Connect the yellow lead to the
10-12V auxiliary power supply of one driver; connect the violet lead to the dimming input (DIM+) of all drivers;
connect the gray lead to the dimming return (dimming ground or DIM-) of all drivers. The three wires comprise
both power and signal connections, and there is no AC connection.
WARNING: Observe the following to avoid equipment damage or incorrect dimming behavior:
• Ensure that the auxiliary power circuit can source at least 5 mA of current at 10-12V.
• The driver’s dimming input circuit must be current sourcing type.
• Never connect the auxiliary power leads of two or more drivers together.
• ENERGENI can be installed in parallel with other 0-10V dimming equipment (e.g. motion sensors, Beacon
LifeShield), if such equipment’s dimming interface is current sinking only and rated Class 2. The driver will
follow the device attempting to assert the lowest dimming signal, so carefully consider the desired behavior.
For example, the host fixture will have limited or no response to a motion sensor after the ENERGENI dims.
• If interactive features are to be used, best results will be achieved if all fixtures on a given circuit are same
model and wattage (see Page 6).
ENERGENI USER’S MANUAL
ROUTINE SETTINGS OPTIONS
ENERGENI has 32 pre-programmed functional settings (routines) which define the dimmed brightness
value and time delay. They can be selected through the interactive functionality (see Pages 6-7), or directly
using the five DIP switches, as shown in the illustration below.
Each switch does not have a distinct function; rather the combination of all five refers to a routine shown in
the chart on Page 5. Refer to that chart for specific switch settings. Also note that ENERGENI only reads
the switch settings when powering up, therefore a power reset is required after a change of settings.
Based on the routine chosen, ENERGENI can do one of three things:
STATIC DIMMING
Choose Routines 1, 2, 7 or 12 to simply make the fixture dim to 100%, 20%, 40%, or 60% brightness
respectively (Note that Routine 1 effectively turns the ENERGENI off). The fixture powers up to the dimmed
state, and no timing is involved. These settings are ideal for configuring a fixture’s brightness level, in a
more uniform and precise manner than a potentiometer.
TIMED DIMMING WITH SIMPLE DELAY
Choose Routines 3-6, 8-11, or 14-16 to make the fixture dim once a fixed time has passed since turning
on. Multiple delay and brightness options are available. For example, Routine #10 will cause the fixture
to turn on at 100% brightness, then dim to 40% brightness after 7 hours. When the fixture is powered off
and back on, ENERGENI will begin a new cycle at 100% brightness. These settings are ideal for fixtures
switched by a real time clock, as they would dim at the same time every evening.
TIMED DIMMING WITH VARIABLE DELAY
Choose Routines 17-32 to make the fixture dim at approximately the same time each evening when
switched by a photocontrol or astronomical time clock. Multiple time and brightness options are available.
For example, Routine #19 will cause the fixture to turn on at 100% brightness, then dim to 20% brightness
at approximately 10:00 PM. Basically, ENERGENI records how long the fixture is switched on each day,
and associates this with the time by assuming midnight to be the midpoint of this interval. This is the basis
for calculating the time delay on a day-to-day basis. Due to factors such as geographic longitude and
daylight savings time, this estimation is not exact, so please allow for an error of up to ±90 minutes. Also,
since the time delay is based on a three day rolling average, maximum accuracy will not be achieved until
the fourth night that ENERGENI is deployed. For maximum fidelity in calculating the time delay, ENERGENI
will reject day-length values outside of a reasonable range; providing some immunity to anomalies such
as power interruptions and day burning. Again, these settings are specifically meant to be used with
photocontrol (in-fixture or external) or astronomical switching.
page 4
ENERGENI USER’S MANUAL
page 5
ROUTINE SETTING CHART
Routine Number
Switch 1
Switch 2
Switch 3
Switch 4
Switch 5
Brightness %
Simple Delay
(Hrs.)
01
0
0
0
0
0
100
0
02
1
0
0
0
0
20
0
03
0
1
0
0
0
20
3
04
1
1
0
0
0
20
5
05
0
0
1
0
0
20
7
06
1
0
1
0
0
20
9
07
0
1
1
0
0
40
0
08
1
1
1
0
0
40
3
09
0
0
0
1
0
40
5
10
1
0
0
1
0
40
7
11
0
1
0
1
0
40
9
12
1
1
0
1
0
60
0
13
0
0
1
1
0
60
3
14
1
0
1
1
0
60
5
15
0
1
1
1
0
60
7
16
1
1
1
1
0
60
9
Variable Delay
Estimated Time
17
0
0
0
0
1
20
6:00 pm
18
1
0
0
0
1
20
8:00 pm
19
0
1
0
0
1
20
10:00 pm
12:00 am
20
1
1
0
0
1
20
21
0
0
1
0
1
20
2:00 am
22
1
0
1
0
1
40
6:00 pm
23
0
1
1
0
1
40
8:00 pm
24
1
1
1
0
1
40
10:00 pm
25
0
0
0
1
1
40
12:00 am
26
1
0
0
1
1
40
2:00 am
27
0
1
0
1
1
40
4:00 am
28
1
1
0
1
1
60
6:00 pm
29
0
0
1
1
1
60
8:00 pm
30
1
0
1
1
1
60
10:00 pm
31
0
1
1
1
1
60
12:00 am
32
1
1
1
1
1
60
2:00 am
ENERGENI USER’S MANUAL
page 6
INTERACTIVE FEATURES - OVERVIEW
ENERGENI supports remote diagnostic and programming (routine setting) functions. This is accomplished by
switching the power on and off (at the breaker panel or otherwise) at specific time intervals to provide input to
the device, while ENERGENI provides output by flashing the LED lamps of the fixture. This functionality avoids
the need to physically access each device to confirm or change the programmed routine.
GENERAL NOTES
Turning the fixture on, and turning off within 5 – 20 seconds, then on again will result in the lights flashing due to
triggering of a diagnostic or programming mode. If that was not the user’s intention, the flashing can generally
be ignored. A specific repetitive sequence is required to enable any permanent changes. See below for full
details.
If a Variable Delay Routine is being used, it is recommended to perform any diagnostic or remote programming
outside of the fixture’s normal on-off cycle (i.e. in daylight hours) to avoid affecting the time delay calculation.
Any on-cycle less than 6 hours will not be counted in the time delay calculation.
We recommend that all fixtures switched in common (i.e. by same breaker) should be the same model and
wattage, to avoid variations in power supply turn-on latency which could make it difficult to interact with all units
simultaneously.
DIAGNOSTICS
CONFIRM OPERATION (AUTOMATIC)
Every time an ENERGENI enabled fixture is powered up, the brightness will dwell at about 10% for about two
seconds, prior to executing the set routine (at which time a change in brightness will be evident). This behavior
confirms that ENERGENI is hooked up and operating.
CONFIRM CHANGE OF SWITCH SETTINGS (AUTOMATIC)
If the switch settings of ENERGENI are altered, upon the next power-up the fixture will flash the routine setting
code for the new switch setting selection and execute the new routine a few seconds later. The output will be
two series of flashes separated by a pause to indicate the routine setting code. As an example, two flashes,
followed by a pause, then ten flashes, indicates Routine #20 (see Page 5). Zero is expressed by ten flashes.
Note that the change in the physical switch setting overrides any previous remotely-programmed routine setting.
QUERY ROUTINE SETTING CODE
Perform the following steps to remotely query ENERGENI’s routine setting code. Turn the fixture off, turn back
on, and turn off within 5-10 seconds. When the fixture is again turned on, it will flash the routine setting code
(see above section) and after a few seconds will execute the set routine.
QUERY TIME DELAY
Perform the following steps to remotely query ENERGENI’s current time delay (this may vary from day to day if a
Variable Delay Routine has been chosen). Turn the fixture off, turn back on, and turn off within 10-15 seconds.
When the fixture is again turned on, it will flash the time delay in minutes, then after a few seconds will execute
the set routine. For example, one flash, followed by a pause, then eight flashes, another pause, then ten flashes
indicates 180 minutes (3 hours). Again zero is represented by 10 flashes. Note that a Static Dimming Routine
will always return 10 flashes (zero minutes). ENERGENI USER’S MANUAL
page 7
REMOTE PROGRAMMING
ENERGENI can be reprogrammed (routine selection changed) remotely, but this procedure does require several
specific on-off cycles in order to reduce the risk of being reprogrammed by accident. Any of the 32 routine
settings shown on Page 5 can be selected using this method, or control can be returned to the physical DIP
switch selection. To remotely program ENERGENI, use the following procedure:
1. Starting with the ENERGENI fixture off, turn on, and turn off within 15-20 seconds.
2. Turn fixture back on, then off again after 15-20 seconds. As a visual aid, the fixture will flash for 15 seconds.
Turning the fixture off within 5 seconds after flashing stops will complete this cycle.
3. Repeat Step 2 - turn fixture back on, then off again after 15-20 seconds. As a visual aid, the fixture will flash
for 15 seconds. Turning the fixture off within 5 seconds after flashing stops will complete this cycle.
4. Turn fixture back on. The fixture will flash up to 33 times at a slower rate. Promptly turn the fixture off once
the number of flashes equals the desired routine setting code. For example, turning the fixture off at the 15th
flash will cause it to be programmed to Routine #15. Also, note that setting to 33 (turning off at or after 33rd
flash) will return control to the physical DIP switch selection. If the fixture is not turned off within a few seconds
after the 33rd flash, no change will be affected.
5. Turn the fixture back on. The fixture will flash to confirm numerically the new routine setting code (see Page
6), then within a few seconds will assume normal execution of the newly set routine.
USER INTERFACE SUMMARY
= User action (input)
TO MANUALLY SET ROUTINE
Change DIP switches to desired
routine setting code.
= ENERGENI action (output)
→
TO SET ROUTINE
Power fixture on. Power off
within 15-20 seconds
→
In event of unexpected time
interval, or fixture is left on,
no changes are made and
fixture executes set routine.
Power fixture on.
Fixture flashes current
value of time delay, then
executes set routine.
Power fixture on. Power off
within 15-20 seconds.
Fixture flashes for first 15
seconds to assist.
→
→
→
Fixture flashes current
routine setting code, then
executes set routine.
→
TO QUERY TIME DELAY
Power fixture on. Power off
within 10-15 seconds.
→
Power fixture on.
→
TO QUERY ROUTINE CODE
Power fixture on. Power off
within 5-10 seconds.
→
Power fixture on. Power off
within 15-20 seconds.
Fixture flashes for first 15
seconds to assist.
Rev A 12/3/2014
Power fixture on. Power
off when number of flashes
equals desired routine code,
or 33 flashes to return to
DIP switch control.
→
Fixture prompts by flashing
up to 33 times.