1
USER’S
GUIDE
Otogram ML4000
TM
Interactive Diagnostic Audiometric Testing System
Important:
Read the User’s Manual before operating the equipment.
WARNING
No modification of this equipment is allowed. If non-system equipment is connected, it is the
operator’s responsibility to ensure that the assembled system compiles with EN 60601-1.
Injury to personnel or damage to equipment can result when a three-pronged adapter is
connected between the Otogram power plug and an AC outlet or extension cord. Additionally, the Otogram is equipped with a specific power transformer which should not be interchanged with any other transformer or power supply.
The user acknowledges and agrees that Ototronix is not and will not be responsible for any
losses, injuries, or damages arising from the operation, condition, possession or use of the
Ototronix product purchased, leased, rented or licensed by the user. The Otogram and other
Ototronix products should only be used by trained healthcare professionals who do not rely
upon the Ototronix products or User’s Manual for their healthcare training.
Risk of explosion if battery is replaced with an incorrect type. Do not attempt to replace the
battery. Refer to Chapter 7 of this manual.
CAUTION: Federal (U.S.) Law restricts this device to
sale by or on the order of a properly licensed practitioner.
3
CONTENTS
Chapter 1: Otogram Safety and Specifications
06 Safety Instructions
08 Specifications
Chapter 2: Set Up
11 Otogram Anatomy
12 Getting Started
12 Selecting a Location
12 Connecting Hardware
14 Turning On/Off the Otogram
Chapter 3: Getting to Know Your Otogram
15 Test Battery
16 Ambient Noise Monitor
16 Paging System
16 Pager Operation Instructions
17 Pager Messages and Suggested Responses
17 Command Button
18 Other Pager Operations
19 Tools
Chapter 4: Daily Calibration and Equipment Checks
31
Calibrating Probes
33
Equipment Check
Chapter 5: Otogram Test Administration
34
Patient Selection
34
Otoscopy
34 Ear Tip Usage
35
New Session Screen Input
35
Objective Tests
36 Patient Set Up and Instructions
36 Testing Procedure
38
Subjective Tests
38 Patient Set Up and Instructions
40 Testing Procedure
41
Reporting
41 Report Layout
43 Viewing and Printing Reports
45
Advanced Automated Features
46
Manual Testing
46 Pure Tone Air and Bone Conduction
47 Speech Discrimination
Chapter 6: Caring for your Otogram
48
Annual Calibration
48
Daily Calibration and Equipment Check
48
Touch Screen
48
Otovest Transducers
49 Probes
49 Insert Earphones and Bone Oscillator
Chapter 7: Otogram Troubleshooting
50
No Device Connected Error
50
Calibration Expired Message Persists After Calibration
50
Cannot Hear Speech or Tones
50 Touchscreen Not Responding
50
Touch Screen Calibration
50
Technical Support and Service
Chapter 8: Otogram Service and Maintenance
51
Transport and Storage
51
Disposal
Appendix: Surveys
5
OTOGRAM SAFETY AND SPECIFICATIONS
1
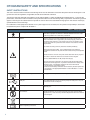
SAFETY INSTRUCTIONS
This user’s manual contains information and warnings which must be followed to ensure the safe performance of the Otogram. Local
government rules and regulations, if applicable, should also be followed at all times.
The Otogram has been designed and verified to comply with EN 60601-1 “Safety of Medical Electrical Equipment”. To ensure safe
performance, the Product must be installed correctly with strict adherence to the following safety requirements. The following symbols
appear on the Otogram to indicate that it is important for users to refer to the associated warnings given in this manual. Please pay
special attention to these warnings.
No modification of this equipment is allowed. If non-system equipment is connected, it is the operator’s responsibility to ensure that
the assembled system complies with EN 60601-1.
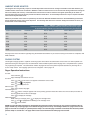
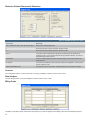
Table 1 – Safety Symbols
Type B Applied Part
This symbol indicates compliance with Type B requirements of EN 60601-1.
This class of equipment is allowed in domestic establishments when used
under the jurisdiction of a health care professional.
Caution
Only the original power cable supplied with the Product must be used.
This must be fitted with an approved 3-pole mains (line) plug, which has a
protective earth conductor. The Product must only be connected to an AC
power supply that has a protective earth conductor in accordance with EN
requirements.
CAUTION: Grounding continuity should be checked periodically.
Avoid using extension cables. The increased length of the cable may
increase the resistance of the protective earth conductor beyond acceptable
levels.
To disconnect the unit from main power, either disconnect the AC plug from
the outlet, or disconnect the DC Out connector from the Otogram.
Use only Model #PMP135-13-3B (15.6V) Power Supply
The use of accessory equipment not complying with the equivalent safety
requirements of this equipment, may lead to a reduced level of safety of the
resulting system. Consideration relating to the choice shall include:
• Use of accessory in the patient vicinity
• Evidence that the safety certification of the accessory has been performed
in accordance to the appropriate EN 60601-1 and/or EN 60601-1-1 harmonized standard.
Intentional Non-Ionizing Radiation
The pager transmitter produces non-ionizing radiation.
USB port
Plug USB cables (such as the one to the printer) into these ports. They are
connected to the PC’s USB ports
Network port
Plug network (Ethernet) cables into this port. It is connected to the PC’s
Ethernet port
Do Not Reuse
Eartips provided for use on Insert Earphones and Probes are intended for
single use only. Once used, they should be disposed of rather than cleaned
and used again.
Do Not Dispose of Devices
Return used devices to manufacturer for proper disposal.
Refer to Operating Instructions
6
SPECIFICATIONS
Device Description:
The Otogram is a computer-controlled, audiometric instrument combining the functions of an Audiometer, Distortion Product Otoacoustic Emissions Analyzer and Auditory Acoustic Impedance/Admittance Tester (i.e. Tympanometer).
Intended Use:
The Otogram is an auditory diagnostic instrument intended to administer, under supervision by a trained healthcare professional, a
battery of diagnostic and screening procedures that include the following:
1. Pure tone air and bone conduction audiometry with automated masking
2. Speech recognition threshold with automated masking
3. Speech discrimination with automated masking
4. Tympanometry
5. Acoustic reflex threshold, both ipsilateral and contralateral
6. Distortion product otoacoustic emissions
7. Pure tone Stenger
8. Patient survey
The Otogram is indicated for use by trained healthcare professionals on both adult and pediatric subjects for measurement of audiometric parameters to identify and supply data to help diagnose hearing loss and ear disorders.
The Otogram can be used to complete tympanometry, acoustic reflexes, distortion product otoacoustic emissions, masked pure tone
air and bone conduction audiometry, speech reception threshold, speech discrimination, Stenger, and patient surveys to assist in
diagnosing hearing loss and/or ear disease. The table below provides a list of standard product features and system requirements for
the Otogram.
Patient Selection and Contraindications:
Refer to Chapter 5 Otogram Test Administration for further information.
Table 2 - Contents and System Requirements
Standard Features
Otogram computer peripheral (Hardware and
Software)
Diagnostic and screening testing software
Configuration software
Data backup software
Patient response control
Otobow or headband
Pager
Otovest
Ambient noise microphones
EAR-5A insert earphones
Radio Ear B71 bone oscillator
Tympanometry/acoustic reflex/DPOAE probes
(not available in all models)
7
Table 3 - Otogram – General Specifications
Hardware Specification
Otogram - General Specifications
Mechanical:
- Dimensions
- Weight
Closed: 12.25”W x 13.25”D x 5.25”H (31.1cm W x 33.7cm D x 13.3cm H)
Open: 12.25”W x 13.25”D x 14.75”H (31.1cm W x 33.7cm D x 37.5cm H)
17.2 lbs (7.8 kg) net, Otogram and Vest only
35.5 lbs (16.1 kg) shipping
Environment:
- Operating
- Storage
- Humidity
60 F to 105 F, 15 C to 40 C
-4 F to 140 F, -20 C to 60 C
Max 90% (no condensation)
Power:
- Line voltage
- Frequency range
- Line voltage current audiometer
- Line voltage current computer
- Power consumption
100-240 V AC (+/-10%)
50 – 60 Hz (+/-5%)
0.2 amps at 120 V or 0.1 amps at 240 V AC, 1.25 amp maximum
1.6 amps at 100 V or 0.8 amps at 240 V
130 watts maximum
Warm up time:
10 minutes
Supplied Accessories:
- Otovest
- Test cavity
- Ear tips
- User’s Manual
Transducers for Comprehensive Audiometry
0.5 cm3, 2.0 cm3, 5.0 cm3
Various sizes
Model Specific
Standards:
IEC 60601-1-1 Medical Electrical Equipment Requirements for Safety
IEC 60601-1-2 EMC emission and immunity
Table 4 - Otogram Specifications for Impedance Audiometer
Hardware Specification
Otogram - Impedance Audiometer
Probes:
Otovest for tympanometry and both ipsilateral and contralaterl acoustic reflex measures
Calibration and standards:
ANSI S3.39 – 1987 (Type 3)
IEC 60601-1-1 Medical Electrical Equipment Requirements for Safety
IEC 60601-1-2 EMC emission and immunity
Tympanometry:
- Probe tone
- Total harmonic distortion
- Total range
Air pressure system:
- Range
- Air pump speed
- Accuracy
- Air release
Acoustic Reflex:
- Reflex stimuli
- Ipsilateral and contralateral
stimulation
- Air pressure sweep
226 Hz +/- 2% at 85 dB
<5%
0.2 cm3 to 6.0 cm3
+200 daPa to -400 daPa, selectable
50 daPa/sec to 400 daPa/sec
Pressure accuracy: greater of +/-15% or 10 daPa
Magnitude measurement accuracy: greater of +/- 5% or 0.1 mmho
Reflex stimuli SPL: +/- 3 dB
Automatic
Pure tone
PT freq: 500 Hz, 1000 Hz, 2000 Hz, 4000 Hz
Freq accuracy: +/- 3%
Total harmonic distortion: < 3%
Level: 500 Hz-4000 Hz; 80 dB HL to 105 dB HL
Forward or backward
Calibration possibilities:
Software controlled calibration for all transducers and the device
Configuration:
Acoustic Reflex Stimulus Frequency – 500 Hz, 1000 Hz, 2000 Hz, 4000 Hz
Acoustic Reflex Stimulus Levels – 75dB to 105dB, Configurable increments of 5dB to 15dB
Tympanogram pressure width at 50% of peak compliance.
Modified Jerger Method
Automatically set to pressure at the lesser of peak compliance or a configurable static compliance rule (to
facilitate reflex testing for patients with hyper-mobile tympanic membranes)
Compliance change of 0.05 cm3 (or alternate configuration) or greater.
1 to 12 seconds depending upon the number of ipsilateral and/or contralateral test frequencies selected
- Gradient
- Tympanogram Classification
- Pressure
- Reflex determination
- Reflex testing time
8
Table 5 - Otogram Specifications Distortion Product Otoacoustic Emissions
Specification
Distortion Product Otoacoustic Emissions
Probes:
Otovest
Geometric Center Frequency:
1000 Hz, 1500 Hz, 2000 Hz, 3000 Hz, 4000 Hz, 5000 Hz, 6000 Hz, 8000 Hz
Stimulus:
2 sinus stimulus channels
Stimulus level range:
45 dB SPL-70 dB SPL
Maximum output:
90 dB SPL
Microphone system noise:
-20 dB SPL @ 2000 Hz (1 Hz bandwidth)
-13 dB SPL @ 1000 Hz (1 Hz bandwidth)
Frequency response accuracy – microphone:
+/- 3 dB from 1000 Hz to 4000 Hz
Frequency response accuracy:
+/- 4 dB from 1000 Hz to 4000 Hz
9
Table 6 - Otogram Specifications Audiometer
Specification
Otogram Audiometer
Calibration and standards:
ANSI S3.6 – 1996 for pure tone audiometers
IEC 60601-1-1 Medical Electrical Equipment Requirements for Safety
IEC 60601-1-2 EMC emission and immunity
Channels:
2
Channel input:
Tone, external (Tape/CD), narrow band noise, speech noise
Channel output:
Insert phones Left/Right, headset phone Left/Right, bone
Presentation:
Pulsed, 2.5 Hz
Attenuation:
120 dB range, 5 dB step
Frequency range:
125 Hz to 8000 Hz
Frequency accuracy:
+/- .5%
Total harmonic distortion:
< 3%
Frequency 125 Hz
Air 90 dB HL, bone NA dB HL
Frequency 250 Hz
Air 100 dB HL, bone 40 dB HL
Frequency 500 Hz
Air 110 dB HL, bone 60 dB HL
Frequency 1000 Hz
Air 110dB HL, bone 65 dB HL
Frequency 2000 Hz
Air 110 dB HL, bone 65 dB HL
Frequency 4000 Hz
Air 110 dB HL, bone 75 dB HL
Frequency 8000 Hz
Air 110 dB HL, bone 45 dB HL
External inputs:
Left/Right with 1.0 V line level
Extended range:
Channel 1 allows air conduction intensities to be limited to 20 dB below maximum output.
Channel 1:
Input: tone, microphone, computer. Output: Left/Right insert earphones, bone oscillator
Channel 2:
Input: tone, microphone, computer, narrow band noise, speech noise. Output: Left/Right insert earphones, bone oscillator, Off.
Presentation Ch 1:
Single or multiple pulses. Single and multiple pulse speed: 150 ms, 250 ms, 500 ms, 750 ms, 1000 ms, 1500 ms, 2000 ms, 4000 ms,
5000 ms.
Presentation Ch 2:
Simultaneous or alternate to Ch 1
Attenuators:
Totally click free, -10 dB HL to 120 dB HL in 5 dB steps.
Transducers:
Otovest insert earphones (EAR5A - 50 ohm)
Otovest bone oscillator (Radio-ear B71 - 50 ohm)
Ambient noise microphones
All RETSPLs for insert earphones are as stated in ANSI 3.6, Table 7 .RETFLs for bone oscillator with forehead placement are as stated in
ANSI 3.6, Table 8. The Otobow produces a static force of 5.4 N +/- .5N when spread to width of 190mm. Bone oscillator application site
is forehead. Calibration applies to an insert earphone occluded test ear and masked (non-test) ear.
Calibration possibilities:
Software controlled calibration for all transducers and the device
Communication:
Talk forward: 0 dB HL-110 dB HL; continuously adjustable
Talk back: Not applicable
Auto masking:
Masking provided following ASHA guidelines
Test type – tone:
Pulsed pure tone with automatic and manual masking
Test type – speech:
Manual and automated speech reception threshold and speech discrimination with recorded voice and automatic level setting and
masking. Score counter calculates correct percent at 85% confidence level.
Monitoring Meter:
Not applicable. The Otogram does not provide for live voice speech testing.
Speech RETSPL:
12.5 dB SPL as measured with the insert phone in an HA-2 coupler with rigid tube attachment
Frequency Modulated Signal:
Not provided
Masking characteristics:
Narrow band noise centered at 250 Hz, 500 Hz, 750 Hz, 1000 Hz, 1500 Hz, 2000 Hz, 3000 Hz, 4000 Hz, 6000 Hz, and 8000 Hz with
spectrum described by corresponding rows of cut-off frequency columns 2-5 of ANSI s3.6 Table 7. The masking RETSPLs are found using the RETSPLS for the insert phone as shown in Table 7 for the HA-2 coupler with rigid tube, then adding the one-third octave correction as shown in column 7 of Table 5. The masking effect is to completely mask pure tone of the designated intensity. Speech masking
is within the +/- 5dB tolerance; constant spectrum from 100 Hz to 1000 Hz, with 12dB per octave roll off above 1000 Hz (+/- 5 dB)
10
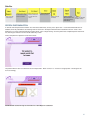
SET UP 2
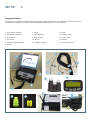
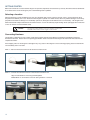
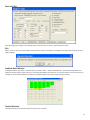
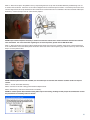
Otogram Anatomy:
The Otogram is a computer-controlled, audiometric instrument combining the functions of an Audiometer, Distortion Product Otoacoustic Emissions Analyzer and Auditory Acoustic Impedance/Admittance Tester (i.e. Tympanometer).
1. Touch Screen Computer
7. Probes
12. Pager
2. Patient Response Button
8. Insert Earphones
13. Rubber Ear Tips
3. Power Switch
9. Bone Oscillator
14. Foam Ear Tips
4. Power Cord
10. Otobow
15. Antenna
5. Ambient Noise Microphones
11. Calibration Cavities
16. Touch Screen Stylus
6. Otovest
5
6
1
9
10
4
11
7
8
7
12
3
2
15
13
14
16
11
GETTING STARTED
Below are instructions to ensure that the Otogram is unpacked, inspected, stored and set up correctly. Ensure that the test administrator is trained in the use of the Otogram prior to administering tests to patients.
Selecting a Location
Place the Otogram in a well-ventilated room away from all liquids and sources of heat. If stored in a hot or cold environment, allow
temperature to stabilize prior to use. Ensure that the Otogram is placed on a stable surface, safe from potential damage. The most appropriate environment for testing is in a moderately quiet room, although a sound-treated room is not necessary. The Otogram’s Ambient Noise Monitor helps to determine if the ambient noise in a room will adversely impact testing results. (See page 29 for instruction
on how to measure a room’s ambient noise)
CAUTION:
The Otogram is NOT suitable for use in the presence of a flammable
anesthetic mixture with air or with oxygen or nitrous oxide.
Connecting Hardware
The Otogram is shipped in its own custom made carton together with this User’s Manual, a packaging specification sheet and
standard accessories. Please refer to the packing specification sheet enclosed with the Otogram to ensure that all accessories are
complete and intact.
If the shipping carton or the Otogram is damaged in any way, and/or if the Otogram is not functioning properly, please contact Ototronix immediately at 877-410-4327.
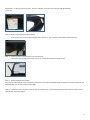
STEP 1— Remove the Dust Covers from the Otovest Connector Ports.
STEP 2— Connect the Otovest Connector to the Otovest Connection Port.
Align the red indicators on the Plug and Receptacle.
IMPORTANT: Do not twist the connector during insertion or removal.
12
IMPORTANT— If utilizing multiple Otograms, verify the S/N label on the back of the Otogram with the S/N label
on the vest.
STEP 3—Connecting the Patient Response Button
Lift the Dust Cover on the smaller receptacle, then insert the ¼” plug connector of the Patient Response Button.
STEP 4— Extend the antenna located at the rear of the Otogram.
The antenna can be positioned in such a way as to avoid contact with the computer screen.
STEP 5—Connecting the AC/DC Adapter Plug one end of the supplied power cord into the power inlet on the side of the Otogram Base and plug the other end directly into the
selected outlet. Use only the included power supply.
STEP 6— On the back of the Otogram, locate the date of manufacturing, model number and serial number. This information may be
required when requesting support.
13
Turning On/Off the Otogram
To turn on the Otogram, complete these steps:
STEP 1—Plug in the Otogram.
Ensure that the power cord is connected to the Otogram Base before proceeding.
Laptop battery power is not sufficient to operate all components of the Otogram.
STEP 2—Turn on the computer.
Push the computer power switch (located on the front right corner of the system).
To turn off the Otogram:
STEP 1—Touch the <Turn Off> command on the Otogram New Session screen.
STEP 2—The Otogram will ask “Are you sure?” Select <Yes>.
STEP 3— Disconnect the Otovest by sliding back the sleeve on the Otovest Plug and pulling away from the Otogram.
IMPORTANT: Do not twist the connector during insertion or removal.
STEP 4— Retract the antenna into the protective recess.
STEP 5— If the Otogram will be stored, transported or not used for an extended period of time, then replace the
Connection Port Dust Covers.
Printer
At the conclusion of the selected tests, the Otogram will print a report of the results. Please install your printer from “Devices and
Printers” on the Start Menu.
14
GETTING TO KNOW YOUR OTOGRAM
3
TEST BATTERY
Air and Bone Conduction
Pure tones are presented through air and bone conduction using a modified Hughson-Westlake method to measure frequency-specific hearing thresholds. Air conduction measures the intensity of the signal required to reach a patient’s threshold assessing the entire
auditory system. Bone conduction isolates the sensory structure of the inner ear and auditory tracks. Thresholds measured during air
and bone conduction helps identify the type of hearing loss. Masking of the non-test ear and Stenger are employed as needed.
Tympanometry
Tympanometry measures tympanic membrane mobility and middle-ear pressure by presenting a tone and varying air pressure in the
ear canal while measuring the ability of the tympanic membrane to reflect and absorb sound. As a measure of middle ear function,
tympanometry can help identify issues with the eardrum or the middle ear.
Acoustic Reflexes
The acoustic reflex threshold determines the intensity of a sound required to elicit a contraction of the stapedius muscle. Different
pathologies or degrees of hearing loss can affect the acoustic reflex making it a useful diagnostic tool.
DP Otoacoustic Emissions
Otoacoustic emissions are the result of microscopic biomechanical activity associated with healthy outer hair cells. Because only a
healthy cochlea can produce otoacoustic emissions, when the emissions are absent, a diagnosis of hearing loss is likely but further
testing is required to define type and degree of loss.
Stenger
The Stenger test helps identify unilateral pseudohypacusis (malingering). The Stenger principle states that if a sound is played simultaneously in each ear, the listener will only be aware of the louder tone. Based on that principle, it is possible to evaluate a patient for
a unilateral functional or non-organic hearing loss. Since accurate diagnosis is paramount to patient management, the Otogram discreetly and automatically employs a frequency-specific Stenger Test any time a patient’s behavioral thresholds deviate by more than
35dB between ears. The results of the Stenger Test are displayed on the patient report.
Speech Reception Threshold
The speech reception threshold (SRT) test measures the lowest level (in decibels) that a patient can recognize speech. The Otogram
uses recorded speech with a closed-set picture identification task using commonly accepted spondee words. The presentation level
is varied and the lowest level at which the patient correctly identifies the spondee 50% of the time is recorded as the speech reception
threshold. Because closed-set tests are easier than open-set tests, the Otogram scores closed-set tests by giving more weight to an
incorrect response than a correct response.
Speech Discrimination
Speech discrimination testing presents similar sounding words (i.e. mop, stop, top, shop) to the patient at an audible level to determine whether or not the patient has difficulty discriminating between words that sound similar. Words are presented in each ear until
an 85% confidence interval is achieved. The Otogram also calculates and reports Unexplained Discrimination Loss. Masking of the
non-test ear is employed as needed.
Patient Survey
The Otogram offers a few patient-report surveys including the Hearing Handicap Index for the Elderly (HHIE), the Hearing Handicap Index for the Elderly-short version (HHIE-S), the Mayo Clinic Survey and the Hearing and Balance Survey. Each survey presents a variety
of questions to assess the perceived impact of the patient’s hearing loss on his or her everyday communication.
15
AMBIENT NOISE MONITOR
The Otogram does not generally require an acoustically treated room because an average examination room falls within the permissible ambient noise levels as outlined in ANSI S3.1-1999. Excessive noise in a test environment during audiometric testing can
reduce the validity and accuracy of the audiometric test because it tends to mask the test signals particularly at the lower frequencies where the insert ear phones provide less effective attenuation. An acoustically treated room may be required if ambient
noise reaches objectionable levels.
Maximum permissible noise levels are specified by the American National Standards Criteria for Permissible Background Noise
during Audiometric Testing using insert earphones. The following table shows the maximum background levels that can be presented inside a room while testing.
Table 7 – ANSI S3.1-1999 Permissible Ambient Noise Levels
Octave band ears covered maximum permissible ambient noise levels for three test frequency ranges a
as specified in ANSI S3.1-1999 when ears covered testing is performed using insert earphones
Octave Band Intervals
125-8000 Hz
250 to 8000 Hz
500 to 8000 Hz
125
59.0
67.0
78.0
250
53.0
53.0
64.0
500
50.0
50.0
50.0
1000
47.0
74.0
47.0
2000
49.0
49.0
49.0
4000
50.0
50.0
50.0
8000
56.0
56.0
56.0
See page 29 for more information regarding using the Ambient Noise Monitor to pre-screen a testing environment for compliance with
ANSI standards.
PAGING SYSTEM
The Otogram’s Paging System is a patient monitoring system which allows the administrator to leave the room while a patient completes the hearing test. During the test, the administrator will be notified of patient status ranging from a completed test to a patient
not progressing as expected. The administrator will also be paged to return if the patient requests assistance by touching the onscreen <Help> button. Some paging options can be configured – refer to page 18.
Pager Operation Instructions
Turn ON:
Turn OFF:
Press and hold
Pager will beep twice when it turns on.
Press
until a row of seven icons appear at the bottom of the screen
Press
until
is highlighted.
Press
twice to power off.
Silence Pager:
Press
to silence the pager.
View Messages:
Press
until the envelope appears with arrows pointing upward in the bottom left corner of the screen (the number of
arrows indicates the number of messages).
Press
to display the message
Delete Messages:
While viewing a message, press
to display the message menu.
Press
until is highlighted and blinking on the message menu.
Press
twice to delete.
NOTE: It is important that messages are deleted after they have been read. The pager can only contain a limited number of
pages and will stop accepting pages if not cleared. The pager will not “beep” if a message identical to a page stored on the
pager is received. For example, if a patient pressed <Help> once and the page is read but not cleared, then the same patient
presses <Help> a second time - the pager will not alert a second time that another page was received.
16
PAGER LOW BATTERY ALERT
A low battery indicator will display on the pager when battery replacement is needed. To replace the battery, remove the panel on
the back side of the pager and install a new battery.
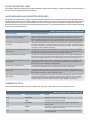
PAGER MESSAGES AND SUGGESTED RESPONSES
The Otogram does not generally require an acoustically treated room because an average examination room falls within the permissible ambient noise levels as outlined in ANSI S3.1-1999. Excessive noise in a test environment during audiometric testing can
reduce the validity and accuracy of the audiometric test because it tends to mask the test signals particularly at the lower frequencies where the insert ear phones provide less effective attenuation. An acoustically treated room may be required if ambient
noise reaches objectionable levels.
Table 8 – Pager Messages and Suggested Responses
Pager Message
Administrator Response
Patient’s Name has requested assistance.
Please return as soon as possible.
The patient has pressed the <Help> button. The test has been paused and an on-screen message
appears: “The test administrator has been paged. Please wait for the administrator to return”.
Return immediately to determine the issue. To continue testing, touch the screen, and then select
<Ok>. To discontinue testing, touch the screen and refer below for Command Button instructions.
Patient’s Name - Bone Vibrator may not be
functioning.
This indicates that the patient did not respond at all to the first bone threshold, but did respond to
the first air threshold. Return immediately, select <Command> then <Pause>. Evaluate bone oscillator function and placement, reinstruct the patient and continue with the test. To discontinue testing,
refer below for Command Button instructions.
Patient’s Name is not registering activity in the
Test Name test.
The patient has not interacted with the Otogram for 2 minutes. Return immediately. If the patient
response button and/or touch screen are functioning, reinstruct the patient and restart the test. If
necessary, discontinue testing. Refer below for Command Button instructions.
Patient’s Name Otogram is completed.
The patient has successfully completed the Otogram test. Return to the patient immediately and
touch the yellow screen. If possible, review the results before removing the Otovest so that a manual
recheck of any specific frequencies can be completed if necessary without further patient setup.
Patient’s Name is not progressing through the
Test Name test.
This message indicates that the patient is not responding consistently. Return immediately. If the
patient is able to continue, reinstruct and restart the test. This message is an indicator that the
patient may be a poor candidate for automated testing.
Repeat: Return to Patient’s Name.
The administrator did not respond to a message within 2 minutes. This message will repeat every 2
minutes until the administrator returns to the patient and touches the yellow screen.
Return to Patient’s Name to perform Speech
Discrim test.
If the Otogram has been configured for open set speech discrimination, the administrator will be
paged to return to the patient at the appropriate point in the test battery to facilitate administration.
See page 38 for information on how to administer this test.
Patient’s Name is responding improperly too
often. Retrain?
When the patient responds outside the response window 3 times during the course of 15 consecutive pure tone presentations, an inappropriate response point is assigned. If the total number of
allowed points is exceeded, the administrator will receive this message. The occurrence of this
message is based on the “False Response Sensitivity” value specified in the Tools menu.
COMMAND BUTTON
The Command Button provides options for pausing a test, skipping a certain section of a test, and aborting a test.
Table 9 – Commands to Abort or Pause a Test
Keyboard Command
On-Screen Command
Result
Alt-D
<Command>
Displays the on-screen test commands
Alt-E
<Exit>
Exits the test without saving the results
Alt-G
<Go to End>
Terminates the test, saves any partial results and proceeds to the
reporting screen
Alt-P
<Pause>
Pauses the current test until the patient or administrator is prepared to
resume testing. Select <OK> to resume.
Alt-N
<Next>
Terminates the current test, saves any partial results, and then starts
the next selected test
17
OTHER PAGER OPERATIONS
18
Read message
Press “
Turn on mailbox alert
Select one message of the mailbox, press “
” key, select “
”, press “
”
Turn off mailbox alert
Select one message of the mailbox, press “
” key, select “
”, press “
”
Delete one message
Read the desired message, press “
” key, select “
” , press “
” key twice
Delete all messages
Read the desired message, press “
” key, select “
” , press “
” key twice
Message protected /
unprotected
Read the desired message, press “
” key, select “
” or “
Set private message alert
Select “
”, pres “
Key tone On / Off
Select “
”, press “
Set time / date
Select “ ”, press “ ” key, use “
cursor, press “ ” to confirm
” or “
” to adjust, press “
” to move
Set alarm
Select “ ”, press “ ” key, use “
cursor, press “ ” to confirm
” or “
” to adjust, press “
” to move
Set LCD Contrast
Select “
” key, use “
” or “
” to adjust, press “
” to confirm
Set auto On / Off power
Select “ ”, press “ ” key, use “
cursor, press “ ” to confirm
” or “
” to adjust, press “
” to move
Power off
Select “
Turn On / Off light
Hold “
” key to read, pres “
”, press “
”, press “
” or “
” key, use “
” or “
” key, select “
” key twice
” key for a moment
” to select
”, press “
” key
” to select the alert, press “
” key
” or “
”, press “
” key
TOOLS
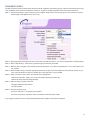
Tools can be accessed from the New Session screen of the Otogram by selecting the <Tools> button on the left side of the screen.
Most of the Otogram’s configurability is accessible through the tools utility.
INPUT SCREEN
The Otogram always requires the administrator to input the patient’s name and chart number. In addition, the Otogram allows entry
of other fields, such as doctors, administrators, clinic, or additional patient information as either an optional or a required field. To alter
the information that is displayed on the New Session screen, follow these instructions:
Add a name to Doctors or Administrators
STEP 1—Select the empty text box under “Doctors” or “Administrators”.
STEP 2—Type the name.
STEP 3—Select <Add>.
Remove a name
STEP 1—Select on the name to be removed.
STEP 2—Select <Remove>.
Change order of names
STEP 1—Select on the name to be reordered.
STEP 2—Select the <Up> or <Down> button until the names are in the correct order.
Create default settings
STEP 1—Select the empty text box below “Clinic” or “Chart# Default”.
STEP 2—Type the default text.
19
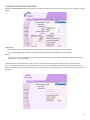
Display fields on the New Session screen
STEP 1—Under “Optional Input Fields”, select <Displayed> for any fields that should be displayed on the New Session screen.
STEP 2—Select <Required> if any of the fields should be required before a test battery can be initiated.
PAGING ENCODER INTERFACE
The Paging Encoder Interface fields should not be adjusted without direction from Ototronix.
To test the pager’s coverage area or functionality, select <Send Test Page>. If the pager is within range and functioning properly, the
pager will receive the message “Testing pager using cap code 105 NO.01.”
PAGING OPTIONS
The administrator can be paged at any or all of the following situations: end of testing session, end of each test, end of DPOAE test,
after inactivity threshold has been reached, and after inability to reach pure tone threshold in the designated time window. Both the
“Inactivity Threshold” and the “Inability Threshold” are configurable.
The rest of the Paging Options fields should not be adjusted without direction from Ototronix.
20
MACHINE OPTIONS
Machine Serial Number—Unique Otogram identifier
Customer Number—identifies the owner of the Otogram
Display On-Screen Admin Controls—Check this box if the keyboard is not attached to the Otogram or if there is a preference for using
the On-Screen keyboard.
NOTE: If “Display On-Screen Admin Controls” is not selected, the on-screen keyboard will not appear on the New Session
screen, and the Admin Controls will not appear during the test without pressing Alt+D.
Select Pointing Device—Indicate the type of pointing device to be used with the Otogram by choosing one from the following:
“Pointing Device” options:
Pointer (a touch screen used with a stylus)
Finger (a touch screen used with the finger)
Mouse
These choices will change the on-screen training so that the patient is instructed to use the appropriate device.
Select Response Button—Use the “Response Button” option to indicate how the patient should respond during pure tone testing:
Screen –Responds by touching the red button on the screen with whichever pointer is specified under “Pointing Device”
Trigger – Responds by using a trigger-style mouse
Push Button – Responds by pressing a traditional push button response device
The rest of the Machine Options fields should not be adjusted without direction from Ototronix.
21
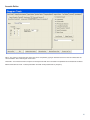
REPORTING OPTIONS
Report View Options
Number of Panels—displays the audiometric thresholds either on a one panel shared audiogram or on two separate panels
View Audiogram Graphics—displays ear-specific thresholds at tested frequencies as a function of intensity (presentation level)
View Audiogram Tables—displays audiometric thresholds on a table including air-bone gap and masking information
Include Billing—includes a table listing the diagnostic and billing codes with associated descriptions as entered by the practice
Include Interpretation Table—includes a table that provides basic observations regarding the type and level of hearing loss, asymmetries, internal consistency, etc.
Include Paragraph Summary—includes information regarding type and level of hearing loss, asymmetries, internal consistency, etc. in
sentence form
Include Case History Information—prints basic case history questions for use in patient interviews
Include Referral Recommendations—includes referral suggestions based on test results Medical Clearance Form – includes a medical clearance form for those patients who require a medical evaluation before proceeding
with a hearing aid fitting.
Other Options
Save Report as an Image—check box to save report as an image and select the image format from the available drop down menu.
Image Output Directory—location of saved reports
Minimum Intensity to Report—indicates the lowest threshold level that should be displayed on the Otogram report.
Enable Threshold Quality Reporting—allows thresholds to be flagged with potential patient response indicators, sometimes referred
to as quality markers, if the patient’s response characteristics were atypical. Patient response indicators are noted as superscripted
characters next to the thresholds in the audiogram table. The characters that can be displayed are:
[ T ] Too Many Presentations—displayed when the number of presentations required to achieve a consistent threshold exceeds
the value in the “Number of Presentations” field.
[ F ] False Positive Ratio—Indicates that the patient responded excessively when no tone was presented. The tolerance for false
positive responses can be adjusted by changing the “Suspicious False Positives Ratio” field.
[ U ] Undermasked – displayed when the Otogram was unable to effectively mask the non-test ear before reaching the output
limits, indicating that the threshold may be greater than could be measured.
Report Print Options
Number of Copies—Configure the number of Otogram reports to be printed from 0 to 3.
Insert Page Breaks—When using a “Report Style” of “Page View”, checking this box will print the patient name, test date, etc. at the
top of each page.
22
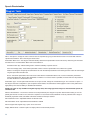
NETWORK OPTIONS
The “Web server root” field should not be adjusted without direction from Ototronix.
TEST OPTIONS
Test protocol configurability is accessible through the Test Options tab including the ability to add, delete, or edit protocols.
Pure Tone Air & Bone Conduction
Name – The option to change the name of the test can be completed by typing an alternate test name in the “Name” field under the
“Air and Bone Conduction” tab on the Otogram Tools screen.
Always, Never and As Needed – select these options by frequency to indicate which frequencies will be tested using the automated
audiometry function.
Always means the frequency will be tested under all circumstances.
Never means the frequency will not be tested under any circumstances.
As Needed indicates that the frequency will be tested if the neighboring frequencies differ by more than 20dB.
Always mask bone—Select this option to ensure that masking is always used to establish bone conduction thresholds as part of a
standard protocol.
Test Bone/Test Air—Deselect these options if either air or bone conduction should not be included as part of a standard protocol.
Masking Margin – Although the Otogram uses commonly accepted rules to determine masking levels, the masking levels can be
increased or decreased by a fixed number of decibels by selecting an alternate masking margin from the drop down menu.
Minimum Presentation Level –The minimum presentation level is adjustable between -15dB and 20dB and is protocol-specific. If the
patient’s threshold is better than the minimum presentation level, it will be plotted with an up arrow on the Otogram report.
False Response Sensitivity – Can be adjusted between 0 and 9 with 0 indicating the least amount of tolerance for false positive responses. The likelihood of receiving a page that the patient is responding improperly is dependent on the sensitivity level specified in
this field.
23
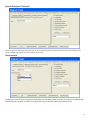
Tympanometry
Name –The option to change the name of the test can be completed by typing an alternate test name in the name field under the
“Tympanometry” tab on the Otogram Tools screen.
Sweep Direction – Options are available to set the device to sweep from +200 daPa to -400 daPa (Sweep Direction: Pos) or from -400
daPa to +200 daPa (Sweep Direction: Neg),
ECV Calculation – The Otogram can measure the ear canal volume using the positive (Pos) tail, the negative (Neg) tail, or the average
(Avg) of the positive and negative tail.
Jerger Classification – These values are used to define the upper and lower normal limits for the classification of tympanograms, using
the Jerger method.
Calibration Values – Provides the most recent information on daily probe calibration. These values will change each time the probe
calibration is performed. Refer to page 31 for detailed instructions on Daily Calibration.
Probe Tone Loop Speed and Smooth Factor – Do not change these values unless instructed to do so by Ototronix.
24
Acoustic Reflex
Name – The option to change the name of the test can be completed by typing an alternate test name in the name field under the
“Acoustic Reflex” tab on the Otogram Tools screen.
Thresholds – check the boxes that correspond to the frequencies that are to be tested in the ipsilateral and contralateral conditions.
Maximum AR Stimulus Level – loudest presentation level that will be presented at any frequency.
25
Speech Discrimination
Name –The option to change the name of the test can be completed by typing an alternate test name in the name field under the
“Speech Discrimination” tab on the Otogram Tools screen.
Presentation Base Level – The Otogram will automatically determine the presentation level for this test by referencing the “Presentation Base Level”. The Presentation Base Level can be based on:
Articulation Index (AI) – Default setting used to maximize audibility of speech sounds.
Pure Tone Average (PTA) - words will be presented at PTA or minimum presentation level, whichever is greater.
Manual - the Otogram will prompt the administrator to enter the desired presentation and masking levels for each ear before beginning the speech discrimination test.
Boost – Should the presentation level need to be louder than the Presentation Base Level, it can be increased by the decibel
amount specified in the “Boost” field. Regardless of whether or not a boost value is specified, the words will never be presented
less than the Minimum Presentation Level.
Presentation Type – To test speech discrimination as an open-set test, change the “Presentation Type” from “Closed” to “Open”. If
the Otogram has been configured for open set speech discrimination, the administrator will be paged to return to the patient at the
appropriate point in the test battery to facilitate administration.
NOTE: This option is only available for English language tests; other languages must always use the automated speech discrimination test
Minimum Presentations – The minimum number of words presented by the Otogram for speech discrimination testing is 12. If the
patient gets the first 12 words correct, the test is complete. For each word missed, additional words are presented until a range of
statistically equivalent values (calculated at the 85% confidence interval) is reached.
Min Presentation Level—adjustable between 40 dB and 75 dB
Max Presentation Level—adjustable between 80 dB and 100 dB
Word List (Open Set, English Only)—option of NU-6 or W-22
Display Written Words—select this option to display written words beneath pictures
26
Speech Reception Threshold
Name–The option to change the name of the test can be completed by typing an alternate test name in the name field under the
“Speech Reception Threshold” tab on the Otogram Tools screen.
Questionnaire
The Otogram comes with four subjective questionnaires for evaluating patient perception of auditory and vestibular difficulty/functionality: the HHIE, the HHIE-S, the Mayo Clinic Survey and the Hearing and Balance Survey.
27
Distortion Product Otoacoustic Emissions
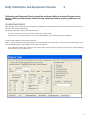
Table 10– DPOAE Configuration Options
Parameter
Meaning
1KHz, 1.5KHz 2KHz, 3KHz, 4KHz, 5KHz, 6KHz, 8KHz
Select one or more test frequencies
L1
Set the level for the F1 frequency between 45 dB and 70 dB
L2
Set the level for the F2 frequency between 45 dB and 70 dB
Pass %
If the total number of OAE responses divided by the total frequencies tested per ear
exceeds this value – the ear will be marked as having passed the OAE test. This value is
adjustable between 50% and 90%.
Test Neighbor
If there is no OAE response this option will test the frequency 5% above and below the
target frequency.
Min S/N Diff
The minimum S/N difference defines the pass criteria and is adjustable in 1 dB increments
between 5 dB and 10 dB.
Default DPOAE Billing Code
No longer active for 3.0.2 and above. To upgrade software, contact Ototronix Support.
Licenses
The configuration options on the Licenses tab is no longer available for software versions 3.0.3 or later.
Data Analyzer
The Data Analyzer tab is no longer available for software versions 3.0.3 or later.
Billing Codes
The Billing Codes tab provides a table where the practice may enter the diagnostic and billing codes with associated descriptions.
28
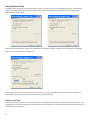
Save and Exit
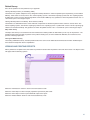
Once all configuration changes are completed, select <Save and Exit> to return to the New Session screen.
Exit
Select <Exit> to return to the New Session Screen without saving any changes in the Otogram Tools utility. Before exiting, this message will appear.
Ambient Noise Monitor
To evaluate ambient noise levels in a specific test environment, select <Ambient Noise Monitor>. The Ambient Noise Monitor will
display the level of ambient noise in the room. If the measured ambient noise levels do not cross the “0dB” line, the environment is in
compliance with the ANSI standard for maximum permissible ambient noise levels during audiometric testing.
Restart Machine
The Restart Machine command will restart the touch screen computer.
29
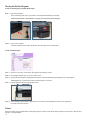
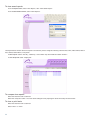
Back Up/Restore Data
This feature allows the backup of all archived Otogram reports or only those reports from a specified date range to an optical disk,
external, or mapped network drive. If the system detects the presence of storage devices other than the built in CD drive, the
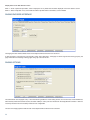
advanced button will be enabled.
Clicking on the Advanced button will show the available Advanced Backup Locations available. In the example below, a USB flash
drive is at E:, and a network drive is mapped to Z:
If the Otogram reports ever need to be removed from an Otogram, they can be reinstalled by restoring the data from the back up
archive location. Any reports which have not been backed up cannot be restored.
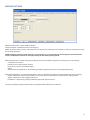
Recover Last Test
In the event that a test does not run in its entirety and there is useful data that needs to be recovered select <Recover Last Test>. Any
completed tests from the last testing session will be displayed. These results may not be saved in the test archive but the practice can
print these to retain a hard copy.
30
Daily Calibration and Equipment Checks 4
Calibration and Equipment Checks should be performed daily to optimize Otogram performance. While performing daily calibration and equipment checks, begin by putting on the
Otovest.
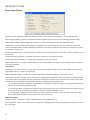
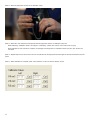
CALIBRATING PROBES
Daily calibration of the probes accounts for changes in temperature and barometric pressure that can influence the accuracy of tympanometry and acoustic reflex testing.
During Daily Calibration, verify the following information:
The “Cal” numbers are similar in value to the numbers from the day before.
There were no errors during calibration. If an error message appears, try to reseat the probe and recalibrate.
To perform daily calibration, follow these instructions:
STEP 1—Access Calibration from the New Session screen by selecting the <Tools> button. The Tools menu will automatically come
up to the calibration page in the “Tympanometry” Tab of “Test Options”.
In the “Calibration Values” Box, there are 6 <Cal> buttons which correspond with a right or left probe and one of three calibration
cavity sizes (0.5 ml, 2.0 ml, and 5.0 ml).
31
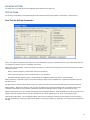
STEP 2—Place the right probe into the 0.5 ml calibration cavity.
STEP 3—Select the <Cal> button that corresponds with the right probe and 0.5 ml calibration cavity size.
While calibrating, “Calibration Values” will change to “Calibrating…please wait” and the <Cal> buttons will turn gray.
When calibration for this chamber is complete, the message will change back to “Calibration Values” and the <Cal> buttons will
turn black.
STEP 4—Repeat steps 2 and 3 for the 2.0 ml and 5.0 ml chambers for the right probe and then again for all three chambers for the left
probe.
STEP 5—When calibration is complete, select <Save and Exit> to return to the New Session screen.
32
EQUIPMENT CHECK
This daily equipment check provides critical assurance that the equipment is functioning properly. Ototronix recommends that a copy
of the equipment check report be maintained for reference. To perform the daily equipment check, follow these instructions:
STEP 1—From the New Session screen, select the protocol entitled “Equip Check” from the drop down menu and enter in required
fields to begin a test (patient name, chart #, etc.).
STEP 2—Place appropriate sized rubber ear tips on the probes, and seat them firmly in your ears for tympanometry and OAE testing.
STEP 3—Select <Start Testing>. Allow test to progress through tympanometry and OAEs.
STEP 4—When the test is complete, verify that the results look reasonable. If so, select <Accept Results>. If not, redo whichever ear
is in question.
STEP 5—Remove rubber ear tips, and place appropriate sized foam ear tips on the insert earphones and seat them securely in your
ears. Place the Otobow so the bone oscillator sits on the high center of your forehead.
STEP 6—Select <Continue> when ready to proceed with the remaining tests.
Listen to the instruction. Make sure you can hear speech equally loud in both ears.
Listen to the tones and respond appropriately.
STEP 7—When the test is complete, verify that:
The pager notified the administrator
The report printed
STEP 8—View the report and verify:
Scores for OAE (“OK or “X”) matched your baseline.
Scores for air and bone conduction match your baseline in both ears within 10dB
If your equipment check does not meet the standards listed above, please contact Ototronix Support.
33
Otogram Test Administration 5
The Otogram is intended to be used by trained health professionals, knowledgeable of hearing
testing procedures and experienced in diagnosing and treating hearing disorders. The tests
may be administered by a physician, audiologist or qualified and trained administrator under
the supervision of a physician. The test is not self-administered by the patient. The results of
the test are to be reviewed and interpreted by either a physician or audiologist.
PATIENT SELECTION
Before conducting any automated audiometry test, evaluate the patient’s ability to listen and follow simple instructions. Patients with
cognitive, behavioral or physical limitations that would preclude sustained attention and reliable subjective responses may not be appropriate candidates for the Otogram’s automated testing option. Examples are listed below. In such instances it may be necessary
to evaluate the patient using manual audiometry and/or strictly objective measures.
Limited cognitive skills
Inattentiveness
Emotional or psychological deficiencies
An inability to press the response button or touch the screen accurately and repeatedly
An inability to hear speech in both ears at less than 95 dB HL
OTOSCOPY
Before testing, the administrator and/or physician must check the patient’s ears to make sure no contraindications for testing exist. If
the eardrum is not predominately visible or if the ear appears unhealthy, the patient should be cleared by an audiologist or physician
before testing is performed. Failure to properly examine the patient’s ears prior to testing may cause test administration errors and/
or lead to inaccurate test results. To avoid contamination, do not test patients with active ear infections or fluid in the ear canal. While
examining the canal, determine the best size ear tips and the optimum angle for the insertion of the ear tips.
EAR TIP USAGE
Ear tips are single-use only. To avoid contamination, only use a new set of ear tips for each patient.
Push the ear tips onto the transducers to install them, and pull the ear tips off to remove them. Avoid twisting which can damage the
transducer.
To ensure safe and effective use of the Otogram, use only the ear tips provided with the Otogram or otherwise specified for use with
the Otogram. Ear tips may be reordered through Ototronix or an authorized dealer. Refer to Ototronix web site for ear tip reorder
form: www.ototronixdiagnostics.com
34
NEW SESSION SCREEN INPUT
The Otogram only requires the administrator to complete three input fields in order to start the test: language, patient name and chart
number. However, the Otogram does allow customization of the required input information to meet practice needs (see page 19 New
Session Screen for Input Configuration Instructions). Any required information will need to be entered before the <Start Testing> button appears.
Upon initiating a new testing session, select a protocol from the drop down menu. A checkmark will appear next to each test that is
included in the selected protocol. Individual tests can be selected and deselected without permanently changing protocols. If a specific test is not available, it will be grayed out. The selected tests will run sequentially, from top to bottom, as listed on the screen.
Once the administrator completes the required fields, the <Start Testing> button will appear on the top left-hand side of the screen.
OBJECTIVE TESTS
Objective tests include: tympanometry, acoustic reflexes, and distortion product otoacoustic emissions. Please note that changes in
temperature and barometric pressure can have a significant effect on tympanometry performance. For accurate results, perform probe
calibration daily (See page 31 for daily calibration instructions). The following sections address patient instructions and basic administration.
NOTE: Do not attempt to test a patient without first performing otoscopy to verify that no contraindications are present such
as wax impaction, foreign body, or fluid in the ear canal.
CAUTION: Probe damage may result if performing
tympanometry when fluid is present in the ear canal.
35
PATIENT SET UP AND INSTRUCTIONS
STEP 1—Drape the Otovest over the patient’s shoulders so that the red insert earphone is on the right of the patient, and the blue
insert earphone is on the left. Fasten the side Velcro closure so the Otovest rests comfortably on the patient’s shoulders.
STEP 2—Before putting ear tips in the patient’s ears, provide some basic instructions such as:
“You will feel a pressure change in your ears and hear some various tones, some may be loud. You do not need to respond
to these tones. Please sit still and quiet.”
STEP 3—Select a rubber ear tip that is slightly larger than the opening of the ear canal and place it on the probe so that the base of
the ear tip sits flush with the base of the nose cone on the probe.
STEP 4—Insert the probe in the patient’s ear canal using a gentle twisting motion to seat the probe securely. It may be necessary to
straighten the ear canal by pulling on the ear to achieve full probe tip insertion as tympanometry requires a tight seal between the rubber probe tip and the patient’s ear canal.
STEP 5—When the patient is set up and ready to proceed, select <Start Testing> on the New Session screen.
TESTING PROCEDURE
During this portion of the test, the administrator should stay in the room to ensure the probe seal is maintained and that the patient
remains still and quiet.
As the tests are being conducted the top of the screen will indicate which ear and test is being performed. If a good seal is attained,
the bar on the left side of the screen will advance to the top while changing from red to yellow to green and the tests should progress
normally.
36
If the progress bar remains in red or yellow zone indicating that a good seal has not been attained:
STEP 1—Select <Stop Testing> to re-evaluate the seal and ear tip size.
STEP 2—Gently rotate the probe, changing its angle or insertion depth until the bar turns green indicating an air-tight seal.
STEP 3—If the probe still does not pressurize, try a different size ear tip.
NOTE: Do not hold the probe in the patient’s ear throughout the Objective Tests. This can lead to inaccurate test results.
After establishing an air-tight seal, select <Redo Right> or <Redo Left> for whichever ear was not pressurizing. Ensure that tests are
completed in both ears.
It is possible for the Otogram to complete the test but not record accurate data if the probe seal was inadequate or if muscle artifact
is present (patient talking or swallowing, handholding the probe, etc). At the end of the test, evaluate the results and decide if they are
reasonable.
When evaluating the validity of the results, confirm that:
Ear Canal Volume (ECV) is consistent with the size of the canal
Tympanogram has normal morphology (smooth tracing)
“CNT” (could not test) does not appear for any acoustic reflex measures
After the tests are complete, select <Accept Results> to proceed.
If other audiometric tests are selected, the Otogram will ask the administrator to “Prepare patient for remaining tests.”
37
SUBJECTIVE TESTS
Subjective Tests include: air and bone conduction, speech reception threshold, speech discrimination, and patient survey. After
instructions and set up, the administrator does not need to be present during the subjective tests but needs to wear the Pager at all
times in case the patient needs assistance or is not progressing through the test. For Paging System instructions, reference page 16.
Patient Set Up and Instructions
STEP 1— Before covering the patient’s ears, provide some basic instructions such as:
Air and Bone Conduction Testing:
“For the first test, you will hear a series of pulsing tones. Press the button (or touch the red square on the touch screen) each time you
hear the series of tones, even if they are very soft. I will be placing ear tips in your ears and an Otobow on your forehead. You will feel
some pressure from the Otobow but when you’ve completed the tone test, the Otogram will instruct you to remove the Otobow from
your forehead and place it in your lap for the duration of the test.”
Speech Testing:
“The next tests will determine how well you hear and understand speech using a picture pointing task. Simply touch the picture that
corresponds to the word you hear. Some of the words will be so soft that you can barely hear them but be sure to make a guess
anyway so the test will move on to louder words.”
Assistance:
“Should you need assistance at anytime during the test, press the red help button on the screen. The Otogram will page me and I will
return to the room. As a safety precaution, please avoid standing up or moving away while connected to the Otogram.”
Volume:
“As soon as the test starts, the Otogram will instruct you to ‘Touch the screen with your finger now.’ It will repeat that phrase until you
touch the screen. Wait to touch the screen until that message is at a comfortable listening level for instructions. Once the test starts,
if the instructions need to be adjusted, you’ll be able to do so by pressing the ‘louder’ or ‘softer’ button on the screen.”
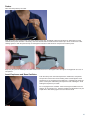
STEP 2— For Insert Earphones: Drape the Otovest over the patient’s shoulders so that the red insert earphone is on the right of the
patient, and the blue insert earphone is on the left. Fasten the side Velcro closure so the Otovest rests comfortably on the patient’s
shoulders. Give the patient the response button to use during pure tone testing. Select a foam ear tip that is slightly larger than the
opening of the ear canal. Place the black stem of the foam ear tip on the insert earphone without twisting so that it completely covers
the silver post. (Likewise remove foam eartips without twisting, which can damage the insert earphone.) Place the ear tips in the
patient’s ears by compressing the foam ear tip into the smallest diameter possible being sure not to obstruct the sound tube. Pull on
the ear in order to straighten the ear canal and improve insertion. Insert the tip into the ear canal. The rear edge of the foam ear tip
should be 2-3mm inside the ear canal entrance and no sidewalls of the insert should be visible (see illustration). Hold the ear tips in
the ear canal until they expand.
NOTE: Proper insertion depth is necessary to achieve accurate test results and to achieve maximum interaural and ambient noise
attenuation. For more information regarding use of insert earphones, please refer to ANSI S3.6-1996.
38
STEP 3—Place the ear tips in the patient’s ears by compressing the foam ear tip into the smallest diameter possible being sure not
to obstruct the sound tube. Pull on the ear in order to straighten the ear canal and improve insertion. Insert the tip into the ear canal.
The rear edge of the foam ear tip should be 2-3mm inside the ear canal entrance and no sidewalls of the insert should be visible (see
illustration). Hold the ear tips in the ear canal until they expand.
NOTE: Proper insertion depth is necessary to achieve accurate test results and to achieve maximum interaural and ambient
noise attenuation. For more information regarding use of insert earphones, please refer to ANSI S3.6-1996.
STEP 4—Place the Otobow around the patient’s head with the raised circle of the bone oscillator at the center of the forehead close
to the natural hairline. Place the rubber pad of the Otobow at the base of the head. Drape the gray cable across the top of the head to
keep it out of the patient’s face.
NOTE: If Otobow placement seems unstable, use an alcohol wipe to clean the skin and bone oscillator surface to improve
contact.
STEP 5—To start automated audiometry:
Select <Continue> if this test is being performed after Objective tests.
Select <Start Testing> if this test is the first test in the battery
NOTE: To conduct speech discrimination testing without pure-tone testing, the Otogram will prompt the administrator to enter
the presentation and masking levels for the test.
39
Testing Procedure
Once the test has begun and the patient seems to be responding properly, the administrator can leave the room wearing the pager.
Once all selected tests have been performed, the administrator will be paged to return to the patient. Return to the patient immediately and touch the yellow screen that says “The test administrator has been paged. Please wait for the administrator to return.”
If the yellow screen is not touched, the administrator will continue to be paged that the patient has completed their test. Take the
insert earphones out of the patient’s ears, and remove the Otovest. Results will print for audiologist or physician review.
40
REPORTING
The Otogram produces a standard report for audiologists and physicians to interpret when making a diagnosis or treatment decision.
Normal reporting conventions are used, such as red indicating results for the right ear and blue indicating results for the left ear. The
Otogram’s testing database allows each patient’s hearing test to be archived and later recalled.
Report Layout
Report Header
This is a standard header that will appear on every report. Any information entered on New Session screen will automatically populate
on the header.
Air and Bone Conduction
Pure tone thresholds can be plotted graphically (one or two panel audiogram) and/or in table format. The audiogram uses the standard ASHA symbols as shown in the Symbols legend. Please refer to the Tools section on page 19 for detail on how to configure the
audiogram view.
41
Speech Intelligibility
Note: Test language is noted within “Speech Intelligibility” title bar.
Under “Speech Intelligibility”, a table with a description of each measure and corresponding ear-specific test results is displayed. The
report also shows the predicted and actual speech reception threshold (SRT) and speech discrimination scores including any discrimination loss that cannot be explained by degree of hearing loss.
Tympanometry
Tympanogram Legend:
White Box – Normal limits for tympanometry according to
Jerger classification
ECV – Ear Canal Volume
SC – Static Compliance
MEP – Middle Ear Pressure
TW – Tympanometric Width
Type:
A – normal
AS – reduced mobility
AD – excessive mobility
B – flat
C – negative pressure
? – indeterminate
Acoustic Reflexes
Both ipsilateral and contralateral acoustic reflexes are plotted on the audiogram.
DPOAE
DPOAE Legend:
S - amplitude of emission
N - amplitude of environmental/biologic noise
OK – emission present
Per frequency
Per ear (OK if emission present at 50% or more of tested frequencies)
42
Patient Survey
See a list of questions for each patient survey in Appendix.
Hearing Handicap Inventory for the Elderly (HHIE)
The HHIE is a 24 question subjective survey designed to identify situations in which the patient reports experiencing communication
difficulty. Each answer is scored, with a “Yes” answer equaling 4 points, “Sometimes” equaling 2 points and “No” equaling 0 points.
A patient with a score over 20 is reporting significant communication difficulty. Only questions for which the patient answers “Yes” or
“Sometimes” print on the Otogram report.
Hearing Handicap Index for the Elderly- Short Versions (HHIE-S)
The HHIE-S is an abbreviated version of the HHIE and comprised of 10 situational questions. Each answer is scored, with a “Yes”
answer equaling 4 points, “Sometimes” equaling 2 points and “No” equaling 0 points. A patient with a score over 20 is reporting significant communication difficulty. Only questions for which the patient answers “Yes” or “Sometimes” print on the Otogram report.
Mayo Clinic Survey
The Mayo Clinic Survey is an assessment of each individual ear’s hearing health as determined by a set of up to 46 questions. The
questions explore the onset and progression of the patient’s hearing loss, as well as situational difficulties, and emotional consequences of hearing impairment.
Hearing and Balance Survey
The Hearing and Balance Survey includes questions about two common ear related issues: dizziness and tinnitus. Additional questions assess the subjective need for amplification.
VIEWING AND PRINTING REPORTS
After a patient has completed a test, the results are printed and saved under the patient’s name and chart number. The Report screen
will appear with the following options:
Select the <New Session> button to return to the New Session screen.
Select the <View Report> button to display a patient’s report directly after a test.
Select the <Print Report> button to print additional copies of the report.
Select the <Manual Retest> button to enter manual audiometry mode.
43
To view saved reports:
From the Report screen, select <View Report>, then <View Saved Report>.
From the New Session screen, select <View Reports>.
The Report Search window allows the reports to be sorted by various categories including: Chart Number, Clinic, Date of Birth, Date of
Test, Gender, Patient Name, or Physician.
To filter reports: use the “Sort By”, “Select By”, and “Criteria” drop down fields and select <Search>.
To view all reports: select <Display All>.
To compare two reports:
Select the check box next to each test.
Select the <Compare> button. The most recent audiogram and tympanogram results will overlay the older results.
To view or print tests:
Select the check box next to each test.
Select <View> or <Print>.
44
ADVANCED AUTOMATED FEATURES
Selecting <Advanced Mode> on the New Session screen allows the frequencies and stimuli of any protocol to be modified for a single
patient
Frequencies:
Select Always, Never, or As-Needed next to each frequency to modify the air and bone conduction protocol.
Check “Always Mask Bone” to mask bone regardless of air-bone gaps or lateral differences in air thresholds.
Stimuli:
To test only one ear for all selected tests or to eliminate bone conduction, uncheck boxes as appropriate. Adjust the “Maximum
AR Stim Level” from 80-110 dB HL.
The Otogram has a manual audiometry mode. To perform manual audiometry testing select <Manual Test> on the New Session
screen. Use manual audiometry to retest specific thresholds at the end of an automated audiometry test by selecting <Manual Retest> from the Report screen. Before proceeding with manual audiometry, instruct the patient to turn so the touch screen computer is
not visible.
45
MANUAL TESTING
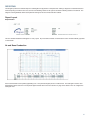
Pure Tone Air and Bone Conduction
The Otogram uses accepted symbols and conventions for manual audiometry (red=right; blue=left).
The gray areas identify the testing limits of the Otogram for both air and bone conduction. An ambient
noise warning will appear when environmental noise
is at a level that could interfere with testing.
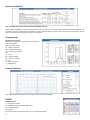
Controls
Alternate between the patient’s
left and right ear for pure tone
testing
Alternate between air and bone
conduction
Present continuous tone
Present pulsing tone
Delete a plot
The <Talk Forward> button allows
talking to the patient using the
ambient noise microphones on the
back of the Otovest. Change the
volume by selecting the volume
bubbles.
Choose insert earphones or
headphones. Not available
in all software versions.
Plot measured threshold
Present masking
Increase or decrease presentation level in 5 dB increments.
Present the tone to the patient’s
test ear
Indicate that no response was
obtained at the presentation
level
Indicate that the threshold may
be better than the measured
threshold
Increase or decrease masking
level in 5 dB increments
Activate Otogram’s automated
masking protocols
Keyboard Interface
The keyboard commands are as follows:
Key
Command
{Space Bar} or {End}
Present Tone
{Up Arrow} {Down Arrow}
Presentation level +/-5 dB
{Page Up} {Page Down}
Presentation level +/- 20 dB
{W} {Z}
Masking Intensity +/- 5 dB
{M}
Masking on/off
<>
Change frequency
{Enter}
Plot threshold
{Delete}
Delete plotted threshold
{R} {L} or {F3}
Right and left ear selection
{A} {B} or {F2}
Air and bone selection
{Home}
Talk forward (enable microphone)
46
Side Bar
Save or print the
manual results
Manual results will only
be archived once this
button is selected
Report will print with
the word “manual” in
the upper left hand
corner
Return to the manual
audiometry screen
Delete all manual
thresholds
Perform speech
discrimination manually (See instructions below)
Return to the New
Session screen
SPEECH DISCRIMINATION
To activate manual speech discrimination from the manual audiometry screen, press <Spch Test>. If automated thresholds are not
available, enter the presentation and masking levels for each ear in the Speech Discrimination Presentation window. Press <View
Audiogram> to review manual thresholds if needed. Press <OK> to begin testing. Once the patient has completed speech discrimination, the Otogram will return to the manual audiometry screen.
Instruct the patient to repeat the words that he hears.
The patient will then hear recorded words and will repeat them. Mark <Correct> or <Incorrect> as appropriate. The Otogram will
score accordingly.
NOTE: Manual results will only be archived once <Save Report> is selected.
47
Caring for your Otogram 6
ANNUAL CALIBRATION
Annual calibration is required according to the manufacturer’s specifications to ensure accurate test results. The diagnostic module
and the Otovest must be calibrated by an Ototronix authorized technician to meet ANSI specification for diagnostic hearing testing.
When the Otogram is within 14 days of its calibration due date, an on-screen reminder will appear upon start-up. If the Otogram is out
of calibration, an “uncalibrated” watermark will appear on all reports performed after that date until the unit is calibrated.
To schedule Otogram calibration, contact Ototronix Support.
Warranties are available to cover the cost of this service.
DAILY CALIBRATION AND EQUIPMENT CHECK
Changes in temperature and barometric pressure can have a significant effect on tympanometry performance. For accurate results,
the practice must perform daily tympanometry calibration.
Daily equipment checks provide critical assurance that the equipment is functioning properly. Ototronix recommends that a copy of
the equipment check report be maintained for reference.
See page 31 for more detailed instructions on performing daily calibration and equipment check.
ROUTINE CLEANING
When cleaning the touch screen, use the cloth provided with the Otogram, or other soft cloth to remove dust.
For routine cleaning of other surfaces, use a soft cloth to remove dust. It is also acceptable to use a water-diluted mild detergent and
a soft damp cloth. Wring the cloth thoroughly to prevent damage caused by moisture entering the equipment.
Do not use chemical agents containing ammonia, thinner, or alcohol or other harsh chemicals, as they may damage the equipment.
OTOVEST TRANSDUCERS
The Otovest contains sensitive electronic devices; care should be taken to avoid damaging them. Keep all transducers clean, dry, and
protected.
48
Probes
Never hold the probes by the cable.
When the probes are not being used, cover them with the probe caps. Periodically inspect the probe tip for debris that may have
collected in the probe channels. If necessary, clean the channels with the small brush from base to tip. Never use alcohol or other
cleaning agents to clean the probe as they can damage the transducers and electronic components inside the probe.
Stop using the probe immediately if the cable insulation becomes worn or damaged. Further damage to the equipment can occur if
not repaired.
Insert Earphones and Bone Oscillator
Push the ear tips onto the insert earphones to install them, and pull the
ear tips off to remove them. Avoid twisting which can damage the insert
earphones. Do not unplug the insert earphones. Unplugging the insert earphone can strip the outlet leaving the earphone loose or damaged. Avoid
holding the earphone by its cable.
Do not unplug the bone oscillator. When removing the oscillator from the
Otobow, do not pull the cord. The bone oscillator and the Otobow may be
wiped with a mild cleaning agent such as an alcohol swab.
49
Otogram Troubleshooting 7
Resolutions to the most frequently asked troubleshooting questions have been provided below.
Please contact Ototronix support for additional assistance.
NO DEVICE CONNECTED MESSAGE
Before rebooting the Otogram, verify that the power cord is securely plugged into both the outlet and the Otogram Base.
When the above are verified, turn off the Otogram by selecting <Start> then <Turn Off Computer>. After the Otogram shuts down,
activate the Power Switch to turn the Otogram back on. If the Otogram does not start normally, contact Ototronix Support.
CALIBRATION EXPIRED MESSAGE PERSISTS AFTER CALIBRATION
If the Calibration Expired message persists after receiving the Otogram back from annual calibration, the touch screen computer has
not loaded the calibration file from the audiometer. The easiest way to sync these components is to perform daily calibration and an
equipment check (reference page 31).
After completing daily calibration and equipment check, restart the Otogram to verify that the Calibration Expired message no longer
persists. The “uncalibrated” watermark should not appear on subsequent tests.
CANNOT HEAR SPEECH OR TONES
Ensure the Otovest is securely connected to the audiometer.
TOUCHSCREEN NOT RESPONDING PROPERLY TO FINGER CONTACT
Avoid touching the screen with both the fingernail and the fingertip. If issues persist, the Laptop handle is equipped with a stylus as an
option for use with the touchscreen.
TOUCH SCREEN CALIBRATION
If the Otogram’s touch screen does not seem to be accurate, it can be recalibrated. To recalibrate, follow these steps:
STEP 1— Sit in front of the Otogram in the same position, at the same level as a patient.
STEP 2— On the keyboard, press the <Windows> key. The start menu should appear.
STEP 3— From Start, select <All Programs>, <Accessories>, <System Tools>, <Control Panel>, then <Tablet Calibration>.
STEP 4— Follow the on-screen instructions to calibrate the touchscreen.
TECHNICAL SUPPORT AND SERVICE
Contact Ototronix support for information on products, software updates, and to request enhancements, or browse our website at
www.ototronixdiagnostics.com. Email Ototronix at [email protected] or call toll-free at 877-410-4327 in North America and talk
to Ototronix Support.
Service and repair of electronic medical equipment and battery replacement should be performed by the equipment manufacturer or
an authorized representative. Ototronix reserves the right to disclaim all responsibility for the operating safety, reliability and performance of equipment serviced or repaired by other parties.
CAUTION: Do not remove the hardware platform cover under any circumstances.
50
Otogram Service and Maintenance 8
All Otograms come with a standard one-year service and maintenance agreement. Extended warranty and service agreements are
available for purchase, which may cover annual calibration, software updates and upgrades, maintenance, and loaner units.
If a warranty is not purchased, Ototronix will still provide repair and calibration services at the customer’s expense. Standard shipping
rates and the full cost of all repairs, including labor and materials, will apply. A repair quote will be provided and an authorization
signature is required prior to beginning repairs. The Otogram may then be transported to Ototronix for required service and
maintenance.
For shipping information or if for any reason there is dissatisfaction with the Otogram, please call our toll free support number at
877-410-4327 or email us at [email protected].
TRANSPORT AND STORAGE
The Otogram is provided with packaging capable of repeated use and safe transport of the Otogram and its accessories. It is advised
to save the original Otogram packaging for use in future transport of the Otogram.
If the Otogram is to be stored for extended periods, it is advised to use the original Otogram packaging in order to preserve the
equipment and minimize the possibility of damage. Please refer to the General Specification sections in Section 1 of this Guide for
proper storage environment conditions.
DISPOSAL
If you wish to dispose of your Otogram for any reason, contact Ototronix for return and proper disposal.
51
Appendix
Patient Survey Questions
Hearing Handicap Index for the Elderly - Short (HHIE-S)
1.
Does a hearing problem cause you to feel embarrassed when meeting new people? Yes, Sometimes, No
2.
Does a hearing problem cause you to feel frustrated when talking to members of your family? Yes, Sometimes, No
3.
Do you feel handicapped by a hearing problem? Yes, Sometimes, No
4.
Does a hearing problem cause you difficulty when visiting friends relatives or neighbors? Yes, Sometimes, No
5.
Does a hearing problem cause you to feel frustrated when talking to coworkers, clients or customers? Yes, Sometimes, No
6.
Does a hearing problem cause you difficulty in the movies or theaters? Yes, Sometimes, No
7.
Does a hearing problem cause you to have arguments with family members? Yes, Sometimes, No
8.
Does a hearing problem cause you difficulty when listening to TV or radio? Yes, Sometimes, No
9.
Do you feel that any difficulty with your hearing limits or hampers your personal or social life? Yes, Sometimes, No
10.
Does a hearing problem cause you difficulty when in a restaurant with relatives or friends? Yes, Sometimes, No
Hearing Handicap Index for the Elderly (HHIE)
1.
Does a hearing problem cause you to use the phone less often than you would like? Yes, Sometimes, No
2.
Does a hearing problem cause you to feel embarrassed when meeting new people? Yes, Sometimes, No
3.
Does a hearing problem cause you to avoid groups of people? Yes, Sometimes, No,
4.
Does a hearing problem make you irritable? Yes, Sometimes, No
5.
Does a hearing problem cause you to feel frustrated when talking to members of your family? Yes, Sometimes, No
6.
Does a hearing problem cause you difficulty when attending a party? Yes, Sometimes, No
7.
Do you feel handicapped by a hearing problem? Yes, Sometimes, No
8.
Does a hearing problem cause you difficulty when visiting friends, relatives or neighbors? Yes, Sometimes, No
9.
Does a hearing problem cause you to feel frustrated when talking to coworkers, clients or customers? Yes, Sometimes, No
10.
Does a hearing problem cause you difficulty in the movies or theaters? Yes, Sometimes, No
11.
Does a hearing problem cause you to be nervous? Yes, Sometimes, No
12.
Does a hearing problem cause you to visit friends, relatives or neighbors less often than you would like? Yes, Sometimes, No
13.
Does a hearing problem cause you to have arguments with family members? Yes, Sometimes, No
14.
Does a hearing problem cause you difficulty when listening to TV or radio? Yes, Sometimes, No
15.
Does a hearing problem cause you to go shopping less often than you would like? Yes, Sometimes, No
16.
Does any problem or difficulty with your hearing upset you at all? Yes, Sometimes, No
17.
Does a hearing problem cause you to want to be by yourself? Yes, Sometimes, No
18.
Does a hearing problem cause you to talk to family members less often than you would like? Yes, Sometimes, No
19.
Do you feel that any difficulty with your hearing limits or hampers your personal or social life? Yes, Sometimes, No
20.
Does a hearing problem cause you difficulty when in a restaurant with relatives or friends? Yes, Sometimes, No
21.
Does a hearing problem cause you to feel depressed? Yes, Sometimes, No
22.
Does a hearing problem cause you to listen to TV or radio less often than you would like? Yes, Sometimes, No
23.
Does a hearing problem cause you to feel uncomfortable when talking to friends? Yes, Sometimes, No
24.
Does a hearing problem cause you to feel left out when you are with a group of people? Yes, Sometimes, No
52
Mayo
1. Which best describes how quickly your hearing loss developed in your RIGHT EAR? Suddenly (< one day), Rapidly (> one day,
less than 5 months), Gradually (> five years, or unknown), Fluctuating Hearing - sometimes I hear better than others, Hearing loss
present at birth, No hearing loss suspected
2. Which best describes how quickly your hearing loss developed in your LEFT EAR? Suddenly (< one day), Rapidly (> one day,
less than 5 months), Gradually (> five years, or unknown), Fluctuating Hearing - sometimes I hear better than others, Hearing loss
present at birth, No hearing loss suspected
3. Have you had a head cold recently? Yes, No
4. Have you had pain, pressure or fullness in your ears? Yes, No
5. In which ear did you have pain, pressure or fullness? Right, Left, Both
6. Have you had hearing loss that fluctuates (comes and goes)? Yes, No
7. In which ear did you have the hearing loss that comes and goes? Right, Left, Both
8. Have you had an abnormal sensitivity to loud sounds? Yes, No
9. In which ear did you have the unusual sensitivity to loud sounds? Right, Left, Both
10. Have you ever worked around loud noise? Yes, No
11. Have you been exposed to gunfire? Yes, No
12. Where were you exposed to gunfire? As a hunter, In the military, As a sport
13. Does anyone else in your family have a hearing problem similar to yours? Yes, No
14. Did you have many ear infections as a child? Yes, No
15. Do you ever have trouble hearing common sounds like a door bell or ringing telephone? Yes, No
16. Do you ever have trouble telling which direction sounds are coming from? Yes, No
17. Do you ever have trouble understanding voices on the telephone (either ear)? Yes, No
18. Do you ever have difficulty understanding what someone says to you when they are directly in front of you and there is NO background noise? Yes, No
19. Do you ever have difficulty understanding what someone says to you when they are directly in front of you and there is SOFT
background noise? Yes, No
20. Do you ever have difficulty understanding what someone says to you when they are directly in front of you and there is LOUD
background noise? Yes, No
21. Do you ever have difficulty understanding what someone says to you when they are over ten feet away and there is no background noise? Yes, No
22. Does a hearing problem cause you to use the phone less often than you would like? Yes, No
23. Does a hearing problem cause you to feel embarrassed when meeting new people? Yes, No
24. Does a hearing problem cause you to avoid groups of people? Yes, No
25. Does a hearing problem make you irritable? Yes, No
26. Does a hearing problem cause you to feel frustrated when talking to members of your family? Yes, Sometimes, No
27. Does a hearing problem cause you difficulty when attending a party? Yes, Sometimes, No
28. Does a hearing problem cause you difficulty hearing or understanding coworkers, clients, or customers? Yes, Sometimes, No
29. Do you feel handicapped by a hearing problem? Yes, Sometimes, No
30. Does a hearing problem cause you difficulty when visiting friends relatives or neighbors? Yes, Sometimes, No
31. Does a hearing problem cause you to feel frustrated when talking to coworkers, clients or customers? Yes, Sometimes, No
32. Does a hearing problem cause you difficulty in the movies or theaters? Yes, Sometimes, No
33. Does a hearing problem cause you to be nervous? Yes, Sometimes, No
34. Does a hearing problem cause you to visit friends, relatives or neighbors less often than you would like? Yes, Sometimes, No
35. Does a hearing problem cause you to have arguments with family members? Yes, Sometimes, No
36. Does a hearing problem cause you difficulty when listening to TV or radio? Yes, Sometimes, No
37. Does a hearing problem cause you to go shopping less often than you would like? Yes, Sometimes, No
38. Does any problem or difficulty with your hearing upset you at all? Yes, Sometimes, No
53
39. Does a hearing problem cause you to want to be by yourself? Yes, Sometimes, No
40. Does a hearing problem cause you to talk to family members less often than you would like? Yes, Sometimes, No
41. Do you feel that any difficulty with your hearing limits or hampers your personal or social life? Yes, Sometimes, No
42. Does a hearing problem cause you difficulty when in a restaurant with relatives or friends? Yes, Sometimes, No
43. Does a hearing problem cause you to feel depressed? Yes, Sometimes, No
44. Does a hearing problem cause you to listen to TV or radio less often than you would like? Yes, Sometimes, No
45. Does a hearing problem cause you to feel uncomfortable when talking to friends? Yes, Sometimes, No
46. Does a hearing problem cause you to feel left out when you are with a group of people? Yes, Sometimes, No
Hearing and Balance Survey
Balance and Dizziness
1. Do you ever lose your balance or feel dizzy or unsteady? Yes, No
2. Have you fallen more than twice in the past year? Yes, No
3. Do you ever fall or feel like you are about to fall? Yes, No
4. Are you dizzy or unsteady when you first get up? Yes, No
5. Do you worry that you may fall and hurt yourself? Yes, No
6. Does moving your head quickly make you dizzy? Yes, No
7. Does bending over make you dizzy? Yes, No
8. Does dizziness or imbalance interfere with your life? Yes, No
9. Have you recently changed your medications? Yes, No
10. Has your vision changed over the last six months? Yes, No
Tinnitus
1. Do your ears ring or make noises? Yes, No
2. Have these noises started or gotten worse in the past six months?Yes, No
3. Is the ringing in your ears bothersome? Yes, No
Amplification
1. Do you have problems understanding what people say if there is noise? Yes, No
2. Do you think people mumble? Yes, No
3. Do friends or family members complain that you do not hear them? Yes, No
4. Do you “hear”, but not “understand” what people say? Yes, No
54
55
Ototronix, LLC
26620 I-45 North
Houston, Texas 77386 USA
Atlantico Systems, LTD
34 Oldfield, Kingston,
Galway, Ireland
© 2014 Ototronix, LLC. All rights reserved. Otogram is a trademark of Ototronix, LLC. 403-1014-001 Rev. B
(877) 410-4327
[email protected]
www.ototronixdiagnostics.com