1
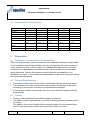
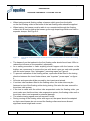
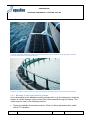
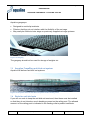
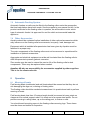
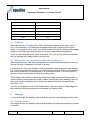
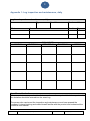
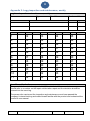
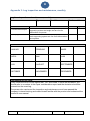
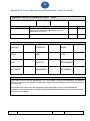
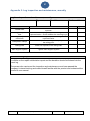
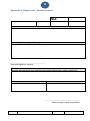
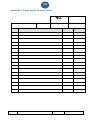
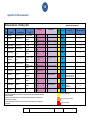
User Manual Aqualine Froya Ring floating collar Rev. 07.06.13 - KR Page 2 of 33 USER MANUAL AQUALINE FRØYARING – FLOATING COLLAR Innholdsfortegnelse: 1 Introduction .................................................................................................................................... 2 2 Aqualine og Aqualine FrøyaRingen ............................................................................................. 2 2.1 Contacts in Aqualine AS ............................................................................................................. 3 3 Definitions ...................................................................................................................................... 3 4 HSE Health, Safety and Environment .......................................................................................... 3 5 Main Principles Floating Collar .................................................................................................... 3 5.1 General Description of the Construction .................................................................................... 3 5.2 Clamps........................................................................................................................................ 4 5.3 Marking of Floating Collar .......................................................................................................... 5 5.4 Net Buoyancy Floating Collar ..................................................................................................... 5 5.5 Specification Floating Collar ....................................................................................................... 6 6 Preparation ..................................................................................................................................... 6 6.1 6.2 6.3 6.4 Assembly / Construction at Customer Site ................................................................................. 6 General Requirements ............................................................................................................... 6 Towing ........................................................................................................................................ 6 Installation into Mooring System ................................................................................................ 8 6.4.1 6.4.2 Mooring in standard mooring clamps ................................................................................................................ 8 Mooring in tube type mooring clamps................................................................................................................ 9 6.5 Frame Mooring ......................................................................................................................... 11 6.6 Fastening of the cage net to the Floating Collar ...................................................................... 12 7 Accessories .................................................................................................................................. 13 7.1 Aqualine FrøyaRing Sinker Tube ............................................................................................. 13 7.2 Aqualine gangway .................................................................................................................... 13 7.3 Aqualine FrøyaRing anit-bird net system ................................................................................. 14 7.4 Rods for anti-bird nets .............................................................................................................. 14 7.5 Automatic Feeding System ...................................................................................................... 15 7.6 Other Accessories .................................................................................................................... 15 8 Operation ...................................................................................................................................... 15 8.1 Mooring of boats ....................................................................................................................... 15 8.2 Delousing .................................................................................................................................. 16 8.3 Lifting of floating collar .............................................................................................................. 16 8.4 Cleaning ..................................................................................................................................... 2 8.5 Measures to be used when landing and launching .................................................................... 2 9 Storage ............................................................................................................................................ 2 9.1 Storage at sea ............................................................................................................................ 2 9.2 Storage on shore ........................................................................................................................ 3 10 Unwanted Incidents ....................................................................................................................... 3 10.1 Extreme Situations ................................................................................................................. 3 10.2 Rupture or damage to the floater tube ................................................................................... 3 10.3 Tidal variations and storm surge ............................................................................................ 4 10.4 Ice and Snow ......................................................................................................................... 4 11 Waste handling .............................................................................................................................. 4 12 Inpection, maintenance ................................................................................................................. 4 12.1 12.2 Aqualine AS Logging................................................................................................................................... 4 Modifications .......................................................................................................................... 4 Prepared by: Kjell Roger, Odd Erland & Anders Rev. 07.06.2013 © Copyright, must not be copied Page 3 of 33 USER MANUAL AQUALINE FRØYARING – FLOATING COLLAR 12.3 Spare Parts ............................................................................................................................ 4 13 Sjekkpunkter .................................................................................................................................. 5 13.1 Ettersyn og vedlikehold på flytekrage .................................................................................... 6 14 References...................................................................................................................................... 7 14.1 NS9415, the most recent applicable, as well as underlying standards ................................. 7 14.2 The Nytec Regulations, the most recent applicable .............................................................. 7 Appendix 1: Log inspection and maintenance, daily ......................................................................... i Appendix 2: Logg inspection and maintenance, weekly ................................................................... ii Appendix 3: Log inspection and maintenance, monthly .................................................................. iii Appendix 4: Log inspection and maintenance, every 3rd month ..................................................... iv Appendix 5: Log inspection and maintenance, annually .................................................................. v Appendix 6: Repair note / deviation report ........................................................................................ vi Appendix 7: Event log for floating collars ........................................................................................ vii Aqualine AS Prepared by: Kjell Roger, Odd Erland & Anders Rev. 07.06.2013 © Copyright, must not be copied Page 2 of 33 USER MANUAL AQUALINE FRØYARING – FLOATING COLLAR 1 Introduction This user manual describes important information on how the floating collars and other components delivered by Aqualine AS are to be transported, handled, installed, inspected and maintained. At the end of the user manual there are forms for inspection, control, reporting of deviations and repair attached. These are intended as templates with the necessary points for checks and follow-up of the floating collar. Take contact with Aqualine AS for ordering of spare parts and service. If you find elements that have been poorly explained, please contact us; we are more than willing to provide further guidance and advice. 2 Aqualine og Aqualine FrøyaRingen Since 1980, Aqualine AS has delivered floating collars to the fish farming industry in Norway and internationally. For our design and concepts, site-specific environmental specifications are taken into account. Furthermore, as Aqualine AS deliver complete cages with nets, collars and mooring, possible risk aspects influencing operations of the constructions are carefully evaluated. Within this document there some references made to standard NS9415. This standard is governing for all design/production and operation of fish farm constructions in Norwegian Sea. Please note that requirements are implemented in general design, however foreign customers may have other requirements for the equipment. The site class governing a delivery is indicated on the product certificate for each individual floating collar. Here, also the applicable requirements to maximum cage net depth and allowed load per mooring point and other important information have been included. Aqualine AS Prepared by: Kjell Roger, Odd Erland & Anders Rev. 07.06.2013 © Copyright, must not be copied Page 3 of 33 USER MANUAL AQUALINE FRØYARING – FLOATING COLLAR 2.1 Contacts in Aqualine AS Switchboard: Tel. Fax. 73 80 99 30 73 80 99 40 Please visit our web-site to get in touch with the right person: www.aqualine.no/kontakt/ansatte Web site: E-mail: 3 www.aqualine.no [email protected] Definitions Reference NS9415-2009 contains all definitions. 4 HSE Health, Safety and Environment Work operations on a net cage must be mapped and risk assessed, and the necessary safety measures must be initiated. This should at least include: The possibility to save oneself in case you fall into the sea The risk of falling That the installation is ergonomically prepared, hereunder gangways and railings Access with boat Requirements and routines for maintenance and inspection Appropriate and good lighting Work operations when using a crane 5 Main Principles Floating Collar 5.1 General Description of the Construction The construction consists of: The floating collar has double floater tubes and railing tubes in polyethylene plastic. All welded steel clamps or injection moulded plastic clamps have been mounted on the tubes. The clamps are anchored with a dimensioned main supporting system in the horizontal plane, see Figure 1. The main supporting system consists of steel clamps/plastic clamps connected to steel rods/chain/fibre ropes which handles the forces round the circumference of the floating collar. Aqualine AS Prepared by: Kjell Roger, Odd Erland & Anders Rev. 07.06.2013 © Copyright, must not be copied Page 4 of 33 USER MANUAL AQUALINE FRØYARING – FLOATING COLLAR Separate steel mooring clamps handles the loads from the moorings which are distributed around the circumference by means of this construction. The client may choose another option, but then the customer must evaluate the risk of this option. The steel clamps counteract any ovalization of the floater tubes. This local buckling is prevented and the flexibility of the floater tubes is maintained. By fastening the cage net onto clamps, an even distribution of the net load into the system is ensured. Bushings between the steel clamps and the floater tubes reduce friction. The floater tubes thus move freely inside the clamps, both in terms of rotation and longitudinal movement. There is expanded polystyrene in both floater tubes to maintain the buoyancy in case of any damage or puncture. Figure 1: Load Distribution around the circumference 5.2 Clamps The floating collar is assembled by means of various types of clamps. They have different applications and the following should be observed when using a floating collar: The floating collar should only be moored in dedicated steel mooring clamps. The sinker tube, if any, should only be fastened in dedicated clamps. The cage net should preferably be fastened at lowest point at the railing post. The capacity of the mooring clamps, allowed torque and the forces on the railing posts and the maximum weights on the sinker tuber/distention system, are indicated in the floating collar’s product certificate. Aqualine AS Prepared by: Kjell Roger, Odd Erland & Anders Rev. 07.06.2013 © Copyright, must not be copied Page 5 of 33 USER MANUAL AQUALINE FRØYARING – FLOATING COLLAR 5.3 Marking of Floating Collar Every delivery will have its unique serial number which identifies the products. The floating collars are marked with a unique marking tube in plastic and in addition, the serial number is stamped into the 4 mooring clamps. Figure 2: Marking of mooring clamps and marking tube. The marking tube is permanent fitted with the following readable information: 1. Certificate no. NSAS 006 2. Type no./Product 3. Manufacturer 4. Approved in accordance with NS 9415 5. Max. significant wave height Hs 6. Max. current Vc 7. Payload 8. Dimensioning time of use 9. Production date and year 10. Project no. 11. Serial number 5.4 Net Buoyancy Floating Collar In the product certificate, the net buoyancy of the floating collar without any accessories is described. Aqualine AS Prepared by: Kjell Roger, Odd Erland & Anders Rev. 07.06.2013 © Copyright, must not be copied Page 6 of 33 USER MANUAL AQUALINE FRØYARING – FLOATING COLLAR 5.5 Specification Floating Collar Type 315 Relevant perimeters omkretser * Relevant diameters * 60-120m 400 80-160m 450 500 110-180m 120-200m 630 140-++m 19,1-38,2m 28,6-50,9m 35,0-57,3m 38,2-63,7m 44,6-++m 286-1146m2 645-2037m 2 963-2578m 2 1146-3183m 2 1560-++m 2 Floater tube Ø 315mm Ø 400mm Ø 450mm Ø 500mm Ø 630mm Hand rail Ø 125mm Ø 140mm Ø 140mm Ø 140mm Ø 160mm Surface Expanded polystyrene In both floater tubes Mooring fastening points Standard in steel In both floater tubes Standard In both floater tubes Standard In both floater tubes Standard In both floater tubes Standard Plastic bushing Standard Standard Standard Standard Standard Fender Standard Standard Standard Standard Standard * The circumference and diameters are measured on the inside of the inner floater tube. 6 Preparation 6.1 Assembly / Construction at Customer Site When mounting floating collars at customers site, where the customer is responsible for the assembly area and the facilities, parts for the assembly will arrive in advance of the operation in time. In these cases, it is important that the parts are unloaded and stored in an appropriate and suitable area, so that the parts are not damaged and/or deformed. Care must be taken so that the area for the assembly is not blocked by the parts. It is the customer’s responsibility to take care of the parts during the whole assembly period. 6.2 General Requirements The floating collars must only be used in accordance with the site survey report. The customer must make sure that the floating collar, accessories is delivered according to the contract, and that no components are damaged. If the delivery includes a sinker tube; this one is then delivered together with the floating collar. 6.3 Towing Floating collars should be towed without cage net attached. The floating collar is fastened with a crowfoot to a towing hawser, distance about 20 meters. The bridle is fixed to the floating collar’s mooring clamps. We recommend three parts for the front floating collar, and a minimum of two for the rest. Aqualine AS Prepared by: Kjell Roger, Odd Erland & Anders Rev. 07.06.2013 © Copyright, must not be copied Page 7 of 33 USER MANUAL AQUALINE FRØYARING – FLOATING COLLAR When towing several floating collars a hawser which goes from the bridle on the first floating collar to the bridle of the last floating collar should be applied. When towing, the hawser must be able to run unrestricted through the floating collars; this is best by letting the hawser go through loops/rings which are fixed in separate clamps. See Figure 3. Figure 3: This photo shows an example of how the hawser and the bridles are fixed to the floating collars. The hawser from the towboat to the first floating collar should be at least 150m to reduce the influence of the propeller’s slipstream. As a safety precaution in case anything should happen with the hawser or the bridles, we recommend to secure the tow with slack ropes on each side parallel with the main hawser. See “sikringstau” (securing ropes) on Figure 4. To prevent ovalization of the floating collars, ropes should be fitted in the towing direction between the inner floater tubers, see “krysstau” (cross ropes” on figure 4. All knots and ropes should be secured by two inserts and seized. If a sinker tube has been fitted to the floating collar, the sinker tube may be fastened on top of the floating collar during towing. See also the user manual for the sinker tube system. If the tow is made with the sinker tube suspended under the floating collar, you must make sure that the sinker tube suspension system, the floating collar and/ or the sinker tuber is not exposed to potential damage. The relative towing speed must not exceed 3 knots. During moving of the floating collar with cage net, the speed should be adapted so that current/waves do not exceed the floating collars maximum allowed significant wave height and current. Aqualine AS Prepared by: Kjell Roger, Odd Erland & Anders Rev. 07.06.2013 © Copyright, must not be copied Page 8 of 33 USER MANUAL AQUALINE FRØYARING – FLOATING COLLAR Figure 4: The figure shows an example of how the hawser and the crowfoots are fixed to the floating collars. 6.4 Installation into Mooring System When it comes to the maximum allowed payload for the mooring connections, we refer to the product certificate. It is assumed that the mooring system is dimensioned for the same allowed significant wave height and current, or higher. 6.4.1 Mooring in standard mooring clamps If a shackle is used for mooring of the floating collar with standard mooring clamps, all shackles must be secured with a plastic coated locking wire or other securing system which does not cause corrosion. Do NOT use cotter pins of stainless material. Aqualine AS Prepared by: Kjell Roger, Odd Erland & Anders Rev. 07.06.2013 © Copyright, must not be copied Page 9 of 33 USER MANUAL AQUALINE FRØYARING – FLOATING COLLAR Figure 5: The photo shows an example of fastening of mooring in standard mooring clamps. Shackle secured with a plastic coated locking wire. Figure 6: The photo shows a floating collar with injection moulded clamps and steel mooring clamps. 6.4.2 Mooring in tube type mooring clamps As an alternative to the standard mooring clamps with a lug, the fastening is made by means of a bridle through a tube (chain hole) which passes through the clamp. This clamp may be used in the following manner. Chain and shackle dimensions must be 16mm or 19mm galvanized alloy chain with 6.5T H shackle. Aqualine AS Prepared by: Kjell Roger, Odd Erland & Anders Rev. 07.06.2013 © Copyright, must not be copied Page 10 of 33 USER MANUAL AQUALINE FRØYARING – FLOATING COLLAR The chain from the bridle is pulled from the beneath clamp and is secured with a shackle as shown on the photo below. It is important that the shackle rests properly against the cross plate on the chain tube. Figure 7: This photo shows an example of fastening of mooring in tube type mooring clamps. The chain is secured by means of a cross plate and shackle. Figure 8: Underneath the clamp, it is very important that the chain act like a hinge as show non the picture. No bending loads on the chain link legs. If the bridle consists of other chain dimensions or of ropes, the bridle should be spliced with minimum 3m 16mm or 19mm preferably Gunnebo long linked galvanised chain for fastening in the mooring clamp. Aqualine AS Prepared by: Kjell Roger, Odd Erland & Anders Rev. 07.06.2013 © Copyright, must not be copied Page 11 of 33 USER MANUAL AQUALINE FRØYARING – FLOATING COLLAR 6.5 Frame Mooring The bridles from the mooring system is fastened in the mooring clamp on the floating collar. All crowfoots should be of the same type of rope/chain and have the same dimension. The rings should be placed as close to the centre relative to the frame as possible, and there should be a certain slack in the bridles, see Figure below. Pre-tensioning: The mooring frame must be constructed so that the pre-tensioning forces are distributed on the frame system and not in the bridles. Figure 9: Rings in centre of Frame Mooring (Picture taken from Analysis Software Aquasim) Aqualine AS Prepared by: Kjell Roger, Odd Erland & Anders Rev. 07.06.2013 © Copyright, must not be copied Page 12 of 33 USER MANUAL AQUALINE FRØYARING – FLOATING COLLAR 6.6 Fastening of the cage net to the Floating Collar Fitting of the cage net is made according to the specifications from the manufacturer of the cage net. When using a sinker tube system, reference is made to specific manual for such system. The fastening points on the floating collar are preferably at the lower part of the railing post. If the cage nets fastening points is not adapted to the floating collar’s clamps, you may fasten the cage net in the floater tubes between the clamps. This may be done in 2 ways; 1) The rope passes over the inner floater tube and then under the outer. Tied between the floater tubes around the outer. 2) The rope passes over both floater tubes and is tied between the tubes around the outer one. In order to reduce the risk of gnawing, the rope should be padded. Make sure that there are openings in the gangway or move the gangway somewhat. By tying a rope on the railing post on each side of the fastening of the cage net, you will reduce the sideways displacement of the fastening of the cage net. We recommend using cage nets, which are adapted to the floating collar so that all the fastening points are suited for the Clamps on the floating collar. Figure 10: These photos are for illustration purposes only. Fastening of the cage net between the railing posts. When using a sinker tube, all the fastening points of the cage net to the floating collar should be fastened before lowering the sinker tube. The jump net for the cage net should, as a starting point, not be suspended in the cage net hooks during operation. Aqualine AS Prepared by: Kjell Roger, Odd Erland & Anders Rev. 07.06.2013 © Copyright, must not be copied Page 13 of 33 USER MANUAL AQUALINE FRØYARING – FLOATING COLLAR 7 Accessories 7.1 Aqualine FrøyaRing Sinker Tube Aqualine FrøyaRing floating collars are also delivered with an Aqualine FrøyaRing sinker tube system for distention of the cage net. Aqualine AS has long-term experience with delivering and operating sinker tubes. A sinker tube contributes to maintaining that the shape, and thus also the size, of the cage net, is not altered materially in localities which are subjected to a lot of current. Figure 11: Aqualine FrøyaRing flytekrage med bunnring The Aqualine FrøyaRing sinker tube system is described in a separate user manual. 7.2 Aqualine gangway Gangways provide the safest and best working environment for the personnel at site in all types of weather. Gangways also increase the efficiency, as the tasks may be carried out both easier and faster. Aqualine AS Prepared by: Kjell Roger, Odd Erland & Anders Rev. 07.06.2013 © Copyright, must not be copied Page 14 of 33 USER MANUAL AQUALINE FRØYARING – FLOATING COLLAR Aqualine gangways: Designed to avoid slip-incidents. Fitted so that they do not interfere with the flexibility of the net cage. May easily be fitted at a later stage on previously supplied net cage systems. Figure 12: Gangway The gangway should not be used for storage of weights etc. 7.3 Aqualine FrøyaRing anit-bird net system Aqualine AS delivers anti-bird net systems. Figure 13: The photo shows an anti-bird net system inside a floating collar. 7.4 Rods for anti-bird nets If you will use rods to keep the anti-bird net tensioned, then these must be installed so that they do not introduce much bending moment on the railing post. The allowed moment on the railing post is indicated in the floating collar’s product certificate. Aqualine AS Prepared by: Kjell Roger, Odd Erland & Anders Rev. 07.06.2013 © Copyright, must not be copied Page 15 of 33 USER MANUAL AQUALINE FRØYARING – FLOATING COLLAR 7.5 Automatic Feeding System Automatic feeders on rafts may be fitted to the floating collar under the assumption that load calculations have been made. See the supplier’s user manual for this. In the product certificate for the floating collar in question, we will be able to enter which type of automatic feeder it is approved for and for which environmental loads this applies to. 7.6 Other Accessories Aqualine should be contacted before installation of other optional accessories which may influence on the floating collar’s movements, buoyancy, load, damages etc. Equipment which is installed after permission has been given by Aqualine must be fastened in a proper way. The main components of the floating collar must not be removed or repositioned for installation of optional accessories. Aggregate and electrical equipment must be well insulated from the floating collar’s steel components to prevent galvanic corrosion. Zinc anodes may be used to extend the service life of the floating collar’s steel components. These may be replaced when needed. Aqualine AS take no responsibility for accessories supplied by other suppliers. This is for the clients own risk. 8 Operation 8.1 Mooring of boats Fish farming boats (workboats) and well boats should be moored so that they do not risk damaging the cage net, mooring or floating collar. The floating collar should be marked at areas where it is practical and safe to perform mooring of boats. Fish farming boats less than 15 meters length should be moored at lower points on clamps at non-vertical support rods if it is made out of a square steel profile. Do not perform mooring in railing tubes, up on the railing post, in chains or rods. You should avoid mounting ropes in the floating collars mooring lugs. These items must be clean and visible for inspection. Aqualine AS Prepared by: Kjell Roger, Odd Erland & Anders Rev. 07.06.2013 © Copyright, must not be copied Page 16 of 33 USER MANUAL AQUALINE FRØYARING – FLOATING COLLAR Fish farming boats over 15 meters length and well boats should not have their main mooring in the floating collar as it may cause too high loads. These should be moored in the system mooring at dedicated point. 8.2 Delousing The floating collar is dimensioned for use of closed tarpaulin down to 7m when delousing. This assumes that the use of a tarpaulin is made within the following environmental loads: Dim. Floater tube Sign. Wave Height, Hs [m] Current, Vc [m/s] 315 0,5 0,15 400 0,75 0,2 450 1,0 0,25 500 1,0 0,3 630 1,0 0,5 Table 1: Environmental laods when use of closed tarpaulin. 8.3 Lifting of floating collar For lifting, we recommend 2 pcs wide lifting straps with a space in-between of around 3m or more, so that there are at least 2 clamps between the lifting points. The straps should pass under both floater tubes, not under the sinker tube. Working angle: β < 30°. (I.e. the angle between the strap and a vertical line). Maximum lifting height from the water surface is 3m. Figure 14: The photos are for illustration only. Wider lifting straps should be used for lifting. Aqualine AS Prepared by: Kjell Roger, Odd Erland & Anders Rev. 07.06.2013 © Copyright, must not be copied Page 2 of 33 USER MANUAL AQUALINE FRØYARING – FLOATING COLLAR Dim. Floating Tube [mm] Width of lifting Strap [mm] 315 80 400 100 450 110 500 120 630 150 Table 2: Minimum width of the lifting strap on lifting floating collar. 8.4 Cleaning After each launch, it is preferred to clean the floating collar and the sinker tube, if any. It is customary to use specially designed hosing rigs to remove fouling and shells. If you have to use a crane, you should make sure that the floating collar hangs safely in the lifting straps and that you do not stay underneath hanging loads. If you use disinfectants and/or other chemicals, you must ensure that the compound will not damage the floating collar’s components. 8.5 Measures to be used when landing and launching Space requirements: The area must be able to accommodate the floating collar and have a free way of passage of around 10 meters. For landing, you may use cranes or other appropriate lifting equipment, see chapter 8.3. To lift the whole floating collar, you will need big cranes and this is not practical if the floating collar has a circumference of 90 meters and larger. The most common thing is to use a combination of lifting and pulling force. The floating collar may be ovalized by stretching a rope across the floating collar in order to make it more practical to land it. Make sure that the tubes bending radius of the tubes is within allowable limits. (Maximum allowed diameter increase during handling: 15 %) Do not put equipment on top of the floater tubes; make sure that no sharp edges on the machines and the ground does not damage the floater tubes. 9 Storage In case of storage, the floating collar should be stored to avoid damage on the collar. 9.1 Storage at sea On storage at sea, the floating collar should properly moored and marked for general sea traffic. Aqualine AS Prepared by: Kjell Roger, Odd Erland & Anders Rev. 07.06.2013 © Copyright, must not be copied Page 3 of 33 USER MANUAL AQUALINE FRØYARING – FLOATING COLLAR 9.2 Storage on shore For storage on shore, the ground must be even to avoid point loads on the floater tubes. See the product certificate regarding area. 10 Unwanted Incidents 10.1 Extreme Situations If, during extreme situations, the floating collar should be damaged, it will normally not sink as it is filled with expanding polystyrene. The operations manager must assess whether the floating collar must be repaired immediately or if the repair may wait. We recommend contacting Aqualine AS to discuss the issue. Such incidents should be logged for inspection and maintenance, see appendix 1-7. Subsequent to weather conditions and incidents which may have caused damage to the equipment beyond the ordinary, one should, as a minimum, carry out a monthly control of the floating collar. 10.2 Rupture or damage to the floater tube If a rupture or damage occurs to parts of the floating collar, the construction will normally keep its shape and prevent total collapse. The clamps which are connected to a dimensioning main supporting system in the horizontal plane, will keep the construction together. The floating collar’s remaining capacity will normally prevent that the cage net will collapse. Aqualine FrøyaRingen floating collars are delivered with floater tubes filled with rods made out of expanded polystyrene. The rods are there to maintain the buoyancy in case of damage or puncture. In case of punctures in both floater tubes, the net buoyancy is reduced in accordance with table 2: Dimension floater tube [mm] Reduction of net buoyancy in case of puncture of both floater tubes 315 About 9% 400 About 4% 450 About 28% 500 About 39% 630 About 50% Table 3: Reduction of net buoyancy in case of puncture of both floater tubes. Aqualine AS Prepared by: Kjell Roger, Odd Erland & Anders Rev. 07.06.2013 © Copyright, must not be copied Page 4 of 33 USER MANUAL AQUALINE FRØYARING – FLOATING COLLAR 10.3 Tidal variations and storm surge Tidal variations and storm surges are not critical for the floating collar. 10.4 Ice and Snow Ice and snow may cause great loads on the construction. The load effect from icing is primarily connected to loss of buoyancy. Build-up of ice and snow should primarily be removed by means of a rubber hammer/wooden mallet. Ropes for fastening the jump net to the floating collar should have low breaking strength. On great build-up of ice on the jumping net, the ropes will break and the jumping net will fall into the water and the ice will melt. On localities where icing and floating sea ice may occur, the fish farmer must have emergency plans/measures for removing ice. 11 Waste handling All the components in the floating collar can be recovered/recirculated. May be delivered to an approved waste handling plant. 12 Inpection, maintenance 12.1 Logging All inspections, maintenance, repairs and incidents should be logged in accordance with the check points in chapter 0 and the forms in Attachments 1 to 7. 12.2 Modifications Each modification must be managed and carried out by a qualified Aqualine installer. Agreement about such service must be made with Aqualine AS. Old product certificate expires/are terminated and filed. New product certificate is established and distributed. Any modification must be made in accordance with the specifications and requirements to the new type of floating collar. 12.3 Spare Parts The correct spare parts are identified and procured according to data on the product certificate. Replacement of spare parts must be discussed with Aqualine AS, to ensure that the correct/appropriate parts are used. Aqualine AS Prepared by: Kjell Roger, Odd Erland & Anders Rev. 07.06.2013 © Copyright, must not be copied Page 5 of 33 USER MANUAL AQUALINE FRØYARING – FLOATING COLLAR 13 Sjekkpunkter 5 1 1 3 2 6 6 4 7 4 7 7 6 2 Figure 15: The illustrations show checkpoints for inspection and maintenance. Aqualine AS Prepared by: Kjell Roger, Odd Erland & Anders Rev. 07.06.2013 © Copyright, must not be copied Page 6 of 33 USER MANUAL AQUALINE FRØYARING – FLOATING COLLAR 13.1 Ettersyn og vedlikehold på flytekrage THE MAINTENANCE SHOULD BE PERFORMED AT THE INDICATED INTERVALS Checkpoint What How Check the floater tube for cuts, Floater tube 1 breaks and ruptures. 2 3 4 5 6 7 Mooring clamps with bow Check the mooring clamps with bushings for ruptures/ cracks. Check whether the mooring lug is bent or whether there is a rupture in the mooring lug. Also check for wear and tear on mooring lug and clamp. Mooring clamps with tube hawse hole Steel/plastic clamps Check the mooring clamps with bushings for breaks/cracks. Railing tube Check for ruptures in the railing tube. DAILY WEEKLY MONTHLY LLY Check the clamps with bushings for any ruptures in the railing post. Check whether Trusses/chains/ropes Trusses/chains/rop in es* the main supporting system are taught and are free for deformations or ruptures. Bolt/plug connections 3. MONTH ANNUA * Check whether the Trusses/ chains/ropes in the main supporting system are free from deformations or ruptures. * Tighten the main supporting system after 3 months use and at the annual check if it is necessary. This may be done, for example, with the aid of a chain hoist on the chain in the main supporting system. See Figure below. Figure 16: Tightening of chain with chain hoist. Anyone who performs inspections and maintenance should have passed the company’s internal training and made himself familiar with the product and understood the product’s user manual. Aqualine AS Prepared by: Kjell Roger, Odd Erland & Anders Rev. 07.06.2013 © Copyright, must not be copied Page 7 of 33 USER MANUAL AQUALINE FRØYARING – FLOATING COLLAR As a minimum, a monthly check should be performed after a period of bad weather. PS. When it comes to the annual control, it is most practical to replace parts after every launch. This may be extended to 2 years assuming that the check is made close to the time for the floating collar to be deployed for service. 14 References 14.1 NS9415, the most recent applicable, as well as underlying standards 14.2 The Nytec Regulations, the most recent applicable Aqualine AS Prepared by: Kjell Roger, Odd Erland & Anders Rev. 07.06.2013 © Copyright, must not be copied i Appendix 1: Log inspection and maintenance, daily Log form inspection and maintenance, daily Name: Type: What Prod. No. Purchased Year: How MONDAY TUESDAY Month SIGN. MONTH WEDNESDAY THURSDAY Sign. FRIDAY User Manual for the form: If there are deviances, you should refer to a number on the repair not/deviation report and the deviation should be entered into the event log. The person who carries out the inspection and maintenance must have passed the company’s internal training and made himself familiar with the product and understood the product’s user manual. Aqualine AS Prepared by: Kjell Roger, Odd Erland & Anders Rev. 07.06.2013 © Copyright, must not be copied ii Appendix 2: Logg inspection and maintenance, weekly Log form inspection and maintenance, weekly Name: Type: What WEEK Prod. No. Purchased Year: How SIGN. WEEK SIGN. Month WEEK SIGN. WEEK SIGN. WEEK 1 12 23 34 45 2 13 24 35 46 3 14 25 36 47 4 15 26 37 48 5 16 27 38 49 6 17 28 39 50 7 18 29 40 51 8 19 30 41 52 9 20 31 42 53 10 21 32 43 11 22 33 44 Sign. SIGN. User Manual for the form: Every week the form is to be signed with “OK” and initials. If there are deviances, you should refer to a number on the repair not/deviation report and the deviation should be entered into the event log. The person who carries out the inspection and maintenance must have passed the company’s internal training and made himself familiar with the product and understood the product’s user manual. Aqualine AS Prepared by: Kjell Roger, Odd Erland & Anders Rev. 07.06.2013 © Copyright, must not be copied iii Appendix 3: Log inspection and maintenance, monthly Log form inspection and maintenance, monthly Name: Type: Prod. No. Purchased Year: What How Trusses/chains/ropes Check whether trusses/chains/ropes in the main supporting system are taught and are free for deformities or ruptures. Bolt/plug connections Month Sign. Check whether the trusses/chains/ropes in the main supporting system are free from deformations and ruptures. SIGN. YEAR JANUAR FEBRUAR MARS APRIL MAI JUNI JULI AUGUST SEPTEMBER OKTOBER NOVEMBER DESEMBER User Manual for the form: Every month the form is to be signed with “OK” and initials. If there are deviations, you should refer to a number in the repair note/deviation report and the deviation should be entered into the event log. The person who carries out the inspection and maintenance must have passed the company’s internal training and made himself familiar with the product and understood the product’s user manual. Aqualine AS Prepared by: Kjell Roger, Odd Erland & Anders Rev. 07.06.2013 © Copyright, must not be copied iv Appendix 4: Log inspection and maintenance, every 3rd month Loggskjema ettersyn og vedlikehold, every 3rd month Name: Type: Prod. No. Purchased Year: What How Month Trusses/chains/ropes Check whether trusses/chains/ropes in the main supporting system are taught and are free for deformities or ruptures. Sign. SIGN. YEAR JANUAR FEBRUAR MARS APRIL MAI JUNI JULI AUGUST SEPTEMBER OKTOBER NOVEMBER DESEMBER User Manual for the form: Every day the form is to be signed with “OK” and initials. If there are deviations, you should refer to a number in the repair note/deviation report and the deviation should be entered into the event log. The person who carries out the inspection and maintenance must have passed the company’s internal training and made himself familiar with the product and understood the product’s user manual. Aqualine AS Prepared by: Kjell Roger, Odd Erland & Anders Rev. 07.06.2013 © Copyright, must not be copied v Appendix 5: Log inspection and maintenance, annually Log form inspection and maintenance, annually Name: Type: What Prod. No. Purchased Year: How Floater tube Mooring clamps with bow Mooring clamps with chain hole Steel/plastic clamps Month Sign. Check the floater tube for cuts, breaks and ruptures. Check the mooring clamp with bushings for ruptures/cracks. Check whether the mooring lug is Check the mooring clamp with bushings for ruptures/cracks. Check the clamps with bushings for any ruptures in the railing post. Railing tube Check for ruptures in the railing tube. Main support system Tighten main support system Bruksanvisning skjema: Every year is to be signed with “OK” and initials. If there are deviances, you should refer to a number on the repair not/deviation report and the deviation should be entered into the event log. The person who carries out the inspection and maintenance must have passed the company’s internal training and made himself familiar with the product and understood the product’s user manual. Aqualine AS Prepared by: Kjell Roger, Odd Erland & Anders Rev. 07.06.2013 © Copyright, must not be copied vi Appendix 6: Repair note / deviation report NO. Name: Type: Prod. No. Purchased Year: Description of the defect/maintenance which ought to be done: If possible, please suggest what ought to be done: __________________________________ Date and signature, reporter Repair Describe what has been done and the costs related (Spent time + parts), rejects etc.: Was the repair successful: New measure on repair note No.: __________________________________ Date and sign., repair responsible Aqualine AS Prepared by: Kjell Roger, Odd Erland & Anders Rev. 07.06.2013 © Copyright, must not be copied vii Appendix 7: Event log for floating collars NO. Name: Date Aqualine AS Type: Description of event/deviation Prepared by: Kjell Roger, Odd Erland & Anders Prod. No. Purchased Year: Repair note Sign. Rev. 07.06.2013 © Copyright, must not be copied vii i Appendix 8: Risk assessment Risk assessment – Floating collar Inspection and maintenance Probability No. 1 Element Floater tube Unwanted incident Rupture in floater tube Run into by a boat 2 2 2 2 Floater tube Broken floater tuber 3 Floater tube Cut in floater tube Run into by a boat Mooring clamps Overload or run into by a boat Overload or run into by a boat Bent mooring lug Risk Exposure Measure Inspection/maintenance Cause Overload or run into by a boat 4 Consequence 2 At least once every 10 years At least once every 10 years At least once every 10 years At least once every 10 years At least once every 10 years 1 1 1 1 Minor escape, 1 to 100 fish Minor escape, 1 to 100 fish Minor escape, 1 to 100 fish Minor escape, 1 to 100 fish Minor escape, 1 to 100 fish 2-1 13 % A 2-1 13 % A 2-1 13 % A 2-1 13 % A 2-1 13 % A 5 Mooring clamps Broken mooring lug 6 Mooring clamps Cracks/breaks in clamp parts Overload or caused damage 2 At least once every 10 years 1 Minor escape, 1 to 100 fish 2-1 13 % A 7 Mooring clamps, tube clamps Cracks/breaks in clamp parts Overload or caused damage 2 At least once every 10 years 1 Minor escape, 1 to 100 fish 2-1 13 % A 8 Clamps Rupture in railing post. 2-1 13 % A 9 Railing tube Rupture 2-1 13 % A 3-1 19 % A 2-4 50 % 2-1 13 % 2-4 50 % 2-1 13 % 10 11 12 13 14 Overload or caused damage. Overload or caused damage Overload or caused damage 2 2 2 At least once every 10 years At least once every 10 years 1 1 1 Trusses/chains Deformation Rods/chains Rupture Overload or caused damage 2 At least once every year At least once every 10 years Bolt connection Deformation Overload or caused damage. 2 At least once every 10 years 1 Bolt connection Rupture Overload or caused damage 2 At least once every 10 years 4 Floater tube Loss of buoyancy Icing 2 3 At least once every 10 years 1 4 1 Minor escape, 1 to 100 fish Minor escape, 1 to 100 fish Minor escape, 1 to 100 fish More than 15000 fish Minor escape, 1 to 100 fish More than 15000 fish Minor escape, 1 to 100 fish The person who performs inspection and maintenance should have a minimum of 2 years practice on a floating fish farming installation. As a minimum, a monthly check should be performed before and after a period of bad weather. PS. When it comes to annual checks, it is most practical to perform replacements of parts after each launch. This may be extended to 2 years assuming that the check is made close to the time for the floating collar to be deployed for service again. Aqualine AS Utarbeidet av: Kjell Roger, Odd Erland & Anders Trusses/chains in the floater collar’s perimeter must be inspected often A Bolt connections must be inspected often M A Low risk (no actions neede) Medium risk (actions to be evaluated) Large risk (unacceptable) Rev. 26.12.2012 M © Copyright, må ikke kopieres ix Aqualine AS Utarbeidet av: Kjell Roger, Odd Erland & Anders Rev. 26.12.2012 © Copyright, må ikke kopieres