1
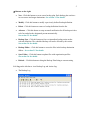
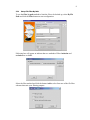
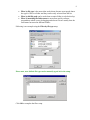
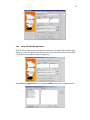
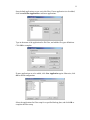
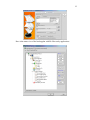
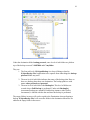
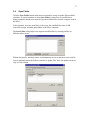
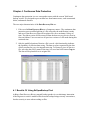
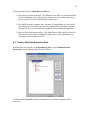
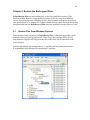
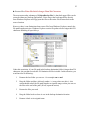
i
TABLE OF CONTENTS
[User manual For EzOpenBackup Plus! 3.1]
Chapter 1 Introduction ................................................................................ 1
Chapter 2 Installation Guide ....................................................................... 2
Chapter 3 The Scheduled Backup ............................................................. 4
3.1
3.2
3.3
3.4
3.5
3.6
Using the Buttons............................................................................................ 4
Create A New Backup Plan ............................................................................ 6
Advanced Settings ........................................................................................ 14
Backup Now.................................................................................................. 15
The Backup Destination................................................................................ 15
Sync Folder ................................................................................................... 17
Chapter 4 Continuous Data Protection ..................................................... 18
4.1
4.2
4.3
4.4
Benefits Of Using EzOpenBackup Plus! ...................................................... 18
Create a New Data Protection Plan................................................................ 19
Advanced Settings ......................................................................................... 20
Access Data Recovery Bin............................................................................. 21
Chapter 5 Restore the Back-upped Files.................................................. 24
5.1
5.2
Restore Files From Windows Explorer......................................................... 24
Restore files that may be locked by an application....................................... 26
1
Chapter 1 Introduction
EzOpenBackup Plus! is a backup software plus a unique feature: real time, continuous
savings of modified data of monitored files between scheduled backups. The innovative
creation of Data Recovery Bin keeps all changed files of the source folder for a specified
period of time so that lost or damaged files can be recovered by a prior version. Data
Recovery Bin eliminates the risk of data loss due to human error, such as accidental file
deletions and overwrites, and file corruptions.
Major features of EzOpenBackup Plus! are listed as following:
•
Continuous data protection - Data Recovery Bin saves changed files
continuously in real time before next scheduled or manual backup
•
Application individual care - Handles files of specific applications, such as VB,
VC, Microsoft Office and more, with individually designed backup techniques
•
Backup open and locked files - Built-in functions to handle open and locked file
backup (eg. SQL database files, and MS Outlook mail files)
•
Backup to multiple desitions - Besides regular backup method, FTP protocol is
also utilized to backup to different locations of local, removable or remote
destinations with individual schedules.
•
Easy file update and restore - EzOpenBackup Plus!'s sync utility can be used
for easy file update. Restore by copy individual files or the entire backup structure
from Windows Explorer at any time.
Two major components are included in EzOpenBackup Plus!
•
•
The scheduled backup
The real-time, continuous backup
With the increasing needs for real-time, continuous backup, putting the two into one box
makes ExOpenBackup Plus! a powerful software.
Getting help for your questions or problems on using EzOpenBackup Plus! is easy. Our
technical support team can be reached by phone, email or fax.
Phone: 408-263-8201
fax: 408-263-8203
email: [email protected]
2
Chapter 2 Installation Guide
Before install EzOpenBackup Plus!, please make sure your computer meets following
requirements:
• Microsoft Windows systems of 2000/XP/2003 platforms
• RAM: 64MB or above
• Hard disk: 8GB or large
Install EzOpenBackup Plus! software is easy. With a successful download, double click
the installer icon, a welcome popup box will show up.
Following the process, you will run into next screen of licensing agreement. Read it
carefully and make sure you understand all terms listed and agree with it before move on.
If you decided not to continue with installation, click “No” to abort the installation
process.
If you agree with all terms listed for using the product, click “Yes” to move on.
Following the process, the last dialog box to be seen looks like the next picture:
3
You have the choice of rebooting the system right away or to do it later. It is
recommended that you reboot the system right away to ensure proper function of
EzOpenBackup Plus!.
When the system is rebooted, find the EzOpenBackup Plus! application from Windows
program list by looking into the “Start\Programs” list.
An icon will also show up in the system tray as indicated in following picture.
Double click the icon to open up the user interface for EzOpenBackup Plus!
configuration.
4
Chapter 3 The Scheduled Backup
The scheduled Backup is also referred to as the traditional backup in which the backup
process is activated automatically according to pre-set schedule. The backup destination
can be local or remote to the source files. Since each backup plan maintains its own
schedule, the scheduled backup of EzOpenBackup Plus! is efficient.
3.1
Using the Buttons
Double click the icon on system tray to open the user interface dialog box as shown
below for configuration or modification of the settings.
Following picture showing the main status screen of EzOpenBackup Plus!. Under the
selection of Open File Backup, the buttons on the right are for backup configurations.
5
Buttons on the right:
•
New - Click this button to create a new backup plan. Each backup plan can have
its own source and target destinations. See section 3.2 for details.
•
Modify - Click this button to modify a previously defined backup definition.
•
Delete - Click this button to remove a backup definition from the list.
•
Advance – Click this button to setup an email notification for all backup activities
to be forwarded to the designated person automatically.
See section 3.3 for details.
•
Backup Now - Click this button to force an immediate backup action on the
selected definition. The scheduled backup will not be affected by this action.
See section 3.4 for details.
•
Backup Folder – Click this button to access the files in the backup destination
folders. See section 3.5 for details.
•
Sync Folder – Click this button to update files with organization profiles.
See section 3.6 for details.
•
Refresh – Click this button to bring the Backup Plan listing to current setting
Lick Log on the title bar to view Backup Log and Action Log.
•
The Backup Log
6
•
3.2
The Action Log
Create A New Backup Plan
EzOpenBackup Plus! comes with easy to understand user interface screens that make
application configuration easy and management effective. As you can see from following
picture that all you need to do to create a new Backup Plan is to click a few buttons.
7
Issues involved in creating a new backup plan:
• Backup source - must be on the same system of EzOpenBackup Plus! application
• Backup destination - local or Remote
• Backup schedule - daily or hourly
Following gives details of each step in creating a new backup plan.
Click button New Plan in the main dialog box to begin creating a backup plan.
Backup Plan Name: Notice that a default Backup Plan Name is filled with a datetime string of the date and time the backup plan is created. User can change this name
if desired.
Backup Area: This area defines Backup source locations. All backup source files
must be on the local system of EzOpenBackup Plus!.
Two schemes are utilized to allocate the backup source:
1. by file path - file filters of inclusion or exclusion can be applied to files in
the named file path
2. by application - restrict to files created by the listed application(s) in the
named file path
See following sections for detailed explanations.
8
3.21
Setup File Filter By Path
To use the filter by path method to limit the files to be backed up, select By File
Path and click the Filter button to start configuration.
Following box will appear to indicate that two methods of filter: inclusion and
exclusion are available.
Select the filter method and click the button Add to select from one of the file filter
schemes that suits your filtering purpose.
9
•
•
•
Filter by file type is the most often used scheme because most people know
the types of files in a folder and they can be easily selected from the list.
Filter by full file path can be used when an entire folder is to be backed up.
Filter by matching file/folder name is most often used by software
programmers whose source, debugging and release files are usually bear the
same name but stored in different folders.
Following is an example using the Filter by file type setup.
Please note, user defined file type can be manually typed in for the setup.
Click OK to complete the filter setup.
10
3.22
Setup File Filter By Application
This file filter method is provided for the convenience of application specified users.
Simply by select the applications that associate to the files for backup, all related file
will be backed up without further configuration.
Select Filter by application and click button Define to open the configuration box.
11
Some default applications are pre-set in this filter. If new application is to be added,
click button Define Application to add new applications.
Type in the name of the application for file filter, and add the file types definitions.
Click OK to complete.
If more applications are to be added, click New Application again. Otherwise, click
OK to finish configuration.
Select the applications for filter setup for a specified backup plan, and click OK to
complete the filter setup.
12
Here is the status view of the backup plan with file filter set by applications.
13
Backup Destination: A secondary backup destination is provided to satisfy the needs
of multiple location backup. FTP connection is provided to support remote backup.
•
Versions: Each time a file is modified, two thing will happen in the backup
destination folder:
1. the newly-modified file is saved in the LastBackup folder
2. the file was in the LastBackup folder is pushed to the PreviousBackup
folder to become the last version of the file.
Explanation on the file backup versions
The default number of versions for each modified file is 9
The maximum number of versions is 999
Users can change it to the number desired
The file push out follows the rule of first in, first out should
modified version exceeding the setup version number
•
Backup Schedule: This part of setup is quite straight forward. Check and select
the ways you want to backup: by day or by hour, and then set the time.
14
3.3
Advanced Settings
Click the Advanced button to setup Email Notification
This notification reports to defined persons on each action recorded in the Backup Log.
The purpose of it is that users can monitor all backup activities and notice of error right
away should it occur at any time.
Here is an example of Email Notification setup.
15
3.4
Backup Now
Click Backup Now button to activate an immediate backup action on the selected
backup plan. This forced backup process sometimes can be necessary for users who see
the need to backup some very important files before the scheduled time. The regular
backup schedule set on the backup plan will not be affected by this action.
Users can choose to backup all files in the source folder or only the modified files.
1. Backup modified files - when a very important file is modified and you want to
make sure that a backup copy of the new file is saved, do a one-time backup with
this selection is the best solution.
2. Backup all files - this choice is, in general, for emergency use. For example, when
the regular backup server is down that you want to backup files to a different
system temporarily; or that you simply want to copy all current files to a location
other than the backup destination.
3. Backup all files under 'lastBackup' folder to FTP site - because files in the
'lastbackup' folder match the current files in users' working folders, this option
can be used to copy all current files to a remote location via ftp.
3.5 The Backup Destination
In general, the backup destination can be local or remote to the backup source as long as
they can be “seen” by Windows Explorer. An initial full backup is recommended so that
a well matched file structure in the destination and the source folders will ensure
accuracy and efficiency of the backup process.
Following picture is an example of a backup plan’s destination path viewed from
Windows Explorer. Here the backup destination is C:\backup personal.
16
Under the destination folder backup personal, some levels of sub-folders are piled on
top of the backup sources C:\10052004 and C:\myfolder.
They are:
1. The first sub-level of EzOpenBackup is to keep all things related to
EzOpenBackup Plus! application to be separate from other things the backup
personal folder may store.
2. The next level of sub-folder indicates the name of the backup plan. Here we
have two backup plans share one destination. The backup plans are with
names other personals and personal.
3. The next level of sub-folder is the BackupSet. This level of folders are
created when a Full Backup is performed. Under each BackupSet,
incremental backups are attached. Each backup instance, either Full or
Incremental, is labeled with the date and time the backup is performed.
The empty folders in source will not be copied to the Destination when performing a
backup. EzOpenBackup Plus! will create the folder in the destination when files are
added to an empty folder in the source.
17
3.6
Sync Folder
Click the Sync Folder button in the main user-interface screen to update files modified
elsewhere. A typical situation of using Sync Folder is when files are modified on a
laptop computer, and the user wants to copy the modified files onto the computer used in
the office.
In this situation, users are most likely to first copy the modified files onto a USB
removable storage, and then upload them to the office computer.
The Sync Folder utility helps users organize modified files by creating profiles on
different subject areas.
Within each profile, matching source and destinations are set so that there is no need for
users to manually locate the folders each time to update files. Now, file-update can be as
easy as click a button.
18
Chapter 4 Continuous Data Protection
Continuous data protection is a new concept that comes with the current "disk-based
backup" model. It is designed to prevent data loss from human errors, such as unwanted
delete, and natural disasters.
The two major characteristics of the Data Recovery Bin are:
1. Files saved in Data Recovery Bin are of temporary nature - The continuous data
protection saves modified portion of a file at the time the modification is made
and saved. Data Recovery Bin will keep these files for a maximum 14 days of
time. The oldest version will be removed from the data recovery bin in a first-infirst-out fashion. Users can retrieve all previous versions of a file made during this
restricted time.
2. Only the modified portion of data in a file is saved - this functionality indicates
the capability of real-time data saving. The data saved are organized by the date
of their creation for easy viewing and retrieving. To Restore a piece of data to a
file, select the data file by name of the time it is saved and click button Copy to.
The data will be plant back to its original file.
4.1 Benefits Of Using EzOpenBackup Plus!
Adding a Data Recovery Bin to a normal backup product is a revolutionary innovation.
Allowing users to retrieve modified files between backups brings not only convenience,
but also security to users when working on files.
19
The three major benefits of Data Recovery Bin are:
1) File retrieving between backups - The Data Recovery Bin saves all modified data
of a file and arrange them by the date the change was made so that users can go
back to a specific version of modification when need it.
2) Prevent file loss due to human error - Because all changed data are saved in real
time when files are modified, data loss due to human error including accidental
file deletion, file overwrites and file corruptions can be eliminated completely.
3) Recover files when disaster strikes - This Data Recovery Bin can also be used as
disaster recovery to replace working files with a prior version should there is a
virus attack or accidental power off.
4.2 Create a New Data Protection Plan
From the main user-interface of EzOpenBackup Plus!, select Continuous Data
protection to begin configure this part of the software.
Click button New Scenario to define backup items for real-time, continuous data
protection.
20
Because continuous data protection is especially useful for software programmers who
have the needs to constantly modify their program files and sometimes would really want
to go back to a previous version of coding, the filter area is set to include only VBS files
as an example.
4.3 Advanced Settings
Incorporating with XLink's in-house developed Snapshot technology with its innovative
creation of Data Recovery Bin, EzOpenBackup Plus! creates a unique solution to satisfy
the need for data protection and storage especially for small businesses. Because
snapshots are taken at each point-in-time and on the transaction level, user roll back to
previous versions of a file is easy with accuracy.
Because of its ability to save continuously of modified files between scheduled backups,
Data Recovery Bin serves best the people, such as computer programmers, who makes
frequent modifications of files and always have the need to go back to the previous
versions for verification.
21
A brief explanation of the selections set here:
•
Enable Data Recovery Bin - This box is checked by default to allow individual
plans to determine if this file retrieving feature is to be included. Uncheck this
box will disable Data Recovery Bin for all backup plans.
•
Delete versions older than _ days - users can change the number of the days up
to 14 to indicate that all files saved in Data Recovery Bin are kept in the fashion
of "first in, first out" so that the oldest dated files will be pushed off the list.
•
Always maintain a maximum of _ versions - Data Recovery Bin creates files
for modified data in clusters by way of "point-in-time snapshots". All modified
data being saved at this time point belongs to the same version. There is no
limitations on the number of versions a user wants to keep, but again, the large
listing of files may cause confusion when trying to find a file and determine
which version to use.
•
Version point creation interval - this is the time interval between each snapshot
is taken for modified files. Too frequent savings will result too many files
generated in the Data Recovery Bin and may affect system performance.
•
Maximum virtual memory usage - Data Recovery Bin reserves a default of
8MB for each file created. Users can increase this memory size if they consider it
necessary. When the virtual memory size is larger than 8MB, the needed memory
size will be allocated to create a temp file for file savings.
•
Workspace path for Data Recovery Bin - this is the default location where
Data Recovery Bin saves files. Users can change it to other locations if desired.
Because the settings here affect memory allocation, ease of finding a file and effective
file saving, to make the most efficient use of Data Recovery Bin, knowing what you
want to accomplish is the key.
4.4 Access Data Recovery Bin
From the main user interface of EzOpenBackup Plus! click button Data Bin to access
Data Recovery Bin files in the destination location for file retrieve and viewing.
22
Click the drop-down menu to select the time for a particular file listing back-upped
during the time interval.
The five functional buttons for Data Recovery Bin are:
1. Refresh – Update the file listing to current time
2. Copy to – Restore a selected file to a user defined location
3. View – When viewing from Data Recovery Bin, Files before being modified
will be seen here.
4. Search – To help you find a file you have worked on
5. Empty Bin – This function allows you to manually delete all files listed in Data
Recovery Bin.
Please note: the listings of all columns can be sorted by click on the column title
space.
To go back to a certain version of previous modification, you can select the file by its
name within the time range and click the button Copy to to restore the file. Following
dialog box will come up with default path of the location of the original file.
If you click OK in above box without changing the path, you are attempting to replace
the file current in the location with the previous version. The next box will come up to
confirm that this is what you really want to do.
If you want to keep the current version of the file, click No to go back and change the
restore path to a different location.
Using Search to find a file ?if you do not remember the complete path of the file, use
search by Any part of the file name. This search method will find all files with the same
name and you can decide which one to restore by the time the file was created.
23
If you are not sure if the file is the one you needed, take a look at it before restore. Click
View to take a look at it before restore.
24
Chapter 5 Restore the Back-upped Files
EzOpenBackup Plus! not only backup files, it also saves modified versions of files
between backups. Because saving modified versions of files is a very much different
process from normal process of backing up files, the file restore of these two processes is
also quite different. This chapter will explain in details how to restore files from the backup
destination and from the Data Recovery Bin where the modified version of files are saved.
5.1
Restore Files From Windows Explorer
The most noteworthy advantage of EzOpenBackup Plus! is that back-upped files can be
restored without any backup applications. Users can get the back-upped files directly
from Windows Explorer and copy/paste the files or the entire file structure back to the
source location.
In following example, the backup source is C:\myfolder and the backup destination is
E:\acctbackup\EzOpenBackup\PreviousBackup\C\myfolder.
25
► Restore Files When File Path Is Longer Than 256 Characters
The most noteworthy advantage of EzOpenBackup Plus! is that back-upped files can be
restored without any backup applications. Users can get the back-upped files directly
from Windows Explorer and copy/paste the files or the entire file structure back to the
source location.
However, there is one limitation when restore files from Windows Explorer, namely the
file path length restriction. Windows Explorer restrict file paths to be no longer than 256
characters including all special keys.
Under this restriction, if your file path in the backup destination folder is longer than 256
characters, the part that exceeds the 256 limitation will be invisible. In this situation, you
would need to do following:
1
Rename the last folder you can see - for example aaa to aaa1
2
Drag the folder and place it directly under c:\ (or any other root drive) - this
action should reduce the file path length to acceptable range so that you can see
the files at the end of the path. (If not, repeat the action)
3
Restore the files you need
4
Drag the folder back to where it was in the backup destination location
5
Rename it back to its original name
26
5.2 Restore files that may be locked by an application
One thing that requires some extra attention when restoring files is that, if your files are
locked due to some application requirement, to restore them you will need to first stop the
application's service, copy the files back, and then restart the service again.
Using MSSQL files as an example - To restore these files, you will need to:
1. Stop the MS SQL service from Windows "services"
2. Copy the files back - in our example, folder1 is the original source folder, folder2
is the backup target folder. You can choose to either copy the entire folder2 to c:\
drive or some of the files in folder2 to folder1.
27
3. Restart the MS SQL service