1
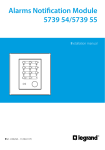
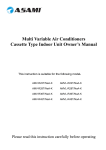
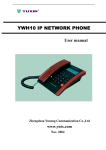
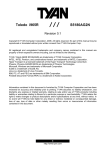
USER
MANUAL
PHY SERIES
HIGH WALL AIR CONDITIONERS
R407- C
CONTENTS
PAGES
MAIN FEATURES
1
SYSTEM DESCRIPTION
2
INDOOR UNIT MANUAL CONTROL PANEL AND DISPLAYS
3
REMOTE CONTROL HANDSET (LCD)
4-8
GUIDE TO PROPER USAGE
9
ADJUSTING AIRFLOW DIRECTION
10
CARE AND PRECAUTIONS
11-12
TROUBLESHOOTING GUIDE
13
MEMO FOR FUTURE SERVICE
14
1. MAIN FEATURES
TIMER SETTING FUNCTION
*Allows you to program the unit to turn on.
Auto Start or Auto Stop any time within 24
hours.
3 MINUTE DELAY FOR
COMPRESSOR PROTECTION
*To protect your system from problems
caused by frequent starting and stopping,
there is an automatic 3 minute delay before
compressor starts operating when you
change modes.
*For presetting the time: press timer for OFF
when unit is in ON condition.
Press timer for ON when unit is in OFF
condition.
3 MINUTE DELAY
PROTECTION
SLEEP FUNCTION
(COOL AND HEAT MODES)
*After selecting the temperature required,
during the first 2 hours of operation the unit
will automatically increase temperature by
2oC above your requested level in cooling
mode or decrease temperature by 2oC in
heating mode.
AUTOMATIC AIRFLOW CYCLE
*The modern automatic up-down louver
ensures airflow is evenly distributed in
automatic cycles or may be stopped in a
position according to your selection.
*Sleep function saves electricity and
provides a comfortable sleeping
environment.
REMOTE CONTROL HANDSET
*Your infra-red remote
control handset has a wide
communication range.
2. SYSTEM DESCRIPTION
INDOOR EVAPORATOR UNIT
MODELS: PHY-07/09/12
PHY-15/18/24/30/36
Air Intake
Front Cover
Manual Control Panel
Air Outlet
Electrical Safety Cover
High voltage electrical safety cover must
always be kept closed. Only to be opened by a
qualified technician.
Operation Displays
Right-Left Airflow Deflector
Automatic Up-Down Louver
Primary Air Filters
Filter Handle
Infra-Red Remote Control Handset
OUTDOOR CONDENSING UNIT
Refrigerant Pipe and Wiring
Drain Pipe
Indoor air moisture will condense
and drain outdoors during cooling
or dehumidification
Connection Valves
3. INDOOR UNIT MANUAL CONTROL PANEL & DISPLAYS
TIMER
Green light shows timer status; otherwise, light is off.
ON/OFF
First press of this button is for ON in cooling mode.
Second press is for heating.
Third press turns the unit OFF.
RUN INDICATING LIGHT
Red light shows system is on.
RECEIVER FOR INFRA-RED SIGNAL
Receives the signal from remote control handset
POWER INDICATING LIGHT
Green light shows power is available.
4. REMOTE CONTROL HANDSET (LCD)
Signal transmitter
Aim this side at the receiving signal window of indoor unit
Operation display
Auto heat/cool
Dry
Cooling
Heating
Sleep
Fan speed display
AutoFan
Temperature display
Airflow direction display
Low
Medium
High
Auto airflow direction
Airflow direction swing
Airflow direction location
Timer display
Timer on
Timer off
ON/OFF button
Room Temp. Setting button
Press once to start operation
Press again to stop operation
TO adjust the temperature
Mode selection button
Press to operate
Airflow direction setting button
Auto heat/cool
Cooling Dry
Heating
Press once to set airflow direction to
angle following the figure
Fan speed selection button
Press to operate
Auto
Low Medium High
Airflow direction swing setting button
Press for swing.
Press again to stop swing.
Sleep operate selection button
Timer-off button
Timer-on button
Minute adjustment button
Hour adjustment button
NAMES AND FUNCTIONS OF HANDSET DISPLAY AREA
1.
Operation display area:
Shows the selected operation mode. You can select Auto heat/cool
heating
2.
, dry
, or sleep
, cooling
,
.
Temperature display:
Show the set temperature.
3.
Fan speed display:
Shows the selected fan speed. You can select Auto Fan
high
4.
, low
, medium
, or
.
Airflow direction display:
Shows the selected airflow direction. You can select
auto direction,
full louver swing,
select louver position.
5.
Time display area:
If you have set timer on or timer off, it will show your timing, or it will show you the current real
time.
★ Notes:
1.
All the icons shown in the picture of remote controller are for customer’s reference. When
in actual use, screen will only show you the corresponding area.
2.
If the air-conditioner is turned off, screen will show nothing. (Except for starting
air-conditioner using timer-on.)
OPERATION INSTRUCTIONS
1. HOW TO INSERT NEW BATTERIES
★After inserting the batteries, please press the
reset button to set the remote controller
ready for use.
RESET
Put pole “+” and
“-” correctly
2. ADJUSTING THE TIME OF REMOTE CONTROL HANDSET
★Open the back cover of remote controller,
press * CLOCK button, when the display is
flashing *
and CLOCK, then begin to
CLOCK
set the time.
★Press
button and press
button to change the time.
★Press *CLOCK to fix the right time, then
flashing will stop.
3. AUTO OPERATION
★Press
button to start the air-conditioner. Now, fan speed is automatic (fan speed is
selected by the micro computer to suit room cooling requirement). Press
to select desired
fan speed.
★Press
button to select auto heat / cool mode.
★To stop working, press
button again.
★Setting temperature is not shown on remote controller when in AUTO heat/cool operation.
★When operation shifts from auto into heating or cooling operation, indoor fan speed can be set in
low, middle, high speed or auto.
★After air conditioner operation for 15 minutes, if you feel too warm, please push <
<
> or
> to adjust the temperature.
★Auto heat/cool operation is an economical mode, which selects suitable fan operation and mode
according to room-temperature. Operation mode of louver can be set into Swing full flow, Auto,
or you may select Angle 1>2>3>4>5.
4. COOLING, DRY AND HEATING OPERATION
★Press
button to start air conditioner.
★Press
mode button to select operation. Each press of this button changes the mode of
operation from auto heat/cool
★Press
★Press
★Press
cooling
heating.
button to set fan speed.
or
button to set air flow director.
button to set preferred temperature.
If you feel too warm, please press
★Press
dry
or
to adjust the temperature.
button again, to stop operation.
5. ADJUSTMENT OF FAN SPEED AND HOW TO DO TIMER ON-OFF.
★To adjust fan speed, press
middle speed
button. Fan speed changes in order from low speed
, high speed
★To set timer on-off, press
or
To cancel the timer function, press
★Press
to start sleep mode, press
,
to auto
button, then press
button or
or
button again.
again to cancel.
to adjust time.
TIPS ABOUT REMOTE CONTROL HANSET
★The range of handset signal is 6 metres distance from indoor unit, without any obstruction.
★Remote control handset will show
by pressing any button and at the same time, indoor unit
will sound, meaning it has received the signal. If this sound cannot be heard, please press the
button again or check if unit is within signal receiving range.
★Remote control handset must not be exposed to humidity, sunlight, heat source, or rough
handling.
★Signal transmitter must be aimed at signal receiving window, with a maximum angle of 30 ゚.
★Signal receiving window must not be exposed to strong light which will interfere with handset
signal.
5. GUIDE TO PROPER USAGE
Please consider the following suggestions for electricity
saving and a comfortable environment.
ESTABLISH A WELL SUITED TEMPERATURE SETTING
*When cooling, the most comfortable
environment is to set the room temperature
o
5 C less than the outside temperature.
*When cooling or heating, 10% electricity
o
consumption can be saved for every 1 C
higher (cooling) or lower (heating) temperature setting.
HELP YOUR UNIT WORK EFFICIENTLY
*When cooling, there should be a curtain at
the window to avoid sunlight shining directly into
the room.
*When heating or cooling, always keep
the doors and the windows of the room closed.
USE THE TIMER EFFECTIVELY
*When cooling, or heating, please use timer for
Auto Stop in order to save energy.
Timer for Auto Start also provides a comfortable environment when
required.
*Sleep function saves energy and provides a comfortable sleeping
environment.
SET THE AIRFLOW DIRECTION PROPERLY
*When cooling, or hating, please remember warm air rises so adjust your
deflectors at a lower discharge angle when heating. Auto Swing Airflow
function does this automatically for you.
*In all modes of operation air in the room will be distributed more evenly
by selecting Auto Swing Airflow function. By pressing Swing again
on your handset, while the unit continues to operate, Auto Swing Air flow
will stop in your preferred airflow direction.
CLEAN THE PRIMARY AIR FILTERS REGULARLY
*Performance will be affected when the primary air filters become
dirty.
Use the
‘Timer’
efficiently
6. ADJUSTING AIRFLOW DIRECTION
Airflow direction from the air outlet can be adjusted both vertically and horizontally
Adjusting Airflow Up-Down
1. Auto Swing Airflow Up-Down
Air will be distributed more evenly by selecting
Auto Swing Airflow function. The horizontal deflector
Closed automatically when the unit is OFF.
2. Adjusting Airflow
Remote control: Stop the Auto Swing Airflow to
the airflow direction desired.
Manual control: Turn the horizontal deflector by
hand upward or downward.
PHY-7/9/12/15/18
In Cooling Mode
When cooling in hot weather, turning the horizontal
deflector to the horizontal position improves air circulation
in the room and cooling effectiveness.
Horizontal Deflector
PHY-24
In Heating Mode
Since cold air descends and warm air ascends,
turning the horizontal deflector downwards when
in heating mode will more evenly distribute warm
air in the room.
Horizontal Deflector
PHY-7/9/12/15/18
Adjusting Airflow Left-Right
Vertical Deflector
Turn the vertical deflector by hand left or right to
the desired position.
PHY-24
Vertical Deflector
7. CARE AND PRECAUTIONS
Please pay attention to the following to ensure operation efficiency.
Use a stable power source for your unit.
A terrating current
Single phase 230V
Do not obstruct indoor or outdoor unit intake or
outlet to ensure proper operation.
Do not insert foreign materials into the intake or
outlet of the indoor or outdoor unit.
Install both indoor and outdoor units in proper
places.
*Install both indoor and outdoor units on a firm
and flat location that can with stand weight yet
has easy access for maintenance.
*Do not install either the indoor or outdoor unit
near locations where there are flammable
gases, petrol or oil.
*Put a cover on the outdoor unit and switch off
the main power when it will not be used for
extended periods of time.
Outdoor unit
Indoor unit
7. CARE AND PRECAUTIONS
Care of Unit
Cleaning the primary
Air filters
When cleaning the outside surfaces
of the indoor unit use a soft cotton
cloth with a mild detergent in warm
water and wipe casing gently.
Cleaning of the primary air filters is
needed approximately once every
two weeks.
1. Take the primary air filters out
when the unit is completely off.
- Open the front cover.
- Push the primary air filters up
gently until the filter handles are
exposed pull downwards.
o
BELOW 40 C
Do not use any form of alcohol, oils
or chemical agents which may
cause damage to the casing.
If the primary air filters are very dirty,
clean with a mixture of mild detergent
and warm water and let them dry
before reinstalling.
OR A VACUUM
CLEANER CAN ALSO
BE USED
Do not wash the unit with water
directly to avoid short circuiting the
unit.
2. Re-install the primary air filters
3. Close the front cover.
8. TROUBLE SHOOTING GUIDE
If your system is not functioning properly, please follow our checking procedures to determine if
there is a genuine fault.
(A)
1.
2.
3.
WHEN THE FAN ON THE INDOOR UNIT DOES NOT OPERATE
Check whether power is On or Off.
Check whether power supply is available.
Are other home appliances working properly on the
same electrical circuit?
4. Check whether there is a low battery supply to the remote controller which may affect
normal operation.
5. Check whether the controller is communicating with the indoor unit. Use the manual control
panel inside the lift up cover.
6. Check whether the setpoint is reasonable.
a. During cooling mode, if the temperature setpoint is higher than the room temperature,
the compressor will not start.
b. During heating mode, if the temperature setpoint is lower than the room temperature,
the compressor will not start.
(B) WHEN THE INDOOR UNIT IS OPERATING, BUT THE
TEMPERATURE DOES NOT MEET YOUR EXPECTATIONS.
1. Check whether the temperature setpoint is set properly
2. Check whether there is a sudden increase in the
number of people in the room.
3. Check whether the filters are dirty on the indoor unit or
whether the heat exchanger is dirty in the outdoor unit
both of which will block air flow entering and impair
efficient performance. Once a year the heat exchanger in the outdoor unit should be
cleaned by a serviceman. For quick cleaning, remove any dirt from the heat exchanger
with a stiff brush.
4. Check the supply and return air grilles on both the indoor and outdoor units to see
whether there is an obstruction to the airflow.
5. Check whether all the windows are closed properly.
If you have tried the above procedures without success, please switch the unit off and contact our
service centre or distributor or arrange for our service personnel to investigate.
9. MEMO FOR FUTURE SERVICE
PLEASE INSERT:
Model
Indoor Evaporator Unit
:
Outdoor condensing Unit
:
Purchase Date
:
Distributor and Service Center
:
Contact details
Serviceman
:
Telephone Number
:
Home or Office Notes
Last maintenance system check date
:
Last cleaning of heat exchanger in outdoor unit date
:
Last check of filters cleanliness date
:
Last filters replacement date
:
Last replacement of handset batteries date
: