1
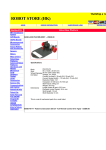
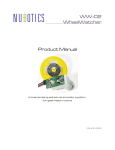
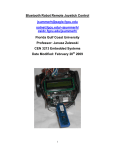
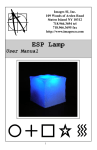
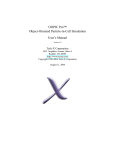
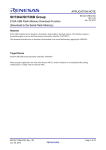
WW-12 WheelWatcher Product Manual Incremental quadrature encoder system for gearhead motors 1.02 11/28/2011 WheelWatcher Features easy installation simple interface preprinted 32 stripe self-adhesive reflective codewheel multiple interface modes for easy integration: o quadrature (ChA, ChB) o sign-magnitude (clock, direction) o 38400 baud serial (position, velocity) compatible with Solarbotics GM-2, GM-3, GM-8, and GM-9 Gearhead motors* designed for use with standard injection-molded robot wheels –any color code examples for common robot controllers available *GM-2 and GM-3 motors require the use of the optional CS-100 Codewheel Spacer. Description The WW-12 WheelWatcher incremental encoder system enables robot builders to quickly add closed-loop control to their robots. The WW-12 provides standard ChA/ChB raw quadrature outputs (90° phase shift between channels), decoded Clock and Direction signals, or serial output of distance and velocity. The clock signal toggles state at each transition of ChA or ChB, providing a 4x increase in resolution compared to the number of stripes –128 clocks per rotation –while the direction signal indicates the decoded direction of rotation, making it very easy to add to any microcontroller. The new serial output mode does all the hard work for you –it keeps track of and reports current position (a signed 32 bit integer) and also measures and reports current velocity in encoder ticks per second. Serial data is output only when encoder ticks occur, up to a rate of 100 updates per second at 38400 baud, 8N1. Serial data is non-inverted, TTL logic level, not RS-232 (which is by definition inverted logic and +/- > 5v signal levels). See the Mode Selection section below, as well as the FAQ at the end of this document, for more details. WheelWatcher WW-12 Product Manual 2 WW-12 Parts List 1. 2. 3. 4. 5. 6. printed circuit board, preassembled self-adhesive codewheel 6" five lead color-coded ribbon cable two insulated washers two 2-56 hex nuts two 2-56 1”pan head machine screws Installation Proper spacing between the photodetectors and codewheel, as well as alignment of the photodetectors to the codewheel, is essential to proper operation. Proper spacing depends on the board being held tightly against the top of the motor using appropriate mounting hardware, and also depends on the use of standard injection molded wheels designed for the GM-2, GM-3, GM8, and GM-9 gearhead motors. It is possible to use the WheelWatcher system with other commercial wheels, custom wheels, or even to give feedback on the rate of rotation or relative position of a leg or arm joint. However, details of such use is up to the end user; Noetic Design, Inc. does not provide support for such custom applications. Accurate alignment of the photodetectors to the codewheel depends on accurate placement of the sticker on the back of the wheel. It also depends on reliable maintenance of that alignment by means of the mounting hardware. The GM-series motor mounting holes are compatible with #2 (e.g., 2-56) or #3 screws. The GM-3 and GM-9 mounting holes are compatible with #2, #3, or #4 (e.g., 4-40) pan head machine screws. WheelWatcher WW-12 Product Manual 3 Installation Step by Step 1. 2. 3. 4. 5. 6. 7. if the motor is already mounted on the robot, remove it lower the board over the motor output shaft, with the shaft going into the largest hole in the center of the WW-12, making sure the raised alignment pin on the motor housing enters the matching hole on the board Make sure the slightly raised area around the motor shaft fits entirely inside the hole in the circuit board mount the motor and WW-12 to the robot chassis, using 2-56 machine screws and 2-56 nuts; place insulated washers between the screw heads and the circuit board wire up the cable to your microcontroller; see the Connector Pinout for assembly and Interfacing Examples for details For GM-2 or GM-3 motors: peel off the adhesive backing, then install the optional CS-100 Codewheel Spacer onto the back of the wheel (the side into which the motor shaft is inserted), being sure to center it; then attach the codewheel sticker to the top of the Codewheel Spacer, while also ensuring it is centered with the hub For GM-8 or GM-9 motors: place the codewheel sticker on the back of the wheel, being sure to center it with the hub; the back of the wheel is the side into which the motor shaft is inserted; the raised hub fits inside the sticker’ s center hole Figure 1: CS-100 (Sold Separately) WheelWatcher WW-12 Product Manual 4 Cable Assembly The WW-12 kit contains a length of ribbon cable, 5 female Molex crimp pins, and a matching white Molex header. You will need to assemble this cable by performing the following steps. 1. separate about 0.75”of the ribbon cable into individual wires 2. strip off approximately 1/8”of insulation from the separated wires 3. twist the ends of each wire so that the individual fine wires are not frayed (do not connect the 5 wires to each other, just tighten each one separately) 4. notice that each crimp pin, once crimped to a wire, will grab the bare wire with one set of crimped tabs and will grab the insulated area adjacent to the bare area with another set of crimped tabs: Figure 2: Ready to Crimp 5. using a crimping tool or needle nose pliers, crimp the pins one at a time to each separate wire, being sure to crimp both the insulated and uninsulated sections; it must be crimped tightly so that the pin can fit into the connector housing: WheelWatcher WW-12 Product Manual 5 Figure 3: Crimping Figure 4: One Crimped 6. optional: solder the crimped bare section for a more reliable connection 7. insert the crimp pins, one at a time, into the end of the connector housing with the larger openings, such that the retention bump on the pin engages with the small opening on the side of the connector: WheelWatcher WW-12 Product Manual 6 Figure 5: Inserting Pins 8. your cable assembly is now complete. Figure 6: Complete WheelWatcher WW-12 Product Manual 7 Connector Pinout The color suggestions based on cable assembly photos below. We provide two different colors of ribbon cable, indicated below as Color Set A and Color Set B. Choice of color is up to the distributor. Table 1: connector pinout Pin SilkQuadrature Mode screen 1 + 2 B ChB 3 A ChA 4 M QuadMode=1 5 - Sign / Magnitude Mode Vcc Direction Clock /SMMode=0 Gnd Serial Mode /SerMode=0 TX out RX in Color Set A Red Orange Yellow Green Blue Color Set B Violet Gray Black Brown Mode Selection As hinted at in the connector pinout, you can select the desired operating mode of the encoder by holding specific pins high or low at reset. In firmware revisions 2 and later, this is sampled 50ms after reset (revision 1 firmware would sample immediately after reset). You can accomplish this by using a pull-up or pull-down resistor (anything up to 10K ohm would work) to either Gnd (for logic low, 0) or Vcc (for logic high, 1), depending on the mode required. If you do not pull down any pins, the encoder defaults to quadrature outputs (ChA / ChB). These signals are square waves which are 90 degrees out of phase with respect to each other. NOTE: it can be helpful to tie pin 4 high with a resistor to Vcc to ensure it definitely goes into quadrature mode. If you pull down pin 4, the encoder goes into sign-magnitude mode. In this mode, the direction line is logic high when the wheel rotates clockwise, and low when it rotates counter-clockwise. The clock line toggles on every change of either sensor, resulting in an alternating pattern of 128 high and low values for each wheel rotation. NOTE: this is different from the behavior of the clock line in the WW-01 and WW-02 WheelWatcher encoders; in those older products, the clock WheelWatcher WW-12 Product Manual 8 line would pulse low briefly on each edge. If you pull down pin 2 instead of pin 4, the encoder goes into serial mode. In serial mode, data will be output from the Serial TX Out pin (pin 3) at 38400 baud, 8 data bits, no parity, 1 stop bit; commands can be issued to the WW-12 using Serial RX In pin (pin 4). Again, the TX and RX lines expect normal TTL signaling with non-inverted data. This is what one would obtain from the serial interface coming directly out of most common off the shelf microcontrollers (such as PIC or ATMEGA), the Arduino TX/RX pins (usually digital pins 0 and 1), and/or from a USB to serial converter such as the Acroname S27USB-SERIAL (http://www.acroname.com/robotics/parts/S27-USB-SERIAL.html); see figure below. NOTE: Do not connect the WW-12 directly to a USB to RS-232 converter nor to a standard PC serial port –the high voltages present can damage the WW-12, and the inverted signaling will result in unusable data. Figure 7: Acroname USB-Serial Connector WW-12 to S27 USB-Serial Connections Table 2: connections WW-12 Pin 1 2 3 4 5 Name Vcc /SerMode=0 Tx Out Rx In Gnd WheelWatcher WW-12 Product Manual S27 Pin VCC 10K resistor to GND STX (Data In) SRX (Data Out) GND 9 Data Format For consistency, this serial data format matches the format for our other serial-interface product, the WC-132 WheelCommander Differential Drive Controller. After reset, the string “ NWw02”is displayed, indicating the ‘ N’ ame of the product “ Ww” = WheelWatcher and the firmware revision “ 02.” NWw02<LF> Once the encoder detects motion, it starts outputting distance travelled and velocity of rotation, up to 100 times per second, where distance, a signed 32 bit value, is rendered in ASCII characters with its hexadecimal equivalent requiring 8 characters; and velocity, a signed 16 bit value, is also rendered in ASCII hexadecimal, requiring 4 characters. The letter ‘ D’precedes the distance value, and the letter ‘ V’precedes the velocity value. These values are terminated with a line feed (\n = ASCII 0x0A). D00000000<LF> V0000<LF> After moving 123 steps at 25 ticks per second, the output would look like this: D0000007B<LF> V0019<LF> WheelWatcher WW-12 Product Manual 10 Command Set The following commands are supported by firmware revisions 1 and 2 of the WW-12 WheelWatcher encoder when in serial mode. D<LF> - Control Distance Output Toggle automatic output of distance on change. V<LF> - Control Velocity Output Toggle automatic output of velocity on change. E<n1><n2><LF> - Test Interface Echo back the specified nibbles (n1 and n2) in reverse order; this is used to test the interface. The returned data will be: E<n2><n1><LF> For example, if you issue: E5A<LF> You’ ll receive back: EA5<LF> T<LF> - Request Time This command returns the time since power on of the WW-12 in increments of 10 milliseconds (1/100 of a second resolution). For example: T<LF> T00000352<LF> Means the device has been running for 352H = 850 / 100 = 8.5 seconds. This command can be used to compensate for clock speed variations in each WW-12, which affects the accuracy of the velocity reports. M<LF> - Request Output Mode This command returns the current operating mode, which will always be 2. N<LF> - Request Name and Version This returns the current device name and firmware version (same as power up): NWw02<LF> . –Synchronize If you issue a single period character, the unit will flush its buffers and issue back its own period character. This is useful to ensure communication synchronization between the unit and your controller. WheelWatcher WW-12 Product Manual 11 Timing Diagram The following diagram illustrates the behavior of the ChA, ChB, Direction, and Clock signals as the wheel slows down and changes direction, then speeds back up. Figure 8: WW-12 Timing Specifications Supply Voltage (Vcc) Supply Current (Icc) DC Input Voltage (low) DC Input Voltage (high) DC Output Voltage (low) DC Output Voltage (high) DC Output Current (pins 2-4) Mode Sample Time Radial misalignment Tangential misalignment Angular misalignment Codewheel tilt Phase error Encoder Resolution Per Rev Maximum Encoder Ticks/Second PCB center shaft hole diameter PCB width PCB length PCB thickness Detector height (See figure 11 below) Detector top to codewheel (See figure 9 below) WheelWatcher WW-12 Product Manual +3.3v to +5.5v 34mA TYP, 42mA MAX (when Vcc = 5v) -0.5v to 0.3*Vcc 0.6*Vcc to Vcc + 0.5v 0.6v 4.1v (if Vcc = 5v); 2.5v (if Vcc = 3.3v) 20mA 50ms after reset (firmware rev 2 and later) TBD TBD TBD TBD TBD 128 (32 stripes) TBD NOM 9.22mm (0.363” ) NOM 22.71mm (0.894” ) NOM 49.89mm (1.964” ) NOM 0.79mm (0.031” ) 1.50mm (0.059” ) MIN, 1.70mm (0.067” ) MAX (from top to PCB) NOM 0.5mm (0.020") - 1.0mm (0.039") MIN 0.3mm (0.012") (TBD) MAX 1.7mm (0.067") (TBD) 12 Figure 9: from datasheet for Fairchild QRE1113 Rev 1.7.0, Copyright 2011 Fairchild Corporation Figure 10: board outline WheelWatcher WW-12 Product Manual 13 Figure 11: proper spacing WheelWatcher WW-12 Product Manual 14 Interfacing Examples Please visit www.nubotics.com to view and download example code for Atmel AVR Basic and C, Microchip PIC Basic and C, Kronos Robotics DIOS, Motorola 68hc11 Interactive C and Ridgesoft RoboJDE Java, Parallax Basic Stamp, and Savage Innovations OOPIC controllers. Raw Quadrature: ChA / ChB Only The ChA / ChB signals can be used with motor controllers that accept industrial-style incremental encoder signals, such as the Acroname BrainStem Moto, Savage Innovations OOPIC, or Solutions Cubed MiniPID. ChA and ChB are 50% duty cycle, 90° out of phase signals, created by having two photo-detector packages spaced at a very specific angle with respect to each other, at a specific radius from the center of the axis of rotation, and expect to be used with a 32 stripe codewheel with a 50% silver/50% black radial stripe pattern. Decoded Quadrature: Clock / Direction Only The decoded outputs Clock and Direction are useful when interfacing the WheelWatcher to the Parallax BasicStamp II, Microchip Technologies’PIC midrange family, or other microcontrollers with hardware counter inputs or external interrupt pins. The clock line changes state (toggles) upon each transition of either ChA or ChB. The direction line is high when the wheel rotates one way, and low when it rotates the opposite way. For example, on a Basic Stamp II, the PulsIn command operating on a Clock signal results in a direct measurement of the period of rotation of a wheel. Use that value to calculate a new servo pulse period to maintain a desired velocity. On a PIC 16F877, tie the Clock signals to T0CKI and T1CKI, then tie the Direction signals to B4 and B5, which can issue an interrupt on change. WheelWatcher WW-12 Product Manual 15 Whenever B4 or B5 change, read the timer value, add or subtract it from a running position value based on the last direction value (since the counts in the counter were from previous motion before the direction changed), save the new direction value, then reset the hardware counter. Accurate, relatively high-bandwidth measurements of wheel velocity can be taken by using Timer2 to measure the time between edges of the Clock signals. This allows you to tightly control wheel velocity and acceleration despite the low sample rate (up to 128 clock changes per second for a 60 RPM wheel speed). WheelWatcher WW-12 Product Manual 16 WheelWatcher Frequently Asked Questions Can I hook a WW-12 directly to a PC serial port? No. You need to provide an RS-232 level converter between the PC serial port and the WW-12, so that TTL logic levels are used and non inverted data is provided. One product that can do this is the Acroname Serial Interface Connector: http://www.acroname.com/robotics/parts/S13-SERIAL-INT-CONN.html. Can I use a USB to serial adapter to interface with the WW-12, such as a Keyspan USA-19HS? No. This type of USB to RS-232 dongle is not directly compatible; you can identify such an incompatible adapter by the presence of a DB-9 connector. To use such an adapter, you must add an RS-232 level converter between it and the WW-12, such as a circuit you make yourself using a Maxim MAX232 chip (http://www.maximic.com/datasheet/index.mvp/id/1798) or the Acroname Serial Interface Connector. A better choice is to use a USB to serial interface that directly provides non-inverted TTL signals, such as the Acroname S27-USB-SERIAL adapter. Where can I buy a WheelWatcher Encoder? and What happens if the codewheel sticker is not centered on the wheel? This will result in a repeating wobbling signal pattern for each wheel rotation. It would be hard to correct for this in firmware, so go slowly and take care when mounting the sticker. This won't affect you much if you are only using the WheelWatcher for odometry (distance measurement), but will affect you if you are using it for velocity control. What do the LEDs mean? The YELLOW LED (D1) is connected to the Direction signal, so it turns off when the wheel rotates clockwise (CW) and on when it rotates counter clock wise (CCW). The GREEN LED (D2) is connected to the ChA signal, so it blinks on and off as the wheel turns. NOTE: For 1 second after power up, the LEDs are set to a pattern to indicate which WheelWatcher WW-12 Product Manual 17 operating mode the WW-12 is in. If quadrature mode, yellow will be on and green off; if sign-magnitude, yellow will be off and green on; and if serial, both will be on. How can I clean the codewheel stickers? We recommend only gentle cleaning with a tissue or Q-Tip moistened with clean warm water. Do not use isopropyl (rubbing) alcohol or other cleaners, as they can cloud the silver areas and render them less reflective. They could also damage the adhesive. Can I run the WheelWatcher from my +6v (or +9v, ...) battery pack? No. The ICs on the board require Vcc to be between +3.3v and +5.5v. We recommend the use of a regulated +5v supply. How can I tell how far my robot has travelled? This is called odometry. As the robot moves, simply count up edges of ChA, CB, or Clock signals; or, use the serial mode and decode the D (distance) string. See the next question for clues as to how to convert these counts to real world distance units. Note that wheel slippage or uneven terrain will result in inaccurate distance measurements, no matter what encoder system you use; this is the bane of dead reckoning. How can I measure the velocity of the wheel? Two methods are commonly employed. The easiest is to count the number of clock transitions N (or changes to ChA and/or ChB) over a certain interval of time T. Velocity V = N / T in terms of counts per unit time. If T is too small you sometimes won't get any counts, even if the wheel is still turning. The standard injection molded wheel used with the WheelWatcher is 2.75" in diameter (for O-ring wheels). Pi * D gives a circumference of 8.64". If you are using the Clock signal, the counts per rotation C = 128. That gives C / (PI * D) = 128/8.64 = 14.8 clocks per inch of linear travel. So, if you measured N using Clock and T in seconds, then V = (N / T) * pi * D / C in terms of inches per second. The limitation with this method is that you can only update your servo control pulse width or PWM value every T seconds. For a normal servo, the highest rotation speed is usually around 60 RPM, which is one rotation per second, or 128 CLK transitions per second; at slower speeds, you will get fewer transitions per second. Your update rate (or control loop bandwidth, in control theory language) will be slow. Another method is to measure the time, using your microcontroller's hardware timers, between each Clock edge (or ChA or ChB edge), then take the inverse (1/T) to get counts per unit time. At 60RPM, you could update your servo control pulse value or PWM value every 8 ms instead of every second, and have much better resolution too. WheelWatcher WW-12 Product Manual 18 However, regardless of how well aligned the board is and well centered the sticker is, manufacturing error and alignment error will still result in some time variation from clock to clock, so we recommend that your firmware calculates a running average of the time between the 4 most recent pulses when using this method. How can I control the velocity of the wheel? This is an area of engineering known as control systems theory. There are many methods for using feedback to control velocity of a motor. In the simplest method, one measures the actual velocity of the wheel, calculates an error signal by subtracting the actual velocity from the commanded or goal velocity, multiplies that by a constant, then feeds that value to the motor. Thus, if the wheel is spinning too slowly, the motor is told to speed up, and vice versa. What I just described is known as a P loop -- proportional control loop -- since the only error term is proportional to the difference in velocity. One common technique that works better for varying terrain is called a PID loop, which stands for Proportional Integral Differential. Much has been written about this technique, and Google is your friend. See the Example Code area of the Nubotics website for examples of P and PI loops using the WheelWatcher for various robot platforms. Why am I not getting good counts from the encoders? Check the behavior of the LEDs while your motors are turning. Do this either by turning the wheels slowly by hand (rough turning can strip the gears in the motors, so be gentle!) with the power on to the WW-12s but off to the motors, or by using your own test program. The yellow LED should be solid on or off, and should only change state when the direction of wheel rotation changes. The green LED should blink on and off, once per stripe -- 32 times on and 32 off for each wheel rotation. If the yellow LED is flashing when it shouldn't be, or if the green LED is not pulsing 32 times per rotation, make sure your wheels are on tight. If the wheels are too high above the WW-12 PCBs, there won't be enough light reflected to the sensors on the boards. It is best to use the screws provided with your motors to hold the wheels in tight. If you are still having problems, check the alignment of the PCB with the motor shaft. Also, check that the codewheel stickers are flat against the wheel, without bubbles under them, and that they are clean. What mounting hardware is provided? The WW-02 and WW-12 are provided with two insulated #2 washers; two #2 hex nuts; and two 2-56 1" pan head machine screws. WheelWatcher WW-12 Product Manual 19 My robot uses nonstandard motors and wheels. Can I use the WheelWatcher with it? Maybe. You will need to mount the WW-12 such that it is aligned with your motor's shaft, and place the codewheel sticker on a flat surface (your wheel or something attached to the motor shaft) so that it is parallel to the surface of the WW-12 PCB (the CS-100 Codewheel Spacer is useful for this). The distance between the top of the 2 sensors on the WW-12 and the codewheel sticker must be close to 1.1 mm (0.43") for it to function. Beyond that, good luck. We can't support nonstandard motors, wheels, and mounting schemes -- the WW-12 is designed specifically for standard injection molded wheels and Solarbotics GM-series motors. Let us know how it works for you, though. I want to use the WW-12 with a Nubotics WheelCommander differential drive controller. What settings should I use? Let WW-12 pin 4 float or tie it high with a pull-up resistor to select quadrature mode. For the left WW-12, connect pins 1 and 5 to WheelCommander connector J6 Vdd and ground, and pins 2 and 3 of the WW-12 to J6 ChB / ChA inputs. Connect the right WW12 to WheelCommander connector J8 in similar manner. In the WheelCommander Setup Wizard, Motor and Encoder Settings tab, ensure that the Quadrature Settings checkbox is checked, and that the Encoder Resolution text box says 128. I have used the WW-02 encoders for quite a few years and recently purchased a few WW-12 encoders. I am following the instructions and trying to use the WW-12s in sign-magnitude mode, so I am connecting pin#4 to ground, pin#1 to 3.3v, and pin#5 to ground. I am only observing 64 high and low transitions on pin#3 and not the expected 128. Is there something that I am missing? The WW-12 uses a microcontroller instead of a fixed-function quadrature decoder chip, the LSI LS7084, used in the WW-01 and WW-02. That chip's clock output generated a very short pulse at each transition of the quadrature sensors. This short pulse was problematic for some beginners to detect, so when writing the code for the WW-11/WW12, we decided to make it easier by toggling the clock line on each transition. You will still get 128 transitions per rotation -- you just need to change your code to look for either edge of CLK rather than just one edge. WheelWatcher WW-12 Product Manual 20 What is new about the WW-12 compared to the WW-02? The WW-12 differs in these ways: o 5 pin, 0.1" pitch connector rather than 8 pin (2 rows of 4) 2mm connector o 3 operating modes which can be selected by selectively pulling down certain connector pins: quadrature (ChA/ChB) sign/magnitude (CLK/DIR) serial (38400 baud); outputs distance traveled as well as velocity o sign/magnitude mode toggles the clock line on either edge of either quadrature channel, rather than the 50us low pulse on either edge generated on the WW-02 WheelWatcher WW-12 Product Manual 21 Errata Firmware Rev 1: The power up states of pins 2 and 4 were sampled immediately after the microcontroller exited reset; this is too fast for slow rising power supplies. Revision 2 and later now delay 50ms after reset before sampling pins 2 and 4, ensuring proper mode selection. Noetic Design released firmware revision 2 on 6/21/2011. For more information visit: www.nubotics.com Produced by Noetic Design, Inc., 25 NW 23rd PL, STE 6 PMB 181, Portland OR 97210 Copyright ©2004-2011 Noetic Design, Inc. All rights reserved WheelWatcher WW-12 Product Manual 22