1
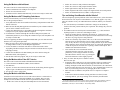
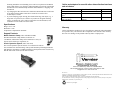
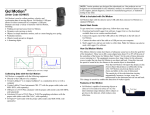
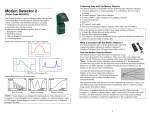
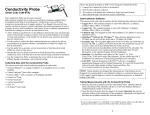
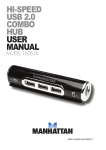
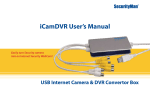
NOTE: This product is to be used for educational purposes only. It is not appropriate for industrial, medical, research, or commercial applications. Go! Motion What is Included with Go! Motion? (Order Code GO-MOT) Go! Motion is used to collect position, velocity and acceleration data of moving objects. Go! Motion’s USB port allows for direct connection to a computer’s USB port, which simplifies experiment set up. Students can study a variety of motions with Go! Motion, including • Walking toward and away from Go! Motion. • Dynamics carts moving on track. • Objects in simple harmonic motion, such as a mass hanging on a spring. • Pendulum motions. • Objects tossed upward or dropped. • A bouncing object. This is motion data collected with Logger Pro® and a computer. Go! Motion ships with the detector, a USB cable that connects Go! Motion to a standard USB port, and a CD containing Logger Lite software. These materials are everything that you need to use Go! Motion with a USBcompatible computer. Quick Start Guide To get started on a computer right away, follow these easy steps. 1. Install the Logger Lite software. 2. Connect the square end of the USB cable to the USB port on the left side of Go! Motion. 3. Connect the other end of the cable to a USB port on your computer. 4. Start Logger Lite, and you are ready to collect data. Note: Go! Motion can also be used with Logger Pro software. How Go! Motion Works Motion of a cart on a ramp Go! Motion is compatible with the following equipment: • Directly to the USB port of a computer • Vernier LabQuest™ • Vernier LabPro®, Texas Instruments CBL 2™ with the proper cable (order code MDC-BTD, sold separately) • USB port of a TI-84 Plus calculator with the proper cable (order code GMMINI, sold separately) • Calculator I/O port of TI-83 Plus or TI-84 Plus graphing calculators with the proper cable (order code GM-CALC, sold separately) • Universal Lab Interface with the proper cable (order code ULI-MDC, sold separately) This Motion Detector emits short bursts of ultrasonic sound waves from the gold foil of the transducer. These waves fill a cone-shaped area about 15 to 20° off the axis of the centerline of the beam. Go! Motion then “listens” for the echo of these ultrasonic waves returning to it. The equipment measures how long it takes for the ultrasonic waves to make the trip from Go! Motion to an object and back. Using this time and the speed of sound in air, the distance to the nearest object is determined. Note that Go! Motion will report the distance to the closest object that produces a sufficiently strong echo. Go! Motion can pick up objects such as chairs and tables in the cone of ultrasound. The sensitivity of the echo detection circuitry automatically increases, in steps, every few milliseconds as the ultrasound travels out and back. This change in sensitivity enables the detection of weaker signals. Features of Go! Motion • Go! Motion is capable of measuring objects as close as 0.15 m and as far away as 6 m. The short minimum target distance allows objects to get close to the detector, which reduces stray reflections. 2 • • • • • Go! Motion has a pivoting head, which helps you aim the sensor accurately. For example, if you want to measure the motion of a small toy car on an inclined plane, you can lay Go! Motion on its back and pivot Go! Motion head so that it is perpendicular to the plane. Go! Motion has a Sensitivity Switch, which is located under the pivoting Go! Motion head. To access it, simply rotate the detector head away from the detector body. Go! Motion has automatic temperature correction, allowing you to use it indoors at room temperature or outdoors at temperatures above or below room temperature. Rubber feet on Go! Motion provide stability when it is placed on its back or standing up. A standard camera screw mount can be found on the back of Go! Motion. This screw mount allows you to use the Motion Detector Clamp (sold separately, order code MD-CLAMP), which is a universal-mounting clamp, or to use it with typical tripod-mounting hardware. Camera Screw Mount Motion Detector Clamp (sold separately) Calculator I/O Port The calculator I/O port on the left side of Go! Motion allows you to connect any Texas Instruments graphing calculator through the calculator’s link port. You will need the proper cable (order code GM-CALC, sold separately). DIG/SONIC On the right side of the case, you will find a port labeled “DIG/SONIC”. This port allows Go! Motion to connect to Vernier LabPro or Texas Instruments CBL 2 with the proper cable, which is sold separately (order code MDC-BTD). Using the Sensitivity Switch Slide the Sensitivity Switch to the right to set the switch to the “normal” setting. This setting is best used for experiments such as studying the motion of a person walking back and forth in front of Go! Motion, a ball being tossed in the air, pendulum motion, and any other motion involving relatively large distances or with objects that are poor reflectors, e.g., coffee filters. The other sensitivity setting, which we call “track”, works well when studying motion of carts on tracks like the Vernier Dynamics System, or motions in which you want to eliminate stray reflections from object near to the sensor beam. Go! Motion and Batteries Using Go! Motion with a Computer Go! Motion has a battery compartment located on the bottom of the case. Four AA batteries can be inserted into the compartment. Please note: batteries are only needed if Go! Motion is used directly with a calculator. If you are connecting Go! Motion to the USB port of a computer or LabQuest or the DIG/SONIC port of a data-collection interface, you do not need to put batteries into the unit. Through the USB port This sensor can be used directly with a Macintosh® or PC computer. Before connecting Go! Motion to your computer, you must install Logger Lite software version 1.3 or newer or Logger Pro 3.4 software or newer. Once the software is installed: 1. Connect the square end of the USB cable into the USB port on the left side of Go! Motion. 2. Connect the other end of the cable into a USB port on your computer. 3. Start the data-collection program, and you are ready to collect data. Connecting Go! Motion Go! Motion has three ports that allow it to connect to a variety of devices; a USB port for computers and calculators, a DIG/SONIC port for data-collection interfaces, e.g., LabQuest, LabPro, CBL 2 and, a calculator I/O port for TI graphing calculators. USB Port The Go! Motion USB port is used when connecting the sensor to a computer or LabQuest. The USB port can also be used with the TI-84 Plus and TI-84 Plus Silver Edition calculators, which also have USB ports. To connect Go! Motion to a TI-84 Plus calculator, you will need to purchase a separate cable (order code, GM-MINI). 3 Through the LabPro or LabQuest This sensor can also be used with the LabPro or LabQuest connected to a computer. Here is the general procedure for using Go! Motion with a LabPro or LabQuest: 1. Connect Go! Motion to the DIG/SONIC port on the interface. 2. Start the Logger Lite or Logger Pro software on the computer. 3. You may alternately open an experiment file for a motion detector, and you are ready to collect data. 4 • • • • • Using Go! Motion with LabQuest This sensor can also be connected directly to LabQuest: 1. Connect Go! Motion to the USB port on LabQuest. 2. Choose New from the File menu. 3. Go! Motion will be identified automatically. You are now ready to collect data. Using Go! Motion with TI Graphing Calculators For the TI-84 Plus family of calculators through calculator’s USB port or I/O port, here are the general procedures: 1. Verify that batteries have been installed in the battery compartment located on the bottom of the case. 2. Make sure that the EasyData application is installed on your calculator and that you are on the calculator’s home screen. 3. Connect Go! Motion directly to TI graphing calculator through the calculator’s USB port or I/O port (separate cables are required). 4. If Go! Motion is connected through the calculator USB port, EasyData will automatically launch. If you are using the calculator I/O port, start EasyData. You are ready to collect data. For all a TI graphing calculators through the DIG/SONIC port of a data-collection interface, here is the general procedure: 1. Make sure that a data-collection program is installed on your calculator. If you are using LabPro or CBL 2, use the EasyData application. 2. Use the calculator-to-calculator link cable to connect the interface to the TI graphing calculator using the I/O ports located on each unit. Be sure to push both plugs in firmly. 3. Connect the Go! Motion to the DIG/SONIC port on the interface using the MDC-BTD cable (sold separately). 4. Start the data-collection program, and you are ready to collect data. Using Go! Motion with a Palm OS™ device This sensor can be used with a Palm OS handheld and the LabPro. 1. Connect the Palm OS handheld, LabPro, and Go! Motion. 2. Start Data Pro. 3. Tap New, or choose New from the Data Pro menu. In the dialog box that appears, tap New again. Go! Motion will be identified automatically. 4. You are now ready to collect data. Using Go! Motion with Other Sensors Go! Motion can be used with one or more other sensors when it is connected to a data-collection interface or through a USB hub on a computer. Here are some examples of how Go! Motion can be used for experiments with another sensor: • With a force sensor to study the relationship between force and motion 5 With a force sensor to study collisions and impulse With a force sensor to study simple harmonic motion With a light sensor to study the inverse square law With a magnetic field sensor to study how magnetic field varies with position With a second Motion Detector (LabPro or LabQuest only) Tips on Getting Good Results with Go! Motion1 The most frequently reported problems with a motion detector are (1) that the motion detector does not work beyond a certain distance or (2) that the graph is very noisy. There are a number of ways to troubleshoot these situations, and they are described below. 1. See if the Sensitivity Switch makes a difference. Simply set the Sensitivity Switch to the other position and retry the experiment. This change may solve the problem. 2. If Go! Motion does not work beyond a certain distance, e.g., it does not detect anything beyond 1.2 m, here are some things to check: • Check for movable objects (textbooks, ring stands, etc.) in the cone of the ultrasound. If possible, move these objects out of the measurement cone. It may not take a very large object to cause problems. • Check for a stationary object (chair, table, etc.) in the cone of the ultrasound. This object may be detected when you are trying to study an object further away. It may not take a very large object to cause problems. If you have trouble with a stationary object causing unwanted echoes, try setting the equipment up so that the objects are not in the cone or placing a cloth over the object. This minimizes the ultrasound reflection. • Also note that the cone of ultrasound extends downward from the center line. This can cause problems if you are using Go! Motion on a hard, horizontal surface. In these cases, try pivoting the head of Go! Motion to aim it slightly upward. 3. Noisy or erratic data may have a number of causes. Here are some tips. • Sometimes other sound sources can cause problems. If there is another source of ultrasonic waves in the same frequency range, this will cause erroneous readings. Examples include motors and fans, air track blowers, the sound made by the air exiting the holes on an air track, etc. Try to eliminate these sources of noise. If you are using an air track, try changing the air flow volume. • Make sure that Go! Motion is not placed close to a computer or computer monitor. • If the room in which Go! Motion is being used has a lot of hard, soundreflecting surfaces, you can get strange effects caused by the ultrasound 1 An excellent discussion of motion detector theory and operation can be found in “Physics and Technical Characteristics of Ultrasonic Sonar Systems”, Dan MacIsaac and Ari Hamalainen, The Physics Teacher 40, 39 – 46 (January 2002). 6 • • bouncing around the room. Standing waves can be set up between Go! Motion and a sound reflector. Try placing a cloth horizontally just in front of and below Go! Motion. This sometimes helps eliminate ultrasound that is “skipping” into Go! Motion. Try changing the data-collection rate. Sometimes Motion Detectors work better at one data rate than another. Rates above 30 Hz do not work well in acoustically live rooms. If you are studying people moving, have them hold a large, flat object (e.g., a large book or a pizza box) as a reflector. If you have an irregular reflecting surface, sometimes the waves will be reflected back to the transducer, and sometimes not. The results will seem erratic. Cables and adapters for use with other data-collection interfaces and calculators To use Go! Motion with LabPro or CBL 2 through the TI calculator I/O port with the USB port on TI-84 Plus calculators Use this cable or adapter Motion Detector Cable Go! Motion to calculator cable Order code MDC-BTD GM-CALC Standard-to-mini USB Adapter USB-MINI Specifications Range: 0.15 to 6 m Resolution: 1 mm Temperature compensation: automatic Warranty Vernier warrants this product to be free from defects in materials and workmanship for a period of five years from the date of shipment to the customer. This warranty does not cover damage to the product caused by abuse or improper use. Support Products Motion Detector Clamp (order code MD-CLAMP) The Motion Detector Clamp attaches to the back of Go! Motion, and then the clamp can be attached to a variety of objects such as table tops, ring stands, etc. Vernier Dynamics System (order code VDS) The Vernier Dynamics System consists of a versatile track and two carts with ultra low friction bearings. This system facilitates performing kinematics and dynamics experiments. Go! Motion attaches to the dynamics track in such a way that the entire track can be used for motion studies. Vernier Software & Technology 13979 S.W. Millikan Way • Beaverton, OR 97005-2886 Toll Free (888) 837-6437 • (503) 277-2299 • FAX (503) 277-2440 [email protected] • www.vernier.com Rev.10/3/07 Logger Pro, Logger Lite, Vernier LabQuest, Vernier LabPro, Go! Link, Vernier EasyLink and other marks shown are our trademarks or registered trademarks in the United States. CBL 2 and CBL, TI-GRAPH LINK, and TI Connect are trademarks of Texas Instruments. All other marks not owned by us that appear herein are the property of their respective owners, who may or may not be affiliated with, connected to, or sponsored by us.. Printed on recycled paper. 7 8