1
2.2 Hoisting mount
3. hardware setting
3.1 Dial codes switch setting
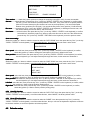
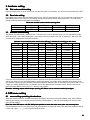
Open the codes cover on top of dome cover, see the dial codes of 10 numbers, you can turn every number ON or OFF
3.2 Baud rate setting
High speed dome camera can auto identify the Pelco-D / Pelco-P, then starting work, so you just need to set baud rate
and address codes of the camera, it can starting normal working. Baud rate can set through the 9th ~10th dial codes,
setting method as below: factory default as 2400bps.
Baud rate and dial codes switch matching sheet
Dial codes
No. 9
No. 10
2400 bps
OFF
OFF
4800 bps
ON
OFF
9600 bps
OFF
ON
19200 bps
ON
ON
3.3 Address codes setting
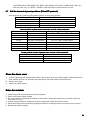
10numbers dial codes switch, (picture 01) No.1~ No.8 are use to set the address codes, you can set address codes
within the range 1~256, factory default as 1. Use binary, dial every number to be "ON" is means as 1, dial to be "OFF"
is means as 0, details please reference the sheet.
Address codes and dial codes switch sheet (Binary
Binary)), calculate it according to this sheet
Binary
Add
Binary
Add
Binary
Add
Binary
Add
0000000
0
11110000
15
01111000
30
10110100
45
10000000
1
00001000
16
11111000
31
01110100
46
01000000
2
10001000
17
00000100
32
11110100
47
11000000
3
01001000
18
10000100
33
00001100
48
00100000
4
11001000
19
01000100
34
10001100
49
10100000
5
00101000
20
11000100
35
01001100
50
01100000
6
10101000
21
00100100
36
11001100
51
11100000
7
01101000
22
10100100
37
00101100
52
00010000
8
11101000
23
01100100
38
10101100
53
10010000
9
00011000
24
11100100
39
01101100
54
01010000
10
10011000
25
00010100
40
11101100
55
11010000
11
01011000
26
10010100
41
00011100
56
00110000
12
11011000
27
01010100
42
10011100
57
10110000
13
00111000
28
11010100
43
01011100
58
01110000
14
10111000
29
00110100
44
11011100
59
6