1
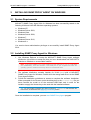
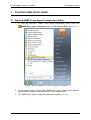
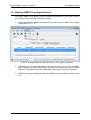
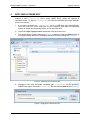
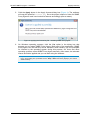
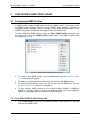
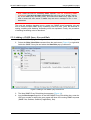
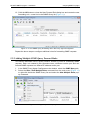
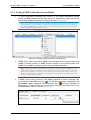
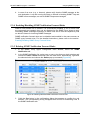
MG-SOFT Corporation SNMP Proxy Agent 2014 USER MANUAL (Document Version: 3.2) Document published on 29-September-2014 Copyright © 2007-2014 MG-SOFT Corporation MG-SOFT SNMP Proxy Agent — User Manual Introduction In order to improve the design or performance characteristics, MG-SOFT reserves the right to make changes in this document or in the software without notice. No part of this document may be reproduced or transmitted in any form or by any means, electronic or mechanical, for any purpose, without the express written permission of MG-SOFT Corporation. Permission to print one copy is hereby granted if your only means of access is electronic. Depending on your license, certain functions described in this document may not be available in the version of the software that you are currently using. Screenshots used in this document may slightly differ from those on your display. MG-SOFT may have patents, patent applications, trademarks, copyrights, or other intellectual property rights covering subject matter in this document. The furnishing of this document does not give you any license to these patents, trademarks, copyrights, or other intellectual property. Copyright © 2007-2014 MG-SOFT Corporation. All rights reserved. 2 MG-SOFT SNMP Proxy Agent — User Manual Introduction TABLE OF CONTENTS 1 Introduction .........................................................................................................5 1.1 Product Description....................................................................................................... 5 2 Installing SNMP Proxy Agent on Windows.......................................................6 2.1 System Requirements ...................................................................................................6 2.2 Installing SNMP Proxy Agent for Windows ...................................................................6 3 Starting SNMP Proxy Agent ...............................................................................7 3.1 Starting SNMP Proxy Agent Configuration Utility.......................................................... 7 3.2 Starting SNMP Proxy Agent Service ............................................................................. 8 4 5 Applying License Key.........................................................................................9 Configuring SNMP Proxy Agent ......................................................................11 5.1 Configuring SNMP Profiles .........................................................................................11 5.1.1 New/Edit SNMP Profile Dialog Box.......................................................................................11 5.2 Configuring Proxy Forward Rules for SNMP Querying Operations............................. 13 5.2.1 5.2.2 5.2.3 5.2.4 5.2.5 5.2.6 Adding a SNMP Query Forward Rule ...................................................................................14 Adding Multiple SNMP Query Forward Rules.......................................................................16 Testing SNMP Query Forward Rules....................................................................................19 Viewing Activity Status of Rules............................................................................................20 Enabling/Disabling SNMP Query Forward Rules .................................................................21 Deleting SNMP Query Forward Rules ..................................................................................23 5.3 Configuring Proxy Forward Rules for SNMP Notifications .......................................... 23 5.3.1 5.3.2 5.3.3 5.3.4 5.3.5 Adding a SNMP Notification Forward Rule ...........................................................................23 Adding Multiple SNMP Notification Forward Rules...............................................................26 Testing SNMP Notification Forward Rules............................................................................30 Enabling/Disabling SNMP Notification Forward Rules .........................................................31 Deleting SNMP Notification Forward Rules ..........................................................................31 6 Filtering Rules ...................................................................................................32 7 Exporting and Importing Configuration ..........................................................33 7.1 Exporting Configuration to .ini File ..............................................................................33 7.2 Importing Configuration from .ini File ..........................................................................35 3 MG-SOFT SNMP Proxy Agent — User Manual Introduction TABLE OF FIGURES Figure 1: Starting SNMP Proxy Agent Configurator in Windows 7 ......................................................... 7 Figure 2: Starting SNMP Proxy Agent Service from Proxy Agent Configurator...................................... 8 Figure 3: Selecting the license.key file .................................................................................................... 9 Figure 4: Applying the license.key file ..................................................................................................... 9 Figure 5: Applying the license.key file - restarting SNMP Proxy Agent ................................................ 10 Figure 6: SNMP profile management dialog box .................................................................................. 11 Figure 7: New SNMP Profile dialog box – SNMPv3 settings ................................................................ 12 Figure 8: Password For Authentication/Privacy Protocol dialog box .................................................... 13 Figure 9: Adding a new SNMP query forward rule................................................................................ 14 Figure 10: New SNMP Proxy Rule dialog box....................................................................................... 15 Figure 11: A new SNMP query forwarding rule in the Proxy Agent Configurator ................................. 16 Figure 12: Adding multiple SNMP query forward rules ......................................................................... 16 Figure 13: New Multiple Rules dialog box ............................................................................................. 17 Figure 14: Multiple new forward rules in the SNMP Query list.............................................................. 19 Figure 15: Testing an SNMP query forward rule ................................................................................... 20 Figure 16: Viewing a rule’s test status details in a tooltip...................................................................... 20 Figure 17: A list of enabled forwarding rules, where some of them are active and some idle.............. 21 Figure 18: Disabling forwarding rules.................................................................................................... 22 Figure 19: A list of forwarding rules, where some of them are disabled ............................................... 22 Figure 20: Adding a new SNMP notification forward rule...................................................................... 24 Figure 21: Configuring a new forward rule for SNMP notifications ....................................................... 25 Figure 22: A new SNMP notification forwarding rule in the SNMP Notification list..................................... 26 Figure 23: Adding multiple SNMP notification forward rules ................................................................. 27 Figure 24: New Multiple SNMP Notification Proxy Rules dialog box .................................................... 27 Figure 25: Multiple notification forward rules in the SNMP Notification tab .......................................... 29 Figure 26: Testing an SNMP notification forwarding rule...................................................................... 30 Figure 27: Viewing a notification rule’s test status details in a tooltip ................................................... 30 Figure 28: Deleting selected SNMP notification forward rules .............................................................. 31 Figure 29: Filtering rules in the SNMP query list ................................................................................... 33 Figure 30: Selecting the Export Configuration command...................................................................... 34 Figure 31: Exporting configuration to .ini file ......................................................................................... 34 Figure 32: Selecting the Import Configuration command...................................................................... 35 Figure 33: Selecting the .ini file to import configuration from ................................................................ 35 Figure 34: Selecting the import method ................................................................................................ 36 4 MG-SOFT SNMP Proxy Agent — User Manual 1 Introduction INTRODUCTION This user manual contains instructions for completing basic operations in MG-SOFT SNMP Proxy Agent application. Majority of instructions are provided on a step-by-step basis, which should help the reader start using the software effectively. It is supposed that you are familiar with using a graphical computer environment, such as choosing a main menu command or a pop-up command, selecting items, closing windows and dialog boxes, etc. All program commands in this manual are written in bold and italic letters. Individual commands in combinations of commands are separated by the “/” character. All hyperlinks in text are marked with blue colored letters, e.g., Configuring SNMP Proxy Agent. Clicking a hyperlink opens the page which the hyperlink points to. The content of this guide is listed in the Table of Contents. 1.1 Product Description MG-SOFT SNMP Proxy Agent software application can receive, optionally translate, and forward any valid SNMP messages to final targets, as well as receive, optionally translate, and send responses to these messages back to the message originators. In addition to SNMP Get, GetNext, GetBulk and Set requests, it can also forward and translate SNMP Trap and Inform messages. The software supports SNMPv1, SNMPv2c and SNMPv3 protocol versions and can translate SNMP messages between different versions of the protocol. This makes it fully transparent to the network management (NMS) applications and managed SNMP devices, which are not aware that the actual management is conducted through a SNMP proxy application. A typical SNMP proxy agent application is located between one or more network management (NMS) applications and the managed SNMP devices (agents), for example, when NMS and agents do not support the same version of the SNMP protocol or when they are not in the same (sub)network. The main components of the software are the proxy service and the management console. The SNMP Proxy Agent service runs as a system service application and receives, translates and forwards SNMP messages. The SNMP Proxy Agent Configurator is a management console that provides a graphical user interface (GUI) for configuring the proxy rules and controlling the service. In addition to MS Windows operating systems (Windows XP, Windows Server 2003, Windows Vista, Windows Server 2008, Windows 7, Windows Server 2012, Windows 8.x), MG-SOFT SNMP Proxy Agent will soon be available also for Linux operating systems running on Intel x86 architectures (Red Hat, SuSE, Debian, Ubuntu,...), as well as for Apple Mac OS X (universal binaries for Intel x86 and x86_64 platforms). 5 MG-SOFT SNMP Proxy Agent — User Manual 2 Installing SNMP Proxy Agent on Windows INSTALLING SNMP PROXY AGENT ON WINDOWS 2.1 System Requirements MG-SOFT SNMP Proxy Agent 2014 for Windows has been successfully tested on the following 32-bit and 64-bit MS Windows operating systems: Windows XP, Windows Server 2003, Windows Vista, Windows Server 2008, Windows 7, Windows Server 2012, Windows 8.x. You need to have administrative privileges to successfully install SNMP Proxy Agent 2014. 2.2 Installing SNMP Proxy Agent for Windows 1. Use Windows Explorer to locate the MG-SOFT SNMP Proxy Agent software distribution (zip archive or setup file) that you have downloaded from MG-SOFT’s Website or obtained on a removable medium. Note: If MG-SOFT SNMP Proxy Agent installer has been delivered to you on a USB flash card (WalletFlash), insert the card into a free USB port on your computer and allow the operating system to install the necessary drivers to use the flash drive. 2. The software distribution contains installer for 32-bit (x86) build of MG-SOFT SNMP Proxy Agent for Windows. Double-click the setup.exe file to run the SNMP Proxy Agent installer. 3. Follow the installation guidelines on screen to complete the software installation. When prompted for the license, point the dialog box to the license.key file you have received via e-mail or on the enclosed USB flash card in order for the installer to apply the license key to be used with the installed software. Tip:: You can install the software also without providing a license.key file and apply the license later, as described in the Applying License Key section. Once the installation is complete, you can start SNMP Proxy Agent program. 6 MG-SOFT SNMP Proxy Agent — User Manual 3 Starting SNMP Proxy Agent STARTING SNMP PROXY AGENT 3.1 Starting SNMP Proxy Agent Configuration Utility 1. To start the MG-SOFT SNMP Proxy Agent configuration utility, select the SNMP Proxy Agent Configurator entry from the Windows Start menu (Figure 1). Figure 1: Starting SNMP Proxy Agent Configurator in Windows 7 2. As the program starts, the MG-SOFT SNMP Proxy Agent splash screen appears, displaying the company name and announcing the program itself. 3. The SNMP Proxy Agent Configurator desktop will appear (Figure 2). 7 MG-SOFT SNMP Proxy Agent — User Manual Starting SNMP Proxy Agent 3.2 Starting SNMP Proxy Agent Service By default, SNMP Proxy Agent Service is started automatically by the system. Should you need to start it manually, proceed as follows: 1. Select the Service / Start command from the main menu in SNMP Proxy Agent Configurator (Figure 2). Figure 2: Starting SNMP Proxy Agent Service from Proxy Agent Configurator 2. Depending on your operating system and user privileges, you may be prompted with a dialog to enter the administrator password or to permit the service starting operation. If prompted, enter the administrator password or permit the operation. 3. SNMP Proxy Agent Configurator will start SNMP Proxy Agent Service and connect to it. 8 MG-SOFT SNMP Proxy Agent — User Manual 4 Applying License Key APPLYING LICENSE KEY Without a valid license.key file in place SNMP Proxy Agent will operate in restricted mode. To apply a license.key file after the software has been installed, proceed as follows: 1. If you have received your license.key file on a USB flash card (WalletFlash), insert the card into a free USB port on your computer and allow the operating system to install the necessary drivers to use the flash drive. 2. Select the Help / Apply License command from the main menu. 3. The empty Apply License dialog box (Figure 4) appears. Click the Select button in the Apply License dialog box to display the Select License dialog box (Figure 3). Figure 3: Selecting the license.key file 4. Navigate to the drive and folder containing your license.key file for MG-SOFT SNMP Proxy Agent. Select the license.key file and click the Open button (Figure 3). Figure 4: Applying the license.key file 9 MG-SOFT SNMP Proxy Agent — User Manual Applying License Key 5. Click the Apply button in the Apply License dialog box (Figure 4). The software will copy the specified license.key file to the proper location in order for SNMP Proxy Agent to read it and unlock its features accordingly (after a restart). Figure 5: Applying the license.key file - restarting SNMP Proxy Agent 6. On Windows operating systems, click the Yes option in the dialog box that prompts you to restart SNMP Proxy Agent. Both parts of the application (SNMP Proxy Agent GUI and service) will be restarted. Allow restart if you are prompted for consent by the operating system during this process. On Linux and other operating systems, restart SNMP Proxy Agent manually. After restart, the selected license should be applied and you can start using the software. Tip: You can check if the license has been properly applied by verifying if the About SNMP Proxy Agent dialog box (accessible via the Help / About command) displays your license details correctly. 10 MG-SOFT SNMP Proxy Agent — User Manual 5 Configuring SNMP Proxy Agent CONFIGURING SNMP PROXY AGENT 5.1 Configuring SNMP Profiles A SNMP profile contains SNMP protocol settings (SNMP version, community names or SNMPv3 user settings) that are used by SNMP Proxy Agent for receiving or forwarding SNMP messages. One can configure many different SNMP profiles in the SNMP Proxy Agent Configurator and assign them to forwarding rules. To start configuring SNMP profiles, select the Edit / SNMP Profiles command from the main menu or click the SNMP Profiles toolbar button. The SNMP Profiles dialog box appears (Figure 6). Figure 6: SNMP profile management dialog box To create a new SNMP profile, click the New button and the New/Edit SNMP Profile dialog box will appear. To remove an existing profile, select it on the list and click the Delete button. To edit an existing profile, select it on the list and click the Edit button and the New/Edit SNMP Profile dialog box will appear. To filter existing SNMP profiles by the protocol version (SNMPv1, SNMPv2c, SNMPv3) or by the usage (in use) or by disabled status, select the respective option(s) in the Filter frame in the SNMP Profiles dialog box. 5.1.1 New/Edit SNMP Profile Dialog Box 1. In the Profile name input line in the New/Edit SNMP Profile dialog box, enter the name of the SNMP profile. 11 MG-SOFT SNMP Proxy Agent — User Manual Configuring SNMP Proxy Agent 2. Choose the SNMP version that will be supported by the simulated agent(s) by selecting the corresponding radio button. 3. If you have selected the SNMPv1 or SNMPv2c protocol version, check the Read Community checkbox and into the accompanying input line enter the community name used for SNMP querying operations (SNMP Get, GetNext, GetBulk). To accept SNMP query messages with any community string (Receive profile) or to disable translating community string (Forward profile), leave the Read community checkbox unchecked. Note 1: When a profile is used as the input profile (Receive profile) in a proxy rule, the Read community parameter functions as a filter for incoming SNMP querying requests, i.e., only those incoming SNMP query messages that include the matching community string will be forwarded by the given rule. If the Read community checkbox is unchecked, then all SNMP querying requests will be passed through, regardless of the community name they contain. Note 2: When a profile is used as the output profile (Forward profile) in a proxy rule, the specified Read community will be inserted into all outgoing SNMP query messages forwarded by the given rule. If the Read community checkbox is unchecked, then each outgoing SNMP message will contain the same community name as it had it on the input (no community translation occurs). 4. If you have selected the SNMPv1 or SNMPv2c protocol version, check the Write Community checkbox and into the accompanying input line enter the community name used for SNMP Set requests. To accept SNMP Set messages with any community string (Receive profile) or to disable translating community string in outgoing SNMP Set messages (Forward profile), leave the Write community checkbox unchecked. Figure 7: New SNMP Profile dialog box – SNMPv3 settings 5. If you have selected the SNMPv3 protocol version, specify the following parameters: Enter the name of the SNMPv3 USM user into the Security user name input line. 12 MG-SOFT SNMP Proxy Agent — User Manual Configuring SNMP Proxy Agent Enter the SNMPv3 context name into the Context input line. Select the SNMPv3 authentication protocol from the Authentication dropdown list and click the Change Password button next to it. The Password For Authentication Protocol dialog box appears (Figure 8). Figure 8: Password For Authentication/Privacy Protocol dialog box Enter the authentication password twice into the Password and the Password confirmation input lines and click the OK button. Tip: To see the entered characters, check the Show typing checkbox. Select the SNMPv3 privacy protocol from the Privacy drop-down list and click the Change Password button next to it. The Password For Privacy Protocol dialog box appears, which has the same appearance as the Password For Authentication Protocol dialog box (Figure 8). Enter the privacy password twice into the Password and the Password confirmation input lines and click the OK button to close the Password For Privacy Protocol dialog box. Tip: To see the entered characters, check the Show typing checkbox. 6. Click the OK button at the bottom of the New/Edit SNMP Profile dialog box to create a new SNMP profile and close the dialog box. 5.2 Configuring Operations Proxy Forward Rules for SNMP Querying This section describes how to add, configure and delete rules for forwarding SNMP requests (SNMP Get, GetNext, GetBulk, and Set requests). A forwarding rule is a configuration item that determines the port on which SNMP Proxy Agent listens for incoming SNMP requests, the target address and port to which SNMP requests are forwarded, as well as the SNMP protocol settings used for receiving and forwarding SNMP messages (the latter two control translation of SNMP messages between different versions of the protocol). The software lets you configure multiple proxy forwarding rules to enable managing multiple devices through the proxy. Every rule for forwarding SNMP requests must have a unique receive port (i.e., port on which the software listens for incoming SNMP requests). 13 MG-SOFT SNMP Proxy Agent — User Manual Configuring SNMP Proxy Agent Note: Unlike the rules for forwarding SNMP requests, rules for forwarding SNMP notifications can have the same receive port (this port must not be already used by any of the SNMP query forwarding rules). This means that SNMP Proxy Agent can be used to forward the same stream of SNMP Trap and Inform messages to two or more destinations. The next two sections describe how to create one SNMP query forwarding rule and how to create multiple SNMP query forwarding rules at a time. Then, the methods of testing, enabling and disabling forwarding rules are explained. Finally, the procedure of deleting forwarding rules is described. 5.2.1 Adding a SNMP Query Forward Rule 1. In the SNMP Proxy Agent Configurator main window, select the SNMP Query tab. 2. Select the Rule / New Rule command from the main menu (Figure 9) or right-click inside the SNMP Query list and select the New Rule pop-up command. Figure 9: Adding a new SNMP query forward rule 3. The New SNMP Proxy Rule dialog box appears (Figure 10). 4. Into the Receive port input line in the New SNMP Proxy Rule dialog box, enter the UDP port number on which the proxy agent will listen for incoming SNMP requests (SNMP Get, GetNext, GetBulk (if applicable), Set). 14 MG-SOFT SNMP Proxy Agent — User Manual Configuring SNMP Proxy Agent Figure 10: New SNMP Proxy Rule dialog box 5. In the Receive profile drop-down list, select the SNMP profile, whose settings the incoming SNMP requests must match in order to be forwarded by the given rule. Tip: To create a new SNMP profile, select the <New SNMP profile…> entry from the Receive profile drop-down list and set its properties, as described in the New/Edit SNMP Profile Dialog Box section. 6. In the Forward profile drop-down menu, select the SNMP profile to be used for forwarding SNMP requests. If the Receive and Forward profiles are different, all incoming SNMP requests will be translated according to the Forward profile’s SNMP protocol settings and then forwarded to the target address. Similarly, all SNMP Response messages received from the target address will be translated back to the initial SNMP version according to the Receive profile settings before being sent back to the request sender. Tip: To create a new SNMP profile, select the <New SNMP profile…> entry from the Forward profile drop-down list and set its properties, as described in the New/Edit SNMP Profile Dialog Box section. 7. Into the Forward address input line, enter the IP address or the fully qualified domain name (e.g., myserver.mydomain.com), which the SNMP requests will be forwarded to. 8. Into the Forward port input line, enter the UDP port number, which the SNMP requests will be forwarded to. 9. Into the Timeout input line, enter the timeout value in seconds for forwarding SNMP requests. 10. Into the Retries input line, enter a number that designates how many times the requests will be retransmitted after the first timeout occurs. 11. Into the Comment input line, optionally enter a short comment, e.g., describing the rule or its target. 15 MG-SOFT SNMP Proxy Agent — User Manual Configuring SNMP Proxy Agent 12. Click the OK button to close the New Forward Rule dialog box and create the new forwarding rule - a new line in the SNMP Query list (Figure 11). Figure 11: A new SNMP query forwarding rule in the Proxy Agent Configurator Repeat the above steps to configure additional rules for forwarding SNMP requests. 5.2.2 Adding Multiple SNMP Query Forward Rules This section describes how to quickly create a number of rules for forwarding SNMP requests. Each rule created in this procedure uses a different receive port and can forward SNMP requests to a different IP address and/or port. 1. In the SNMP Proxy Agent Configurator main window, select the SNMP Query tab. 2. Select the Rule / New Multiple Rules command from the main menu (Figure 12) or right-click inside the SNMP Query list and select the New Multiple Rules popup command. Figure 12: Adding multiple SNMP query forward rules 16 MG-SOFT SNMP Proxy Agent — User Manual Configuring SNMP Proxy Agent 3. The New Multiple Rules dialog box appears (Figure 13). Figure 13: New Multiple Rules dialog box 4. Into the Number of rules input line in the New Multiple Rules dialog box, enter the number of SNMP query forwarding rules you would like to create (n). 5. Into the Receive port input line, enter the first UDP port number on which the proxy agent will listen for incoming SNMP requests (SNMP Get, GetNext, GetBulk (if applicable), Set). The software will automatically listen for incoming SNMP requests also on the additional n-1 ports, starting from the receive port. For example, if the Number of rules = 10 and Receive port = 8001, then ten rules will be created, each with a different receive port in the range of 8001-8010 (the software will listen for SNMP requests on this port range). 6. In the Receive profile drop-down list, select the SNMP profile, whose settings the incoming SNMP requests must match in order to be forwarded by the rules we are creating. Tip: To create a new SNMP profile, select the <New SNMP profile…> entry from the Receive profile drop-down list and set its properties, as described in the New/Edit SNMP Profile Dialog Box section. 7. In the Forward Profile drop-down menu, select the SNMP profile to be used for forwarding SNMP requests. If the Receive and Forward profiles are different, all incoming SNMP requests will be translated according to the Forward profile’s SNMP protocol settings and then forwarded to the target address. Similarly, all SNMP Response messages received from the target address will be translated back to the initial SNMP version according to the Receive profile settings before being sent back to the request sender. Tip: To create a new SNMP profile, select the <New SNMP profile…> entry from the Forward profile drop-down list and set its properties, as described in the New/Edit SNMP Profile Dialog Box section. 17 MG-SOFT SNMP Proxy Agent — User Manual Configuring SNMP Proxy Agent 8. Into the Forward Address input line, enter the IP address, which the SNMP requests will be forwarded to. For each rule to forward SNMP requests to a different IP address, select the Auto increment option next to the Forward address input line. This will create a series of forward rules, automatically incrementing the last octet of the specified forward IP address by one in each consecutive rule. For example, if the Number of rules = 10 and Forward address = 10.0.0.1, then ten rules will be created, first with the forward address of 10.0.0.1 and the last with the forward address of 10.0.0.10. 9. Into the Forward port input line, enter the UDP port number, which the SNMP requests will be forwarded to. For each rule to forward SNMP requests to a different port, select the Auto increment option next to the Forward port input line. This will create a series of forward rules, automatically incrementing the forward port number in each rule. For example, if the Number of rules = 10 and Forward port = 2001, then ten rules will be created, first rule with the forward port of 2001 and the last rule with the forward port of 2010. 10. Into the Timeout input line, enter the timeout value in seconds for forwarding SNMP requests. 11. Into the Retries input line, enter a number that designates how many times the requests will be retransmitted after the first timeout occurs. 12. Into the Comment input line, optionally enter a short comment, e.g., describing the rules or target devices. 13. Click the OK button to close the New Multiple Rules dialog box and create the new forwarding rules (add new lines to the SNMP Query list). 18 MG-SOFT SNMP Proxy Agent — User Manual Configuring SNMP Proxy Agent Figure 14: Multiple new forward rules in the SNMP Query list 5.2.3 Testing SNMP Query Forward Rules 1. To test a rule, select it in the SNMP Query list and choose the Rule / Test command from the main menu. Alternatively, right-click the rule and select the Test command from the pop-up menu (Figure 15). Tip: You can select and test several or all SNMP query forward rules at a time using the above procedure. To select a block of adjacent rules, click the first rule in the list, press and hold down the SHIFT key and click the last rule. To select non-adjacent rules, press and hold down the CTRL key while clicking the rules. 19 MG-SOFT SNMP Proxy Agent — User Manual Configuring SNMP Proxy Agent Figure 15: Testing an SNMP query forward rule 2. SNMP Proxy Agent sends an SNMP request to the forward destination specified by the selected rule. If it receives a valid SNMP response from the destination, the OK status icon ( ) and the test time stamp is displayed in the Test Status column of the respective rule. Otherwise, the Error status icon ( ) and error description is displayed (e.g., Timeout). Place your mouse cursor above the test status icon to see the detailed test result (retrieved value) in a tooltip. Figure 16: Viewing a rule’s test status details in a tooltip 5.2.4 Viewing Activity Status of Rules The SNMP Proxy Agent Configuration utility lets you view at any given time, which of the enabled forwarding rules are currently active and working as expected. The software enables this by displaying a different rule status symbol, based on whether the rule is currently forwarding SNMP messages and receiving responses, or not: - rule is enabled but idle (no forwarding is currently performed by this rule; probably no matching incoming SNMP messages are being received) - rule is enabled and active (rule is currently forwarding SNMP messages to end destination and receiving responses from it) - rule is enabled and semi-active (rule is currently forwarding SNMP messages to end destination, but is not receiving responses from it; test the rule for more information) 20 MG-SOFT SNMP Proxy Agent — User Manual Configuring SNMP Proxy Agent Example: Figure 17: A list of enabled forwarding rules, where some of them are active and some idle 5.2.5 Enabling/Disabling SNMP Query Forward Rules When a new forwarding rule is created, it is automatically enabled. If a rule is temporarily not needed, you can disable it. When a rule is disabled, SNMP Proxy Agent stops forwarding SNMP messages as specified by the given rule and releases the respective receive port. To disable rules: 1. In the SNMP Proxy Agent Configurator main window, select the SNMP Query tab. 2. Select one or more forwarding rules you wish to disable and choose the Rule / Disable command from the main menu. Alternatively, right-click the selected rules and choose the Disable pop-up command (Figure 18). 21 MG-SOFT SNMP Proxy Agent — User Manual Configuring SNMP Proxy Agent Figure 18: Disabling forwarding rules 3. The status of the selected rules changes to Disabled (Figure 19), meaning that the rules are not in effect (forwarding is disabled). The software also stops listening on the receive ports specified in the disabled rules. Figure 19: A list of forwarding rules, where some of them are disabled To enable rules: 1. In the SNMP Proxy Agent Configurator main window, select the SNMP Query tab. 2. Select one or more forwarding rules you wish to enable and choose the Rule / Enable command from the main menu. Alternatively, right-click the selected rules and choose the Enable pop-up command. Enabled (Figure 18), meaning that 3. The status of the selected rules changes to the rules are in effect, i.e., the software listens on the specified receive port for incoming SNMP messages and is ready to forward SNMP requests according to the rule configuration. 22 MG-SOFT SNMP Proxy Agent — User Manual Configuring SNMP Proxy Agent 5.2.6 Deleting SNMP Query Forward Rules 1. In the SNMP Proxy Agent Configurator main window, select the SNMP Query tab. 2. In the SNMP Query list, select one or more rules that you wish to delete and choose the Rule / Delete command from the main menu. Alternatively, right-click the selected rules and choose the Delete pop-up command (Figure 28). 3. Click the Yes button in the confirmation dialog that appears to confirm the rule deletion. The corresponding line(s) disappear from the list of forwarding rules in the SNMP Query tab. 5.3 Configuring Proxy Forward Rules for SNMP Notifications This section describes how to add, configure and delete the rules for forwarding and optionally translating SNMP notifications (SNMP Trap and SNMP Inform messages). A notification forwarding rule is a configuration item that specifies the port on which SNMP Proxy Agent listens for incoming SNMP notification messages, the address and port to which SNMP notifications are forwarded, as well as the SNMP protocol settings used for receiving and forwarding SNMP messages (the latter two control translation of SNMP notification messages between different versions of the protocol). SNMP-enabled devices send SNMP notification messages to one or more SNMP management applications when some event occurs, e.g., device is restarted, device is queried with wrong credentials, link is lost or restored, etc. SNMP Proxy Agent lets you configure multiple notification forwarding rules, for example, to enable forwarding SNMP notifications to more than one SNMP management application. Unlike the rules for forwarding SNMP requests, where each rule must have a unique receive port, two or more rules for forwarding SNMP notifications can have the same receive port (of course, this port must not be already used by any of the SNMP query forwarding rules). This means that SNMP Proxy Agent can forward the same stream of incoming SNMP Trap and Inform messages to two or more destinations. The next two sections describe how to create a single notification forwarding rule and how to create multiple forwarding rules at a time, respectively. Then, the method of testing, enabling and disabling notification forwarding rules is explained. Finally, the procedure of deleting notification forwarding rules is described. 5.3.1 Adding a SNMP Notification Forward Rule 1. In the SNMP Proxy Agent Configurator main window, select the SNMP Notification tab. 2. Select the Rule / New Rule command from the main menu or right-click inside the SNMP Notification list and select the New Rule pop-up command (Figure 20). 23 MG-SOFT SNMP Proxy Agent — User Manual Configuring SNMP Proxy Agent Figure 20: Adding a new SNMP notification forward rule 3. The New SNMP Notification Proxy Rule dialog box appears (Figure 21). 4. Into the Receive port input line in the New SNMP Notification Proxy Rule dialog box, enter the number of UDP port on which the proxy agent will listen for incoming SNMP Trap and SNMP Inform (if applicable) notification messages. Tip: You can create two or more SNMP notification rules that will listen on the same port but forward SNMP notifications to different destinations. 24 MG-SOFT SNMP Proxy Agent — User Manual Configuring SNMP Proxy Agent Figure 21: Configuring a new forward rule for SNMP notifications 5. In the Receive profile drop-down list, select the SNMP profile, whose settings the incoming SNMP notification messages must match in order to be forwarded by the given rule. Tip: To create a new SNMP profile, select the <New SNMP profile…> entry from the Receive profile drop-down list and set its properties, as described in the New/Edit SNMP Profile Dialog Box section. 6. In the Forward Profile drop-down menu, select the SNMP profile to be used for forwarding SNMP notification messages. If the Receive and Forward profiles are different, all incoming SNMP Trap and Inform notification messages will be translated to match the Forward profile SNMP protocol settings and then forwarded to the target address. Similarly, all SNMP Response to Inform messages received from the target address will be translated back to the initial SNMP version according to the Receive profile settings before being sent back to the Inform sender. Tip: To create a new SNMP profile, select the <New SNMP profile…> entry from the Forward profile drop-down list and set its properties, as described in the New/Edit SNMP Profile Dialog Box section. 7. Into the Forward Address input line, enter the IP address or the fully qualified domain name (e.g., myserver.mydomain.com), which the SNMP requests will be forwarded to. 8. Into the Forward port input line, enter the UDP port number, which the SNMP notifications will be forwarded to. 9. Into the Timeout input line, enter the timeout value in seconds for forwarding SNMP Inform messages. Note that this setting applies only to SNMP Inform messages (Trap messages are not retransmitted). 25 MG-SOFT SNMP Proxy Agent — User Manual Configuring SNMP Proxy Agent 10. Into the Retries input line, enter a number that controls how many times the SNMP Inform messages will be retransmitted after the first timeout. Note that this setting applies only to SNMP Inform messages (Trap messages are not retransmitted). 11. To enable adding a variable binding carrying the original source address to each forwarded SNMP notification message, check the Add source address variable binding to PDU checkbox. If this checkbox is checked, SNMP Proxy Agent appends an additional variable binding to the variable bindings list of every received SNMP notification PDU before forwarding the notification to the target address. The name (OID) portion of this variable binding is snmpTrapAddress.0 (1.3.6.1.6.3.18.1.3.0), and the value is either the value of the SNMPv1 agent-addr field (if the notification was received as SNMPv1 Trap message), or the IP address from which SNMP Proxy Agent actually received the notification (if the notification was received as SNMPv2c or SNMPv3 Trap or Inform message). 12. Into the Comment input line, optionally enter a short comment describing the rule. 13. Click the OK button to close the New SNMP Notification Proxy Rule dialog box and create the new forwarding rule (a new line appears in the SNMP Notification list Figure 22). Figure 22: A new SNMP notification forwarding rule in the SNMP Notification list Repeat the above steps to configure additional rules for forwarding SNMP notification messages. 5.3.2 Adding Multiple SNMP Notification Forward Rules This section describes how to quickly create a number of rules for forwarding SNMP Trap and Inform notification messages. Each rule created in this procedure uses a different receive port and can forward SNMP requests to a different IP address and/or port. 1. In the SNMP Proxy Agent Configurator main window, select the SNMP Notification tab. 26 MG-SOFT SNMP Proxy Agent — User Manual Configuring SNMP Proxy Agent 2. Select the Rule / New Multiple Rules command from the main menu or right-click inside the SNMP Query list and select the New Multiple Rules pop-up command (Figure 23). Figure 23: Adding multiple SNMP notification forward rules 3. The New Multiple SNMP Notification Rules dialog box appears (Figure 24). Figure 24: New Multiple SNMP Notification Proxy Rules dialog box 4. Into the Number of rules input line in the New Multiple SNMP Notification Rules dialog box, enter the number of SNMP notification forwarding rules you would like to create (n). 5. Into the Receive port input line, enter the UDP port number on which the SNMP Proxy Agent will listen for incoming SNMP Trap and Inform notification messages. There are two options: To create rules that will have different (incrementing) receive port; select the Auto increment checkbox next to the Receive port input line. If this option is selected, the software will automatically listen for incoming SNMP notifications 27 MG-SOFT SNMP Proxy Agent — User Manual Configuring SNMP Proxy Agent also on the additional n-1 ports, starting from the specified receive port. For example, if the Number of rules is 10 and Receive port is 2000, then ten rules will be created, each with a different receive port starting with port 2000 and ending with port 2009 (the software will listen for SNMP notifications on UDP port range 2000-2009). To create rules that will have the same receive port, but different forward destinations, uncheck the Auto increment checkbox. In this case SNMP Proxy Agent will listen on one port for incoming SNMP Trap and Inform messages and forward them to n destinations. 6. In the Receive profile drop-down list, select the SNMP profile, whose settings the incoming SNMP notification messages must match in order to be forwarded by the given rules. Tip: To create a new SNMP profile, select the <New SNMP profile…> entry from the Receive profile drop-down list and set its properties, as described in the New/Edit SNMP Profile Dialog Box section. 7. In the Forward Profile drop-down menu, select the SNMP profile to be used for forwarding SNMP notification messages. If the Receive and Forward profiles are different, all incoming SNMP Trap and Inform notification messages will be translated to match the Forward profile’s SNMP protocol settings and then forwarded to the target address. Similarly, all SNMP Response to Inform messages received from the target address will be translated back to the initial SNMP version according to the Receive profile settings before being sent back to the Inform sender. Tip: To create a new SNMP profile, select the <New SNMP profile…> entry from the Forward profile drop-down list and set its properties, as described in the New/Edit SNMP Profile Dialog Box section. 8. Into the Forward Address input line, enter the IP address, which the SNMP notification messages will be forwarded to. If you wish that each rule forwards SNMP notifications to a different IP address, select the Auto increment option next to the Forward address input line. This will create a series of rules, where the last octet of the specified forward IP address will be incremented by one in each consecutive rule. For example, if the Number of rules is 10 and Forward address is 10.0.0.1, then ten rules will be created, first with the forward address of 10.0.0.1 and the last with the forward address of 10.0.0.10. 9. Into the Forward port input line, enter the UDP port number, which the SNMP requests will be forwarded to. For each rule to forward SNMP requests to a different port, select the Auto increment option next to the Forward port input line. This will create a series of rules with the increasing Forward port number, starting with the entered value. For example, if the Number of rules is 10 and Forward port is 8001, then ten rules will be created, first rule with the forward port of 8001 and the last rule with the forward port of 8010. 10. Into the Timeout input line, enter the timeout value in seconds for forwarding SNMP Inform messages. Note that this setting applies only to SNMP Inform messages (Trap messages are not retransmitted). 28 MG-SOFT SNMP Proxy Agent — User Manual Configuring SNMP Proxy Agent 11. Into the Retries input line, enter a number that controls how many times the SNMP Inform messages will be retransmitted after the first timeout. Note that this setting applies only to SNMP Inform messages (Trap messages are not retransmitted). 12. To enable adding a variable binding carrying the original source address to each forwarded SNMP notification message, check the Add source address variable binding to PDU checkbox. If this checkbox is checked, SNMP Proxy Agent appends an additional variable binding to the variable bindings list of every received SNMP notification PDU before forwarding the notification to the target address. The name (OID) portion of this variable binding is snmpTrapAddress.0 (1.3.6.1.6.3.18.1.3.0), and the value is either the value of the SNMPv1 agent-addr field (if the notification was received as SNMPv1 Trap message), or the IP address from which SNMP Proxy Agent actually received the notification (if the notification was received as SNMPv2c or SNMPv3 Trap or Inform message). 13. Into the Comment input line, optionally enter a short comment describing the rule. 14. Click the OK button to close the New SNMP Notification Proxy Rule dialog box and create the new forwarding rules (new lines appear in the SNMP Notification list). Figure 25: Multiple notification forward rules in the SNMP Notification tab 29 MG-SOFT SNMP Proxy Agent — User Manual Configuring SNMP Proxy Agent 5.3.3 Testing SNMP Notification Forward Rules 1. To test a notification forwarding rule, select it in the SNMP Notification list and choose the Rule / Test command from the menu. Alternatively, right-click the rule and select the Test command from the pop-up menu (Figure 26). Tip: You can select and test several or all SNMP notification forward rules at a time using the above procedure. To select a block of adjacent rules, click the first rule in the list, press and hold down the SHIFT key an click the last rule. To select non-adjacent rules, press and hold down the CTRL key while clicking the rules. Figure 26: Testing an SNMP notification forwarding rule 2. SNMP Proxy Agent will send an SNMP Trap message (if the forward profile uses SNMPv1 protocol version) or SNMP Inform message (if the forward profile uses SNMPv2c or SNMPv3 protocol version) to the forward destination. Note: SNMP Trap sending represents an unconfirmed event reporting mechanism, while SNMP Inform sending is a confirmed event reporting mechanism. In other words, in case of a SNMP Trap message no response is sent back by the Trap receiver, while in case of an SNMP Inform message the receiver is required to send a response message back to the sender to confirm Inform reception. 3. If SNMP Proxy Agent receives a valid SNMP response to Inform message from the destination, the OK status icon ( ) and the test time stamp is displayed in the Test Status column. Otherwise, the Error status icon ( ) and error description is displayed (e.g., Timeout). Place your mouse cursor above the test status icon to see the detailed test result in a tooltip (Figure 27). Figure 27: Viewing a notification rule’s test status details in a tooltip 30 MG-SOFT SNMP Proxy Agent — User Manual Configuring SNMP Proxy Agent 4. In case of an error (e.g., a timeout), please verify that the SNMP manager at the end destination is up and running and that no firewall is blocking SNMP Trap and SNMP Inform messages, as well as SNMP Response messages. 5.3.4 Enabling/Disabling SNMP Notification Forward Rules When a new forward rule is created, it is automatically enabled. If one or more rules are temporarily not needed, they can be disabled for the SNMP Proxy Agent to stop forwarding SNMP messages according to these rules and to free the respective ports on which it listens for incoming SNMP messages. SNMP notification forward rules can be disabled and enabled in the same manner as SNMP query forward rules. For the detailed instructions, please refer to the section Enabling/Disabling SNMP Query Forward Rules. 5.3.5 Deleting SNMP Notification Forward Rules 1. In the SNMP Proxy Agent Configurator main window, select the SNMP Notification tab. 2. In the SNMP Notification list, select one or more rules that you wish to delete and choose the Rule / Delete command from the main menu. Alternatively, right-click the selected rules and choose the Delete pop-up command (Figure 28). Figure 28: Deleting selected SNMP notification forward rules 3. Click the Yes button in the confirmation dialog that appears to confirm the rule deletion. The corresponding line(s) disappear from the list of forwarding rules in the SNMP Notification tab. 31 MG-SOFT SNMP Proxy Agent — User Manual 6 Filtering Rules FILTERING RULES MG-SOFT SNMP Proxy Agent Configurator implements a convenient filtering feature that lets you find and display only those rules that contain the user-specified text string in any of the selected columns. To filter forwarding rules: 1. Select the tab in the Proxy Agent Configurator main window where you wish to filter the rules, i.e., SNMP Query tab or SNMP Notification tab. 2. Click the Options button next to the Filter input line and in the Options dropdown list that appears select the desired filtering options and the columns that you wish to search in. Select the Dynamic filter option to make the filter behave as a continuous search and filter tool, meaning that any subsequent changes you make to the rules are automatically put through the filter and only those rules that match the filtering criteria are displayed. This process continues until you remove (clear) the filter. If Dynamic filter option is not selected the filter functions as a one-time search. Select the Match case option to make the filter case sensitive. If this option is enabled, the search will find only those strings in which the letter capitalization matches the one used in the Filter input line (e.g., SNMPv1 will find SNMPv1, but not Snmpv1). Select the Match whole word only option to find only those strings that are whole words and not part of a larger word (e.g., SNMP will find SNMP, but not SNMPv1). 3. Enter characters that will serve as a filter condition into the Filter input line. 4. Only the rules (rows) that contain the entered text in one or more of the selected columns will be displayed in the list of forwarding rules. The number of hits, i.e., rules that match the filter condition, is displayed next to the Filter input line (Figure 29). For example, indication (7/108) means that 7 rules out of 108 satisfy the filter condition. 32 MG-SOFT SNMP Proxy Agent — User Manual Exporting and Importing Configuration Figure 29: Filtering rules in the SNMP query list 5. Click the Clear button next to the Filter input line to remove the filter and display all forwarding rules. 7 EXPORTING AND IMPORTING CONFIGURATION MG-SOFT SNMP Proxy Agent Configurator lets you export the entire configuration, i.e., all SNMP query and notification forwarding rules and SNMP profiles, and save it to a configuration .INI file. This .INI file can later be imported into (the same or different copy of) SNMP Proxy Agent Configurator in order to either replace its current configuration or append the rules and profiles from the .ini file to the current configuration. 7.1 Exporting Configuration to .ini File 1. In the Proxy Agent Configurator select the File / Export Configuration command from the main menu (Figure 30). 33 MG-SOFT SNMP Proxy Agent — User Manual Exporting and Importing Configuration Figure 30: Selecting the Export Configuration command 2. The Export dialog box appears (Figure 31). Navigate to the location whereto you want to save the configuration file and enter the name of the configuration .ini file into the File name input line and click the Save button to write the file to disk. Figure 31: Exporting configuration to .ini file 34 MG-SOFT SNMP Proxy Agent — User Manual Exporting and Importing Configuration 7.2 Importing Configuration from .ini File 1. In the Proxy Agent Configurator select the File / Import Configuration command from the main menu (Figure 32). Figure 32: Selecting the Import Configuration command 2. The Import dialog box appears (Figure 33). Navigate to the location that contains the previously exported configuration .ini file, select the file and click the Open button to start importing the configuration. Figure 33: Selecting the .ini file to import configuration from 3. The Proxy Agent Configurator displays the dialog box prompting you to select whether to replace or supplement the current configuration (Figure 34). 35 MG-SOFT SNMP Proxy Agent — User Manual Exporting and Importing Configuration Figure 34: Selecting the import method Select the Replace button to replace the current configuration (rules and profiles) with the one from the selected .ini file, or Select the Append button to append the configuration (rules and profiles) from the .ini file to the current configuration. 4. The Proxy Agent Configurator reads the configuration from the .ini file and either replaces the current configuration or appends data to it, based on your selection. 36