1
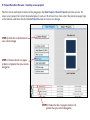
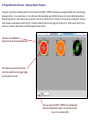
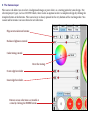
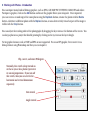
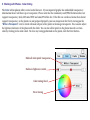
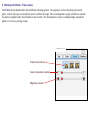
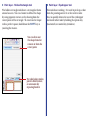
DISCUS 4
User Manual
© 2005 Magic Mouse Productions
Table of contents:
Installation
Quick start
Project selection
Preview tab
Canvas tab
Paint tab
Symbol tab
Text tab
Grid tab
Printing
Support
◆Macintosh Installation:
Discus is ready to run without any installation process; just double click the Discus icon, and begin making
labels.
To copy Discus to your hard disk, drag the Discus program, and the Discus.art art database file to the desired
destination folder. These are the only two files necessary to operate Discus. These two files must reside in the
same folder at the same level. They can be put into any folder, as long as they stay together.
To make a minor update of the Discus 4 program, such as going from 4.01 to 4.02, download a replacement
program file and trash the old program file.
To remove Discus from your system, simply drag the files to the trash.
◆Windows Installation:
When the CD-ROM is inserted, a special launcher program will appear, that allows you to run directly from the
CD, or copy the program to your hard drive. The Apple Quicktime utility program is used by Discus to import
images from various sources. The Quicktime system is included on the installation CD, and new versions are
periodically available from Apple’s web site at www.apple.com/quicktime
The Discus labeling system consists of two necessary files: The Discus.exe program file and the Discus.art art
database file. These are the only two files necessary that comprise Discus. These two files must reside in the
same folder at the same level. They can be put into any folder, as long as they stay together.
To remove Discus from your system, simply send the files to the recycle bin.
◆ Design a label in 60 seconds
Step 1) Double click the Discus program icon to start the program
Step 2) At the opening screen select the type of label project you wish to make and click the “Create Project”
button.
Step 3) Click on the Canvas tab and select a background canvas design.
Step 4) If you wish, paint on the canvas by clicking on the Paint tab, and using one of the many paint tools to
alter the background. Try using the paint bucket tool for a fast fill.
Step 5) Click on the Text tab, click Add, and type in some text. Add more text boxes if you like. The text size
and is adjusted with a sliders on the left. The text color and font are chosen at the bottom of the
screen.
Step 6) Click on the Photo tab, click Add, and locate a photograph or other graphic on your hard disk that you
wish to import. You can adjust the scaling factor of the photograph with the slider to the left. The
photo can be dragged with the mouse, or nudged with the keyboard arrow keys.
Step 7) Click on the Project Prevew tab, select the paper you will be using, and click the Print button. Use the
four arrows at the bottom to nudge the printout to match a die-cut paper.
◆ Project Selection Screen - Creating a new project
The first screen and top level menu of the program is the New Projects / Recent Projects selection screen. To
create a new project first select the kind of project such as CD or Jewel Case, then select the printer or paper type
at the bottom, and then click the Create Project button to create a new design.
STEP 3) Click the create button to
start a fresh design
STEP 1) Choose the die cut paper
or direct cd printer that you wish to
design for.
STEP 2) Choose the die cut paper or direct cd
printer that you wish to design for.
◆ Project Selection Screen - Opening Recent Projects
To open a recently used document use the menubar FILE / OPEN command, or simply double click an existing
document file. As a convenience, the software will remember up to 20 of the most recently edited documents.
The documents are sorted by name, and once the list is full the least recently accessed item is removed. To manually remove a document from the list, click the small X icon to the right of the preview. Please note that if you
move or rename a document it will disappear from the list.
Click on a thumbnail to
open one of the recent documents
To remove an item from the list,
click the small X at the upper right
of each preview icon.
You can also use FILE / OPEN or the keyboard
shortcut command-o (mac) or control-o (win)
to access a previous file
◆ Project preview for direct CD/DVD printing
As you are designing a project, you will come back frequently to the Project Preview tab, where you can view the
project as it will print. In the case of direct CD/DVD printing, there are some special features that appear in the
preview screen. There are three preference sets so that you can switch between different brands of media. The
default names of “Setting 1” can be changed to the brand name of the media you are using. Each setting will
remember the settings for the outer diameter, inner diameter and nudge parameters, so you can quickly jump
between different media types.
Media preference sets
Click to change the label
“Setting 1” to the desired
name
Outer diameter control
Inner diameter control
◆ Project preview for paper projects
When you are working with a multiple-part label sheet, such as the 2-up jewel case base project shown, you can
design two completely different labels and print in one pass. To select which label to edit, first click in the left
side and highlight one of the two labels. Then jump to the Canvas, Paint, Symbols, etc to compose that specific
label. To switch to the next label in the sheet, click back on the Project Preview tab and select a new label. The
software can accomodate up to 100 different labels per sheet. If you want to produce two identical labels, then
select the Clone option which will copy exactly the label above. To create two different labels, click the Original
button.
Select which label to edit by
clicking on the number
Print the sheet
Page setup button
Test printer connection
Click on arrow buttons to nudge
printout up / down / left /right
◆ Designing in layers
Each label is a composite of each of the layers in your design. The canvas layer is fixed at the bottom and text is
fixed to the topmost layer, but photos can be moved around. To adjust a photo’s stacking order, select the photo
tab, and drag the shingle corresponding to each photo to the left to put in lower in the stacking order, or drag it
to the right to raise it higher in the stacking order.
Bottom layer
Canvas layer
Paint layer
Photo layer
Text layer
Top layer
◆ The Canvas Layer
The canvas tab allows you to select a background image, or pure white, as a starting point for your design. For
selected project types, such as CD/DVD labels, there is also an option to select a complete design by clicking the
template button at the bottom. The canvas layer is always pinned to the very bottom of the stacking order. You
cannot add or remove canvases from the art collection.
Flip, invert and rotate buttons
Darkness/lightness control
Color tinting control
Reset the tinting
Outer edge fuzz slider
Inner edge fuzz slider
Browse canvas selections a screenful at
a time by clicking the INDEX button
◆ Working with symbols
As a convenience we have included the most popular symbols for media production into the software, as builtin transparent photos. To access the symbols, go to the Symbols tab, click “Add” and then select the symbol you
wish. You can colorize the symbol, rotate it, and change its size.
There are more symbols available by using the text tool and symbolic fonts. Some of the most commonly used
symbolic fonts are Zapf Dingbats, Webdings, Wingdings, and Symbol.
Create a new symbol
Make another copy of a selected symbol
Size control
Angle control
Click to set symbol color
◆ Working with Photos - Introduction
You can import many kinds of bitmap graphics, such as JPEG, GIF, BMP, PICT, TIFF, PSD, ILBM, IFF and others.
To import a graphic, click on the Add button and locate the graphic file on your computer. Once imported,
you can create a second copy of the same photo using the Duplicate button, remove the photo with the Delete
button, substitute a different photo with the Replace button, or non-destructively trim what part of the image is
visible with the Crop button.
You can adjust the stacking order of the photographs by dragging the layer icons at the bottom of the screen. You
can keep a photo in a project but disable printing by clicking on the eye icon in the layer shingle.
Vector graphic formats such as WMF and EPS are not supported. To use an EPS graphic, first convert it to a
bitmap format using Photoshop and then you can import it.
Flip , invert, and rotate 90 degrees
Normally, this switch is kept turned on
so that as you scale a photo it preserves
its natural proportions. If you turn off
this switch, then you can stretch the
horizontal and vertical dimensions
separately.
Size control
Angle control
◆ Working with Photos - Color tinting
The Color tab for photos offers several useful features. If your imported graphic has embedded transparency
information then it will show up as transparent. Please note that the commonly used JPEG file format does not
support transparency (only GIF, some TIFF, and some PNG files do). If the file was saved in a format that doesn’t
support transparency, or the photo was not prepared properly, you can compensate for this by turning on the
“White is Transparent” switch, which will make all pure white pixels in the image transparent. You can also adjust
the lightness/darkness of the photo with the slider. You can tint all the pixels in the photo towards a certain
color by clicking in the color wheel. To clear any tinting performed on the photo, click the Reset button.
Make all white pixels transparent
Darkness/lightness control
Color tinting wheel
Reset tinting
◆ Working with Photos - Frame styles
The Frame tab for photos offers three different framing options. One option is to have the photo presented
plain. In that style you can round the corner and fuzz the edge. The second option is to put a black line around
the photo, coupled with a white border on the outside. The third option is to put a scalloped edge around the
photo, as if it was a postage stamp.
Frame style selector
Corner roundness control
Edge fuzz control
◆ Working with Text
Click on the Add button to create a new text box. You can make the text straight, angled, vertical or curved. You
can control the size, letter spacing, line spacing, color and font of each block of characters. At present text boxes
are limited to 4000 characters.
Curving upwards text
Create a new text box
Edit an existing text box
Adjust text size
Adjust letter spacing
Adjust line spacing
Adjust angle of text
Curving downwards text
Select a font
◆ The Paint Layer
With the 16 paint tools available, you can draw your own background, retouch an existing canvas, or perhaps
draw on top of a photo. The photo layer is separate layer from each photo you import, and cannot be used to
modify a photo, although if you paint on top of a photo it has almost the same effect until you move thoe photo,
in which case the overpainting will be in the wrong place.
Normally the paint layer resides above the photo layers just below the text layer, but if you wish to treat the paint
layer as a background, you can adjust the stacking order of the paint layer by manipulating the layer bar at the
bottom of screen when under the PHOTO tab.
Paintbrush
Eraser
Spray can
Polygons
Rubber Stamp
Copy/move
Filled oval/circle
Filled ring
Filled rectangle
Grabber tool
Eyedropper
Framed rectangle/square
Bucket fill
Framed ring
Lines
Framed oval
◆ Paint layer - Brush tool
◆ Paint layer - Eraser tool
The brush tool places a series of dots in a freeform
manner. Each click of the mouse imprints the current
bursh stroke shape into the painting. By dragging the
mouse, a series of imprints will occur, with adjustable
spacing.
The eraser tool removes pixels from the paint layer,
uncovering what is beneath the paint layer such
as the canvas. Each click of the mouse removes
the current erase shape from the painting. For fast
erasure of an area use the selection area shapes.
Brush shape selection
Eraser shape selection
Brush spacing slider
Erase entire paint layer
Opacity control
(not avail in windows)
◆ Paint layer - Spray tool
◆ Paint layer - Polygon tool
The spray tool paints a cluster of dots like a spray paint
can would. You can
The polygon tool is used to draw filled shapes. This
tool can make shapes with straight or curved edges.
To draw a polygonal shape, just mouse and click the
mouse to create succesive vertex points. Press the
SPACE key to finish the polygon. You can also drag
the mouse to create a freeform shape.
Brush density
Brush radius slider
Opacity control
Opacity control
(not avail in windows)
(not avail in windows)
Fill with a color, a
gradient, or a pattern
◆ Paint layer - Filled Oval tool
◆ Paint layer - Filled Ring Section tool
The solid oval tool is used to draw solid ellipses and
circles. To constrain the shape to be circular, hold
down the SHIFT key as you drag the mouse.
This tool draws a section of a ring. This is most
useful to provied a background to curved text. To
draw the shape, click on one endpoint and drag the
mouse to extend out a ring fragment border.
You can draw out
the shape from the
corners or from the
center point
Adjust the corner
roundness
Opacity control
Opacity control
(not avail in windows)
(not avail in windows)
Fill with a color, a
gradient, or a pattern
Fill with a color, a
gradient, or a pattern
◆ Paint layer - Filled Rectangle tool
◆ Paint layer - Grabber tool
The filled rectangle tool is used to draw solid
rectangles and squares. To constrain the shape to
be a perfect square, hold down the SHIFT key as you
drag the mouse.
This tool draws nothing. It is used to grab the
painting and move it around the screen. Click
the mouse anywhere in the edit area and drag to
move. You can also scroll the edit window using the
navigator window in the lower right corner of the
window.
You can draw out
the shape from the
corners or from the
center point
Opacity control
(not avail in windows)
Fill with a color, a
gradient, or a pattern
By dragging the red frame in
the navigation window you can
quickly scroll the document
◆ Paint layer - Rubber Stamp tool
◆ Paint layer - Scissors (Copy/Move) tool
The rubber stamp is used to imprint pre-drawn
decorative elements into your painting. Each click of
the mouse will imprint a copy of the stamp into the
paint layer. Dragging the mouse will create a stream
of the stamp elements, spaced apart by the amount
specified by the spacing slider.
This tool is used to grab the section of the paint
layer and convert it to a rubber stamp for use with
the stamp tool. You can cut the section away from
the paint layer or copy the section. Once you have
successfully grabbed a section of the painting, the
tool will automatically jump to the rubber stamp
tool where the section can be imprinted elsewhere.
Flip or rotate the stamp
Size control
Rotation control
Rectangular, oval, or
polygonal selection
Spacing control
Copy or remove from
paint layer
Lightness/darkness
Include layers below?
Opacity control
How shape is dragged
(not avail in windows)
The first stamp is created by using
the copy/move tool (scissors icon)
◆ Paint layer - Bucket fill tool
◆ Paint layer - Line tool
The bucket tool is used to quickly fill an area of the
same color pixels with a different color, gradient, or
pattern. When the mouse is clicked on a section of
the painting, all pixels adjacent to the the starting
pixel that have exactly the same color will be filled in
by the currently selected pattern or color. Please note
that because the pixels have to be exactly equal to the
starting pixel to be considered inside the area, using the
bucket fill tool in a photograph or varying area will not
be effective.
This tool is used to draw lines in the paint layer. To
draw a line click on a starting point and drag the
mouse to the endpoint and release the mouse. If
you hold the shift key during the dragging operation,
the line will be constrained to be at an even
multiple of 45 degrees, which is very convenient for
guaranteeing perfect horizontal or vertical lines.
Line thickness control
Opacity control
(not avail in windows)
◆ Paint layer - Hollow Oval tool
◆ Paint layer - Hollow Ring Section tool
The hollow oval tool is used to draw hollow ellipses
and circles. To constrain the shape to be circular,
hold down the SHIFT key as you drag the mouse.
This tool draws a section of a ring. This is most
useful to provied a frame around curved text. To
draw the shape, click on one endpoint and drag the
mouse to extend out a ring fragment border.
You can draw out
the shape from the
corners or from the
center point
Opacity control
(not avail in windows)
Stroke thickness
Adjust the corner
roundness
◆ Paint layer - Hollow Rectangle tool
◆ Paint layer - Eyedropper tool
The hollow rectangle tool draws a rectangular frame
around an area. You can choose to define the shape
by using opposite corners, or by drawing from the
center point of the rectangle. To constrain the shape
to be a perfect square, hold down the SHIFT key as
you drag the mouse.
This tool draws nothing. It is used to pick up a color
from the painting and set it as the current color.
You can quickly obtain the use of the eyedropper
tool inside other tools by holding the option key
(macintosh) or control key (windows).
You can draw out
the shape from the
corners or from the
center point
Use solid color strokes,
pattern filled strokes,
or automatically
repeating borders
◆ Printing Issues - Direct CD/DVD Printing
In order to print directly onto CD’s and DVD’s you must use specially coated disks, called “Inkjet Printable Media”.
Unfortunately there is no agreed upon standard for the amount of the disk that is coated. All standard DVD and
CD media is exactly 120 mm in diameter but the coatings may not extend all the way form the outer edge to the
spindle hole which is 15 mm. We recommend you give yourself a 1 mm safety margin on all edges so that you don’t
spray ink onto an uncoated surface, which will make a mess as the ink will really never dry on an uncoated area.
Since manufacturing variances occur, the first task is to center the printing on the disk. We recommend you first
lower the outer diameter slider to 114 mm and use the nudge buttons to perfectly align the center point, then
raise the outer diameter to its normal value such as 118 mm. When you overspray off the edge of the media you
cannot tell how far off you are, so it is important to underprint during the calibration process.
As a convenience the software will remember up to 3 media type preferences, which can be renamed.
Because a coated disk does not have the absorptive properties of paper, and since most printers are designed
originally for paper, there will likely be some loss of contrast in the printing, and color matching will also be very
difficult.
If the printer driver supplied by the printer manufacturer offers a density control slider, use that to adjust the
intensity of the image.
◆ Printing Issues - Large projects like DVD box covers and VHS box wraps
Please note that certain die cut paper projects such as DVD wraps, are very large designs that go very close the
edge of the sheet of paper. All commonly used inkjet printers have only one set of rubber rollers that grip the
paper from the bottom. Although some manufacturers claim to offer “border free” or “borderless” printing, there
is usually an unprintable area at the trailing edge of the paper, often as large as 14 mm or 1/2 inch, which cannot
be inked. Unfortunately in a DVD wrap project the trailing edge of the printout corresponds to the all important
front panel of the paper.
If you are experiencing a truncation of your printout, please try using the “border free” option in your printer
driver if that is available. If that option is not available, then we recommend you switch papers to a larger sheet
that doesn’t require printing close to the edge, such as a plain legal size paper.
Another option is to request 180 degree rotation in your printer driver, so that the incomplete printing corresponds
to the back covert.
Another workaround is to temporarily tape a small piece of paper to the trailing edge, and inform the printer you
are using long paper such as “Legal Size” (8.5 x 14 inches) so that it will continue to grip the paper properly.
◆ Support
Discus technical support is available through the following channels:
e-mail:
[email protected]
telephone: 1-415-669-7010 (see website for current phone support hours)
fax:
1-415-669-7009
mail:
Magic Mouse Productions
12615 Sir Francis Drake Blvd.
Inverness, CA 94937 USA
for more information about upgrades and other products, visit our web page at www.magicmouse.com