1
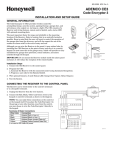
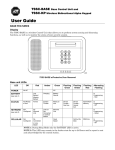
ADEMCO 6162RF Keypad / Transceiver –
User Guide
Alphanumeric Addressable Keypad/Transceivers for use with
Honeywell Control Panels; incorporates functions of an RF
Receiver and a 5800 Transmitter module.
6162RF: 4-Line Alpha Display
Custom Zone Designators
= System ARMED
= System NOT ARMED
= READY to Arm
= NOT READY to Arm
Arming Keys
Sounder
Programmable Function Keys
The Function Keys can be programmed
for special functions or panic alarm
activations. See the Function Keys
section and check with the system
installer for more information.
6162RF-KEYPAD-LBLD-UG-07-19-13_1
SETTINGS KEY FUNCTION
Displays Settings Menu
(options details below):
1 Set Time/Date
2 View Event Log
3 Reboot Keypad
4 Set User Code**
1. Add a User
2. Delete a User
3. Assign Attr.
Press
**The menu-based user code
programming feature is only
available with certain
systems. Check with the
system installer for details on
features of your system.
Note: For Commercial controls, some of the steps are different than described
below. Refer to the system User Guide for details on setting these options.
SETTINGS KEY OPTIONS
Set Time/ Date
1. Press
and then
to select ‘Set Time/Date’.
2. Enter the Master User Code at the ‘Enter Your Code’ prompt and press
to edit the time and date:
3. Press
• Use the number keys to change the time and date shown
•
•
•
= PM,
= AM;
The navigation keys to move the cursor:
When done, press
to save and exit.
= forward,
= back.
.
View Event Log
1. Press
and then
to select the ‘View Event Log’.
2. Enter the Master User Code at the ‘Enter Your Code’ prompt and press
3. Press
to move forward or
.
to move backward through events.
and
4. To exit, press any key except the
keys.
Reboot Keypad
1. Press
and then
to Reboot the keypad. (The keypad beeps and
the LEDs flash for several seconds.)
Set User Codes
1. Press
and then
to select ‘Set User Code’.
2. Enter the Master User Code at the ‘Enter Your Code’ prompt and press
to see a user option screen.
to select ‘Add a User’.
Add a User: Press
• At ‘Enter User No.’ screen, enter a unique two-digit number and press
.
• At the ‘New User Code’ prompt, enter a new four-digit user code and press
.
Note: Four digit user codes options: 0000 – 9999.
•
The keypad will confirm the User setting and exit the Settings mode:
Confirmation
Short “ding”
Long “ding”
No sound
Meaning
User created successfully
Error– that user number already has a user code assigned.
User not created – try again. If necessary, delete the user
and try again.
Delete a User: Press
to select ‘Delete a User’.
• At ‘Enter User No.’ prompt, enter the desired two-digit number and press
.
• The keypad will “ding” to confirm the User deletion and exit the Settings
mode.
to select ‘Assign Attr.’.
Assign Attributes: Press
• At ‘Enter User No.’ screen, enter the desired two-digit user number and press
.
The Assign Attributes menu appears:
1. Authority Level
2. Access Group
3. User Partition
4. RF User Number
5. Pager On or Off
Refer to the system User Guide for assigning the appropriate user settings in the
Assign Attributes Menu.
-2-
SINGLE BUTTON ARMING
If desired, the Arming Keys can be set for Single Button Arming by following
prompts to store a valid user code in the keypad. (See the system User Guide for
details on programming user codes.)
Enabling Single Button Arming
and
keys at the same time for 3
1. Press and hold down the
seconds. The screen displays the keypad’s address.
2. Press
to move to the USER CODE entry screen.
3. Enter a valid four digit user code between 0000 – 9999 and press
save and continue.
to
Recommended: Set a dedicated user code for this feature.
The user code must be entered for each keypad in the system where Single
Button Arming is desired.
4. At the ‘Delete Devices?’ screen, press
to decline and exit.
Disabling Single Button Arming
1. Press and hold down the
and
keys at the same time for 3
seconds. The screen displays the keypad’s address.
2. Press
to move to the USER CODE entry screen.
3. Enter
screen.
and then press
4. Press
to decline and exit.
to save and move to ‘Delete Devices?’
When Single Button Arming is disabled, a valid user code is required to arm the
system with the Arming keys.
FUNCTION KEYS
The Function keys may be programmed by the installer
for special functions or alarm activations. Key pairs
may also be programmed for alarm activations.
To activate the Function keys, press and hold the key
for at least 2 seconds; key pairs are activated
immediately.
Check with the system installer for more information.
COMMERCIAL STAY MODES
A or
and
B or
and
C or
and
D
Commercial Systems Stay Modes
For commercial controls, if Stay Mode
2 is programmed, refer to the
control’s manuals and the table on
the right for Stay mode arming.
+ 1 = Stay Mode 1
+ 2 = Stay Mode 2
= Stay Mode 3 (both Stay 1 and
Stay 2 modes)
SOUNDER
• Two-tone sound = burglary and audible panic alarms
• Pulsing sound = fire or carbon monoxide alarms
Refer to the system’s user guide for details of audible notifications.
-3-
TROUBLESHOOTING
The error messages listed in the following table cause the keypad to produce a
single ding tone. The table describes the error messages and the corrective
actions.
Display
Corrective Action
KeyPd LB
Replace the battery in the wireless keypad.
Open Ckt
Contact your Installer.
Check 100
Contact your Installer.
FEDERAL COMMUNICATIONS COMMISSION (FCC) STATEMENTS
The user shall not make any changes or modifications to the equipment unless authorized
by the Installation Instructions or User's Manual. Unauthorized changes or modifications
could void the user's authority to operate the equipment.
Class B digital device Statement
This equipment has been tested to FCC requirements and has been found acceptable for
use. The FCC requires the following statement for your information: This equipment
generates and uses radio frequency energy and if not installed and used properly, that is,
in strict accordance with the manufacturer's instructions, may cause interference to radio
and television reception. It has been type tested and found to comply with the limits for a
Class B computing device in accordance with the specifications in Part 15 of FCC Rules,
which are designed to provide reasonable protection against such interference in a
residential installation. However, there is no guarantee that interference will not occur in a
particular installation. If this equipment does cause interference to radio or television
reception, which can be determined by turning the equipment off and on, the user is
encouraged to try to correct the interference by one or more of the following measures:
• If using an indoor antenna, have a quality outdoor antenna installed.
• Reorient the receiving antenna until interference is reduced or eliminated.
• Move the radio or television receiver away from the receiver/control.
• Move the antenna leads away from any wire runs to the receiver/control.
• Plug the receiver/control into a different outlet so that it and the radio or television
receiver are on different branch circuits.
• Consult the dealer or an experienced radio/TV technician for help.
INDUSTRY CANADA CLASS B STATEMENT
This Class B digital apparatus complies with Canadian ICES-003.
Cet appareil numérique de la classe B est conforme à la norme NMB-003 du Canada.
FCC / IC STATEMENT
This device complies with Part 15 of the FCC rules and RSS210 of Industry Canada.
Operation is subject to the following two conditions: (1) This device may not cause
harmful interference, and (2) This device must accept any interference received, including
interference that may cause undesired operation.
Cet appareil est conforme à la partie 15 des règles de la FCC & de RSS 210 des
Industries Canada. Son fonctionnement est soumis aux conditions suivantes: (1) Cet
appareil ne doit pas causer d' interférences nuisibles. (2) Cet appareil doit accepter toute
interférence reçue y compris les interférences causant une réception indésirable.
REFER TO INSTALLATION INSTRUCTIONS FOR THE CONTROL PANEL WITH WHICH THIS DEVICE
IS USED FOR WARRANTY INFORMATION AND LIMITATIONS OF THE ENTIRE ALARM SYSTEM.
2 Corporate Center Drive, Suite 100
P.O. Box 9040, Melville, NY 11747
Copyright © 2013 Honeywell International Inc.
www.honeywell.com/security
Ê800-11509V1:Š
800-11509V1 7/13 Rev A
-4-