1
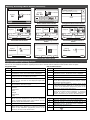
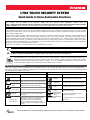
LYNX TOUCH SECURITY SYSTEM
Quick Guide to Home Automation Functions
Full Home Automation Guide Available Online: This Quick Guide describes the most frequently used features and functions of
your system. For full details of all functions, please see the system’s Home Automation located online at:
http://www.security.honeywell.com/hsc/products (see LYNX Touch Security System Home Automation Guide P/N 80016091 or higher). The full version Home Automation Guide is also available from your installer upon request.
General Information
The Honeywell LYNX Touch control is a security enabled Z-Wave® device that is designed to automate devices in a home control
network. The control allows you to easily add and control multiple devices with the press of a button and supports Z-Wave Network
Wide Inclusion (NWI) mode.
Management of Z-Wave devices, which are also known as nodes or modules, includes two main operations; inclusion/exclusion and
control. This section describes how to Include (add) devices into your home control network, edit devices and Exclude (delete)
devices. Automation and Z-Wave functions are accessed via the LYNX Touch Automation icon, Z-Wave Device Management and ZWave Advanced Tools screens. The devices can be controlled from the LYNX Touch control or a Mobile Device. Once the Z-Wave
devices have been Included (added) to the network they can be controlled either manually or through “Scenes” that are programmed
using your LYNX Touch control’s Automation features.
Check with your Installer to see which features are available with your system.
Automation is intended for lifestyle convenience. It should not be used for life safety or property protection.
!
UL
Automation
Z-Wave automation functionality is supplementary only and has not been evaluated by UL.
The Automation icon on the LYNX Touch Home Screen provides access to Z-Wave Home Automation features. (For
additional information regarding terms and functions refer to the Z-Wave Glossary included in LYNX Touch Security
System Home Automation Guide P/N 800-16091 or higher). A list of compatible Z-Wave Devices can be found in the
LYNX Touch Security System Home Automation Guide P/N 800-16091 or higher.
Z-Wave® System Basics
LYNX Touch Z-Wave options are displayed on two Automation Screens. The down T and up S arrows are used to scroll between the
two screens. Advance tools functions are displayed on the Z-Wave Device Management Screen. Refer to the full Home Automation Guide
P/N 800-16091 for complete information.
Automation Screen (Page 1) Options
Button
68
Function
Switches
Provides access to the Switches Screen
Thermostats
Provides access to the Thermostats Screen
Locks
Provides access to the Locks Screen
Water Valves
Provides access to the Water Valves Screen
Garages
Provides access to control Garage Door
operation.
Press To See
Failed devices
Displayed if a device failure is detected in
the Z-Wave network (For additional
information Refer to the Failed Device
section of LYNX Touch Security System
Home Automation Guide P/N 800-16091 or
higher)
Automation Screen (Page 2) Options
Button
Functions
Scenes
Provides access to the Scenes Screen. Up
to 20 scenes can be programmed.
Schedules
Provides access to the Schedules Screen.
Rules
Provides access to the Rules Screen.
Tools
Provides access to the Z-Wave Device
Management Screen
Garage door
setup
Provides access to program/enroll
Garage Door Openers.
Other Devices
Provides access to control Unknown or
Unsupported Devices using basic On/Off
commands
-Wave and Z-Wave Plus are registered trademarks of Sigma Designs and its subsidiaries in the United States and other countries.
Z-Wave® System Basics (Continued)
Z-Wave Device Management Screen Options
Button
Editing Z-Wave Device Names
The steps described below should be accomplished at the LYNX
Touch control in order to edit a Z-Wave devices name.
Function
Include Devices
Exclude Devices
View Failed Devices
Advanced Tools
Step
Enroll Z-Wave Devices/Modules
Delete Z-Wave Devices/Modules
Displayed only when device failures have
been detected in the Z-Wave network
(For additional information Refer to the
Failed Device section of LYNX Touch
Security System Home Automation Guide
P/N 800-16091 or higher)
Provides access to additional Z-Wave
options.
Z-Wave® Advanced Tools
Action
1.
At the Home Screen select the “Automation” icon.
2.
At the Automation Screen, select the type of device to edit.
3.
Select the device that you wish to edit from the list.
4.
Select the edit button
5.
Enter the desired information (limited to 14 characters) on
the displayed keypad and then select “Done”. The system
returns to the previous screen.
6.
Press the “Home” key to return to the Home screen or
select the “2” button to return to the Automation screen.
Excluding Z-Wave® Devices
Z-Wave Advanced Tools Options
Button
Function
The steps described below should be accomplished at the LYNX
Touch control in order to Exclude (remove) a Z-Wave device from
the network.
View Enrolled Devices
View Enrolled
Controllers
View Z-Wave device information.
View Controller Information.
Action
1.
At the Home Screen select the “Automation” icon.
2.
At the Automation Screen, select “Tools”.
3.
At the “Device Management” screen, select “Exclude
Devices”.
Reset Controller
Deletes all nodes and generates a new
random Home ID. Resetting the Controller
does not Exclude the individual devices.
Pri. Controller Shift
to Secondary
Transfers the role of primary controller to
another controller (i.e.; a Z-Wave remote
control)
and
duplicates
the
Z-Wave
network.
4.
“Entering Exclusion Mode. Please Wait…” is displayed
followed by “Ready to Exclude device. Press the function
button on the device”. Within one minute press the
device’s Function button or activate the switch.
Enable Arm Stay, Arm Away or Arm without
Auto-Stay when Z-Wave door lock is locked.
Causes the system to arm in the selected
mode, Away, Stay, or Away without AutoStay when the Z-Wave Door is Locked.
5.
If the device has been successfully excluded, the device
information is shown on the excluded list. If a device,
which is not known to the panel is excluded, “Unknown
Device Excluded” is displayed on the excluded list.
6.
Once you have finished excluding devices, press the
“Home” key to return to the Home screen or select the
“2” button to return to the previous screen.
Locking Door
Learn
Includes the panel as secondary controller,
usually on a Z-Wave remote control, and
duplicates the Z-Wave network.
All Devices Off
OR
All Devices On
Allows User to “manually” turn Off OR On all
switches that are programmed in the ZWave Network.
Including Z-Wave® Devices
The steps described below should be accomplished at the LYNX
Touch control in order to include (add) Z-Wave devices to the
network. For additional information regarding the inclusion of
specific Z-Wave Devices refer to the full Home Automation Guide
P/N 800-16091 or higher.
Step
Step
Action
1.
At the Home Screen select the “Automation” icon
2.
At the second page of the Automation Screen, select
“Tools”.
3.
At the “Device Management” screen, select “Include
Devices”. The panel displays “Entering Inclusion Mode.
Please Wait…”
Controlling Z-Wave Devices
Z-Wave devices can be activated Manually or by using Scenes to
control a single or group of devices, by turning them OFF, ON,
ON to a preset lighting level, temperature or mode, and/or to
lock/unlock a door. The LYNX Touch provides 20 Scenes that
can be configured to control up to 10 devices each. Scenes can
be activated manually or by a Schedule or Rule. Schedules and
Rules are used to control Scenes via pre-set “Conditions” and
“Triggers”. Up to 20 Rules may be programmed locally in the
LYNX Touch. An additional 20 Rules can be programmed through
Total Connect Service. Check with your Installer to see if these
features are available to you.
Manually Activating Z-Wave Devices
The steps described below should be accomplished at the LYNX
Touch control in order to manually activate devices.
Step
Action
1.
At the Home Screen select the “Automation” icon.
2.
At the Automation Screen, select the type of device (i.e.;
Switches, Thermostats or Locks) that you wish to control.
3.
Select the device that you wish to control from the
displayed list.
4.
Refer to the figures below for typical examples of the
features that can be controlled manually for the devices.
4.
“Ready to include device. Press the function button on
device” is displayed. Within one minute press the device’s
Function button or activate the switch, as applicable.
5.
If the module has been successfully enrolled, the panel
displays “Device Found! Please Wait” and then displays the
device information.
6.
After successfully including a device, the associated
information will be added to the top of the inclusion list.
5.
Press the “BACK” key to return to the previous screen.
7.
Repeat steps 4 - 6 to enroll additional Z-Wave devices.
6.
8.
Once you have finished including devices, press the “Home”
key to return to the Home screen or select the “2” button
to return to the previous screen.
Press the “Home” key to return to the Home screen or
select the “2” button to return to the Automation screen.
Note: The features and functions that can be controlled vary by
manufacturer. Refer to the User Manual that was provided with
the Z-Wave device to determine the specific capabilities.
Manually Activating Z-Wave Devices (Continued)
Unknown 001
Secured
1
Unknown Type: 0000 ID: 0000
Node:2 Sigma Designs (Sigma Designs)
Den Lamp
Den Lamp
Ready To Arm
Ready To Arm
Ready To Arm
Press to Turn Off
ON 70%
Press to Turn Off
Basic Off
ON
OFF
Edit
Edit
Back
Back
5200-100-104-V0
5200-100-100-V0
5200-100-099-V0
Switch Control Screen
Dimmer Switch Control Screen
Unsupported Device Control Screen
Ready To Arm
Ready To Arm
Ready To Arm
Set to
Set to
73
Living Room
Mode
Basic On
HEAT
Fan
Hold
AUTO
Thermostat Control Screen
Front Door
AUTO
Mode
AUTO
Cool
Setpoint
73
84
Fan
Hold
BACK
Heat
Setpoint
AUTO
Threshold Monitoring
EDIT
BACK
5200-100-103-V0
5200-100-102-V0
Thermostat Energy Savings Control
Screen
Thermostat Dual Setback Control
Screen
Ready To Arm
Ready To Arm
Press to Lock
Edit
Living Room
Saving Off
EDIT
Ready To Arm
Unlocked
Fan
NORMAL
BACK
5200-100-101-V0
23.0
HEAT
Mode
Threshold Monitoring
EDIT
25.5C
Living Room
Switch 003
Garage Door 1
Press to open
Water On
CLOSED
Back
Edit
Close in
Close at
Lock Control Screen
Edit
Back
5200-100-098-V0
Press to Turn Off
Back
5200-100-054-V0
5100-100-106-V0
Water Valve Control Screen
Garage Door Control Screen
Programming/Editing/Deleting Scenes
The steps described below should be accomplished at the LYNX Touch control in order to program Scenes used to control Z-Wave
devices. For more detailed information regarding Scenes refer to the full Home Automation Guide P/N 800-16091 or higher.
Edit or Delete a Scene
Program a Scene
Step
1.
2.
3.
Action
Select the “Automation” icon from the Home Screen.
Select the “Automation” icon from the Home Screen.
Select the “Scenes” icon from the second page of the
“Automation” screen. The Scenes screen is displayed.
2.
Select the “Scenes” icon from the second page of the
“Automation” screen. The Scenes screen is displayed.
Select “Add New Scene”. The system displays a keypad
along with the next available Scene number.
3.
Select the scene you wish to edit or delete.
4.
Select the “Edit” or “Delete” button.
5.
If “Edit” was selected, the system advances to the
Scene. Edit as required and proceed to Step 6. If delete
was selected proceed to Step 7.
6.
Select Save when complete. The system returns to the
Z-Wave device screen. Select the “2” button as required
to return to the Automation programming screen or the
Home key to return to the Home screen.
7.
The system displays a confirmation screen and then
returns to the previous screen. Select the “2” button as
required to return to the Automation programming
screen or the Home key to return to the Home screen.
If desired, select clear then enter a name (limited to 13
characters) for the scene on the displayed keypad then
select “Done”.
5.
Select the “Add New Device” button. The system displays
the available Z-Wave device types.
7.
Step
1.
4.
6.
Action
Select one of the following options:
Switches
Thermostats
Locks
Garages
Water Valves
Sirens
Manually Run a Scene
Select the desired device type, then select the applicable
device from the displayed list. The device’s operational
screen is displayed. Select “Save” when finished. Up to 10
devices may be associated with a scene.
8.
Set the desired options.
9.
Select Save when complete. The system returns to the ZWave device screen. Select the “2” button as required to
return to the Automation programming screen or the
Home key to return to the Home screen.
Step
Action
1.
Select the “Automation” icon from the Home Screen.
2.
Select the “Scenes” icon from the second page of the
“Automation” screen. The Scenes screen is displayed.
3.
Select the scene you wish to run.
4.
Select the
“
”button to run the scene.
Programming/Editing/Deleting Schedules
The steps described below should be accomplished at the LYNX
Touch control in order to program Schedules that are used to
automatically perform certain functions at a scheduled time, day
of the week or month, as applicable. For more detailed
information regarding Schedules refer to the full Home
Automation Guide P/N 800-16091 or higher.
Program a Scheduled Function
Step
Programming/Editing/Deleting Rules (Continued)
Step
Action
5.
Select the “Type” button to toggle through the type options.
The available options are dependent upon what features are
programmed in your control. The system displays several new
programming fields that are dependent upon the Type that
was chosen.
6.
Select “Action” to toggle between options, which is dependent
on the selection made in Step 5.
7.
Select “Start Zone Type” OR “Zone Type Fault”. Select an
option from the displayed list, which is dependent upon the
selection made in Step 5.
Action
1.
Select the “Automation” icon from the Home Screen.
2.
Select the “Schedules” icon from the second page of the
“Automation” screen. The Schedules screen is displayed.
3.
At the Schedules screen, select “Add New”.
8.
4.
Select “Name” then enter a name (limited to 13
characters) for the schedule on the displayed keypad
then select “Done”.
Select “Stop Zone Type” OR “Zone Type Restore. Select an
option from the displayed list, which is dependent on the
selection made in Step 5.
9.
Select “Start System Operation” OR “System Operation 1”.
Select an option from the displayed list, which is dependent on
the selection made in Step 5.
10.
Select “Stop System Operation” OR “System Operation 2”.
Select an option from the displayed list, which is dependent on
the selection made in Step 5.
11.
Use the “T” button to advance to next page, then select “Zone
Number Operation” to toggle between options.
12
Select the First, Second or Third “Start Zone” then select a
Zone from the displayed list.
5.
Select “Frequency”, then select one of the displayed
options.
6.
Program the options based upon the Frequency selected
in Step 5.
7.
Select “Type” to scroll between the available options.
8.
If Auto Stay is selected, select “Start Time” and proceed
to Step 9. If “Rules” is selected proceed to Step 10. If
“Disarm Notification” is selected, proceed to Step 11.
9.
On the displayed keypad, select “Clear” and enter a 4digit time on the displayed keypad, then select “Save”.
13
10.
Select “Rules” OR “Scenes”, as applicable, then select a
Rule or Scene from the displayed list.
Select the First, Second or Third “Stop Zone” then select a
Zone from the displayed list.
14.
Select “Save” when programming is complete.
15.
Select the “2” button or press the Home key to return to the
Automation programming or the Home screen.
11.
Select “Start Time” and “End Time” and on the displayed
keypad select “Clear. Enter a 4-digit Start Time and End
Time, as applicable, then select “Save”.
12.
Select the “2” button or press the Home key to return to
the Automation programming or the Home screen.
Edit or Delete a Rule
Step
Edit or Delete a Scheduled Function
Action
1.
At the Rules screen, select the Rule to edit or delete.
2.
Select the “Edit” or “Delete button as applicable.
Step
Action
3.
1.
At the Schedules screen, select the Schedule to edit or
delete.
If editing the rule, follow Steps 4-15 as noted above in the
Program a Rule section. If deleting the rule, proceed to Step 4.
4.
2.
Select the “Edit” or “Delete button as applicable. If editing
the schedule, proceed to Step 3 or if deleting proceed to
Step 4
Select the “2” button or press the Home key to return to the
Automation programming or the Home screen.
3.
When the Schedule programming screen appears, follow
Steps 4-11 as noted above in the Program a Scheduled
Function section to edit and save your changes.
Step
1.
Select the “Automation” icon from the Home Screen.
Select the “Delete” button. At the displayed confirmation
screen select “Yes” to confirm the deletion.
2.
At the Automation Screen, select the Garages icon.
3.
Select the Garage door that you wish to control/program from
the displayed list. The control advances to the Garage Door
operation screen.
4.
Refer to the table below for additional operation and
programming information.
4.
5.
Garage Door Feature Operation
Select the “2” button or press the Home key to return to
the Automation programming or the Home screen.
Programming/Editing/Deleting Rules
The steps described below should be accomplished at the LYNX
Touch control in order to program up to 20 Rules that are used
for Triggers, Z-Wave Scenes and Follow-Me Messages. For more
detailed information regarding Rules refer to the full Home
Automation Guide P/N 800-16091 or higher.
Action
Button
Edit
Close in
Program a Rule
Step
Action
1.
Select the “Automation” icon from the Home Screen.
Close at
2.
Select the “Rules” icon from the second page of the
“Automation” screen. The Rules screen is displayed.
Back
3.
At the Rules screen, select a “Rules” key.
Press to open
4.
Select “Name” then enter a name (limited to 13
characters) for the Rule on the displayed keypad then
select “Done”.
Press to close
Function
Used to modify description of Garage Door
Used to set a specific period of time (up to 12 hours and
59 minutes) before an open garage door closes
automatically. If programmed the time will also be
displayed.
Used to set a specific time that an open garage door
closes automatically. If programmed the time will also
be displayed.
Used to return the control to the Garage Door list.
Displayed when Garage Door is Closed. Select to Open
Garage Door.
Displayed when Garage Door is Open. Select to Close
Garage Door.
Ê800-160928Š
800-16092 12/13 Rev B
2 Corporate Center Drive, Suite 100
P.O. Box 9040, Melville, NY 11747
Copyright © 2013 Honeywell International Inc.
www.honeywell.com/security