1
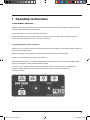
Duo-Scan 3
User manual
Duo-Scan 3 manual.indd 1
15/06/2009 21:38
Duo-Scan 3
Contents
page
Introduction
3
Operator safety
4
1 Operating instructions
5
1.1 Preliminary switch on
5
1.1.2 Imaging display device connection
5
1.2 Power on/off
6
1.3 Display layout
7
1.4 Scanning
8
1.4.1 Standard operation
8
1.4.2 Mode selection
9
1.4.3 Gain and power adjustment
9
1.4.4 Freeze image
9
1.5 Battery life, metering and charging
10
2 Care & maintenance
11
2.1 Axial and radial probe
11
2.2 Duo-Scan 3 battery
12
2.3 Duo-Scan 3 console
12
Technical specifications
13
Main service centres
14
Accessories 15
2
Duo-Scan 3 manual.indd 2
15/06/2009 21:38
Introduction
BCF Technology Ltd is a market leader in the development and production of “real time”
ultrasound pregnancy scanners for most animal species. We have over 26 years experience of
developing, manufacturing and the distribution and support of animal imaging equipment.
BCF, in consultation with leading experts in animal husbandry applications, have combined the best
features of the Duo-Scan 2 with the latest state of the art technology. The result is Duo-Scan 3, an
ultrasound scanner which is small, light, robust, portable and easy to work with.
The Duo-Scan 3 is designed and manufactured in Scotland by:
BCF Technology Ltd
3 Tailend Court
Starlaw Road
Livingston, West Lothian
EH54 8TE
Scotland, UK
Telephone: Facsimile: Email: Website: +44 (0)1506 460023
+44 (0)1506 460045
[email protected]
www.bcftechnology.com
As specialists in providing ultrasound imaging equipment for animal husbandry applications,
we understand the importance of having reliable equipment. All BCF products are designed and
manufactured to withstand the environments in which they are going to be used. However, should you
experience any problems with your Duo-Scan 3, BCF Technology Service Engineers will be available to
provide rapid service support and ensure optimum performance of your BCF system.
The Duo-Scan 3 has been designed to conform with the requirements of European Directive 89/336/
EEC relating to electromagnetic compatibility (EMC) and also 2002/95/EC relating to Reduction of
Hazardous Substances (RoHS). The CE mark on the rear panel is a symbol of this conformance. If you
require any further information regarding these directives please contact us directly.
Note:All BCF Technology products are to be used for animal applications only.
3
Duo-Scan 3 manual.indd 3
15/06/2009 21:38
Duo-Scan 3
Operator safety
The Duo-Scan 3 is designed to operate only from a 12V DC source.
The use of a 12V lead acid battery ensures safety from electrical hazard.
When charging batteries, use only the BCF supplied charger. This charger is matched to the battery
capacity and will ensure long life and continued safety. Higher charge rates from unsuitable chargers
may lead to hazards from fire or battery leakage in addition to reducing battery life.
Although the Duo-Scan 3 runs from a low voltage source, dangerous voltages are generated within the
unit. For this reason, no attempt should be made to disassemble the scanner. Should you require any
assistance please contact a BCF Service Engineer.
4
Duo-Scan 3 manual.indd 4
15/06/2009 21:38
1 Operating Instructions
1.1 Preliminary Switch On
Before connecting or disconnecting the probe, ensure that the Duo-Scan 3 power is switched off and
that the probe connector is free from dirt.
Connect the probe to the front connector marked ‘G’.
Rotate the probe connector until the notches on the probe and scanner align, and then screw the
retaining ring clockwise to lock the connector in position.
1.1.2 Imaging display device connection
The Duo-Scan 3 accessories allow the ultrasound image to be viewed on the display headset, monitor or
wrist-mounted display options.
Before connecting an imaging display device be sure the connector is free from dirt.
Displays are connected to the ‘Display’ connector ‘H’.
Make sure the connector is correctly oriented before pushing home and the external threaded metal
lock ring is engaged carefully before tightening gently.
If you are using a wireless monitor you do not need to connect it to the console, and the display
connector cover plug may be left in place. If the monitor uses a video cable, follow the
instructions above.
5
Duo-Scan 3 manual.indd 5
15/06/2009 21:38
Duo-Scan 3
1.2 Power on/off
Duo-Scan 3 is designed to operate only from a 12V DC battery pack.
Use only the BCF supplied battery pack.
Ensure the charged battery pack is securely latched to the Duo-Scan 3.
Press and hold the ‘POWER’ button
FREEZE
on the front panel until the system beeps.
The green ‘DC POWER’ light located above the power button should be illuminated and the scanner
will now perform a system initialisation.
If the probe is connected, it will start to rotate. If the imaging display device is connected, its screen
will be illuminated.
The sector scan and settings will be displayed on the screen.
The buzzer will sound twice; the second indicates that the system initialisation is complete and the
system is ready to function.
If the supply voltage is too low (less than 9 volts) the system will display a ‘Low Battery’
message for 6 seconds before powering down.
To switch the scanner off, press and hold the power button
FREEZE
until the scanner shuts down.
6
Duo-Scan 3 manual.indd 6
15/06/2009 21:38
1.3 Display Layout
1.
RANGE
FREQ
POWER
GAIN
3.
=
=
=
=
22 CM
3.5 MHZ
9
6
MODE 1
2.
GAIN
4.
1. The current range, operating frequency, power and gain settings are displayed at the top left hand
corner of the screen.
2. The grey bar contains 32 of the 256 shades of grey. This helps with the adjustment of brightness and
contrast and gives a comparison of grey intensity for the ultrasound picture.
3. The current function of the ‘soft’ keys is displayed along the bottom of the screen.
The menu disappears after approximately 6 seconds, leaving only the scan, voltage and battery
capacity displayed.
To switch the menu back on, press any button on the scanner.
4. A battery capacity and voltage reading are displayed in the lower corners of the display.
7
Duo-Scan 3 manual.indd 7
15/06/2009 21:38
Duo-Scan 3
1.4 Scanning
1.4.1 Standard operation
All functions of the console are set using the front panel keys shown below.
SETTING
Scrolls through
preset Modes
SELECT
Switches between
Power or Gain
Power or Gain down
Power or Gain up
FREEZE
Short press freezes image
Long press switches on & off
8
Duo-Scan 3 manual.indd 8
15/06/2009 21:38
1.4.2 Mode selection
The Duo-Scan 3 comes with 8 default Preset modes for cattle pregnancy scanning as listed below:
Mode
Mode
Mode
Mode
Mode
Mode
Mode
Mode
1: Range 16cm, Frequency 5MHz, Foetal Ageing Circles On
2: Range 16cm, Frequency 5MHz, Foetal Ageing Circles Off
3: Range 19cm, Frequency 3.5MHz, Foetal Ageing Circles On
4: Range 19cm, Frequency 3.5MHz, Foetal Ageing Circles Off
5: Range 22cm, Frequency 3.5MHz, Foetal Ageing Circles On
6: Range 22cm, Frequency 3.5MHz, Foetal Ageing Circles Off
7: Range 25cm, Frequency 3.5MHz, Foetal Ageing Circles On
8: Range 25cm, Frequency 3.5MHz, Foetal Ageing Circles Off
These modes are the default factory settings.
Your scanner will be preloaded with the settings requested when ordered so the information
provided above may vary.
The shorter ranges are for use in early pregnancy and for improved detail, the longer ranges for late
pregnancy and better penetration.
As the range is altered, the speed of the probe varies to provide the best quality image. The smaller the
range, the faster the probe rotates.
The scanner always powers on in Mode 1.
To scroll through preset modes press
1.4.3 Gain and power adjustment
Both ultrasound gain and power can be adjusted by the user, the menu along the bottom of the screen
will display either “Gain” or “Power” in the 2nd box.
To switch between gain and power, press the Select button.
SELECT
To adjust the Gain or Power values, use the Up and Down keys on the front panel.
1.4.4 Freeze image
To freeze the image press the power button briefly.
FREEZE
Pressing this button briefly once more returns the scanner to live imaging.
9
Duo-Scan 3 manual.indd 9
15/06/2009 21:38
Duo-Scan 3
1.5 Battery life, metering and charging
The Duo-Scan 3 runs for approximately 5 hours on a fully charged battery, the current charge
level of the battery is displayed in the lower right of the display
Each bar on the meter represents approximately 1 hour of run time.
The battery meter will flash when there is less than 5 minutes of power remaining.
The current battery voltage is displayed in the lower left of the display, this is primarily for factory use.
Charging
The battery must first be removed from the Duo-Scan 3 before charging.
Attach the battery to the charger by securing both latches.
Once the battery is connected the charger may be plugged in and switched on.
An indication of battery condition may be observed on the charger when the Push button is pressed
and the unit will show the state of battery condition during charging – “Low”, “Good” or “Full”.
The battery will require at least eight hours charging from fully discharged, but may be left connected
for longer without damage.
10
Duo-Scan 3 manual.indd 10
15/06/2009 21:38
2 Care and maintenance
The Duo-Scan 3 was designed for reliability in the animal husbandry marketplace. BCF engineers
and their appointed agents are available to provide rapid service assistance to ensure optimum
performance of BCF systems. However there is no substitute for careful usage.
As specialists in providing ultrasound imaging equipment for animal husbandry applications,
we understand the importance of having reliable equipment. All BCF products are designed and
manufactured to withstand the environments in which they are going to be used. However, should you
experience any problems with your Duo-Scan 3, BCF Service Engineers will be available to provide rapid
service support and ensure optimum performance of your BCF system.
The Duo-Scan 3 is designed to be robust and reliable and to withstand the environment in which it will
be used. Should you experience any problems, BCF Service Engineers are available to provide rapid
service support and ensure optimum performance.
2.1 Axial and rAdial probe
• Always clean the probe immediately after use and before any contamination can dry in.
The probe head can be immersed in warm (not hot) water to clean.
• The probe connector carries critical pulses from the console to the probe head and back. It is
imperative to keep these contacts clean and free of contamination. To maintain a good contact,
clean the connectors using methylated spirits (or equivalent alcohol) and a small toothbrush to
gain access to the contacts, flush with alcohol and leave to drain hanging downwards.
• Never force a connector if it will not go together easily. Debris may collect between the pins and
can be carefully removed with a small screwdriver.
• Be very careful to avoid anything getting into the gold plated connector inserts, this may cause
damage and some of these are expensive to replace.
• Do not knock or scrape the transducer window, this may cause the window to burst. Do not push
against the probe window, the sealing may be damaged or fluid may be forced out of the internal
expansion tube. If a window or its seal leaks then the probe must be returned to BCF. Further use
of the probe with a window leakage will further damage other internal parts of the probe due to
dirt from outside contaminating the internal gears.
• Do not forcibly bend or pull the cable connecting the probe to the module.
• Examine the probe regularly for any damage, especially the window. The chamber behind the
window is filled with a silicon fluid and it is normal for a small bubble, about 1mm diameter, to be
present. A large bubble or signs of leaking fluid should be referred to a BCF Service Engineer.
• Any other problems or maintenance queries should be referred to a BCF Service Engineer.
11
Duo-Scan 3 manual.indd 11
15/06/2009 21:38
Duo-Scan 3
2.2 Duo-scan 3 battery
The battery unit is of sealed lead acid type and will give many hundreds of recharge cycles if the
supplied charger is used. While the battery is in good condition and is fully charged, it will run the
Duo-Scan 3 for approximately three hours.
Electrical connection to the battery is through the latches on either side of the battery. Battery output
is protected with a resetting fuse but care should be taken to prevent short circuiting between latches.
The battery unit may be cleaned by wiping down with a damp cloth.
Dry the battery unit out at the earliest opportunity if it gets wet.
Warning: The battery unit must not be stored damp – severe corrosion will result.
2.3 Duo-scan 3 console
• Keeping all the connectors clean and dry is especially important, use methylated spirits (or
equivalent alcohol) and a small toothbrush to gain access to the contacts, flush with alcohol
and leave to drain/dry.
The outer case and PVC carrying case can be cleaned using a cloth, warm soapy water.
The front panel can be cleaned with a cleaning agent such as isopropyl alcohol cleaning cloths.
Note: If using soap and water on the front panel ensure that no water enters any of the connectors.
• Examine all cables (power and probe) on a weekly basis for signs of damage such as cracks or
splits. Pay extra attention close to connectors and joints. If damage is found it is imperative to
have repairs carried out immediately to avoid further damage or risk of electric shock.
• Any other problems or maintenance queries should be referred to a BCF Service Engineer.
To ensure optimum performance we recommend that the equipment is serviced once a year by a
BCF Service Engineer. The Service Engineer will thoroughly check the equipment, ensuring that
electrical safety is being maintained, and advise of any work which appears to be necessary.
12
Duo-Scan 3 manual.indd 12
15/06/2009 21:38
Technical specifications
Specifications
• Operation/Image Modes: Standard B mode
• Grey Shades: 256 different shades
• Power/Battery: Up to 5 hours in continuous use
• 12V battery attached to the unit
• Physical Dimensions (mm): 280 (D) x 195 (W) x 95 (H)
• Weight: 3Kg (with battery)
• Application preset modes: Up to 8 different preset modes
Probes
• 3.5 and 5.0 MHz radial scan probe – 170 degree only. Length 16”
• 3.5 MHz axial scan probe – 85 degree and 170 degree
• 5.0 MHz axial scan probe – 85 degree and 170 degree
• 3.5 and 5.0 MHz split dual axial scan probe – 170 degree only
13
Duo-Scan 3 manual.indd 13
15/06/2009 21:38
Duo-Scan 3
Main service centres
BCF Technology Ltd
3 Tailend Court
Starlaw Road
Livingston
Scotland, UK
EH54 8TE
Tel: +44 (0)1506 460023
Fax: +44 (0)1506 460045
Email: [email protected]
Web: www.bcftechnology.com
BCF Technology USA
2625 Highway 14
West Suite K, Rochester
Minnesota 55901
USA
Tel: +1-800-210-9665
Fax: +1-507-529-8205
Email: [email protected]
Web: www.bcftechnology.com
BCF Ultrasound Australasia Pty Ltd
Unit 10
56 Norcal Road
Nunawading 3131
Melbourne
Victoria
Australia
Tel: +61 3 9894 8980
Fax: +61 3 9894 8991
Email: [email protected]
Web: www.bcfultrasound.com
14
Duo-Scan 3 manual.indd 14
15/06/2009 21:38
Accessories
Rectal Probe
Axial Probe
Batteries and charger
Wrist Display
Goggles
Monitor
Video Cable
Carry Sack
15
Duo-Scan 3 manual.indd 15
15/06/2009 21:38
Duo-Scan 3
www.bcftechnology.com
Duo-Scan 3 manual.indd 16
15/06/2009 21:38