1
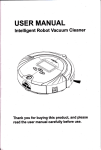
Robot Vocuum Cleoner
USER MANUAL
Thank you for purchasing this product.
Please read the instructions carefully before use.
Robot Vacuum Cleaner
Product introduction
.'...
Function introduction
Product
..... 1
....
"'
parameter
Structure introduction
2
-.-..... 4
.....
..........
5
:
.Notes on
use
Cleaning and
maintenance
Common faults andtreatment
methods
Answers to common problems when
Packing list
...
-...
12
.........
13
....
18
..
using
19
......-...
20
Robot Vacuum Cleaner
Robot Vacuum Cleaner
tr
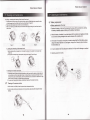
Thank you very much for the use Robot Vacuum Cleaner.Robot Vacuum Cleaner is a high-tech
intelligent automatic vacuum cleaner,even if you are not at home, you can easily clean the house,
creating a comfortable clean home for you.
H
tr
E
@
@
E
@
lntelligent function:
Press on lhe switch, it willautomatically clean
the room, the wholecleaning process doesn't
need people's monitors.
Navigation function:
plan the clean lines automatimlly, cleaning
each place of the room comprehensively.
@
,,|
fr.;l
t-
Automatic charging:
When the battery is about to run out, the
vacuum cleaner will automatically find the
charging base for charging.
Memory function:
After charging, it can continue to perform the
cleaning work automaticallY.
Automatic cleaning:
As long as you set the automatic clean
function, the vacuum cleaner will begin to
work immediately after charging.
Appointment cleaning:
it can begin to work according to the
appointment time.
Resistane and self-help:
if it is encountered with barrier or stuck by
object, it will automatically start a self-help
program to get rid of obstacles.
Anti-drop function:
prevent the vacuum cleaner falling off the
table or the ladder under normal circumstances.
''!
,&
tr
@
@
@
il
it
*
tr
2
E
Tornado brush:
worldwide patented quadruple tornado brush,
with high cleaning efficiency.
Side brush set:
ln the right side of the fuselage, side brush is
equipped, you can easily clean the corners of
the room.
Ultra thin fuselage:
the fuselage is ultra thin, you can easily drill
down to the bottom of the bed or sofa to clean.
Soft rubber wheel design:
the wheels are made up of soft rubber material,
which will not scratch the floor or carpet.
Low-noise design:
the noise is low, which is far lower than the
ordinary vacuum cleaner
Environmental protection function:
Built-in lilter filters the dusteffectively, cleans
the air
Safety and energy mnseruation:
Voltage =14V power: 24w Run for 2 hours
every day with the electricity of less than 3 Jiao
Disinfection and sterilization:
UV germicidal device can kill some bacteria
on the ground.
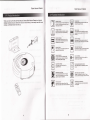
Robot Vacuum Cleaner
Robot Vacuum Cleaner
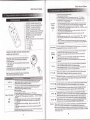
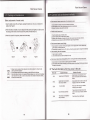
Number
LCD display : 1 . .)fti
signage
2. ffi
3. 4l>
*
Display of the number of appointmenl
Disptay orwneel rolation/speed.
utavioter
qermicidal displav (UV lamp drsplav).
4. e
5. e Display offixed pointcleaning6, weelg Display of the curentweek.
7. ffi olsptayortaultmaintenance.
8. rEj Displayorcharsins/power.
Displayofautomaticcleaning.
g. EEl.EB
Touch-key I 1,
Display ortime/faultcode.
Uftraviolet germicidal button (UV lamp button)
2. Auto cleaning button
3. Spot cleaning button
F
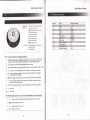
Project
lndicator parameter
2
3
4
5
Power
Noise
Diameter
Height
24W
7
I
I
10
11
Battery
litu
time
Romote corfirol rango
lnitial charging time
Normal charging time
800tirrcs
Single run
60-90min
> 8rn
th
zt-fi
12
Dust collector capacity
440m1
davs seting
< 65dB
33CM
9.1CM
Function information ofdisplay interface'
1.
Confirm the robot vacuum cleaner battery is installed correctly and has enough power.Turn on the
power switch, beeper rings for one time, the display screen shows the following information.
2.
w""rff
3.
5.
ffi
f,
rtit
'-
6.
gE:88
7.
#
4.
Display the currentweek in a week automatically according to the date.
Appearfaultdisplay,atthesametirr|e,BE:EEshowsfaultcode,whichisrepresentedbyE00l
...E005.
power display, full three grid electricity means the sufficient power, whereas the power reduces.
tt means it is charging, when the icon flashes,the battery is not fully charged. lf it does not flash,
it means power has been sufficient.
power display, full three grid electricity means the sufficient power, whereas the power reduces.
The wheel rotation speed when running, wheel rotation is slow at the running speed of 1 , wheel
rotation is fast at the running speed of 2.
8.*
Power display, full three grid electricity means the sufficient power, whereas the power reduces.
e.@
AUTO mode.
10. o
SPOT mode.
The following display function can only be set and selected on the remote- 99,11P]:..
1.
.*r"
Display the number of appointment days and appointment cleaning mode of each week.
2.
flfl;flf
Display the appointment and set time.
3.
#
**rfl
Display the speed of adjusted wheel.
4.
Display the currentweek.
3
4
Robot Vacuum Cleaner
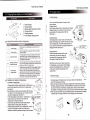
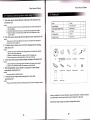
}.
-:
lnfrared signal receiver
Robot Vacuum Cleaner
€
.
Handle
Display window
Clean route diagram
Robot vacuum cleaner uses intelligent control, the function is very powerful. Through
infrared detection,vacuum cleaner could bypass obstacles voluntarily under normal
circumstance.Encountering staircases or other steps, it alsocan bypass, and will not
fall down. ln order to adapt to the complex work environment and high efficiency cleaning,
the running modes of vacuum cleaner will automatically converse between in the following
ways_
Sensor window
Ash box's button
Ground detection sensor
Ground detection sensor
Automatic charging pole piece
Front wheel
Right spiral
Main brush
Carriage
Ground detection sensor
Left spiral
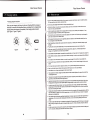
Broken line type
m
<_v
Glue brush
Side sweep brush
AA/\A
6
Left wheel
Battery cover
@
Along the wall
model
Around the column
mode
Free mode
Mop
Right wheel
Ash box
€
Using method of the host
Wind window
Power switch
Before usingtobot vacuum cleaner to clean, reorganize
small objects or obstructions in the room first, particularly
such winding materials as power line musl be cleanedl
Charging jack
\v
Press the automatic cleaning key, robot vacuum cleaner
stads to clean automati@lly,until the power is not enough.
It will automatically find recharging baseto charge. The
battery can run 60-90 minutes ifthe battery is fully chargedl
Press the fixed cleaning key again, stopping cleaning.
Scope of application:
o
Ceramic tile ground, wood floor, oilcloth,short-haired carpet (carpet hair is
shorter than 1.5 cm).
reMWW
Ceramic tile ground
Wood floor
Oilcloth
Short-haired carpet
Press the fixed cleaningkey , automatically
entering within the range of about 1 square,and
cleaning ac@rding to spiral mode for about 2-3
minutes.
a
a
.
Running time will have slight differences
beeuse of choosing quick stall, slow stall,
which doesn't affect its normal work.
a
When robot vacuum cleaner is running and
cleaning, if the battery is low, it will stop
running, at this time, cleaning robot willtweet
for ten times, and research for charging base
to charge automatically.
a
When starting robot vacuum cleaner, press
UV key, the icon is lit, UV lamp is lit.
lf you do not use UV lamp, press UV key to
turn off the imn .
Press the flxed cleaning key, stopping cleaning.
Press this key to turn on or turn off the UV lamp.
When cleaning, robot vacuum cleaner
system defaults to run slow, you can
select the fast or slow running with
remote control.
When robot vacuum cleaner is running
and cleaning, it will stop running if battery
power is low At this time, robot vacuum
cleaner will tweet fortimes, and research
for charging base to charge automatically.
.
o
When vacuum cleaner stops running, UV
lamp is automatically turned off.
Robot Vacuum Cleaner
Robot Vacuum Cleaner
Appointment time of machine automatic cleaning:
l
1. 'AUTO/FRI" Automatic cleaning key/Friday
2. "SPOT/SAT'
Fixed-point cleaningkey/Saturday
3. 'TIMEMED' Time setting keyMednesday
4.'CLOCK/TUE" Appointment key/Tuesday
5. "UVffHU" Ultraviolet germicidal UV key/Thursday
on the remote contror, the icon " 'ri:; " is nashins.
lill""lJlS
3. lf you want to appoint any day or everyday in the week to" clean, press the key of Sunday to
Saiurdaydirectly, the day being selected will flash. I in ' iii " represents Monday, 2 means
Tuesday...And so on. 7 represents Sunday
4. lf you need the appointment time interual or consecutive cleaning time of every week, press any
arbitrary date from Sunday tosaturday on the remote control directly. The selected data willflash
5. Press ihe key " D-l\.4oDE" on the remote control' the "D" in the hoat'ri)ii; "is flashing'
6. ln the setting of week, press the following keys " MoN, TUE, WED, THU, FRl, SAI SUN' D-MoDE
can delete or choose the appointment date.
7. After confirming the set of appointmentdata of every week, press the leftkey ' right key on the
Appointment
cleaning
nn.nn
trD.trtr
remote control to access appointment time setting.
"
8. Then press foMard key and backward key on the remote control to select the clock " BE:
you want.
:EE
" it isflashing'
9. After confir.mingthe clock, press the leftkey , right key to access the minute"
'
"
"
10. Press fomard key and backward key on the remote controlagain to select the minute :gE
in you want.
'l'1. After you complete the set of appointmentdata and appointment time of every week, press the
,,OK,'
tly on tne remote control, confirming to save your settingand exit the set of appointmentdata
and appointment time.
6. "DOC[(MON' Automatic recharge key/Monday
7. "SPEED/SUN" Speed selection key/Sunday
s.'O"shutdownkey/off
9. "D MODE" After the battery is full,it will work automatimlly
10. "
oK'
Conlirm key
11.'
" Fomard key
12." Y
13.',<
" Backward key
1:14."
" Left key
>',
9-o!t-o-l:o-l-Y9-Y -c-?11-"i
Y:.'j!
l
Speed selecting
Right key
lmportant note: Match code before using the remote
-.-
Code process: ensure that the host and the remote control have
enough power, and then operate according to the following:
'1. Shut down the host;
2. Press "confirm" keyon the remote control for at least 4 seconds,
without releasing;
3. Open the host;
4. After hearing "beep" of the hostfor two times, release confirm key
on the remote control, then matching code is completed.
Note: lf you could not hear "beep" for two times, it means that the
code is failed, please repeat the above procedure.
Turn on this key, the machine is cleaning under flxed-point cleaning mode, the runnrng
speed of machine is based on the pre-selected speed file Press this key again, the
machine will stop running, this function has no memory
Week and Time setting
the power switch of the host, press this key when normalfunctional status is displayed on
the display screen can make the vacuum cleaner run and shut down
2. Press this key in various running modes when opening the vacuum cleaner can make the run
mode stop.
3. In the set of appointment, week, and time settings, if the setting is wrong or you want to stop
setting, press this key to delete it and return to the original setting state.
4. presJthe key for S seconds or more, you can delete all settings and memories, back to factory
original state.
o
After completing the setting
saving of the setup process,
2. Afteriompleting the setting
saving of the setup process,
1.
"OK"Key
"UV " Key
@
Saturday.
After seiecting week, press the leftkey , right key to ac@ss the time setting " gg:gg "
Then press foMard key and backward key on the remote control to select the clock
ygu want " 88: "
" :Bg "
6. After mnfirming the clock, press the leftkey , right key to access the minute ,
it isflashing.
7. Press foriard key and backward key on the remote control to select the minute ":88 '
in you want.
8. After you mmplete the set of the week and time, press the "OK" key on the remote control,
confirming to save your settingand exit week and time setting.
7
of data, you must press the confirm key to conflrm the
and exit the set of appointmentdata
of time, you must press the confirm key to confirm the
and exit the set of appointmenttime.
When host is in standby or in running, press this key to turn on or off, UV lamp lights
or stops. Lighting or stopping after the set is automatically remembered'
key, vacuum cleaner will automatically
search for recharging basefor docking charging. When stopping, press this key again,
the machine will stop recharging.
when host is in standby or in running, press this
Forward Key
Backward
I
Key!
'1. Turn on the switch of the machine.
w@'U' is flashing
2. Press time setting key on the remote control, the ico "
3. Press "MON, TUE, WED, THU, FRl, SAT, SUN" on the remote control, selecting the week
"w*rf "you want. 1 in"w@k8" represents week, 2 means Monday... ... And so on. 7 represents
4.
5.
Press this key repeatedly,you can choose fast-range one and low-rang secondto run. lt will remember
it automatically after the confirming of selectingthe fast or slow speed.
1. Turn on
Shutdown/
cancel/stop
" DOCK " Key
Turn on this key, the machine is cleaning under automatic cleaning mode, the running
speed of machine is based on the pre-selected speed file.Press this key again, the
machine will stop running, this function has no memory
iHtLT"tlila"ll?r."
Right
Key
)
press the forward key, vacuum cleaner will run and clean foMard accordingto the arrow.
Press the shutdown key to stop. lt will stop automatically in case of obstructions'
Long press the backward key, vacuum cleaner will go back accordingto the arrow to
run and clean.Vacuum cleaner will stop going back after the release of the key'
Long press the left key, vacuum cleaner will be in counterclockwise in-situ rotation.
Rel6ase this key at this time, vacuum cleaner will run according to your desired direction.
press the shutdown key to stop, and it will stop automatically in case of obstructions.
Long press the right key, vacuum cleanerwill be in clockwise in-situ rotation.Release
this key at this time, vacuum cleaner will run according to your desired direction.Press
the shutdown key to stop, and it will stop automatically in case of obstructions'
Warm tips: 1. When using the remote control to control the hostremotely, you must use the remote control
within 1Om of the range of wireless signal, or it may cause the failure of remote control.
2. When you press the automatic recharge, the process of looking for recharging base by vacuum
cleanei may be failed because the obstructions in the environment is too complex, or the battery
of the host has run out.
a
Robot Vacuum Cleaner
Robot Vacuum Cleaner
o Artificial recharge:
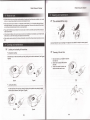
1. Power indicator
2. Charge indicator
3. lnfrared signal transmission window
4. Charging positive
5. Charging negative
6. Power adapter charging socket
(f
f
tI
Plug the power in the charging base, the power indicator is lit,
or it is off.
When the charging base is connected to the host for charging,
indicator is flashing
Connect this electrode with the host electrode for charging. When
using, it cannot be sheltered by foreign bodies. Please keep clean,
otherwise it will affect the connection charge.
o
lnstallation and charging of charging base:
:ll*ql*gLgj:Isp:rg-bixi
Charging base should be installed securely on the flat ground
and let its back against the wall firmly which is perpendicular
to the ground.
2. No obstructions or sunken areas could appear within the range
of 3 meters in front of charging base, and 0.5 meters in the left
and right of charging base. (See Figure 1).
3. lf the infrared signal launch window on charging base is
being covered,vacuum cleaner will not research for
charging base to charge automatically.
4. Connect the output terminals of power adapter with the
charging socket of charging base. (See Figure 2).
5. Please reorganize thepower cord of charging base, as shown
in Figure 2.Do not place the power cord on the ground,
otherwise it will affect the automatic recharge of vacuum cleaner.
I
rl
Automatic charging
Fisure 3
1. During the sweep, if the battery is low, robot vacuum cleaner will automatically
search for charging base to charge.
2. When robot vacuum cleaner is searching for charging base, itwill encounter obstacles,
the battery capacity will decreese, andit will beeffected by complex environment, which
may result in the failure of searching for charging base by vacuum cleaner.Therefore,
the installation of charging base should be put in a spacious environmentas far as possible.
3. When robot vacuum cleaner has just completed the sweep, the temperature of the battery
is relatively high. lf it charges at this time, the full charging time will be extended
f,it
Figure 2
!
Note:When the robot vacuum cleaner is searching
for charging base, vacuum cleaner will immediately
stop searching charging base if you press any key
on the panel or automatic recharge key on the
remote control.
Connection jack of the output DC24V of power adapter. Charging
base is the transit station of the host and power adapter when
charging, so when using chargin'g base,it must be close to the
edge of the wall. At the same time, power adapter connector must
be far away from the charging base, don't put it on two sides of
charging base, so as to avoid collision, entanglement when the
vacuum cleaner is cleaning and thus affecting the use.
1.
Atention:Danoer
hish voltagel
Charging method 3
Press the automatic recharge function in the
remote control, robot vacuum cleaner will
automatically find charging base within the
valid range to charge. (See Figure 3)
Transmitting signal is the only path to guide the host to return to
charging base to charge. Therefore,transmitting signal shall be
kept clean permanently, don't cover something above it, so as to
avoid affecting the signal effect.
(9=
A
A,
Charging method 2
Use charging base to charge. Firstly, connect the power
adapter and charging base, make the robot vacuum cleaner
close to charging base, so that the charge pole piece of
vacuum cleaner contacts with the charge pole piece of the
charging base well. (See Figure 2)
Using method and function condition of charging base:
Power adapter
charging sockel
You can use the following ways to charge the robot
vacuum cleaner:
Charging method 1
Use the power adapter directly to charge the smart charger,
charging directly is the connection of output terminal of
power adapter with charging socket of the host.
(See Figure 1)
{o
Robot Vacuum Cleaner
Robot Vacuum Cleaner
repair or modify the product'
Apart from the specified service technician of our company, no person could remove,
Or it may cause fire, electric shock, orpersonal injury.
o Charging diagram descriPtion:
when you start charging, the first grid in the icon is flashing.with the increase of
electricity, the second and thirdgridare flashing, indicating that it is charging.Flash
stopping means that charging is completed (or the charging isdisconnected).
(See Figure 4, Figure 5, Figure 6)
,
* gE:g8
x 3l[jr'-Q__.*_
""u j
_-
BB|EE
B.*t
^
4.1"-?oo
@
T,-,fi*t
Figure 5
Figure 4
touch power adapter with wet hands, or it may cause electric shock'
ofrobot vacuum
o Don't let the clothes or any parts of your body (hair, fingers, etc) involve in the brush or wheel
cleaner. Or it may cause bodily harm'
r Limited to usethe power adapter which is equipped with the machine. Don't useother power adapters, or it may
cause product damage, fire caused by shock or high pressure'
o Don,t bend the power cordexcessively or place heavy objects on the power cord. Otherwise you may damage the
power cord and cause a fire or electric sfiock.
. Don,t approach the heat sources such as cigarettes, lighters and matches or near flammable materials (such as
a Don't
the use of gasoline to clean the product).
o
Figure 6
o
o
.
o
power' Otherwise' battery may be
When transporting or Storing robot vacuum cleaner for a long time, turn off the
damaged.
plug the power cord of power adapter tightly, or it may cause electrical shock, short circuit, smoking or fire.
glass, etc)' or these objects may be
Before use, remove all the vulnerable object (luminous objects, fabrics,
damaged, or it may affect the use of robot vacuum cleaner'
in no charging, thus causing fire'
Check whether the power adapter is connected to the outlet reliably, or it may result
making children frightened
to
avoid
ln
order
cautiouslycleaner
When children are present, please use robot vacuum
or hurt.
o
.
or cause bodily harm'
Do not stand or sit on robot vacuum cleaner, so as not to cause damage to the machine
damage to robot vacuum
cause
not
to
so
as
(small
chairs),
tables,
space
narrow
vacuum
cleanerin
robot
use
Don,t
cleaner.
o
o
excessive use'
Do not use robot vacuum cleaner in places of business, or it may result indamage because
Note: do not let robot vacuum cleaner inhale water and other liquids, so as not to cause damage.
.
r
Avoid outdoor use, or it may cause damage to robot vacuum cleaner'
.
.
.
ground to prevent they
There cannot be wire which is longer than 1somm,cable, and other movable objects on the
will entangle hair brush.
perceived defects), children and
This product is not suitable for people with disabilities (the person of physical,
people who are not familiar with product usage manual.
when using
Appointment cleaning function and automatic cleaning function will automatically charge and workonly
cannot be achieved'
cnarging base to chige.lf you use the power adaptoi to charge directly, this two functions
pleaseoften wipe the charging
ln order to ensure robot vacuum cleaner can charge automatically and normally,
with a dry cloth, preventing
contact head on the front shell of the machine and iontact chip on the charging base s
dust cover and causing poor contact.
r
possible. Don't placeobstructions within the
Charging base should be installed in the open area of the room as far as
of
radius of 3 meters in front of tire charging base, so as not to affect robot vacuum cleaner's charging
returning to the charging base.
tothe requirements of
This machine must use the random matching charging base, the power supply must conform
to the vacuum
charging base,. Do not use any other charging base and battery, so as to avoid causing damage
ong"-ofih"
.
.
.
11
cleaner.
first use or using again
ln order to extend the battery life, it is necessary to recharge for 8-9 hours before use for the
will achieve the best
after not using for a long time. ffier tne full chaige-discharge cycles for 2-3 times, the battery
results.
the battery and
lf robot vacuum cleaner is not used for a long time, please charge the battery fully, and then remove
put it in a cool place, keeping dry at the bottom robot vacuum cleaner'
,12
Robot Vacuum Cleaner
Robot Vacuum Cleaner
o
All places where robot vacuum cleaner would possibly go through cannot have filamentous materials, wires, towels
and so on, to prevent being inhaled by the cleaner and entangled in brush"
.
Please don't let robot vacuum cleaner run on extremely smooth surface, or run on the surface with large fillet and
bevel angle.Otherwise, it may be stuck or even fall down to cause injury; if there are similar steps at home, please
use the virtual wall emission signal to block or special supervision.
.
Please don't let thisrobot vacuum cleaner run on plush carpet, in order to avoid that carpet wool will be involved in
robot vacuum cleaner.
o
Mw
€
The uninstall of the moP:
t ztA
lntheprocessofwalking,robotvacuumcleanermayknockoversomelightandsmallobjects,suchasflowervases,
small cartons, so, before the cleaning, these objects should be removed.
o
When using the remote control and the virtual wall transmitter, do not let the infrared emission head aim at human's
eyes.
lmportant Note:the mop and carriage in the figureare not suitable for carpet or uneven ground.
g
Loading and unloading of the ash box:
o
€
Unloading the ashtray:
Press the keys on the ash boxwith your hand, pulling out the ash box backward. (See Figurel,
Figure2)
Cleaning of the ash box:
1. Take out dust box, put rubbish in dust box
2.
3.
!9 ali n g
tn 9.
Kt
Figure2
Figurel
e''
into trash bin.
Clean dust in dust box with brush or
soft cloth.
There is fan motor in dust box, so
water cannot be used to rinse.
-e--s..t'..tjgy-:
Put the keys face of the ash box upwards, aligning at the position and pushing it slightly
into the vacuum cleaner. (See Figure3, Figure4)
HZ
Figure3
Figure4
{3
14
Robot Vacuum Cleaner
Robot Vacuum Cleaner
e Loading, unloading and cleaning of hair brush, floor brush:
1. Pushforward the lock lever with your right hand thumb, and then lift the plate cover, squeeze the stem
of middle sweep brush by left hand and move it up.(See Figure 1, Figure 2)
2. Removing middle sweep brush and floor brush. (See Figure 3)
3. When you install it, aim middle sweep brush and floor brush at the mounting hole, and then close the
platen cover.
F
Battery replacement:
r Battery
replacement of the host:
1. Replace the battery of the host by loosening the screw with the screwdriver, opening
the battery installation plate and taking out the battery. (See Figure )
2. When the battery is installed, it must be aligned with the positive and negative terminals
so as to avoid causing darnage to the vacuum cleaner with a polarity error!
Figure
o
1
Figure 2
Loading and unloading of side sweep brush'
1. Before replacing the side sweep brush, removing the screws on the spindle of side sweep brush
of the host.
2. Then press side sweep brush intoits spindle, locking screws again. (See the figure)
o Cleaning of hair brush, floor brush:
1. Periodically clear the hairs and large dust particles on hair brush and floor brush, and clean the dust
on the entrance, and then clean paper scraps or small particles by cleaning brush directly. As to the
involved hair or yarn and other objects, turn the brushcarefully, and use scissors to break them or pull
them out with your hands, to increase cleaning performance.
2. You can clean it according to loading, unloading and cleaning of hair brush, floor brush.
€
Cleaning of the sensor window:
1
. Use the crtton or soft cloth to clean the ground sensor transparent window.
, 2. ln order to make smart vacuum cleaners work more sensitive, please keep the transparent window
cleaning.
{5
3. ln the case of not using for a long time, in order to extend the life of the battery please
charge the battery fully.When it is used again, charge it for 8 hours in order to achieve
the best battery use.
4. lt must be replaced with manufacturer's batteries.Or it may result in damage or accident.
5. Warranty period is 6 months.
:if;eeil
Robot Vacuum Cleaner
Robot Vacuum Cleaner
Battery replacement of remote control:
o
1. Open the battery cover with your fingers, exposing the battery box, then you can replace the
battery. (See Figure 1)
2. When the battery is installed, it must be aligned with the positive and negative, in order to avoid
the damage of the remote control because of the polarity error!(See Figure 2)
Robot vacuum cleaner cannot work or the cleaning is weak
1. Check whether the switch of robot vacuum cleaner is turned on.
2. Check whether ash box, filtor, attracting importer and so on are cleaned
3. Whether tho battery voltage declines seriously.
o
Remote control cannot work
1. Check the battery status of remote control
2. Check the battery status of rirbot vacuum cleaner.
3. Whether code confirmation of remote Control and robot vacuum cleaner has been carried on
4. Whetherrobot vacuum cleaner is within the effective range of signal emission'
3. When it is unused for a long time, please remove the battery.
o
Robot vacuum cleaner cannot charge
*h"iili
ihe connection of the power adapter and the charging base is normal. Whether the
power indicator of charging base is lit.
2. bheckwhether the battery is too low, if it is too low, choose the power adapter to charge the hostdifectly.
i. 6ffi;*
o
Figure
1
Figure 2
When cleanino, the noise increases
1. Clean the ash box and filter.
2. Check whether the brushor the side sweep is too dirty.
Figure 3
o
Robot vacuum cleaner stops workingsuddenly when it is running and makes continuous beep sound.
1. Check the set time to see whether the cleaning has been completed.
2. Check whether there is fault code display on the display screen in the surface of robot vacuum cleaner.
See the fault information.
X
1. Battery must be recycled with safe disposal.Do not arbitrarily discard it or threwit into the
water to prevent the explosion!
2. Do not forceexert external forceon the battery or make it fall from the high place.
3. Check the batteryof remote control regularly.lf battery leakage occurs, you should immediately
wipe it clean with a dry cloth, in order to avoid corrosion and oxidation of electrode, affecting
the use of the remote control.
€
The fault information which may occur in the use:
Fault code
E00'1
System fault of cliff detection
E002
System fault of main brush of
robot vacuum cleaner
Solution of the fault
Clear the dust or otherobstacles on the
sensor in the bottom of the robot vacuum
cleaner
E00s
17
Cause of the fault
Very low battery
Check whether there is debris or wire, hair
wrapped on main brush, clear debris
Please use it after carrying on artificial
charging by power adaPter
E004
Fault of left and right wheel
Please check left and right wheel in the
bottom of robot vacuum cleaner, andclear
debris
E005
The ash box is not installed or
has poor contact
Check the ash box, install it again.
Robot Vacuum Cleaner
Robot Vacuum Cleaner
I
lf the robot vacuum cleaner falls back continuously in the process of use,
what should I do?
Answer:
1. Move the front shell of robot vacuum cleaner lightly with your hands, making the front
Shell moveflexiblY.
2. The ambient light may be too strong. You should avoid direct exposure to sunlight.
3. please avoid using it on the black carpet, which may result in falling back of robot
vacuum cleaner.
II
lf the robot vacuum cleaner falls from the edge of the stair, what should I do?
Answer:
il
N
1. Wipe the robot vacuum cleaner and the charging electrode of charging base regularly
with a dry cloth to keeP them clean'
2. Maintain no obstructions within 3m of radius in front of the charging base.
3. Use the remote control to find charge station of robot vacuum cleaner'
lf the noise ofrobot vacuum cleaner suddenly increases, what should I do?
Answer:
1. Check whether there is any foreign object in the bottom of the robot vacuum cleaner.
2. Deliver it to the maintenance station for maintenance, adding lubricant.
V
After storingtherobot vacuum cleaner for a long-term, it cannot charge
automatically, what should I do?
Answer:
Use power adapter for artificial recharge.
U
lf therobot vacuum cleaner stops working with no error code,
what should I do?
Answer:
CHrrlage
1
Power iAdaoter
1
Side Sweep Brush
2
Recharseeble BatterY Pack
1
Cleaning brush
1
Mop
2
User Manual
1
Charging Base
1
Filter Nel
2
Remote Control
1
Warranty Card
1
please use a dry cloth to wipe thedust on the sensor in the bottom of the robotvacuum
cleaner, then it can be wiPed out.
lf therobot vacuum cleaner could not find the charging base for charging,
what should I do?
Answer:
Host
/A
^.Y
zz€\\
-/:oL
ru @)D,r
,-,\}
.Y-e/
\-a
Host
w
Carriage
t=-l
ll
ll
User Manual
3::X'li""j:iffi:1",'i"
Remotecontror charsins Base
Power Adapter
host)
%
2 pieces of mops
X
Cleaning
brush
Side Sweep Brush
r=l
l
Warranty Card
please contact the after-sales service maintenance point, don't remove it repair by yourself.
'..,-.-.--'-,,",'.,'.,..,'..,'".",,.,,,1
Users do notattempt to remove machines to repair by themselves, it should be repaired
by professionals or sent to repair center to repair, othenvise it is risk'prone.
Note:Product design changes are subject to change without notice'
,t9
20