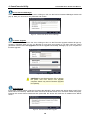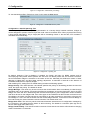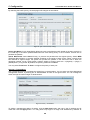
1
Version 2.00
Information in this document is subject to change without notice.
© 2007 D-Link Computer Corporation. All rights reserved.
Reproduction in any manner whatsoever without the written permission of D-Link Computer Corporation is strictly
forbidden.
Trademarks used in this text: D-Link and the D-Link logo are trademarks of D-Link Computer Corporation; Microsoft and
Windows are registered trademarks of Microsoft Corporation.
Other trademarks and trade names may be used in this document to refer to either the entities claiming the marks and names
or their products. D-Link Computer Corporation disclaims any proprietary interest in trademarks and trade names other than
its own.
FCC Warning
This equipment has been tested and found to comply with the limits for a Class A digital device, pursuant to Part 15 of the
FCC Rules. These limits are designed to provide reasonable protection against harmful interference when the equipment is
operated in a commercial environment. This equipment generates, uses, and can radiate radio frequency energy and, if not
installed and used in accordance with this user’s guide, may cause harmful interference to radio communications. Operation
of this equipment in a residential area is likely to cause harmful interference in which case the user will be required to
correct the interference at his own expense.
CE Mark Warning
This is a Class A product. In a domestic environment, this product may cause radio interference in which case the user may
be required to take adequate measures.
Warnung!
Dies ist ein Produkt der Klasse A. Im Wohnbereich kann dieses Produkt Funkstoerungen verursachen. In diesem Fall kann
vom Benutzer verlangt werden, angemessene Massnahmen zu ergreifen.
Precaución!
Este es un producto de Clase A. En un entorno doméstico, puede causar interferencias de radio, en cuyo case, puede
requerirse al usuario para que adopte las medidas adecuadas.
Attention!
Ceci est un produit de classe A. Dans un environnement domestique, ce produit pourrait causer des interférences radio,
auquel cas l`utilisateur devrait prendre les mesures adéquates.
Attenzione!
Il presente prodotto appartiene alla classe A. Se utilizzato in ambiente domestico il prodotto può causare interferenze radio,
nel cui caso è possibile che l`utente debba assumere provvedimenti adeguati.
VCCI Warning
December 2007 P/N
Table of Contents
D-Link Web Smart Switch User Manual
Table of Contents
Table of Contents ............................................................................................................................................ 1
About This Guide............................................................................................................................................. 1
Online Resources........................................................................................................................................... 1
Terms/Usage.................................................................................................................................................. 1
Copy Right and Trademarks .......................................................................................................................... 1
Hardware Installation ...................................................................................................................................... 2
Step1: Unpacking........................................................................................................................................... 2
Step2: Switch Installation............................................................................................................................... 2
Desktop or Shelf Installation....................................................................................................................... 2
Rack Installation ......................................................................................................................................... 2
Step 3 – Plugging in the AC Power Cord....................................................................................................... 3
Power Failure ............................................................................................................................................. 3
Getting Started................................................................................................................................................. 4
Management Options..................................................................................................................................... 4
Using Web-based Management Utility........................................................................................................... 4
Supported Web Browsers .......................................................................................................................... 4
Connecting to the Switch............................................................................................................................ 4
Login Web-based Management Utility ....................................................................................................... 5
Smart Wizard ................................................................................................................................................. 5
Web-based Management Utility..................................................................................................................... 5
SmartConsole Utility....................................................................................................................................... 5
Product Introduction ....................................................................................................................................... 7
DGS-1216T .................................................................................................................................................... 7
Front Panel ................................................................................................................................................. 7
Rear Panel.................................................................................................................................................. 8
DGS-1224T .................................................................................................................................................... 8
Front Panel ................................................................................................................................................. 8
Rear Panel.................................................................................................................................................. 9
DGS-1248T .................................................................................................................................................... 9
Front Panel ................................................................................................................................................. 9
Rear Panel.................................................................................................................................................. 9
SmartConsole Utility ..................................................................................................................................... 10
SmartConsole Settings ................................................................................................................................ 10
Utility Settings........................................................................................................................................... 10
Log............................................................................................................................................................ 11
Trap .......................................................................................................................................................... 11
File ............................................................................................................................................................ 11
Help .......................................................................................................................................................... 12
Device Configurations.................................................................................................................................. 13
Add(+), Delete(-) and Discover the device ............................................................................................... 15
Device List.................................................................................................................................................... 16
Configuration ................................................................................................................................................. 17
Smart Wizard Configuration......................................................................................................................... 17
Password Settings.................................................................................................................................... 17
SNMP Settings ......................................................................................................................................... 18
System Settings........................................................................................................................................ 19
Identifying the Web-based Management Utility ........................................................................................... 20
i
Table of Contents
D-Link Web Smart Switch User Manual
Tool Menu .................................................................................................................................................... 20
Reset ........................................................................................................................................................ 20
Configure Backup & Restore.................................................................................................................... 21
Firmware Backup and Upload .................................................................................................................. 21
System Reboot ......................................................................................................................................... 22
Setup Menu.................................................................................................................................................. 22
System > System Settings ....................................................................................................................... 22
System > Trap Settings ............................................................................................................................ 23
System > Port Settings............................................................................................................................. 24
System > SNMP Settings ......................................................................................................................... 24
System > Password Access Control ........................................................................................................ 26
Configuration > Jumbo Frame.................................................................................................................. 26
Configuration > 802.1Q VLAN.................................................................................................................. 26
Configuration >Asymmetric VLAN............................................................................................................ 27
Configuration > 802.1Q Management VLAN............................................................................................ 28
Configuration > Trunking .......................................................................................................................... 29
Configuration > IGMP Snooping .............................................................................................................. 29
Configuration > 802.1D Spanning Tree.................................................................................................... 31
Configuration > Port Mirroring .................................................................................................................. 32
Configuration > Power Saving.................................................................................................................. 32
QoS > 802.1p/DSCP Priority Settings...................................................................................................... 33
Security > Trusted Host............................................................................................................................ 34
Security > Safeguard Engine.................................................................................................................... 35
Security > Broadcast Storm Control......................................................................................................... 35
Security > 802.1X Settings ....................................................................................................................... 36
Security > Mac Address Table > Static Mac ............................................................................................ 37
Security > Mac Address Table > Dynamic Forwarding Table.................................................................. 37
Monitoring > Statistics .............................................................................................................................. 38
Monitoring > Cable Diagnostics ............................................................................................................... 38
Appendix A - Ethernet Technology................................................................................................................ 1
Gigabit Ethernet Technology ......................................................................................................................... 1
Fast Ethernet Technology.............................................................................................................................. 1
Switching Technology .................................................................................................................................... 1
Power over Ethernet (PoE) ............................................................................................................................ 1
Appendix B - Technical Specifications ......................................................................................................... 3
Hardware Specifications ................................................................................................................................ 3
Key Components / Performance ................................................................................................................ 3
Port Functions ............................................................................................................................................ 3
Physical & Environment ............................................................................................................................. 3
Emission (EMI) Certifications ..................................................................................................................... 3
Safety Certifications.................................................................................................................................... 3
Features ......................................................................................................................................................... 3
L2 Features ................................................................................................................................................ 3
VLAN .......................................................................................................................................................... 3
QoS (Quality of Service)............................................................................................................................. 3
Security....................................................................................................................................................... 3
Management............................................................................................................................................... 3
ii
About This Guide
D-Link Web Smart Switch User Manual
About This Guide
This guide provides instructions to install D-Link Gigabit Ethernet Web Smart Switches DGS-1216T/24T/48T,
how to use the SmartConsole Utility, and to configure Web-based Management Utility step-by-step.
Note: The model you have purchased may
appear slightly different from the illustrations
shown in the document. Refer Product
Instruction and Technical Specification section
for detailed information about your switch, its
components, network connections, and technical
specifications.
This guide is mainly divided into four parts:
1. Hardware Installation: Step-by-step hardware installation procedures
2. Getting Started: A startup guide for basic switch installation and settings
3. Smart Console Utility: An introduction to the central management system
4. Configuration: Information about the function descriptions and configuration settings
Online Resources
The website addresses are not prefixed with http:// because most of the current web browsers do not need it.
If you are using an older web browser, you may have to append http:// in the web address.
For the latest information about the Web Smart Switches, e-mail:
Resource
Website
D-Link
www.dlink.com.tw
Technical Support
tsd.dlink.com.tw
Terms/Usage
In this guide, the term “Switch” (first letter is capitalized) refers to the Smart Switch, and “switch” (first letter in
lower case) refers to other Ethernet switches. Some technologies refer to terms “switch”, “bridge” and
“switching hubs” interchangeably, and both are commonly accepted for Ethernet switches.
A NOTE Alerts you to supplementary
information.
A CAUTION indicates potential property damage
or personal injury.
Copy Right and Trademarks
Information in this document is subjected to change without notice.
© 2007 D-Link Corporation. All rights reserved.
Reproduction in any manner whatsoever without the written permission of D-Link Corporation is strictly
forbidden.
Trademarks used in this text: D-Link and the D-LINK logo are trademarks of D-Link Corporation; Microsoft
and Windows are registered trademarks of Microsoft Corporation.
Other trademarks and trade names may be used in this document to refer to either the entities claiming the
marks and names or their products. D-Link Corporation disclaims any proprietary interest in trademarks and
trade names other than its own.
1
1 Hardware Installation
1
D-Link Web Smart Switch User Manual
Hardware Installation
This chapter provides unpacking and installation information for the D-Link Web-Smart Switch.
Step1: Unpacking
Open the shipping carton and carefully unpack its contents. Please consult the packing list located in the
User Manual to make sure all items are present and undamaged. If any item is missing or damaged, please
contact your local D-Link reseller for replacement.
One D-Link Web-Smart Switch
One AC power cord
Four rubber feet
Screws and two mounting brackets
One Multi-lingual Getting Started Guide
User’s Guide CD with SmartConsole Utility program
If any item is found missing or damaged, please contact the local reseller for replacement.
Step2: Switch Installation
For safe switch installation and operation, it is recommended that you:
Visually inspect the power cord to see that it is secured fully to the AC power connector.
Make sure that there is proper heat dissipation and adequate ventilation around the switch.
Do not place heavy objects on the switch.
Desktop or Shelf Installation
When installing the switch on a desktop or shelf, the rubber feet included with the device must be attached
on the bottom at each corner of the device’s base. Allow enough ventilation space between the device and
the objects around it.
Figure 1 – Attach the adhesive rubber pads to the bottom
Rack Installation
The switch can be mounted in an EIA standard size 19-inch rack, which can be placed in a wiring closet with
other equipment. To install, attach the mounting brackets to the switch’s side panels (one on each side) and
secure them with the screws provided (please note that these brackets are not designed for palm size
switches).
Figure 2 – Attach the mounting brackets to the Switch
2
1 Hardware Installation
D-Link Web Smart Switch User Manual
Then, use the screws provided with the equipment rack to mount the switch in the rack.
Figure 3 – Mount the Switch in the rack or chassis
Step 3 – Plugging in the AC Power Cord
Users may now connect the AC power cord into the rear of the switch and to an electrical outlet (preferably
one that is grounded and surge protected).
Figure 4 –Plugging the switch into an outlet
Power Failure
As a precaution, the switch should be unplugged in case of power failure. When power is resumed, plug the
switch back in.
3
2 Getting Started
2
D-Link Web Smart Switch User Manual
Getting Started
This chapter guides you how to get into and introduces the management interface of D-Link Web-Smart
Switch.
Management Options
The D-Link Web Smart Switch can be managed through any port on the device by using the Web-based
Management Utility or through any PC using the SmartConsole Utility.
If you want to manage only one D-Link Web Smart Switch, the Web-Based Management Utility is the better
option. Each switch must be assigned its own IP Address, which is used for communication with Web-Based
Management Utility or an SNMP network manager and the PC should have an IP address in the same range
as the switch.
However, if you want to manage multiple D-Link Web Smart Switches, the SmartConsole Utility is the better
option. Using the SmartConsole Utility, you don’t need to change the IP address of your PC and it is easy to
start the initial setting of multiple Smart Switches.
Please refer to the following detailed installation instructions for the Web-Based Management Utility and the
SmartConsole Utility.
Using Web-based Management Utility
After a successful physical installation, you can configure the Switch, monitor the LED panel, and display
statistics graphically using a web browser.
Supported Web Browsers
The embedded Web-based Management Utility currently supports the following web browsers:
Microsoft Internet Explorer ver. 6.0, 5.5
Mozilla ver. 1.7.12, 1.6
Firefox ver. 1.5, 1.0.7
Netscape ver. 8.0.4, 7.2
Opera ver. 8.5, 7.6
Safari ver. 2.0.2
Connecting to the Switch
You need the following equipment to begin the web configuration of your device:
1.
A PC with a RJ-45 Ethernet connection
2.
A standard Ethernet cable
Connect the Ethernet cable to any of the ports on the front panel of the switch and to the Ethernet port on the
PC.
Figure 5 –Connected Ethernet cable
4
2 Getting Started
D-Link Web Smart Switch User Manual
Login Web-based Management Utility
In order to login and configure the switch via an Ethernet connection, the PC must have an IP address in the
same subnet as the switch. For example, if the switch has an IP address of 192.168.0.1, the PC should have
an IP address of 192.168.0.x (where x is a number between 2 and 254), and a subnet mask of
255.255.255.0. There are two ways to login the Web-based Management Utility, you may click the Web
Access button at the top of the SmartConsole Utility or open your web browser and enter 192.168.0.1 (the
factory-default IP address) in the address box. Then press <Enter>
Figure 6 –Enter the IP address 192.168.0.1 in the web browser
NOTE: The switch's factory default IP address is
192.168.0.1 with a subnet mask of 255.0.0.0 and
a default gateway of 0.0.0.0.
The web configuration can also be accessed through the SmartConsole Utility. Open the SmartConsole
Utility and double-click the switch as it appears in the Monitor List. This will automatically load the web
configuration in your web browser.
When the following login box appears, enter the password then press OK to entering the Web-based
Management Utility. The default password is Admin.
Figure 7 – Log in screen
Smart Wizard
Before entering the Web-based Management Utility, When The Smart Wizard will guide you to quick
configure the D-Link Web Smart Switch. Please refer to Samrt Wizard Configuration section for detail
configurations.
Web-based Management Utility
After clicking the Exit button in Smart Wizard, you will enter the Web-based Management Utility. Please refer
to Chapter 5 Configuration for detail configurations.
SmartConsole Utility
The SmartConsole Utility included on the installation CD is a program for discovering Smart Switches with
the same L2 network segment connected to your PC. This tool is only for computers running Windows 2000,
Windows XP, and Windows Vista x64/86 operating systems. There are two options for the installation of
SmartConsole Utility, one is through the autorun program on the installation CD and the other is manual
installation.
NOTE: Please be sure to remove any existing
SmartConsole Utility from your PC before
installing the latest SmartConsole Utility.
5
2 Getting Started
D-Link Web Smart Switch User Manual
Option 1: Follow these steps to install the SmartConsole Utility via the autorun program on the installation
CD.
1.
Insert the Utility CD into your CD-Rom Drive.
2.
The autorun program will pop up automatically
3.
Simply click on the ”Install SmartConsole Utility” button and an installation wizard will guide you through
the process.
4.
After successfully installing the SmartConsole Utility, you can open the utility by clicking Start >
Programs > D-Link SmartConsole Utility.
5.
Just connect the Smart Switch to the same L2 network segment of your PC and use the SmartConsole
Utility to discover the Smart Switches.
Option 2: Follow these steps to install the SmartConsole Utility manually.
1.
Insert the Utility CD into your CD-Rom Drive.
2.
From the Start menu on the Windows desktop, choose Run.
3.
In the Run dialog box, type D:\D-Link SmartConsole Utility\setup.exe (where D:\ represents the drive
letter of your CD-Rom) and click OK.
4.
Follow the on-screen instructions to install the utility.
5.
Upon completion, go to Start > Programs > D-Link SmartConsole Utility and open the SmartConsole
Utility.
6.
Just connect the Smart Switch to the same L2 network segment of your PC and use the SmartConsole
Utility to discover the Smart Switches.
For a detailed look at SmartConsole’s functions, please refer to Chapter 4 SmartConsole Utility
6
3 Product Introduction
3
D-Link Web Smart Switch User Manual
Product Introduction
Thank you and congratulations on your purchase of D-Link Web Smart Switch Products.
D-Link's next generation Web Smart Gigabit switch series blends plug-and-play simplicity with exceptional
performance and reliability for small and medium-sized business (SMB) networking. All models are housed in
a new style rack-mount metal case with easy-to-view front panel diagnostic LEDs, and provide advance
features including up to two or four combo SFP fiber connections, network security, traffic segmentation,
QoS and versatile management. Some of the advanced features include:
A Switch for Each Business Size: With three models (16, 24 and 48) Gigabit ports to choose from, this
series provides flexible choices for different network size requirements. Since Gigabit copper ports capable
of connecting to your existing Cat.5 twisted-pair cable, these switches eliminate the need of a complex
reconfiguration process. In addition supports auto-detection of MDI/MDIX, bringing inexpensive and easy
Gigabit connection to the desktops. Each switch provides two or four combo SFP slots for flexible connection
to a fiber backbone or servers. All the SFP slots support 100M and 1000M dual speed fiber connections.
Extensive Layer 2 Features: Implemented as complete L2 devices, these switches include functions such
as Jumbo frame support, IGMP snooping, port mirroring, Spanning Tree, port trunks. The IEEE 802.3x flow
control function allows your servers to directly connect to the switch for fast, reliable data transfer.
Traffic Segmentation and QoS: The switches support 802.1Q VLAN standard tagging by prioritizing traffic
to enhance network security and performance. Also support 802.1p priority queues, enabling users to run
bandwidth-sensitive applications such as streaming multimedia and VoIP in network. These functions allow
switches to work seamlessly with VLAN and 802.1p traffic in network. Asymmetric VLAN is implemented in
these switches for a more efficient use of shared resources such as server or gateway devices.
Network Security: D-Link’s innovative Safeguard Engine function protects the switches against traffic
flooding caused by virus attacks. Additional features like MAC address filters screen access to the network.
They support 802.1X port-based authentication, allowing network to be configured with external RADIUS
servers.
Versatile Management: The new generation of Gigabit web smart switches provides growing businesses
simple and easy management of their network using an intuitive SmartConsole utility or a Web-Based
management interface that allows administrators to remotely control their network down to the port level. The
SmartConsole easily allows customers to discover multiple D-Link web smart switches with the same L2
network segment connected to user’s local PC. With this utility, users do not need to change the IP address
of PC and also provides easy initial setting of smart switches. The switches with the same L2 network
segment connected to user’s local PC are displayed on the screen for instant access. It allows extensive
switch configuration setting, and basic configuration of discovered devices such as password change,
firmware upgrade.
In addition, users can also use the built-in MIB browser to poll the switches for information about their status
and send traps of abnormal events. MIB support allows users to integrate the switches with third-party
devices for management in an SNMP environment.
DGS-1216T
16 Port 10/100/1000BaseT with 2 Combo SFP Smart Switch
Front Panel
Figure 8 – DGS-1216T Front Panel
Power LED: The Power LED flashes when the Switch is connected to a power source.
CPU LED: When the CPU LED is blinking, then the switch is in the normal condition. If the CPU LED is off or
stays in solid light state that means the system might have crashed or firmware upgrade has failed.
Port Link/Act LED (1-14, 15T/F, 16T/F): The Link/Act LED flashes which indicates a network link through
the corresponding port. Blinking state indicates that the Switch is either sending or receiving data to the port.
7
3 Product Introduction
D-Link Web Smart Switch User Manual
NOTE: On DGS-1216T, the MiniGBIC ports 15F
and 16F are shared with normal RJ-45 ports 15T
and 16T. When MiniGBIC port is used, the RJ-45
port cannot be used.
100/1000M LED (1-14, 15T, 16T): A steady green light denotes a valid 1000Mbps link on the corresponding
port, a steady orange light denotes a valid 10 or 100Mbps link on the port. These LEDs will remain dark if
there is no link/activity on the port.
1000M LED (15F, 16F): The 1000M LED sign lights up when the corresponding port is running on 1000Mbps.
These LEDs will remain dark if there is no link/activity on the port.
Rear Panel
Figure 9 – DGS-1216T Rear Panel
Reset: By pressing the Reset button the Switch will change back to the default configuration and all changes
will be lost.
Power: The power port is where to connect the AC power cord.
DGS-1224T
24 Port 10/100/1000BaseT with 2 Combo SFP Smart Switch
Front Panel
Figure 10 – DGS-1224T Front Panel
Power LED: The Power LED flashes when the Switch is connected to a power source.
CPU LED: When the CPU LED is blinking, then the switch is in the normal condition. If the CPU LED is off or
stays in solid light state that means the system might have crashed or firmware upgrade has failed.
Port Link/Act LED (1-22, 23T/F, 24T/F): The Link/Act LED flashes which indicates a network link through
the corresponding port. Blinking state indicates that the Switch is either sending or receiving data to the port.
NOTE: On DGS-1224T, the MiniGBIC ports 23F
and 24F are shared with normal RJ-45 ports 23T
and 24T. When MiniGBIC port is used, the RJ-45
port cannot be used.
100/1000M LED (1-22, 23T, 24T): The 100/1000M LED lights up in steady green denotes a valid 1000Mbps
link on the corresponding port, a steady orange light denotes a valid 10 or 100Mbps link on the port. These
LEDs will remain dark if there is no link/activity on the port.
1000M LED (23F, 24F): The 1000M LED sign lights up when the corresponding port is running on 1000Mbps.
These LEDs will remain dark if there is no link/activity on the port.
8
3 Product Introduction
D-Link Web Smart Switch User Manual
Rear Panel
Figure 11 – DGS-1224T Rear Panel
Reset: By pressing the Reset button the Switch will change back to the default configuration and all changes
will be lost.
Power: The power port is where to connect the AC power cord.
DGS-1248T
48 Port 10/100/1000BaseT with 4 Combo SFP Smart Switch
Front Panel
Figure 12 – DGS-1248T Front Panel
Power LED: The Power LED flashes when the Switch is connected to a power source.
CPU LED: When the CPU LED is blinking, then the switch is in the normal condition. If the CPU LED is off or
stays in solid light state that means the system might have crashed or firmware upgrade has failed.
Port LED (1-44, 45-48T/F): The port LED lights up in steady green denotes a valid 1000Mbps link on the
port, and blinking green light indicates activity on the port (at 1000Mbps). A steady orange light denotes a
valid 10 or 100Mbps link on the port while a blinking orange light indicates activity on the port (at 100Mbps).
These LEDs will remain dark if there is no link/activity on the port.
NOTE: On DGS-1248T, the MiniGBIC ports 45F to
48F are shared with normal RJ-45 ports 45T to
48T. When MiniGBIC port is used, the RJ-45 port
cannot be used.
Reset: By pressing the Reset button the Switch will change back to the default configuration and all changes
will be lost.
Rear Panel
Figure 13 – DGS-1248T Rear Panel
Power: The power port is where to connect the AC power cord.
9
4 SmartConsole Utility
4
D-Link Web Smart Switch User Manual
SmartConsole Utility
D-Link SmartConsole Utility allows the administrator to quickly discover all D-Link smart switches which are
in the same domain the PC, collect traps and log messages, and quick access to some basic configurations
of the switch.
The SmartConsole Utility is divided into three parts, Device Configurations at the top, Device List, and
SmartConsole Settings at the left.
Figure 14 – SmartConsole Utility
SmartConsole Settings
The SmartConsole Settings at the left has five icons, Utility Settings, Log, Trap, File, and Help.
Utility Settings
By clicking on this icon the Utility Settings window will pop up. Refresh time refreshes the devices which
were selected as monitored device in the Device List. Choices include 15 secs, 30 secs, 1mins, 2mins and
5 mins for selecting the monitoring time intervals. Utility Group Interval establishes the intervals (in
seconds) that the Switch will be discovered in the SmartConsole Device List.
Figure 15 – SmartConsole Utility Settings
NOTE: If the Group Interval is set to 0, IGMP
snooping must be disabled or the Web-Smart
Switch will not be discovered.
10
4 SmartConsole Utility
D-Link Web Smart Switch User Manual
Log
By clicking on this icon the Log window will pop up. Click View Log to show the events of the SmartConsole
Utility and the device. Date/Time indicates when the log was received, IP indicates where it comes from and
Status shows the content of this log message. Click Clear Log to clear all log entries. Click OK to exit.
Figure 16 – SmartConsole Log
Trap
By clicking on this icon the Trap window will pop up. Click View Trap to show the events of the
SmartConsole Utility and the device. Date/Time indicates when the trap was received, IP indicates where it
comes from and Status shows the content of this trap message. Click Clear Trap to clear all entries. Click
OK to exit.
Figure 17 – SmartConsole Trap
The trap icon in the SmartConsole Settings will change while receiving new trap messages please see below
for detail description
Icon
Description
No new traps
New traps was received
File
By clicking on this icon you will see below options:
11
4 SmartConsole Utility
D-Link Web Smart Switch User Manual
Figure 18 – SmartConsole File
Monitor Save: To record the setting of the Device List as default for the next time the SmartConsole Utility is
used.
Monitor Save As: To record the setting of the Device List in an appointed filename and file path.
Monitor Load: To manually load a Device List setting file.
Help
By clicking on this icon a window with information about the SmartConsole will pop up.
Figure 19 – SmartConsole Help
12
4 SmartConsole Utility
D-Link Web Smart Switch User Manual
Device Configurations
The Device Configurations in the SmartConsole Utility has five icons:
Device Settings
Device Password Manager
Firmware Upgrade
DHCP Refresh
Web Access
and the
,
,
device buttons for the Device List.
Device Settings
Select a switch from the Device List, then clicking on this icon the Device Settings window will pop up. Here
you can configure the Product Name, IP Address, Gateway, Subnet Mask, System Name, Location, Trap IP,
Switch Group Interval, and DHCP Setting of the Switch.
To apply the configuration, insert the correct device password in Confirm Password then click OK
Figure 20 – SmartConsole Device Settings
13
4 SmartConsole Utility
D-Link Web Smart Switch User Manual
Device Password Manager
Select a switch from the Device List, then clicking on this icon the Device Password Manager window will
pop up. Here you can enter a new password and confirm.
Figure 21 – SmartConsole Device Password Manager
Firmware Upgrade
Select a switch from the Device List, then clicking on this icon the Firmware Upgrade window will pop up.
Choose a Firmware Path (or you can Browse for one) that you’re going to use then input the correct
password of device and click Upgrade and wait the upgrade successfully message pop up to complete the
firmware upgrade
Figure 22 – Firmware Upgrade
CAUTION: Do not disconnect the PC or remove
the power cord from device until upgrade
complete. Switch may crash if firmware upgrade
incompletely.
DHCP Refresh:
If the DHCP enabled switch in Device List shows the default IP, which means the device doesn’t get IP from
DHCP server successfully. Select this switch and click the DHCP refresh icon, the DHCP refresh will popup.
Entering the correct Device Password then press OK, the device will renew the IP address from DHCP
server.
Figure 23 – SmartConsole Firmware Upgrade
14
4 SmartConsole Utility
D-Link Web Smart Switch User Manual
Web Access
Select a switch from the Device List, then clicking this icon an internet browser will pop up (default is Internet
Explorer). Here you can configure the Switch through the Web-based Management Utility. You may also get
into the Web-based Management Utility by double clicking the device in the device list.
Add(+), Delete(-) and Discover the device
By pressing the Discovery button, all the Web-Smart devices locate in the same domain with the
management PC are listed in the Device List.
Click the + and insert the device IP address to add a device into Discover List, or select a device and click
the – button to remove it.
Figure 24 – SmartConsole Add device
Figure 25 – SmartConsole Delete device
15
4 SmartConsole Utility
D-Link Web Smart Switch User Manual
Device List
This is the list where all Web-Smart devices on the network are discovered.
Figure 26 – SmartConsole Device List
Definitions of the Device List features:
Monitor: Check the Monitor box, and the SmartConsole will collect the trap and log data from the device.
The
in the monitor means the device was discovered by SmartConsole, by single click the icon it will
become
, which means this device will keep updating the information such as system log or trap to the
SmartConsole Utility. When the device was detected not reachable, the icon will change to
. Please
check if the power or the cable of this device is disconnected.
IP Address: Shows the current IP addresses of devices.
MAC Address: Shows the device MAC Address.
Protocol version: Shows the version of the Utility protocol.
Product Name: Shows the device product name.
System Name: Shows the appointed device system name.
DHCP: Specify if the IP address of this device is from DHCP server or manual configured
Location: Shows where the appointed device location.
Trap IP: Shows the IP where the Trap information will be sent.
Subnet Mask: Shows the Subnet Mask setting of the device.
Gateway: Shows the Gateway setting of the device.
Device Group Interval: Shows the intervals (in seconds) that the Switch will be discovered in the
SmartConsole Device List
Firmware version: Show the current Firmware version of this device.
16
5 Configuration
5
D-Link Web Smart Switch User Manual
Configuration
Through a Web-based Management Utility, the features and functions of the D-Link Web Smarty Switch can
be configured for optimum use.
Smart Wizard Configuration
Before entering the Web-based Management Utility, When The Smart Wizard will guide you to quick
configure some functions. If you don’t plan to change anything, click Exit to exit the Wizard and enter the
Web Interface.
Password Settings
Password setting allows you to change the login password of the device. Type the desired new password in
the Switch Password box and again in the Confirm Switch Password then click the Apply button to
change the password.
Figure 27 – Configure Password in Smart Wizard
17
5 Configuration
D-Link Web Smart Switch User Manual
SNMP Settings
The SNMP Setting allows you to quick enable/ disable the SNMP function and configure the SNMP
community name. For detail SNMP function description please see “Setup Menu > System > SNMP
Settings”. The default SNMP Setting is Disabled. Click Enabled the Apply to configure Community Settings.
Public: Read-only privilege allows authorized management stations to retrieve MIB objects.
Private: Read/write privilege allows authorized management stations to retrieve and modify MIB objects.
Figure 28 – Configure SNMP in Smart Wizard
18
5 Configuration
D-Link Web Smart Switch User Manual
System Settings
By selecting Static and clicking Apply you can manually change the system IP Address, Subnet Mask, and
Gateway address. You can further configure and read more about the above settings in the “Setup Menu >
System > System Settings”. The default setting of System IP address is DHCP.
Figure 29 – Configure System IP address in Smart Wizard
NOTE: Changing the system IP address will
disconnect you from your internet connection,
please enter the correct IP address in the Web
browser and make sure your PC is in the same
subnet with the switch. See Login Web-based
Management Utility for detail description.
If you want to change the IP settings, click YES and start a new web browser.
Figure 30 – Confirm the changes of IP address in Smart Wizard
19
5 Configuration
D-Link Web Smart Switch User Manual
Identifying the Web-based Management Utility
After clicking the Exit button in Smart Wizard you will see the screen below:
Figure 31 – Web-based Management Utility
This is the Web-based Management Utility. Here you will see a Tools menu bar on top, a Function Tree,
and the Main Configuration Screen.
In the Tools menu, you can Reset, Config Backup and Restore, Firmware Backup and Upload, and
System Reboot.
Next to the Tools menu is the Smart Wizard button. By clicking this you can return to the Smart Wizard if
you wish to make any changes there.
By choosing different functions in the function tree, you can change all the configurations in the Main
Configuration Screen. The main configuration screen will show the current status of your Switch by clicking
the model name on top of the function tree.
At the upper right of the screen you can see your username and current IP address.
Under your username is the Logout button. Click this to end this session.
Finally, by clicking on the D-Link logo at the upper left of the screen you will be linked to the official D-Link
website.
For learn the further information to configuring the D-Link Web Smart Switch via Web-based Management
Utility, please check the “Configuration” section.
Tool Menu
The Tool Menu offers global function controls such as Reset, Configuring Backup and Restoration, Firmware
Backup and Upload, and System Reboot.
Figure 32 – Tool Menu
Reset
Provide a safe reset option for the Switch. All configurations will be reset to default. Click Factory Reset to
restore the settings to default values.
Figure 33 – Tool Menu > Reset
20
5 Configuration
D-Link Web Smart Switch User Manual
Configure Backup & Restore
Allow the current configuration settings to be saved to a file (not including the password), and if necessary, to
be restored from a backup.
Figure 34 – Tool Menu > Configure Backup and Restore
Click Backup to save the current settings to your disk.
Click Browse to browse your inventories for a saved backup settings file.
Click Restore after selecting the backup settings file you want to restore.
Note: To restore the configuration the
switch will restart and all current
configurations will be lost
Firmware Backup and Upload
Allow for the firmware to be saved, or for an existing firmware file to be uploaded to the Switch.
Figure 35 – Tool Menu > Firmware Backup and Upload
Click Backup to save the firmware to your disk.
Click Browse to browse your inventories for a saved firmware file.
Click Restore after selecting the firmware file you want to restore.
CAUTION: Do not disconnect the PC or remove
the power cord from device until upgrade
complete. Switch may crash if firmware upgrade
incompletely.
21
5 Configuration
D-Link Web Smart Switch User Manual
System Reboot
Provide a safe way to reboot the system. Click System Reboot to restart the switch.
Figure 36 – Tool Menu > System Reboot
Setup Menu
All configuration options on the switch are accessed through the Setup menu on the left side of the screen.
Click on the setup item that you want to configure. The following sections describe in more detail each of the
features and functions.
Figure 37 –Setup Menu
System > System Settings
The System Setting allows the user to configure the IP address and the basic system information of the
Switch.
IP Information: There are two ways for the switch to attain IP: Static and DHCP (Dynamic Host
Configuration Protocol).
When using static mode, the IP Address, Subnet Mask and Gateway can be manually configured. When
using DHCP mode, the Switch will first look for a DHCP server to provide it with an IP address, network
mask, and default gateway before using the default or previously entered settings. By default the IP setting is
static mode.
System Information: By entering a System Name and System Location, the device can more easily be
recognized through the SmartConsole Utility and in other Web-Smart devices on the LAN.
Login Timeout: The Login Timeout controls the idle time-out for security purposes, when there is no action
in the Web-based Management Utility. When the Login Timeout expires, the Web-based Management Utility
requires a re-login before using the Utility again.
Group Interval: The D-Link Web Smart Switch will routinely send report packets to the SmartConsole Utility
in order to maintain the correct data shown. The user can configure the Group Interval to control the time
routine. Zero means disabling Group Interval, and 120~1225 means sending the message according to the
value chosen, the unit is in seconds.
22
5 Configuration
D-Link Web Smart Switch User Manual
Figure 38 – System > System Setting
System > Trap Settings
By configuring the Trap Setting, it allows SmartConsole Utility to monitor specified events on this Web-Smart
Switch. By default, Trap Setting is disabled. When the Trap Setting is enabled, enter the Destination IP
address of the managing station that will receive trap information.
Figure 39 – System > Trap Setting
You can choose which event to send to the managing station
System Event: Monitors the system’s trapping information.
Device Bootup: Traps system boot-up information.
Illegal Login: Traps events of incorrect password logins, recording the IP of the originating PC.
Fiber Port Link Up/Link Down: Traps fiber connection information.
Twisted pair Port Link Up/Link Down: Traps copper connection information.
23
5 Configuration
D-Link Web Smart Switch User Manual
System > Port Settings
In the Port Setting page, the status of all ports can be monitored and adjusted for optimum configuration. By
selecting a range of ports (From Port and To Port), the Speed can be set for all such ports, by clicking
Apply. To refresh the information table to view the latest Link Status and Priority, press the Refresh button.
Figure 40 – System > Port Setting
Speed: Gigabit Fiber connections can operate in Auto Mode or Disable. Copper connections can operate in
Forced Mode settings (100M Full, 100M Half, 10M Full, 10M Half), Auto, or Disable. 100M Fiber connections
support 100M Full Force Mode, Auto or Disable. The default setting for all ports is Auto.
NOTE: Be sure to adjust port speed settings
appropriately after changing connected cable
media types.
Link Status: Reporting Down indicates the port is disconnected.
Priority: Displays each port’s 802.1p QoS priority level for received data packet handling. Default setting for
all ports is Middle. You can change the priority settings in Qos > 802.1p Default Priority
NOTE: When the Combo Fiber port and the
Copper ports are both connected, the Fiber port
will take precedence over the Copper ports,
meaning the Fiber port will be the only connection.
System > SNMP Settings
Simple Network Management Protocol (SNMP) is an OSI Layer 7 (Application Layer) designed specifically
for managing and monitoring network devices. SNMP enables network management stations to read and
modify the settings of gateways, routers, switches, and other network devices. Use SNMP to configure
system features for proper operation, monitor performance and detect potential problems in the Switch or
LAN.
Managed devices that support SNMP include software (referred to as an agent), which runs locally on the
device. A defined set of variables (managed objects) is maintained by the SNMP agent and used to manage
the device. These objects are defined in a Management Information Base (MIB), which provides a standard
presentation of the information controlled by the on-board SNMP agent. SNMP defines both the format of the
MIB specifications and the protocol used to access this information over the network.
The default SNMP setting is disabled. Click enable, then Apply, to set Community Settings.
24
5 Configuration
D-Link Web Smart Switch User Manual
Figure 41 – System > SNMP Setting
Community Setting: In support of SNMP version 1, the Web-Smart Switch accomplishes user
authentication by using Community Settings that function as passwords. The remote user SNMP application
and the Switch SNMP must use the same community string. SNMP packets from a station that are not
authenticated are ignored (dropped).
The default community strings for the Switch used for SNMP v.1 management access are:
Public: The community with read-only privilege allows authorized management stations to retrieve MIB
objects.
Private: The community with read/write privilege allows authorized management stations to retrieve and
modify MIB objects.
Trap Setting: Traps are messages that alert network personnel of events that occur on the Switch. Such
events can be as serious as a reboot (someone accidentally turned the Switch OFF), or less serious events
such as a port status change. The Switch can generate traps and send them to the trap recipient (i.e.
network administrator).
Setting up a Trap: Select Enable, enter a Trap Name, add the IP of the device to be monitored, and choose
the event(s) to trap. The available trap Events to choose from including:
System Device Bootup
Fiber Link Up / Link Down
Fiber Abnormal Receive Error
Fiber Abnormal Transmit Error
Twisted Pair Link Up / Link Down
Twisted Pair Abnormal Receive Error
Twisted Pair Abnormal Transmit Error
Note: Trap Name must be selected from a
Community Name
25
5 Configuration
D-Link Web Smart Switch User Manual
System > Password Access Control
Setting a password is a critical tool for managers to secure the Web-Smart Switch. After entering the old
password and the new password two times, press Apply for the changes to take effect.
Figure 42 – System > Password Access Control
Configuration > Jumbo Frame
D-Link Gigabit Web Smart Switches support jumbo frames (frames larger than the Ethernet frame size of
1536 bytes) of up to 10240 bytes (tagged) can be transmitted by the Switch. Default is disabled, Select
Enabled then click Apply to turn on the jumbo frame support.
Figure 43 – Configuration > Jumbo Frame
Configuration > 802.1Q VLAN
A VLAN is a group of ports that can be anywhere in the network, but communicate as though they were in
the same area.
VLANs can be easily organized to reflect department groups (such as R&D, Marketing), usage groups (such
as e-mail), or multicast groups (multimedia applications such as video conferencing), and therefore help to
simplify network management by allowing users to move devices to a new VLAN without having to change
any physical connections.
The IEEE 802.1Q VLAN Configuration page provides powerful VID management functions. The original
settings have the VID as 01, named “default”, and all ports as “Untagged”
Rename: Click to rename the VLAN group.
Delete VID: Click to delete the VLAN group.
Add New VID: Click to create a new VID group, assigning ports from 01 to 28 as Untag, Tag, or Not
Member. A port can be untagged in only one VID. To save the VID group, press Apply.
You may change the name accordingly to the desired groups, such as the aforementioned R&D, Marketing,
email, etc.
Figure 44 – Configuration > 802.1Q VLAN > Default Setting
26
5 Configuration
D-Link Web Smart Switch User Manual
Figure 45 – Configuration > 802.1Q VLAN > Add VID
Figure 46 – Configuration > 802.1Q VLAN > Example VIDs
Figure 47 – Configuration > 802.1Q VLAN > VID Assignments
Configuration >Asymmetric VLAN
This function is located in the 802.1Q Configuration page; it allows devices in different VLANs to
communicate with the servers, firewalls or other shared resources in the shared VLAN. This configuration is
accomplished in three steps:
1. Enabling Asymmetric VLAN
2. Creating VLAN
3. Setting PVID
Figure 48 – Configuration > 802.1Q VLAN > Asymmetric VLAN
27
5 Configuration
D-Link Web Smart Switch User Manual
Click Example and follow the instructions below to configure Asymmetric VLAN.
Figure 49 – Configuration > 802.1Q VLAN > Example of Asymmetric VLAN
1. Enable Asymmetric VLAN and click “Apply” button. The overlapping VLAN cannot be configured unless
this function is enabled.
2. Configure the VLAN settings. For example ports that are shared in the network are:
•
Ports 15-18 are connected to the server
•
Port 20 is connected to the firewall
Therefore, this group of ports needs to be included for all the VLANs. VLAN 2 is then configured to include
ports 15-18, 20 (shared VLAN ports) and the set of ports to be separated from the other subset VLANs (port
5). VLAN 3 and 4 are then configured to include shared ports and the set of ports to be separated from the
other subset VLANs (port 6 and 7). Therefore we have three VLANs that share ports and are separated from
each other so cannot communicate with each other.
3. Configure the PVID setting located in the bottom of VLAN configuration page. The user needs to set the
shared set of ports as PVID 1, the other separated groups of ports as PVID 2, 3 and 4.
Figure 50 – Configuration > 802.1Q VLAN > Configure PVID
After configuration, the user is able to share the network resources set on the shared group of ports
(nominated as PVID 1), with both smaller subsets of VLANs (nominated PVID 2, 3 and 4). However, VLAN 2
3 and 4 groups are incapable of sharing information with each other.
Configuration > 802.1Q Management VLAN
802.1Q Management VLAN setting allows you to transfer the authority of the switch from the default VLAN to
others created by users. Doing so makes managing the whole network more flexible.
By default, the Management VLAN is disabled. You can select any existing VLAN as the management VLAN
when this function is enabled.
28
5 Configuration
D-Link Web Smart Switch User Manual
Figure 51 – Configuration > 802.1Q Management VLAN
Configuration > Trunking
The Trunking function enables the cascading of two or more ports for a combined larger bandwidth. Up to six
Trunk groups may be created, each supporting up to 8 ports. Add a Trunking Name and select the ports to
be trunked together, and click Apply to activate the selected Trunking groups.
Figure 52 – Configuration > Trunking
NOTE: Each combined trunk port must be
connected to devices within the same VLAN
group.
Configuration > IGMP Snooping
With Internet Group Management Protocol (IGMP) snooping, the Web-Smart Switch can make intelligent
multicast forwarding decisions by examining the contents of each frame’s Layer 2 MAC header.
IGMP snooping can help reduce cluttered traffic on the LAN. With IGMP snooping enabled globally, the
Web-Smart Switch will forward multicast traffic only to connections that have group members attached.
Please note that IGMP will not alter or route IP multicast packets. To send IP multicast packets across
subnetworks a multicast routing protocol will be necessary.
29
5 Configuration
D-Link Web Smart Switch User Manual
Figure 53 – Configuration > IGMP Snooping Configuration
By default, IGMP is disabled. If enabled, the IGMP Global Settings will need to be entered:
Querier State: D-Link Smart Switch is able to send out the IGMP Queries to check the status of multicast
clients. Default is disabled.
Query Interval (60-600 sec): The Query Interval is the interval between General Queries sent. By adjusting
the Query Interval, the number of IGMP messages can increase or decrease; larger values cause IGMP
Queries to be sent less often. Default is 125 seconds.
Max Response Time (10-25 sec): The Max Response Time specifies the maximum allowed time before
sending a responding report. Adjusting this setting effects the "leave latency", or the time between the
moment the last host leaves a group and when the IGMP protocol is notified that there are no more members.
It also allows adjustments for controlling the frequency of IGMP traffic on a subnet. Default is 10 seconds.
Robustness Variable (2-255 sec): The Robustness Variable allows adjustment for the expected packet loss
on a subnet. If a subnet is expected to be lossy, the Robustness Variable may be increased. The
Robustness Variable can not be set zero, and SHOULD NOT be one. Default is 2 seconds.
Last Member Query Interval (1-25 sec): The Last Member Query Interval is the Max Response Time
inserted into Group-Specific Queries sent in response to Leave Group messages, and is also the amount of
time between Group-Specific Query messages. This value may be adjusted to modify the "leave latency" of
the network. A reduced value results in reduced time to detect the loss of the last member of a group. Default
is 1 second.
Host Timeout (System assigned): This is the interval after which a learnt host port entry will be purged. For
each host port learnt, a 'Port Purge Timer' runs for 'Host Port Purge Interval'. This timer will be restarted
whenever a report message from host is received over that port. If no report messages are received for 'Host
Port Purge Interval' time, the learnt host entry will be purged from the multicast group. After entering Max
Response Time, Robustness Variable and Last Member Query Interval, system will auto assign the value of
Host Timeout.
Router Timeout (60-600 sec): This is the interval after which a learnt router port entry will be purged. For
each router port learnt, a 'Router Port Purge Timer' runs for 'Router Port Purge Interval'. This timer will be
restarted whenever a router control message is received over that port. If no router control messages are
received for 'Router Port Purge Interval' time, the learnt router port entry will be purged. Default is 260
seconds.
Leave Timer (0-25 sec): This is the interval after which a Leave message is forwarded on a port. When a
leave message from a host for a group is received, a group-specific query is sent to the port on which the
leave message is received. A timer is started with a time interval equal to Igs Leave Process Interval. If a
report message is received before above timer expires, the Leave message is dropped. Otherwise the Leave
message is either forwarded to the port. Default is 1 second.
To enable IGMP snooping for a given VLAN, select enable and click on the Apply button. Then press the
Edit button under Router Port Setting, and select the ports to be assigned for IGMP snooping for the VLAN,
and press Apply for changes to take effect.
30
5 Configuration
D-Link Web Smart Switch User Manual
Figure 54 – Configuration > IGMP Router port Settings
To view the Multicast Entry Table for a given VLAN, press the View button.
Figure 55 – Configuration > IGMP Multicast Entry Table
Configuration > 802.1D Spanning Tree
802.1D Spanning Tree Protocol (STP) implementation is a backup link(s) between switches, bridges or
routers designed to prevent network loops that could cause a broadcast storm. When physical links forming
a loop provide redundancy, only a single path will be forwarding frames. If the link fails, STP activates a
redundant link automatically.
Figure 56 – Configuration > Spanning Tree
By default, Spanning Tree is disabled. If enabled, the Switch will listen for BPDU packets and its
accompanying Hello packet. BPDU packets are sent even if a BPDU packet was not received. Therefore,
each link between bridges is sensitive to the status of the link. Ultimately this difference results in faster
detection of failed links, and thus faster topology adjustment. A draw-back of 802.1D is this absence of
immediate feedback from adjacent bridges.
After enabling STP, setting the STP Global Setting includes the following options:
Bridge Priority: This value between 0 and 65535 specifies the priority for forwarding packets: the lower the
value, the higher the priority. The default is 32768.
Bridge Max Age: This value may be set to ensure that old information does not endlessly circulate through
redundant paths in the network, preventing the effective propagation of the new information. Set by the Root
Bridge, this value will aid in determining that the Switch has spanning tree configuration values consistent
with other devices on the bridged LAN. If the value ages out and a BPDU has still not been received from the
Root Bridge, the Switch will start sending its own BPDU to all other switches for permission to become the
Root Bridge. If it turns out that the Switch has the lowest Bridge Identifier, it will become the Root Bridge. A
time interval may be chosen between 6 and 40 seconds. The default value is 20.
Bridge Hello Time: The user may set the time interval between transmissions of configuration messages by
the root device, thus stating that the Switch is still functioning. The default is 2 seconds. (Max Age has to
have a value bigger than Hello Time)
Bridge Forward Delay: This sets the maximum amount of time that the root device will wait before changing
states. The default is 15 seconds.
31
5 Configuration
D-Link Web Smart Switch User Manual
Root Bridge: Displays the MAC address of the Root Bridge.
Root port: Displays the root port.
Root Path Cost: Shows the root path cost.
In addition to 802.1D global settings, the D-Link Web smart switch allows the user to configure 802.1D STP
by ports. Select From Port / To Port to specify the ports you want to configure.
Control: select STP to let a port partake in the STP calculations and send/receive BPDU (Bridge Protocol
Data Unit) packets. When selecting STP, the corresponding port will be treat as a normal STP port which will
process the procedure Listening>Learning>Forwarding to prevent the loop happen. By selecting Disable, all
the STP activities will be shut down by ports. You may also appoint this port to be the STP Edge port to
forward STP packet only, in order to speed up the overall STP calculations.
Path Cost: This defines a metric that indicates the relative cost of forwarding packets to specified port list.
The lower the number, the greater the probability the port will be chosen to forward packets. The default
value is 19.
Path Priority: Select a value between 0 and 255 to specify the priority for a specified port for forwarding
packets: the lower the value, the higher the priority. The default is 128.
Configuration > Port Mirroring
Port Mirroring is a method of monitoring network traffic that forwards a copy of each incoming and/or
outgoing packet from one port of the Switch to another port where the packet can be studied. This enables
network managers to better monitor network performances.
Figure 57 – Configuration > Port Mirroring
Selection options for the Source Ports are as follows:
TX (transmit) mode: Duplicates the data transmitted from the source port and forwards it to the Target Port.
Click “all” to include all ports into port mirroring.
RX (receive) mode: Duplicates the data that gets sent to the source and forwards it to the Target Port. Click
“all” to include all ports into port mirroring.
Both (transmit and receive) mode: Duplicate both the data transmitted from and data sent to the source
port, and forwards all the data to the assigned Target Port. Click “all” to include all ports into port mirroring.
None: Turns off the mirroring of the port. Click “all” to remove all ports from mirroring.
Configuration > Power Saving
The Power Saving mode feature reduces power consumption automatically when the RJ-45 port is link down
or the connected devices are turned off. By reducing power consumption, less heat is produced, resulting in
extended product life and lower operating costs.
By default, the Power Saving mode is enabled.
32
5 Configuration
D-Link Web Smart Switch User Manual
Figure 58 – Configuration > Power Saving
QoS > 802.1p/DSCP Priority Settings
QoS is an implementation of the IEEE 802.1p standard that allows network administrators to reserve
bandwidth for important functions that require a larger bandwidth or that might have a higher priority, such as
VoIP (voice-over Internet Protocol), web browsing applications, file server applications or video conferencing.
Thus with larger bandwidth, less critical traffic is limited, and therefore excessive bandwidth can be saved.
The following figure displays the status of Quality of Service priority levels of each port, higher priority means
the traffic from this port will be first handled by the switch. And for packets that are untagged, the switch will
assign the priority depending on your configuration.
Figure 59 – QoS > 802.1p Default Priority
33
5 Configuration
D-Link Web Smart Switch User Manual
By selecting the DSCP priority, the web pages will changes as seen below:
Figure 60 – QoS > DSCP Priority Settings
Select QoS Mode: D-Link Smart Switch allows the user to prioritize the traffic based on the 802.1p priority in
the VLAN tag or the DSCP (Differentiated Services Code Point) priority in the IP header. Choose one to
prioritize the packets.
Queue Mechanism: Select Strict Priority, to process the packets with the highest priority. Select WRR
(Weighted Round-Robin), to process packets according to the weight of each priority. When a priority level
has reached its egress weight, the system will process the packets in the next level even if there are
remaining packets. D-Link Smart Switch system’s weight of priority levels are: 8 (Highest), 4 (High), 2
(Middle) and 1 (Low) packet. By default, the queuing mechanism is Strict.
You may select From Port / To Port to configure the priority of each port.
Security > Trusted Host
Use Trusted Host function to manage the switch from a remote station. You can enter upto three designated
management stations, by defining the IP address/Mask as seen in the figure below. You can manage the
switch through the web manager or telnet session.
Figure 61 Security > Trusted Host
To define a management station IP setting, click the Add Host button and type in the IP address and IP
mask then click the Apply button. You may permit only single or a range of IP addresses by different IP
34
5 Configuration
D-Link Web Smart Switch User Manual
mask setting, the format can be either 192.168.1.1/255.255.255.0 or 192.168.0.1/24. Please see below for
the example for permitting the IP range
IP Address
IP Mask
Permitted IP
192.168.0.1
255.255.255.0
192.168.0.1~192.168.0.255
172.17.5.215
8
172.0.0.1~172.255.255.255
To delete the IP address simply click the Delete Host button, check the unwanted address then click Apply.
Security > Safeguard Engine
D-Link’s Safeguard Engine is a robust and innovative technology that automatically throttles the impact of
packet flooding into the switch's CPU. This function helps protect the Web-Smart Switch from being
interrupted by malicious viruses or worm attacks. By default this is enabled.
Figure 62 – Security > Safeguard Engine
Security > Broadcast Storm Control
The Broadcast Storm Control feature provides the ability to control the receive rate of broadcasted packets. If
enabled (default is disabled), threshold settings of 8,000 ~ 4,096,000 bytes per second can be assigned.
Press Apply for the settings to take effect.
Figure 63 – Security > Broadcast Storm Control
35
5 Configuration
D-Link Web Smart Switch User Manual
Security > 802.1X Settings
Network switches provide easy and open access to resources by simply attaching a client PC. Unfortunately
this automatic configuration also allows unauthorized personnel to easily intrude and possibly gain access to
sensitive data.
IEEE-802.1X provides a security standard for network access control, especially in Wi-Fi wireless networks.
802.1X holds a network port disconnected until authentication is completed. The switch uses Extensible
Authentication Protocol over LANs (EAPOL) to exchange authentication protocol client identity (such as a
user name) with the client, and forward it to another remote RADIUS authentication server to verify access
rights. The EAP packet from the RADIUS server also contains the authentication method to be used. The
client can reject the authentication method and request another, depending on the configuration of the client
software and the RADIUS server. Depending on the authenticated results, the port is either made available
to the user, or the user is denied access to the network.
The RADIUS servers make the network a lot easier to manage for the administrator by gathering and storing
the user lists.
Figure 64 – Security > 802.1X Setting
By default, 802.1X is disabled. To use EAP for security, select enabled and set the 802.1X Global Settings
for the Radius Server and applicable authentication information.
Authentication Port: sets primary port for security monitoring. Default is 1812.
Key: Masked password matching the Radius Server Key.
Confirm Key: Enter the Key a second time for confirmation.
TxPeriod: Sets the number of seconds that the switch waits for a response to an EAP-request/identity frame
from the client before retransmitting the request. Default is 24 seconds.
ReAuthEnabled: This enables or disables the periodic ReAuthentication control. When the 802.1X function
is enabled, the ReAuthEnabled function is by default also enabled.
QuietPeriod: Sets the number of seconds that the switch remains in the quiet state following a failed
authentication exchange with the client. Default is 80 seconds
SuppTimeout: Sets the switch-to-client retransmission time for the EAP-request frame. Default is 12
seconds.
ServerTimeout: Sets the amount of time the switch waits for a response from the client before resending the
response to the authentication server. Default is 16 seconds.
MaxReq: This parameter specifies the maximum number of times that the switch retransmits an EAP
Request packet to the client before it times out the authentication session. Default is 5 times.
ReAuthPeriod: This command affects the behavior of the switch only if periodic re-authentication is enabled.
Default is 3600.
To establish 802.1X port-specific assignments, select the From Ports / To Ports and select enable.
36
5 Configuration
D-Link Web Smart Switch User Manual
Security > Mac Address Table > Static Mac
This page provides two distinct features. The top table provides the ability to turn off auto learning Mac
address if a port isn't connected to an uplink Switch (i.e. DHCP Server). By default, this feature is Off
(disabled). The Macs listed on this table may only connect from corresponding ports and VIDs, in order to
protect the network from illegal Macs.
Figure 65 – Security > Static Mac Address
To initiate the removal of auto-learning for any of the uplink ports, press On to enable this feature, and select
the port(s) for auto learning to be disabled.
The Static Mac Address Setting table displays the static Mac addresses connected, as well as the VID.
Press Delete to remove a device. To add a new Mac address assignment, press Add Mac, then select the
assigned Port number, enter both the Mac Address and VID and press Apply.
Security > Mac Address Table > Dynamic Forwarding Table
For each port, this table displays the Mac address of each packet passing through the Switch. To add a Mac
address to the Static Mac Address List, click the Add checkbox then press Apply associated with the
identified packet.
Figure 66 – Security > Dynamic Forwarding Table
37
5 Configuration
D-Link Web Smart Switch User Manual
Monitoring > Statistics
The Statistics screen displays the status of each port packet count.
Figure 67 – Monitoring > Statistics
Refresh: To renew the details collected and displayed.
Clear Counter: To reset the details displayed.
TxOK: Number of packets transmitted successfully.
RxOK: Number of packets received successfully.
TxError: Number of transmitted packets resulting in error.
RxError: Number of received packets resulting in error.
To view the statistics of individual ports, click one of the linked Port numbers for details.
Figure 68 – Monitoring > Port Statistics
Monitoring > Cable Diagnostics
The Cable Diagnostics is designed primarily for administrators and customer service representatives to view
tests of the copper cables. It rapidly determines the type of cable errors occurred in the cable.
Select a port and then click the Test Now button to view the diagnosis.
38
5 Configuration
D-Link Web Smart Switch User Manual
Figure 69 – Monitoring > Cable Diagnostic
Test Result: The description of the cable diagnostic results.
•
OK means the cable is fine
•
Short in Cable means the lines of the RJ45 cable maybe in contact somewhere
•
Open in Cable means the lines of RJ45 cable maybe broken or the other end of the cable is simply
disconnected.
•
Test Failed means some other errors occured during cable diagnostics. Please select the same port and
test again.
Cable Fault Distance (meters): Indicates the distance of the cable fault from the Switch port, if the cable is
less than 2 meters, it will show “No Cable”.
Cable Length (meter): If the test result shows the cable is OK, cable length indicates the total length of the
cable. The cable lengths are categorized into four types: <50 meters, 50~80 meters, 80~100 meters and
>100 meters.
NOTE: Cable length detection is supported on
Gigabit ports only.
NOTE: Please make sure the power saving
function is disabled before using the cable
diagnostics function.
39
Appendix A - Ethernet Technology
D-Link Web Smart Switch User Manual
Appendix A - Ethernet Technology
This chapter provides some background information about Ethernet/Fast Ethernet/Gigabit Ethernet switching
technology.
Gigabit Ethernet Technology
Gigabit Ethernet is an extension of IEEE 802.3 Ethernet utilizing the same packet structure, format, and
support for CSMA/CD protocol, full duplex, and management objects, but with a tenfold increase in
theoretical throughput of over 100-Mbps Fast Ethernet and a hundredfold increase over 10-Mbps Ethernet.
Since it is compatible with all 10-Mbps and 100-Mbps Ethernet environments, Gigabit Ethernet provides a
straightforward upgrade without wasting existing investments in hardware, software, or trained personnel.
The increased speed and extra bandwidth offered by Gigabit Ethernet is essential to help solving network
bottlenecks that frequently develop as more advanced computer users and newer applications continue to
demand greater network resources. Upgrading key components, such as backbone connections and servers
to Gigabit Ethernet technology can greatly improve network response times as well as significantly speed up
the traffic between subnets.
Gigabit Ethernet enables fast optical fiber connections to support video conferencing, complex imaging, and
similar data-intensive applications. Likewise, since data transfers occur 10 times faster than Fast Ethernet,
servers outfitted with Gigabit Ethernet NIC’s are able to perform 10 times the number of operations in the
same amount of time.
In addition, the phenomenal bandwidth delivered by Gigabit Ethernet is the most cost-effective method to
take advantage of today and tomorrow’s rapidly improving switching and routing internetworking
technologies. And with expected advances in the coming years in silicon technology and digital signal
processing that will enable Gigabit Ethernet to eventually operate over unshielded twisted-pair (UTP) cabling,
outfitting your network with a powerful 1000-Mbps-capable backbone/server connection which will create a
flexible foundation for the next generation of network technology products.
Fast Ethernet Technology
The growing importance of LANs and the increasing complexity of desktop computing applications are
fueling the need for high performance networks. A number of high-speed LAN technologies have been
proposed to provide greater bandwidth and improve client/server response times. Among them, 100BASE-T
(Fast Ethernet) provides a non-disruptive, smooth evolution from the current 10BASE-T technology. The
non-disruptive and smooth evolution nature, and the dominating potential market base, virtually guarantees
cost-effective and high performance Fast Ethernet solutions.
100Mbps Fast Ethernet is a standard specified by the IEEE 802.3 LAN committee. It is an extension of the
10Mbps Ethernet standard with the ability to transmit and receive data at 100Mbps, while maintaining the
CSMA/CD Ethernet protocol. Since the 100Mbps Fast Ethernet is compatible with all other 10Mbps Ethernet
environments, it provides a straightforward upgrade and utilizes existing investments in hardware, software,
and personnel training.
Switching Technology
Another approach to push beyond the limits of Ethernet technology is the development of switching
technology. A switch bridges Ethernet packets at the MAC address level of the Ethernet protocol transmitting
among connected Ethernet or Fast Ethernet LAN segments.
Switching is a cost-effective way of increasing the total network capacity available to users on a local area
network. A switch increases capacity and decreases network loading by dividing a local area network into
different segments which won’t compete with each other for network transmission capacity.
The switch acts as a high-speed selective bridge between the individual segments. The switch, without
interfering with any other segments, automatically forwards traffic that needs to go from one segment to
another. By doing this the total network capacity is multiplied, while still maintaining the same network
cabling and adapter cards.
Power over Ethernet (PoE)
Power over Ethernet (PoE) integrates power and data onto one single cabling infrastructure, eliminating the
need to have AC power available at all locations.
i
Appendix A - Ethernet Technology
D-Link Web Smart Switch User Manual
Power and Data are integrated onto the same cable. Supporting category 5/5e up to 100 Meters, PoE will
provide power to PoE compatible devices, such as IP telephones, wireless LAN access points, and IP
security cameras.
PoE is already widely adopted in the market, saving up to 50% of overall installation costs by eliminating the
need to install separate electrical wiring and power outlets.
ii
Appendix B - Technical Specifications
D-Link Web Smart Switch User Manual
Appendix B - Technical Specifications
Storage Humidity: 5%~90% RH
Hardware Specifications
Key Components / Performance
Switching Capacity:
- DGS-1216T: 32Gbps
- DGS-1224T: 48Gbps
- DGS-1248T: 96Gbps
Max. Forwarding Rate
- DGS-1216T: 23.8Mpps
- DGS-1224T: 35.7Mpps
- DGS-1248T: 71.4Mpps
Forwarding Mode: Store and Forward
Packet Buffer memory:
- DGS-1216T: 512KB
- DGS-1224T: 512KB
- DGS-1248T: 1MB
SDRAM for CPU: 8M Bytes
Flash Memory: 2M Bytes
Emission (EMI) Certifications
FCC class A
CE Class A
VCCI Class A
Safety Certifications
cUL, UL
Features
L2 Features
Supports up to 8K MAC address
IGMP snooping: supports 64 multicast
group
802.1D Spanning Tree
Port trunk (Link Aggregation): up to 6
groups per device, up to 8 ports per group
Port mirroring
Jumbo Frame:
- DGS-1216T: 10,240KB
- DGS-1224T: 10,240KB
- DGS-1248T: 9,216MB
Port Functions
16, 24 or 48 10/100/1000BaseT ports
compliant with the following standards:
- IEEE 802.3
- IEEE 802.3u
- IEEE 802.3ab
- Supports Full-Duplex operations
2 or 4 combo SFP ports compliant with
the following standards:
- IEEE 802.3z
- Supports Full-Duplex operations
SFP transceivers supported
- DEM-310GT (1000BASE-LX)
- DEM-311GT (1000BASE-SX)
- DEM-314GT (1000BASE-LH)
- DEM-315GT (1000BASE-ZX)
- DEM-312GT2 (1000BASE-SX)
- DEM-210 (100BASE-FX)
- DEM-211 (100BASE-FX)
WDM Transceivers Supported:
- DEM-330T (TX-1550/RX-1310nm)
- DEM-330R (TX-1310/RX-1550nm)
- DEM-331T (TX-1550/RX-1310nm)
- DEM-331R (TX-1310/RX-1550nm)
VLAN
802.1Q VLAN standard (VLAN Tagging)
Up to 256 static VLAN groups
QoS (Quality of Service)
802.1p Priority Queues standard
Up to 4 queues per port
Supports WRR mode in queue handling
Security
802.1x port-based access control
Broadcast Storm Control
D-Link Safeguard Engine
Management
Web-based GUI or SmartConsole Utility
SNMP support
DHCP client
Trap setting for destination IP, system
events, fiber port events, twisted-pair port
events
Port access control
Web-based configuration backup /
restoration
Web-based firmware backup/upload
Firmware upgrade using SmartConsole
Utility
Reboot
Physical & Environment
AC input, 100~240 VAC, 50/60Hz,
internal universal power supply
Operation Temperature 0~40°C
Storage Temperature -10~70°C
Operation Humidity: 10%~90% RH
iii
Technical Support
Technical Support
You can find software updates and user documentation on the D-Link websites.
If you require product support, we encourage you to browse our FAQ section on
the Web Site before contacting the Support line. We have many FAQ’s which
we hope will provide you a speedy resolution for your problem.
For Customers within
The United Kingdom & Ireland:
D-Link UK & Ireland Technical Support over the Internet:
http://www.dlink.co.uk
ftp://ftp.dlink.co.uk
D-Link UK & Ireland Technical Support over the Telephone:
08456 12 0003 (United Kingdom)
+1890 886 899 (Ireland)
Lines Open
9:00 am - 06:00 pm
Mon-Fri
10:00am - 02:00 pm
Sat
Closed on Sun
For Customers within Canada:
D-Link Canada Technical Support over the Telephone:
1-800-361-5265 (Canada)
Mon. to Fri. 7:30AM to 9:00PM EST
D-Link Canada Technical Support over the Internet:
http://support.dlink.ca
email: [email protected]
60
Technische Unterstützung
Aktualisierte Versionen von Software und Benutzerhandbuch finden
Sie auf der Website von D-Link.
D-Link bietet kostenfreie technische Unterstützung für Kunden
innerhalb Deutschlands, Österreichs, der Schweiz und Osteuropas.
Unsere Kunden können technische Unterstützung über unsere
Website, per E-Mail oder telefonisch anfordern.
Web: http://www.dlink.de
E-Mail: [email protected]
Telefon: +49 (1805)2787
0,12€/Min aus dem Festnetz der Deutschen Telekom.
Telefonische technische Unterstützung erhalten Sie Montags bis
Freitags von 09.00 bis 17.30 Uhr.
Unterstützung erhalten Sie auch bei der Premiumhotline für D-Link
Produkte unter der Rufnummer 09001-475767
Montag bis Freitag von 6-22 Uhr und am Wochenende von 11-18
Uhr.
1,75€/Min aus dem Festnetz der Deutschen Telekom.
Wenn Sie Kunde von D-Link außerhalb Deutschlands, Österreichs, der
Schweiz und Osteuropas sind, wenden Sie sich bitte an die zuständige
Niederlassung aus der Liste im Benutzerhandbuch.
61
Assistance technique
Vous trouverez la documentation et les logiciels les plus récents sur le site
web D-Link.
Vous pouvez contacter le service technique de
D-Link par notre site internet ou par téléphone.
Support technique destiné aux clients établis en France:
Assistance technique D-Link par téléphone :
0820 0803 03
N° INDIGO - 0,12€ TTC/min*
*Prix en France Métropolitaine au 3 mars 2005
Du lundi au samedi – de 9h00 à 19h00
Assistance technique D-Link sur internet :
http://www.dlink.fr
e-mail : [email protected]
Support technique destiné aux clients établis au Canada :
Assistance technique D-Link par téléphone :
(800) 361-5265
Lun.-Ven. 7h30 à 21h00 HNE.
Assistance technique D-Link sur internet :
http ://support.dlink.ca
e-mail : [email protected]
62
Asistencia Técnica
Puede encontrar las últimas versiones de software así como
documentación técnica en el sitio web de D-Link.
D-Link ofrece asistencia técnica gratuita para clientes
residentes en España durante el periodo de garantía del
producto.
Asistencia Técnica de D-Link por teléfono:
+34 902 30 45 45
Lunes a Viernes de 9:00 a 14:00 y de 15:00 a 18:00
Asistencia Técnica de D-Link a través de Internet:
http://www.dlink.es/support/
e-mail: [email protected]
63
Supporto tecnico
Gli ultimi aggiornamenti e la documentazione sono
disponibili sul sito D-Link.
Supporto tecnico per i clienti residenti in Italia
D-Link Mediterraneo S.r.L.
Via N. Bonnet 6/B 20154 Milano
Supporto Tecnico dal lunedì al venerdì dalle ore
9.00 alle ore 19.00 con orario continuato
Telefono: 199 400057
URL : http://www.dlink.it/supporto.html
Email: [email protected]
64
Technical Support
You can find software updates and user documentation on the D-Link website.
D-Link provides free technical support for customers within Benelux for the
duration of the warranty period on this product.
Benelux customers can contact D-Link technical support through our website, or
by phone.
Tech Support for customers within the Netherlands:
D-Link Technical Support over the Telephone:
0900 501 2007
Monday to Friday 9:00 am to 10:00 pm
D-Link Technical Support over the Internet:
www.dlink.nl
Tech Support for customers within Belgium:
D-Link Technical Support over the Telephone:
070 66 06 40
Monday to Friday 9:00 am to 10:00 pm
D-Link Technical Support over the Internet:
www.dlink.be
Tech Support for customers within
Luxemburg:
D-Link Technical Support over the Telephone:
+32 70 66 06 40
Monday to Friday 9:00 am to 10:00 pm
D-Link Technical Support over the Internet:
www.dlink.be
65
Pomoc techniczna
Najnowsze wersje oprogramowania i dokumentacji użytkownika
można znaleźć w serwisie internetowym firmy D-Link.
D-Link zapewnia bezpłatną pomoc techniczną klientom w Polsce
w okresie gwarancyjnym produktu.
Klienci z Polski mogą się kontaktować z działem pomocy
technicznej firmy D-Link za pośrednictwem Internetu lub
telefonicznie.
Telefoniczna pomoc techniczna firmy D-Link:
0 801 022 021
Pomoc techniczna firmy D-Link świadczona przez Internet:
URL: http://www.dlink.pl
e-mail: [email protected]
66
Technická podpora
Aktualizované verze software a uživatelských příruček najdete na
webové stránce firmy D-Link.
D-Link poskytuje svým zákazníkům bezplatnou technickou
podporu
Zákazníci mohou kontaktovat oddělení technické podpory přes
webové stránky, mailem nebo telefonicky
Web: http://www.dlink.cz/suppport/
E-mail: [email protected]
Telefon: 224 247 503
Telefonická podpora je v provozu:
PO- PÁ od 09.00 do 17.00
67
Technikai Támogatás
Meghajtó programokat és frissítéseket a D-Link Magyarország
weblapjáról tölthet le.
Telefonon technikai segítséget munkanapokon hétfőtől-csütörtökig
9.00 – 16.00 óráig és pénteken 9.00 – 14.00 óráig kérhet
a (1) 461-3001 telefonszámon vagy a [email protected] emailcímen.
Magyarországi technikai támogatás :
D-Link Magyarország
1074 Budapest, Alsóerdősor u. 6. – R70 Irodaház 1 em.
Tel. : 06 1 461-3001
Fax : 06 1 461-3004
email : [email protected]
URL : http://www.dlink.hu
68
Teknisk Support
Du kan finne programvare oppdateringer og bruker
dokumentasjon på D-Links web sider.
D-Link tilbyr sine kunder gratis teknisk support under
produktets garantitid.
Kunder kan kontakte D-Links teknisk support via våre
hjemmesider, eller på tlf.
Teknisk Support:
D-Link Teknisk telefon Support:
800 10 610
(Hverdager 08:00-20:00)
D-Link Teknisk Support over Internett:
http://www.dlink.no
69
Teknisk Support
Du finder software opdateringer og brugerdokumentation på D-Link’s hjemmeside.
D-Link tilbyder gratis teknisk support til kunder
i Danmark i hele produktets garantiperiode.
Danske kunder kan kontakte D-Link’s tekniske
support via vores hjemmeside eller telefonisk.
D-Link teknisk support over telefonen:
Tlf. 7026 9040
Hverdager: kl. 08:00 – 20:00
D-Link teknisk support på Internettet:
http://www.dlink.dk
70
Teknistä tukea asiakkaille
Suomessa:
D-Link tarjoaa teknistä tukea asiakkailleen.
Tuotteen takuun voimassaoloajan.
Tekninen tuki palvelee seuraavasti:
Arkisin klo. 9 - 21
numerosta
0800-114 677
Internetin kautta
Ajurit ja lisätietoja tuotteista.
http://www.dlink.fi
Sähköpostin kautta
voit myös tehdä kyselyitä.
71
Teknisk Support
På vår hemsida kan du hitta mer information om
mjukvaru uppdateringar och annan användarinformation.
D-Link tillhandahåller teknisk support till kunder i
Sverige under hela garantitiden för denna produkt.
Teknisk Support för kunder i Sverige:
D-Link Teknisk Support via telefon:
0770-33 00 35
Vardagar 08.00-20.00
D-Link Teknisk Support via Internet:
http://www.dlink.se
72
Suporte Técnico
Você pode encontrar atualizações de software e documentação de
utilizador no site de D-Link Portugal http://www.dlink.pt.
A D-Link fornece suporte técnico gratuito para clientes no Portugal
durante o período de vigência de garantia deste produto.
Suporte Técnico para clientes no Portugal:
Assistência Técnica:
Email: [email protected]
http://www.dlink.pt/support/
ftp://ftp.dlink.es
73
Τεχνική Υποστήριξη
Μπορείτε να βρείτε software updates και πληροφορίες για τη χρήση των
προϊόντων στις ιστοσελίδες της D-Link
Η D-Link προσφέρει στους πελάτες της δωρεάν υποστήριξη
στον Ελλαδικό χώρο
Μπορείτε να επικοινωνείτε με το τμήμα τεχνικής υποστήριξης μέσω της
ιστοσελίδας ή μέσω τηλεφώνου
Για πελάτες εντός του Ελλαδικού χώρου:
Τηλεφωνική υποστήριξη D-Link :
Τηλ: 210 86 11 114
Φαξ: 210 86 53 172
(Δευτέρα-Παρασκευή 09:00-17:00)
e-mail: [email protected]
Τεχνική υποστήριξη D-Link μέσω Internet:
http://www.dlink.gr
ftp://ftp.dlink.it
74
Technical Support
You can find software updates and user documentation on the D-Link website.
Tech Support for customers in
Australia:
Tel: 1300-766-868
Monday to Friday 8:00am to 8:00pm EST
Saturday 9:00am to 1:00pm EST
http://www.dlink.com.au
e-mail: [email protected]
India:
Tel: 1800-222-002
Monday to Friday 9:30AM to 7:00PM
http://www.dlink.co.in/support/productsupport.aspx
Indonesia, Malaysia, Singapore and Thailand:
Tel: +62-21-5731610
(Indonesia)
Tel: 1800-882-880
(Malaysia)
Tel: +65 66229355
(Singapore)
Tel: +66-2-719-8978/9 (Thailand)
Monday to Friday 9:00am to 6:00pm
http://www.dlink.com.sg/support/
e-mail: [email protected]
Korea:
Tel: +82-2-890-5496
Monday to Friday 9:00am to 6:00pm
http://www.d-link.co.kr
e-mail: [email protected]
New Zealand:
Tel: 0800-900-900
Monday to Friday 8:30am to 8:30pm
Saturday 9:00am to 5:00pm
http://www.dlink.co.nz
e-mail: [email protected]
75
Technical Support
You can find software updates and user documentation on the D-Link website.
Tech Support for customers in
Egypt:
Tel: +202-2919035 or +202-2919047
Sunday to Thursday 9:00am to 5:00pm
http://support.dlink-me.com
e-mail: [email protected]
Iran:
Tel: +98-21-88822613
Sunday to Thursday 9:00am to 6:00pm
http://support.dlink-me.com
e-mail: [email protected]
Israel:
Tel: +972-9-9715701
Sunday to Thursday 9:00am to 5:00pm
http://www.dlink.co.il/support/
e-mail: [email protected]
Pakistan:
Tel: +92-21-4548158 or +92-21-4548310
Sunday to Thursday 9:00am to 6:00pm
http://support.dlink-me.com
e-mail: [email protected]
South Africa and Sub Sahara Region:
Tel: +27-12-665-2165
08600 DLINK (for South Africa only)
Monday to Friday 8:30am to 9:00pm South Africa Time
http://www.d-link.co.za
Turkey:
Tel: +90-212-2895659
Monday to Friday 9:00am to 6:00pm
http://www.dlink.com.tr
e-mail: [email protected]
e-mail: [email protected]
U.A.E and North Africa:
Tel: +971-4-391-6480 (U.A.E)
Sunday to Wednesday 9:00am to 6:00pm GMT+4
Thursday 9:00am to 1:00pm GMT+4
http://support.dlink-me.com
e-mail: [email protected]
76
Техническая поддержка
Обновления программного обеспечения и документация
доступны на Интернет-сайте D-Link.
D-Link предоставляет бесплатную поддержку для клиентов
в течение гарантийного срока.
Клиенты могут обратиться в группу технической поддержки
D-Link по телефону или через Интернет.
Техническая поддержка D-Link:
+495-744-00-99
Техническая поддержка через Интернет
http://www.dlink.ru
e-mail: [email protected]
77
Asistencia Técnica
D-Link Latin América pone a disposición de sus clientes, especificaciones,
documentación y software mas reciente a través de nuestro Sitio Web
www.dlinkla.com
El servicio de soporte técnico tiene presencia en numerosos países de la
Región Latino América, y presta asistencia gratuita a todos los clientes de
D-Link, en forma telefónica e internet, a través de la casilla
[email protected]
Soporte Técnico Help Desk Argentina:
TTeléfono: 0800-12235465 Lunes a Viernes 09:00 am a 22:00 pm
Soporte Técnico Help Desk Chile:
Teléfono: 800 8 35465 Lunes a Viernes 08:00 am a 21:00 pm
Soporte Técnico Help Desk Colombia:
Teléfono: 01800-9525465 Lunes a Viernes 07:00 am a 20:00 pm
Soporte Técnico Help Desk Ecuador:
Teléfono: 1800-035465 Lunes a Viernes 07:00 am a 20:00 pm
Soporte Técnico Help Desk El Salvador:
Teléfono: 800-6335 Lunes a Viernes 06:00 am a 19:00 pm
Soporte Técnico Help Desk Guatemala:
Teléfono: 1800-8350255 Lunes a Viernes 06:00 am a 19:00 pm
Soporte Técnico Help Desk Panamá:
Teléfono: 00800 0525465 Lunes a Viernes 07:00 am a 20:00 pm
Soporte Técnico Help Desk Costa Rica:
Teléfono: 0800 0521478 Lunes a Viernes 06:00 am a 19:00 pm
Soporte Técnico Help Desk Perú:
Teléfono: 0800-00968 Lunes a Viernes 07:00 am a 20:00 pm
Soporte Técnico Help Desk México:
Teléfono: 001 800 123-3201 Lunes a Viernes 06:00 am a 19:00
Soporte Técnico Help Desk Venezuela:
Teléfono: 0800-1005767 Lunes a Viernes 08:00 am a 21:00 pm
78
Suporte Técnico
Você pode encontrar atualizações de software e documentação
de usuário no site da D-Link Brasil www.dlinkbrasil.com.br.
A D-Link fornece suporte técnico gratuito para clientes no Brasil
durante o período de vigência da garantia deste produto.
Suporte Técnico para clientes no Brasil:
Telefone
São Paulo +11-2185-9301
Segunda à sexta
Das 8h30 às 18h30
Demais Regiões do Brasil 0800 70 24 104
E-mail:
e-mail: [email protected]
79
D-Link 友訊科技 台灣分公司
技術支援資訊
如果您還有任何本使用手冊無法協助您解決的產品相關問題,台灣
地區用戶可以透過我們的網站、電子郵件或電話等方式與D-Link台灣
地區技術支援工程師聯絡。
D-Link 免付費技術諮詢專線
0800-002-615
服務時間:週一至週五,早上8:30 到 晚上9:00
(不含周六、日及國定假日)
網
站:http://www.dlink.com.tw
電子郵件:[email protected]
如果您是台灣地區以外的用戶,請參考D-Link網站 全球各地
分公司的聯絡資訊以取得相關支援服務。
產品保固期限、台灣區維修據點查詢,請參考以下網頁說明:
http://www.dlink.com.tw
產品維修:
使用者可直接送至全省聯強直營維修站或請洽您的原購買經銷商。
80
Dukungan Teknis
Update perangkat lunak dan dokumentasi pengguna dapat
diperoleh pada situs web D-Link.
Dukungan Teknis untuk pelanggan:
Dukungan Teknis D-Link melalui telepon:
Tel: +62-21-5731610
Dukungan Teknis D-Link melalui Internet:
Email : [email protected]
Website : http://support.dlink.co.id
81
技术支持
您可以在 D-Link 的官方網站找到產品的軟件升級和使用手冊
办公地址:北京市东城区北三环东路 36 号 环球贸易中心 B 座 26F 0205 室 邮编: 100013
技术支持中心电话:8008296688/ (028)66052968
技术支持中心传真:(028)85176948
维修中心地址:北京市东城区北三环东路 36 号 环球贸易中心 B 座 26F
02-05 室 邮编: 100013
维修中心电话:(010) 58257789
维修中心传真:(010) 58257790
网址:http://www.dlink.com.cn
办公时间:周一到周五,早09:00到晚18:00
82
International Offices
U.S.A
17595 Mt. Herrmann Street
Fountain Valley, CA 92708
TEL: 1-800-326-1688
URL: www.dlink.com
Canada
2180 Winston Park Drive
Oakville, Ontario, L6H 5W1
Canada
TEL: 1-905-8295033
FAX: 1-905-8295223
URL: www.dlink.ca
Europe (U. K.)
D-Link (Europe) Ltd
D-Link House, Abbey Road
Park Royal, London NW10 7BX
United Kingdom
TEL: +44 (0)20 8955 9000
FAX: +44 (0)20 8955 9001
URL: www.dlink.co.uk
Austria
Building A, Level 3, 11 Talavera Rd
North Ryde, NSW, 2113
Tel: (+61 2 ) 8899 1800
Fax: (+61 2 ) 8899 1868
URL: www.dlink.at
Belgium
Rue des Colonies 11
B-1000 Brussels,
Belgium
TEL: +32 (0)2 517 7111
FAX: +32 (0)2 517 6500
URL: www.dlink.be
Bulgaria
60A Bulgaria Blvd., Office 1,
Sofia 1680,
Bulgaria
TEL: +359 2 958 22 42
FAX: +359 2 958 65 57
URL: www.dlink.eu
Czech Republic
Vaclavske namesti 36
110 00 Praha 1
Czech Republic
TEL: +420 224 247 500
FAX: +420 224 234 967
Hot line CZ: +420 225 281 553
Hot line SK: +421 263 813 628
URL: www.dlink.cz
URL: www.dlink.sk
Denmark
Naverland 2,
DK-2600 Glostrup, Copenhagen,
Denmark
TEL: +45 43 96 9 040
FAX: +45 43 42 43 47
URL: www.dlink.dk
Finland
Latokartanontie 7A
FIN-00700 Helsinki,
Finland
TEL : +358 10 309 8840
FAX: + 358 10 309 8841
URL: www.dlink.fi
France
41 boulevard Vauban
78280 Guyancourt
France
TEL: +33 (0)1 30 23 86 88
FAX: +33 (0)1 30 23 86 89
URL: www.dlink.fr
83
Germany
Schwalbacher Strasse 74
D-65760 Eschborn,
Germany
TEL: +49 (0)6196 77 99 0
FAX: +49 (0)6196 77 99 300
URL: www.dlink.de
Spain
Avenida Diagonal, 593-95, 9th floor
08014 Barcelona,
Spain
TEL: +34 93 409 07 70
FAX: +34 93 491 07 95
URL: www.dlink.es
Greece
101, Panagoulis Str. 163-43
Heliopolis, Athens,
Greece
TEL: +30 210 9914512
FAX:+30 210 9916902
URL: www.dlink.gr
Sweden
Gustavslundsvägen 151B
S-167 51 Bromma
Sweden
TEL: +46 (0)8 564 619 00
FAX: +46 (0)8 564 619 01
URL: www.dlink.se
Hungary
Rákóczi út 70-72
HU-1074 Budapest,
Hungary
TEL: +36 (0) 1 461 30 00
FAX: +36 (0) 1 461 30 04
URL: www.dlink.hu
Switzerland
Glatt Tower, 2.OG
Postfach
CH-8301 Glattzentrum
Switzerland
TEL: +41 (0)1 832 11 00
FAX: +41 (0)1 832 11 01
URL: www.dlink.ch
Italy
Via Nino Bonnet n. 6/b
20154 – Milano,
Italy
TEL: +39 02 2900 0676
FAX: +39 02 2900 1723
URL: www.dlink.it
Luxembourg
Rue des Colonies 11
B-1000 Brussels,
Belgium
Tel: +32 (0)2 517 7111
FAX: +32 (0)2 517 6500
URL: www.dlink.be
Netherlands
Weena 290
3012NJ Rotterdam,
Netherlands
TEL: +31 (0)10 282 1445
FAX: +31 (0)10 282 1331
URL: www.dlink.nl
Norway
Karihaugveien 89
N-1086 Oslo,
Norway
TEL: +47 99 300 100
FAX: +47 22 30 90 85
URL: www.dlink.no
Poland
Budynek Aurum
ul. Waliców 11
00-851 Warszawa,
Poland
TEL: +48 (0) 22 583 92 75
FAX: +48 (0) 22 583 92 76
URL: www.dlink.pl
Portugal
Rua Fernando Palha, 50 Edificio
Simol
1900 Lisbon,
Portugal
TEL: +351 21 8688493
FAX: +351 21 8622492
URL: www.dlink.es
Romania
B-dul Unirii nr. 55, bl. E4A, sc.2, et. 4,
ap. 39,
sector 3, Bucuresti,
Romania
Tel: +40(0)21 320 23 05
Fax: +40(0)21 320 23 07
URL: www.dlink.eu
Singapore
1 International Business Park
#03-12 The Synergy
Singapore 609917
TEL: 65-6774-6233
FAX: 65-6774-6322
URL: www.dlink-intl.com
Australia
1 Giffnock Avenue
North Ryde, NSW 2113
Australia
TEL: 61-2-8899-1800
FAX: 61-2-8899-1868
URL: www.dlink.com.au
India
D-Link House, Plot No.5,
Kurla-Bandra Complex Road, Off.
CST Road,
Santacruz (E), Mumbai - 400 098
India
TEL: 91-22-26526696/ 30616666
FAX: 91-22-26528914/ 8476
URL: www.dlink.co.in
Middle East (Dubai)
P.O.Box: 500376
Office: 103, Building:3
Dubai Internet City
Dubai, United Arab Emirates
Tel: +971-4-3916480
Fax: +971-4-3908881
URL: www.dlink-me.com
Turkey
Cayazaya Maslak Yolu
S/A Kat: 5,
Istanbul, Turkey
TEL: 0212-289-5659
FAX:0212-289-7606
URL: www.dlink.com.tr
Iran
Unit 6, No. 39, 6th Alley,
Sanaei St, Karimkhan Ave
Tehran-IRAN
Tel: 9821 8882 2613
Fax: 9821 8883 5492
Pakistan
Office#311, Business Avenue
Main Shahrah-e-Faisal
Karachi-Pakistan
Tel: 92-21-4548158, 4548310
Fax: 92-21-4535103
Egypt
47,El Merghany street,Heliopolis
Cairo-Egypt
TEL: +202-2919035, +202-2919047
FAX: +202-2919051
URL: www.dlink-me.com
Israel
11 Hamanofim Street
Ackerstein Towers, Regus Business
Center
P.O.B 2148, Hertzelia-Pituach
46120
Israel
TEL: +972-9-9715700
FAX: +972-9-9715601
URL: www.dlink.co.il
LatinAmerica
Av. Vitacura # 2939, floor 6th
Las Condes, Santiago.
RM Chile
TEL: 56-2-5838-950
FAX: 56-2-5838-952
URL: www.dlinkla.com
Brazil
Av das Nacoes Unidas
11857 – 14- andar - cj 141/142
Brooklin Novo
Sao Paulo - SP - Brazil
CEP 04578-000 (Zip Code)
TEL: (55 11) 21859300
FAX: (55 11) 21859322
URL: www.dlinkbrasil.com.br
South Africa
Einstein Park II
Block B
102-106 Witch-Hazel Avenue
First Floor Block B
Einstein Park II
Highveld Techno Park
Centurion
Gauteng
Republic of South Africa
TEL: 27-12-665-2165
FAX: 27-12-665-2186
URL: www.d-link.co.za
Russia
Grafsky per., 14, floor 6
Moscow
129626 Russia
TEL: 7-495-744-0099
FAX: 7-495-744-0099 #350
URL: www.dlink.ru
Japan K.K.
Level 6 Konan YK Building, Konan
2-4-12
Minato-Ku Tokyo 108-0075, Japan
URL: www.dlink-jp.com
China
Room02-05,Floor26,Building B,
Global trade center,36 north third ring
road east , Dongcheng District,
Beijing
100013 , China.
TEL: (8610) 5825 7789
FAX: (8610) 5825 7792
URL: www.dlink.com.cn
Taiwan
No. 289 , Sinhu 3rd Rd., Neihu
District ,
Taipei City 114 ,Taiwan
TEL: 886-2-6600-0123
FAX: 886-2-6600-1188
URL: www.dlink.com.tw