1
DAVIX
The Data Analysis and Visualization Linux®
Version 1.0.1
Authors:
Jan P. Monsch, jan döt monsch ät iplosion döt com
Raffael Marty, raffy ät secviz döt org
1 / 128
Contents
1.
DAVIX - Visualize Your Logs!.............................................................................5
1.1.
Introduction....................................................................................................5
1.2.
Roadmap ........................................................................................................5
2. Quick Start Guide ..................................................................................................6
2.1.
Download.......................................................................................................6
2.2.
Burn................................................................................................................7
2.3.
Boot................................................................................................................9
2.4.
Analyze ........................................................................................................11
2.5.
What to Do Next? ........................................................................................13
3. Tools - Showing You the Ropes ..........................................................................14
3.1.
AfterGlow (PV) ...........................................................................................15
3.2.
ARGUS (CP) ...............................................................................................17
3.3.
Chaosreader (P)............................................................................................18
3.4.
ChartDirector (V).........................................................................................20
3.5.
Cytoscape (V) ..............................................................................................21
3.6.
EtherApe (V)................................................................................................23
3.7.
GeoIP (P) .....................................................................................................24
3.8.
GGobi (V) ....................................................................................................25
3.9.
glTail (V) .....................................................................................................27
3.10.
GNUplot (V) ............................................................................................29
3.11.
Graphviz (V) ............................................................................................31
3.12.
GUESS (V) ..............................................................................................33
3.13.
gwhois (P) ................................................................................................35
3.14.
InetVis (V) ...............................................................................................36
3.15.
Large Graph Layout - LGL (V) ...............................................................38
3.16.
Mondrian (V) ...........................................................................................43
3.17.
MRTG (V) ...............................................................................................45
3.18.
NVisionIP (V)..........................................................................................47
3.19.
Parvis (V) .................................................................................................50
3.20.
Passive Asset Detection System - PADS (CP) ........................................52
3.21.
Ploticus (V) ..............................................................................................53
3.22.
p0f (C)......................................................................................................54
3.23.
Processing (V)..........................................................................................55
3.24.
R Project (V) ............................................................................................57
3.25.
RRDtool (V).............................................................................................60
3.26.
RT Graph 3D (V) .....................................................................................62
3.27.
rumint (V) ................................................................................................64
3.28.
Scapy (CPV) ............................................................................................66
3.29.
Shell Tools (P) .........................................................................................69
3.30.
Shoki Packet Hustler (V) .........................................................................70
3.31.
Snort (CP) ................................................................................................72
3.32.
syslog-ng (CP) .........................................................................................73
3.33.
tcpdump (C) .............................................................................................74
3.34.
tcpreplay (P).............................................................................................75
3.35.
Timesearcher 1 (V) ..................................................................................76
3.36.
tnv (V)......................................................................................................78
3.37.
Treemap (V).............................................................................................80
2 / 128
3.38.
Tulip (V) ..................................................................................................82
3.39.
Walrus (V) ...............................................................................................84
3.40.
Wireshark (CV)........................................................................................86
4. Customizing the DAVIX ISO Image...................................................................88
4.1.
Windows ......................................................................................................88
4.2.
Linux ............................................................................................................89
4.3.
Adding and Removing Modules ..................................................................90
4.4.
Overriding Files with rootcopy....................................................................90
4.5.
Modifying the Boot Menu ...........................................................................90
4.6.
Boot Cheat Codes ........................................................................................91
5. Creating and Modifying Modules........................................................................92
5.1.
Leverage Existing SLAX Modules ..............................................................92
5.2.
Create New Modules from Slackware Packages .........................................92
5.3.
Customize Existing SLAX or DAVIX Modules .........................................93
6. Deployment Options ............................................................................................94
6.1.
VMware .......................................................................................................94
6.1.1.
Virtual Machine Setup .........................................................................94
6.1.2.
CD-ROM based Boot...........................................................................95
6.1.3.
Installation on Virtual Hard Drive .......................................................95
6.2.
Other Virtualization Environments..............................................................96
6.3.
USB Stick.....................................................................................................96
6.3.1.
On Windows with VFAT Formatted USB Stick .................................97
6.3.2.
On Linux with VFAT Formatted USB Stick .....................................100
6.3.3.
On Linux with xfs Formatted USB Stick...........................................101
6.4.
Hard Drive .................................................................................................104
7. Hardware............................................................................................................108
7.1.
Physical Machines .....................................................................................108
7.1.1.
Hardware Known to Work.................................................................108
7.1.2.
Incompatible Hardware......................................................................111
7.2.
Virtual Machines........................................................................................112
8. Networking ........................................................................................................113
8.1.
LAN Networking .......................................................................................113
8.2.
Wireless Networking .................................................................................113
8.2.1.
Kernel Supported Drivers ..................................................................113
8.2.2.
NDISwrapper .....................................................................................115
9. Graphic Cards ....................................................................................................116
9.1.
OpenGL......................................................................................................116
9.2.
Multi-Head Support ...................................................................................116
10.
FAQ................................................................................................................117
10.1.
General ...................................................................................................117
10.2.
Troubleshooting .....................................................................................117
10.3.
Support...................................................................................................118
10.4.
Build Environment.................................................................................118
10.5.
Image Distribution .................................................................................118
11.
Acknowledgements........................................................................................119
12.
Licenses..........................................................................................................120
12.1.
Software .................................................................................................120
12.2.
Sublicense Attribution ...........................................................................120
12.3.
Documentation.......................................................................................120
13.
Disclaimer ......................................................................................................121
3 / 128
14.
15.
Versioning......................................................................................................122
GNU Free Documentation License................................................................123
4 / 128
1.
DAVIX - Visualize Your Logs!
1.1.
Introduction
Need help understanding gigabytes of logs? Your OS performance metrics do not
make sense? You want to analyze your SAP user permissions? Then DAVIX, the live
CD for visualizing IT data, is your answer!
DAVIX - the Data Analysis & Visualization Linux® - brings the most important free
tools for data processing and visualization to your desk. There is no hassle with
installing an operating system or struggle to build the necessary tools to get started
with visualization. You can completely dedicate your time to data analysis.
The DAVIX CD is based on SLAX 6.0.x1 by Tomáš Matějíček and features broad
out-of-the-box hardware support for graphic cards and network adapters. SLAX is
based on Slackware and follows a modularized approach. Thus, the SLAX ISO image
can easily be customized for various purposes. It can even be installed on USB sticks
and provide you with mobile analysis capabilities.
The product is shipped with a comprehensive manual that gives you a quick start for
all tools and provides information on how-to tailor DAVIX to your needs. All tools
are accessible through the KDE start menu and accompanied with links to external
manuals and tutorials. Therefore, all information to get started with the tools is
available at a click of a button.
DAVIX is also part of Raffael's upcoming book Applied Security Visualization that
will be published by Addison Wesley Professional2.
1.2.
Roadmap
The first release of DAVIX is just the start. In the future, we would like establish
DAVIX as the number one choice for log analysts. In particular we will improve
following areas:
·
·
·
·
·
1
2
More parser support for specific log formats,
Data format converters for the visualization tools,
More visualization tools,
Support for distributed log processing,
Integrated UI that will allow easy orchestration of the different tools.
SLAX: http://www.slax.org/
Applied Security Visualization: http://www.informit.com/store/product.aspx?isbn=0321510100
5 / 128
2.
Quick Start Guide
Starting to use DAVIX is as simple as counting from 1 to 4:
1.
2.
3.
4.
2.1.
Download the ISO image,
Burn it onto a CD-ROM or DVD,
Boot the CD on your PC,
Analyze your data.
Download
The DAVIX ISO image can be downloaded from several locations around the world.
Please select one of the mirrors closest to you. Since web browsers on occasion
corrupt large downloads, we recommend using wget3 for downloading the ISO.
Main Server:
· Switzerland:
http://82.197.185.121/davix/release/davix-1.0.1.iso.gz
Mirrors
· Switzerland:
· Germany:
· United States:
· United States:
· United States:
ftp://mirror.switch.ch/mirror/DAVIX/davix-1.0.1.iso.gz
http://bastard.codenomad.com/davix/davix-1.0.1.iso.gz
http://www.noaccess.com/davix/davix-1.0.1.iso.gz
http://www.geekceo.com/davix/davix-1.0.1.iso.gz
http://depot.unixfoo.ch/davix/davix-1.0.1.iso.gz
As a nice side effect of using wget, you can resume downloads by using the -c
command line option when the connection got interrupted:
wget -c http://mirror.foo.bar/ davix-1.0.1.iso.gz
After download check the size and the integrity4 of the ISO image. The MD5 hash and
the file size are published on the DAVIX homepage5.
3
For Win32 wget can found as part of the GNU utilities for Win32: http://unxutils.sourceforge.net/
The UNIX tool md5sum can be used to calculate the MD5 hash. The utility is also part of the GNU utilities for Win32.
5
DAVIX Homepage: http://davix.secviz.org/
4
6 / 128
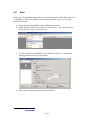
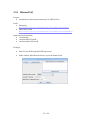
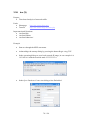
2.2.
Burn
Utilize any CD or DVD burning software of your liking and burn the ISO image on to
a CD-ROM or DVD. The following screenshots show how to use Nero Burning
ROM6 for this task.
6
·
·
Open Nero Burning ROM from the Windows start menu.
In the Windows menu choose Recorder\Burn Image... and select in the file
dialog the ISO image you want to burn.
·
To achieve highest compatibility with CD/DVD readers, we recommend
burning with the slowest speed possible.
·
Select the burn options and press the button Burn.
Nero Burning ROM: http://www.nero.com/
7 / 128
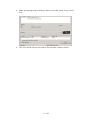
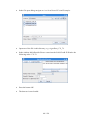
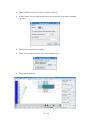
·
When the burning progress dialog is shown, select the option Verify written
data.
·
The CD or DVD will now be burned. This can take a while to finish.
8 / 128
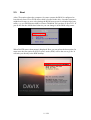
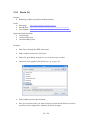
2.3.
Boot
After CD creation reboot the computer. On some systems the BIOS is configured to
boot directly from CD or DVD when a disk is located in the drive. On other systems it
might be necessary to press a key during the BIOS boot screen for a displaying a boot
menu, e.g. on a Dell Inspiron 6000 or Lenovo ThinkPad T60 you have to press F12. If
you do not like the default boot behavior you can change it in the BIOS setup menu.
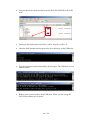
When DAVIX starts a boot menu is displayed. Here you can select the boot option. In
most cases the first option DAVIX Graphics mode (KDE) will be the one to go for. It
will take you directly to the KDE desktop.
9 / 128
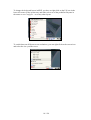
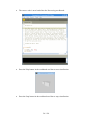
To change the keyboard layout in KDE, you have to right click on the US icon in the
lower left corner of the system tray and either select on of the predefined layouts in
the menu or use Configure... to set any other layout.
To switch between different screen resolutions, you can right click on the screen icon
and select the size you like to use.
10 / 128
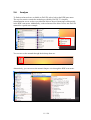
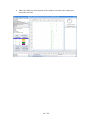
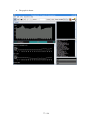
2.4.
Analyze
To find out what tools are available on DAVIX, take a look at the KDE start menu.
The top four entries contain the modules provided by DAVIX. To simplify
documentation access we have provided the links to the tool homepages and tutorials
in the KDE start menu. Additionally, each tool menu offers direct access into DAVIX
manual for a quick start example.
You can access the manual through the desktop short cut:
Alternatively, you can access the manual chapter wise through the KDE start menu:
11 / 128
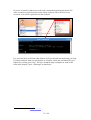
If you see a console symbol next to the tool it means that selecting the menu will
cause a console to open and some form of help is shown. The tool itself is not
executed. You will be required to do that yourself.
It is your turn now to find out what all these tools can do and start analyzing your logs.
If you do not know what you can analyze or visualize, check the tool tutorials or get
inspired by visiting secviz.org7. We have included usage examples for each of the
tools in the chapter Tools - Showing You the Ropes.
7
SecViz - Security Visualization: http://www.secviz.org/
12 / 128
2.5.
What to Do Next?
The chapter Tools - Showing You the Ropes gives an overview of the most important
tools found on the DAVIX CD as well as a quick start example for each tool.
Apart from the tools on the CD, Firefox contains bookmarks to online tools for
visualization as well as for libraries to write your visualization tools.
If you are requiring information on an intermediate level, we recommend reading
Raffael's book Applied Security Visualization8. A rough cuts version of the book is
available on the Internet9. The book gives a very good introduction to visualization
and introduces a use-case driven approach. It offers various case examples and shows
you hands-on how to get from the log file to the visualization. Another good book on
the topic is Greg Conti's book Security Data Visualization10. It shows you many
samples on how security data can be visualized.
Most likely you will stumble over a thing or two in DAVIX that you would like to
tweak. Or some of your favorite tools are not included with DAVIX. Well then it is
time to read the following chapters Customizing the DAVIX ISO Image and Creating
and Modifying Modules.
To get informed about the newest development of DAVIX, we recommend you
registering with the Google Group davix-announce11. For support questions, register
with Google Group davix-support12.
8
Applied Security Visualization: http://www.informit.com/store/product.aspx?isbn=0321510100
Rough Cuts Version of the book Applied Security Visualization: http://safari.informit.com/9780321585530
10
Security Data Visualization: http://www.amazon.com/Security-Data-Visualization-GregConti/dp/1593271433?ie=UTF8&s=books&qid=1183891229&sr=8-1
11
DAVIX Announcement Google Group: http://groups.google.ch/group/davix-announce
12
DAVIX Support Google Group: http://groups.google.ch/group/davix-support
9
13 / 128
3.
Tools - Showing You the Ropes
The important tools in DAVIX are organized in three categories depending on their
use within the analysis process:
·
·
·
Capture (C)
Process (P)
Visualize (V)
Some tools have the ability to cover several parts of the analysis process. In the
following chapters the tool and its categories are noted in the chapter title.
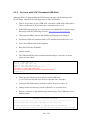
All tools described in this manual are accessible through the system PATH. Therefore
it is generally not required to know the install location. To run a tool open a console
and then enter the first character of the tool's name and then press the tabulator key
for auto completion.
root@slax:~# ru<TABULATOR>
ruby
rumint
rubyforge
run-parts
run-with-aspell
runlevel
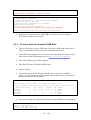
The entry point binaries of most tools are installed in /usr/local/bin. For others see the
section important install locations in the following tool chapters.
14 / 128
3.1.
AfterGlow (PV)
Purpose
· Tool to convert CSV input to a DOT graph description. AfterGlow takes a
configuration file that configures how the nodes and edges are represented in
the DOT file. The DOT file can then be graphed via Graphviz.
· In addition to the main tool, AfterGlow ships a set of tools to convert CSV
data into data formats that can be used with other visualization tools.
· Includes capper.pl script from Raffael Marty's book "Applied Security
Visualization".
Links
· Homepage
· Manual
http://afterglow.sourceforge.net/
http://afterglow.sourceforge.net/manual.html
Important installation locations
· /usr/local/bin
· /usr/local/share/afterglow
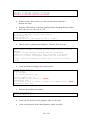
Example13
13
·
Open a console.
·
First a CSV file of sniffed network traffic has to be generated using the
command:
tcpdump -vttttnneli eth0 | tcpdump2csv.pl "sip dip dport" > sniff.csv
·
Open Firefox and do some extended surfing.
·
Press Ctrl-C in the console window where tcpdump is running.
·
To transform the CSV file to a GraphViz dot file execute:
cat sniff.csv | afterglow.pl > sniff.dot
·
To render the sniff.dot into a GIF file use the command:
neato -Tpng -o sniff.png sniff.dot
Example partly taken from AfterGlow manual: http://afterglow.sourceforge.net/
15 / 128
·
To view the result open GQview with command: gqview
16 / 128
3.2.
ARGUS (CP)
Purpose
· Captures and analyze network transaction information.
Links
· Homepage
· Manual
http://qosient.com/argus/
http://qosient.com/argus/manuals.htm
Important installation locations
· /etc/argus.conf
· /etc/rc.d/rc.argus
· /usr/local/bin
· /usr/local/sbin
· /usr/local/share/afterglow
Log directory
· /var/log/argus
Example
·
Open a console.
·
To start the ARGUS daemon execute the command:
sh /etc/rc.d/rc.argus start
·
For live monitoring use the following command to connect to the daemon:
ra -S 127.0.0.1
·
Generate some traffic with Firefox to get log entries.
00:15:29.748387
192.168.16.1.domain
00:15:29.748438
216.92.177.115.http
00:15:29.748465
216.92.177.115.http
00:15:29.750016
64.191.203.30.http
00:15:30.744245
192.168.16.1.domain
00:15:30.824766
209.85.161.127.http
00:15:32.169042
64.191.203.30.http
00:15:32.447994
...
·
e
udp
2
e
tcp
491
e
tcp
405
e d
tcp
59
e
udp
2
e
tcp
18
e
tcp
10
e
tcp
192.168.16.150.38246
152
CON
192.168.16.150.54920
476787
CON
192.168.16.150.54921
388328
CON
192.168.16.150.54522
42903
CON
192.168.16.150.48256
452
CON
192.168.16.150.57185
9758
CON
192.168.16.150.54524
3943
CON
192.168.16.150.43754
To stop the ARGUS daemon execute the command:
sh /etc/rc.d/rc.argus stop
17 / 128
<->
->
->
->
<->
->
->
->
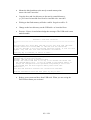
3.3.
Chaosreader (P)
Purpose
· The tool allows reassembly of content in network traffic capture files. The
extracted information is then made available as HTML report where the
individual content elements can be accessed.
Links
· Homepage
http://chaosreader.sourceforge.net/
Important installation locations
· /usr/local/bin
Example
·
Sniff some network traffic as described in tool chapters tcpdump (C) or
Wireshark (CV) and save it as sniff.cap
·
Open a console.
·
To reassemble content from traffic execute:
chaosreader sniff.cap
root@slax:~# chaosreader sniff.cap
Chaosreader ver 0.94
Opening, sniff.cap
Reading file contents,
100% (464470/464470)
Reassembling packets,
100% (713/741)
Creating files...
Num Session (host:port <=> host:port)
0016 192.168.16.150:48184,74.125.39.103:80
0035 192.168.16.140:1163,192.168.16.150:22
0008 192.168.16.150:47506,209.85.161.127:80
18 / 128
Service
http
ssh
http
0002 192.168.16.150:47834,216.92.151.5:80
0011 192.168.16.150:56912,71.183.55.9:80
...
0014 192.168.16.150:47322,192.168.16.1:53
0007 192.168.16.150:59449,192.168.16.1:53
0025 192.168.16.150:514,192.168.16.1:514
0009 192.168.16.150:49664,192.168.16.1:53
...
0015 192.168.16.150:51945,192.168.16.1:53
0031 192.168.16.150,192.168.16.1
Unreachable
...
root@slax:~#
http
http
domain
domain
syslog
domain
domain
ICMP Destination
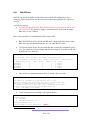
·
Then open the generated report in Firefox using:
firefox index.html
·
To get an overview of all reassembled images press the ink Image Report.
19 / 128
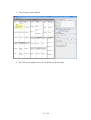
3.4.
ChartDirector (V)
Purpose
· Programming library to generate a wide variety of charts.
Links
· Homepage
· Manual
http://www.advsofteng.com/
file:///usr/local/share/chartdirector/doc/cdperl.htm
Important install locations
· /usr/lib/perl5/site_perl/5.8.8
· /usr/local/share/chartdirector
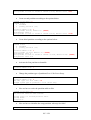
Example
·
To generate a pie chart create a Perl script test.pl with the following contents:
#!/usr/bin/perl
use perlchartdir;
my $data = [10,20,25,10,5,40];
my $label = ["Dogs","Cats","Birds","Spiders","Rats","Mice"];
my $c = new PieChart(400, 300);
$c->setPieSize(200, 150, 75);
$c->setData($data, $label);
$c->makeChart("test.png");
·
Open a console.
·
Then execute the script with the command: perl test.pl
·
To view the result open GQview with the command: gqview
20 / 128
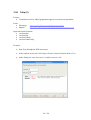
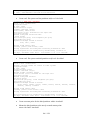
3.5.
Cytoscape (V)
Purpose
· Generation and display of two-dimensional link graphs.
Links
· Homepage:
· Tutorial:
http://www.cytoscape.org/
http://cytoscape.org/cgi-bin/moin.cgi/Presentations
Important install locations
· /usr/local/bin
· /usr/local/lib/cytoscape
· /usr/local/share/cytoscape
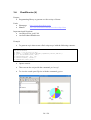
Example
·
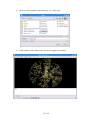
Start Cytoscape through the KDE start menu.
·
In the file open dialog navigate to: /usr/local/share/cytoscape/sampleData
·
Open the sample graph in this directory, e.g. galFiltered.cys
21 / 128
·
The data is then rendered.
22 / 128
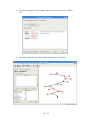
3.6.
EtherApe (V)
Purpose
· Real-time visualization of network traffic.
Links
· Homepage:
http://etherape.sourceforge.net/
Important install locations
· /usr/local/bin
· /usr/local/etc/etherape
· /usr/local/share/etherape
Example
·
Start EtherApe through the KDE start menu.
·
EtherApe will go directly into monitoring mode.
·
Open Firefox and generate some network traffic. EtherApe will then visualize
your network connections.
23 / 128
3.7.
GeoIP (P)
Purpose
· Lookup of country information for an IP address or a host name.
· When the extended geo coding databases are purchased from MaxMind
latitude and longitude information are displayed.
Links
· Homepage
http://www.maxmind.com/app/ip-location
Important installation locations
· /usr/local/bin
Example
·
Open a console.
·
To lookup the country information for an IP address or a host name use:
geoiplookup davix.secviz.org
root@slax:~# geoiplookup davix.secviz.org
GeoIP Country Edition: US, United States
24 / 128
3.8.
GGobi (V)
Purpose
· Visualizes data with different graphs and allows brushing.
Links
· Homepage:
· Manual:
· XML Input Format:
http://www.ggobi.org/
/usr/local/share/ggobi/manual/manual.pdf
/usr/local/share/ggobi/manual/xml.pdf
Important install locations:
· /etc/xdg/ggobi
· /usr/local/bin
· /usr/local/share/ggobi
Example
·
Start GGobi through the KDE start menu.
·
In the file open dialog navigate to: /usr/local/share/ggobi/data
25 / 128
·
Open one of the graphs in this directory, e.g. Shipman.csv
·
In the window menu select Display\New Parallel Coordinate Display.
·
Activate the scatter plot window and the select Interaction\Brush in the main
window menu.
·
Now you can move the yellow box around in the scatter plot and see how the
selection behaves in the other graph.
26 / 128
3.9.
glTail (V)
Purpose
· Real-time visualization of web server traffic.
Links
· Homepage:
http://www.fudgie.org/
Important install locations
· /usr/bin/
· /usr/lib/ruby/gems/1.8/doc/gltail-0.0.7
Example
·
Open a console.
·
Start the Apache daemon by executing the command:
sh /etc/rc.d/rc.httpd start
·
Start the SSH daemon by executing the command:
sh /etc/rc.d/rc.sshd start
·
Execute the following command to generate a configuration file template:
gl_tail --new foobar.yaml
·
Adjust the configuration file to your needs.
servers:
foobar:
host: 127.0.0.1
port: 22
user: root
password: toor
command: tail -f -n0
files: /var/log/httpd/access_log
parser: apache
color: 0.2, 1.0, 0.2, 1.0
config:
...
·
Execute the following command to start the visualization: gl_tail foobar.yaml
·
Open Firefox and access the URL http://127.0.0.1/ and press the reload button
as much as you like.
27 / 128
·
In the glTail window the visualization should now appear.
·
To stop the SSH daemon execute the command:
sh /etc/rc.d/rc.httpd stop
·
To stop the Apache daemon execute the command:
sh /etc/rc.d/rc.httpd stop
28 / 128
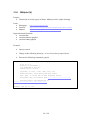
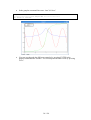
3.10. GNUplot (V)
Purpose
· Generation of various types of charts. Mainly used for simple charting.
Links
· Homepage:
· Tutorial:
· Manual:
http://www.gnuplot.info/
http://t16web.lanl.gov/Kawano/gnuplot/intro/basic-e.html
http://www.gnuplot.info/docs/gnuplot.html
Important install locations
· /usr/local/bin
· /usr/local/libexec/gnuplot
· /usr/local/share/gnuplot
Example
·
Open a console.
·
Change to the following directory: cd /usr/local/share/gnuplot/demo/
·
Execute the following command: gnuplot
root@slax:/usr/local/share/gnuplot/demo# gnuplot
G N U P L O T
Version 4.2 patchlevel 2
last modified 31 Aug 2007
System: Linux 2.6.24.4
Copyright (C) 1986 - 1993, 1998, 2004, 2007
Thomas Williams, Colin Kelley and many others
Type `help` to access the on-line reference manual.
The gnuplot FAQ is available from http://www.gnuplot.info/faq/
Send bug reports and suggestions to
<http://sourceforge.net/projects/gnuplot>
Terminal type set to 'x11'
29 / 128
·
In the gnuplot command line enter: load "all.dem"
gnuplot> load "all.dem"
******************** file simple.dem ********************
Hit return to continue
·
You can step through the different examples by pressing ENTER in the
gnuplot command line window. You can stop the interactive tour by pressing
Ctrl-C.
30 / 128
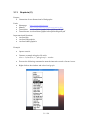
3.11. Graphviz (V)
Purpose
· Generation of two-dimensional of link graphs.
Links
·
·
·
·
Homepage
Manual
Tutorial dot
Tutorial neato
http://www.graphviz.org/
http://www.graphviz.org/Documentation.php
/usr/local/share/graphviz/doc/pdf/dotguide.pdf
/usr/local/share/graphviz/doc/pdf/neatoguide.pdf
Important install locations
· /usr/local/bin
· /usr/local/lib/graphviz
· /usr/local/share/graphviz
Example
·
Open a console.
·
Generate a sample afterglow file with:
echo -e "a,b\nc,d\nc,e" | afterglow.pl > test.dot
·
Execute the following command to start the interactive mode of neato: lneato
·
Right click on the window and select load graph.
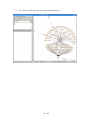
31 / 128
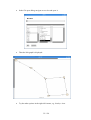
·
In the file open dialog navigate to test.dot and open it.
·
Then the link graph is displayed.
·
Try the other options in the right click menu, e.g. birdseye view.
32 / 128
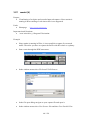
3.12. GUESS (V)
Purpose
· Display and interaction with two-dimensional link graphs. Has the capability
to use a scripting language to process graphs.
Links
· Homepage
· Tutorial
· Manual
http://graphexploration.cond.org/documentation.html
http://guess.wikispot.org/Tutorial
http://guess.wikispot.org/manual
Important install locations
· /usr/local/bin
· /usr/local/lib/guess/lib
· /usr/local/share/guess
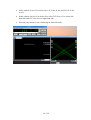
Example
·
Start GUESS through the KDE start menu.
·
Click the button Load GDF/GraphML.
·
In the file dialog click the browse button (the one with the three dots) and
navigate to: /usr/local/share/guess/
·
In the drop down list Files of Type select All Files.
33 / 128
·
Open one of the graphs in this directory, e.g. sample.gdf.
·
Acknowledge all the dialogs and wait for the graph to be loaded.
34 / 128
3.13. gwhois (P)
Purpose
· A generic whois client that can handle web site based whois services.
Links
· Homepage
http://freshmeat.net/projects/gwhois/
Important installation locations
· /usr/local/bin
Example
·
Open a console.
·
To lookup the country information for an IP address or a host name use:
geoiplookup davix.secviz.org
root@slax:~# gwhois gnu.org
Process query: 'gnu.org'
Querying whois.pir.org:43 with whois.
...
Domain ID:D899661-LROR
Domain Name:GNU.ORG
Created On:24-Nov-1995 05:00:00 UTC
Last Updated On:05-Sep-2006 15:50:42 UTC
Expiration Date:23-Nov-2008 05:00:00 UTC
Sponsoring Registrar:Gandi SAS (R42-LROR)
Status:CLIENT TRANSFER PROHIBITED
Registrant ID:0-443631-Gandi
Registrant Name:GNU/FSF Hostmaster
Registrant Organization:Free Software Foundation
....
Admin ID:GH297-GANDI
Admin Name:GNU/FSF Hostmaster
Admin Organization:Free Software Foundation
...
Tech ID:AR41-GANDI
Tech Name:CONTACT NOT AUTHORITATIVE see http://www.gandi.net/whois
Tech Organization:GANDI SARL
...
Name Server:NS1.GNU.ORG
Name Server:NS2.GNU.ORG
Name Server:NS3.GNU.ORG
Name Server:NS4.GNU.ORG
...
root@slax:~#
35 / 128
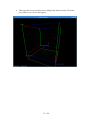
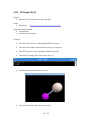
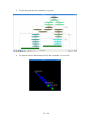
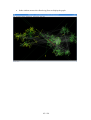
3.14. InetVis (V)
Purpose
· Real-time visualization of network traffic as a three-dimensional scatter plot.
Links
· Homepage
http://www.cs.ru.ac.za/research/g02v2468/inetvis.html
Important install locations
· /usr/local/bin
· /usr/local/share/inetvis
Example
·
Start InetVis through the KDE start menu.
·
In the InetVis Control Panel select the menu Mode\Monitor Local Host. Due
to a bug in the application you have to select the menu even when the flag is
already set. Otherwise you will not be able to monitor live traffic.
36 / 128
·
Then open the browser and do some surfing in the Internet. In the 3D scatter
plot window you will see dots appear.
37 / 128
3.15. Large Graph Layout - LGL (V)
Purpose
· Generation of two- and three-dimensional link graphs.
Links
· Homepage
http://lgl.sourceforge.net/
Important install locations
· /usr/lib/perl5/site_perl/5.8.8
· /usr/local/bin
· /usr/local/etc
· /usr/local/lib/lgl
· /usr/local/share/lgl
Example 2D
·
Open a console.
·
First a space separated file with the data has to be prepared:
echo -e "a b\nc d\nc e\ne d\nb e" > test.ncol
·
Then the graph can be generated using the following command:
lgl2d test.ncol
root@slax:~# lgl2d test.ncol
LGLBREAKUP: /usr/local/bin//lglbreakup -d ./lgl/1210511733 ./lgl/test.lgl
Loading ./lgl/test.lgl...Done.
5 : Total Vertex Count
5 : Total Edge Count
Determining connected sets...
Found 1 connected sets.
Writing ./lgl/1210511733/0.lgl
5 : Vertex Count
5 : Edge Count
LGLAYOUT: /usr/local/bin//lglayout2D -o ./lgl/1210511733/0.coords -e l ./lgl/12
10511733/0.lgl
Reading in Graph from ./lgl/1210511733/0.lgl...
Vertex Count: 5
Edge Count: 5
Outer radius is set to 2.23607
Initializing 5 particles...Done.
Initializing grid and placing particles...Done.
Initializing handlers...Done.
Generating Tree and checking for root.
Nodes Checked:
6
Root Node: e
There are 2 levels.
Initializing 1 thread(s)...Done.
Iteration:
303 Dx:
0.724267 Level:
2
Final Settle
Iteration:
455 Dx:
0.745508 Level:
2
38 / 128
LGLREBUILD: /usr/local/bin//lglrebuild -o ./lgl/final.coords
c ./lgl/coordFile
List
Total Total Connected Sets :
0
root@slax:~#
-
·
To view the graph start LGL Viewer through the KDE start menu.
·
In the window menu select File\Open .lgl file.
·
From the directory where your test.ncol is located navigate down to the
subdirectory lgl and select test.lgl.
·
In the window menu select File\Open 2D Coords file.
·
From the directory where your test.ncol is located navigate down to the
subdirectory lgl and select final.coords.
39 / 128
·
The graph should now be drawn.
·
To display the node ids press in the tool bar section the radio button Show All
IDs.
40 / 128
Example 3D
·
Open a console.
·
First a space separated file with the data has to be prepared:
echo -e "a b\nc d\nc e\ne d\nb e" > test.ncol
·
Then the graph can be generated using the following command:
lgl3d test.ncol
root@slax:~# lgl3d test.ncol
LGLBREAKUP: /usr/local/bin//lglbreakup -d ./lgl/1210512148 ./lgl/test.lgl
Loading ./lgl/test.lgl...Done.
5 : Total Vertex Count
5 : Total Edge Count
Determining connected sets...
Found 1 connected sets.
Writing ./lgl/1210512148/0.lgl
5 : Vertex Count
5 : Edge Count
LGLAYOUT: /usr/local/bin//lglayout3D -o ./lgl/1210512148/0.coords -e l ./lgl/1210512148/0.lgl
Reading in Graph from ./lgl/1210512148/0.lgl...
Vertex Count: 5
Edge Count: 5
Outer radius is set to 1.70997
Initializing 5 particles...Done.
Initializing grid and placing particles...Done.
Initializing handlers...Done.
Generating Tree and checking for root.
Nodes Checked:
6
Root Node: e
There are 2 levels.
Initializing 1 thread(s)...Done.
Iteration:
303 Dx:
0.731679 Level:
2
Final Settle
Iteration:
455 Dx:
0.747695 Level:
2
- Done LGLREBUILD: /usr/local/bin//lglrebuild -o ./lgl/final.coords c ./lgl/coordFileList
Total Total Connected Sets :
0
Current Connected Set
:
1
·
To generate the VRML file use the following command:
genVrml.pl lgl/test.lgl lgl/final.coords
root@slax:~# genVrml.pl lgl/test.lgl lgl/final.coords
Loading coords...Done.
Generating node/text coordinates in VRML...Done.
Loading edges from file...Done.
Generating lines in VRML...Done.
Writing to lgl/final.coords.wrl...Done.
41 / 128
·
To view the result start FreeWRL:
freewrl lgl/final.coords.wrl
42 / 128
3.16. Mondrian (V)
Purpose
· Generation and display of a variety of charts that are linked.
Links
· Homepage
http://rosuda.org/Mondrian/
Important install locations
· /usr/local/bin
· /usr/local/lib/mondrian
· /usr/local/share/mondrian
Example
·
Start Mondrian through the KDE start menu.
·
From the window menu select File\Open and open any one of the files found
in the directory /usr/local/share/mondrian/, e.g. Pollen.txt.
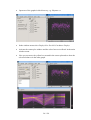
43 / 128
·
In the Mondrian main window select any columns you like.
·
In the window menu select Plot\Histogram. Two histogram windows should
appear.
·
In the window menu select Plot\Scatterplot. A graph with a scatter plot should
appear.
·
You can now select a bar in the histogram and see how the selected data is
represented in the other graphs.
44 / 128
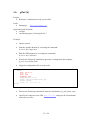
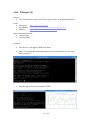
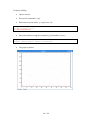
3.17. MRTG (V)
Purpose
· Visualization of traffic load on network devices using SNMP queries.
Links
· Homepage
· Installation Guide
http://oss.oetiker.ch/mrtg/
http://oss.oetiker.ch/mrtg/doc/mrtg-unix-guide.en.html
Important install locations
· /usr/local/bin
· /usr/local/lib/mrtg2
· /usr/local/share/mrtg2
Example
·
Open a console.
·
First you have to create a configuration file for you network device you want
to monitor. In our example we have chosen 192.168.16.5.
cfgmaker --global 'WorkDir: /tmp' --global 'Options[_]: bits,growright' -output /tmp/mrtg.cfg [email protected]
·
To initialize the database we have to run the following mrtg command a
couple of times. The error messages during the first two runs are normal.
mrtg /tmp/mrtg.cfg
mrtg /tmp/mrtg.cfg
mrtg /tmp/mrtg.cfg
·
Create a cron job which calls mrtg every now and then using the command:
mrtg /tmp/mrtg.cfg
45 / 128
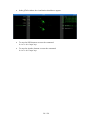
·
After a couple of runs open file:///tmp/192.168.16.5_1.html in Firefox to view
the graph.
46 / 128
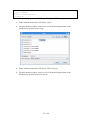
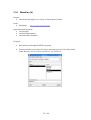
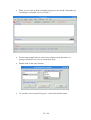
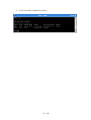
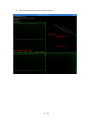
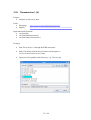
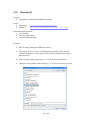
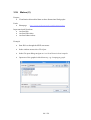
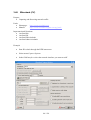
3.18. NVisionIP (V)
Purpose
· Animated two-dimensional scatter plot of ARGUS files.
Links
· Homepage
http://security.ncsa.uiuc.edu/distribution/NVisionIPDownLoad.html
· Quick Start Guide
http://security.ncsa.uiuc.edu/distribution/NVisionIPDownLoad.html#Run
Important install locations
· /usr/local/bin
· /usr/local/lib/NVisionIP
· /usr/local/share/NVisionIP
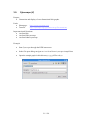
Example
·
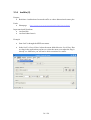
Start NVisionIP through the KDE start menu.
·
In the window MultiDataSetChooser press the button Load.
47 / 128
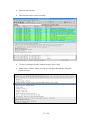
·
In the file open dialog navigate to: /usr/local/share/NVisionIP/samples
·
Open one of the file in this directory, e.g. ArgusData_178_78.
·
In the window MultiDataSetChooser enter into the field ClassB IP Header the
following value: 178.78.
·
Press the button OK.
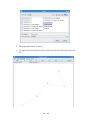
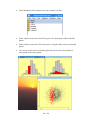
·
The data set is now loaded.
48 / 128
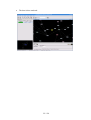
·
Move the slider bar at the bottom of the window to advance the scatter plot
across the time line.
49 / 128
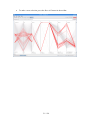
3.19. Parvis (V)
Purpose
· Rendering of data as parallel coordinate display.
Links
· Homepage
http://home.subnet.at/flo/mv/parvis/
· Introduction http://home.subnet.at/flo/mv/parvis/introduction.html
· User Manual http://home.subnet.at/flo/mv/parvis/documentation.html
Important install locations
· /usr/local/bin
· /usr/local/lib/parvis
· /usr/local/share/parvis
Example
·
Start Parvis through the KDE start menu.
·
In the window menu select File\Open.
·
In the file open dialog navigate to: /usr/local/share/parvis/data
·
Open one of the graphs in this directory, e.g. voyager.stf.
·
In the toolbar press the Brush button.
·
Now you can select lines you want to inspect in more detail. When you select
you do not select single lines. Instead you define an angle.
50 / 128
·
To make a new selection, press the Reset All button in the toolbar.
51 / 128
3.20. Passive Asset Detection System - PADS (CP)
Purpose
· PADS allows to passively instrument hosts on the network and their services.
Links
· Homepage
http://passive.sourceforge.net/
Important installation locations
· /etc/rc.d/rc.pads
· /usr/local/etc
· /usr/local/bin
· /usr/local/share/pads/
Log directory
· /var/log/pads
Example
·
Open a console.
·
To start the PADS daemon execute the command:
sh /etc/rc.d/rc.pads start
·
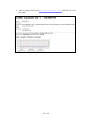
The assets are recorded in a log file. To view the assets, tail this log file with
following command: tail -f /var/log/pads/assets.csv
root@slax:~# tail -f /var/log/pads/assets.csv
asset,port,proto,service,application,discovered
74.125.39.103,80,6,www,gws,1217205195
74.125.39.99,80,6,www,gws,1217205195
·
Generate some traffic with Firefox to get the PADS log file populated with
information.
·
To stop the PADS daemon execute the command:
sh /etc/rc.d/rc.pads stop
52 / 128
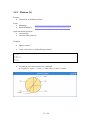
3.21. Ploticus (V)
Purpose
· Generation of all kinds of charts.
Links
· Homepage
· Prefab Handbook
http://ploticus.sourceforge.net/doc/welcome.html
http://ploticus.sourceforge.net/doc/prefabs.html
Important install locations
· /usr/local/bin
· /usr/local/share/ploticus
Example
·
Open a console.
·
Create a file data.csv with following content:
Dogs,10
Cats,20
Birds,25
Spiders,10
Rats,5
Mice,40
·
To generate a pie chart execute the command:
pl -prefab pie values=2 labels=1 data=data.csv delim=comma
53 / 128
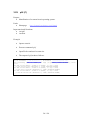
3.22. p0f (C)
Purpose
· Identification of a remote host's operating system.
Links
· Homepage
http://lcamtuf.coredump.cx/p0f.shtml
Important install locations
· /etc/p0f
· /usr/sbin
Example
·
Open a console.
·
Execute command: p0f
·
Open Firefox and surf to some site.
·
The output of p0f reads as follows:
p0f - passive os fingerprinting utility, version 2.0.8
(C) M. Zalewski <[email protected]>, W. Stearns <[email protected]>
p0f: listening (SYN) on 'eth0', 262 sigs (14 generic, cksum 0F1F5CA2), rule:
'all'.
192.168.16.220:36390 - Linux 2.6 (newer, 2) (up: 4 hrs)
-> 216.92.151.5:80 (distance 0, link: ethernet/modem)
192.168.16.220:35442 - Linux 2.6 (newer, 2) (up: 4 hrs)
-> 216.92.177.115:80 (distance 0, link: ethernet/modem)
192.168.16.220:50819 - Linux 2.6 (newer, 2) (up: 4 hrs)
-> 209.85.161.147:80 (distance 0, link: ethernet/modem)
...
54 / 128
3.23. Processing (V)
Purpose
· A visualization framework that allows you to program visualizations in Java
style language and provides a runtime environment to view these programs.
Links
· Homepage
http://processing.org/
Important installation locations
· /usr/local/bin
· /usr/local/lib/processing/
· /usr/local/share/processing/
Example
·
Start Processing through the KDE start menu.
·
From the window menu select File\Open... and open any one of the PBE files
found in the subdirectories of /usr/local/share/processing/examples, e.g.
Perspective.pde
55 / 128
·
The source code is now loaded into the Processing workbench.
·
Press the Play button in the workbench tool bar to start visualization.
·
Press the Stop button in the workbench tool bar to stop visualization.
56 / 128
3.24. R Project (V)
Purpose
· Tool for statistical analysis that offers a great variety of graphing capabilities.
Links
· Homepage
· Introduction
· Manual
http://www.r-project.org/
http://cran.r-project.org/doc/manuals/R-intro.html
http://cran.r-project.org/manuals.html
Important install locations
· /usr/local/bin
· /usr/local/lib/R
Example
·
Start R Project through the KDE start menu.
·
After receiving the R command prompt you can start the demo by executing:
demo(graphics())
·
Step through the demo by pressing ENTER.
57 / 128
·
When you are back on the R command prompt you can start R Commander by
executing the command: library("Rcmdr")
·
To load some sample data set select in the window menu Data\Data in
packages\Read data set from an attached package...
·
Double click on the entry datasets.
·
To visualize, select Graph\Histogram... in the main window menu.
58 / 128
·
In the Histogram configuration dialog select the variable you want to visualize,
e.g. height, and then acknowledge the dialog.
·
The histogram is now plotted.
59 / 128
3.25. RRDtool (V)
Purpose
· A tool for graphing time series data.
Links
· Homepage
· Tutorial
http://oss.oetiker.ch/rrdtool/
http://oss.oetiker.ch/rrdtool/tut/rrdtutorial.en.html
Important install locations
· /usr/local/bin
· /usr/local/lib
· /usr/local/rrdtool-1.2.26
· /usr/local/share/rrdtool
Example14
·
Open a console.
·
To set up the round robin database use the following command:
rrdtool create test.rrd --start 920804400 DS:speed:COUNTER:600:U:U
RRA:AVERAGE:0.5:1:24 RRA:AVERAGE:0.5:6:10
·
To update the database with data use the following commands:
rrdtool
rrdtool
rrdtool
rrdtool
rrdtool
·
update
update
update
update
update
test.rrd
test.rrd
test.rrd
test.rrd
test.rrd
920804700:12345
920805600:12363
920806500:12383
920807400:12405
920808300:12420
920805000:12357
920805900:12363
920806800:12393
920807700:12411
920808600:12422
920805300:12363
920806200:12373
920807100:12399
920808000:12415
920808900:12423
The following command generates a PNG file with the graph:
rrdtool graph speed.png --start 920804400 --end 920808000
DEF:myspeed=test.rrd:speed:AVERAGE LINE2:myspeed#FF0000
14
Partly taken from RRDtool Tutorial: http://oss.oetiker.ch/rrdtool/tut/rrdtutorial.en.html
60 / 128
·
Open GQview and view image speed.png
61 / 128
3.26. RT Graph 3D (V)
Purpose
· Real-time 3D visualization of linked graphs.
Links
· Homepage
http://www.secdev.org/projects/rtgraph3d/
Important install locations
· /usr/local/bin
· /usr/local/lib/rtgraph3d
Example
·
Start RT Graph 3D Server through the KDE start menu.
·
Wait until the window named RealTime Graph 3D appears.
·
Start RT Graph 3D Client through the KDE start menu.
·
On the RTG prompt of the client enter: edge a b
·
The linked graph should now be shown.
·
On the RTG prompt of the client enter: help
62 / 128
·
A list of possible commands is shown.
63 / 128
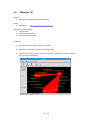
3.27. rumint (V)
Purpose
· Visualization of real-time and recorded network captures. Since rumint is
running in Wine sniffing of real-time traffic is not supported.
Links
· Homepage
http://www.rumint.org/
Important install locations
· ./root/.wine/drive_c/Program Files/rumint
Example
·
Since rumint is running in Wine, it is not possible to capture live network
traffic. Therefore you have to capture the traffic with Wireshark or tcpdump.
·
Start rumint through the KDE start menu.
·
In the window menu select File\Load PCAP Dataset.
·
In the file open dialog navigate to your capture file and open it.
·
In the window menu select View\Scatter Plot and then View\Parallel Plot.
64 / 128
·
In the window Scatter Plot select Source IP in the X-axis and Dest IP in the
Y-axis.
·
In the window Parallel Coordinate Plot select TCP Source Port on the left
hand side and TCP Dest Port on right hand side.
·
Press the play button to start visualizing the network traffic.
65 / 128
3.28. Scapy (CPV)
Purpose
· Capture and manipulation of TCP/IP traffic.
· Visualization of traceroutes.
Links
· Homepage
· Tutorial
http://www.secdev.org/projects/scapy/
http://www.secdev.org/projects/scapy/demo.html
Important install locations
· /usr/lib/python2.5
· /usr/local/bin
Example traceroute
·
Open a console.
·
Execute the command: scapy
·
Execute the following command to traceroute a series of hosts:
res,unans = traceroute(["www.microsoft.com","www.cisco.com"],
dport=[80,443],maxttl=20,retry=-2)
root@slax:~# scapy
Welcome to Scapy (1.2.0.2)
>>> res,unans = traceroute(["www.microsoft.com","www.cisco.com"],
... dport=[80,443],maxttl=20,retry=-2)
Begin emission:
**********************************************************************Finish
ed to send 80 packets.
*******Begin emission:
Finished to send 3 packets.
*Begin emission:
Finished to send 2 packets.
Begin emission:
Finished to send 2 packets.
Received 78 packets, got
198.133.219.25:tcp443
207.46.19.190:tcp80
1 192.168.16.1
11
192.168.16.1
11
2 212.254.136.1
11
212.254.136.1
11
...
78 answers, remaining 2 packets
198.133.219.25:tcp80 207.46.19.190:tcp443
192.168.16.1
11
192.168.16.1
11
212.254.136.1
11
212.254.136.1
11
66 / 128
·
To plot the graph use the command: res.graph()
·
To generate a three-dimensional plot use the command: res.trace3D()
67 / 128
Example Sniffing
·
Open a console.
·
Execute the command: scapy
·
Sniff some network traffic: p=sniff(count=50)
root@slax:~# scapy
Welcome to Scapy (1.2.0.2)
>>> p=sniff(count=50)
·
Plot some statistics using the command: p.plot(lambda x:len(x))
>>> p.plot(lambda x:len(x))
<Gnuplot._Gnuplot.Gnuplot instance at 0x84cf0ec>
·
The graph is plotted.
68 / 128
3.29. Shell Tools (P)
Purpose
· Common UNIX tools for processing text files.
Links
· Tutorial awk: http://www.grymoire.com/Unix/Awk.html
· Tutorial grep: http://www.panix.com/~elflord/unix/grep.html
· Tutorial sed: http://www.grymoire.com/Unix/Sed.html
Important install locations
· /usr/bin
Example
·
Open a console.
·
To extract the first column of a colon separated text file use:
awk -F\: '{print $1}' /etc/passwd
root@slax:~# awk -F\: '{print $1}' /etc/passwd
root
bin
daemon
adm
lp
...
·
To grep a single line from a text file use:
grep "^root" /etc/passwd
root@slax:~# grep "^root" /etc/passwd
root:x:0:0::/root:/bin/bash
·
To egrep lines for multiple patterns use:
egrep "^root|^apache" /etc/passwd
root@slax:~# egrep "^root|^apache" /etc/passwd
root:x:0:0::/root:/bin/bash
apache:x:80:80:User for Apache:/srv/httpd:/bin/false
69 / 128
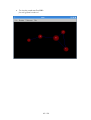
3.30. Shoki Packet Hustler (V)
Purpose
· Visualization of network traffic as a three-dimensional scatter plot.
Links
· Homepage
· Manual
http://shoki.sourceforge.net/
http://shoki.sourceforge.net/hustler/manual.html
Important install locations
· /usr/local/shoki
Example
·
First you have to create a capture file with Wireshark.
·
Next, Start Shoki Packet Hustler through the KDE start menu.
·
In the file open dialog select the capture file.
70 / 128
·
The scatter plot of the network traffic is shown.
71 / 128
3.31. Snort (CP)
Purpose
· Intrusion Detection System to analyze life traffic or network capture files.
· DAVIX comes with the Bleeding Edge Threads rules. Since the Bleeding
Edge Threats15 project is currently inactive, the rules are not current. We
suggest you to register at Snort and get current VRT and install them into
DAVIX.
Links
· Homepage
· Manual
· VRT Rules
http://www.snort.org/
http://www.snort.org/docs/snort_htmanuals/htmanual_282/
http://www.snort.org/pub-bin/downloads.cgi
Important installation locations
· /etc/rc.d/rc.snort
· /etc/rules
· /etc/snort
· /usr/local/bin
· /usr/local/share/doc/snort
Log directory
· /var/log/snort
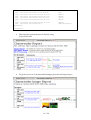
Example
·
Open a console.
·
To start the Snort daemon execute the command:
sh /etc/rc.d/rc.snort start
·
The Snort alerts are recorded in a log file. To view the alerts, tail this log file
with following command: tail -f /var/log/snort/eth0/alert
·
Open Firefox and access following URL:
http://www.iplosion.com/davix/..%255..%255..%255..%255cmd.exe
·
In the snort alert log the attack should now be visible as Double Decoding
Attack.
root@slax:~# tail -f /var/log/snort/eth1/alert
07/28-00:35:55.048842 [**] [119:2:1] (http_inspect) DOUBLE DECODING ATTACK
[**] [Priority: 3] {TCP} 192.168.16.150:49785 -> 192.168.80.10:80
·
15
To stop the Snort daemon execute the command:
sh /etc/rc.d/rc.snort stop
Bleeding Edge Threats: http://www.bleedingthreats.net/
72 / 128
3.32. syslog-ng (CP)
Purpose
· New generation syslog daemon that allows for easy post processing of log
events.
· In DAVIX syslog-ng is configured to receive remote syslog data through the
UDP and TCP ports 514. Local syslog events are not handled through
syslog-ng. They are dealt with the standard syslog daemon.
Links
· Homepage
· Manual
http://www.balabit.com/network-security/syslog-ng/
http://www.balabit.com/dl/html/syslog-ng-adminguide_en.html/bk01-toc.html
Important installation locations
· /etc/rc.d/rc.syslog-ng
· /etc/syslog-ng
· /usr/local/bin
· /usr/local/sbin
Log directory
· /var/log/syslog-ng
Example
·
Open a console.
·
To start the syslog-ng daemon execute the command:
sh /etc/rc.d/rc.syslog-ng start
·
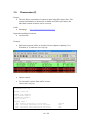
The syslog messages are recorded in a log file. To view the messages, tail this
log file with following command: tail -f /var/log/syslog-ng/syslog-ng
·
Redirect your device syslog to DAVIX to populate the log file.
·
The syslog messages should now be shown in the console where you are
tailing.
root@slax:/var/log/syslog-ng# tail -f syslog-ng
Jul 28 00:41:38 milkyway ipmon[93]: 00:41:38.084572 sis3 @0:58 b
192.168.48.10,1761 -> 123.123.123.123,443 PR tcp len 20 48 -S IN
Jul 28 00:41:41 milkyway ipmon[93]: 00:41:41.002881 sis3 @0:58 b
192.168.48.10,1761 -> 123.123.123.123,443 PR tcp len 20 48 -S IN
Jul 28 00:41:47 milkyway ipmon[93]: 00:41:47.018679 sis3 @0:58 b
192.168.48.10,1761 -> 123.123.123.123,443 PR tcp len 20 48 -S IN
·
To stop the syslog-ng daemon execute the command:
sh /etc/rc.d/rc.syslog-ng stop
73 / 128
3.33. tcpdump (C)
Purpose
· Command line tool for sniffing network traffic.
Links
· Homepage:
· Manual:
http://www.tcpdump.org/
http://www.tcpdump.org/tcpdump_man.html
Important install locations
· /usr/sbin
Example
·
Open a console.
·
To capture network traffic into a file from the network interface eth0, use the
following command: tcpdump -s0 -i eth0 -w test.cap
74 / 128
3.34. tcpreplay (P)
Purpose
· Actually a suite of three tools, which allows to replay capture network traffic
back to the network (tcpreplay), rewrite packets in capture files (tcprewrite)
and a pre-processing tool for both mentioned tools (tcpprep).
Links
· Homepage
· Manual
http://tcpreplay.synfin.net/trac/
http://tcpreplay.synfin.net/trac/wiki/Documentation
Important install locations
· /usr/local/bin/
75 / 128
3.35. Timesearcher 1 (V)
Purpose
· Analysis of time series data.
Links
· Homepage
· Manual
http://www.cs.umd.edu/hcil/timesearcher/
http://www.cs.umd.edu/hcil/timesearcher/docs/index.html
Important install locations
· /usr/local/bin
· /usr/local/lib/timesearcher1
· /usr/local/share/timesearcher1
Example
·
Start Timesearcher 1 through the KDE start menu.
·
In the file dialog click the browse button and navigate to:
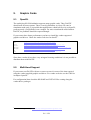
/usr/local/share/timesearcher1/data
·
Open one of the graphs in this directory, e.g. 52weeks.tqd.
76 / 128
·
The graph is shown.
77 / 128
3.36. tnv (V)
Purpose
· Time based analysis of network traffic.
Links
· Homepage
· Tutorial
http://tnv.sourceforge.net/
http://tnv.sourceforge.net/start.php
Important install locations
· /usr/local/bin
· /usr/local/lib/tnv
· /usr/local/share/tnv/
Example
·
Start tnv through the KDE start menu.
·
Acknowledge the startup dialog by pressing the button Begin using TNV.
·
In the upcoming dialog set your local network IP range, in our example it is
192.168.16.0 with the network mask 255.255.255.0.
·
In the Open Database Connection dialog select Embedded.
78 / 128
·
In the window menu select Capture\Capture Packets...
·
In the Capture Packets dialog select the network interface you want to monitor,
e.g. eth0.
·
Open Firefox and do some surfing.
·
When you are done press the Stop capture button in tnv.
·
The graph is rendered.
79 / 128
3.37. Treemap (V)
Purpose
· Visualization of hierarchical data as treemaps.
Links
· Homepage
· Manual
http://www.cs.umd.edu/hcil/treemap/
http://www.cs.umd.edu/hcil/treemap/doc4.1/toc.html
Important install locations
· /usr/local/bin
· /usr/local/lib/treemap
· /usr/local/share/treemap
Example
·
Start TreeMap through the KDE start menu.
·
The tool gives give a license warning that it can only be used for non
commercial purposes. If you agree to the license conditions press Agree,
otherwise Exit.
·
In the file open dialog navigate to: /usr/local/share/treemap/data.
·
Open one of the graphs in this directory, e.g. election-with-hierarchy.tm3.
80 / 128
·
The treemap is then rendered.
·
By clicking into single boxes you can drill down the hierarchy.
81 / 128
3.38. Tulip (V)
Purpose
· Visualization tool for linked graphs that supports several layout algorithms.
Links
· Homepage
· Manual
http://www3.labri.fr/perso/auber/projects/tulip/
http://www3.labri.fr/perso/auber/projects/tulip/userHandbook.php
Important install locations
· /usr/local/bin
· /usr/local/lib
· /usr/local/lib/tlp
· /usr/local/share/tulip
Example
·
Start Tulip through the KDE start menu.
·
In the window menu select File\Import\Graphs\Uniform Random Binary Tree.
·
In the dialog box enter for minsize 10 and for maxsize 100.
82 / 128
·
To layout the graph, use the window menu Algorithm\Layout\Tree\Bubble
Tree.
·
Just acknowledge the upcoming dialog and the tree gets laid out.
83 / 128
3.39. Walrus (V)
Purpose
· Visualization hierarchical data as three-dimensional link graphs.
Links
· Homepage
http://www.caida.org/tools/visualization/walrus/
Important install locations
· /usr/local/bin
· /usr/local/lib/walrus
· /usr/local/share/walrus
Example
·
Start Walrus through the KDE start menu.
·
In the window menu select File\Open.
·
In the file open dialog navigate to: /usr/local/share/walrus/samples
·
Open one of the graphs in this directory, e.g. champagne.graph.
84 / 128
·
In the window menu select Rendering\Start to display the graph.
85 / 128
3.40. Wireshark (CV)
Purpose
· Capturing and dissecting network traffic.
Links
· Homepage:
· Manual:
http://www.wireshark.org/
http://www.wireshark.org/docs/wsug_html/
Important install locations
· /usr/local/bin
· /usr/local/lib
· /usr/local/lib/wireshark
· /usr/local/share/wireshark
Example
·
Start Wireshark through the KDE start menu.
·
Select menu Capture\Options.
·
In the field Interface select the network interface you want to sniff.
86 / 128
·
Press the Start button.
·
The network traffic is now recorded.
·
To stop recording select the window menu Capture\Stop.
·
In the center window frame you can now navigate through the dissected
protocol layers.
87 / 128
4.
Customizing the DAVIX ISO Image
You will most likely get quickly to a point where you want to modify the DAVIX
image to suit your particular requirements. Thanks to SLAX customizing your CD
with your own configuration and adding or removing modules is really easy. This
chapter shows you how to do that. Customizing can either be done under Linux or
Windows.
4.1.
Windows
The general steps for modifying the DAVIX ISO under Windows are the following:
·
Create a new directory on your hard drive, e.g. D:\mydavix\
·
Copy the boot and slax directory to the newly created directory.
·
Make your changes according to the instructions in the following chapters.
·
Open a DOS prompt.
·
Navigate to the slax directory on your hard drive using the command:
cd /d D:\mydavix\slax\
·
Execute the following command to build the ISO image:
make_iso.bat d:\mydavix\mydavix.iso
D:\mydavix\slax>make_iso.bat D:\mydavix\mydavix.iso
mkisofs 2.01 (i686-pc-cygwin)
Scanning .
Scanning ./boot
Scanning ./boot/dos
Scanning ./boot/isolinux
Excluded by match: ./boot/isolinux/isolinux.boot
Scanning ./boot/syslinux
Scanning ./slax
Scanning ./slax/base
Scanning ./slax/devel
Scanning ./slax/modules
Scanning ./slax/optional
Scanning ./slax/rootcopy
...
Scanning ./slax/rootcopy/usr/share/wallpapers
Scanning ./slax/tools
Scanning ./slax/tools/WIN
...
Writing:
Initial Padblock
Start Block
Done with: Initial Padblock
Block(s)
Writing:
Primary Volume Descriptor
Start Block
Done with: Primary Volume Descriptor
Block(s)
Writing:
Eltorito Volume Descriptor
Start Block
Size of boot image is 4 sectors -> No emulation
Done with: Eltorito Volume Descriptor
Block(s)
Writing:
Joliet Volume Descriptor
Start Block
88 / 128
0
16
16
1
17
1
18
Done with: Joliet Volume Descriptor
Block(s)
Writing:
End Volume Descriptor
Start Block
Done with: End Volume Descriptor
Block(s)
Writing:
Version block
Start Block
Done with: Version block
Block(s)
Writing:
Path table
Start Block
Done with: Path table
Block(s)
Writing:
Joliet path table
Start Block
Done with: Joliet path table
Block(s)
Writing:
Directory tree
Start Block
Done with: Directory tree
Block(s)
Writing:
Joliet directory tree
Start Block
Done with: Joliet directory tree
Block(s)
Writing:
Directory tree cleanup
Start Block
Done with: Directory tree cleanup
Block(s)
Writing:
Extension record
Start Block
Done with: Extension record
Block(s)
Writing:
The File(s)
Start Block
1.74% done, estimate finish Thu May 1 17:23:51 2008
...
99.16% done, estimate finish Thu May 1 17:23:34 2008
Total translation table size: 2048
Total rockridge attributes bytes: 48022
Total directory bytes: 166354
Path table size(bytes): 860
Done with: The File(s)
Block(s)
Writing:
Ending Padblock
Start Block
Done with: Ending Padblock
Block(s)
Max brk space used 64000
287420 extents written (561 MB)
1
19
1
20
1
21
4
25
4
29
82
111
69
180
0
180
1
181
287089
287270
150
New ISO should be created now.
Press any key to continue . . .
·
4.2.
Either burn the created ISO image mydavix.iso to a CD-ROM/DVD or use any
other deployment method as document in the chapter Deployment Options.
Linux
The general steps for modifying the DAVIX ISO under Linux are the following. Note
that hdc is used here as a sample. On you system it could be on another device ID.
·
Open a console.
·
Insert DAVIX CD into your CD or DVD drive. On some Linux system the CD
will automatically be mounted into /mnt/hdc.
·
If DAVIX CD or DVD does not mount automatically you can mount it
manually: mount /dev/hdc /mnt/hdc
·
Create a new directory on your hard drive, e.g.: mkdir -p /tmp/mydavix
·
Copy the boot and slax directory to the newly created directory:
cp -pvR /mnt/hdc/boot /mnt/hdc/slax /tmp/mydavix
·
Make your changes according to the instructions in the following chapters.
89 / 128
·
Navigate to the slax directory on your hard drive using the command:
cd /tmp/mydavix/slax
·
Execute the following command to build the ISO image:
./make_iso.sh /tmp/mydavix/mydavix.iso
·
Either burn the created ISO image mydavix.iso to a CD-ROM/DVD or use any
other deployment method as documented the chapter Deployment Options.
4.3.
Adding and Removing Modules
After copying all the SLAX files to the hard drive you can customize the SLAX
content. Modules can be found in following directories:
·
·
·
slax\base
SLAX core modules. Will be loaded on every boot.
slax\modules Standard modules. Will be loaded on every boot.
slax\optional Optional modules which can be specified in the boot menu.
You can add or remove modules from these directories as you like.
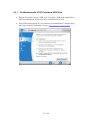
4.4.
Overriding Files with rootcopy
If you just want to override a specific file in one of the modules you can use the
slax\rootcopy directory. The content of rootcopy will be applied to the union file
system as the last step and it allows you to override any file in the file system.
This feature is very useful when you want to tweak single configuration files, like
/etc/X11/xorg.conf. But for larger changes the use of modules is encouraged.
4.5.
Modifying the Boot Menu
The boot menu can be modified through the file slax.cfg, which can be found in the
boot directory. Here you can add or remove additional entries in the boot menu. To
add a new one just append following section to the file:
90 / 128
LABEL myconf
MENU LABEL DAVIX Graphics mode (KDE)
KERNEL /boot/vmlinuz
APPEND initrd=/boot/initrd.gz ramdisk_size=6666 root=/dev/ram0 rw
changes=slax autoexec=xconf;kdm
TEXT HELP
Help for currently selected:
Run DAVIX the max, try to
autoconfig graphics card and use
the maximum allowed resolution.
ENDTEXT
Due to the width limitation in this document the line with the keyword APPEND is
wrapped to form two lines. In your slax.cfg it needs to be on one line to work
correctly.
The available boot options are documented in the chapter Boot Cheat Codes.
4.6.
Boot Cheat Codes
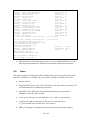
SLAX has many useful boot options that allow you to tweak boot and kernel behavior.
The following list shows an extract of the most important ones. For a complete list
check the SLAX boot parameter page16.
16
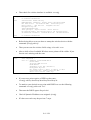
·
·
·
·
·
nodma
noauto
nohd
nocd
nosound
Disable DMA for CD-ROM and hard drives.
Hard disk are not mounted automatically.
Hard disks are not mounted.
CD-ROMs are note mounted.
Disable sound.
·
·
password=foobar
password=ask
Set root password to foobar.
Ask for new password during boot.
·
·
·
changes=/dev/hdx
changes=/foo/bar
changes=/foo.dat
Stores changes to the specified device.
Stores changes to the specified directory.
Stores changes to the specified file.
·
·
toram
copy2ram
Copy all CD files to RAM
Same as toram
·
·
load=module
noload=module
Loads the specified module from slax\optional.
Disable loading of specified module
·
autoexec=xconf;kdm After boot auto-configures X and starts KDM.
Boot Parameters in SLAX: http://www.slax.org/documentation_boot_cheatcodes.php
91 / 128
5.
Creating and Modifying Modules
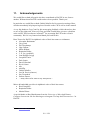
This chapter shows you the different ways for getting your hands on additional SLAX
modules for DAVIX.
5.1.
Leverage Existing SLAX Modules
The easiest way to get a new SLAX module is by checking the SLAX website itself.
The modules page offers a wide range of contributed ready to use SLAX modules17.
These modules in general come with all the required libraries and should work right
away.
5.2.
Create New Modules from Slackware Packages
Another fast way to get additional modules is to search and download existing
Slackware packages18 and convert them to SLAX modules using following command:
tgz2lzm foo-bar-1.0.tgz foo-bar-1.0.lzm
17
18
SLAX modules: http://www.slax.org/modules.php
Search Slackware Packages: http://packages.slackware.it/
92 / 128
This approach does no dependency checking and requires you to investigate the
package dependencies yourself and convert all required packages to SLAX modules
as well. The pragmatic approach is to convert the particular module you want to run
and integrate it into the DAVIX ISO. Then you boot DAVIX and try to execute one of
the binaries in your module. If there is an error that a specific library is missing then
you have found an unsatisfied dependency. You then have to identify the Slackware
package where the library can be found and convert it to a SLAX module. And then
the testing starts again...
5.3.
Customize Existing SLAX or DAVIX Modules
If you want to tweak a single SLAX or DAVIX package a just little, it is possible to
extract a SLAX module using following command:
lzm2dir foo-bar-1.0.lzm /foo/bartarget/dir
You can then modify the extracted files to your needs and repack the directory to a
SLAX module with following command:
dir2lzm /foo/bartarget/dir foo-bar-1.0.lzm
93 / 128
6.
Deployment Options
The following options show you the different ways to install DAVIX on different
types of media. The step-by-step guides are generic and also apply to other SLAX
distributions.
6.1.
VMware
DAVIX can be run inside VMware without any problems. Even OpenGL is supported.
The procedures were successfully tested with:
·
VMware Workstation 6.0.3 Build 80004
6.1.1. Virtual Machine Setup
For all the described VMware deployments the following procedure is common to all:
·
Start VMware Workstation.
·
Through the Windows menu File\New...\Virtual Machine... start the New
Virtual Machine Wizard.
·
In the Virtual machine configuration step select Custom.
·
In the Virtual machine hardware compatibility step select Workstation 6.
·
As guest operating system select Linux and select Other Linux 2.6.x kernel.
·
Choose virtual machine name and storage location.
·
Choose One as the number of processors.
·
Allocate at least 512 MB of memory. The optimal value is 1024 MB.
·
Select Use bridged networking.
·
Select I/O adapter type SCSI adapter LSI Logic.
·
Select Create a new virtual disk.
·
Select virtual disk type SCSI (Recommended).
94 / 128
·
Choose disk size of 8 GB without allocating disk space.
·
Choose disk file name and press Finish.
The basic virtual machine is now set up. Continue with one of the chapters CD-ROM
based Boot or Installation on Virtual Hard Drive.
6.1.2. CD-ROM based Boot
Before continuing with this chapter please setup the basic virtual machine as
described in chapter Virtual Machine Setup.
Edit virtual machine settings:
· Select tab Hardware
· Select CD-ROM drive.
· Select option Use ISO image and browse for the DAVIX image.
· Close the settings dialog.
On first startup the CD-ROM will not boot as default. Therefore following steps have
to be taken:
· Start virtual machine.
· When the BIOS screen is shown press F2.
· Navigate to menu Boot.
· Move the entry CD-ROM Drive to the first position in boot order.
· Press F10 and confirm changes by selecting Yes.
6.1.3. Installation on Virtual Hard Drive
Before continuing with this chapter please setup the basic virtual machine as
described in chapter Virtual Machine Setup.
Start the virtual machine and continue with the steps set out in chapter Hard Drive.
95 / 128
6.2.
Other Virtualization Environments
Our testers have reported that DAVIX works with the following other virtualization
suites:
·
·
·
·
Parallels 3.0 Build 5584
QEMU 0.9
VirtualBox 1.6.0
VMware Fusion 1.1.2 Build 87978
For the exact environments, which the virtualization suites have been tested with, see
chapter Virtual Machines.
6.3.
USB Stick
It is possible to run DAVIX from a USB stick. This has the advantages that booting
from stick in general is faster and it allows for changes to be made persistent. The
following step-by-step instructions will help you to achieve this.
The procedures were successfully tested with following USB sticks:
· Corsair FlashVoyager 16GB
· Kingston 1GB
· SanDisk Cruzer TITANIUM, 4GB
· SanDisk Cruzer Micro, 4 GB
· SONY Micro Vault, 1 GB
· Pretec 02GB Cha Cha, 2 GB
A word of warning:
· To avoid data loss the system should be shutdown properly before removing
the USB stick. In particular the VFAT is quite prone to such abuse. If you
want to have a robust solution use xfs as file system instead. For details see xfs
instruction below.
96 / 128
6.3.1. On Windows with VFAT Formatted USB Stick
·
First of all you have to get a USB stick. Currently a USB stick with at least 1
GB is recommended. If you have more it should work as well.
·
If the USB stick supports U3 it is necessary to uninstall the U3 feature using
the tool provided by following web-site: http://www.u3.com/uninstall/.
97 / 128
·
Then open the MMC console and add the Disk Management Snap-in.
·
Format the USB stick partition with FAT32 and the default allocation unit size.
98 / 128
·
Copy the directories boot and slax from the DAVIX CD/DVD to the USB
stick.
·
Writing to the flash memory will take a while. So grab a coffee. J
·
Open the DOS prompt and navigate to the boot directory on the USB stick.
·
Execute bootinst.bat and acknowledge the messages. The USB stick is now
made bootable.
·
Reboot your system and boot from USB stick. When you are seeing the
DAVIX boot menu you are done!
99 / 128
6.3.2. On Linux with VFAT Formatted USB Stick
Although VFAT is supported by the SLAX kernel the mkfs.vfat is missing on the
SLAX image. Therefore the first steps have to done in Windows.
·
First of all you have to get a USB stick. Currently a USB stick with at least 1
GB is recommended. If you have more it should work as well.
·
If the USB stick supports U3 it is necessary to uninstall the U3 feature using
the tool provided by following web-site: http://www.u3.com/uninstall/.
·
Then open the MMC console and add the Disk Management Snap-in.
·
Format the USB stick partition with FAT32 and the default allocation size.
·
Leave the USB inserted in the computer.
·
Boot DAVIX from CD-ROM.
·
Open a console.
·
The USB should have been mounted automatically to /mnt/sda1. Execute
mount to cross-check.
root@slax:~# mount
aufs on / type aufs (rw)
proc on /proc type proc (rw)
sysfs on /sys type sysfs (rw)
usbfs on /proc/bus/usb type usbfs (rw)
/dev/sda1 on /mnt/sda1 type vfat
(rw,noatime,quiet,umask=0,check=s,shortname=mixed)
root@slax:~# .
·
Then copy the directories boot and slax to the USB stick.
cp -pvR /mnt/live/mnt/hdc/boot /mnt/live/mnt/hdc/slax /mnt/sda1
·
Writing to the flash memory will take a while. So grab a coffee. J
·
Change to the boot directory on the USB stick: cd /mnt/sda1/boot
·
Execute ./bootinst.sh and acknowledge the messages. The USB stick is now
made bootable.
-=-=-=-=-=-=-=-=-=-=-=-=-=-=-=-=-=-=-=-=-=-=-=-=-=-=-=-=-=-=-=-=-=-=-=-=-=Welcome to Slax boot installer
-=-=-=-=-=-=-=-=-=-=-=-=-=-=-=-=-=-=-=-=-=-=-=-=-=-=-=-=-=-=-=-=-=-=-=-=-=This installer will setup disk /dev/sda1 to boot only Slax.
Warning! Master boot record (MBR) of /dev/sda will be overwritten.
If you use /dev/sda to boot any existing operating system, it will not work
100 / 128
anymore. Only Slax will boot from this device. Be careful!
Press any key to continue, or Ctrl+C to abort...
Flushing filesystem buffers, this may take a while...
Setting up MBR on /dev/sda...
The Master Boot Record of /dev/sda has been updated.
Activating partition /dev/sda1...
No partition table modifications are needed.
Updating MBR on /dev/sda...
Setting up boot record for /dev/sda1...
Disk /dev/sda1 should be bootable now. Installation finished.
Read the information above and then press any key to exit...
·
Reboot your system and boot from USB stick. When you are seeing the
DAVIX boot menu you are done!
6.3.3. On Linux with xfs Formatted USB Stick
·
First of all you have to get a USB stick. Currently a USB stick with at least 1
GB is recommended. If you have more it should work as well.
·
If the USB stick supports U3 it is necessary to uninstall the U3 feature using
the tool provided by following web-site: http://www.u3.com/uninstall/.
·
Leave the USB inserted in the computer.
·
Boot DAVIX from CD-ROM in KDE mode.
·
Open a console.
·
To find out which device ID your hard disk has execute the command:
sfdisk --list. For simplicity of this example sda has been chosen. Your device
ID may be different. So watch out!
root@slax:~# sfdisk --list
Disk /dev/sda: 1019 cylinders, 127 heads, 62 sectors/track
Units = cylinders of 4031488 bytes, blocks of 1024 bytes, counting from 0
Device Boot Start
/dev/sda1
*
0+
/dev/sda2
0
/dev/sda3
0
/dev/sda4
0
·
End
1018
-
#cyls
10190
0
0
#blocks
4011772
0
0
0
Id
83
0
0
0
System
Linux
Empty
Empty
Empty
Use mount to make sure that all file systems on the USB stick are unmounted.
root@slax:~# mount
aufs on / type aufs (rw)
proc on /proc type proc (rw)
sysfs on /sys type sysfs (rw)
101 / 128
usbfs on /proc/bus/usb
/dev/hda1 on /mnt/hda1
/dev/hda3 on /mnt/hda3
/dev/sda1 on /mnt/sda1
type
type
type
type
usbfs (rw)
ext3 (rw,noatime)
ext3 (rw,noatime)
xfs (rw,noatime)
·
If there is still a file system (e.g. sda1) mounted then unmount it:
umount /dev/sda1
·
Wipe the USB stick to avoid later problems when installing the boot loader:
dd if=/dev/zero of=/dev/sda bs=1M
root@slax:~# dd if=/dev/zero of=/dev/sda bs=1M
dd: writing `/dev/sda': No space left on device
3920+0 records in
3919+0 records out
4110227968 bytes (4.1 GB) copied, 557.438 s, 7.4 MB/s
·
Then we have to partition the hard drive. Execute: fdisk /dev/sda
root@slax:~# fdisk /dev/sda
Device contains neither a valid DOS partition table, nor Sun, SGI or OSF
disklabel
Building a new DOS disklabel with disk identifier 0x66b7eb5d.
Changes will remain in memory only, until you decide to write them.
After that, of course, the previous content won't be recoverable.
Warning: invalid flag 0x0000 of partition table 4 will be corrected by
w(rite)
·
Create partition according to the options below:
Command (m for help): n
Command action
e
extended
p
primary partition (1-4)
p
Partition number (1-4): 1
First cylinder (1-1019, default 1): {ENTER}
Using default value 1
Last cylinder or +size or +sizeM or +sizeK (1-1019, default 1019): {ENTER}
Using default value 1019
·
Activate the partition as bootable:
Command (m for help): a
Partition number (1-4): 1
·
Create xfs file system on first partition: mkfs.xfs /dev/sda1
·
Create a mount point for the third partition: mkdir /mnt/sda1
102 / 128
·
Mount the third partition to the newly created mount point:
mount /dev/sda1 /mnt/sda1
·
Copy the boot and slax directory to the newly created directory:
cp -pvR /mnt/live/mnt/hdc/boot /mnt/live/mnt/hdc/slax /mnt/sda1
·
Writing to the flash memory will take a while. So grab a coffee. J
·
Change to the boot directory on the USB stick: cd /mnt/sda1/boot
·
Execute ./liloinst.sh and acknowledge the messages. The USB stick is now
made bootable.
-=-=-=-=-=-=-=-=-=-=-=-=-=-=-=-=-=-=-=-=-=-=-=-=-=-=-=-=-=-=-=-=-=-=-=-=-==-=Welcome to Slax boot installer
-=-=-=-=-=-=-=-=-=-=-=-=-=-=-=-=-=-=-=-=-=-=-=-=-=-=-=-=-=-=-=-=-=-=-=-=-==-=This installer will setup disk /dev/sda to boot only Slax from /dev/sda1.
Warning! Master boot record (MBR) of /dev/sda will be overwritten.
If you use /dev/sda to boot any existing operating system, it will not work
anymore. Only Slax will boot from this device. Be careful!
Press any key to continue, or Ctrl+C to abort...
Flushing filesystem buffers, this may take a while...
Updating MBR to setup boot record...
Warning: /dev/sda is not on the first disk
Warning: The initial RAM disk is too big to fit between the kernel and
the 15M-16M memory hole. It will be loaded in the highest memory as
though the configuration file specified "large-memory" and it will
be assumed that the BIOS supports memory moves above 16M.
Added Slax ? *
Disk /dev/sda should be bootable now. Installation finished.
Read the information above and then press any key to exit...
·
Reboot your system and boot from USB stick. When you are seeing the
DAVIX boot menu you are done!
103 / 128
6.4.
Hard Drive
DAVIX can also be installed on hard disk where all SLAX modules have been
extracted. These instructions are based in parts on the paper published by Offensive
Security19.
A word of warning:
· According to BackTrack the BackTrack Installer is experimental and has not
yet been tested! It is therefore highly recommended to work with an empty
hard drive or use VMware.
Here is the procedure for installing DAVIX on hard disk:
·
Boot DAVIX from CD or DVD in KDE mode. Make sure there are no other
hard drive devices attached than the one you want DAVIX onto.
·
To find out which device ID your hard disk has execute the command: sfdisk -list. For simplicity of this example hda has been chosen. Your device ID may
be different. So watch out!
root@slax:~# sfdisk --list
Disk /dev/hda: 9733 cylinders, 255 heads, 63 sectors/track
Units = cylinders of 8225280 bytes, blocks of 1024 bytes, counting from 0
Device Boot Start
/dev/hda1
0
/dev/hda2
0
/dev/hda3
0
/dev/hda4
0
·
End
-
#cyls
0
0
0
0
#blocks
0
0
0
0
Id
0
0
0
0
System
Empty
Empty
Empty
Empty
First we have to partition the hard drive. Execute: fdisk /dev/hda
root@slax:~# fdisk /dev/hda
The number of cylinders for this disk is set to 9733.
There is nothing wrong with that, but this is larger than 1024,
and could in certain setups cause problems with:
1) software that runs at boot time (e.g., old versions of LILO)
2) booting and partitioning software from other OSs
(e.g., DOS FDISK, OS/2 FDISK)
·
Create first partition according to the options below:
Command (m for help): n
Command action
e
extended
p
primary partition (1-4)
p
Partition number (1-4): 1
First cylinder (1-9733, default 1): {ENTER}
19
BackTrack Hard Drive Installation: http://www.offensive-security.com/documentation/backtrack-hd-install.pdf
104 / 128
Using default value 1
Last cylinder or +size or +sizeM or +sizeK (1-9733, default 9733): +50M
·
Create second partition according to the options below:
Command (m for help): n
Command action
e
extended
p
primary partition (1-4)
p
Partition number (1-4): 2
First cylinder (8-9733, default 8): {ENTER}
Using default value 8
Last cylinder or +size or +sizeM or +sizeK (8-9733, default 9733): +512M
·
Create third partition according to the options below:
Command (m for help): n
Command action
e
extended
p
primary partition (1-4)
p
Partition number (1-4): 3
First cylinder (71-9733, default 71): {ENTER}
Using default value 71
Last cylinder or +size or +sizeM or +sizeK (71-9733, default 9733): {ENTER}
Using default value 9733
·
Activate the first partition as bootable:
Command (m for help): a
Partition number (1-4): 1
·
Change the partition type of partition #2 to 82 for Linux Swap:
Command (m for help): t
Partition number (1-4): 2
Hex code (type L to list codes): 82
Changed system type of partition 2 to 82 (Linux swap)
·
Now we have to write the partition table to disk:
Command (m for help): w
The partition table has been altered!
Calling ioctl() to re-read partition table.
Syncing disks.
root@slax:~#
·
Now we have to initialize the swap partition: mkswap /dev/hda2
root@slax:~# mkswap /dev/hda2
105 / 128
Setting up swapspace version 1, size = 518184 kB
no label, UUID=4964f425-7308-4f41-bc1a-b7b6c2ff4a3c
·
Create ext3 file system on first partition: mkfs.ext3 /dev/hda1
root@slax:~# mkfs.ext3 /dev/hda1
mke2fs 1.40.8 (13-Mar-2008)
Filesystem label=
OS type: Linux
Block size=1024 (log=0)
Fragment size=1024 (log=0)
14056 inodes, 56196 blocks
2809 blocks (5.00%) reserved for the super user
First data block=1
Maximum filesystem blocks=57671680
7 block groups
8192 blocks per group, 8192 fragments per group
2008 inodes per group
Superblock backups stored on blocks:
8193, 24577, 40961
Writing inode tables: done
Creating journal (4096 blocks): done
Writing superblocks and filesystem accounting information: done
This filesystem will be automatically checked every 24 mounts or
180 days, whichever comes first. Use tune2fs -c or -i to override.
·
Create ext3 file system on third partition: mkfs.ext3 /dev/hda3
root@slax:~# mkfs.ext3 /dev/hda3
mke2fs 1.40.8 (13-Mar-2008)
Warning: 256-byte inodes not usable on older systems
Filesystem label=
OS type: Linux
Block size=4096 (log=2)
Fragment size=4096 (log=2)
4857856 inodes, 19404511 blocks
970225 blocks (5.00%) reserved for the super user
First data block=0
Maximum filesystem blocks=0
593 block groups
32768 blocks per group, 32768 fragments per group
8192 inodes per group
Superblock backups stored on blocks:
32768, 98304, 163840, 229376, 294912, 819200, 884736, 1605632, 2654208,
4096000, 7962624, 11239424
Writing inode tables: done
Creating journal (32768 blocks): done
Writing superblocks and filesystem accounting information: done
This filesystem will be automatically checked every 23 mounts or
180 days, whichever comes first. Use tune2fs -c or -i to override.
·
Create a mount point for the third partition: mkdir /mnt/hda3
·
Mount the third partition to the newly created mount point:
mount /dev/hda3 /mnt/hda3
106 / 128
·
In the KDE start menu System select BackTrack Installer (Experimental).
·
Configure BT Installer as follows:
Source (BackTrack CD):
Install BackTrack to:
Write New MBR (lilo.mbr) to:
Installation method:
Restore Original MBR after lilo
/mnt/live/mnt/sda1/slax
/mnt/hda3
/dev/hda
Real
unchecked
·
Press the Install button.
·
Installing DAVIX on hard drive will take a while. So grab a coffee. J
·
Press the Close button.
·
Shutdown DAVIX.
·
Remove install media, like CD or USB stick.
·
Boot your system. When you are seeing the DAVIX boot menu you are done!
107 / 128
7.
Hardware
SLAX and therewith DAVIX runs on normal PCs as well as in virtual machines. This
chapter show which environments are known to work with DAVIX and which ones
not.
7.1.
Physical Machines
7.1.1. Hardware Known to Work
In general DAVIX should work on any Intel and AMD based architecture. Following
hardware setups were reported by testers to work with DAVIX:
PC Brand & Type
Compaq Evo
CPU Type
Intel(R) Pentium(R) 4 CPU 2.40GHz
Memory
1 GB
Graphic Card
nVidia Corporation G73 [GeForce 7600 GS] (rev a2)
LAN Network Card
Intel Corporation 82801DB PRO/100 VM (LOM) Ethernet Controller (rev 81)
Wireless Network Chipset
-
PC Brand & Type
Dell Dimension 3100c
CPU Type
Intel P4 Celeron
Memory
-
Graphic Card
-
LAN Network Card
-
Wireless Network Chipset
-
PC Brand & Type
DELL Latitude D620
CPU Type
Intel Core 2 Duo, 2.33 GHz
Memory
2 GB
Graphic Card
NVIDIA Quadro NVS 110M [Display adapter]
LAN Network Card
Broadcom NetXtreme 57xx Gigabit Controller
Wireless Network Chipset
Intel(R) PRO/Wireless 3945ABG (Was not tested)
PC Brand & Type
Dell Inspiron 6000
CPU Type
Intel Pentium M, 1.86 GHz
Memory
1 GB
Graphic Card
ATI Mobility Radeon X300
LAN Network Card
Broadcom 440x 10/100
Wireless Network Chipset
Intel PRO/Wireless 2200BG
108 / 128
PC Brand & Type
Fujitsu-Siemens Lifebook T Series T4215
CPU Type
Intel Core2 CPU T5500 1.66GHz
Memory
1GB
Graphic Card
Intel Corporation Mobile 945GM/GMS, 943/940GML Express Integrated
Graphics Controller
LAN Network Card
Marvell Technology Group Ltd. 88E8055 PCI-E Gigabit Ethernet Controller
Wireless Network Chipset
Atheros Communications Inc. AR242x 802.11abg Wireless PCI Express Adapter
PC Brand & Type
Lenovo ThinkPad T60
CPU Type
T2400, 1.83 GHz
Memory
1 GB
Graphic Card
ATI Mobility Radeon X1400
LAN Network Card
Intel PRO/1000 PL
Wireless Network Chipset
Intel PRO/Wireless 3945ABG
PC Brand & Type
Lenovo ThinkPad T60
CPU Type
Intel(R) Core(TM)2 CPU T5600 @ 1.83GHz
Memory
2 GB
Graphic Card
ATI Radeon Mobility X1400
LAN Network Card
Intel Corporation 82573L Gigabit Ethernet Controller
Wireless Network Chipset
Intel Corporation PRO/Wireless 3945ABG Network Connection
PC Brand & Type
HP dv9000
CPU Type
AMD 64 TL-56
Memory
2 GB
Graphic Card
NVIDIA 6150
LAN Network Card
NVIDIA MCP51 LAN
Wireless Network Chipset
Not supported directly. Requires ndiswrapper.
PC Brand & Type
HP nx7400
CPU Type
Intel Centrino Duo
Memory
-
Graphic Card
-
LAN Network Card
-
Wireless Network Chipset
-
PC Brand & Type
HP nc6320
CPU Type
Intel Centrino Duo
Memory
-
Graphic Card
-
LAN Network Card
-
Wireless Network Chipset
-
109 / 128
PC Brand & Type
HP Pavilion Slimline s7710
CPU Type
AMD Athlon 64 X2 Dual Core Processor 3800+
Memory
1GB
Graphic Card
nVidia GeForce 6150 LE
LAN Network Card
nVidia MCP51 Ethernet Controller
Wireless Network Chipset
-
PC Brand & Type
No-Name AMD PC
CPU Type
AMD Sempron(tm) 2600+
Memory
0.5 GB
Graphic Card
ATI Technologies Inc Radeon RV250 [Radeon 9000] (Secondary) (rev 01)
LAN Network Card
Digital Equipment Corporation DECchip 21142/43 (rev 30)
Wireless Network Chipset
-
PC Brand & Type
Shuttle SK22G2
CPU Type
Dual Core AMD 2500
Memory
1 GB
Graphic Card
NVIDIA GeForce 7300 LE
LAN Network Card
VIA Compatible Fast Ethernet Adapter
Wireless Network Chipset
Intel PRO/Wireless 2200BG
PC Brand & Type
Toshiba Satellite A10-S169
CPU Type
P4M at 2.2GHz
Memory
0.5 GB
Graphic Card
Intel 82852/855GM
LAN Network Card
Intel PRO/100 VE
Wireless Network Chipset
Netgear WG511T (Atheros-based)
Intel PRO/Wireless 2200BG (does not work)
PC Brand & Type
Custom built PC
CPU Type
Intel Core 2 6600 Dual Core, 2.4 GHz
Memory
2 GB
Graphic Card
NVIDIA 7950 GT
LAN Network Card
Marvel Yukon 88E8056 / Gigabit
Wireless Network Chipset
No wireless adapter
PC Brand & Type
Custom built PC based on Gigabyte GA-K8NF-9 motherboard
CPU Type
AMD Athlon 64 X2 Dual Core Processor 4400+, 2.21 GHz
Memory
2 GB
Graphic Card
Matrox Millennium P650 PCIe 128
LAN Network Card
NVIDIA nForce Networking Controller
Wireless Network Chipset
No wireless adapter
110 / 128
PC Brand & Type
Custom built PC based on Gigabyte GA-K8NF-9 motherboard
CPU Type
AMD Athlon 64 X2 Dual Core Processor 4400+, 2.21 GHz
Memory
2 GB
Graphic Card
NVIDIA GeForce 6500
LAN Network Card
NVIDIA nForce Networking Controller
Wireless Network Chipset
No wireless adapter
7.1.2. Incompatible Hardware
The hardware listed here is known to have problems.
PC Brand & Type
Dell Dimension E521
CPU Type
AMD
Memory
-
Graphic Card
-
LAN Network Card
-
Wireless Network Chipset
-
Issue
Graphic card and USB not detected.
PC Brand & Type
lenovo 3000 n200
CPU Type
Intel® Core 2 Duo
Memory
-
Graphic Card
NVIDIA GeForce Go 7300 with Turbo Cache
LAN Network Card
-
Wireless Network Chipset
-
Issue
Under KDE the start menu does not show text and icons.
111 / 128
7.2.
Virtual Machines
DAVIX runs as guest operating system on several different virtualization platforms.
Following configurations are known to work.
Host OS
Windows XP SP2
Virtualization Software
VMware Workstation 6.0.3 Build 80004
Guest OS Type
Other Linux 2.6 Kernel
Host OS
Ubuntu(Gutsy/Herdy)
Virtualization Software
VMware Server 1.0.4 Build 56528
Guest OS Type
Other Linux 2.6 Kernel
Host OS
Ubuntu(Gutsy/Herdy)
Virtualization Software
Virtualbox 1.5.6
Guest OS Type
Other Linux 2.6 Kernel
Host OS
Ubuntu(Gutsy/Herdy)
Virtualization Software
Qemu 0.9.0
Guest OS Type
Other Linux 2.6 Kernel
Host OS
FreeBSD 7.0 Stable
Virtualization Software
Qemu 0.9.1
Guest OS Type
Other Linux 2.6 Kernel
Host OS
Mac OS 10.5.2
Virtualization Software
Parallels 3.0 Build 5584
Guest OS Type
Other Linux
Host OS
Mac OS 10.5.2
Virtualization Software
VirtualBox 1.5.51
Guest OS Type
Linux 2.6
Host OS
Mac OS 10.5.2
Virtualization Software
VirtualBox 1.6.0
Guest OS Type
Linux 2.6
Host OS
Mac OS 10.5.3
Virtualization Software
VMware Fusion 1.1.2 Build 87978
Guest OS Type
Other Linux 2.6 Kernel
112 / 128
8.
Networking
8.1.
LAN Networking
Wired LAN with DHCP should work out of the box on most systems. In some cases,
e.g. under VMware, it can sometimes happen that the interface eth0 is not up after
booting. The following procedure shows you how to troubleshoot connectivity
problems. For simplicity reasons the example shown here are based on the network
interface ID eth0. For your particular system it can be different.
·
First check if your network cable is attached and if the LEDs on your network
card or switch port are turned on.
·
See if eth0 is listed: ifconfig
·
If in the resulting list eth0 is missing then try to start up the interface:
ifconfig eth0 up
·
Check again if eth0 is up: ifconfig
·
When the interface is showing up you can start the DHCP agent: dhcpcd eth0
·
Check if a dynamic IP address was assigned: ifconfig
·
If no IP address was assigned, repeat the previous four steps.
8.2.
Wireless Networking
8.2.1. Kernel Supported Drivers
Since not every wireless card has open source drivers, setting up wireless LAN can be
difficult. But the first thing is to try if any the kernel supported drivers work. For
simplicity reasons the example shown here are based on the network interface ID eth0.
For your particular system it can be different, e.g. it can be wlan0 or ath0.
·
First make sure that wireless is enabled in your BIOS and activated. On some
systems, like the Lenovo ThinkPad T60, it is required to turn on wireless by
moving the switch located on the outside of you notebook into the On position.
On others you can use a keyboard function shortcut to enable wireless, e.g. on
a Dell Inspiron it is Fn-F2.
·
Boot DAVIX in KDE mode and open a console.
113 / 128
·
Then check if a wireless interface is available: iwconfig
root@slax:~# iwconfig
lo
no wireless extensions.
eth0
unassociated ESSID:off/any
Mode:Managed Channel=0 Access Point: Not-Associated
Bit Rate:0 kb/s
Tx-Power=20 dBm
Sensitivity=8/0
Retry limit:7
RTS thr:off
Fragment thr:off
Encryption key:off
Power Management:off
Link Quality:0 Signal level:0 Noise level:0
Rx invalid nwid:0 Rx invalid crypt:0 Rx invalid frag:0
Tx excessive retries:0 Invalid misc:218
Missed beacon:0
eth1
no wireless extensions.
·
Before being able to scan you have to startup the wireless device with the
command: ifconfig eth0 up
·
Then you can scan for wireless LANs using: iwlist eth0 scan
·
After a while a list of available Wireless access points will be visible. If you
favorite on is missing redo the scan.
root@slax:~# iwlist eth0 scan
eth0
Scan completed :
Cell 04 - Address: 00:DE:AD:BE:EF:00
ESSID:"xxx"
Protocol:IEEE 802.11b
Mode:Master
Frequency:2.412 GHz (Channel 1)
Encryption key:off
Bit Rates:1 Mb/s; 2 Mb/s; 5.5 Mb/s; 11 Mb/s
Quality=83/100 Signal level=-83 dBm
Extra: Last beacon: 184ms ago
·
If your access point requires a WEP key then enter:
iwconfig eth0 key dead-beaf-dead-beaf-dead-beaf-de
·
To attach to your desired access point with ESSID xxx use the following
command: iwconfig eth0 essid "xxx"
·
Then start the DHCP agent: dhcpcd eth0
·
Check if dynamic IP address was assigned: ifconfig
·
If it does not work retry the previous 7 steps.
114 / 128
8.2.2. NDISwrapper
If the steps in the previous chapters do not work out for you, you can try to get
wireless running with the NDIS Drivers. DAVIX supports the ndiswrapper, which
allows you using the Windows NDIS Drivers.
For details on you particular wireless card see NDISwrapper home page20 and other
third party websites.
Known issues:
·
20
Not all vendor drivers support the promiscuous mode in their wireless drivers.
Therefore, it can be that sniffing network traffic of other system on the
network is not possible.
NDISwrapper: http://ndiswrapper.sourceforge.net/
115 / 128
9.
Graphic Cards
9.1.
OpenGL
The underlying SLAX distribution supports many graphic cards. Thus, DAVIX
should work on most systems. There is one big limitation: As Open GL runs in
simulation mode only, it is possible that applications, which heavily rely on OpenGL,
perform poorly. GoogleEarth is one example. For most visualization tools found on
DAVIX, no problems should be expected though.
If you want to have better performance you have to install the vendor supported
graphic card drivers. Check the vendor web sites for details21:
3DLabs
ATI
Elsa
Intel
Matrox
NVIDIA
S3
SIS
http://www.3dlabs.com/support/drivers/
http://ati.amd.com/support/driver.html
http://www.elsa.com/EN/Support/driver_gladiac.asp
http://support.intel.com/support/graphics
http://www.matrox.com/mga/support/drivers/latest/home.cfm
http://www.nvidia.com/content/drivers/drivers.asp
http://www.s3graphics.com/drivers.jsp
http://www.sis.com/support/support_prodid.htm
Since these vendor drivers have very stringent licensing conditions it is not possible to
distribute them with DAVIX.
9.2.
Multi-Head Support
If you want to run DAVIX with two or more screens it is most of the time required
using the vendor supplied graphic card driver. For vendor web sites see the URL list
in chapter OpenGL.
For configuration hints check the README and INSTALL files coming along the
vendor driver packages.
21
List taken from GoogleEarth Help: http://earth.google.com/support/bin/answer.py?answer=21462
116 / 128
10.
FAQ
10.1. General
Q: What does DAVIX stand for?
A: DAVIX is an abbreviation for "Data Analysis and VIsualization LinuX®".
Q: Which Linux distribution is DAVIX based on?
A: DAVIX utilizes the SLAX 6.0.x as a base.
Q: What is the difference between DAVIX and BackTrack?
A: BackTrack is focused on penetration testing. Although several tools can be found
in both distributions, DAVIX concentrates on the aspects of data mining and
visualization.
Q: Why is GoogleEarth not distributed with DAVIX?
A: Google has a very stringent license that prohibits redistribution of GoogleEarth.
Although we love to distribute it with DAVIX, we are not allowed to.
10.2. Troubleshooting
Q: When booting DAVIX from CD/DVD I get the following message: “Cannot read
module data. Corrupted download?”. How can I fix it?
A: Most likely you burned the CD/DVD with a high burning speed. Some CD/DVD
readers have problems reading this kind of media. We recommend burning the
CD/DVD with the lowest speed available.
Q: When booting DAVIX in KDE mode the menus are missing text. How can I fix it?
A: This is most likely a graphic driver issue. We recommend you installing the vendor
driver and try again. As an alternative you can boot DAVIX in VESA compatibility
mode, but I will lake support for high resolutions.
Q: LAN is not available after booting under VMware. How can I fix it?
A: Open a console and execute "ifconfig". If the interface eth0 is missing then execute
"ifconfig eth0 up". Then execute "dhcpcd eth0" and check by executing ifconfig that
the IP address is assigned. If not, try to execute "dhcpcd eth0" again. If this does not
solve your issue reboot the VM and/or physical machine.
Q: After using one of the network capture tools within VMware the network stack is
dead. What can I do?
A: First shutdown the network interface with "ifconfig eth0 down". Then execute
"dhcpcd eth0" and check by executing ifconfig that the IP address is assigned. If not,
try to execute "dhcpcd eth0" again. If this does not solve your issue reboot the VM
and/or physical machine.
117 / 128
10.3. Support
Q: I have a problem with DAVIX. Where can I discuss it?
A: We have created a Google Group davix-support22. Check for answer there first. If
your problem is new, register and post your questions there.
Q: Where can I report a bug or a feature request?
A: We utilize Google Code23 for bug tracking. To report a bug you are required to
create a Google account and contact us such that we can put you on the project
member list. If this to much fuss for you can report bugs directly to us: jan.monsch ät
iplosion.com.
10.4. Build Environment
Q: Which OS did you use as a build system for your modules?
A: A full installation of Slackware 12.0 and dropline Gnome 2.20.0 was used for
compiling applications from source code. Several DAVIX packages have been
directly taken from the Slackware and dropline GNOME distribution and have been
converted with tgz2lzm to SLAX packages.
Q: Can I build DAVIX from ground up?
A: Currently, the build scripts do not allow automated building of the CD. Therefore
we refrain from publishing the scripts. When we have fixed the build environment we
will certainly publish the build scripts.
10.5. Image Distribution
Q: How can I provide a download mirror for DAVIX?
A: Create a cron job with following command and report the HTTP or FTP download
URL to us: jan.monsch ät iplosion.com
rsync -av 82.197.185.121::davix /to/wherever/it/goes/on/your/sever
22
23
DAVIX Support Google Group: http://groups.google.ch/group/davix-support
DAVIX Google Code Project: http://code.google.com/p/davix/
118 / 128
11.
Acknowledgements
We would like to thank all people who have contributed to DAVIX in one form or
another. Without them DAVIX would not have been possible. Thank you!
In particular we would like to thank Gabriel Mueller for his regression testing efforts,
which tremendously help improving lots of details on the CD as well as in the manual.
A very big thanks to Greg Conti for his encouraging feedback, which showed us, that
we are on the right track. Above all Greg and John Goodall have given us a platform
at the vizSEC 2008 conference in Boston24 for presenting DAVIX to the research
community. We feel very honored and thank you both for this.
Beta-Testers for DAVIX in alphabetic order of their last names or nicknames:
· Alexander Bochmann
· Greg Conti
· Eric Deschamps
· Olga Gelbart
· Mirko Kildani
· Benjamin Kohler
· C. S. Lee (geek00L)
· Jean-Philippe Luiggi
· Joseph M Lanier
· Zach Lanier
· David Libershal
· Kevin Liston
· mfs
· mOODy
· Gabriel Mueller
· Jose M. Pavón (chmeee)
· Izar Tarandach
· Stefano Zanero
· ... many others who want to stay anonymous ...
Mirror & bandwidth providers in alphabetic order of their last names:
· Kord Campbell
· Benjamin Kohler
· Martin Winter
A special thanks to Ben Shneiderman from the University of Maryland HumanComputer Interaction Lab for allowing us to integrate Treemap and Timesearcher 1 in
DAVIX.
24
vizSEC:http://www.vizsec.org/
119 / 128
12.
Licenses
12.1. Software
DAVIX incorporates software with different types of licenses ranging from BSD over
GPL to custom licenses. So if you want to make derivative works you have to check if
you are allowed to. The software packages utilized by DAVIX and their licenses are
documented in the file LICENSE-DAVIX.pdf, which can be found on the DAVIX
CD.
All original contributions by the authors, which are not part of other software
distributions, are licensed under the GNU GPL Version 2. Changes to third party
software packages are distributed under the license of the original software package.
Copyright (c) 2008 Jan P. Monsch, Raffael Marty
12.2. Sublicense Attribution
The registered trademark Linux® is used pursuant to a sublicense from LMI25, the
exclusive licensee of Linus Torvalds, owner of the mark on a world-wide basis.
The tools Treemap and Timesearcher 1 used with permission from Ben Shneiderman
from the University of Maryland Human-Computer Interaction Lab26.
12.3. Documentation
This document is distributed under the GNU Free Documentation License Version 1.2.
Copyright (c) 2008 Jan P. Monsch, Raffael Marty
Permission is granted to copy, distribute and/or modify this document under the terms
of the GNU Free Documentation License, Version 1.2 or any later version published
by the Free Software Foundation; with no Invariant Sections, no Front-Cover Texts,
and no Back-Cover Texts. A copy of the license is included in the section entitled
"GNU Free Documentation License".
25
26
Linux Mark Institute: http://www.linuxmark.org/
Human-Computer Interaction Lab: http://www.cs.umd.edu/hcil/
120 / 128
13.
Disclaimer
The DAVIX authors and contributors disclaim all warranties with regard to this
software and documentation, including all implied warranties of merchantability and
fitness. In no event shall the DAVIX authors and contributors be liable for any special,
indirect or consequential damages or any damages whatsoever resulting from loss of
use, data or profits, whether in an action of contract, negligence or other tortious
action, arising out of or in connection with the use or performance of this software.
121 / 128
14.
0.1.0
0.2.0
0.5.0
0.5.1
1.0.0
1.0.1
Versioning
Initial document
Beta 2 Release
Final release for Raffael's Applied Security Visualization book
Fixed several bugs and added documentation for newly added tools
Release version of document
No change in content. Just updated version information
122 / 128
15.
GNU Free Documentation License
GNU Free Documentation License
Version 1.2, November 2002
Copyright (C) 2000,2001,2002 Free Software Foundation, Inc.
51 Franklin St, Fifth Floor, Boston, MA 02110-1301 USA
Everyone is permitted to copy and distribute verbatim copies
of this license document, but changing it is not allowed.
0. PREAMBLE
The purpose of this License is to make a manual, textbook, or other
functional and useful document "free" in the sense of freedom: to
assure everyone the effective freedom to copy and redistribute it,
with or without modifying it, either commercially or noncommercially.
Secondarily, this License preserves for the author and publisher a way
to get credit for their work, while not being considered responsible
for modifications made by others.
This License is a kind of "copyleft", which means that derivative
works of the document must themselves be free in the same sense. It
complements the GNU General Public License, which is a copyleft
license designed for free software.
We have designed this License in order to use it for manuals for free
software, because free software needs free documentation: a free
program should come with manuals providing the same freedoms that the
software does. But this License is not limited to software manuals;
it can be used for any textual work, regardless of subject matter or
whether it is published as a printed book. We recommend this License
principally for works whose purpose is instruction or reference.
1. APPLICABILITY AND DEFINITIONS
This License applies to any manual or other work, in any medium, that
contains a notice placed by the copyright holder saying it can be
distributed under the terms of this License. Such a notice grants a
world-wide, royalty-free license, unlimited in duration, to use that
work under the conditions stated herein. The "Document", below,
refers to any such manual or work. Any member of the public is a
licensee, and is addressed as "you". You accept the license if you
copy, modify or distribute the work in a way requiring permission
under copyright law.
A "Modified Version" of the Document means any work containing the
Document or a portion of it, either copied verbatim, or with
modifications and/or translated into another language.
A "Secondary Section" is a named appendix or a front-matter section of
the Document that deals exclusively with the relationship of the
publishers or authors of the Document to the Document's overall subject
(or to related matters) and contains nothing that could fall directly
within that overall subject. (Thus, if the Document is in part a
textbook of mathematics, a Secondary Section may not explain any
mathematics.) The relationship could be a matter of historical
connection with the subject or with related matters, or of legal,
commercial, philosophical, ethical or political position regarding
them.
The "Invariant Sections" are certain Secondary Sections whose titles
are designated, as being those of Invariant Sections, in the notice
that says that the Document is released under this License. If a
section does not fit the above definition of Secondary then it is not
allowed to be designated as Invariant. The Document may contain zero
Invariant Sections. If the Document does not identify any Invariant
Sections then there are none.
The "Cover Texts" are certain short passages of text that are listed,
as Front-Cover Texts or Back-Cover Texts, in the notice that says that
123 / 128
the Document is released under this License. A Front-Cover Text may
be at most 5 words, and a Back-Cover Text may be at most 25 words.
A "Transparent" copy of the Document means a machine-readable copy,
represented in a format whose specification is available to the
general public, that is suitable for revising the document
straightforwardly with generic text editors or (for images composed of
pixels) generic paint programs or (for drawings) some widely available
drawing editor, and that is suitable for input to text formatters or
for automatic translation to a variety of formats suitable for input
to text formatters. A copy made in an otherwise Transparent file
format whose markup, or absence of markup, has been arranged to thwart
or discourage subsequent modification by readers is not Transparent.
An image format is not Transparent if used for any substantial amount
of text. A copy that is not "Transparent" is called "Opaque".
Examples of suitable formats for Transparent copies include plain
ASCII without markup, Texinfo input format, LaTeX input format, SGML
or XML using a publicly available DTD, and standard-conforming simple
HTML, PostScript or PDF designed for human modification. Examples of
transparent image formats include PNG, XCF and JPG. Opaque formats
include proprietary formats that can be read and edited only by
proprietary word processors, SGML or XML for which the DTD and/or
processing tools are not generally available, and the
machine-generated HTML, PostScript or PDF produced by some word
processors for output purposes only.
The "Title Page" means, for a printed book, the title page itself,
plus such following pages as are needed to hold, legibly, the material
this License requires to appear in the title page. For works in
formats which do not have any title page as such, "Title Page" means
the text near the most prominent appearance of the work's title,
preceding the beginning of the body of the text.
A section "Entitled XYZ" means a named subunit of the Document whose
title either is precisely XYZ or contains XYZ in parentheses following
text that translates XYZ in another language. (Here XYZ stands for a
specific section name mentioned below, such as "Acknowledgements",
"Dedications", "Endorsements", or "History".) To "Preserve the Title"
of such a section when you modify the Document means that it remains a
section "Entitled XYZ" according to this definition.
The Document may include Warranty Disclaimers next to the notice which
states that this License applies to the Document. These Warranty
Disclaimers are considered to be included by reference in this
License, but only as regards disclaiming warranties: any other
implication that these Warranty Disclaimers may have is void and has
no effect on the meaning of this License.
2. VERBATIM COPYING
You may copy and distribute the Document in any medium, either
commercially or noncommercially, provided that this License, the
copyright notices, and the license notice saying this License applies
to the Document are reproduced in all copies, and that you add no other
conditions whatsoever to those of this License. You may not use
technical measures to obstruct or control the reading or further
copying of the copies you make or distribute. However, you may accept
compensation in exchange for copies. If you distribute a large enough
number of copies you must also follow the conditions in section 3.
You may also lend copies, under the same conditions stated above, and
you may publicly display copies.
3. COPYING IN QUANTITY
If you publish printed copies (or copies in media that commonly have
printed covers) of the Document, numbering more than 100, and the
Document's license notice requires Cover Texts, you must enclose the
copies in covers that carry, clearly and legibly, all these Cover
Texts: Front-Cover Texts on the front cover, and Back-Cover Texts on
the back cover. Both covers must also clearly and legibly identify
you as the publisher of these copies. The front cover must present
the full title with all words of the title equally prominent and
124 / 128
visible. You may add other material on the covers in addition.
Copying with changes limited to the covers, as long as they preserve
the title of the Document and satisfy these conditions, can be treated
as verbatim copying in other respects.
If the required texts for either cover are too voluminous to fit
legibly, you should put the first ones listed (as many as fit
reasonably) on the actual cover, and continue the rest onto adjacent
pages.
If you publish or distribute Opaque copies of the Document numbering
more than 100, you must either include a machine-readable Transparent
copy along with each Opaque copy, or state in or with each Opaque copy
a computer-network location from which the general network-using
public has access to download using public-standard network protocols
a complete Transparent copy of the Document, free of added material.
If you use the latter option, you must take reasonably prudent steps,
when you begin distribution of Opaque copies in quantity, to ensure
that this Transparent copy will remain thus accessible at the stated
location until at least one year after the last time you distribute an
Opaque copy (directly or through your agents or retailers) of that
edition to the public.
It is requested, but not required, that you contact the authors of the
Document well before redistributing any large number of copies, to give
them a chance to provide you with an updated version of the Document.
4. MODIFICATIONS
You may copy and distribute a Modified Version of the Document under
the conditions of sections 2 and 3 above, provided that you release
the Modified Version under precisely this License, with the Modified
Version filling the role of the Document, thus licensing distribution
and modification of the Modified Version to whoever possesses a copy
of it. In addition, you must do these things in the Modified Version:
A. Use in the Title Page (and on the covers, if any) a title distinct
from that of the Document, and from those of previous versions
(which should, if there were any, be listed in the History section
of the Document). You may use the same title as a previous version
if the original publisher of that version gives permission.
B. List on the Title Page, as authors, one or more persons or entities
responsible for authorship of the modifications in the Modified
Version, together with at least five of the principal authors of the
Document (all of its principal authors, if it has fewer than five),
unless they release you from this requirement.
C. State on the Title page the name of the publisher of the
Modified Version, as the publisher.
D. Preserve all the copyright notices of the Document.
E. Add an appropriate copyright notice for your modifications
adjacent to the other copyright notices.
F. Include, immediately after the copyright notices, a license notice
giving the public permission to use the Modified Version under the
terms of this License, in the form shown in the Addendum below.
G. Preserve in that license notice the full lists of Invariant Sections
and required Cover Texts given in the Document's license notice.
H. Include an unaltered copy of this License.
I. Preserve the section Entitled "History", Preserve its Title, and add
to it an item stating at least the title, year, new authors, and
publisher of the Modified Version as given on the Title Page. If
there is no section Entitled "History" in the Document, create one
stating the title, year, authors, and publisher of the Document as
given on its Title Page, then add an item describing the Modified
Version as stated in the previous sentence.
J. Preserve the network location, if any, given in the Document for
public access to a Transparent copy of the Document, and likewise
the network locations given in the Document for previous versions
it was based on. These may be placed in the "History" section.
You may omit a network location for a work that was published at
least four years before the Document itself, or if the original
publisher of the version it refers to gives permission.
K. For any section Entitled "Acknowledgements" or "Dedications",
Preserve the Title of the section, and preserve in the section all
the substance and tone of each of the contributor acknowledgements
and/or dedications given therein.
125 / 128
L. Preserve all the Invariant Sections of the Document,
unaltered in their text and in their titles. Section numbers
or the equivalent are not considered part of the section titles.
M. Delete any section Entitled "Endorsements". Such a section
may not be included in the Modified Version.
N. Do not retitle any existing section to be Entitled "Endorsements"
or to conflict in title with any Invariant Section.
O. Preserve any Warranty Disclaimers.
If the Modified Version includes new front-matter sections or
appendices that qualify as Secondary Sections and contain no material
copied from the Document, you may at your option designate some or all
of these sections as invariant. To do this, add their titles to the
list of Invariant Sections in the Modified Version's license notice.
These titles must be distinct from any other section titles.
You may add a section Entitled "Endorsements", provided it contains
nothing but endorsements of your Modified Version by various
parties--for example, statements of peer review or that the text has
been approved by an organization as the authoritative definition of a
standard.
You may add a passage of up to five words as a Front-Cover Text, and a
passage of up to 25 words as a Back-Cover Text, to the end of the list
of Cover Texts in the Modified Version. Only one passage of
Front-Cover Text and one of Back-Cover Text may be added by (or
through arrangements made by) any one entity. If the Document already
includes a cover text for the same cover, previously added by you or
by arrangement made by the same entity you are acting on behalf of,
you may not add another; but you may replace the old one, on explicit
permission from the previous publisher that added the old one.
The author(s) and publisher(s) of the Document do not by this License
give permission to use their names for publicity for or to assert or
imply endorsement of any Modified Version.
5. COMBINING DOCUMENTS
You may combine the Document with other documents released under this
License, under the terms defined in section 4 above for modified
versions, provided that you include in the combination all of the
Invariant Sections of all of the original documents, unmodified, and
list them all as Invariant Sections of your combined work in its
license notice, and that you preserve all their Warranty Disclaimers.
The combined work need only contain one copy of this License, and
multiple identical Invariant Sections may be replaced with a single
copy. If there are multiple Invariant Sections with the same name but
different contents, make the title of each such section unique by
adding at the end of it, in parentheses, the name of the original
author or publisher of that section if known, or else a unique number.
Make the same adjustment to the section titles in the list of
Invariant Sections in the license notice of the combined work.
In the combination, you must combine any sections Entitled "History"
in the various original documents, forming one section Entitled
"History"; likewise combine any sections Entitled "Acknowledgements",
and any sections Entitled "Dedications". You must delete all sections
Entitled "Endorsements".
6. COLLECTIONS OF DOCUMENTS
You may make a collection consisting of the Document and other documents
released under this License, and replace the individual copies of this
License in the various documents with a single copy that is included in
the collection, provided that you follow the rules of this License for
verbatim copying of each of the documents in all other respects.
You may extract a single document from such a collection, and distribute
it individually under this License, provided you insert a copy of this
License into the extracted document, and follow this License in all
other respects regarding verbatim copying of that document.
126 / 128
7. AGGREGATION WITH INDEPENDENT WORKS
A compilation of the Document or its derivatives with other separate
and independent documents or works, in or on a volume of a storage or
distribution medium, is called an "aggregate" if the copyright
resulting from the compilation is not used to limit the legal rights
of the compilation's users beyond what the individual works permit.
When the Document is included in an aggregate, this License does not
apply to the other works in the aggregate which are not themselves
derivative works of the Document.
If the Cover Text requirement of section 3 is applicable to these
copies of the Document, then if the Document is less than one half of
the entire aggregate, the Document's Cover Texts may be placed on
covers that bracket the Document within the aggregate, or the
electronic equivalent of covers if the Document is in electronic form.
Otherwise they must appear on printed covers that bracket the whole
aggregate.
8. TRANSLATION
Translation is considered a kind of modification, so you may
distribute translations of the Document under the terms of section 4.
Replacing Invariant Sections with translations requires special
permission from their copyright holders, but you may include
translations of some or all Invariant Sections in addition to the
original versions of these Invariant Sections. You may include a
translation of this License, and all the license notices in the
Document, and any Warranty Disclaimers, provided that you also include
the original English version of this License and the original versions
of those notices and disclaimers. In case of a disagreement between
the translation and the original version of this License or a notice
or disclaimer, the original version will prevail.
If a section in the Document is Entitled "Acknowledgements",
"Dedications", or "History", the requirement (section 4) to Preserve
its Title (section 1) will typically require changing the actual
title.
9. TERMINATION
You may not copy, modify, sublicense, or distribute the Document except
as expressly provided for under this License. Any other attempt to
copy, modify, sublicense or distribute the Document is void, and will
automatically terminate your rights under this License. However,
parties who have received copies, or rights, from you under this
License will not have their licenses terminated so long as such
parties remain in full compliance.
10. FUTURE REVISIONS OF THIS LICENSE
The Free Software Foundation may publish new, revised versions
of the GNU Free Documentation License from time to time. Such new
versions will be similar in spirit to the present version, but may
differ in detail to address new problems or concerns. See
http://www.gnu.org/copyleft/.
Each version of the License is given a distinguishing version number.
If the Document specifies that a particular numbered version of this
License "or any later version" applies to it, you have the option of
following the terms and conditions either of that specified version or
of any later version that has been published (not as a draft) by the
Free Software Foundation. If the Document does not specify a version
number of this License, you may choose any version ever published (not
as a draft) by the Free Software Foundation.
ADDENDUM: How to use this License for your documents
To use this License in a document you have written, include a copy of
the License in the document and put the following copyright and
license notices just after the title page:
127 / 128
Copyright (c) YEAR YOUR NAME.
Permission is granted to copy, distribute and/or modify this document
under the terms of the GNU Free Documentation License, Version 1.2
or any later version published by the Free Software Foundation;
with no Invariant Sections, no Front-Cover Texts, and no Back-Cover Texts.
A copy of the license is included in the section entitled "GNU
Free Documentation License".
If you have Invariant Sections, Front-Cover Texts and Back-Cover Texts,
replace the "with...Texts." line with this:
with the Invariant Sections being LIST THEIR TITLES, with the
Front-Cover Texts being LIST, and with the Back-Cover Texts being LIST.
If you have Invariant Sections without Cover Texts, or some other
combination of the three, merge those two alternatives to suit the
situation.
If your document contains nontrivial examples of program code, we
recommend releasing these examples in parallel under your choice of
free software license, such as the GNU General Public License,
to permit their use in free software.
128 / 128