1
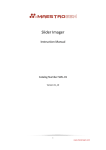
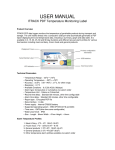
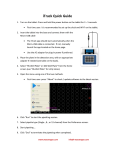
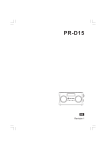
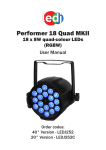
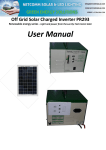
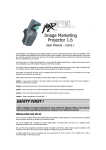
® iTrack Pipette Tracking System Cat. No.: TK-01 Instruction Manual Version 1_14 0 www.maestrogen.com Table of Contents Table of Contents ........................................................................................................... 1 Table of Figures .............................................................................................................. 2 About iTrack ................................................................................................................... 3 Technical Support ........................................................................................................... 4 Warranty ........................................................................................................................ 4 Regulatory Notice .......................................................................................................... 4 Product Specifications.................................................................................................... 5 Setup .............................................................................................................................. 5 What’s included ......................................................................................................... 6 Connection ................................................................................................................. 6 Kickstand .................................................................................................................... 7 Assembly .................................................................................................................... 7 Microplate Adapter Selection ........................................................................................ 8 Buttons and Indicators ................................................................................................. 10 1. Menu ................................................................................................................. 11 2. Refresh .............................................................................................................. 12 3. Work Status ....................................................................................................... 12 4. Help ................................................................................................................... 12 5. USB connection ................................................................................................. 13 Operation Instruction................................................................................................... 13 1. Turn on the tablet ............................................................................................. 14 2. Open the iTrack app .......................................................................................... 14 3. Place the microplate ......................................................................................... 14 4. Select plate type................................................................................................ 14 5. Open the menu ................................................................................................. 14 6. Click ‘’Run’’ button ............................................................................................ 14 7. Select the pipette type ...................................................................................... 15 8. Start pipetting ................................................................................................... 15 9. End the pipetting session .................................................................................. 15 10. Change the plate type ................................................................................... 16 Log File ......................................................................................................................... 17 Software Update .......................................................................................................... 18 Troubleshooting ........................................................................................................... 19 1 www.maestrogen.com Table of Figures Figure 1. Pipette detection............................................................................................. 3 Figure 2. Illumination of pipetted location .................................................................... 3 Figure 3. Log file records every step .............................................................................. 3 Figure 4. iTrack components .......................................................................................... 6 Figure 5. Connect iTrack ................................................................................................. 6 Figure 6. Bottom view with kickstand ............................................................................ 7 Figure 7. iTack assembly ................................................................................................. 7 Figure 8. Adapter A and C heights ................................................................................. 8 Figure 9. Adapter A and C hole sizes .............................................................................. 8 Figure 10. Place a 96-Well Plate on Adapter A .............................................................. 9 Figure 11. Place a 96-well ELISA or storage plate on adaptor B .................................... 9 Figure 12. Place a 384-well plate directly in the Detection Region ............................... 9 Figure 13. Upper scanning layer for 96-well plates ..................................................... 10 Figure 14. Lower scanning layer for 384-well plates.................................................... 10 Figure 15. Indicators and Buttons ................................................................................ 10 Figure 16. Open the Menu ........................................................................................... 11 Figure 17. Preference ................................................................................................... 12 Figure 18. Red light indicates the detection is inactive ............................................... 12 Figure 19. USB Connected............................................................................................ 13 Figure 20. USB Disconnected ....................................................................................... 13 Figure 21. Home page .................................................................................................. 14 Figure 22. The number indicates how many times the well is pipetted ...................... 15 Figure 23. End the pipetting session ............................................................................ 16 Figure 24. 384-Well plate user interface...................................................................... 16 Figure 25. Log File ........................................................................................................ 17 Figure 26. Log file list ................................................................................................... 17 Figure 27. Log file content............................................................................................ 17 Figure 28. Menu - About .............................................................................................. 18 Figure 29. Software update .......................................................................................... 18 Figure 30. LED & Sensor error ...................................................................................... 19 2 www.maestrogen.com About iTrack iTrack, a proprietary1 pipette tracking system, is a tablet powered smart lab device that can detect, guide, and record manual pipetting. It helps users avoid pipetting errors and keep a detailed record of each pipetting step for troubleshooting and quality control. iTrack uses two layers of sensors to detect the locations of pipette tips. The lower layer is for 384-well plates, whereas, the upper layer is for 96-well plates and strip tubes. Figure 1. Pipette detection Figure 2. Illumination of pipetted location Figure 3. Log file records every step 1 Patent pending 3 www.maestrogen.com Technical Support Maestrogen provides technical support for all of its products. If you have any questions about the product use or operation, please contact Maestrogen: 8275 South Eastern, Avenue #200 Las Vegas, NV 89123 USA E-Mail: [email protected] Warranty iTrack is warranted against defects in materials and workmanship for 1 year after the purchase. If any defects occur in the instrument or accessories during this warranty period, Maestrogen will repair or replace the defective parts at its discretion without charge. The following defects, however, are specifically excluded: 1. Damages caused by improper operation, misuse, accident, or disaster 2. Repair, modification, or part substitution performed by anyone other than Maestrogen or its authorized agent. 3. Use of fittings or spare parts supplied by anyone other than Maestrogen. 4. Corrosion caused by solvent or samples. For any inquiry or request for repair service, contact your local Maestrogen office. Inform Maestrogen of the model and serial number of your instrument. Regulatory Notice IMPORTANT: The iTrack instrument is designed and certified to meet safety standards and EMC regulations. Certified products are safe to use when operated in accordance with the instruction manual. This instrument should not be modified or altered in any way. Alteration of this instrument will: 1. Void the manufacturer’s warranty 2. Void the safety and EMC certification 3. Create a potential safety hazard Maestrogen is not responsible for any injury or damage caused by the use of this instrument for purposes other than those for which it is intended, or by modifications of the instrument not performed by Maestrogen or an authorized agent. 4 www.maestrogen.com Product Specifications Items Specifications Compatible Pipette Single-, 8-, & 12-channel (fixed space) Compatible Tip 0.1 - 1,000 µL Compatible Microplate / Tube (PCR, ELISA, storage…) 96-Well Microplate (height < 23.5 mm) 384-Well Microplate (height < 11 mm) 8-tube / 12-tube strips Control System Android Tablet CPU & RAM Quad-Core A9 1.6GHZ, 1G DDR3 RAM Storage 8 GB NAD Flash, MicroSD supports 64GB Ports MicroSD, MicroUSB, power, headset Display 8” Capacitive Touch Screen, 1,024 x 768 pixel Cameras Front / 2MP Back Operation Voltage 100-240V / 0.3A (Tablet) Operation Power Consumption 5V / 0.5A Battery 3.7V – 3500mAh Scan Light Source IR Light-Emitting Diode Scan Frequency 200 - 500 Hz Detection Time 0.5 - 3 sec. Size 255mm x 230mm x 54mm (10” x 9” x 2”) Weight 1.9 Kg (4.1 lb) Setup 1. Carefully unpack the iTrack instrument. 2. Place the instrument on a stable, horizontal surface without vibrating devices such as centrifuges or ice makers around. 3. Turn on the tablet: Press and hold the power button for 3 - 5 seconds. 4. Set up clock, network connection and others as needed from the tablet. 5. Connect the tablet to the base using the Micro-USB OTG adapter (Figure 5). 6. Avoid direct sunlight, fire, infrared light, and blinking lights nearby to prevent interference. 7. The instrument uses infrared LED to detect pipetting locations. The slits that house sensors layer should be kept clean and clear. 8. The screen is protected by a film. It can be operated with or without the film. 5 www.maestrogen.com What’s included Base (Detection unit) AC adapter Tablet PC (Control unit) Micro-USB OTG adapter Adaptor A Adaptor B Power cord Adaptor C (Optional) Figure 4. iTrack components Connection AC cord & adapter Micro-USB OTG adapter USB connection activates the App Adaptor A Figure 5. Connect iTrack 6 www.maestrogen.com Kickstand Kickstand for tilted view Figure 6. Bottom view with kickstand Assembly Control Region Detection Region Figure 7. iTack assembly 7 www.maestrogen.com Microplate Adapter Selection Plate Type Adapter 384-well (full-skirt) plate No adapter is needed 96-well PCR plate & Low-profile tube strips adapter A 96-well ELISA or storage plate adapter B Full height (high profile) tube strips adapter C (not included) Figure 8. Adapter A and C heights Figure 9. Adapter A and C hole sizes 8 www.maestrogen.com Figure 10. Place a 96-Well Plate on Adapter A Figure 11. Place a 96-well ELISA or storage plate on adaptor B Figure 12. Place a 384-well plate directly in the Detection Region The purpose of the adapters is to secure microplates and tubes to the correct location and adjust their heights so that they sit just below the detection layers. It is important to make sure the top surface of the plate or tube does not obstruct the scanning layer. The upper scanning layer should be clear of any object other than the pipette during a 96-well detection session. The lower scanning layer 9 www.maestrogen.com should be clear of any object other than the pipette during a 384-well detection session. Upper scanning layer Figure 13. Upper scanning layer for 96-well plates Lower scanning layer Figure 14. Lower scanning layer for 384-well plates Buttons and Indicators Menu Refresh Work Status Help USB Connection Figure 15. Indicators and Buttons 10 www.maestrogen.com 1. Menu Touch the Menu Button (method b) at upper right corner will bring up the menu. The menu can also be brought up by swiping from left side of the screen to the right (method a). Press the Menu button Swipe from left to right Figure 16. Open the Menu o Run: Start a new pipetting detection session, or resume a paused detection session. Please make sure the scanning layer is free of any object (including pipette) when clicking the “Run” button. o Pause: Pause detection of the current session. “Pause” shows up at the “Run” button location when the session is active. o End: End the current detection session. o Undo: Erase the signal (light and number) generated from last pipetting step, as if it didn’t happen. However, the log file still records the last step, as well as the Undo action. o Redo: Restore the signal erased by Undo. o Home: Return to the Home Page. It will end the current session if it has not been terminated. o Preference: Choose the type of pipette being used: Single-, 8-, or 12-channel Adjust the detection sensitivity if needed. The default is optimal for most users and usually do not need to be adjusted. Lower sensitivity improves reliability of the detection. The “Auto Save Log file” is checked by default. Each pipetting step will be saved in a log file automatically. If this feature is not desirable, uncheck the box. 11 www.maestrogen.com Figure 17. Preference o About: Check software & firmware update (see “Software Update”). 2. Refresh Detection may stop if the microplate is moved during pipetting. If iTrack fails to detect pipetting after repeated attempts, press the Refresh button resume the detection. to 3. Work Status o Red: The detection is inactive. No pipetting will be detected. o Green: The detection is active. Figure 18. Red light indicates the detection is inactive 4. Help Press Help button will open the latest iTrack manual if it is already downloaded to the tablet. A PDF Reader is needed to read the manual. The free PDF Reader can be installed from Google Play store. 12 www.maestrogen.com If the latest iTrack manual is not downloaded to the tablet, pressing Help will start the downloading process. 5. USB connection The indicator shows the tablet is connected to the base (via USB). Figure 19. USB Connected The indicator shows the tablet is not connected to the base. Figure 20. USB Disconnected Operation Instruction iTrack can be operated with the tablet’s battery or plug-in power with included AC adapter. The AC adapter supplies 5V DC. Avoid direct sunlight, fire, infrared light, and blinking lights nearby to prevent interference. 13 www.maestrogen.com 1. Turn on the tablet Press and hold the power button for 3 - 5 seconds. 2. Open the iTrack app Connect the base with the tablet through the attached USB cable and the micro-USB OTG adapter (Figure 4 & 6). After connecting, the tablet will start iTrack app automatically. The iTrack app can also be started manually from the tablet. To save energy, the Wi-Fi will be turned off automatically by the iTrack app. 3. Place the microplate Place the microplate or tube strips in the detection area with the appropriate adapter (see “Microplate Adapter Selection”) if needed. Make sure the top surface of the plate / tube does not block the detection layer. 4. Select plate type Press “96-Well Plate” or “384-Well Plate” from the Home page. Choose “96-Well Plate” when using strip tubes. Figure 21. Home page 5. Open the menu Use one of the two methods (see Figure 15): (a) Swipe from left side of the screen to the right. (b) Click the menu button at upper right corner of the screen. 6. Click ‘’Run’’ button The “Run” button can be used to start a new session, and resume or paused a current session. (The “Run” button cannot be clicked if the tablet is not 14 www.maestrogen.com connected to the base via USB.) 7. Select the pipette type Preference screen will pop up - Select the pipette type and press OK to start the pipetting session (Figure 16). 8. Start pipetting o After each pipetting step (after the pipette tip leaves the well), the detected pipetting location will be shown in light on the tablet screen, both underneath the well in the detection area and in the control area. The last pipetting location is shown in continuous flash light. o If the same well is pipetted multiple times, it will show a different color and the number of times it is pipetted. o It’s preferred to perform the next pipetting step after the tablet shows the previous pipetting location. o Make sure the pipette tip only moves up-and-down when pipetting. Figure 22. The number indicates how many times the well is pipetted 9. End the pipetting session Click “End“ button to terminate the pipetting session. A confirmation window will pop up to confirm. A text log file will be saved automatically if the “Auto Save Log file” option is checked in the Preference. The log file records every pipetting step (pipetting location and time). 15 www.maestrogen.com Figure 23. End the pipetting session 10. Change the plate type Click “Home” to return to the Home page and select a different plate type. Figure 24. 384-Well plate user interface 16 www.maestrogen.com Log File On the Home page, click “Log File” to display the pipetting records. Figure 25. Log File Click specific log files to show the options to open, delete, or rename the log files. Figure 26. Log file list Each log file includes the time and location of every pipetting step in text format. Click icon to go back. Figure 27. Log file content 17 www.maestrogen.com Software Update For best performance, please keep the software and firmware up to date. Following the steps below to check and update: Step 1 – Click “About” button at either 96-well or 384-well interface. The system will connect to the Internet automatically if Wi-Fi is set up. Figure 28. Menu - About Step 2 – Click “Upgrade” if the Firmware or App is “out-of-date” after checking. Figure 29. Software update The URL of the user manual is also listed in the About screen. 18 www.maestrogen.com Troubleshooting If the following problems are encountered, please refer to the following suggestions for troubleshooting. For further assistance, please contact your local customer services. 1. iTrack does not work after connecting the tablet via the USB cable. (a) Re-connect the USB cable. (b) Re-start the iTrack app. (c) Reboot the Tablet. (d) Check if the USB cable is damaged. (e) Check if the USB port of tablet is damaged. 2. iTrack shows the LED and sensor failure indicator indicator , or the LED failure indicator , the sensor failure Figure 30. LED & Sensor error (a) The microplate or tubes may be sitting too high, blocking the sensing signal. Please choose an appropriate adapter to make sure the top surface of the microplate or tubes is below the scanning layer. (b) Re-start the iTrack app. before pressing “Run” to start the pipetting session, please make sure the scanning layer is free of any object. (c) Press to refresh the detection. 3. High error rate of detection (a) If encountered two or more errors consecutively, press 19 www.maestrogen.com to refresh the detection. Avoid moving the microplate or tubes during the session. (b) Make sure the scanning layer is not blocked by any object when the “Run” button is pressed. Keep the scanning layer free of any object other than the pipette tips during the session. (c) Try the different sensitivity setting. (d) Check if the well adaptor is at the right position. (e) Re-plug or change a new Micro-USB OTG adaptor. (f) Clear iTrack app cache in the tablet setting. 20 www.maestrogen.com