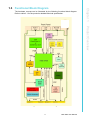
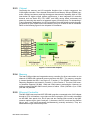
1
User Manual
MIC-5602
Advanced Mezzanine Card
Processor AMC
Copyright
The documentation and the software included with this product are copyrighted 2009
by Advantech Co., Ltd. All rights are reserved. Advantech Co., Ltd. reserves the right
to make improvements in the products described in this manual at any time without
notice. No part of this manual may be reproduced, copied, translated or transmitted
in any form or by any means without the prior written permission of Advantech Co.,
Ltd. Information provided in this manual is intended to be accurate and reliable. However, Advantech Co., Ltd. assumes no responsibility for its use, nor for any infringements of the rights of third parties, which may result from its use.
Acknowledgements
All other product names or trademarks are properties of their respective owners.
Product Warranty (2 years)
Advantech warrants to you, the original purchaser, that each of its products will be
free from defects in materials and workmanship for two years from the date of purchase.
This warranty does not apply to any products which have been repaired or altered by
persons other than repair personnel authorized by Advantech, or which have been
subject to misuse, abuse, accident or improper installation. Advantech assumes no
liability under the terms of this warranty as a consequence of such events.
Because of Advantech’s high quality-control standards and rigorous testing, most of
our customers never need to use our repair service. If an Advantech product is defective, it will be repaired or replaced at no charge during the warranty period. For outof-warranty repairs, you will be billed according to the cost of replacement materials,
service time and freight. Please consult your dealer for more details.
If you think you have a defective product, follow these steps:
1. Collect all the information about the problem encountered. (For example, CPU
speed, Advantech products used, other hardware and software used, etc.) Note
anything abnormal and list any onscreen messages you get when the problem
occurs.
2. Call your dealer and describe the problem. Please have your manual, product,
and any helpful information readily available.
3. If your product is diagnosed as defective, obtain an RMA (return merchandise
authorization) number from your dealer. This allows us to process your return
more quickly.
4. Carefully pack the defective product, a fully-completed Repair and Replacement
Order Card and a photocopy proof of purchase date (such as your sales receipt)
in a shippable container. A product returned without proof of the purchase date
is not eligible for warranty service.
5. Write the RMA number visibly on the outside of the package and ship it prepaid
to your dealer.
MIC-5602 User Manual
Part No. 2002560200
Edition 1
Printed in Taiwan
February 2009
ii
Declaration of Conformity
CE
This product has passed the CE test for environmental specifications when shielded
cables are used for external wiring. We recommend the use of shielded cables.
FCC Class B
Note: This equipment has been tested and found to comply with the limits for a Class
B digital device, pursuant to part 15 of the FCC Rules. These limits are designed to
provide reasonable protection against harmful interference when the equipment is
operated in a commercial environment. This equipment generates, uses, and can
radiate radio frequency energy and, if not installed and used in accordance with the
instruction manual, may cause harmful interference to radio communications. Operation of this equipment in a residential area is likely to cause harmful interference in
which case the user will be required to correct the interference at his own expense.
FM
This equipment has passed the FM certification. According to the National Fire Protection Association, work sites are classified into different classes, divisions and
groups, based on hazard considerations. This equipment is compliant with the specifications of Class I, Division 2, Groups A, B, C and D indoor hazards.
Technical Support and Assistance
1.
2.
Visit the Advantech web site at www.advantech.com/support where you can find
the latest information about the product.
Contact your distributor, sales representative, or Advantech's customer service
center for technical support if you need additional assistance. Please have the
following information ready before you call:
– Product name and serial number
– Description of your peripheral attachments
– Description of your software (operating system, version, application software,
etc.)
– A complete description of the problem
– The exact wording of any error messages
iii
MIC-5602 User Manual
Warnings, Cautions and Notes
Warning! Warnings indicate conditions, which if not observed can cause personal
injury!
Caution! Cautions are included to help you avoid damaging hardware or losing
data. e.g.
There is a danger of a new battery exploding if it is incorrectly installed.
Do not attempt to recharge, force open, or heat the battery. Replace the
battery only with the same or equivalent type recommended by the manufacturer. Discard used batteries according to the manufacturer's
instructions.
Note!
Notes provide optional additional information.
Document Feedback
To assist us in making improvements to this manual, we would welcome comments
and constructive criticism. Please send all such - in writing - to: [email protected]
Packing List
!
!
!
MIC-5602 Processor Advanced Mezzanine Card
User manual (PDF file) CD-ROM disc x1
Warranty certificate document x1
If any of these items are missing or damaged, contact your distributor or sales representative immediately.
MIC-5602 User Manual
iv
Safety Instructions
1.
2.
3.
Read these safety instructions carefully.
Keep this User Manual for later reference.
Disconnect this equipment from any AC outlet before cleaning. Use a damp
cloth. Do not use liquid or spray detergents for cleaning.
4. For plug-in equipment, the power outlet socket must be located near the equipment and must be easily accessible.
5. Keep this equipment away from humidity.
6. Put this equipment on a reliable surface during installation. Dropping it or letting
it fall may cause damage.
7. The openings on the enclosure are for air convection. Protect the equipment
from overheating. DO NOT COVER THE OPENINGS.
8. Make sure the voltage of the power source is correct before connecting the
equipment to the power outlet.
9. Position the power cord so that people cannot step on it. Do not place anything
over the power cord.
10. All cautions and warnings on the equipment should be noted.
11. If the equipment is not used for a long time, disconnect it from the power source
to avoid damage by transient overvoltage.
12. Never pour any liquid into an opening. This may cause fire or electrical shock.
13. Never open the equipment. For safety reasons, the equipment should be
opened only by qualified service personnel.
14. If one of the following situations arises, get the equipment checked by service
personnel:
– The power cord or plug is damaged.
– Liquid has penetrated into the equipment.
– The equipment has been exposed to moisture.
– The equipment does not work well, or you cannot get it to work according to
the user's manual.
– The equipment has been dropped and damaged.
– The equipment has obvious signs of breakage.
15. DO NOT LEAVE THIS EQUIPMENT IN AN ENVIRONMENT WHERE THE
STORAGE TEMPERATURE MAY GO BELOW -20° C (-4° F) OR ABOVE 60° C
(140° F). THIS COULD DAMAGE THE EQUIPMENT. THE EQUIPMENT
SHOULD BE IN A CONTROLLED ENVIRONMENT.
16. CAUTION: DANGER OF EXPLOSION IF BATTERY IS INCORRECTLY
REPLACED. REPLACE ONLY WITH THE SAME OR EQUIVALENT TYPE
RECOMMENDED BY THE MANUFACTURER, DISCARD USED BATTERIES
ACCORDING TO THE MANUFACTURER'S INSTRUCTIONS.
17. The sound pressure level at the operator's position according to IEC 704-1:1982
is no more than 70 dB (A).
DISCLAIMER: This set of instructions is given according to IEC 704-1. Advantech
disclaims all responsibility for the accuracy of any statements contained herein.
v
MIC-5602 User Manual
Safety Precaution - Static Electricity
Follow these simple precautions to protect yourself from harm and the products from
damage.
! To avoid electrical shock, always disconnect the power from your PC chassis
before you work on it. Don't touch any components on the CPU card or other
cards while the PC is on.
! Disconnect power before making any configuration changes. The sudden rush
of power as you connect a jumper or install a card may damage sensitive electronic components.
Product Configurations
Model Number
On-Board Option
CPU
Memory
MIC-5602A-M1E
Core2 Duo LV 1.5 GHz (L7400)
1 GB DDR2 with ECC
MIC-5602A-M2E
Core2 Duo LV 1.5 GHz (L7400)
2 GB DDR2 with ECC
MIC-5602B-M1E
Core2 Duo ULV 1.06 GHz (U7500)
1 GB DDR2 with ECC
MIC-5602B-M2E
Core2 Duo ULV 1.06 GHz (U7500)
2 GB DDR2 with ECC
Note!
1.
2.
3.
TPM support is available as an option.
CF module is available as an option.
Full size front panel design will be available upon request.
We Appreciate Your Input
Please let us know of any aspect of this product, including the manual, which could
use improvement or correction. We appreciate your valuable input in helping make
our products better.
MIC-5602 User Manual
vi
Glossary
AMC
ATCA
BMC
CMC
EHCI
GbE
HPM
IPMC
IPMI
LSB
MCH
MMC
OOS
PATA
PCIe
PICMG
PXE
RX
SAS
SATA
SBC
SCSI
SDR
SerDes
SIW
SSD
TPM
TX
Advanced Mezzanine Card
Advanced Telecommunications Computing Architecture
Baseboard Management Controller
Carrier Management Controller
Enhanced Host Controller Interface
Gigabit Ethernet
Hardware Platform Management
Intelligent Platform Management Controller
Intelligent Platform Management Interface
Least Significant Byte
MicroTCA Carrier Hub
Module Management Controller
Out Of Service
Parallel Advanced Technology Attachment
PCI Express
PCI Industrial Computer Manufacturers Group
Pre-boot Execution Environment
Receive
Serial Attached SCSI
Serial Advanced Technology Attachment
Single Board Computer
Small Computer System Interface
Sensor Data Record
Serializer/Deserializer
Serial I/O and Watchdog Timer
Solid State Drive
Trusted Platform Module
Transmit
vii
MIC-5602 User Manual
MIC-5602 User Manual
viii
Contents
Chapter
Chapter
1
Product Overview ................................1
1.1
1.2
1.3
Introduction ............................................................................................... 2
Application................................................................................................. 2
Functional Block Diagram ......................................................................... 3
Figure 1.1 MIC-5602 Block Diagram ........................................... 3
2
Board Specification .............................5
2.1
Technical Data .......................................................................................... 6
Table 2.1: Advantech MIC-5602 Processor AMC Tech Data ...... 6
Product Features....................................................................................... 7
2.2.1 CPU .............................................................................................. 7
Table 2.2: Intel Processor Selection for the MIC-5602................ 7
2.2.2 BIOS ............................................................................................. 7
2.2.3 Chipset.......................................................................................... 8
Figure 2.1 Intel 3100 Chipset....................................................... 8
2.2.4 Memory ......................................................................................... 8
2.2.5 Ethernet Controller........................................................................ 8
2.2.6 SATA Interface.............................................................................. 9
2.2.7 USB Host Interface ....................................................................... 9
2.2.8 MMC ............................................................................................. 9
Table 2.3: Sensor Data Record ................................................. 11
Table 2.4: FRU Structure........................................................... 12
2.2.9 Chipset Watchdog Interface........................................................ 12
2.2.10 RS-232 Ports .............................................................................. 12
2.2.11 Clock Generator.......................................................................... 12
2.2.12 Legacy USB Support .................................................................. 13
2.2.13 E-Keying ..................................................................................... 13
Table 2.5: E-Keying Match ........................................................ 13
Table 2.6: E-Keying Mis-Match ................................................. 13
2.2.14 On-board Storage Chip............................................................... 14
2.2.15 Compact Flash Expansion Module (Optional) ............................ 14
2.2.16 Trusted Platform Module (Optional)............................................ 14
2.2.17 Handle Switch ............................................................................. 14
2.2.18 Front Panel Ports and Indicators ................................................ 14
Figure 2.2 MIC-5602 Front Panel .............................................. 14
Table 2.7: LAN LEDs................................................................. 15
Table 2.8: Front Panel LEDs ..................................................... 15
2.2.19 Jumper Settings .......................................................................... 16
Figure 2.3 Jumper Locations ..................................................... 16
Table 2.9: CN8 BIOS Recovery Image...................................... 16
Table 2.10: CN9 Clear CMOS ..................................................... 16
2.2
Chapter
3
Console Terminal Setup ...................17
3.1
3.2
3.3
USB to UART Bridge............................................................................... 18
Terminal Emulator................................................................................... 18
PuTTY Configuration............................................................................... 18
Figure 3.1 PuTTY configuration................................................. 19
Figure 3.2 PuTTY screen........................................................... 19
Figure 3.3 MIC-5602 BIOS POST shown on PuTTY screen ..... 20
ix
MIC-5602 User Manual
Chapter
4
AMI BIOS Setup................................. 21
4.1
Introduction ............................................................................................. 22
Figure 4.1 Setup program initial screen..................................... 22
Entering Setup ........................................................................................ 23
Figure 4.2 Press <DEL> to run setup ........................................ 23
Main Setup.............................................................................................. 24
Figure 4.3 Main Setup Screen................................................... 24
4.3.1 System Time and System Date .................................................. 24
Figure 4.4 Main Setup Showing BIOS Image 01....................... 25
Advanced BIOS Feature Setup............................................................... 25
Figure 4.5 Advanced BIOS Features Setup Screen.................. 25
4.4.1 CPU Configuration...................................................................... 26
Figure 4.6 CPU configuration .................................................... 26
4.4.2 ACPI Configuration ..................................................................... 27
Figure 4.7 ACPI Configuration................................................... 27
4.4.3 MPS Configuration...................................................................... 28
Figure 4.8 MPS Configuration ................................................... 28
4.4.4 PCI-Express Configuration ......................................................... 28
Figure 4.9 PCI-Express Configuration....................................... 28
4.4.5 System Console Configuration ................................................... 29
Figure 4.10System Console Configuration................................. 29
4.4.6 Trusted Computing ..................................................................... 30
Figure 4.11Trusted Computing Configuration ............................ 30
Boot Setup .............................................................................................. 31
Figure 4.12Boot Setup................................................................ 31
Figure 4.13Hard Disk Drives ...................................................... 32
Figure 4.14Removable Drives .................................................... 32
4.5.1 Boot Settings Configuration ........................................................ 33
Figure 4.15Boot Settings Configuration...................................... 33
4.5.2 Boot Device Priority .................................................................... 34
Figure 4.16Boot Device Priority.................................................. 34
Security ................................................................................................... 35
Figure 4.17Security .................................................................... 35
4.6.1 Supervisor and User Passwords ................................................ 35
4.6.2 Other Security Settings............................................................... 36
Exit Options............................................................................................. 37
Figure 4.18Exit Options .............................................................. 37
4.2
4.3
4.4
4.5
4.6
4.7
Chapter
5
MMC Firmware Operation ................ 39
5.1
Module Management Controller (MMC).................................................. 40
5.1.1 BIOS Image Selection by MMC .................................................. 40
Table 5.1: Command Assignment ............................................. 40
Table 5.2: Request Data ........................................................... 40
Table 5.3: Response Data......................................................... 40
Table 5.4: Command Assignment ............................................. 41
Table 5.5: Request Data ........................................................... 41
Table 5.6: Response Data......................................................... 41
5.1.2 BIOS Firmware Hub (FWH) Write Protection by MMC ............... 42
Table 5.7: Command Assignment ............................................. 42
Table 5.8: Request Data ........................................................... 42
Table 5.9: Response Data......................................................... 42
Table 5.10: Command Assignment ............................................. 43
Table 5.11: Request Data ........................................................... 43
Table 5.12: Response Data......................................................... 43
5.1.3 MIC-5602 MAC Addresses Mirroring.......................................... 44
Table 5.13: Command Assignment ............................................. 44
Table 5.14: Request Data ........................................................... 44
MIC-5602 User Manual
x
5.2
5.3
Chapter
Table 5.15: Response Data......................................................... 44
MMC Firmware Update ........................................................................... 45
5.2.1 MIC-5602 Field Upgradeable Components ................................ 45
5.2.2 HPM.1 Upgrade Process ............................................................ 46
5.2.3 HPM.1 Upgrade with ipmitool ..................................................... 46
Serial-over-LAN (SoL)............................................................................. 48
5.3.1 Overview ..................................................................................... 48
5.3.2 Accessing the MIC-5602 MMC with ipmitool .............................. 48
5.3.3 SoL Configuration with ipmitool .................................................. 50
5.3.4 SoL Session Establishment with ipmitool ................................... 53
6
Overview of Supported Features and
Known Limitations ............................55
6.1
6.2
Supported Features ................................................................................ 56
Table 6.1: Current Supported and Unsupported Features ........ 56
Known Limitations: .................................................................................. 56
7
Replacing and Installing the AMC....57
7.1
7.2
Extracting a MIC-5602 ............................................................................ 58
Installing a MIC-5602 .............................................................................. 58
Appendix A
IPMI/PICMG Command Subset
Supported by MMC ............................59
A.1
IPMI/PICMG Command Subset Supported by MMC .............................. 60
Chapter
xi
MIC-5602 User Manual
MIC-5602 User Manual
xii
Chapter
1
1
Product Overview
This chapter describes briefly the
product technology of the MIC5602.
1.1 Introduction
The MIC-5602 is a highly integrated single-width, mid-size, and economical processor AMC. Its design is based on the low-power, high-performance Intel Celeron M
ULV or Pentium M LV processor combined with the high-performance Intel 3100
chipset. The board includes 1 or 2 GB of soldered DDR2 400 MHz memory with ECC
for higher MTBF and optimum cooling. To facilitate development, test and integration
while offering typical network connectivity once deployed, the front panel provides a
gigabit Ethernet connector, a serial port and a USB 2.0 host port.
The MIC-5602 maximizes AMC edge connector connectivity for the best design flexibility. When redundancy or two separate interconnects are required, the board can
be configured with two PCI Express x4 ports or with a single PCI Express x8 port
when throughput is essential. Two gigabit Ethernet ports provide AMC.2 compliance
and offer control and data plane connectivity to facilitate the migration of existing
applications. Both ports connect to the 3100 chipset via PCI Express for maximum
data throughput. Dual SATA interfaces provide AMC.3 compliant storage and two
USB ports offer further connectivity opportunities.
A dedicated Module Management Controller (MMC) monitors onboard conditions
and manages hot swap operation for field upgrades or module replacement without
the need to power down the underlying system.
1.2 Application
It is designed to allow communication equipment manufacturers to add modular and
upgradeable computing functionality to their AdvancedTCA or MicroTCA proprietary
baseboards and provide the localized capability necessary for applications such as
protocol processing, packet processing, data management and I/O management.
This AMC module is hot-swappable, which allows it to be replaced by operators or
service organizations in the field without bringing down an entire AdvancedTCA
blade or system.
MIC-5602 User Manual
2
The hardware concept can be illustrated by the following functional block diagram.
Refer to table 2.1 for the product's detailed technical specification.
Chapter 1
1.3 Functional Block Diagram
Product Overview
Figure 1.1 MIC-5602 Block Diagram
3
MIC-5602 User Manual
MIC-5602 User Manual
4
Chapter
2
2
Board Specification
This chapter describes the hardware features of the MIC-5602.
2.1 Technical Data
Table 2.1: Advantech MIC-5602 Processor AMC Tech Data
Processor System
Bus
Memory
CPU
Intel Core 2 Duo ULV (U7500) or Core2 Duo LV
(L7400) up to 1.5 GHz
Chipset
Intel 3100
BIOS
AMI (1. Dual images with update rollback, 2. CMOS
settings can be changed over IPMI, and 3. CMOS
backup works without battery)
Front Side Bus
400/533 MHz
PCI Express
PCI Express rev1.0a: configurable one x8 or two x4
routed to AMC connector
Technology
DDR2 400 with ECC
Max. Capacity
2 GB
Controller
Intel 82571EB dual-port Gigabit Ethernet controller
(support 802.3d compliant link aggregation)
Interface
One GbE accessible on front panel via RJ-45 and
two SerDes links to AMC common options region
ports 0 and 1
CompactFlash
Optional expansion board with CF type-1 B socket
On-board
1GB industrial grade internal NAND flash disk (used
as NV storage, emergency boot disk or diagnostics
boot media)
AMC Edge Connector
Two SATA interfaces to common ports region 2-3
Ethernet
Mass Storage
SATA Interface
Serial Interface
USB Interface
Other
One SATA routed to CF daughter board
I/O
Routed to front panel as USB Slave interface
through onboard USB to Serial converter
I/O
One USB 2.0 compliant host port (standard USB
Connector) on front panel
AMC Edge
Connector
Two USB 2.0 ports connect to rear AMC edge connector
Watchdog Timer
AMC compliant watchdog
Hardware Monitor
Controller
IPMI v1.5 compatible MMC
Source Code
Pigeon Point Systems-based
Firmware
Update Standard HPM.1 compliant
Compatibility
Carrier Grade Linux (Wind River Platform for Network Equipment, Linux Edition 2.0)
AMC
Mid-size, single width
Interface
AMC.0 compliant
Miscellaneous
LEDs
x1 blue for hot swap, x1 red for failure and OOS, x1
green for general purpose
Power
Requirement
Configuration
Core 2 Duo L7400 + 3100 + 1 GB on-board DDR2
SDRAM
Consumption
35.2 watts
Dimensions
180.6 mm x 73.5 mm
Operating System
Form Factor
Physical
MIC-5602 User Manual
6
Operating
Environment
Compliance
-5 ~ 55 °C (23 ~ 122 °F) -40 ~ 70 °C (-40 ~ 140 °F)
Humidity
IEC60068-2-78 (95%RH @ 40 °C)
Vibration
(5 ~ 500Hz)
IEC60068-2-6 (0.002 G2/Hz, 1 Grms)
Shock
IEC60068-2-27 (10 G, 11 ms)
Altitude
Sea level to 4,000 m
above sea level
Conformance
UL94V0, FCC Class B, CE, RoHS & WEEE Ready
NEBS Level 3
Designed for GR-63-CORE and GR-1089-CORE
Standards
PICMG AMC.0, AMC.1, AMC.2, AMC.3, IPMI v1.5,
HPM.1
10,000 above sea level
2.2 Product Features
2.2.1 CPU
The MIC-5602 supports the low wattage Intel Core 2 Duo LV and Core 2 Duo ULV
processors on 65 nm technology with core frequencies up to 1.5 GHz and 667 MHz
Front Side Bus (FSB). These processors are validated with the integrated Intel
server-class 3100 chipset. This chipset provides greater flexibility for developers of
embedded applications by integrating the memory and I/O control functions into a
single component, addressing the needs for high-performance, high-reliability, and
low-power consumption within a small form factor such as the MIC-5602. Current
supported processors are listed in the table below. The Intel Core 2 Duo L7400 processor delivers 1.5 GHz of core frequency and 4 MB of L2 cache. It inherits a low
thermal design power of 17 W. And, the Intel Core 2 Duo U7500 processor offering
1.06 GHz of core frequency and 2 MB of L2 cache comes with ultra low maximum
heat dissipation of 10 W.
Table 2.2: Intel Processor Selection for the MIC-5602
Model
Core Speed FSB Speed
L2 Cache TDP
Package
Intel Core 2 Duo LV (L7400)
1.5 GHz
667 MHz
4 MB
17 W
uFCBGA
533 MHz
2 MB
10 W
uFCBGA
Intel Core 2 Duo ULV (U7500) 1.06 GHz
2.2.2 BIOS
An 8 Mbit Firmware Hub (FWH) contains a board-specific BIOS (from AMI) designed
to meet telecom and embedded system requirements. The device shall implement
boot sector protection and dual images to support BIOS update failure recovery. The
BIOS boot sector contains the early start-up code. Two BIOS images stored in the
non volatile memory are the "User" image (Default: Image 0) and the "Recovery"
image (Image 1). The program code in the boot sector will checksum the User image
and start the User BIOS if it has a valid checksum, otherwise it will boot the Recovery
BIOS image. The AMC Module also has a jumper (CN8) for forcing the BIOS into the
recovery mode (see Section 2.2.19).
7
MIC-5602 User Manual
Board Specification
Regulatory
Non-operating
Temperature
Chapter 2
Table 2.1: Advantech MIC-5602 Processor AMC Tech Data
2.2.3 Chipset
Combining the memory and I/O controller functions into a single component, the
3100 chipset includes a four-channel Enhanced Direct Memory Access (EDMA) controller, offering low-latency and high throughput data transfer capability with no CPU
intervention for higher overall system performance. It also integrates I/O controller
features such as Serial ATA, PCI, UART, and USB, saving board real-estate and
power by removing the need for a separate, legacy I/O bridge chip. For demanding I/
O and networking applications, the PCIe interfaces from the chipset provide throughput speeds of up to 4 GB/s on the x8 interface, and up to 2 GB/s on the x4 interfaces.
Refer to the following figure for the chipsets I/O interfaces.
Figure 2.1 Intel 3100 Chipset
2.2.4 Memory
The Intel 3100 provides an integrated memory controller for direct connection to one
channel of DDR2-400 registered memory devices with ECC. The memory controller
is located behind the Bus 0 as Device 0, Function 0. The DRAM Controller Error
Reporting Registers are located in Function 1 of the Device 0. The Intel 3100 memory interface supports 512 Mbit, 1 Gbit and 2 Gbit memory technologies. However, as
product options, the MIC-5602 uses 9 pieces of either 1 Gbit (128 Mb x 8) or 2 Gbit
(256 Mb x 8) SDRAM.
2.2.5 Ethernet Controller
The MIC-5602 uses one Intel 82571EB LAN controller, connected to the 3100 chipset
through a PCIe x4 interface, to provide one GbE connection (PHY mode) accessible
on the AMC front panel via a RJ-45 port and two SerDes links routed to the AMC
common options region (port 0 and port 1). However, the PHY mode and the SerDes
link on port 1 can not be accessed simultaneously (mutually exclusive). They are
switchable through a BIOS setup item.
MIC-5602 User Manual
8
The 3100 chipset contains one SATA (Serial ATA) Host Controller to support a total of
six ports which are located in Bus 0, Device 31, Function 2. Three of these six ports,
namely SATA 0 and SATA 1 are routed to AMC edge connector and SATA 2 to the
CompactFlash expansion board connector for SATA-PATA interface conversion.
2.2.7 USB Host Interface
2.2.8 MMC
The MMC is a logical controller that monitors the health, status, voltages and temperature of the AMC module and stores the data to a local sensor data record (SDR). It
forwards the AMC status and sensor data to the Carrier IPMC on an ATCA board or
the Carrier Manager on a MCH which sends the data to the shelf manager of the
ATCA system or the MicroTCA system, respectively. The MMC also maintains the
AMC module's FRU information repository. The MMC on the MIC-5602 is built based
on Pigeon Point Systems' (PPS) hardware/ software reference design kit for MMC.
2.2.8.1 ATMega128L Microprocessor
Atmel's ATmega128L is used as the micro controller for the MMC implementation on
the MIC-5602. As a highly integrated micro controller that has on-chip Flash,
EEPROM and SRAM memories, it contains an 8-bit AVR enhanced RISC architecture as its core. The peripheral functions of the ATmega128L used in the MMC
design include the I2C controllers, 8-bit timer, watchdog timer (WDT), Analog-to-Digital Converter (ADC), and GPIO. They are responsible for the following:
! Implementing the IPMB-L interface as the communication channel between the
MMC and the Carrier IPMC
! Monitoring sensor devices
! Implementing hot-swap functionality
! Controlling various reset types
! Maintaining SDR and FRU information
2.2.8.2 IPMB Implementation
The ATmega128L AVR core has a built-in I2C controller, which is connected to the
IPMB-L interface on the AMC's edge connector. This interface provides the primary
communication mechanism between the Carrier IPMC and the MMC.
2.2.8.3 Hardware Sensors
Three types of hardware sensors are supported by the MMC. They are I2C-based
thermal, voltage, and GPIO-based sensors.
Thermal Sensors
To support the higher level management in appropriately managing the cooling
resources, the AMC module must provide reports of abnormal temperature of its
environment. It has two I2C-based thermal sensors (LM86 and LM75) attached to the
MMC. When the MMC detects that a monitored temperature sensor crosses one or
more thresholds in either direction, the MMC sends an IPMI temperature event message to the Carrier IPMC. The Carrier IPMC, or higher level management, uses this
information to manage the cooling.
9
MIC-5602 User Manual
Board Specification
The 3100 chipset also contains one EHCI USB 2.0 Host Controller to support a total
of four ports which are located in Bus 0, Device 29, Function 7. All of them are implemented in the AMC payload. Port 0 is brought to a standard USB Type A connector
on the front panel. Port 1 is connected to the on-board USB storage flash controller
(see Section 2.2.15). And, Port 2 and Port 3 are routed to AMC edge connector.
Chapter 2
2.2.6 SATA Interface
Voltage Sensors
Four channels from an internal 10-bit ADC converter contained in the ATmega128L
are used to monitor the following voltages:
! CPU core voltage input power (0.75V to 1.30V)
! Payload input power (12V)
! Management power (3.3V)
! VCCP (1.05V)
GPIO Sensors
The MMC firmware registers some discrete sensors reflecting the states of GPIO signals connected to the AVR MMC. The following binary sensors are implemented on
the MIC-5602, using GPIO pins of the AVR:
! Processor Hot (PROCHOT#): this signal from the Intel CPU can be used as an
input or an output. It will go active (pulled low) when the integrated thermal
diode in the processor detects that a manufacturer-defined maximum operating
temperature is reached. By default, the processor will start throttling (i.e. running
at lower clock speed) thereby reducing its power dissipation when the
PROCHOT# signal is pulled low. The signal is connected to the AVR's PD[6]
GPIO. However, currently there is no plan to signal throttling state by the MMC
(i.e. over IPMI).
! Thermal Trip (THERMTRIP#): The Intel CPU contains a hard-coded threshold
to protect itself from overheating. When the corresponding threshold is reached,
the THERMTRIP# output is activated. This will cause both the 3100 chipset to
enter shutdown state and an interrupt to the MMC (through AVR's PD[7]). The
MMC will send a corresponding sensor event.
2.2.8.4 Logical Sensors
The types of logical sensors are registered by the MMC Management Subsystem.
They are the PCIMG Hot Swap sensor and the BMC watchdog sensor.
Hot Swap Sensors
The AMC module has hot swap capability, which enables the module to be inserted
into or extracted from the carrier board without having to shut down the system, or
allows the module to shut down (intentionally or un-intentionally) without bringing
down the system. The MMC contains a Module Hot Swap sensor which proactively
generates events to enable the Carrier IPMC to perform Hot Swap management for
the AMC module. The following events are supported:
! AMC hot swap handle closed
! AMC hot swap handle opened
! AMC quiesced
BMC Watchdog Sensors
When the BMC watchdog functionality is enabled, the MMC registers an IPMIdefined BMC watchdog sensor. The BMC watchdog will issue a payload cold reset
command when the watchdog timer expires.
Note!
The BMC watchdog timer needs to be enabled, configured and strobed
through IPMI commands.
MIC-5602 User Manual
10
Table 2.3: Sensor Data Record
Sensor Nr.
Sensor Name
Sensor Type
Voltage/Signal Monitored
0
Hot Swap
Discrete
Module Hot Swap
1
CPU VCC
Threshold
CPU core voltage input power
2
+3.3V MP
Threshold
AMC +3.3V management power
3
+12V
Threshold
AMC +12V payload power
4
+1.05V
Threshold
VCCP I/O voltage supply
5
LM75 Temp
Threshold
LM75 system temperature
6
LM86 Local Temp
Threshold
LM86 system temperature
7
LM86 CPU Temp
Threshold
LM86 CPU die temperature
8
Proc Hot GPIO
Discrete
PROCHOT# (Processor Hot)
9
Therm Trip GPIO
Discrete
THERMTRIP# (Thermal Trip)
10
BMC Watchdog
Discrete
BMC watchdog sensor record
11
Version Change
Discrete
MMC firmware version change
2.2.8.6 Reset Types
Three types of logical resets are supported by the MMC.
! Hard reset: the MMC resets all internal and external data/states to default values (such as internal message rings, sensor thresholds, hysteresis and event
enable masks, the states of the E-keying ports, and the state of the Blue LED
and FRU LEDs). When the AVR MMC is powered on, the MMC firmware detects
this condition and performs a hard reset of the AVR MMC. Another example is if
the management power drops below some critical value, a brown-out reset of
the AVR MMC occurs. When the management power returns to its normal
value, the AVR MMC is brought out of reset. The MMC firmware detects the
brown-out condition and performs a hard reset of the AVR MMC.
! Cold reset: the MMC resets all internal and external data/states to default values except for the overridden geographical address, overridden handle switch
state, the states of E-keying controls, and the states of the blue LED and the
FRU LEDs. One example for the cold reset scenario is if the watchdog timer of
the AVR MMC expires, a watchdog reset of the AVR MMC occurs. The MMC
firmware detects the watchdog reset condition and performs a cold reset of the
AVR MMC. Another example is if the front panel reset button is pressed for a
long period (>5s), the MMC will also execute a cold reset command. A cold
reset can be also executed by an IPMI command.
! Warm reset: it is similar to the cold reset with additional preserved external
data/states such as sensor threshold/hysteresis, sensor event masks, and sensor events. On a warm reset, which can be also executed by an IPMI command,
the MMC firmware recovers its state from the data stored in the SRAM memory,
the contents of which is preserved across external and watchdog resets.
11
MIC-5602 User Manual
Board Specification
Implemented module sensors are listed below.
Chapter 2
2.2.8.5 Sensor Data Records
The AMC module has local Sensor Data Records (SDR) for storing the above mentioned information (temperature, voltage, and hot swap state). In addition to sensor
identification (type, name, unit, etc.), the SDR contains the configuration of the sensor parameters that specify sensor behavior, such as threshold, hysteresis, event
generation capabilities, etc. Some of them can be configured through IPMI v1.5 commands. The SDR can be queried with device SDR commands. The MMC sends the
AMC SDR event messages (e.g. AMC Module Hot Swap state) to the carrier manager which then sends the data to the shelf manager and the user can access it
through the shelf manager or system manager.
2.2.8.7 Maintaining FRU Information
The FRU Data is maintained in the EEPROM memory of the ATmega128L AVR. The
structure complies with IPMI FRU Information Storage Definition. The basic structure
is shown below:
Table 2.4: FRU Structure
Common Header
The common header contains the offsets for each area within the
FRU data storage. It will be automatically generated by the FRU
compiler.
Internal Use Area
The internal use area is provided for storage of parameters of the
MIC-5602. It is used for the CMOS override function, the BIOS
image selection bit, the FWH write-protect bit, and the storage of
the GbE MAC addresses, etc.
Board Info Area
The board info area holds board relevant data, such as language
code, manufacturing date/time, manufacturer, product name, serial
number, part number, FRU programmer file ID, etc.
Product Info Area
The product info area holds product relevant data. It contains partially identical data as the board info area.
Multi-record Area
The multi-record area contains several subsets. First, there are the
AMC.0 required entries for E-Keying and system power budgeting.
Next, there is a dummy 256 byte OEM area dedicated for use by
customers.
2.2.9 Chipset Watchdog Interface
A watchdog timer is provided to reset the MMC in the event that the chipset is unresponsive. Being integrated into the SIW block of the Intel 3100, it appears as a logical
device on the LPC bus. The timer is pre-defined for 20 seconds. The 20-second timeout will result in triggering a BMC watchdog.
Known Limitation:
At the time of the manual creation, this feature has not been
implemented in the MMC firmware.
2.2.10 RS-232 Ports
The Intel 3100 serial ports, UART 1 and UART 2, appear as logical devices 4 and 5
on the LPC bus, respectively. The UART 1 is routed to an USB-Serial converter. The
UART 2's RX and TX signals are routed to the MMC.
2.2.11 Clock Generator
One CK410M clock generator (ICS954201) driven with a 14.318 MHz (+/-30ppm)
crystal is used to generate the AMC Module clocks such as the clock frequency (i.e.
100 MHz) required by the processor, the FSB, the memory subsystem and the PCIe
ports. There are also other clock signals (i.e. 14.318 MHz, 33 MHz, and 48 MHz)
required by the Intel 3100. However, The 200 MHz clock for the DDR2 memory is
generated internally by the Intel 3100.
MIC-5602 User Manual
12
The legacy USB support enables USB devices such as keyboards, mice, and hubs to
be used even when the operating system's USB drivers are not yet available. The
legacy USB support allows the user to access the BIOS setup menu and install an
operating system that supports USB. The legacy USB support is set to "Enabled" by
default.
Note!
2.2.13 E-Keying
The purpose of E-Keying as mentioned in the PICMG AMC.0 R2.0 Specification is to
prevent board damage/mis-operation and to verify fabric compatibility. The FRU data
contains the board point-to-point connectivity record as described in Section 3.9.1.2
of the PICMG AMC.0 R2.0 Specification. If the carrier card does not support the
same fabric pin-out as the AMC Module, the E-Keying will disable the fabric interface.
If matched, the MMC will change the status of its pre-assigned GPO pins. And, when
the BIOS detect these pins' changed status, it will enable the corresponding fabric
interface.
Table 2.5: E-Keying Match
Port
USB
Action
GPO Pin Name
GPO Status
BIOS must
EKEY_EN_USB
High
-
EKEY_EN_PCIE1
High
Enable this port
EKEY_EN_PCIE2
High
Enable this port
PCIe Clock
EKEY_EN_PCIE_CLK
High
-
SATA 0
EKEY_EN_SATA0
High
Enable this port
SATA 1
EKEY_EN_SATA1
High
Enable this port
SerDes 1
EKEY_EN_GBE1
High
Enable this port
SerDes 2
EKEY_EN_GBE2
High
Enable this port
PCIe Configuration
Table 2.6: E-Keying Mis-Match
Port
USB
Action
GPO Pin Name
GPO Status
BIOS must
EKEY_EN_USB
Low
-
EKEY_EN_PCIE1
Low
Disable this port
EKEY_EN_PCIE2
Low
Disable this port
PCIe Clock
EKEY_EN_PCIE_CLK
Low
-
SATA 0
EKEY_EN_SATA0
Low
Disable this port
SATA 1
EKEY_EN_SATA1
Low
Disable this port
SerDes 1
EKEY_EN_GBE1
Low
Disable this port
SerDes 2
EKEY_EN_GBE2
Low
Disable this port
PCIe Configuration
13
MIC-5602 User Manual
Board Specification
The legacy USB support is for keyboards, mice and hubs only. It does
not support other USB devices except bootable devices like CD-ROM
drives and floppy disk drives.
Chapter 2
2.2.12 Legacy USB Support
2.2.14 On-board Storage Chip
An on-board 1 GB storage chip consisting of a USB flash controller and non-volatile
NAND flash memory can generally be used as a normal single fixed disk. It can be
used for boot and/or storage on the Linux OS. It can also be write-protected. This
option is provided through a BIOS setup item (enable/disable USB Flash Disk write
protection).
Note!
A 2 GB storage option is available for the NAND flash's capacity.
2.2.15 Compact Flash Expansion Module (Optional)
An on-board CompactFlash expansion module is available as an option. Either a
type-I or type-II CF card can be used. A SATA-PATA converter chip is implemented
on the module since the Intel 3100 chipset does not have a built-in PATA interface. In
applications where the AMC module boots over the Ethernet (PXE boot) or uses the
SATA port on the AMC connector to connect to a boot device, this adapter will not be
required and may be omitted to enhance the thermal characteristics as well as to
reduce cost.
2.2.16 Trusted Platform Module (Optional)
As an option, a Trusted Platform Module can be available on the board. It provides
single chip, turnkey solution, enabling high levels of hardware security and interoperability, while maintaining exceptional user convenience and privacy for embedded
applications. It implements version 1.2 of the Trusted Computing Group specification
for Trusted Platform Modules. The chip communicates with the system through the
LPC interface.
2.2.17 Handle Switch
A handle switch is implemented to facilitate the insertion, locking, and extraction of
the AMC module from the carrier board in addition to the state change of the hot
swap micro-switch. When the handle is pushed towards the front panel by the user,
the switch is toggled to confirm AMC insertion. On the other hand, when the handle is
pulled away from the front panel, the micro-switch will resume its original position to
indicate a request for AMC extraction to the Module Management Controller (MMC).
The MMC sends a Module Hot Swap event message to the Carrier IPMC when the
hot swap micro-switch changes state. The handle switch type and location are
designed according to the PICMG AMC.0 Rev2.0 specification.
2.2.18 Front Panel Ports and Indicators
Figure 2.2 MIC-5602 Front Panel
MIC-5602 User Manual
14
Note!
2.2.18.2 Mini USB Console Port
A mini USB 2.0 compliant slave port is used for debugging, diagnostic information
and implementation of a serial console interface. This function is derived from the onboard USB-to-Serial converter.
2.2.18.3 USB 2.0 Port
There is a USB 2.0 compliant host port on the front panel for USB 2.0 device connection.
2.2.18.4 RJ-45 LAN Port
An RJ-45 port is available on the front panel for 10/100/1000 Base-T Ethernet connection which shares the same LAN0 port on the Intel 82571EB GbE controller with
one of the two SerDes links accessible on the AMC edge connectors. They (PHY
mode and SerDes mode) are switchable and can not be functioning at the same time.
The other SerDes link used LAN1 port on the GbE controller therefore is accessible
independently.
Table 2.7: LAN LEDs
LED
Color
Description
0
Green
Solid = Link
Flashing = Activity
1
Green/Orange
Off = 10 Mbps
Green = 100 Mbps
Orange = 1000 Mbps
2.2.18.5 MMC LED Indicators
The MIC-5602 supports three front panel LEDs. Note that the LED signals are run
through a latch buffer which is unaffected by MMC warm and cold resets as required
by the AMC specification.
Table 2.8: Front Panel LEDs
LED
Color
Description
0
Blue
Hot swap indicator
1
Red
Out of service indicator
2
Green
Flashing = FW application active, payload (x86) in sleep
Solid = FW application active, payload (x86) active
15
MIC-5602 User Manual
Board Specification
As long as the reset button is actively pressed, the red LED will be lit in
order to indicate a successful reset contact.
Chapter 2
2.2.18.1 Reset Button
The reset button on the front panel is controlled by the MMC. Two different reset button modes are supported.
! When the reset button is pressed and released within 1 second, the payload
(x86 system) will reset.
! When the reset button is pressed for more than 5 seconds, the MMC will have a
cold reset.
2.2.19 Jumper Settings
Two 3-pin headers are available on the PCB for jumper functions as described in
Tables 2.9 and 2.10.
Figure 2.3 Jumper Locations
Jumper CN8 forces the BIOS to use the recovery image.
Table 2.9: CN8 BIOS Recovery Image
Default
User Image (Image 0)
1-2
Recovery Image (Image 1)
2-3
Jumper CN9 is used to erase CMOS data and reset the system BIOS information.
Follow the procedures below to clear the CMOS.
1. Turn off the system.
2. Close jumper CN9 (2-3) for about 3 seconds.
3. Set jumper CN9 as Normal.
4. Turn on the system. The BIOS is reset to its default setting.
Table 2.10: CN9 Clear CMOS
Default
MIC-5602 User Manual
Normal
1-2
Clear CMOS
2-3
16
Chapter
3
3
Console Terminal
Setup
This chapter describes, through
an example, how to setup a console for the MIC-5602.
3.1 USB to UART Bridge
The MIC-5602 contains a console port (mini-USB) on the front panel. As mentioned
in the previous chapter (2.2.18.2), the MIC-5602 uses a USB-to-UART bridge called
CP2102 from Silicon Laboratories to convert data traffic between USB and UART formats. This chip includes a complete USB 2.0 full-speed function controller, bridge
control logic, and a UART interface with transmit/receive buffers and modem handshake signals.
For a terminal PC to bridge successfully to the console function on the MIC-5602, the
CP2102 driver available for download from Silicon Laboratories website (hyperlink
below) must be installed on the terminal PC (for example, running on Linux 2.4 or 2.6
Kernel or Windows XP).
https://www.silabs.com/products/interface/usbtouart/Pages/default.aspx
3.2 Terminal Emulator
A terminal emulator application must be available on the terminal PC in order to
access the console screen. If your terminal PC runs on Microsoft Windows, a common application that can act as a client for the SSH, Telnet, rlogin, and raw TCP protocols called PuTTY can be installed and used. It was originally written for Microsoft
Windows; however, it has also been ported to various Unix-like operating systems.
And, it is free and open source software available for download from the internet.
3.3 PuTTY Configuration
Assuming both CP2102 driver and PuTTY have been installed successfully in the terminal PC with Microsoft Windows, you can check the COM port (UART) number
under "COM and LPT" in the "Device Manager", which can be accessed by entering
the "Control Panel" followed by opening up "System" and then "Hardware".
Let us assume the CP210x USB to UART Bridge Controller has been assigned with
"COM5", you can open up PuTTY and begin the configuration as shown below.
MIC-5602 User Manual
18
Chapter 3
Console Terminal Setup
Figure 3.1 PuTTY configuration
!
!
!
Specify COM5 under serial line and 115200 for speed.
Check Serial for connection type.
Click the "Open" button and a PuTTY terminal screen as shown below will
appear.
Figure 3.2 PuTTY screen
19
MIC-5602 User Manual
If the connection is successful, upon boot up the MIC-5602's BIOS POST will be displayed on the PuTTY screen.
Figure 3.3 MIC-5602 BIOS POST shown on PuTTY screen
MIC-5602 User Manual
20
Chapter
4
4
AMI BIOS Setup
This chapter describes how to
configure the AMI BIOS.
4.1 Introduction
The AMI BIOS has been customized and integrated into many industrial and embedded motherboards for over a decade. This section describes the BIOS which has
been specifically adapted to the MIC-5602. With the AMI BIOS Setup program, you
can modify BIOS settings and control the special features of the MIC-5602. The
Setup program uses a number of menus for making changes and turning the special
features on or off. This chapter describes the basic navigation of the MIC-5602 setup
screens.
Figure 4.1 Setup program initial screen
The BIOS ROM has a built-in Setup program that allows users to modify the basic
system configuration.
Note!
As an option, the BIOS setup information can be stored in a batterybacked up CMOS so that the information can be retained when the
power is turned off.
By default, the MIC-5602 does not have a battery. However, a 2-pin
header is reserved on the PCB for battery implementation with a customized holder.
MIC-5602 User Manual
22
To run the BIOS setup menu, simply press the <DEL> key on the USB keyboard
when the boot-up screen (see Figure 3.2) appears following system power up.
Chapter 4
4.2 Entering Setup
AMI BIOS Setup
Figure 4.2 Press <DEL> to run setup
23
MIC-5602 User Manual
4.3 Main Setup
When you first enter the BIOS Setup Utility, you will enter the Main setup screen. You
can always return to the Main setup screen by selecting the Main tab. Two main
setup options are described in this section. The main BIOS setup screen is shown
below.
Figure 4.3 Main Setup Screen
The main BIOS setup menu screen has two main frames. The left frame displays all
the options that can be configured. "Grayed-out" options cannot be configured while
options in blue can. The right frame displays the key legend. Above the key legend is
an area reserved for a text message. When an option is selected in the left frame, it is
highlighted in white. Often a text message will accompany it.
4.3.1 System Time and System Date
Use this option to change the system time and date. Highlight System Time or System Date using the <Arrow> keys. Enter new values through the keyboard. Press the
<Tab> key or the <Arrow> keys to move between fields. The date must be entered in
MM/DD/YY format. The time is entered in HH:MM:SS format.
Note!
1.
2.
MIC-5602 User Manual
There is no battery-backed up CMOS on the MIC-5602 standard
model therefore the system time and date will not be updated continuously when the power to the processor AMC is off.
When the BIOS recovery image is forced to execute (see section
2.2.2), the BIOS Image will be displayed as "01".
24
Chapter 4
4.4 Advanced BIOS Feature Setup
Select the Advanced tab from the MIC-5602 setup screen to enter the Advanced
BIOS Setup screen. You can select any of the items in the left frame of the screen,
such as CPU Configuration, to go to the sub menu for that item. You can display an
Advanced BIOS Setup option by highlighting it using the <Arrow> keys. All Advanced
BIOS Setup options are described in this section. The Advanced BIOS Setup screen
is shown below. The sub menus are described on the following pages.
Figure 4.5 Advanced BIOS Features Setup Screen
25
MIC-5602 User Manual
AMI BIOS Setup
Figure 4.4 Main Setup Showing BIOS Image 01
4.4.1 CPU Configuration
Figure 4.6 CPU configuration
4.4.1.1 Hardware Prefetcher
This feature can reduce the latency of memory read. When enabled, the processor's
hardware prefetcher will prefetch data and instructions from memory into L2 cache. It
is recommended that this value is left at the default setting of Enabled.
4.4.1.2 Adjacent Cache Line Prefetch
This feature can reduce the cache latency. When enabled, the processor will fetch
the subsequent cache line automatically as it makes a request for a 64-byte cache
line. This makes the next cache line retrievable immediately. When disabled, the processor only retrieves the current requested cache. It is recommended that this value
is left at the default setting of Enabled.
4.4.1.3 Maximum CPUID Value Limit
It is recommended that this value is left at the default setting of Disabled.
4.4.1.4 Execute Disable Bit
This is a feature that toggles the Intel Execute Disable Bit. When enabled, the processor prevents the execution of code in data-only memory pages. However, once
disabled, the processor will not restrict code execution in any memory area. This cannot prevent the processor from buffer overflow attacks. It is recommended that you
leave this feature at the default setting of Enabled.
4.4.1.5 Core Multi-Processing
It is recommended that you leave this feature at the default setting of Enabled to get
the most out of the multi-processing capability of CPU.
MIC-5602 User Manual
26
Figure 4.7 ACPI Configuration
Two types of power management technologies are supported by the MIC-5602, ACPI
and APM. ACPI is the newer of the two technologies and puts power management in
the hands of the operating system. APM is controlled by the BIOS. And, it is available
by default when ACPI is disabled. Only one power management interface (ACPI or
APM) can be in control of the system at a time.
The options for "ACPI" are "Yes" or "No" in order to enable or disable ACPI support
for the operating system. The default setting is "Yes".
Note!
If ACPI is disabled, the functionality of graceful OS shutdown becomes
unavailable.
27
MIC-5602 User Manual
AMI BIOS Setup
4.4.2 ACPI Configuration
Chapter 4
4.4.1.6 Intel SpeedStep™ Technology
Intel SpeedStep technology is a feature found in mobile Core 2 Duo processors.
There are four different settings to choose from.
! Maximum Speed (default setting): the CPU is to run at its maximum clock
speed.
! Minimum Speed: the CPU speed is set to run at "Lowest Frequency Mode", i.e.
lowest core operating frequency supported on the processor.
! Automatic: the CPU will automatically switch to a lower speed and lower voltage
operation when the system is running on battery power. Only by operating an
OS that supports the Intel SpeedStep technology can this feature function correctly.
! Disabled: the CPU will operate at default clock speed.
4.4.3 MPS Configuration
Figure 4.8 MPS Configuration
The default setting for the MPS revision is 1.4. It should be set as 1.1 if an older operating system that only supports MPS 1.1 is being run on the processor board.
4.4.4 PCI-Express Configuration
Figure 4.9 PCI-Express Configuration
MIC-5602 User Manual
28
!
Active State Power Management (ASPM): this feature allows power to individual serial Links in a PCI Express fabric to be incrementally reduced as a Link
becomes less active. The default setting is "Disabled".
PCIe Root Port A be Used As: this feature allows the user to select one PCIExpress x8 link (default setting) or two PCI-Express x4 links on the AMC connector Ports 4 to 11.
Note!
SB PCI Express Port 0: the feature allows the PCI-Express root port (as Port B
in Figure 2.1) on the IICH to be enabled (Default) or disabled. Disabling the PCI
Express root port will also disable the LAN controller on the processor AMC.
4.4.5 System Console Configuration
Figure 4.10 System Console Configuration
!
!
Remote Access: the system console access through the front panel mini-USB
port (console re-direction) can be disabled or enabled. The default setting is
"Enabled". Disabling the Remote Access feature in the BIOS setting will leave
Serial-over-LAN (SoL) as the only consoling option for the processor AMC.
Serial Port Number: "COM1" and "COM3" are the port options for selection.
The default setting is "COM1". It will always be used if the front panel console
port is connected to a mini-USB cable.
Note!
"COM3" will only be visible for selection on the setup menu when the
SoL function is available.
29
MIC-5602 User Manual
AMI BIOS Setup
!
When there is a change to the setting for this item, the processor AMC
needs to be removed and reinserted to the MicroTCA or ATCA carrier,
otherwise the carrier management controller will not recognize the AMC
connectivity change (E-keying information in the FRU data of the MIC5602).
Chapter 4
!
!
!
!
!
!
Flow Control: Select the flow control setting for the console re-direction "None", "Hardware", and "Software". The default setting is "None".
Redirection After BIOS POST: the default setting, "Always", means the system
console is always active. However, the console will be automatically turned off
after the BIOS POST operation if the setting is on "Disabled'. Or, by selecting
"Boot Loader", the console will stay active until the completion of the boot loader
operation.
Terminal Type: three different terminal protocols are available - ANSI (Default),
VT100, and VT-UTF8.
VT-UTF8 Combo Key Support: this option allows the user to enable (Default)
or disable the VT-UTF8 combo key support. Enable this feature to have additional keys that are not provided by VT100 for the PC 101 keyboard.
Sredir Memory Display Delay: this option allows the user to select the delay in
seconds before the memory information is displayed. The default setting is "No
Delay".
4.4.6 Trusted Computing
Figure 4.11 Trusted Computing Configuration
The hardware support for TPM on the MIC-5602 series is available by request therefore the default setting for this feature is "No" in BIOS.
MIC-5602 User Manual
30
Chapter 4
4.5 Boot Setup
AMI BIOS Setup
Figure 4.12 Boot Setup
Note!
1.
2.
"Removable Drives" will only appear on the setup screen when at
the least a USB disk drive is connected to the MIC-5602. However,
certain removable USB disk drives may appear under "Hard Disk
Drives" instead of "Removable Drives".
"Hard Disk Drives" and "Removable Drives" can also be disabled
individually in their corresponding sub-menus (see Figures 4.12
and 4.13).
31
MIC-5602 User Manual
Figure 4.13 Hard Disk Drives
Figure 4.14 Removable Drives
MIC-5602 User Manual
32
Chapter 4
4.5.1 Boot Settings Configuration
AMI BIOS Setup
Figure 4.15 Boot Settings Configuration
!
!
!
Quick Boot: Allows the BIOS to skip certain tests while booting. This will
decrease the time needed to boot the system. The default setting is on
"Enabled".
Wait For 'F1' If Error: Wait for the F1 key to be pressed if an error occurs.
Hit 'DEL' Message Display: Displays "Press DEL to run Setup" in POST.
33
MIC-5602 User Manual
4.5.2 Boot Device Priority
Figure 4.16 Boot Device Priority
The user may specify the boot sequence of the devices available to the MIC-5602.
These devices may include an on-board NAND flash, which is available on every
model of the MIC-5602, a generic USB flash disk, a SAS or SATA HDD, a CF card
(on-board CF adaptor module available as an option), and a remote boot server (i.e.
network boot).
There are four options for network boot behaviors (i.e. PXE boot):
! Network Boot Only: Once enabled, the PXE boot will loop indefinitely. However, the default setting is "Disabled", which means other available boot devices
mentioned above are also included in the boot sequence.
! Network Boot Failure and Loop: The default setting is "Normal", which means
the boot sequence will proceed according to the boot device priority list. A boot
error message will appear when the boot attempts (one cycle) have failed. You
can also choose "3 Times" or "5 Times" for the number of cycles for the boot
attempts.
Note!
1.
2.
MIC-5602 User Manual
"Network Boot Only" (when enabled) will override the selection
from "Network Boot Failure and Loop".
The IP Address for PXE boot shall be derived through DHCP.
34
Several security functions are available to limit the user's accessibility to the BIOS
set-up options and to protect certain hardware, software, and firmware features of the
product.
Chapter 4
4.6 Security
AMI BIOS Setup
Figure 4.17 Security
4.6.1 Supervisor and User Passwords
These two items (Change Supervisor Password and Change User Password)
allow you configure the system so that a password after being installed is required
each time the system boots and/or an attempt is made to enter the Setup program.
The "Supervisor" is allowed to change all CMOS settings and grant the "User"
access level to the BIOS setup menu. There are four different user access levels.
! No Access: the "User" is prevented from entering the BIOS setup menu.
! View Only: the "User" is allowed to the setup menu but the fields can not be
changed.
! Limited (Default): the "User" is allowed to change limited fields such as items
under "Main" and "Advanced" menus and the "User Password" related items
under "Security" menu.
! Full Access: the "User" is allowed to have full access to the setup menu except
for changing the "Supervisor's" password.
Note!
The password must be six characters long.
35
MIC-5602 User Manual
4.6.2 Other Security Settings
!
!
!
Boot Sector Virus Protection: Enable or disable (Default) boot sector virus
protection.
CMOS Write Protection: To prevent the current BIOS version from being
erased or overwritten by another version, this setting should be enabled. The
default value is "Disabled".
Flash Disk Write Protection: The content stored in the on-board NAND flash
can be protected against data erase or rewrite by enabling this setting. The
default value is "Disabled".
Note!
!
!
Watchdog Function: Use this setting to disable or enable the watchdog function in the Intel 3100 chipset. The default value is "Disabled".
LAN Port1 Connect From: The GbE interfaced on the front panel (RJ-45) and
to the AMC Port 1 (SerDes) can not function simultaneously. The default setting
is "AMC Port 1".
Note!
!
To activate the USB Flash Disk write protection a payload power cycle
needs to be performed (e.g. shut downing the AMC module by pulling
out and reinserting the hot swap handle).
When there is a change to the setting for this item, the MIC-5602 needs
to be extracted and re-inserted to the MicroTCA or ATCA carrier, otherwise the management controller of the carrier will not recognize the
changed AMC connectivity of the processor AMC (E-keying information
in the FRU data of the MIC-5602).
OS Shutdown Timeout: The OS will be shutting down when the hot swap handle is pulled out. The shutdown duration will depend on the used OS (for example, 10 seconds, 20 seconds or more). It is recommended to allow the OS to
completely shut down so that the sleep states of the SBC are activated and the
MMC knows that shutdown is finished. The default setting for this feature is "20
Sec". Other settings such as "10 Sec" and "40 Sec" are available.
MIC-5602 User Manual
36
Chapter 4
4.7 Exit Options
AMI BIOS Setup
Figure 4.18 Exit Options
!
!
!
!
Save Changes and Exit: When you have completed the system configuration
changes, follow these steps:
Select Exit Saving Changes from the Exit menu and press <Enter>. The following messages appear on the screen:
Save Configuration Changes and Exit Now?
[Ok] [Cancel]
Select "Ok" to save changes and exit.
Discard Changes and Exit: Upon entering this option, the following messages
appear on the screen:
Discard Changes and Exit Setup Now?
[Ok] [Cancel]
Select "Ok" to discard changes and exit.
Discard Changes: Use this option to discard any changes done so far to the
setup items without exiting. The following messages appear on the screen:
Discard Changes?
[Ok] [Cancel]
Select "Ok" to discard changes.
Load Optimal Defaults: Use this function to load optimal default values for all
the setup items. The following messages appear on the screen:
Load Optimal Defaults?
[Ok] [Cancel]
Select "Ok" to load default settings.
37
MIC-5602 User Manual
Note!
Note: During the first boot event following, (1) a new BIOS version
update, or (2) the BIOS recovery image being forced to execute,
you must enter the BIOS setup menu, load the optimal defaults setting, and reboot.
MIC-5602 User Manual
38
Chapter
5
5
MMC Firmware
Operation
This chapter describes the MMC
firmware features.
5.1 Module Management Controller (MMC)
As mentioned in Section 2.2.8, the MMC is an intelligent controller that manages the
AMC (e.g. health monitoring, hot swap, LEDs, etc.). It provides a communication
interface to a carrier in an ATCA or µTCA system over an IPMB bus (IPMB-L). Furthermore, a connection to the x86-system is implemented by a serial interface to the
3100 chipset.
The MIC-5602 MMC is based on an Atmel AVR microcontroller. The Atmega128L is
equipped with 128 KB internal Flash, 4 KB SRAM and 4 KB EEPROM. The flash
holds a boot-loader and two firmware images and the FRU data is stored in the internal EEPROM.
The hardware I2C of the AVR is used as IPMB-L bus interface and one of the
ATmega128 UARTs as serial payload interface to the chipset. Additionally there are
several signals connected between MMC and CPU / chipset for payload monitoring
and control (payload reset, sleep signals, E-Keying, etc.).
Voltage and temperature monitoring is done with the AVR ADC input pins and two
external temperature sensors. Please refer to section 2.2.8 for detail.
5.1.1 BIOS Image Selection by MMC
Booting from the BIOS recovery image can be forced with a jumper setting (verify
chapter 2.2.19). Additionally it is possible to force the recovery image over the IPMBL bus or payload interface with the MMC. This is accomplished by a parameter stored
in the FRU data. If the parameter (byte) is set to 0x01, the MMC will force execution
of the recovery image within the next boot sequence. If the byte is zero (default), the
BIOS user image is executed. To read and write this parameter, Advantech OEM
IPMI commands are used.
5.1.1.1 Read BIOS Image configuration
The "Read Configuration Settings" Advantech OEM IPMI command can be used to
read out the BIOS image selection setting.
Table 5.1: Command Assignment
IPMI net function
0x2E / 0x2F (OEM)
Advantech IPMI OEM command 0x41
Table 5.2: Request Data
Byte
Data field
1:3
Advantech IANA ID: 0x39 28 00
4
Logical device number: 0x03
5
Port byte: 0x00
Table 5.3: Response Data
Byte
Data field
1
Completion Code
2:4
Advantech IANA ID: 0x39 28 00
5
Current setting: 0x00 = BIOS user image
0x01 = BIOS recovery image
MIC-5602 User Manual
40
This Advantech OEM command can be automatically forwarded to the MMC with a
modified version of ipmitool, available as source code and binary executable on the
Advantech MIC-5602 product web site.
Chapter 5
Example (IPMI serial terminal mode):
Request:
[b8 00 41 39 28 00 03 00]
Reply:
[bc 00 41 00 39 28 00 01]
Command Line Syntax:
ipmitool <connection-method> advoem rdbios
Refer to chapter 5.3.2 "Accessing the MIC-5602 MMC with ipmitool" for
more details about available connection methods to the MMC.
5.1.1.2 Change BIOS Image Configuration
To change the BIOS image selection setting, the "Store Configuration Settings"
Advantech OEM IPMI command must be used.
Table 5.4: Command Assignment
IPMI net function
0x2E / 0x2F (OEM)
Advantech IPMI OEM command
0x40
Table 5.5: Request Data
Byte
Data field
1:3
Advantech IANA ID: 0x39 28 00
4
Logical device number: 0x03
5
Port byte: 0x00
6
Setting: 0x00 = Execute BIOS user image
0x01 = BIOS recovery image shall be booted
Table 5.6: Response Data
Byte
Data field
1
Completion Code
2:4
Advantech IANA ID: 0x39 28 00
Example (IPMI serial terminal mode): Force BIOS recovery image boot
Request:
[b8 00 40 39 28 00 03 00 01]
Reply:
[bc 00 40 00 39 28 00]
This Advantech OEM command can be issued with a modified version of ipmitool,
similar to the read command.
Command Line Syntax:
- Execute BIOS user image: ipmitool <connection-method> advoem wrbios user
- Use BIOS recovery image: ipmitool <connection-method> advoem wrbios recovery
Note!
Refer to chapter 5.3.2 "Accessing the MIC-5602 MMC with ipmitool" for
more details about available connection methods to the MMC.
41
MIC-5602 User Manual
MMC Firmware Operation
Note!
5.1.2 BIOS Firmware Hub (FWH) Write Protection by MMC
To prevent BIOS from unintended updates or changes, it can either be write protected with a BIOS menu item setting or over the IPMB-L bus / payload interface with
the MMC included.
A parameter in the FRU data is used to write protect the BIOS FWH from MMC side.
If the setting contains 0x00 (default), the FWH can be written, otherwise (value set to
0x01) the MMC will force the hardware write protection of the FWH.
Advantech OEM IPMI commands are provided to write protect the BIOS FWH and
read the actual MMC write protection setting for the FWH.
5.1.2.1 Read FWH Write Protection Configuration
The "Read Configuration Settings" Advantech OEM IPMI command can be used to
read out the FWH write protection setting.
Table 5.7: Command Assignment
IPMI net function
0x2E / 0x2F (OEM)
Advantech IPMI OEM command 0x41
Table 5.8: Request Data
Byte
Data field
1:3
Advantech IANA ID: 0x39 28 00
4
Logical device number: 0x03
5
Port byte: 0x01
Table 5.9: Response Data
Byte
Data field
1
Completion Code
2:4
Advantech IANA ID: 0x39 28 00
5
Current setting: 0x00 = FWH write protection disabled
0x01 = FWH write protection enabled
Example (IPMI serial terminal mode):
Request:
[b8 00 41 39 28 00 03 01]
Reply:
[bc 00 41 00 39 28 00 00]
This Advantech OEM command can be issued with a modified version of ipmitool,
available as source code and binary executable on the Advantech MIC-5602 product
web site.
Command Line Syntax:
ipmitool <connection-method> advoem rdfwh
Note!
Verify chapter 5.3.2 "Accessing the MIC-5602 MMC with ipmitool" for
more details about available connection methods to the MMC.
MIC-5602 User Manual
42
Table 5.10: Command Assignment
IPMI net function
0x2E / 0x2F (OEM)
Advantech IPMI OEM command
0x40
Byte
Data field
1:3
Advantech IANA ID: 0x39 28 00
4
Logical device number: 0x03
5
Port byte: 0x01
6
Setting: 0x00 = Disable FWH write protection
0x01 = Enable FWH write protection
Table 5.12: Response Data
Byte
Data field
1
Completion Code
2:4
Advantech IANA ID: 0x39 28 00
Example (IPMI serial terminal mode): Write protect the FWH
Request:
[b8 00 40 39 28 00 03 01 01]
Reply:
[bc 00 40 00 39 28 00]
This Advantech OEM command can be issued with a modified version of ipmitool,
similar to the read command.
Command Line Syntax:
! Disable FWH write protection: ipmitool <connection-method> advoem wrfwh
disable
! Enable FWH write protection: ipmitool <connection-method> advoem wrfwh
enable
Note!
Refer to chapter 5.3.2 "Accessing the MIC-5602 MMC with ipmitool" for
more details about available connection methods to the MMC.
43
MIC-5602 User Manual
MMC Firmware Operation
Table 5.11: Request Data
Chapter 5
5.1.2.2 Change FWH Write Protection Configuration
To change the FWH write protection setting, the "Store Configuration Settings"
Advantech OEM IPMI command needs to be used.
5.1.3 MIC-5602 MAC Addresses Mirroring
The Intel 82571EB dual-port Gigabit Ethernet controller provides the LAN interface of
the MIC-5602 with four MAC-Addresses programmed (two additional MACAddresses for Serial-Over-LAN; see chapter 5.3). These MAC-Addresses are mirrored in the MMC FRU data and can be read with an Advantech OEM IPMI command.
5.1.3.1 Read MAC Address Advantech OEM IPMI Command
The "Read MAC Address" Advantech OEM IPMI command can be used to read out
the four MAC addresses of the MIC-5602.
Table 5.13: Command Assignment
IPMI net function
0x2E / 0x2F (OEM)
Advantech IPMI OEM command
0xE2
Table 5.14: Request Data
Byte
Data field
1:3
Advantech IANA ID: 0x39 28 00
4
MAC address number: 0x00 / 0x01 / 0x02 / 0x03
Table 5.15: Response Data
Byte
Data field
1
Completion Code
2:4
Advantech IANA ID: 0x39 28 00
5
MAC address
Example (IPMI serial terminal mode):
Request:
[b8 00 e2 39 28 00 02]
Reply:
[bc 00 e2 00 39 28 00 00 0b ab 12 34 56 ]
This Advantech OEM command can be issued with a modified version of ipmitool,
available as source code and binary executable on the Advantech MIC-5602 product
web site.
Command Line Syntax:
ipmitool <connection-method> advoem getmac <mac-number>
Note!
Refer to chapter 5.3.2 "Accessing the MIC-5602 MMC with ipmitool" for
more details about available connection methods to the MMC.
MIC-5602 User Manual
44
5.2.1 MIC-5602 Field Upgradeable Components
The HPM.1 update works through the IPMB capable interface such as IPMB-L.
5.2.1.1 MMC Boot Loader
Located at the end of the program memory space (on-chip flash memory) of the AVR
microcontroller is a small software component, called the boot loader. This component has several important tasks to perform for the MMC boot process. As the boot
loader is not rollback capable, it can potentially be damaged through a failed upgrade
operation. Hence, Advantech do not plan to release boot loader updates to customers.
5.2.1.2 MMC Firmware
The active MMC firmware (application) is located at the beginning of the program
memory space. The AVR on-chip flash holds two firmware (FW) copies, an active
one as well as a backup one, providing roll back features in case of failed FW
upgrades. Advantech will provide bug fixes, updates and new features through FW
application images.
5.2.1.3 x86 BIOS
The FWH chip contains two BIOS images. The first copy is treated as the default
image, and the second one as roll back copy for error recovery and fail safe booting.
Upgrading of the BIOS firmware requires dedicated support by OS level software on
the x86 system.
Known Limitation:
At the time of the manual creation, the dual BIOS upgrade
utility is not yet available.
5.2.1.4 LAN EEPROM
The LAN EEPROM only contains a single image; meaning it is a HPM.1 compliant
component without rollback support therefore extreme caution should be exercised
when upgrading the LAN EEPROM component. Upgrading the LAN EEPROM image
requires dedicated support by OS level software on the x86 system.
Note!
At the time of the manual creation, this feature has not been implemented in the MMC firmware.
45
MIC-5602 User Manual
MMC Firmware Operation
The MIC-5602 Processor AMC board provides HPM.1 compliant in field updates,
supporting a total of four components:
1) MMC Boot Loader
2) MMC Firmware
3) x86 BIOS
4) LAN EEPROM
Chapter 5
5.2 MMC Firmware Update
5.2.2 HPM.1 Upgrade Process
As mentioned above, the MMC firmware supports a rollback mechanism. This means
that the FW will create a backup copy of the current (active) configuration each time a
new FW is downloaded through HPM.1, thus allowing to switch back to the old version in case of upgrade problems.
All components have separate upgrade and activation phases. For the MMC Application this means that the new configuration will only be activated through a HPM.1
Activation command, resulting in a FW restart.
For the boot loader and LAN EEPROM this means that the new configuration will
either automatically become active at the next reboot or when a reboot is manually
invoked through the HPM.1 Activation command.
5.2.3 HPM.1 Upgrade with ipmitool
Although most HPM.1 compliant update tools can work with the Advantech MIC5602, we recommend using the free "ipmitool", available both in Windows and Linux
versions.
As all field updateable components are realized as HPM.1 compliant components,
the upgrade mechanism is identical for any of them. For example the command for a
Boot loader upgrade is the same as that for a FW upgrade - the upgrade images
themselves contain component IDs and compatibility information which will automatically be verified prior to the download.
The available access method that can be used to communicate with the MIC-5602
MMC is described in the following section.
Note!
The method requires a modified version of ipmitool, available assource
code and binary executable on the Advantech MIC-5602 product web
site.
5.2.3.1 Upgrade through Onboard Serial Payload Interface (PI)
This access method can be used from the OS (Windows or Linux) installed on the
MIC-5602 itself. The MIC-5602 x86 system has a serial connection (COM2 and /dev/
ttyS1/ respectively) to the MMC (serial Payload Interface), which is used by the ipmitool utility to directly access the MMC.
Command Line Syntax:
ipmitool -I serial-terminal -D /dev/ttyS1:115200 hpm upgrade filename.img
-I serial-terminal
-D /dev/ttyS1:115200
hpm upgrade <filename.img>
Specifies that serial terminal mode is used as interface
Onboard serial port connection between chipset and
MMC (note: for Windows use -D com2:115200)
Perform HPM.1 upgrade with filename.img
To activate a previously downloaded component (or multiple components, if applicable), use the following command. It will return an error if no component has been
downloaded previously.
Command Line Syntax:
ipmitool -I serial-terminal -D /dev/ttyS1:115200 hpm activate
Note!
Update and activation can also be performed by issuing one command
as follows,
ipmitool -I serial-terminal -D /dev/ttyS1:115200 hpm upgrade filename.img activate
MIC-5602 User Manual
46
Command Line Syntax:
ipmitool -I lan -H <Shelf Manager IP> -T <carrier IPMC address> -B 0 -t <MMC
address> -b 7 - A <authtype> hpm upgrade filename.img
Specifies that Ethernet is used as interface for communications
with the MMC
-H <Shelf Manager IP>
IP address of the Shelf Manager
-T <carrier IPMC
address>
Remote transit address (IPMB-0 address of the carrier IPMC) to
which requests should be bridged by the Shelf Manager
-B 0
Specifies the remote transit channel (0 = IPMB-0)
-t <MMC address>
Remote target address (IPMB-L address of the MMC) to which
requests should be bridged by the carrier IPMC
-b 7
Specifies the remote target channel (7 = IPMB-L)
-A <authtype>
Authentication type (depending on supported types by the Shelf
Manager), default: NONE
hpm upgrade <filename.img>
Perform HPM.1 upgrade with filename.img
To activate a previously downloaded component (or multiple components, if applicable), use the following command. It will return an error if no component has been
downloaded before.
Command Line Syntax:
ipmitool -I lan -H <Shelf Manager IP> -T <carrier IPMC address> -B 0 -t <MMC
address> -b 7 -A <authtype> hpm activate
Note!
Update and activation can also be performed by issuing one command,
i.e.: ipmitool -I lan -H <Shelf Manager IP> -T <carrier IPMC address> -B
0 -t <MMC address> -b 7 - A <authtype> hpm upgrade filename.img
activate
System setup example: MicroTCA environment
! 3rd party uTCA-Chassis
! 3rd party power module (PM)
! Advantech uTCA-5503 MCH with a plugged network connection (LAN1 or LAN2
frontpanel RJ45 connector)
! Shelf Manger IP address: 192.168.16.17
! MIC-5602 inserted to AMC slot 1 (IPMB-L address = 0x72) of the uTCA-Chassis
! Firmware component ("hpm1fw.img ") should be upgraded and activated
Resulting ipmitool command:
ipmitool -I lan -H 192.168.16.17 -T 0x82 -B 0 -t 0x72 -b 7 -A none hpm upgrade
hpm1fw.img activate
47
MIC-5602 User Manual
MMC Firmware Operation
-I lan
Chapter 5
5.2.3.2 Upgrade through Ethernet (RMCP, Over Shelf Manager, or Bridging to IPMB-L)
This access method can be used from any Linux or Windows host that has an Ethernet connection to the Shelf Manager of the shelf in which the MIC-5602 is installed.
The ipmitool utility uses the Ethernet connection to the Shelf Manager to double
bridge IPMI requests to the MMC over IPMB-0 and IPMB-L.
5.3 Serial-over-LAN (SoL)
5.3.1 Overview
Serial-over-LAN (SOL) allows establishing virtual remote serial console communication with the x86 system over LAN. It's defined in the IPMI v2.0 specification and uses
the RMCP+ protocol to encapsulate serial data in network packets and pass them
between the x86 system and a remote console somewhere on the network. It can be
used for serial-based OS and pre-OS communication over a LAN connection, e.g.
provide a user at a remote console for interacting with serial text-based interfaces
such as OS command-line interfaces or serial redirected BIOS interfaces.
5.3.2 Accessing the MIC-5602 MMC with ipmitool
Advantech recommend using the free ipmiItool, available both in Windows and Linux
versions, to connect to the MMC and to configure Serial-over-LAN with the MIC5602.
The available access method that can be used to communicate with the MIC-5602
MMC is described in the following section:
Note!
The method requires a modified version of ipmitool, available assource
code and binary executable on the Advantech MIC-5602 product web
site.
5.3.2.1 Access the MMC through Onboard Serial Payload Interface (PI)
This access method can be used from the OS (Windows or Linux) installed on the
MIC-5602 itself. The MIC-5602 x86 system has a serial connection (COM2 and /dev/
ttyS1/ respectively) to the MMC (serial Payload Interface), which is used by the ipmitool utility to directly access the MMC.
Command Line Syntax:
ipmitool -I serial-terminal -D /dev/ttyS1:115200 <ipmitool command>
-I serial-terminal
Specifies that serial terminal mode is used as interface
-D /dev/ttyS1:115200
Onboard serial port connection between chipset and MMC (note:
for Windows use -D com2:115200)
<ipmitool command>
The command to be executed with the ipmitool
5.3.2.2 Access the MMC through Ethernet (RMCP, Over Shelf Manager, or Bridging to
IPMB-L)
This access method can be used from any Linux or Windows host that has an Ethernet connection to the Shelf Manager of the shelf in which the MIC-5602 is installed.
The ipmitool utility uses the Ethernet connection to the Shelf Manager to double
bridge IPMI requests to the MMC over IPMB-0 and IPMB-L.
Command Line Syntax:
ipmitool -I lan -H <Shelf Manager IP> -T <carrier IPMC address> -B 0 -t <MMC
address> -b 7 - A <authtype> <ipmitool command>
MIC-5602 User Manual
48
Specifies that Ethernet is used as interface for communications
with the MMC
-H <Shelf Manager IP>
IP address of the Shelf Manager
-T <carrier IPMC address> Remote transit address (IPMB-0 address of the carrier IPMC)
to which requests should be bridged by the Shelf Manager
Specifies the remote transit channel (0 = IPMB-0)
-t <MMC address>
Remote target address (IPMB-L address of the MMC) to which
requests should be bridged by the carrier IPMC
-b 7
Specifies the remote target channel (7 = IPMB-L)
-A <authtype>
Authentication type (depending on supported types by the Shelf
Manager), default: NONE
<ipmitool command>
The command to be executed with the ipmitool
!
!
!
!
!
!
!
System setup example: MicroTCA environment
3rd party uTCA-Chassis
3rd party power module (PM)
Advantech uTCA-5503 MCH with a plugged network connection (LAN1 or LAN2
front panel RJ45 connector)
Shelf Manger IP address: 172.21.35.107
MIC-5602 inserted to AMC slot 3 (IPMB-L address = 0x76) of the uTCA-Chassis
ipmitool command: "mc info" (= "Get Device ID" IPMI command - display general information about the MIC-5602)
user@pramc:~$ ipmitool -I
-b 7 -A none mc info
Device ID
Device Revision
Firmware Revision
IPMI Version
Manufacturer ID
Manufacturer Name
Product ID
Device Available
Provides Device SDRs
Additional Device Support
Sensor Device
FRU Inventory Device
IPMB Event Generator
Aux Firmware Rev Info
0x00
0x00
0x00
0x00
lan -H 172.21.35.107 -T 0x82 -B 0 -t 0x76
:
:
:
:
:
:
:
:
:
:
6
1
1.02
1.5
10297
Unknown (0x2839)
22018 (0x5602)
yes
yes
:
49
MIC-5602 User Manual
MMC Firmware Operation
-B 0
Chapter 5
-I lan
5.3.3 SoL Configuration with ipmitool
The ipmitool utility can be used to configure the SoL parameters stored in the MIC5602 MMC according to your needs.
Please verify the previous chapter for proper connection options to the MMC
(whether serial payload interface or LAN). The way to connect is replaced with a
placeholder (<connection-method>) in the following chapter's descriptions.
The MIC-5602 uses following default parameters for Serial-over-LAN:
Channel Numbers:
1 - first network interface of the Intel 82571 GbE
2 - second network interface of the Intel 82571 GbE
Note!
Channel Number 0 is assigned for communication with the primary
IPMB per default by the IPMI specification.
Username:
Password:
User ID:
"user"
"password"
2
Channel Privilege Level:2 (User)
IP-Address (channel 1):172.21.35.103
IP-Address (channel 2):172.21.35.104
Please find below all ipmitool commands that can be used to configure the SOL
parameters of the MIC-5602.
5.3.3.1 Channel Commands
To get an overview of all possible channel commands please use the keyword "channel" only. This section only contains a description of the channel commands supported by the MIC-5602 for SoL.
- channel info [channel number]
It is used to get general information about an IPMI channel, e.g. to find out whether a
given channel is a LAN/SoL channel.
user@pramc:~$ ipmitool <connection-method> channel info 1
Channel 0x1 info:
Channel Medium Type
: 802.3 LAN
Channel Protocol Type : IPMB-1.0
Session Support
: single-session
Active Session Count : 0
Protocol Vendor ID
: 7154
Volatile(active) Settings
Alerting
: disabled
Per-message Auth
: disabled
User Level Auth
: disabled
Access Mode
: always available
Non-Volatile Settings
Alerting
: disabled
Per-message Auth
: disabled
User Level Auth
: disabled
Access Mode
: always available
MIC-5602 User Manual
50
Get the access attributes associated with a specified SoL user.
user@pramc:~$ ipmitool <connection-method> channel getaccess 1 2
Maximum User IDs
: 2
Enabled User IDs
: 2
:
:
:
:
:
:
:
2
user
Yes
call-in / callback
enabled
enabled
USER
- channel setaccess <channel number> <user id> [privilege=level]
With this parameter you can set a privilege level for a specified SoL user.
user@pramc:~$ ipmitool <connection-method> channel setaccess 1 2 privilege=3
Note!
The command can only be successfully used if the payload (x86) is
powered and active (green LED solid). Otherwise the MMC can't communicate with the 82571 GbE controller and will return completion code
0xFF (unspecified error).
5.3.3.2 User Commands
To get an overview of all possible user commands please use the keyword "user"
only. This chapter only contains a description of the user commands supported by the
MIC-5602 for SOL.
- user set name <user id> [username]
This command can be used to change the SoL username.
user@pramc:~$ ipmitool <connection-method> user set name 2 newuser
Note!
The command can only be successfully used if the payload (x86) is
powered and active (green LED solid). Otherwise the MMC can't communicate with the 82571 GbE controller and will return completion code
0xFF (unspecified error).
- user set password <user id> [password]
This command can be is used change the SoL user password.
user@pramc:~$ ipmitool <connection-method> user set password 2 newpasswd
Note!
The command can only be successfully used if the payload (x86) is
powered and active (green LED solid). Otherwise the MMC can't communicate with the 82571 GbE controller and will return completion code
0xFF (unspecified error).
51
MIC-5602 User Manual
MMC Firmware Operation
User ID
User Name
Fixed Name
Access Available
Link Authentication
IPMI Messaging
Privilege Level
Chapter 5
- channel getaccess <channel number> [user id]
5.3.3.3 LAN Commands
To get an overview of all possible LAN commands please use the keyword "lan" only.
This chapter only contains a description of the LAN commands supported by the
MIC-5602 for SoL.
- lan print [channel number]
Get the LAN configuration parameters for a given channel.
user@pramc:~$ ipmitool <connection-method> lan print 1
Set in Progress
: Set Complete
IP Address
: 172.21.35.103
MAC Address
: 00:0b:ab:00:00:02
Cipher Suite Priv Max
: Not Available
- lan set <channel> <command> [option]
This command can be used to change the management IP address (<command > =
ipaddr).
user@pramc:~$ ipmitool <connection-method> lan set 1 ipaddr 172.21.35.105
Setting LAN IP Address to 172.21.35.105
Note!
Only the "lan set ipaddr" command is supported by the MIC-5602. The
remaining LAN parameters defined in the IPMI v2.0 specification can
not be modified with this command.
5.3.3.4 SoL Commands
To get an overview of all possible SoL commands please use the keyword "sol" only.
This chapter only contains a description of the SoL commands supported by the MIC5602.
- sol info [channel number]
Read out the SoL configuration parameters for a given channel.
user@pramc:~$ ipmitool <connection-method> sol info 1
Set in progress
: set-complete
Enabled
: true
Force Encryption
: true
Force Authentication
: true
Privilege Level
: USER
Character Accumulate Level (ms) : 5
Character Send Threshold
: 1
Retry Count
: 1
Retry Interval (ms)
: 10
Volatile Bit Rate (kbps)
: 19.2
Non-Volatile Bit Rate (kbps)
: 19.2
Payload Channel
: 1 (0x01)
Payload Port
: 623
MIC-5602 User Manual
52
Chapter 5
- sol set <parameter> <value> [channel]
This command allows modifying one of the following SOL configuration parameters:
! session privilege level (<parameter> = "privilege-level"),
! character accumulate level (<parameter> = "character-accumulate-level"),
! character send threshold (<parameter> = "character-send-threshold"),
! retry count (<parameter> = "retry-count").
user@pramc:~$ ipmitool <connection-method> sol set privilege-level admin 1
The remaining SOL configuration parameters defined in the IPMI v2.0
specification are read-only.
5.3.4 SoL Session Establishment with ipmitool
To establish an SoL session it is recommended to use the ipmitool. It's available both
in Windows and Linux versions. To establish a SoL session with the ipmitool, the lanplus interface must be used (different to chapters before, where serial-terminal and
lan interfaces can be used!).
Note!
A modified version of ipmitool needs to be used to establish SoL sessions successful. It is available as source and binary executable on the
Advantech MIC-5602 product web site.
"IP-Address", "Username" and "Password" used for SoL are the important parameters for establishing a SoL session. These parameters (<ipaddr>, <username>,
<password>) are configurable via different ipmitool commands (refer to the previous
section "SoL configuration with IPMItool") and can be changed at run-time. The gkey
parameter is fixed in the MMC firmware and cannot be changed.
ipmitool -o adv -C 1 -I lanplus -H <ipaddr> -U <username> -P <password> -k gkey sol
activate usesolkeepalive
ipmitool -o adv -C 1 -I lanplus -H 172.21.35.103 -U user -P password -k gkey
sol activate usesolkeepalive
[SOL Session operational. Use ~? for help]
53
MIC-5602 User Manual
MMC Firmware Operation
Note!
MIC-5602 User Manual
54
Chapter
6
6
Overview of
Supported Features
and Known
Limitations
Below is a list of the MIC-5602's current supported and unsupported MMC features
for MMC firmware version: 1.02:
6.1 Supported Features
Table 6.1: Current Supported and Unsupported Features
Feature
Supported
Firmware update
√
Redundant fw images
√
HPM.1 bootloader
√
HPM.1 upgrades
√
Unsupported
BIOS update over IPMB
√
LAN EEPROM update over IPMB
√
E-Keying
√
Clock E-Keying
√
SoL support
√
GbE MAC address mirroring
√
CMOS override & backup
√
Chipset 3100 watchdog event
√
Remark
Graceful shutdown/module extraction
√
PCIe link configuration (one x8/two x4) √
Voltage monitoring
√
Temperature monitoring
√
BMC watchdog
√
Rest button (interrupt controlled)
√
Force BIOS recovery image boot
√
FWH write protection
√
LAN SerDes1 and Cu port switching
√
6.2 Known Limitations:
Chipset watchdog interface: the chipset watchdog timeout should trigger a BMC
watchdog. However, this feature is not available in the MMC firmware release version
1.02.
Field upgradeable component x86 BIOS: the FWH contains two BIOS images.
Upgrading the BIOS firmware requires dedicated support by OS level software. At
the time of the manual creation, the upgrade utility has not been fully created. Please
check with your Advantech FAE for the latest software update.
MIC-5602 User Manual
56
Chapter
7
7
Replacing and
Installing the AMC
This chapter recommends the
steps to extract/install the processor AMC from/to a MicroTCA
chassis or an AMC carrier.
7.1 Extracting a MIC-5602
1.
2.
3.
4.
Gently pull the handle switch on the front panel of the AMC. Do not pull the handle out all the way yet. Pulling the handle switch notifies the MMC that you are
going to remove the AMC and notifies it to finish all processes. The hot swap
LED (blue) starts blinking.
Wait until the hot swap LED turns into a steady blue. This may take a few seconds.
Pull the handle switch again more firmly and slide the AMC gently out of the
bay.
If you are not installing another AMC immediately, it is recommended that an
AMC filler be installed into the empty AMC slot. This is to ensure proper cooling
in the system.
7.2 Installing a MIC-5602
1.
2.
3.
Check that the EMC gaskets on the front panel of the AMC are in place and that
their contacts are clean.
Insert the AMC into the chassis or carrier, sliding it along the guide rails gently til
it engages with the AMC connector or the MicroTCA backplane connector.
Push the handle switch all the way in. Wait until the blue hot swap LED turns off
and the power LED turns solid green.
MIC-5602 User Manual
58
Appendix
A
A
IPMI/PICMG Command
Subset Supported by
MMC
A.1 IPMI/PICMG Command Subset Supported by
MMC
Command
Spec Ref
NetFn
CMD
MMC Req (AMC
Specification)
App
01h
Mandatory
IPM Device "Global" Commands
Get Device ID
17.1
Cold Reset
17.2
App
02h
Optional
Warm Reset
17.3
App
03h
Optional
Broadcast "Get DeviceID"
17.9
App
01h
Mandatory
Set BMC Global Enables
18.1
App
2Eh
Mandatory
Get BMC Global Enables
18.2
App
2Fh
Mandatory
Clear Message Flags
18.3
App
30h
Mandatory
Get Message Flags
18.4
App
31h
Mandatory
Get Message
18.6
App
33h
Mandatory
Send Message
18.7
App
34h
Mandatory
Reset Watchdog Timer
21.5
App
22h
Mandatory
Set Watchdog Timer
21.6
App
24h
Mandatory
Get Watchdog Timer
21.7
App
25h
Mandatory
Messaging Commands
BMC Watchdog Timer
Messaging Support/LAN/SOL Configuration Commands (IPMI v2.0)
Set Channel Access
22.22
App
40h
Optional
Get Channel Access
22.23
App
41h
Optional
Get Channel Info
22.24
App
42h
Optional
Set Channel Security Keys
22.25
App
56h
Optional
Set User Access
22.26
App
43h
Optional
Get User Access
22.27
App
44h
Optional
Set User Name
22.28
App
45h
Optional
Get User Name
22.29
App
46h
Optional
Set User Password
22.30
App
47h
Optional
Set LAN Configuration
Parameters
23.1
Transport 01h
Optional
Get LAN Configuration
Parameters
23.2
Transport 02h
Optional
Set SOL Configuration
Parameters
26.2
Transport 21h
Optional
Get SOL Configuration
Parameters
26.3
Transport 22h
Optional
Set Event Receiver
23.1
S/E
00h
Mandatory
Get Event Receiver
23.2
S/E
01h
Mandatory
23.3
S/E
02h
Mandatory
29.2
S/E
20h
Mandatory
Event Commands
Platform Event (a.k.a.
"Event Message")
Sensor Device Commands
Get Device SDR Info
MIC-5602 User Manual
60
29.3
S/E
21h
Mandatory
Reserve Device SDR Repository 29.4
S/E
22h
Mandatory
Get Sensor Reading Factors
S/E
23h
Optional
29.5
Set Sensor Hysteresis
29.6
S/E
24h
Optional
Get Sensor Hysteresis
29.7
S/E
25h
Optional
Set Sensor Threshold
29.8
S/E
26h
Optional
Get Sensor Threshold
29.9
S/E
27h
Optional
Set Sensor Event Enable
29.10
S/E
28h
Optional
Get Sensor Event Enable
29.11
S/E
29h
Optional
Get Sensor Event Status
29.13
S/E
2Bh
Optional
Get Sensor Reading
29.14
S/E
2Dh
Mandatory
Get Sensor Type
29.16
S/E
2Fh
Optional
Get FRU Inventory Area Info
28.1
Storage
10h
Mandatory
Read FRU Data
28.2
Storage
11h
Mandatory
Write FRU Data
28.3
Storage
12h
Mandatory
Get PICMG Properties
3-10
PICMG
00h
Mandatory
FRU Control
3-25
PICMG
04h
Mandatory
FRU Control Capabilities
3-24
PICMG
1Eh
Mandatory
Get FRU LED Properties
3-27
PICMG
05h
Mandatory
Get LED Color Capabilities
3-28
PICMG
06h
Mandatory
Set FRU LED State
3-29
PICMG
07h
Mandatory
FRU Device Commands
AdvancedTCA™ Commands
Get FRU LED State
3-30
PICMG
08h
Mandatory
Get Device Locator Record ID
3-35
PICMG
0Dh
Mandatory
Set AMC Port State
3-26
PICMG
19h
Optional/Mandatory
Get AMC Port State
3-27
PICMG
1Ah
Optional/Mandatory
Set Clock State
3-44
PICMG
2Ch
Optional/Mandatory
Get Clock State
3-45
PICMG
2Dh
Optional/Mandatory
AMC® Commands
HPM.1 Upgrade Commands (HPM.1)
Get target upgrade capabilities
3-3
PICMG
2Eh
Mandatory
Get component properties
3-5
PICMG
2Fh
Mandatory
Abort Firmware Upgrade
3-15
PICMG
30h
Optional
Initiate upgrade action
3-8
PICMG
31h
Optional/Mandatory
Upload firmware block
3-9
PICMG
32h
Mandatory
Finish firmware upload
3-10
PICMG
33h
Mandatory
Activate firmware
3-11
PICMG
35h
Mandatory
Query Self-test Results
3-12
PICMG
36h
Optional/ Mandatory
Query Rollback status
3-13
PICMG
37h
Optional/ Mandatory
Initiate Manual Rollback
3-14
PICMG
38h
Optional/ Mandatory
61
MIC-5602 User Manual
Appendix A IPMI/PICMG Command Subset Supported by MMC
Get Device SDR
www.advantech.com
Please verify specifications before quoting. This guide is intended for reference
purposes only.
All product specifications are subject to change without notice.
No part of this publication may be reproduced in any form or by any means,
electronic, photocopying, recording or otherwise, without prior written permission of the publisher.
All brand and product names are trademarks or registered trademarks of their
respective companies.
Copyright © 2009 Advantech Co., Ltd.