1
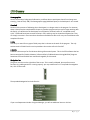
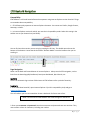
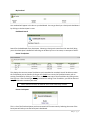
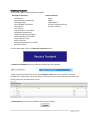
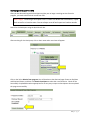
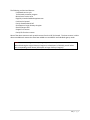
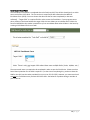
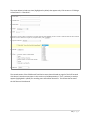
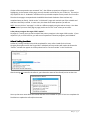
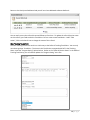
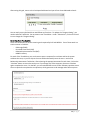
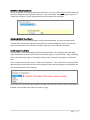
THE FLORIDA ASSOCIATION OF HEALTHY START COALITIONS Florida Home Visiting Information System FLOHVIS ETO User Manual Created by Social Solutions and The Florida Association of Healthy Start Coalitions August 2015 Version 3.0 FLOHVIS ETO Administrator Contact Information For questions about this manual or if you need technical assistance, please contact your ETO Administrator: Virginia Holland [email protected] 1|Page Table of Contents ETO Glossary ......................................................................................................................................4 Demographics ........................................................................................................................................... 4 Dismissal ................................................................................................................................................... 4 Entity ......................................................................................................................................................... 4 FLOHVIS .................................................................................................................................................... 4 Navigation Bar .......................................................................................................................................... 4 Participant ................................................................................................................................................ 5 Referral ..................................................................................................................................................... 5 Touchpoint................................................................................................................................................ 5 ETO Basics & Navigation.....................................................................................................................6 Compatibility ............................................................................................................................................ 6 Page Navigation........................................................................................................................................ 6 Inactivity ................................................................................................................................................... 6 Logging In .................................................................................................................................................. 6 Your Name/Account Information ............................................................................................................ 7 Home Page................................................................................................................................................ 7 Help ........................................................................................................................................................... 8 Logging Off ................................................................................................................................................ 8 Navigation ................................................................................................................................................ 8 Using Quick Search ................................................................................................................................... 9 Accessing your To Do List ......................................................................................................................... 9 My Dashboard/Home Page.................................................................................................................... 10 Participant Dashboard ........................................................................................................................... 12 Recording Data ................................................................................................................................ 15 Adding a New Participant ...................................................................................................................... 15 Recording a Touchpoint ......................................................................................................................... 17 Entity Records......................................................................................................................................... 18 Adding an Entity ................................................................................................................................. 18 Editing an Entity ................................................................................................................................. 20 My Caseload ........................................................................................................................................... 21 Adding a Participant to your Caseload .............................................................................................. 21 Removing a Participant from Your Caseload..................................................................................... 22 2|Page Child Records .......................................................................................................................................... 22 Recording Child Information .............................................................................................................. 22 Adding TouchPoints to a Child’s Record ............................................................................................ 23 Dismissing a Participant from ETO......................................................................................................... 25 Review of Key FLOHVIS TouchPoints ................................................................................................. 27 FLOHVIS Guide to Forms, Assessments, and Touchpoints.................................................................... 27 Child Record TouchPoint ........................................................................................................................ 28 High Need Characteristics TouchPoint .................................................................................................. 31 Family Member Information TouchPoint .............................................................................................. 32 Family Profile TouchPoint ...................................................................................................................... 33 Contact/Personal Visit Record TouchPoint ........................................................................................... 34 MIECHV Benchmark Evaluation TouchPoint ......................................................................................... 36 Referral Tracking TouchPoint................................................................................................................. 37 Goal Tracking TouchPoint ...................................................................................................................... 38 Screening Tools Touchpoints ................................................................................................................. 39 Safety Plan Status TouchPoint ............................................................................................................... 40 ASQ-3 and ASQ-SE TouchPoints ............................................................................................................. 40 Health Record TouchPoint ..................................................................................................................... 40 Frequently Asked Questions ............................................................................................................. 41 Q: How do I know if I should take a new TouchPoint or just edit an existing TouchPoint? ............... 41 Q: How do I know when to complete certain forms/TouchPoints? .................................................... 41 Q: What do I do if there is a change in the Primary Caregiver?........................................................... 41 3|Page ETO Glossary Demographics Contact information, background information, and facts about a participant that will not change over time (e.g., Date of birth, SSN). The Demographics page (Add Participant) is the Participant’s core record. Dismissal Dismissal is the process of indicating that a Participant is no longer active in the program. For instance, when a Participant has completed the Parents as Teachers program and you are no longer working with the family, you will dismiss the Participant from ETO with a dismissal reason of “completed service cycle”. Dismissed Participant records still exist in ETO, and they may be viewed and reported on. They are simply not active in the site and are therefore unavailable for edits or for any new TouchPoints to be completed for them. Entity An Entity is a record for any type of third party that is relevant to the work of the program. The only entities used in FLOHVIS are the service providers who receive referrals from PAT. FLOHVIS FLOHVIS is the acronym for Florida Home Visiting Information System. This is the ETO software that has been customized for Florida’s Maternal, Infant and Early Childhood Home Visiting (MIECHV) Program. Sometimes ETO and FLOHVIS are used interchangeably in this manual. Navigation Bar The green menu bar on the right side of the screen. This is usually collapsed, but to perform some functions (e.g. adding entities or running reports), you may need access to it. To expand the navigation bar, click on the arrow: The expanded Navigation Bar looks like this: If you are a Department Head or Program Manager, you will see additional items on this bar. 4|Page Participant This is the ETO word for an individual who receives services from a program. In the context of PAT, this is the Primary Caregiver of the target child. This manual will use the terms “Participant” and “Primary Caregiver” interchangeably. Referral A record of connecting a Participant to a resource outside of PAT. Each program will have its own list of service provider agencies (entities) to choose from when recording a referral. Referrals will be recorded using the TouchPoint called Referral Tracking. Touchpoint A questionnaire/form that captures static data, or tracks changes in knowledge, belief, attitude, and/or behavior periodically. Touchpoints in ETO: ASQ-3 ASQ-SE Child Record Contact/Personal Visit Record Edinburgh (EPDS) Family Member Information Family Profile Goal Tracking Group Connection Attendance High Needs Characteristics H.O.M.E. Inventory Health Record Life Skills Progression (Child) Life Skills Progression (Caregiver) MIECHV Benchmark Evaluation Perceived Stress Scale Referral Tracking Relationship Assessment Tool (RAT) Safety Plan Status 5|Page ETO Basics & Navigation Compatibility ETO Software is a PC web-based software that operates using Internet Explorer version 9 and 10. Things to remember about compatibility: 1. ETO Software only operates on Internet Explorer browsers. You cannot use Firefox, Google Chrome, Netscape, or Safari. 2. In Internet Explorer version 9 and 10, you must be in Compatibility mode. Select this setting in the toolbar next to your browser bar (see below). You can find out what version you are using by pressing the F12 key. This should open a box at the bottom of the browser. Locate the tab that states “Browser Mode” to see the browser that you are working in: Page Navigation Never use the Back and Forward button in Internet Explorer. Always use the ETO navigation, such as links from the Home Page/My Dashboard, Participant Dashboard, Quick Search, etc. Inactivity There is an automatic log-out time of 60 minutes in ETO Software after a period of inactivity. Logging In 1. From a Windows-based PC, open internet Explorer 9 (or 10 in compatibility view) and go to www.etosoftware.com This will redirect you to a secure website. Create a bookmark for future ease of use. NOTE: Do not enter the web address into a search engine or search bar. 2. Enter your username and password. Note that usernames and passwords are case sensitive. They must contain at least six characters, including one number. 6|Page a. If you forget your username and/or password, select the “Forgot my Password” link and your password will be sent to your email. (If you do not see this email, check your Junk Mail folder). b. If you have trouble logging in, contact your FLOHVIS Administrator for assistance. 3. Once logged in to the site, you will see a set of features on the top right of the screen and a Home Page containing links to the features that you will use most frequently. The Home Page Link in the upper right corner of the page will return you to this Home Page from anywhere within the system. 4. ETO will automatically direct you to your default site; in the example below, the site name is Parents as Teachers – Pinellas. Some sites may have more than one program. In this example, the program that is logged in is Pinellas MIECHV. To change programs click on the program name, in this example it is Pinellas MIECHV and then a drop down box will appear. Select the program you would like to work with and then press Go. If you have access to more than one site (e.g. administrators over more than one team), once you are logged in click on the site name, in this example it is Parents As Teachers - Pinellas. A list of the sites you have access to will appear, click on the site you would like to work with and it will automatically take you there. 5. In the top right corner of the Home Page you will see a series of four links which you will use to navigate ETO: Your Name/Account Information Click here to change your password and security questions. You may also manage certain settings related to the prompts that ETO gives you. Home Page Use this link to return to the Home Page. If you accidentally end up on a data entry page or somewhere in the software you did not mean to be, simply click on Home Page to start over. The Home Page contains links for all of the ETO functions you will commonly access. The Home Page looks like this: 7|Page Help Clicking the Help link will present a drop-down menu with three options, help manual, training, and support. Please note that these resources are not specific to FLOHVIS. If you are having any issues, please reference this manual or contact your FLOHVIS Administrator for assistance and they will provide further instructions. Logging Off ETO Software is a secure website; signing into ETO is the same as signing in to an online banking account or making a purchase online. Therefore, logging out of ETO properly is very important to ensure the security of your data. Always log out properly before closing your browser by clicking the “Log Off” link in the upper right-hand corner of your screen. ETO will log you out automatically if you are inactive in the software for 60 minutes! You will see a 5minute warning before this happens. If ETO logs you out due to inactivity, you will lose any unsaved work. Save your work and log out if you walk away from your computer. Navigation There are three basic ways to go about finding or entering data for a Participant: 1. Navigation from the Home Page First, select the type of information you would like to access/record, then search for the appropriate Participant. 2. Navigation from the Quick Search tab First, search for the appropriate Participant, then select the type of information you would like to access/record. In many cases, you may leave the search field blank to choose from a list of all Participants who are active in the program. You may also enter a full or partial last name to narrow your search. 3. Dashboards You may access a Participant Dashboard either through Quick Search or from your own personal “My Dashboard”. Once on the Participant’s Dashboard, select the type of information you would like to access/record. 8|Page Using Quick Search You may access Quick Search from any screen within ETO; it will always be the tab at the top: 1. In the “Enter Search Term(s)” box, type in the Participant’s last name or leave blank to choose from a list of all participants who are still active within the program. Be sure that the “within” box is set to Participant for Participant searches. Quick Search auto-recalls the last 10 Participants you have worked with during your current session. You may also use Quick Search to look at the demographics page of a Participant who is no longer in the program. To do this, set the “in” dropdown to your PAT site name (Parents as Teachers – County Name) as opposed to the name of the program you are working in (County Name). In this mode, you will NOT be able to edit information about a former Participant, or record any new TouchPoints. The Quick Search box can also be used for Entities. Change the “within” box to Entities to find and work with an entity record. 2. Click on the name of the Participant you would like to work with. You will then see a menu with actions you can take: Click on any of the links to work with the Participant in the software. Accessing your To Do List During the process of recording TouchPoint data, you have the option to set up reminders for yourself to take certain actions. The steps for how to add an item to your To Do List will be covered in the Recording Data sections starting on page 15. To access your To Do List: 1. Click on the To Do List tab, next to the Quick Search. 2. Hit the “Go” button that appears 9|Page 3. There are two useful views for your To Do list. One is a list of Participants you need to record items for. To get to this view, open the drop-down that says “Show” and select “Participant”. 4. You will now see the name for each Participant for whom you have an item due. Click on the “+” sign next to their name to see more information about these tasks: 5. To complete a task, click on the item listed under “Take Action”. This will take you right to the data entry screen and allow you to complete the task. NOTE: Once you click “Take Action” and get into the data entry screen, the item is removed from your To Do List, whether you save this work or not. 6. To view your To Do List as a calendar showing your scheduled tasks for the week, select “Calendar” from the “Show” drop-down. Just as with the Participant view, you will be able to click into the specified data entry screen from here. My Dashboard/Home Page To get to “My Dashboard”, click on the tab near the top of your screen. This is your personal dashboard. It provides an overview of Participant demographic information, contacts, and TouchPoints that you have recently recorded/accessed. It can also give you quick access to the Participants on your caseload. Below is a summary of each major piece of your “My Dashboard”. 10 | P a g e My Caseload Your caseload will appear in this box on your dashboard. You can go directly to a Participant’s dashboard by clicking on the Participant’s name. Dashboard Search Search for the dashboard of any Participant. Selecting a Participant’s name from this search will bring you to that Participant’s dashboard. Searching can be done by first or last name, or some part of either. Recent Touchpoints This displays the ten most recent TouchPoints you have edited or recorded. You will be able to review the TouchPoints you see listed by clicking on the Eyeball icon next to the TouchPoint name; edit an existing TouchPoint by clicking on Pencil icon; and add a new copy of that TouchPoint by clicking on the Plus Sign icon. After reviewing an existing TouchPoint or taking a new TouchPoint, you will be returned to My Dashboard to continue your work. NOTE: Data should never be deleted unless it was entered by mistake. Recent Participants This is a list of the five Participants you have accessed in ETO most recently. Selecting the name of the Participant will take you to that Participant’s Dashboard. 11 | P a g e Action Links These work in the same way as links on the Home Page. Select the action you would like to take, then you will be prompted to search for the Participant you want to work with. Participant Dashboard Each Participant has their own Dashboard, which provides a summary of demographics, recent efforts, recent TouchPoints, and caseworker assignment. The most useful feature of the Participant Dashboard is that as you review, edit or add new data, ETO will return you to the Dashboard. This allows you to do a lot of work with an individual Participant, without having to look up the person by name before taking each action. Participant Information Participant information contains a summary of demographics. Note that the Participant’s age is calculated based on date of birth. You may click on the Participant’s email address to launch an email to them. If you need to edit this info, click on “View/Edit Participant” in the Action Links portion of the Participant’s Dashboard. 12 | P a g e Action Links “Participant Program History” takes you to the Participant’s program history where you can review each program the participant has been enrolled in. “Record TouchPoints” takes you to the Participant’s TouchPoint page where you can choose a TouchPoint to take on that participant’s record. “View Participant’s TouchPoints” takes you to the Review TouchPoints page, where you can see every TouchPoint ever taken for that participant. Child Record Touchpoints The Child Record TouchPoint will be automatically populated here. You can see key data from this TouchPoint and go to the Child Record Dashboard to record information on the child. Proceed to the Child Record Dashboard to take TouchPoints such as the ASQ, HOME, etc. Recent Referrals This box will show you the most recent referrals for a Participant. Update the “Referral/Service Status” by pressing the edit button next to the Referral that you would like to update. 13 | P a g e Recent Touchpoints The ten most recent TouchPoints for that Participant that have been completed by any staff member will be listed here. To review the data in the TouchPoint, click on the Eyeball icon next to the touchpoint name. The Plus Sign icon will open up a new, blank version of the same TouchPoint for the same Participant. Clicking “New” at the bottom of the screen will allow you to choose any TouchPoint to record for this individual. See section below on entering TouchPoint information. Goal Tracking The Participant’s goals will be listed in this box. The box will show you the name of the goal and its current progress rating. Click the Pencil icon to update the progress rating for that goal. Caseworkers The Participant’s caseworker (or Parent Educator) will be listed in this box. You can also add this Participant to your own Caseload via the Caseload box on My Dashboard. Data Planner and Completion Report At the top of the Participants Dashboard there is a grey box titled “PAT MIECHV Data Planner & Completion Report - Click Plus Sign to Expand ->”. Clicking the plus sign the report will automatically load with the Data Planner and Completion report for that Participant. 14 | P a g e Recording Data Remember, ETO Software is only compatible with Internet Explorer. If you are using another browser, you will be able to see some information and move around in the software, but YOUR DATA WILL NOT SAVE. If you hit a Save or Submit button and do NOT see a pop-up acknowledging that your data has been saved, IT HAS NOT BEEN SAVED. This could be due to using the wrong browser or losing Internet connection at the time of saving. If your Internet connection is spotty, check to make sure you are connected to the Internet before saving any data. If you are not connected to the Internet at the time you hit SAVE, your data will be lost. Adding a New Participant 1. On the Home Page, click on the Add New Participant button. 2. Fill in the Participant Information of the Primary Caregiver. Case Number is automatically generated by ETO as soon as the record is saved. Note that city and state are not asked for; ETO generates this out based on Zip Code. Home & Work Phone require a full 10 digit number. ETO will put in the ( ) and – for you. Email must be a valid email format (e.g. @gmail.com, @yahoo.com). ETO will calculate age based on Date of Birth (DOB). 15 | P a g e NOTE: Only first and last name, DOB, and Social Security Number (SSN) are required to save the new Participant. If you do not have more information than this, you may still proceed. 3. Enter the Program Enrollment information. The Program Box will automatically be checked off. Leave this as is. The Program Start Date will default to today’s date; Program Start Date should be the date of program enrollment. You may back date if necessary. 4. Click Save 5. The software should give you a confirmation that the Participant has been added to the software. Click “OK” to proceed to the Participant’s Dashboard: After clicking OK, you should be dropped on to the Participant’s Dashboard, where you can begin recording TouchPoints for that Participant. 16 | P a g e Recording a Touchpoint As a reminder, these are the TouchPoints available: Participant TouchPoints Child Record Contact/Personal Visit Record Edinburgh (EPDS) Family Member Information Family Profile Goal Tracking Group Connection Attendance High Needs Characteristics Life Skills Progression (Caregiver) MIECHV Benchmark Evaluation Perceived Stress Scale Referral Tracking Relationship Assessment Tool (RAT) Safety Plan Status Child TouchPoints ASQ-3 ASQ-SE Health Record Life Skills Progression (Child) H.O.M.E. Inventory 1. On the Home Page, click on the Record a TouchPoint button. 2. Choose the Touchpoint that you would like to record from the dropdown. 3. After choosing the TouchPoint, click on the Participant’s name that you would like to record the TouchPoint for. If you do not see the Participant, enter the last name into the search bar and press enter to easily take you to that Participant’s name: 4. Click Continue to move to the TouchPoint that you are recording. 17 | P a g e 5. Complete the information in the TouchPoint. Some information may be required. Click Save at the bottom of the TouchPoint to save your information. On some TouchPoints, the date taken field at the very top of the screen is blank by default, meaning you must enter it in prior to submitting the TouchPoint. Entity Records An entity is a record for any type of third party that is relevant to the work that PAT does (e.g. outside service providers that receive referrals from PAT). The entities that you will be working with are Service Provider Entities. By adding new service providers to the software, all staff in your program will be able to see them. Adding an Entity Expand the navigation bar on the right side of the screen and click on Entities. Click on the link to Add New Entity. On the Add New Entity Page, enter in the Entity Name and Type. For your purposes, the entity type should always be Service Providers. Fill in as much information as you have about the entity on the top part of the screen. 18 | P a g e Under contacts, you can enter a specific contact that you have at the location. If you do not have any specific contacts, leave those fields blank. Scroll to the bottom of the screen and click Add Entity to the System. The system will ask you a couple of questions: Select OK. 19 | P a g e Select OK. Finally, ETO will confirm that you have added a new entity, and drop you on to the Entities record to review: Editing an Entity To edit an entity, expand the Navigation Bar on the right side of the screen and click on Entities: Select the View/Edit Entity Link. Search by the entity name, or leave it blank to see all entities. Click on the name of the entity to go to their View/Edit screen. Once on the edit screen, change or add any new information that you have, then press submit to complete. 20 | P a g e My Caseload In ETO, you can add Participants to your caseload, which makes accessing the records quick and easy. Once a Participant is on your caseload in ETO, you can click on their name and go directly to the Participant’s dashboard. Adding a Participant to your Caseload Navigate to the My Caseload Box on your dashboard: Click on the Add button. You will get to a screen with a list of Participants. Check off the Participant name(s) that you would like to add to your caseload. If you do not see your Participant’s name, you can search for the Participant using the Search bar (don’t forget to press enter!) 21 | P a g e Removing a Participant from Your Caseload In order to remove a Participant from your caseload, click the “X” button next to the Participant’s name: Click “OK” on the pop up. Enter in the End Date (date of removal) and select a reason for dismissal* from your caseload: After selecting remove, the participant will no longer show as being on your caseload in the software. * There is currently a bug in the software that shows too many Dismissal Reasons when dismissing a Participant from Caseload. Only choose one of the last two reasons: “Transferred to another worker” or “Dismissed from Program”. Child Records Children are not considered Participants in the software. Instead, the record of a child is attached to the Primary Caregiver via a TouchPoint. Recording Child Information Whether the child is already born, or the Participant gives birth to the child while in the program, a Child Record is recorded on the Participant’s record. 22 | P a g e The easiest way to do this is from the Participant’s Dashboard. On the Participant’s Dashboard, navigate to the Child Record box (at the top of the Dashboard): Click “New” to add a Child Record TouchPoint. Fill in all information, then press submit to complete. After submitting the TouchPoint, you will be redirected to the Participant’s Dashboard where you will be able to see the Child Record. Adding TouchPoints to a Child’s Record There are several assessments/screening tools that are recorded for the child. These are TouchPoints in the software. The list of TouchPoints for the child is as follows: ASQ-3 ASQ-SE H.O.M.E. inventory Health Record Life Skills Progression (Child) In order to access these TouchPoints, you must navigate through the Child Record and take the TouchPoints on the Child Record Dashboard. Start from the Participant’s Dashboard and navigate to the Child Record Box: 23 | P a g e Click on the link for Child Record Dashboard (see above) and you will see all the information that you entered on the left side: On the right side, you will see another box for Recent TouchPoints. Click the New button to record a child TouchPoint. After clicking new, you will be redirected to the Take New Touchpoint screen. Select the appropriate TouchPoint, enter data and submit. 24 | P a g e Dismissing a Participant from ETO After you are done working with a Participant and they are no longer receiving services from the program, you need to dismiss their record from ETO. Don’t Forget: Dismissing a Participant from ETO does not delete their information; it puts their record in an inactive state. You can always re-enroll and report on inactive records. Search for the Participant using the Quick Search bar. After searching for the Participant, click on their name and a menu box will appear. Click on the link to Dismiss from program. You will be taken to the dismissal page. Choose an End Date and Dismissal Reason, and then click Dismiss Participant to make their record inactive. Check off the Successfully Completed box when appropriate for an easy way to report on Participants who completed the program successfully. 25 | P a g e The following are Dismissal Reasons: Completed service cycle Transitioned to another program Moved out of service area Regularly missed scheduled appointments Could not be located Family dissatisfied with PAT Participant no longer Primary Caregiver Death of target child Program cut services Family left for other reasons Most of the above reasons match up with reasons from the PAT Exit Record. The three reasons in italics above are additional reasons that have been added to meet MIECHV and individual agency needs. Note: If there is a change in Primary Caregiver, please contact your FLOHVIS Administrator. When dismissing the original Primary Caregiver as a Participant in FLOHVIS, you will select the corresponding reason above (Participant no longer Primary Caregiver). 26 | P a g e Review of Key FLOHVIS TouchPoints FLOHVIS Guide to Forms, Assessments, and Touchpoints The table below can be used as a guide to understanding how the various MIECHV and PAT forms and assessments are entered into FLOHVIS. Please note that some forms combine to be entered as one Touchpoint in FLOHVIS and some forms split and are entered as multiple Touchpoints in FLOHVIS. Each form and assessment has a related action in FLOHVIS. MIECHV Form/Assessment1 PAT Form/Assessment2 Enrollment Form (Primary Caregiver) Enrollment Form (Child) Family Member Information Form Add Participant Recruitment/Enrollment (p. 3) Touchpoint: Child Record Recruitment/Enrollment (p. 4) Touchpoint: High Needs Characteristics Recruitment/Enrollment (p. 2) Touchpoint: Family Member Information Family Profile Form Safety Topics Form FLOHVIS Action Touchpoint: Family Profile Life Skills Progression (Caregiver) Touchpoint: Life Skills Progression (Caregiver) Life Skills Progression (Child) Touchpoint from Child Record Dashboard: Life Skills Progression (Child) Personal Visit Record Touchpoint: Contact/Personal Visit Record Benchmark Evaluation Forms Touchpoint: MIECHV Benchmark Evaluation Health Record Touchpoint from Child Record Dashboard: Health Record Goal Tracking Sheet Touchpoint: Goal Tracking Referral Tracking Form Touchpoint: Referral Tracking Group Connection Attendance Touchpoint: Group Connection Attendance Perceived Stress Scale Touchpoint: Perceived Stress Scale Edinburgh Postnatal Depression Scale Touchpoint: Edinburgh (EPDS) Relationship Assessment Tool Touchpoint: Relationship Assessment Tool Safety Plan Status Form Touchpoint: Safety Plan Status Touchpoint from Child Record Dashboard: ASQ-3 Touchpoint from Child Record Dashboard: ASQ: SE Touchpoint from Child Record Dashboard: HOME Inventory ASQ-3 ASQ: SE HOME Inventory Exit Record Dismiss Participant 1 Some assessments categorized here as MIECHV assessments are also required for PAT. When an assessment was required for both programs, it was placed in the MIECHV column. 2 PAT Forms were revised in September 2013. These revised forms were used to design the system. 27 | P a g e Child Record TouchPoint The Child Record TouchPoint is completed when the family enrolls (if the child is already born) or within one month of the child’s birth. The first section is comprised of data collected on the MIECHV Enrollment Form (Child). You must choose the date that the form was completed (or data was collected). “Target Child” is a required field in order to save the TouchPoint. If your program serves other children in the home besides the target child, this item allows you to indicate which child is the focus for MIECHV but also makes it possible for you to record data about other children in the home by creating a Child Record for them as well. The next several items are required to be completed in order to save the TouchPoint. Please note that Social Security Number for the child is required. If, at the time of completing this, you do not have the SSN for the child, use the codes provided (111-11-1111 or 555-55-5555). However, you must come back and edit this TouchPoint once you have the Child’s SSN. See below for tip about setting a reminder in your To-Do List. 28 | P a g e The screen below includes one item (highlighted in yellow) that appears only if the answer to “Child Age at Enrollment” is “After Birth”. The second section of the Child Record TouchPoint covers data collected on page 3 of the PAT Personal Visit Record. Note that many items in this section are Yes/No questions; if “Yes” is selected, a text box appears (highlighted in yellow) for recording more information about this. This follows the format of the PAT Personal Visit Record. 29 | P a g e Finally, at the end of the TouchPoint, you have the option to set a reminder for your or another staff member’s To-Do List. Since you will never create a new Child Record for the same child, you would use this only to update or “complete this TouchPoint” (see example below). This would be helpful for updating the Child SSN if you did not have it at the time you completed this TouchPoint originally. 30 | P a g e High Need Characteristics TouchPoint This TouchPoint records data collected on page 4 of the PAT Recruitment and Enrollment Record. As each family characteristic is checked off, the system automatically calculates the total below. 31 | P a g e Family Member Information TouchPoint This TouchPoint was designed for recording basic information about other family members. This TouchPoint is optional but encouraged, especially if other family members are involved in the program. If the Primary Caregiver/Participant changes, it becomes very important and is required (see below). *IMPORTANT* If there is a change in the Primary Caregiver, it is imperative that this section be completed. After discussing the issue with your supervisor, please contact the FLOHVIS Administrator as soon as possible. 32 | P a g e Family Profile TouchPoint The Family Profile TouchPoint is required within one month of enrollment and again every 12 months. “Timeframe” (see below) is required—your answer to that determines which questions your will see. At 12 and 24 months post-enrollment, there are two additional questions to answer. Note that a “Yes” answer to “Are you of high school age?” generates a follow-up question (highlighted in yellow). Question #8 asks about health insurance status for the Participant. If “Medicaid” is selected, note that follow-up questions are generated. Since this TouchPoint must be repeated each year, you may want to schedule a reminder for your To-Do List to take a new TouchPoint in one year. 33 | P a g e Contact/Personal Visit Record TouchPoint This is the TouchPoint you will complete the most often. It includes four different pages. Sometimes you will need to complete all four pages, and sometimes you may only complete page 1, depending on what type of contact you had with the family and what content was covered during the contact. Page 1, “Participant Contact” is a summary of the contact and allows you to record phone calls and other types of contacts than just home visits. Page 2, “PAT Visit Overview” corresponds with page 1 of the PAT Personal Visit Record MIECHV and includes an important additional question required for MIECHV. Page 3, “PAT Visit Content” corresponds with pages 2 and 3 of the PAT Personal Visit Record. Page 4, “Safety Topics” corresponds with the MIECHV “Safety Topics Form”. From Page 1 (Participant Contact) If PAT Personal Visit is selected, follow up questions are generated to specify if the visit was attempted, completed, or partial/incomplete, and the location of the visit. By completing the “Start Time” and “End Time”, “Time Spent” is calculated automatically. At the bottom, you can set a reminder for your next scheduled contact/visit. 34 | P a g e From Page 2 (PAT Visit Overview) This page follows the “PAT Personal Visit Record MIECHV”. Be sure you are using this version in your visits. The question in bold (see below) is an added question and is critical for MIECHV reporting. If you select “Yes” to this question, you should also complete a “Referral Tracking TouchPoint”. From Page 3 (PAT Visit Content) This page is divided into three sections: Family Well-Being (p.2 of PAT PVR) and Parent-Child Interaction and Development-Centered Parenting (p. 3 of PAT PVR). The blue section header quick-links will take to you each section in one click. The Family Well-Being Section is condensed for easier navigation. As soon as you click “Yes” on one of the Topics, several sub-topics appear and you are able to specify which sub-topic was covered during the visit. Choose D, I, or CR for each sub-topic covered. You only need to complete the items for the topics and sub-topics you covered. You may leave the rest unanswered. 35 | P a g e From Page 4 (Safety Topics) Complete this page if you discussed any of the safety topics listed. Record as many topics as needed. MIECHV Benchmark Evaluation TouchPoint This is one of the most important TouchPoints for MIECHV reporting; it will be monitored very carefully by supervisors and by state MIECHV staff. As with all MIECHV forms, you must use the Excel Planner to schedule the correct timing for completing these forms and then the TouchPoint. The MIECHV Benchmark Evaluation TouchPoint has four pages. When you complete it, you may only complete one page, or you may complete two pages at one time (for example, the child was enrolled shortly after birth. He is now 6 months old. You might be completing “1-12 Months” and “6 Months”). From Page 1 (1-12 Months) There is a reminder at the top about when the form should be completed and then you must indicate when the family enrolled and how old the child is (1-12 months old) or how many months after enrollment is (1-12 months – see below). 36 | P a g e If either of the two questions are answered “Yes”, then follow-up questions will appear in yellow highlighting. At the bottom of this page, you may schedule a reminder for your To-Do List. This may be very helpful for this “1-12 Months” evaluation since you should complete it every month for 12 months. The other three pages correspond with the MIECHV Benchmark Evaluation forms and are only completed once per family. Similar to the “1-12 Months” page, each reminds you of the schedule and asks when the family enrolled. In some cases, this determines what questions you will see. NOTE: You may click on “next page” or click on a different page by using the tabs at the top. Your data will be saved as you move from page to page, but be sure to click “save” when you are done. Is the primary caregiver the target child’s mother? On pages 2, 3, and 4, you may also be asked if the primary caregiver is the target child’s mother. If your response is yes, as it will often be, you will see more questions related to pregnancy and childbirth. Referral Tracking TouchPoint A Referral Tracking TouchPoint should be completed for every referral made for the Primary Caregiver/Participant and for the Target Child. Individual service providers will need to be entered as “Entities” and will then appear in the drop-down box for “Service Provider” in this TouchPoint. After choosing one reason for the referral, you indicate the status of the referral/service at that time: You may also enter notes about the referral and then set a reminder for your To Do List to complete this TouchPoint to update the referral/service status. 37 | P a g e Return to the Participant Dashboard and you will see a box dedicated to Recent Referrals: You can easily survey the referrals that need follow-up from here. To update the referral/service status on this referral, you need to edit this TouchPoint. Do not create a new TouchPoint. Under “Take Action”, Click on the Pencil icon to change the status of this referral. Goal Tracking TouchPoint The Goal Tracking TouchPoint works in a similar way to the Referral Tracking TouchPoint. You can only record one goal per TouchPoint. The items in this TouchPoint correspond with PAT’s Goal Tracking Sheet. Note the “Progress Rating” options below. Similar to the “Referral/Service Status” in the Referral Tracking TouchPoint, you will need to update the “Progress Rating” over time. 38 | P a g e After saving this goal, return to the Participant Dashboard and you will see a box dedicated to Goals: You can easily survey the Goals that need follow-up from here. To update the “Progress Rating”, you need to edit this TouchPoint. Do not create a new TouchPoint. Under “Take Action”, Click on the Pencil icon to change the “Progress Rating”. Screening Tools Touchpoints There are TouchPoints for all the screening tools required by PAT and MIECHV. Four of these work in a similar manner in FLOHVIS: - Edinburgh (EPDS) - Perceived Stress Scale (PSS) - Relationship Assessment Tool (RAT) - HOME Inventory For each of the TouchPoints, you can choose to enter a response for each item and let the system calculate the score, or you can skip to the score field and manually enter the score. Look at the Relationship Assessment Tool below. After selecting the appropriate answer for each item, click on the “calculate” button to return the total score. If you change any of the responses, be sure to calculate again to update the score. For the RAT, you are reminded that a score of 20+ indicates a positive screen. You are required to complete the next question, which generates a red message and a follow-up item. 39 | P a g e Safety Plan Status TouchPoint Use this TouchPoint to record the Safety Plan Status Form. Be sure to take a new TouchPoint each time the status changes and you complete a new form. If you select either “Safety planning in progress” or “Safety plan complete”, you will be prompted to enter the date of the safety plan. ASQ-3 and ASQ-SE TouchPoints These TouchPoints are accessed through the Child Record Dashboard. You select the appropriate “Interval Code” and then the subscale scores (ASQ-3) or total score (ASQ-SE). Be sure to answer all questions at the end of the TouchPoint as follow-up questions may need to be completed. Health Record TouchPoint This TouchPoint is accessed through the Child Record Dashboard. This TouchPoint has three pages. Page 1 (Health Record) covers all information recorded on pages 1-3 of the PAT form. Page 2 (Hearing) covers information from page 4-5 and Page 3 (Vision) covers information from pages 6-7 of the PAT form. You are required to select the correct “Timeframe of Evaluation”. This is because the second and third administrations of this TouchPoint have fewer questions; items related to pregnancy and childbirth are only complete don the initial timeframe. Please note that “Follow-up” boxes found on the right side of the PAT form have been incorporated into FLOHVIS, and are found at the end of the section or page. 40 | P a g e Frequently Asked Questions This section will be updated periodically as new questions arise. Q: How do I know if I should take a new TouchPoint or just edit an existing TouchPoint? A: In most cases, you should take a new TouchPoint. Think of the TouchPoints as paper data collection forms. Ask yourself: “Would I fill out a new form? Or would I just update a form I already completed?” If you would fill out a new form, then you should take a new TouchPoint. If you would update an item on a form you already completed (such as progress on a goal or status of a referral), then you should edit the existing TouchPoint. These are the only times you might edit an existing TouchPoint: 1) Update “Progress Rating” on a Goal Tracking TouchPoint. 2) Update “Referral/Service Status” on a Referral Tracking TouchPoint. 3) Fill in a missing field, i.e. when you first completed the TouchPoint, you did not have all the necessary data. You would edit the existing TouchPoint to make it complete. 4) Update the Family Member Information TouchPoint. If contact information changes or there is a change in the Primary Caregiver, you would edit the existing TouchPoint for that person. The Child Record should only be taken once for the target child and shouldn’t need to be edited, unless data was missing when it was first completed (Ex. child social security number). If you serve other children in the family, you can add a child record for each child, but only one per child. Q: How do I know when to complete certain forms/TouchPoints? For most MIECHV Data Collection forms, you should always use the Excel file “PAT MIECHV Data Collection Planner” or the “PAT MIECHV Data Planner and Completion Report” in FLOHVIS to calculate timeframes for completing each form. On the Excel file you must select the correct tab to use based on the age of the target child when the family was enrolled. A few MIECHV forms are done as needed so they are not included on the Excel Planner or the FLOHVIS Report (such as the Referral Tracking form and the Family Member Information form). For PAT Forms, you should follow the guidelines provided by the Parents as Teachers National Center to ensure fidelity to the evidence-based PAT model that is funded by MIECHV. Q: What do I do if there is a change in the Primary Caregiver? A: Because the Child Record is embedded inside the Primary Caregiver’s Record in FLOHVIS, a change in the Primary Caregiver requires a few extra steps. For this reason, it is important to discuss the situation with your supervisor to be sure that your program is ready to make a permanent change the family’s record. Then contact the FLOHVIS Administrator for instructions on adding/editing a Family Member Information TouchPoint for the new Primary Caregiver; adding the new Primary Caregiver as a Participant; copying the child records over to that Participant (done by the FLOHVIS Administrator); and dismissing the former Primary Caregiver with the correct dismissal reason. It is essential that these steps are done correctly to assure that the child’s data is not inactivated or duplicated. 41 | P a g e