1
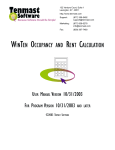
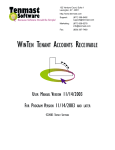
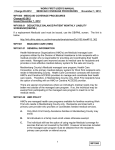
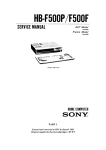
Compass Capture
3.61
USER MANUAL
January 2010
ABOUT NORTHWOODS CONSULTING PARTNERS
Northwoods Consulting Partners, Inc., founded in 1997, is a privately‐held software development and services company headquartered in Dublin, Ohio. Our Compass Software® product suite is created solely to serve the needs of human services agencies nationwide.
With proven technology, and a focus on industry knowledge and our clients, we create business solutions that provide proper application of products and services with tangible and measurable results. COPYRIGHT AND TRADEMARKS NOTICE
Copyright © 2010 by Northwoods Consulting Partners. All rights reserved. The Compass Software® Suite and each of its products individually are owned exclusively by Northwoods Consulting Partners, Inc., and Northwoods hereby asserts its copyright and trademark rights to its products. Rather than repeat the trademark and copyright attributions throughout this document wherever a Northwoods’ product name appears, Northwoods hereby asserts its intellectual property rights for all of its products.
Third‐party Trademarked and Copyrighted names may appear throughout this document. Rather than list the names and entities that own the trademark/copyright or insert a symbol with each mention of the trademark/copyright name, Northwoods states that it is using the names for editorial purposes and to the benefit of the trademark/copyright owner with no intention of infringing upon the trademark or copyright.
DISCLAIMER
Northwoods Consulting Partners has made reasonable effort to ensure the accuracy of this manual. Information in this document is subject to change. If you should discover any discrepancies, please notify us immediately.
CONTACT INFORMATION
Northwoods Consulting Partners
Northwoods Support Center
Address:
5815 Wall Street
Dublin, Ohio 43017
Phone:
(614) 545-0999
Phone:
(614) 781-7800
Email:
[email protected]
Web:
http://www.teamnorthwoods.com
Page i
© 2010 Northwoods Consulting Partners, Inc.
Table of Contents
TABLE OF CONTENTS
Compass Capture Introduction . . . . . . . . . . . . . . . . . . . . . . . . . . . . . . . . . . . . . . . 1
Launching Capture . . . . . . . . . . . . . . . . . . . . . . . . . . . . . . . . . . . . . . . . . . . . . 1
Selecting Caseworker Data . . . . . . . . . . . . . . . . . . . . . . . . . . . . . . . . . . . . . . . 2
Locating Clients and Cases . . . . . . . . . . . . . . . . . . . . . . . . . . . . . . . . . . . . . . 3
Locating Clients and Cases Using the Search Button . . . . . . . . . . . . . . . . . . . 4
Scanning a Document . . . . . . . . . . . . . . . . . . . . . . . . . . . . . . . . . . . . . . . . . . . . . . . 6
Scanning a Document with a Barcode (Stack Scanning) . . . . . . . . . . . . . . . . 9
Deleting a Scanned Image . . . . . . . . . . . . . . . . . . . . . . . . . . . . . . . . . . . . . . . 10
Previewing Scan Results . . . . . . . . . . . . . . . . . . . . . . . . . . . . . . . . . . . . . . . . 11
Making Adjustments to Scanned Images . . . . . . . . . . . . . . . . . . . . . . . . . . . 13
Submitting Documents to the DMS . . . . . . . . . . . . . . . . . . . . . . . . . . . . . . . . . . . 15
Printing Labels . . . . . . . . . . . . . . . . . . . . . . . . . . . . . . . . . . . . . . . . . . . . . . . . . . . 16
Page iii
© 2009 Northwoods Consulting Partners, Inc.
Compass Capture Introduction
COMPASS CAPTURE INTRODUCTION
Compass Capture is distributed scanning software that allows agencies to scan and return docu‐
ments at the point of contact with the client. Caseworkers at the front desk, for example, can “capture” and immediately return document drop‐offs, saving postage and other costs. The doc‐
uments are automatically routed electronically to the appropriate caseworker for their use within seconds of scanning. Documents scanned in Capture can also quickly and easily be retrieved from the Document Man‐
agement System (DMS). Launching Capture
To launch Capture, click on the Capture icon from your desktop (Fig. 7.1).
Fig. 7.1 Capture Navigation Button The main Capture window opens (Fig. 7.2).
Click on the “zipper” to show/hide
the Navigation Pane and Stage
Fig. 7.2 Capture interface Page 1
© 2010 Northwoods Consulting Partners, Inc.
Compass Capture Introduction
Selecting Caseworker Data
Make sure you are using the correct profile. To select a different Profile:
1. Click the Change Capture Profile button in the Toolbar (Fig. 7.3).
Fig. 7.3 Change Capture Profile 2. The Select a Profile window opens. Select the profile you want from the list displayed. In this example, we chose the Reception Profile (Fig. 7.4).
Fig. 7.4 Reception Profile
To select a user:
1. Click on the Recipient(s) tab.
2. Click on the Select User icon to the right of the User field (Fig. 7.5).
Select User
Current user name
Remove Recipient(s)
Add Recipient(s)
Clear All Users/Recipients
Fig. 7.5 Recipients tab 3. Select a username from the list displayed. (Click More to see additional names.)
© 2010 Northwoods Consulting Partners, Inc.
Page 2
Compass Capture Introduction
4. Click the Add Recipient(s) button and choose the recipient(s) from the list displayed, or click the Remove Recipient(s) button to remove a recipient from your selected recipients (See Fig 7.5).
Multiple recipients can also be selected.
Locating Clients and Cases
Before scanning a document, you must populate the Keywords fields. To search for a client or case using the magnifying glass (searching on a single keyword entry):
1. Click the Keywords tab in the Search Criteria area.
2. Enter one type of known client data in a text box, for example, SSN, Case, Last Name or First Name) (Fig. 7.6).
Magnifying glass to search on a single keyword
Required fields have red asterisks (*)
Search button to search multiple Keyword entries
Fig. 7.6 Keywords tab
Page 3
© 2010 Northwoods Consulting Partners, Inc.
Compass Capture Introduction
3. Click the Magnifying Glass icon next to your field entry. A selection grid opens.
If no matches are found, you must enter the client into the DMS before scanning.
4. Choose the correct client data match by single‐clicking the entry to highlight it. 5. To scan a document for multiple clients, select all of the rows you need while in the grid window.
6. Click OK.
To clear the keywords, scroll down in the Keywords area and click Clear Keywords.
Locating Clients and Cases Using the Search Button
Before scanning a document, you must populate the Keywords fields. You can use the Search button to search for a client or case. The Search button performs a “search all” on all the keyword values entered in the Keywords tab.
Certain keywords, such as Source and Submitted By, for example, that may be pre‐populated can be configured to be excluded from a Search button search. Including these values in the search may result in an error where no searches can be performed. See your System Administrator for assistance.
To search for a client or case using the Search button (searching on multiple keyword entries):
1. Click the Keywords tab in the Search Criteria area.
2. Enter several types of known client data in the appropriate text entry boxes (e.g., SSN, Compass Number, Last Name or First Name) (See Fig. 7.6).
3. Click the Search button (See Fig. 7.6). A selection grid window opens.
If no matches are found, you must enter the client into the DMS before scanning.
© 2010 Northwoods Consulting Partners, Inc.
Page 4
Compass Capture Introduction
4. Choose the correct client data match by single‐clicking the entry to highlight it. 5. To scan a document for multiple clients, select all of the rows you want to include while in the selection grid window.
6. Click OK. The keywords entry boxes are populated.
To clear the keywords, click the Clear button at the bottom of the Keywords tab.
Page 5
© 2010 Northwoods Consulting Partners, Inc.
Scanning a Document
SCANNING A DOCUMENT
1. Insert the document you want to scan into the scanner. Make sure your document(s) is upside‐down and backward.
2. Select the appropriate scan options (Fig. 7.7):
• Color scans documents in color. It is suggested that the following document types be scanned in color for quality purposes:
• Colored documents (such as a driver’s license)
• Low‐quality black and white documents
• Documents that have highlighting (except yellow)
• Documents with low or high quality photographs
Depending on what Northwoods or your System Administrator has configured, the Color button may or may not reset once you’ve scanned. If it resets, you will need to select the Color option again. •
•
Duplex will scan both sides of the document and automatically drop blank pages.
Drop Color will remove a specified color from black and white documents. For example, selecting Drop Color (red) will remove any red, or red‐like, marks on the black and white document. Colors you can drop include:
• Red
• Blue
• Green
• Yellow
© 2010 Northwoods Consulting Partners, Inc.
Page 6
Scanning a Document
3. Click the appropriate Document Type Group button.
Scan option buttons
Document Type Group buttons
Fig. 7.7 Scan options and Document Type Group buttons
4. From the sub‐menu, click the appropriate Document Type button. This “triggers” the scanner to begin scanning (Fig. 7.8).
Fig. 7.8 Document Type buttons
The scanned document preview appears briefly, then an icon displays in the Documents panel with basic scan details below it (Fig. 7.9), including:
•
•
•
•
•
•
Document Type
Number of pages
Scanning resolution
Whether the document was scanned as color or black and white
Whether the document was scanned as single‐sided or duplex
Keywords for the client
Fig. 7.9 Scanned image icon with details
Page 7
© 2010 Northwoods Consulting Partners, Inc.
Scanning a Document
Repeat the steps above to scan additional documents.
Check to see if the user/recipient and client information are correct before scanning.
5. To submit, see Submitting Documents to the DMS.
Canceling a Scan
You can cancel a scan while a document is being scanned. When the scan begins, a Cancel Scan button appears in the Toolbar (Fig. 7.10).
Fig. 7.10 Cancel Scan
When you click the button, the scan is stopped. If you were scanning a multi‐page document, the scanner may scan a page or two before it actually stops.
If you do not see the Cancel Scan button, the document previews may be hiding it. Move the preview to see the button. © 2010 Northwoods Consulting Partners, Inc.
Page 8
Scanning a Document
Scanning a Document with a Barcode (Stack Scanning)
Stack Scanning allows you to scan a document containing a barcode without inputting any infor‐
mation. To scan a document containing a barcode:
1. Load the document containing the barcode into the scanner and click Scan A Stack (Fig. 7.11).
2. The document scans automatically, displaying the Keywords in the Document Panel.
3. Click File to submit the document to the DMS. Scan a document containing a barcode
Scanned document and document Keywords
Fig. 7.11 Scan a Stack and Scanned Barcoded Document
Page 9
© 2010 Northwoods Consulting Partners, Inc.
Scanning a Document
4. The Stack Scan Reconciliation and Document Information windows open (Fig.7.12). Verify or change the Document Type.
5. Verify, change, or add keywords. 6. Click Save and Close in the Document Information window.
7. Click Save Changes and File in the Stack Scan Reconciliation window.
Fig. 7.12 Stack Scan Reconciliation and Document Information windows
8. Optional ‐ Print a receipt for this transaction. The document is submitted to the DMS. Deleting a Scanned Image
To delete a scanned image:
1. Click on a scanned document in the Documents panel.
2. Click the Delete button (paper shredder icon) (Fig. 7.13).
Fig. 7.13 Delete button
© 2010 Northwoods Consulting Partners, Inc.
Page 10
Scanning a Document
3. Respond to the resulting Delete Confirmation dialog box (Fig 7.14).
Fig. 7.14 Delete Confirmation Previewing Scan Results
To preview a scanned image:
1. In the Documents panel use the arrow buttons to locate and highlight a document that you want to view.
2. If the Stage is not visible, click on the Zipper to unhide it.
3. Click on the selected scanned image icon to display it.
Page 11
© 2010 Northwoods Consulting Partners, Inc.
Scanning a Document
In the Stage, the Image Viewer displays:
•
•
The first page of the selected scanned document (Fig. 7.15)
Any subsequent pages as thumbnails Fig. 7.15 Scanned image preview with Thumbnails
© 2010 Northwoods Consulting Partners, Inc.
Page 12
Scanning a Document
Making Adjustments to Scanned Images
1. Optional ‐ Click the Detach bar above the Image Viewer. The Image Viewer panel detaches from the Stage. Scan data appears at the top of the page, for example, name of the person who scanned the document, date, and time.
2. Optional ‐ Using your mouse, drag the detached panel where you want it on the screen (Fig. 7.16). Fig. 7.16 Scanned image preview in the Image Viewer in the Detached Compass Capture Panel
3. Make the appropriate changes to the document.
Page 13
© 2010 Northwoods Consulting Partners, Inc.
Scanning a Document
The Image Viewer menu buttons and their functions, from left to right, include (Fig. 7.17):
•
•
•
•
•
•
•
•
•
•
•
•
•
•
Magnifying Glass – Magnify the image with a floating magnifying glass
Zoom To – Magnify parts of the image by drawing a box around the areas you want to enlarge Center at a Point – Centers the document at the point where you mouse is clicked
Fit to Width – Fits the image to the width of the available window
Rotate – Rotates or turns the image clockwise Fit – Resizes the image to fit inside of the available window
Move Image (Pan) – Allows you to grab the image and move it up and down
Reload – Refreshes the image
Print – Prints the entire image or just the current view
Darken Image – Makes the image darker
Lighten Image – Makes the image lighter
Insert a Page Before – Allows you to insert a page before the current image
Insert a Page After – Allows you to insert a page after the current image
Delete This Page – Deletes the current image
Fig. 7.17 Image Viewer options
4. Use the Close Viewer button (X) to close the Image Viewer. © 2010 Northwoods Consulting Partners, Inc.
Page 14
Submitting Documents to the DMS
SUBMITTING DOCUMENTS TO THE DMS
To submit your scanned documents to the DMS:
1. Click on the File button (Fig. 7.18). Fig. 7.18 File button
The Print dialog box opens, prompting you to print a receipt. 2. Choose:
• Yes – The scanned image is saved in the DMS and a receipt is printed on your local printer. The receipt is also saved in the DMS. • No – The scanned image is saved in the DMS but no receipt is printed.
• Cancel – The scanned image is not saved in the DMS and no receipt is printed. You are returned to the main Capture window with the scanned documents still present. The document is submitted to the DMS. Page 15
© 2010 Northwoods Consulting Partners, Inc.
Printing Labels
PRINTING LABELS
There are two options for printing labels.
1. Perform one of the following options to print a label: • From the Toolbar button.
a. Populate the Keyword fields. •
b. Click on the Print Labels Toolbar button.
Depending on your agency configuration, after you click the File button to submit your scanned image(s), you may also be prompted to print a label for mailing purposes. If the scanned document is indexed to more than one client, a label is created for each client.
Address labels can be edited. Click in the field you want to edit and make your changes.
The Print Address Labels window opens (Fig. 7.19).
Fig. 7.19 Print Address Labels
© 2010 Northwoods Consulting Partners, Inc.
Page 16
Printing Labels
2. Click one of the three buttons:
• Print Selected Labels – select the specific label or labels you want to print
• Create New Label – enter data to create a new label. New labels can be selected (marked with a green checkmark) or deselected (marked with a red X) (Fig. 7.20). To create a new label, click in the Last Name field, enter the client’s last name, and click Ctrl + S. If there is more than one match, select the appropriate person from the grid. • Close – close the Print Address Labels… window.
Fig. 7.20 Print Address Labels... Page 17
© 2010 Northwoods Consulting Partners, Inc.