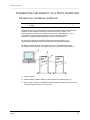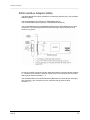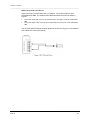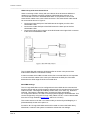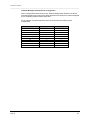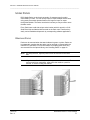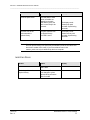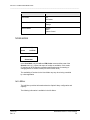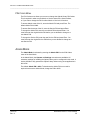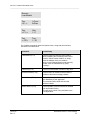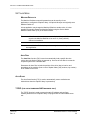
1
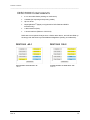
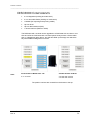
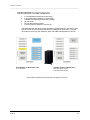
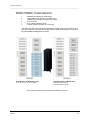
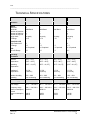
______________________________________________________________________________
DISC1000
DISC3000
DISC4000
DISC7000
User Manual
143714-F
Rev. A
DISCx000 Version 3.1User Manual
1
______________________________________________________________________________
Chapter 1: Copyrights Trademarks and Contact Information 6
Notice of Copyright 8
Changes 8
Trademarks Used in this Manual 9
Contacting DISC 9
International 9
Internet 9
Mailing Address 9
Sales 9
Technical Support 9
Chapter 2: Safety Instructions 11
Intended Use 13
Use of Interjective Terms 13
Ban on Arbitrary Reversions and Changes 13
Repairs 13
Fire and Shock Hazard 14
Opening the Unit 14
Safety 14
Data Security 14
Electromagnetic Compatibility 15
Fuses 15
Professional Disc Media 15
Chapter 3: Overview 17
DISC1000 Components 19
DISC3000 Components 20
DISC4000 Components 21
DISC7000 Components 22
Installed Equipment 23
Structure of Model Designation 23
Example of Model Designation 24
DISCx000 Front 24
Keyboard 25
LCD 25
DISCx000 Rear 26
Chapter 4: Setup 27
Checking the Delivery 29
Removing the Transportation Fixtures 30
Mounting the Stands 31
Placing the Optical Library 32
Operation Modes 33
Function of ID Switch 33
RS232 Mode 33
SCSI Mode 34
143714-F
Rev. A
DISCx000 Version 3.1User Manual
2
______________________________________________________________________________
SCSI Cable Requirements 34
SCSI Cable Length 34
Setting Drive IDs 34
Connecting the Robotic to a Host Computer 35
Connecting the Serial Robotic Interface 35
Connecting the SCSI Robotic Interface 36
Connecting the Robotic via the LVD SCSI to USB Converter 38
Connecting the Drives to a Host Computer 38
SAS Configuration 38
SAS Host Bus Adapter (HBA) 39
External SAS Cables 40
Connecting the SAS drives to a SAS Host Bus Adapter 40
Connecting Line Voltage 41
Chapter 5: Operating the Optical Library 43
Powering on the Optical Library 45
Handling Media 46
Handling Exposed Media 46
Handling Packs 46
Importing and Exporting Media 47
The Mailslot 47
Using Packs 48
Removing Packs 48
Action 49
Status 49
Display 49
Inserting Packs 49
Action 49
Status 49
Display 49
Chapter 6: The User Interface 51
The User Interface 53
Activating the User Interface 54
User Interface Modes 54
User Interface Mode 55
Functional Areas Available 55
User Mode 55
Info Menu 55
Info Menu Sub-Menu 56
Available Information 56
PIN Codes Menu 57
Admin Mode 57
Operate Menu 58
Address Digit 58
This Digit Represents... 58
143714-F
Rev. A
DISCx000 Version 3.1User Manual
3
______________________________________________________________________________
Available Range to Input 58
Command 59
Functionality 59
Settings Menu 61
Machine Defaults 61
Auto Disc 61
Auto Start 61
TCP/IP (for use at embedded NAS machines only) 61
Parameter 62
Function 62
Service Mode 63
Agency Approvals 65
Agency Approvals 67
FCC Declaration 67
Declaration of Conformity – DISC1000 68
EG-Konformitätserklärung 68
EC-Declaration of Conformity 68
CE-Déclaration de Conformité 68
Declaration of Conformity - DISC3000 69
EG-Konformitätserklärung 69
EC-Declaration of Conformity 69
CE-Déclaration de Conformité 69
Declaration of Conformity - DISC4000 70
EG-Konformitätserklärung 70
EC-Declaration of Conformity 70
CE-Déclaration de Conformité 70
Declaration of Conformity - DISC7000 71
EG-Konformitätserklärung 71
EC-Declaration of Conformity 71
CE-Déclaration de Conformité 71
Technical Data 73
Technical Specifications 75
DISC1000 75
DISC3000 75
DISC4000 75
DISC7000 75
Interfaces 75
143714-F
Rev. A
DISCx000 Version 3.1User Manual
4
______________________________________________________________________________
Operating Conditions 75
Power Supply 75
Dimensions and Weights 76
Fuses 76
OEM Specifications 76
DISC1000 76
DISC3000 76
DISC4000 76
DISC7000 76
Robotics 76
Drives 76
Slot Upgrades 77
143714-F
Rev. A
DISCx000 Version 3.1User Manual
5
___________________________________________
CHAPTER 1:
COPYRIGHTS TRADEMARKS AND
CONTACT INFORMATION
Notice of Copyright
■ Disclaimer
■ Trademarks
■ Contacting DISC
■
143714-F
Rev. A
DISCx000 Version 3.1User Manual
6
___________________________________________
<THIS PAGE IS INTENTIONALLY BLANK.>
143714-F
Rev. A
DISCx000 Version 3.1User Manual
7
___________________________________________
NOTICE OF COPYRIGHT
All rights reserved. Copyright 2010 by DISC Archiving Systems B.V.. No part of this
publication may be reproduced, stored in a retrieval system, or traDISCitted in any form
or by any means, electronic, mechanical, photocopying, recording or
otherwise, without the prior written consent of:
DISC Archiving Systems B.V.
Waarderweg 52G
2031 BP Haarlem
The Netherlands
Disclaimer
DISC Archiving Systems B.V. (DISC Archiving Systems B.V. and all of its subsidiaries)
takes no responsibility and offers no warranty with respect to the adequacy of this
documentation, or the procedures which it describes for any particular purpose, or with
respect to its adequacy to produce any particular result. In no event shall DISC
Archiving Systems B-V. its employees, its contractors or the authors of this
documentation be liable for special, direct, indirect or consequential damages, losses,
costs, charges, claims, demands, or claim for lost profits, fees or expenses of any
nature or kind.
CHANGES
The following paragraph does not apply where such provisions are
inconsistent with local law. Some states do not allow disclaimer of express or
implied warranties in certain transactions. Therefore, this statement may not
apply to you: The material in this documentation is for information only and is subject to
change without notice. While reasonable efforts have been taken in the
preparation of this manual to assure its accuracy, DISC Archiving Systems B.V. assumes
no liability resulting from any errors or omissions in this manual, or from the use
of the information contained herein.
DISC Archiving Systems B.V. reserves the right to make changes in the product design
without reservation and without notification to its users.
143714-F
Rev. A
DISCx000 Version 3.1User Manual
8
___________________________________________
TRADEMARKS USED IN THIS MANUAL
DISC, and the DISC logo are registered trademarks of DISC Archiving Systems B.V.
CONTACTING DISC
INTERNATIONAL
INTERNET
www.disc-group.com
MAILING ADDRESS
DISC Archiving Systems B.V.
Waarderweg 52G
2031 BP Haarlem
The Netherlands
SALES
Phone +31 (0) 23 5172 635
Fax +31 (0) 23 5172 639
E-mail [email protected]
TECHNICAL SUPPORT
Phone +49 (0) 6721 98972 11
Fax +49 (0) 6721 98972 20
E-mail [email protected]
Before contacting DISC Technical Support, please have the following
information available
■
■
■
143714-F
Rev. A
Model, Serial Number and production date of your Optical Library
Description of Optical Library environment (Operating System, software
revision, and hardware)
Detailed description of the problem
DISCx000 Version 3.1User Manual
9
___________________________________________
143714-F
Rev. A
DISCx000 Version 3.1User Manual
10
___________________________________________
CHAPTER 2:
SAFETY INSTRUCTIONS
■
■
■
143714-F
Rev. A
Intended Use
Residual Risks
Safety
DISCx000 Version 3.1User Manual
11
___________________________________________
<THIS PAGE IS INTENTIONALLY BLANK.>
143714-F
Rev. A
DISCx000 Version 3.1User Manual
12
___________________________________________
INTENDED USE
The DISCx000 Optical Libraryes are controlled by a host computer
or combined server unit (NAS). The Optical Libraryes were designed exclusively to
read and write bare media, especially the Blue Laser (PDD, PD, BD) media,
and are not intended for any other use.
Improper use of the Optical Library increases residual risk. Any person using the
Optical Library should read and understand the User Manual, and in particular, the
safety instructions included within the User Manual.
USE OF INTERJECTIVE TERMS
WARNING: This word calls attention to a procedure or practice, which could
cause personal injury if not correctly performed.
CAUTION: This word calls attention to a procedure or practice, which could
result in damage to the product if not correctly performed.
NOTE: This word draws the users' attention to information that can improve
understanding of the product.
Disregarding safety messages could result in personal injury or damage to the
Optical Library.
BAN ON ARBITRARY REVERSIONS AND CHANGES
The Optical Library must not be altered or changed in any way that does not comply
with applicable safety regulations.
REPAIRS
Repairs must be carried out only by DISC staff, or DISC authorized service
providers.
DISC will not be liable for any damage caused from repair by unauthorized
individuals.
Repair by unauthorized individuals may void your warranty.
143714-F
Rev. A
DISCx000 Version 3.1User Manual
13
___________________________________________
FIRE AND SHOCK HAZARD
To prevent fire and electrical shock, do not expose the unit to rain or moisture.
OPENING THE UNIT
To prevent electrical shock, remove line cord before opening the unit.
CAUTION: Do not operate the Optical Library while covers are removed. Ambient
light and dust will interfere with Optical Library operation, and moving
parts increase risk of personal injury.
The exchange of the air filter can be done as ’hot swap’ operation without a
need to open the Optical Library!
SAFETY
This product is in the used way a Laser Class 1 device. Disc access is
accomplished via a laser beam. The laser beam does not represent any risk
for the user.
This product complies with the DHHS Rules 21 CFR chapter 1, sub chapter J,
accession number 9520184, applicable at the date of manufacture.
CAUTION: The drives become under Laser Class 2M and 3B radiation if
they get opened! This includes the risk of injury if you stare into
the beam or expose something to the beam. You must not remove
and open an optical drive of this Optical Library!
DATA SECURITY
Access to media, packs, and magazines is available only when a release
command is sent for the host. It is your responsibility to allow access to the
host computer (where the release command is initiated) to authorized
personnel only.
143714-F
Rev. A
DISCx000 Version 3.1User Manual
14
___________________________________________
ELECTROMAGNETIC COMPATIBILITY
For CE certification, the DISCx000 Optical Library was tested with Adaptec 2940,
3940, 29160, 39160, 29320 and 39320 SCSI host adapters. Use of SCSI host
adapters other than those above, particularly with DVD drives, may cause
your system to exceed acceptable electromagnetic emissions.
FUSES
The DISCx000 Optical Library must only be connected to electrical circuits
secured by a 16 A fuse. For USA and Canada the DISCx000 Optical Library must
only be connected to electrical circuits secured by a 20 A fuse.
There are several internal fuses which only may be accessed by certified
service staff! Please call your dealer in case of service needs.
Fuse
PCB
Silkscreen Overlay Top Side
Mount Fuse 5A/63V fast-acting
142959-F
SI1; SI2
Mount Fuse 2A/63V fast-acting
142959-F
SI3
Mount Fuse 2A/125V slo-blo
143612-E
SI1
PROFESSIONAL DISC MEDIEN
The bare BD media surfaces are covered by a special ’hard coating’
technology. Nevertheless they are sensitive to scratches and fingerprints.
Handle writable media with care. Damaged media could result in loss of data.
All bare media shall be handled out site of the Optical Library within a certain cover!
To export bare media best use the DISC Offline Packs (removable front site
15 pcs media magazines).
NOTE: For best performance, DISC recommends that only DISC certified
media be used.
DVD RAM and DVD-R Media
Recordable DVD media (especially DVD-RAM) are very sensitive to scratches and
fingerprints. Please handle recordable DVD media with care, damaged or polluted media
might end in a loss of data.
143714-F
Rev. A
DISCx000 Version 3.1User Manual
15
___________________________________________
<THIS PAGE IS INTENTIONALLY BLANK.>
143714-F
Rev. A
DISCx000 Version 3.1User Manual
16
KAPITEL 4: SETUP
___________________________________________________________________________
CHAPTER 3:
OVERVIEW
143714-F
Rev. A
■
DISCx000 Components
■
Installed Equipment
■
DISCx000 Front
■
DISCx000 Rear
DISCx000 Version 3.1User Manual
17
KAPITEL 4: SETUP
___________________________________________________________________________
<THIS PAGE IS INTENTIONALLY BLANK.>
143714-F
Rev. A
DISCx000 Version 3.1User Manual
18
KAPITEL 4: SETUP
___________________________________________________________________________
DISC1000 COMPONENTS
■
3 or 4 removable Packs (holding 15 media each)
■
1 Mailslot (for importing and exporting media)
■
Up to 2 drives
■
CapacityDoublerTM (flipper) unit (optional for DVD-RAM and DVD-R
machines only)
■
1 data interfaces (SAS)
■
1 robotic interface (RS232 or LVD SCSI)
DISC1000-105-2 Optical Libraryes have 4 Packs rather than 3; and will have filled up
the empty rear side drive bays with additional Magazines (holding 15 media each).
DISC1000 -45-1
DISC1000 105-2
Fixed Number of Media Slots: 45
1 Drive
Variable Number of Media Slots: 105
2 Drives
143714-F
Rev. A
DISCx000 Version 3.1User Manual
19
KAPITEL 4: SETUP
___________________________________________________________________________
DISC3000 COMPONENTS
■
2 or 3 Magazines (holding 50 media each)
■
3 or 4 removable Packs (holding 15 media each)
■
1 Mailslot (for importing and exporting media)
■
Up to 6 drives
■
Up to 2 data interfaces (SAS)
■
1 robotic interface (RS232 or SCSI)
The DISC3000 with 145 slots can be upgraded to a DISC3000 with 270 slots or 210
slots and 6 Drives. DISC3000 with 270 slots Optical Libraryes have 4 Packs rather
than 3; 3 Magazines rather than 2; and will have filled up the empty rear side drive
bays with additional Magazines or Drives.
Fixed Number of Media Slots: 145
Variable Number of Media
2 / 4 / 6 Drives
270 slots with 2 drives
210 slots with 6 drives
Slots:
The position numbers are counted from the bottom to the top.
143714-F
Rev. A
DISCx000 Version 3.1User Manual
20
KAPITEL 4: SETUP
___________________________________________________________________________
DISC4000 COMPONENTS
■
■
■
■
■
■
4 or 5 Magazines (holding 50 media each)
4 removable Packs (holding 15 media each)
1 Mailslot (for importing and exporting media)
Up to 6 drives
Up to 2 data interfaces (SAS)
1 robotic interface (RS232 or LVD SCSI)
The DISC4000 with 260 slots can be upgraded to a DISC4000 with 400 slots or 340
slots and 6 Drives. This Optical Libraries have 5 Magazines rather than 4; and will
have filled up the empty rear side drive bays with additional Magazines or Drives.
Fixed Number of Media Slots: 260
2 / 4 / 6 Drives
Variable Number of Media Slots:
400 slots with 2 drives
340 slots with 6 drives
The position numbers are counted from the bottom to the top.
143714-F
Rev. A
DISCx000 Version 3.1User Manual
21
KAPITEL 4: SETUP
___________________________________________________________________________
DISC7000U) COMPONENTS
■
■
■
■
■
■
9 Magazines (holding 50 media each)
4 removable Packs (holding 15 media each)
1 Mailslot (for importing and exporting media)
Up to 10 drives
Up to 3 data interfaces (SAS)
1 robotic interface (RS232 or LVD SCSI)
The DISC7000 with 510 slots can be upgraded to a DISC7000 with 690 slots or 510
slots and 14 Drives. This Optical Libraries will have filled up the empty rear side drive
bays with additional Magazines or Drives.
Fixed Number of Media Slots: 510
2 / 4 / 6 / 8 / 10 / 12 or 14 Drives
Variable Number of Media Slots:
690 slots with 2 drives
510 slots with 14 drives
The position numbers are counted from the bottom to the top.
143714-F
Rev. A
DISCx000 Version 3.1User Manual
22
KAPITEL 4: SETUP
___________________________________________________________________________
INSTALLED EQUIPMENT
Refer to the serial number plate on your Optical Library for model and equipment
information.
xxx-xxxV~ xx/xxHz xA
X01001-XX
S/N
DISCX000
TY PE
BD-105-2
MANUFACTURED
Made in Germany
archive
CLASS 1
LASER PRODUCT
E 168 64 1
I.T.E
TO IEC 825-1:1993
Disc GmbH
Im Tiergarten 24
D-55411 Bingen am Rhein
Th is product complies with DHHS Rules 21 CFR chap ter 1, subchapter J.
Th is device complies with Part 1 5 of the F CC Rules. Operation is subjec t to the foll owing two
co nditions: (1) This de vice may n ot cause h armful inte rference, and (2) this device must accept
a ny interfer ence rece ived, inclu ding interf erence th at may ca use unde rsired ope ration.
Ce apparei l numériqu e de la c lass B res pecte tou tes les exigences d u Réglem ent sur le
ma tériel bro uilleur du Canada.
Th is Class B digital ap paratu s meets all re quiremen ts of the C anadien In terference -Causing
E quipment Regulation s.
STRUCTURE OF MODEL DESIGNATION
DISCx000-T-XXX YY-R-b
143714-F
Rev. A
DISCx000
Model
T
Technology type
XXX
Number of existing media slots
YY
Number of built-in drives
R
Redundant PSU
b
Options
DISCx000 Version 3.1User Manual
23
KAPITEL 4: SETUP
___________________________________________________________________________
EXAMPLE OF MODEL DESIGNATION
DISC3000 -BD-225-4-R
BD
BD-drives
225
225 trays
4
4 BD drives
R
Redundant power supply unit
DISCX000 FRONT
143714-F
Rev. A
1.
LCD (display)
2.
Keyboard
3.
Power switch
4.
Mailslot (for importing and exporting media)
5.
Pack (for multiple import or export of 15 media)
DISCx000 Version 3.1User Manual
24
KAPITEL 4: SETUP
___________________________________________________________________________
KEYBOARD
The keyboard is used to operate the Optical Library without the aid of any external
host software for Optical Library control. The keyboard is also used to activate
service and event logging functions.
LCD
The Liquid Crystal Display provides information about Optical Library status during
operation. When the Optical Library is first powered on, the firmware revision
displays for 5 seconds.
DISC 4000
V4508 - 09/02/05
The LCD is also used to display and/or edit values in the Service Mode, as
well as to display Event Codes in the Event Logging Mode.
143714-F
Rev. A
DISCx000 Version 3.1User Manual
25
KAPITEL 4: SETUP
___________________________________________________________________________
DISCX000 REAR
SAS equipped DISC3000 - 7000
Serial Number Plate
RS232 ID and Mode Selector
Switches (Rotate to Select)
RS232 Interfaces
Power Connector
LVD SCSI Connector
(68 pin HD, screw attachment)
SAS Connectors SFF-8088 (miniSAS)
Drive SCSI ID Switches
SAS equipped DISC1000
Power Connector
Robotic Mode and ID Switch
RS232 Connections
Type Plate
SCSI Connector
SAS Connector
The DISC1000 is by default equipped with 1 LVD SCSI bus and 1 SAS bus.
The DISC3000 and DISC4000 are by default equipped with 1 LVD bus and 1 or 2
SAS busses, depending upon the number and type of drives in the Optical Library
The SAS connector is SFF-8088 (miniSAS)
The LVD SCSI connector is screwable 68 pin HD (female) type.
143714-F
Rev. A
DISCx000 Version 3.1User Manual
26
KAPITEL 4: SETUP
___________________________________________________________________________
CHAPTER 4:
SETUP
143714-F
Rev. A
■
Checking the Delivery
■
Removing the Transportation Fixtures
■
Mounting the Stands
■
Placing the Optical Library
■
Operation Modes
■
Setting the Drive SCSI IDs
■
Connecting to a Host Computer
■
Connecting Line Voltage
DISCx000 Version 3.1User Manual
27
KAPITEL 4: SETUP
___________________________________________________________________________
<THIS PAGE IS INTENTIONALLY BLANK.>
143714-F
Rev. A
DISCx000 Version 3.1User Manual
28
KAPITEL 4: SETUP
___________________________________________________________________________
CHECKING THE DELIVERY
Review the following table to ensure that you have all the required equipment.
Equipment
Quantity
Power Cord
1 or 2
Power Cord USA (only USA)
1 or 2
Ferrite
1( 2 by dual redundant
power supply unit)
RS232 Cable
1
USB to LVD converter *
1
Quick Installation Guide
1
User Manual CD
1
Allen type screw driver
1
Allen Type screws
4-6 (missing screws to
fully fix the right side
cover)
Stands
4 (only by DISC3-7000)
Optical Library
1
* Optional
143714-F
Rev. A
DISCx000 Version 3.1User Manual
29
KAPITEL 4: SETUP
___________________________________________________________________________
REMOVING THE TRANSPORTATION FIXTURES
NOTE: More detailed information about removing transportation fixtures can
be found on the label affixed to the Optical Library.
▼ Removing the Transportation Fixtures DISC3-7000
1. Remove the two screws that affix the right cabinet cover of the Optical Library.
2. Remove the right cabinet cover.
3. Remove the transportation fixtures inside the Optical Library.
▼Removing the Transportation Fixtures DISC1000
1. Remove the 14 screws that affix the right cabinet cover of the Optical Library.
2. Remove the right cabinet cover.
3. Remove the transportation fixtures inside the Optical Library.
Transportation
Fixtures
CAUTION:
143714-F
Rev. A
Powering on the Optical Library with transportation fixtures inside can
damage the robotics.
Do not operate the Optical Library while covers are removed. Ambient
light will interfere with Optical Library operation, and moving parts
increase risk of personal injury.
DISCx000 Version 3.1User Manual
30
KAPITEL 4: SETUP
___________________________________________________________________________
MOUNTING THE STANDS
WARNING:
Do not operate the Optical Library without the stands installed.
Regulations require the stands to be installed!
▼ Mounting the Optical Library Stands DISC3-7000
NOTE: Two people are required to perform this procedure.
1. Tilt the Optical Library to the left.
2. Push the front stand for the right side into the slot near the bottom of the
Optical Library until it “clicks” in.
3. Push the rear stand for the right side into the slot near the bottom of the
Optical Library until it “clicks” in.
4. Tilt the Optical Library to the right.
5. Push the front stand for the left side into the slot near the bottom of the
Optical Library until it “clicks” in.
6. Push the rear stand for the left side into the slot near the bottom of the
Optical Library until it “clicks” in.
NOTE: The roles of a DISC7000 have to stand to the outside. Take care to
mount the stands angled to the right side
143714-F
Rev. A
DISCx000 Version 3.1User Manual
31
KAPITEL 4: SETUP
___________________________________________________________________________
PLACING THE OPTICAL LIBRARY
The DISCx000 Optical Libraries are intended for use in office or
computer lab environments.
CAUTION: After delivery, the Optical Library should be allowed to come to room
temperature before operation.
When placing the Optical Library...
Avoid places with:
■
extreme temperature
■
excessive sun exposure
■
high humidity
■
contact with water
■
contact with chemicals
■
extreme vibration
The right location has:
■
stable, even support
■
sufficient space to pull out and service the unit
■
ambient maximum of 37° C
CAUTION:
143714-F
Rev. A
To ensure sufficient cooling airflow and to have enough work space to
exchange the air filter, at least 50 cm free space has
to be left at the right side of the Optical Library.
DISCx000 Version 3.1User Manual
32
KAPITEL 4: SETUP
___________________________________________________________________________
OPERATION MODES
Several operation modes are available which can be selected using the Mode
Select switch on the rear of the Optical Library.
The function of the ID Switch depends upon the mode selected.
Which mode must be selected depends upon the host application used to
control the Optical Library.
Mode
Function
Function of ID Switch
0
0 RS232 mode
RS232 ID (robotic)
1
SCSI mode
SCSI ID (robotic)
2-F
DISC internal use only
-------------
RS232 MODE
The RS232 mode must be selected if the Optical Library is controlled via the serial
interface (RS232). The factory default RS232 ID is 00. The available range for
the RS232 ID is 00 to 15, and can be changed using a small flat-head
screwdriver. The ID need only be changed when more than one Optical Library is
connected to the serial bus.
CAUTION:
Do not connect more than 3 Optical Libraries to the serial bus. If more
than 3 Optical Libraries are connected to the serial bus, signal
attenuation will occur, causing Optical Library malfunctions.
The maximum serial cable length of the serial bus is 15 meters, and must not
be exceeded.
143714-F
Rev. A
DISCx000 Version 3.1User Manual
33
KAPITEL 4: SETUP
___________________________________________________________________________
SCSI MODE
The SCSI mode must be selected if the Optical Library is controlled via the SCSI
bus. The ID switch is used to select the robotics SCSI ID. The range for SCSI
IDs is 00 to 07.
SCSI CABLE REQUIREMENTS
CAUTION:
Only shielded high quality SCSI cables should be used. For additional
SCSI cable information, see the SCSI-3 specification.
Your Optical Library uses Low Voltage Differential (LVD) technology,
ensure that all SCSI cables and terminators support LVD.
SCSI CABLE LENGTH
To connect the Optical Library to the SCSI host adaptor only cables that do not
exceed 10 meters cable length may be used
SETTING DRIVE IDS
The ID switches on the rear of the Optical Library are used to set drive IDs
(only DISC 3-7000).
The ID range for each drive is 00 to 07. Each drive on any given bus must
have a unique ID. (If more than one SAS bus is installed you use a small
screwdriver to adjust the switches to the desired IDs.) The factory default for
DISC1000 is ID 01 and 02.
NOTE: Most host applications require to have the ascending order of Drive
IDs according to the physical position of the drive within the Optical Library
(counted from bottom to top)!.
143714-F
Rev. A
DISCx000 Version 3.1User Manual
34
KAPITEL 4: SETUP
___________________________________________________________________________
CONNECTING THE ROBOTIC TO A HOST COMPUTER
CONNECTING THE SERIAL INTERFACE
CAUTION: Turn off the Optical Library and host computer before connecting
cables.
Depending upon host software used to control the Optical Library, either the serial
interface or SCSI interface must be connected to the host computer. This
section pertains to systems connected to the host via a serial interface. If your
host software requires a SCSI connection, see “Connecting the SCSI
Interface” on page 36 and disregard the remainder of this section.
All mechanical operations including loading and unloading media, and
importing and exporting media can be controlled via the RS232 interface.
By default, the RS232 ID for the robotics is set to 00. This setting need only
be changed when more than one Optical Library is connected to the serial bus.
1. Host Computer
2. RS232 cable in (RS232 cable from host computer to Optical Library in)
3. Daisy-chain connection for additional Optical Libraries (Optical Library out from
first unit to Optical Library in on next unit)
143714-F
Rev. A
DISCx000 Version 3.1User Manual
35
KAPITEL 4: SETUP
___________________________________________________________________________
CONNECTING THE SCSI Robotic INTERFACE
CAUTION: Turn off the Optical Library and host computer before connecting
cables.
If the Optical Library shall be operated in SCSI mode (robotic is controlled via the
SCSI bus), the robotic interface is connected to SCSI bus A.
CAUTION: LVD equipped Optical Libraryes are internally terminated, and therefore
do not support daisy-chaining. Max. external cable length is 10m!
1. Host computer
2. Connection SCSI Bus
CAUTION:
143714-F
Rev. A
LVD equipped Optical Libraries require term power from the bus. The
host computer must be powered on for the Optical Library to start up or
operate.
DISCx000 Version 3.1User Manual
36
KAPITEL 4: SETUP
___________________________________________________________________________
CONNECTING THE Robotic via the LVD SCSI to USB
CONVERTER
With a SAS-based DISC library, the external LVD connector on the back of the DISC
library will internally only be connected to the robotics controller.
If a SAS-based DISC library was purchased with an LVD SCSI to USB converter, the
robotics controller can be connected to a USB port and in that case an LVD HBA is
not needed.
The LVD SCSI to USB converter will be delivered without an AC adapter, because the
power for the converter will be supplied by the robotics controller via the termination
power lines of the LVD SCSI bus.
If the converter is connected to the DISC Library and the USB cable is connected to
the host system and both systems (DISC library and host system) are powered on,
the LVD light on the converter should light up (green).
The driver software included with the converter will make the robotics controller
appear as a regular SCSI device to the Jukebox Manager software.
143714-F
Rev. A
DISCx000 Version 3.1User Manual
37
KAPITEL 4: SETUP
___________________________________________________________________________
Connecting the drives to a Host Computer
Turn off the Optical Library and the host computer when connecting the SAS cables.
1. Connection SAS Bus 1
2. Connection SAS Bus 2
3. Connection SAS Bus 3
The DISCx000(U) series do have upto 3 SAS connectors for the drives which has to
be connected to the SAS Host Bus Adapters
SAS Configuration
The concept of Serial Attached SCSI (SAS) differs from the concept of the
conventional parallel SCSI technologies (like LVD SCSI). This may cause the
configuration of a system like a DISC optical library to be confusing. The main
difference with SAS is that each target device will have its own link to the HBA,
instead of multiple devices sharing a parallel bus like LVD SCSI. Another important
difference is the SCSI ID of a SCSI target device. With parallel SCSI, the SCSI target
devices have switches or jumpers which can be used to configure the SCSI target ID.
With SAS, the HBA determines which SCSI target IDs are assigned to the connected
SAS device.
143714-F
Rev. A
DISCx000 Version 3.1User Manual
38
KAPITEL 4: SETUP
___________________________________________________________________________
SAS Host Bus Adapter (HBA)
The DISC libraries have been qualified to work with the following LSI Logic Host Bus
Adapters (HBAs)
The LSISAS380IE (PCI-Express) or LSISAS380IX (PCI-X)
The LSISAS3442E-R (PCI-Express) or LSISAS3422X-R (PCI-X)
The LSISAS380IE and the LSISAS380IX HBAs have two SFF-8088 type mini SAS
connectors. The SAS port physical channel numbering of these connectors is as
shown in the picture.
So the top miniSAS connector has four SAS ports with the physical channel numbers
0 - 3 and the lower miniSAS connector (closer to the PCIe connector) has four ports
with physical channel numbers 4 – 7.
The LSISAS3442E-R and LSISAS3442X-R HBAs have one external SFF-8740 type
SAS connector. This connector has four SAS ports with physical channel
numbers 4 – 7.
143714-F
Rev. A
DISCx000 Version 3.1User Manual
39
KAPITEL 4: SETUP
___________________________________________________________________________
External SAS Cables
The maximum supported length of the external cable is 3 meters.
The DISC libraries are equipped with the miniSAS SFF-8088 type connector. The type
of external SAS cable needed, depends on which HBA is used.
HBA
Host Side Connector
Target Side Connector
LSISAS3801E
SFF-8088 (miniSAS)
SFF-8088 (miniSAS)
LSISAS3801X
SFF-8088 (miniSAS)
SFF-8088 (miniSAS)
LSISAS3442E-R
SFF-8470
SFF-8088 (miniSAS)
LSISAS3442X-R
SFF-8470
SFF-8088 (miniSAS)
Connecting the Drives to a SAS Host Bus Adapter
When connecting a DISC Library via SAS, there are several options possible:
Connect a DISC library with upto 4 drives
Connect a DISC library with 4 to 8 drives
Connect a DISC library with more then 8 drives
DISC Library with upto 4 Drives
When connecting a DISC Library with upto 4 drives , the SCSI Target IDs will be
assigned depending on the LSI Logic HBA used and which external SAS connector is
used. Please not that drive 1 is always the lowest drive in a DISC library. When using
an LSISAS3442E/X or the lower connector of the LSISAS3801e/X HBA, the target IDs
will be assigned to the drives as shown in Table 1.
Table 1: LSISAS3442E/X or Lower SAS Connector of LSISAS3801E/X
143714-F
Rev. A
Drive #
SCSI Target ID
D4
7
D3
6
D2
5
D1
4
DISCx000 Version 3.1User Manual
40
KAPITEL 4: SETUP
___________________________________________________________________________
DISC Library with 4 to 8 Drives
When Connecting a DISC library with 4 to 8 drives, it is recommended to use a
LSISAS3801E/X HBA. The external SAS cable should be connected as shown in
Figure 1:
•
•
Connect the lower SAS connector of the DISC7000 to the higher port of the LSISAS3801
HBA
Connect the higher SAS connector of the DISC7000 to the lower port of the LSISAS3801
HBA
The LSI SAS HBA will assign the SCSI target IDs as shown in Figure 1 if the external
SAS cables are connected correctly.
143714-F
Rev. A
DISCx000 Version 3.1User Manual
41
KAPITEL 4: SETUP
___________________________________________________________________________
DISC Library with more than 8 Drives
When connecting a DISC Library with more than 8 drives at least two HBAs are
needed. As an example we will be configure a DISC7000 with 10 drives. It is
recommended to use two LSISAS3801E/X HBAs. It is important to connect the
external SAS cables to the correct SAS connectors. The external SAS cable should
be connected as shown in Figure 2:
•
•
•
Connect the lower SAS port of the DISC7000 to the higher port of the first
LSISAS3801 HBA
Connect the middle SAS port of the DISC7000 to the lower port of the first
LSISAS3801 HBA
Connect the higher SAS connector of the DISC7000 to the higher SAS connector
of the second LSISAS3801 HBA
The LSI SAS HBA will assign the SCSI target IDs as shown in the picture if the
external SAS cables are connected correctly.
It does not matter which HBA is chosen as the first or second HBA, but it is important
to connect the SAS cables to the correct port. Because the SAS port of the HBA
determines the SCSI target ID of the connected drive.
SAS HBA Settings
The LSI Logic SAS HBAs can be configured such that a SAS device connected to a
physical channel will get a SCSI target ID assigned which is the same as the physical
channel number. This target ID will always be the same, even when e.g. drives are
replaced. This feature is desirable when connecting a DISC optical library,
To configure this feature, we need to set the physical mapping to DirectAttached. This
can be configured by using the LSI Logic utility called ‘LSI Util’. It can be downloaded
from the LSI Logic webside (www.lsi.com, search for “LSI Util”)
The current version is LSI Util 1.62. Use this utility to set the Physical Mapping to ‘1’
(DirectAttached) via the menu option 13:
Do this for all LSI Logic SAS HBAs which will be used to connect the DISC library.
Afterwards, a reboot of the system is needed to activate the new settings.
143714-F
Rev. A
DISCx000 Version 3.1User Manual
42
KAPITEL 4: SETUP
___________________________________________________________________________
Jukebox Manager Software Drive Configuration
When configured the DISC library in the Jukebox Management Software, the drives
should be assigned according to the SCSI target IDs and SCSI port numbers assigned
by the Operating Systems and/or SAS HBA
As an example, the DISC7000 with 10 drives would have the following drive
configuration:
143714-F
Rev. A
Drive #
SCSI Port
SCSI Target ID
D10
4
1
D9
4
0
D8
5
7
D7
5
6
D6
5
5
D5
5
4
D4
5
3
D3
5
2
D2
5
1
D1
5
0
DISCx000 Version 3.1User Manual
43
KAPITEL 4: SETUP
___________________________________________________________________________
CONNECTING LINE VOLTAGE
Before connecting the Optical Library to the electrical outlet, mount the ferrite to the
power cord as close to the Optical Library as possible.
All DISC Optical Libraries have auto-switching power supplies. No adjustment
is needed to switch between 110 volt and 220 volt electrical systems.
All DISCx000 Optical Libraries can either be equipped with a standard or
dual redundant power supply unit.
In case one of the PSU modules is failing or temporarily not connected, the
Optical Library can run with the remaining one. An acoustic alarm (beep) is given
until the failing module has been exchanged or the missing mains cable is
connected again.
CAUTION: If your Optical Library is equipped with a redundant PSU you always
should connect both line voltage cables! In order to get a high
availability system it is recommended to connect each line voltage
cable to a different power circuit.
WARNING: The Optical Library is not electrically disconnected from line voltage
when powered down. To electrically disconnect the Optical Library
from line voltage you must disconnect the power cord.
CAUTION: The DISCx000 Optical Library must be connected to an
electrical circuit that is secured with a 16 Amp fuse.
WARNING: In case of a failing PSU the Optical Library case has to be opened for
exchange. Opening of the covers and service interaction must
be done by skilled service staff only!
143714-F
Rev. A
DISCx000 Version 3.1User Manual
44
KAPITEL 4: SETUP
___________________________________________________________________________
<THIS PAGE IS INTENTIONALLY BLANK.>
143714-F
Rev. A
DISCx000 Version 3.1User Manual
45
KAPITEL 5: ARBEITEN MIT DER OPTICAL LIBRARY
______________________________________________________________________________
CHAPTER 5:
OPERATING THE OPTICAL
LIBRARY
143714-F
Rev. A
■
Powering on the Optical Library
■
Handling Media
■
Importing and Exporting Media
■
The Mailslot
■
Using Packs
DISCx000 Version 3.1User Manual
46
KAPITEL 5: ARBEITEN MIT DER OPTICAL LIBRARY
______________________________________________________________________________
<THIS PAGE IS INTENTIONALLY BLANK.>
143714-F
Rev. A
DISCx000 Version 3.1User Manual
47
KAPITEL 5: ARBEITEN MIT DER OPTICAL LIBRARY
______________________________________________________________________________
POWERING ON THE OPTICAL LIBRARY
Always power on the Optical Library before the host computer. Failure to do so may
result in the host not recognizing the Optical Library, and being unable to interface
with it.
CAUTION:
LVD equipped Optical Libraries require term power from the bus. The
host computer must be powered on simultaneously for the Optical Library
to start up or operate.
To power on the unit, press the red power button on the front of the Optical Library.
The display will show:
Booting …
...and then change to: Reading License Data...
...and finally change to:
DISC4000
V4508 N1170
During boot-up the robotics will rezero. While this is occurring, you will hear
mechanical noises from the unit.
The Optical Library robotics are normally controlled via a host software application.
For information on how to operate the Optical Library using a host, see your host
software user manual. For information on how to operate the Optical Library without
a host, see “Operate Menu” on page 60.
CAUTION: Do not operate the Optical Library while covers are removed. Ambient
light will interfere with Optical Library operation, and moving parts
increase risk of personal injury.
143714-F
Rev. A
DISCx000 Version 3.1User Manual
48
KAPITEL 5: ARBEITEN MIT DER OPTICAL LIBRARY
______________________________________________________________________________
HANDLING MEDIA
HANDLING EXPOSED MEDIA
Exposed media should be handled without touching the readable areas of the
disc. Scratches, fingerprints, or any other artifact on the disc reading surface
may cause loss of data. Best wear cotton gloves when handling the bare
media and keep them only within a well suited case like a ’jewel case’ or the
DISC Offline Packs!
NOTE: The PDD media are protected by a special hard coated surface. You
may clean them carefully using a soft, damp cloth without cleaning
agent!
HANDLING PACKS
Media trays within packs are secured by the casing and will not fall out as long
as all trays are in the pack (with or without media in all trays).
Packs with missing trays must be handled carefully. The remaining trays are
locked into the pack but the medium below the removed tray is exposed and
may move or fall out!
▼ Removing Trays from a Pack
1. Press the red button at the left side of the Pack.
2. Pull out the tray.
143714-F
Rev. A
DISCx000 Version 3.1User Manual
49
KAPITEL 5: ARBEITEN MIT DER OPTICAL LIBRARY
______________________________________________________________________________
IMPORTING AND EXPORTING MEDIA
Media is imported and exported in one of two ways:
■
Through the Mailslot
■
Through Packs
Which method you use will depend on the circumstance, and whether or not
you have a host controlling the Optical Library.
THE MAILSLOT
When using host software to control the Optical Library, the mailslot will
automatically open when an import or export command is sent from the host.
After importing or exporting a medium, the host application usually closes the
mailslot automatically as well. If your host does not automatically close the
mailslot drawer, you can close it by pressing the [Enter] key, or gently pushing
the front of the drawer.
For information on importing and exporting media without using a host
application, see “Operate Menu” on page 60.
CAUTION: Even if the bare PDD media are protected by a special hard
coating, you must not import media with polluted ore scrached
surface into the library! Avoid to touch the read/write area of the
media with your fingers! Place exposed media immediately into a
well suited case or cartridge!
143714-F
Rev. A
DISCx000 Version 3.1User Manual
50
KAPITEL 5: ARBEITEN MIT DER OPTICAL LIBRARY
______________________________________________________________________________
USING PACKS
DISC Media Packs are devices that contain 15 separate trays for media,
surrounded by a case. You can quickly import or export multiple discs at once
using packs, that would otherwise take much longer to import or export
through the Mailslot. The Packs are also the best way to carry around or store
the bare media.
Every Pack has a world wide unique serial number which is stored in a 512k
Smart Card chip and labeled with barcode on the Pack case. Therefore they
easily can be handled and kept track by corresponding software applications.
REMOVING PACKS
Packs can be removed when the status indicator is green or yellow. Packs are
hot swappable, meaning that the packs can be removed or inserted while the
machine is in operation. For more information on handling packs once they
are removed from the Optical Library, see “Handling Packs” on page 46
NOTE: For safety reasons, adjacent packs cannot be removed at the same
time.
NOTE: Magazines are fixed to the Optical Library, and cannot be removed. To
remove media from magazines, either move the media to a pack for
removal, or remove it using the mailslot.
143714-F
Rev. A
DISCx000 Version 3.1User Manual
51
KAPITEL 5: ARBEITEN MIT DER OPTICAL LIBRARY
______________________________________________________________________________
Action
Status
Press the pack button
The LED starts to flash
yellow; all media are
returned to the pack.
LED flashes green; the
pack is now ready to be
removed.
Push the front of the
pack towards the
Optical Library.
Display
The pack releases from
the Optical Library.
The LED is not lit.
The display reads...
Please push pack
<number of pack being
removed>
The display reads...
Please remove pack
<number of pack being
removed>
NOTE: If the Optical Library is controlled by a host application, direct pack access
from the Optical Library front panel may be disabled (visible at the status LED
that turns to amber in this case). If your host software runs in this
manner, packs can only be released by the host computer.
INSERTING PACKS
Action
Status
Display
LED is dark.
Push the pack into the
Optical Library.
143714-F
Rev. A
LED flashes yellow,
then changes to green
Optical Library scans the
pack for media.
DISCx000 Version 3.1User Manual
52
KAPITEL 5: ARBEITEN MIT DER OPTICAL LIBRARY
______________________________________________________________________________
<THIS PAGE IS INTENTIONALLY BLANK.>
143714-F
Rev. A
DISCx000 Version 3.1User Manual
53
KAPITEL 6: DIE BENUTZEROBERFLÄCHE
______________________________________________________________________________
CHAPTER 6:
THE USER INTERFACE
■
User Interface Diagram
■
Activating the User Interface
■
143714-F
Rev. A
User Interface Modes and Commonly Used
Functions
DISCx000 Version 3.1User Manual
54
KAPITEL 6: DIE BENUTZEROBERFLÄCHE
______________________________________________________________________________
<THIS PAGE IS INTENTIONALLY BLANK.>
143714-F
Rev. A
DISCx000 Version 3.1User Manual
55
KAPITEL 6: DIE BENUTZEROBERFLÄCHE
______________________________________________________________________________
THE USER INTERFACE
11
Element
111
Load
1
Operate
12
12
Pack
134
Status
Mute
Alarm
14
2
26
Sensors
License
25
Mode
24
23
Prod.
Data
22
Storage
Config
Config.
21
Element
Info
Press F to activate
13
Tray
132
Export
Medium
131
Import
Medium
122
122
Disable
Button
Medium
121
121
Enable
Button
112
Load
Drive
123
Swap
Media
Mailslot
113
Unload
Drive
124
Pack
to
Mag.
133
Swap
114
Unload
Elements
115
Status
125
Mag.
to
Pack
3
Settings
31
Machine
Defaults
32
Robotic
RS 232
ID
33
Robotics
SCSI ID
Menu
41
Diag.
4
Service
42
Reference
43
Tidy
up
4312
46
Alarm
47
471
Show
Alarm
472
Clear
Alarm
5
Misc.
6
Pin
Codes
62
Enter
Service
Pin
Enter61
Admin
Pin
52
Lift
Adjustm.
63
Change
Admin
Pin
51
Quick
Test
Config.
53
Rezero
Unit
64
Change
Service
Pin
Disable
Service
Pin
65
54
Rescan
Jukebox
55
Reset
Database
4335
Initialize
Mag.
MemTraks
Show
Demo
455
Disable
Unlicensed
454
Enable
Unlicensed
453
Disable
all
452
Enable
all
451
Enable/
Disable
45
Baycontrol
Press ESC to leave
44
Bootloader
4321
Clear
Element
Status
4322
Clear
Flipper
Status
4323
456
Enable
Upgrade
4334
Storage
Permission
43341
Exp. P.
Set
4333
Tray
Event Flag
43331
Set
Evt.Flag
43342
Exp. P.
Clear
43332
Clear
Evt.Flag
432
433
Device Storage
Set to
Factory
Defaults
Rezero
Unit
4311
421
431
Picker
Juke box
Ref.
422
Lift
Ref.
411
Element
Test
412
Quick
Test
423
Lift
Adj.
4313
Reset
Database
Clear
Robotic
Status
43321
Flip to
Side A
4332
Side A/ B
Control
43311
Rescan
Jukebox
43322
Stop
Flipping
4331
Media
Detection
43312
Force
Scanning
43323
Set side
to A
43314
Scan
Empty
Slots
43313
Stop
Scanning
413
Self
Test
414
Drive
Test
34
MS
Auto
close
36
417
Flipper
Test
416
Media
Detect.
35
TCP/
IP
37
415
Pack
Test
Disc
Auto
Auto
Start
Use the arrow keys to navigate
7
System
Control
71
Shut
Down
72
Ack
Service
Req.
73
Set
Code
DISCx000 Version 3.1User Manual
56
143714-F
Rev. A
Press ESC to go up
Press Enter to go down
KAPITEL 6: DIE BENUTZEROBERFLÄCHE
______________________________________________________________________________
ACTIVATING THE USER INTERFACE
The Optical Library User Interface Function Menu is activated by pressing the F key.
To navigate horizontally through the User Interface, press the and
arrow keys. To navigate vertically, press Esc (up) and Enter (down). If you
know the number of the desired function, you can press [F] followed by the
function number to go directly to that screen. Function numbers are listed on
the User Interface Diagram. For more information, see “The User Interface”
on page 53.
To exit the User Interface, go to the menu root (1) and press Esc. The User
Interface will also automatically exit after 10 minutes when no button is
pressed within a submenu.
USER INTERFACE MODES
The Optical Library User Interface is used to configure and operate the Optical Library
without using a host computer.
The User Interface has 3 modes:
■
User Mode
■
Admin Mode
■
Service Mode
Access to User Mode is available to any user. You must first enter the correct
Admin PIN to access the Admin Mode and the correct Service PIN to access
the Service Mode.
Service Mode is for trained technicians only, and should not be
accessed if you are not a DISC authorized service provider.
Refer to the table below to determine what functional areas are part of which
mode:
143714-F
Rev. A
DISCx000 Version 3.1User Manual
57
KAPITEL 6: DIE BENUTZEROBERFLÄCHE
______________________________________________________________________________
User Interface Mode
Functional Areas Available
User-Mode
Info
PIN Codes
Admin-Mode
Operate
Settings
Service-Mode
Service
Demo
System Control
USER-MODE
DISC x000(U)
Vxxxx
01/07/05
User Menu
Select Item
In the User Mode, only the Info and PIN Codes menus and few parts of the
Operate menu (e.g. import and export of media) are available. In this mode,
no settings can be changed or operations performed except for entering or
changing Admin or Service Codes (in the PIN Codes menu).
The availability of functions in the User Mode may vary when being controlled
by a host application
INFO MENU
The Info Menu provides information about the Optical Library configuration and
capacity.
The following information is available in the Info Menu:
143714-F
Rev. A
DISCx000 Version 3.1User Manual
58
KAPITEL 6: DIE BENUTZEROBERFLÄCHE
______________________________________________________________________________
143714-F
Rev. A
Info Menu Sub-Menu
Available Information
Element Config.
.
Optical Library Equipment Information
Mailslot available (yes/no)
Position of drives in Optical Library
Type of drives
SCSI IDs of drives
Storage Config.
Optical Library Capacity Information
Number of media in Optical Library (number of
CDs/DVDs)
Total number of slots in Optical Library
Prod. Data
Optical Library Production Data Information
Vendor ID
Product ID
Revision level
Production date
Part number
Serial number
FW (firmware) revision
FW (firmware) date
Mode
Optical Library Robotics Mode Information
RS232 or SCSI mode
License
Optical Library License Information
License Level used
Interface Board used
License Key Unit data
DISCx000 Version 3.1User Manual
59
KAPITEL 6: DIE BENUTZEROBERFLÄCHE
______________________________________________________________________________
PIN CODES MENU
The PIN Codes menu allows you to enter or change the Optical Library PIN Codes.
This is required in order to enter Admin or Service areas of the User Interface,
or if you wish to change the PIN for either Admin or Service UI functions.
To access Admin areas of the UI, enter the Admin PIN and press Enter. The
default Admin PIN is 9999.
To access Service areas of the UI, enter the Service PIN and press Enter.
To change the Admin PIN, enter the new Admin PIN and press Enter. You
must first enter the original Admin PIN before you are allowed to change to a
new Admin PIN.
To change the Service PIN, enter the new Service PIN and press Enter. You
must first enter the original Service PIN before you are allowed to change to a
new Service PIN.
ADMIN MODE
The Admin Mode is activated by entering the Admin PIN from the PIN Codes
menu of the User Mode.
In the Admin Mode, the Operate and Settings menus become available. All
necessary settings for installing the Optical Library can be configured in this mode. It
is also possible to fully operate the Optical Library without using a host application in
this mode.
The default Admin PIN is 9999. To deactivate the Admin PIN so no code is
required to access the Admin Mode, change the PIN to 0000.
143714-F
Rev. A
DISCx000 Version 3.1User Manual
60
KAPITEL 6: DIE BENUTZEROBERFLÄCHE
______________________________________________________________________________
OPERATE MENU
The Operate menu offers several functions to control or operate the Optical Library
without host software.
CAUTION: Disconnect the Optical Library from the host before executing any
Operate menu commands.
The Operate Menu has 3 sub-menus:
■
Element
■
Pack
■
Tray
Refer to the User Interface Diagram on page 54 to determine which sub-menu
contains the command you wish to execute.
Once you select the function within the Operate menu that you desire, the
Optical Library User Interface will prompt you for pertinent information needed to
execute the command. Typical information that you will be prompted for
includes:
The address of a tray
■
Location (front or rear of the Optical Library).
■
Position (bay) of the magazine
■
Position of the tray within the magazine.
This type of query is answered by entering the 5 digit location address, and
pressing Enter. Location address parameters are listed in the table below:
143714-F
Rev. A
Address Digit
This Digit Represents...
Available Range to Input
1
Location (front or rear of
Optical Library)
1 (front) or 2 (rear)
2 and 3
Position (bay) of magazine.
1 to 17
4 and 5
Position of tray inside
magazine.
01 to 50
DISCx000 Version 3.1User Manual
61
KAPITEL 6: DIE BENUTZEROBERFLÄCHE
______________________________________________________________________________
Element
Load Mailslot
Tray
>X----<
1=Front
2=Rear
Tray
>-YY--<
Bay
1-17
Tray
>---ZZ<
Tray
1 - 50
The available commands within the Operate menu, along with their functions
are listed in the table below:
143714-F
Rev. A
Command
Functionality
Load Mailslot (F111)
Used to import and export a single medium.
After completing the command, press enter to
import or export another medium, or simply
enter the address of the next medium.
After you are finished importing and exporting
media, close the mailslot door by gently
pushing it.
Load Drive (F112)
Used to move and load a medium to any drive.
Unload Elements (F114)
Used to return all media from drives and the
mailslot to their home storage positions..
Enable Button (F121)
Used to release a pack when the pack buttons
are disabled by a host application.
This command will override the host and
Machine Default.
Disable Button (F122)
Used to disable a pack that has been released
with the Enable function.
This will return control of the pack back to the
host application.
DISCx000 Version 3.1User Manual
62
KAPITEL 6: DIE BENUTZEROBERFLÄCHE
______________________________________________________________________________
143714-F
Rev. A
Command
Functionality
Swap Media (F123)
Used to exchange the contents of a pack (front
of the Optical Library) with the contents of a magazine
(rear of the Optical Library).
Parameters include: source pack (front or rear
of Optical Library; bay) and the destination magazine
(front or rear of Optical Library; bay; number of first
slot to use).
Pack to Mag. (F124)
Used to move all media in packs (front of
Optical Library) to magazines (rear of Optical Library).
This is the fasted way to import large quantities
of media to the Optical Library in parallel.
Mag. to Pack (F125)
Used to move all media in magazines (rear of
Optical Library) to packs (front of Optical Library).
This is the fasted way to export large quantities
of media from the Optical Library in parallel.
The operation stops when all trays in packs are
full, and continues as soon as an empty pack is
inserted.
Import Medium (F131)
Used to import several media serially into the
Optical Library.
After import of the first medium, close the
mailslot with the Enter key. The next empty tray
is automatically loaded to the mailslot for the
next import.
After you have imported the final medium,
press the Esc key to stop the operation.
Export Medium (F132)
Used to export several or all media.
Opposite of Import Medium (F131)
Swap Medium (F133)
Used to move a single medium to another
storage location.
Parameters include: source tray (front or rear of
Optical Library; bay of magazine; position of tray
inside magazine), and destination tray (front or
rear of Optical Library; bay of magazine; position of
tray inside magazine).
DISCx000 Version 3.1User Manual
63
KAPITEL 6: DIE BENUTZEROBERFLÄCHE
______________________________________________________________________________
SETTINGS MENU
MACHINE DEFAULTS
The Machine Defaults are special presets that can be used by a host
application to configure the Optical Library. All Optical Libraryes are originally set to
Machine Default 21.
A host application may change the Machine Default to another value. It is also
possible to manually change the Machine Default using the Service Mode
Machine Default menu (F31) in the User Interface.
CAUTION:
NOTE:
All software that wants to operate the Optical Library in SCSI mode
requires the Machine Defaults to be set to 21 (factory default)
before the installation.
In some Machine Defaults, the packs can only be controlled by the
host application.
AUTO DISC
The Auto Disc function (F36) is used to automatically load a specific disc into
a drive when the Optical Library is powered up. One use of Auto Disc is to start the
complete system from a bootable disc.
Parameters for Auto Disc include the position of the drive (bay) to load to, and
the address of the medium (front or rear of Optical Library; bay number; tray number)
to be loaded into the drive.
AUTO START
The Auto Start function (F37) is used to automatically mount media that are
inside drives when the Optical Library is powered up.
TCP/IP (FOR USE AT EMBEDDED NAS MACHINES ONLY)
The TCP/IP function is used to preset the static IP address and configure
network parameters if the Optical Library is equipped with an internal NAS server
unit.
143714-F
Rev. A
DISCx000 Version 3.1User Manual
64
KAPITEL 6: DIE BENUTZEROBERFLÄCHE
______________________________________________________________________________
143714-F
Rev. A
Parameter
Function
IP Address Read
Displays the current IP Address settings.
IP Address Set
Used to set the NAS IP Address.
Factory default is 000.000.000.000.
Subnet Mask Read
Displays the current Subnet Mask settings.
Subnet Mask Set
Used to set the NAS Subnet Mask.
Factory default is 000.000.000.000.
Gateway Addr. Read
Displays the current default Gateway settings.
Gateway Addr. Set
Used to set the default Gateway Address.
Factory default is 000.000.000.000.
Access IP List
Only used with eCabinet storage accessories.
Used to set IP addresses for eCabinets
accessing the Optical Library.
The factory default for all addresses is
000.000.000.000.
IP Settings Clear
Resets all addresses to factory default of
000.000.000.000.
DISCx000 Version 3.1User Manual
65
KAPITEL 6: DIE BENUTZEROBERFLÄCHE
______________________________________________________________________________
SERVICE MODE
NOTE: Unauthorized use of Service Mode functions may damage the Optical Library
and void your warranty.
The Service Mode is activated by entering the Service PIN from the PIN
Codes menu of the User Mode.
In the Service Mode, all functions and submenus become available. The
functions available in the Service Mode should only be used by trained
technicians.
To deactivate the Service PIN so that no code is required to access the
Service Mode, change the PIN to 0000.
NOTE: For more information about the Service Mode, see the DISCx000
Service Manual.
143714-F
Rev. A
DISCx000 Version 3.1User Manual
66
KAPITEL 6: DIE BENUTZEROBERFLÄCHE
______________________________________________________________________________
143714-F
Rev. A
DISCx000 Version 3.1User Manual
67
ANHANG B: BEHÖRDLICHE GENEHMIGUNGEN
______________________________________________________________________________
APPENDIX B:
AGENCY APPROVALS
143714-F
Rev. A
■
FCC Declaration
■
Declaration of Conformity
DISCx000 Version 3.1User Manual
68
ANHANG B: BEHÖRDLICHE GENEHMIGUNGEN
______________________________________________________________________________
<THIS PAGE IS INTENTIONALLY BLANK.>
143714-F
Rev. A
DISCx000 Version 3.1User Manual
69
ANHANG B: BEHÖRDLICHE GENEHMIGUNGEN
______________________________________________________________________________
AGENCY APPROVALS
FCC DECLARATION
This equipment has been tested and found to comply with the limits for a
Class B digital device, pursuant to Part 15 of the FCC Rules. These limits are
designed to provide reasonable protection against harmful interference in a
residential installation. This equipment generates, uses, and can radiate radio
frequency energy and, if not installed and used in accordance with the
instructions, may cause harmful interference to radio communications.
However, there is no guarantee that interference will not occur in a particular
installation. If this equipment does cause harmful interference to radio or
television reception, which can be determined by turning the equipment on
and off, the user is encouraged to try to correct the interference by one or
more of the following measures:
■
Reorient or relocate the receiving antenna.
■
Increase the separation between the equipment and receiver.
■
Connect the equipment into an outlet on a circuit different from that to
which the receiver is connected.
■
Consult the dealer or an experienced radio/TV technician for help.
Important: This product was FCC verified under test conditions that include
the use of shielded cables and connectors between system components. It is
important that you use shielded cables and connectors to reduce the
possibility of causing interference to radios, televisions, and other electronic
devices.
Should you have any problems contact your dealer.
143714-F
Rev. A
DISCx000 Version 3.1User Manual
70
ANHANG B: BEHÖRDLICHE GENEHMIGUNGEN
______________________________________________________________________________
DECLARATION OF CONFORMITY - DISC1000
EG-Konformitätserklärung
EC-Declaration of Conformity
CE-Déclaration de Conformité
mit den Richtlinien 89 / 336 / EWG und 73 /
23 / EWG.
per 89 / 336 / EEC and 73 / 23 / EWG.
avec 89 / 336 / CEE et 73 / 23 / EWG.
Hiermit wird bestätigt, dass das Produkt
This is to confirm that the product
Nous déclarons que le produit
PDD Optical Library
DISC 1000
Optical Library PDD
DISC 1000
mit den folgenden Normen bzw. normativen
Dokumenten übereinstimmt:
is in compliance with the following
standards or other normative documents:
est conforme aux normes ou autres
documents normatifs suivants:
EN 55022: 1998 + A1: 2000
Grenzwerte und Messverfahren für
Funkstörungen von informationstechnischen
Einrichtungen.
EN 55022: 1998 + A1: 2000
Limits and methods of radio interference
characteristics of information technology
equipment.
EN 55022: 1998 + A1 2000
Limites et méthodes de mesure des
charactéristiques de perturbation
radioélectriques produites par les appareils
de traitement de l´information.
EN 50024: 1998 + A1: 2001
Störfestigkeit von informationstechnischen
Einrichtungen.
EN 50024: 1998 + A1: 2001
Information technology equipmentImmunity Characteristics- Limits and
methods of measurement.
EN 50024: 1998 + A1: 2001
Appareils de traitements l´information characteristiques d´immunité - limites et
méthodes de mesure.
EN 61000-3-2: 2000
EN 61000-3-3: 1995 + A1: 2001
EN 61000-3-2: 2000
EN 61000-3-3: 1995 + A1: 2001
EN 61000-3-2: 2000
EN 61000-3-3: 1995 + A1: 2001
EN 60950, UL 1950, CUL C22.2No.950
Sicherheit von Einrichtungen der
Informationstechnik.
EN 60950, UL 1950, CUL C22.2No.950
Safety of information technology
equipment.
EN 60950, UL 1950, CUL C22.2No.950
Sécurité des matériels de traitement de
l´information.
Das Qualitätssicherungssystem von DISC
garantiert die Konformität.
DISC quality assurance system assures
compliance.
La système d´assurance de la qualité de
DISC garantit la conformité.
Hersteller:
Manufacturer:
Fabricant:
DISC Archiving Systems B.V.
Waaderweg 52G
2031 BP Haarlem, Netherlands
DISC Archiving Systems B.V.
Waaderweg 52G
2031 BP Haarlem, Netherlands
DISC Archiving Systems B.V.
Waaderweg 52G
2031 BP Haarlem, Netherlands
Ausstelldatum: 01.01.2010
Date of issue of the declaration:
01-01-2010
Date d´établissement 7e la declaration:
01.01.2010
PDD Optical Library
DISC 1000
___________________________
Kees Machielsen
Managing Director
143714-F
Rev. A
DISCx000 Version 3.1User Manual
71
ANHANG B: BEHÖRDLICHE GENEHMIGUNGEN
______________________________________________________________________________
DECLARATION OF CONFORMITY - DISC3000
EG-Konformitätserklärung
EC-Declaration of Conformity
CE-Déclaration de Conformité
mit den Richtlinien 89 / 336 / EWG und 73 /
23 / EWG.
per 89 / 336 / EEC and 73 / 23 / EWG.
avec 89 / 336 / CEE et 73 / 23 / EWG.
Hiermit wird bestätigt, dass das Produkt
This is to confirm that the product
Nous déclarons que le produit
PDD Optical Library
DISC 3000
Optical Library PDD
DISC 3000
mit den folgenden Normen bzw. normativen
Dokumenten übereinstimmt:
is in compliance with the following
standards or other normative documents:
est conforme aux normes ou autres
documents normatifs suivants:
EN 55022: 1998 + A1: 2000
Grenzwerte und Messverfahren für
Funkstörungen von informationstechnischen
Einrichtungen.
EN 55022: 1998 + A1: 2000
Limits and methods of radio interference
characteristics of information technology
equipment.
EN 55022: 1998 + A1 2000
Limites et méthodes de mesure des
charactéristiques de perturbation
radioélectriques produites par les appareils
de traitement de l´information.
EN 50024: 1998 + A1: 2001
Störfestigkeit von informationstechnischen
Einrichtungen.
EN 50024: 1998 + A1: 2001
Information technology equipmentImmunity Characteristics- Limits and
methods of measurement.
EN 50024: 1998 + A1: 2001
Appareils de traitements l´information characteristiques d´immunité - limites et
méthodes de mesure.
EN 61000-3-2: 2000
EN 61000-3-3: 1995 + A1: 2001
EN 61000-3-2: 2000
EN 61000-3-3: 1995 + A1: 2001
EN 61000-3-2: 2000
EN 61000-3-3: 1995 + A1: 2001
EN 60950, UL 1950, CUL C22.2No.950
Sicherheit von Einrichtungen der
Informationstechnik.
EN 60950, UL 1950, CUL C22.2No.950
Safety of information technology
equipment.
EN 60950, UL 1950, CUL C22.2No.950
Sécurité des matériels de traitement de
l´information.
Das Qualitätssicherungssystem von DISC
garantiert die Konformität.
DISC quality assurance system assures
compliance.
La système d´assurance de la qualité de
DISC garantit la conformité.
Hersteller:
Manufacturer:
Fabricant:
DISC Archiving Systems B.V.
Waaderweg 52G
2031 BP Haarlem, Netherlands
DISC Archiving Systems B.V.
Waaderweg 52G
2031 BP Haarlem, Netherlands
DISC Archiving Systems B.V.
Waaderweg 52G
2031 BP Haarlem, Netherlands
Ausstelldatum: 01.01.2010
Date of issue of the declaration:
01-01-2010
Date d´établissement 7e la declaration:
01.01.2010
PDD Optical Library
DISC 3000
___________________________
Kees Machielsen
Managing Director
143714-F
Rev. A
DISCx000 Version 3.1User Manual
72
ANHANG B: BEHÖRDLICHE GENEHMIGUNGEN
______________________________________________________________________________
DECLARATION OF CONFORMITY - DISC4000
EG-Konformitätserklärung
EC-Declaration of Conformity
CE-Déclaration de Conformité
mit den Richtlinien 89 / 336 / EWG und 73 /
23 / EWG.
per 89 / 336 / EEC and 73 / 23 / EWG.
avec 89 / 336 / CEE et 73 / 23 / EWG.
Hiermit wird bestätigt, dass das Produkt
This is to confirm that the product
Nous déclarons que le produit
PDD Optical Library
DISC 4000
Optical Library PDD
DISC 4000
mit den folgenden Normen bzw. normativen
Dokumenten übereinstimmt:
is in compliance with the following
standards or other normative documents:
est conforme aux normes ou autres
documents normatifs suivants:
EN 55022: 1998 + A1: 2000
Grenzwerte und Messverfahren für
Funkstörungen von informationstechnischen
Einrichtungen.
EN 55022: 1998 + A1: 2000
Limits and methods of radio interference
characteristics of information technology
equipment.
EN 55022: 1998 + A1 2000
Limites et méthodes de mesure des
charactéristiques de perturbation
radioélectriques produites par les appareils
de traitement de l´information.
EN 50024: 1998 + A1: 2001
Störfestigkeit von informationstechnischen
Einrichtungen.
EN 50024: 1998 + A1: 2001
Information technology equipmentImmunity Characteristics- Limits and
methods of measurement.
EN 50024: 1998 + A1: 2001
Appareils de traitements l´information characteristiques d´immunité - limites et
méthodes de mesure.
EN 61000-3-2: 2000
EN 61000-3-3: 1995 + A1: 2001
EN 61000-3-2: 2000
EN 61000-3-3: 1995 + A1: 2001
EN 61000-3-2: 2000
EN 61000-3-3: 1995 + A1: 2001
EN 60950, UL 1950, CUL C22.2No.950
Sicherheit von Einrichtungen der
Informationstechnik.
EN 60950, UL 1950, CUL C22.2No.950
Safety of information technology
equipment.
EN 60950, UL 1950, CUL C22.2No.950
Sécurité des matériels de traitement de
l´information.
Das Qualitätssicherungssystem von DISC
garantiert die Konformität.
DISC quality assurance system assures
compliance.
La système d´assurance de la qualité de
DISC garantit la conformité.
Hersteller:
Manufacturer:
Fabricant:
DISC Archiving Systems B.V.
Waaderweg 52G
2031 BP Haarlem, Netherlands
DISC Archiving Systems B.V.
Waaderweg 52G
2031 BP Haarlem, Netherlands
DISC Archiving Systems B.V.
Waaderweg 52G
2031 BP Haarlem, Netherlands
Ausstelldatum: 01.01.2010
Date of issue of the declaration:
01-01-2010
Date d´établissement 7e la declaration:
01.01.2010
PDD Optical Library
DISC 4000
___________________________
Kees Machielsen
Managing Director
143714-F
Rev. A
DISCx000 Version 3.1User Manual
73
ANHANG B: BEHÖRDLICHE GENEHMIGUNGEN
______________________________________________________________________________
DECLARATION OF CONFORMITY - DISC7000
EG-Konformitätserklärung
EC-Declaration of Conformity
CE-Déclaration de Conformité
mit den Richtlinien 89 / 336 / EWG und 73 /
23 / EWG.
per 89 / 336 / EEC and 73 / 23 / EWG.
avec 89 / 336 / CEE et 73 / 23 / EWG.
Hiermit wird bestätigt, dass das Produkt
This is to confirm that the product
Nous déclarons que le produit
Optical Library
DISC 7000
Optical Library
DISC 7000
mit den folgenden Normen bzw. normativen
Dokumenten übereinstimmt:
is in compliance with the following
standards or other normative documents:
est conforme aux normes ou autres
documents normatifs suivants:
EN 55022: 1998 + A1: 2000
Grenzwerte und Messverfahren für
Funkstörungen von informationstechnischen
Einrichtungen.
EN 55022: 1998 + A1: 2000
Limits and methods of radio interference
characteristics of information technology
equipment.
EN 55022: 1998 + A1 2000
Limites et méthodes de mesure des
charactéristiques de perturbation
radioélectriques produites par les appareils
de traitement de l´information.
EN 55024: 1998 + A1: 2001
Störfestigkeit von informationstechnischen
Einrichtungen.
EN 55024: 1998 + A1: 2001
Information technology equipmentImmunity Characteristics- Limits and
methods of measurement.
EN 55024: 1998 + A1: 2001
Appareils de traitements l´information characteristiques d´immunité - limites et
méthodes de mesure.
EN 61000-3-2: 2000
EN 61000-3-3: 1995 + A1: 2001
EN 61000-3-2: 2000
EN 61000-3-3: 1995 + A1: 2001
EN 61000-3-2: 2000
EN 61000-3-3: 1995 + A1: 2001
EN 60950, UL 1950, CUL C22.2No.950
Sicherheit von Einrichtungen der
Informationstechnik.
EN 60950, UL 1950, CUL C22.2No.950
Safety of information technology
equipment.
EN 60950, UL 1950, CUL C22.2No.950
Sécurité des matériels de traitement de
l´information.
Das Qualitätssicherungssystem von DISC
garantiert die Konformität.
DISC quality assurance system assures
compliance.
La système d´assurance de la qualité de
DISC garantit la conformité.
Hersteller:
Manufacturer:
Fabricant:
DISC Archiving Systems B.V.
Waaderweg 52G
2031 BP Haarlem, Netherlands
DISC Archiving Systems B.V.
Waaderweg 52G
2031 BP Haarlem, Netherlands
DISC Archiving Systems B.V.
Waaderweg 52G
2031 BP Haarlem, Netherlands
Ausstelldatum: 01.01.2010
Date of issue of the declaration:
01-01-2010
Date d´établissement 7e la declaration:
01.01.2010
Optical Library
DISC 7000
___________________________
Kees Machielsen
Managing Director
143714-F
Rev. A
DISCx000 Version 3.1User Manual
74
ANHANG B: BEHÖRDLICHE GENEHMIGUNGEN
______________________________________________________________________________
143714-F
Rev. A
DISCx000 Version 3.1User Manual
75
Index
______________________________________________________________________________
APPENDIX A:
TECHNICAL DATA
143714-F
Rev. A
■
Technical Specifications
■
OEM Specifications
■
Slot Upgrades
DISCx000 Version 3.1User Manual
76
Index
______________________________________________________________________________
<THIS PAGE IS INTENTIONALLY BLANK.>
143714-F
Rev. A
DISCx000 Version 3.1User Manual
77
Index
______________________________________________________________________________
TECHNICAL SPECIFICATIONS
DISC1000
DISC3000
DISC4000
DISC7000
0
9600 Baud
1
8
1
No parity
0–15
0
9600 Baud
1
8
1
No parity
0–15
0
9600 Baud
1
8
1
No parity
0–15
0
9600 Baud
1
8
1
No parity
0–15
0
1–7
8–15 optional
0
1–7
8–15 optional
0
1–7
8–15 optional
0
1–7
8–15 optional
0-7
0-7
0-7
0-7
Ambient
temperature
10°C – 37°C
[50°F – 99°F]
10°C – 37°C
[50°F – 99°F]
10°C – 37°C
[50°F – 99°F]
10°C – 37°C
[50°F – 99°F]
Operating
temperature
[50°F – 91,4°F]
[50°F – 91,4°F]
[50°F – 91,4°F]
[50°F – 91,4°F]
Gradient of
temperature
11°C/h
[19,8°F/h]
11°C/h
[19,8°F/h]
11°C/h
[19,8°F/h]
11°C/h
[19,8°F/h]
Relative humidity,
operating
10% – 68%
non condensing
10% – 68%
non condensing
10% – 68%
non condensing
10% – 68%
non condensing
Line voltage
90 V – 120 V/4 A
90 V – 120 V/5 A
90 V – 120 V/5 A
90 V – 120 V/10 A
Frequency range
Power consumption,
normal
Power consumption,
max.
220 V – 240 V/4 A
50/60 Hz
220 V – 240 V/4 A
50/60 Hz
220 V – 240 V/4 A
50/60 Hz
220 V – 240 V/5 A
50/60 Hz
140 W
345 W
140 W
345 W
155 W
450 W
180 W
920 W
Interfaces
RS232
RS232 ID
Baud rate
Number of start bits
Number of data bits
Number of stop bits
Parity check
ID Range
U160 SCSI LVD
SCSI Robotics ID
ID Range
SAS
Drive ID Range
Operating
Conditions
Power Supply
143714-F
Rev. A
DISCx000 Version 3.1User Manual
78
Index
______________________________________________________________________________
DISC1000
DISC3000
DISC4000
DISC7000
300 mm
365/620,5 mm
365/620,5 mm
365/835 mm
410 mm
680 mm
35 kg
780 mm
730 mm
54 kg
980 mm
730 mm
72 kg
1500 mm
730 mm
95 kg
Dimensions and
Weight
Width JB / JB incl.
Stands
Height
Depth
Weight (without
media)
FUSES
Internally used Fuses
PCB
Silkscreen Overlay Top Side
Mount Fuse 5A/63V quick-acting
Main Controller
S11; S12
Mount Fuse 2A/63V quick-acting
Main Controller
S13
Mount Fuse 2A/125V slo-blo
LKU Board
S11
OEM SPECIFICATIONS
DISC1000
DISC3000
DISC4000
DISC7000
2 second
3 second
4 second
6 second
2.500.000 cycles
2.500.000 cycles
2.500.000 cycles
2.500.000 cycles
CD, DVD
BD
CD, DVD
BD
CD, DVD
BD
CD, DVD
BD
Robotics
Media Exchange
Time (avg)
Reliability (MSBF)
Drives
Read/write drive
143714-F
Rev. A
DISCx000 Version 3.1User Manual
79
Index
______________________________________________________________________________
SLOT UPGRADES
DISC DISC1000 , DISC3000 , DISC4000 and DISC7000 Optical Libraryes are
available in the following capacities:
DISC1000U - 45 media slots
DISC1000 - 105 media slots
DISC3000 - up to 270 media slots
DISC4000 - up to 400 media slots
DISC7000U - 510 media slots
DISC7000 - up to 690 media slots
The basic Optical Library is the DISCx000 version, the upgrade to full capacity is
optional.
Slot upgrades must be completed in the factory or on site by specially trained
service staff. The slot upgrade is not available as a standard field upgrade kit.
For more information about slot upgrades, contact your DISC sales office.
143714-F
Rev. A
DISCx000 Version 3.1User Manual
80
Index
______________________________________________________________________________
<THIS PAGE IS INTENTIONALLY BLANK.>
143714-F
Rev. A
DISCx000 Version 3.1User Manual
81