1
VMware vCloud Director Cookbook
Daniel Langenhan
Chapter No. 5
"Working with the vCloud API"
In this package, you will find:
A Biography of the author of the book
A preview chapter from the book, Chapter NO.5 "Working with the vCloud API"
A synopsis of the book’s content
Information on where to buy this book
About the Author
Daniel Langenhan is a client-focused Virtualization Expert with more than 18 years
of international industry experience.
His skills span the breadth of virtualization, ranging from architecture, design, and
implementation for large multitier enterprise client systems to delivering
captivating education and training sessions in security technologies and practices
to diverse audiences.
In addition to this, he possesses an extensive knowledge and experience in process
management, enterprise-level storage, Linux, and Solaris operating systems.
Utilizing his extensive knowledge, experience, and skills, he has a proven track record
of successful integration of virtualization into different business areas, while minimizing
cost and maximizing reliability and effectiveness of the solutions for his clients.
He has gained his experience with major Australian and international vendors and clients.
Daniel's consulting company is well established with strong industry ties in many
verticals, for example, finance, telecommunications, and print. His consulting business
also provided services to VMware International.
Daniel is the author of Instant VMware vCloud Starter, Packt Publishing and VMware
View Security Essentials, Packt Publishing.
For More Information:
www.packtpub.com/vmware-vcloud-director-cookbook/book
I would like to thank my wife, Renata, for her tireless support and
patience in all things. This book would not have been possible
without her.
For More Information:
www.packtpub.com/vmware-vcloud-director-cookbook/book
VMware vCloud Director Cookbook
VMware vCloud has evolved to be one of the most exciting technologies in the last few
years. It is not only the follow-up product to VMware Lab Manager but it also opens up
your vSphere infrastructure for customer-based management. VMware vCloud allows
you to manage your vSphere infrastructure and lets you push work from the
administrators back onto the customers. This enables customers to self provide and self
administer their resources without impacting their security or resource management.
This book contains the most up-to-date and enterprise-proven concepts to enhance your
vCloud productivity. Not only do we discuss vCloud 5.1, but we also talk about the
newest release, vCloud 5.5. You will see how to integrate these new features and increase
your productivity even more.
We will present recipes that not only deal with the daily tasks but also present you with
new ideas and concepts that you may not have thought of before, as well as give you
some great tips and shortcuts.
What This Book Covers
Chapter 1, Setting Up Networks, walks you through the creation of the different networks
that exist in vCloud. We will go from External Networks, through VXLANs, and the
Cisco 1000v to Edge networks.
Chapter 2, vCloud Networks, plays with all the vCloud networking, routing, and isolation
possibilities. Accessing isolated network, working with vCloud routers, as well as Edge
and fencing will be investigated.
Chapter 3, Better vApps, delves into all that you can do with vApps. We will discuss the
import and export of vApps as well as Guest Customization.
Chapter 4, Datastores and Storage Profiles, focuses on Datastores, storage profiles, and
linked clones.
Chapter 5, Working with the vCloud API, introduces you to working with the vCloud
API. We will be using PowerShell, PHP, vCenter Orchestrator as well as the REST API
to build VMs.
Chapter 6, Improving the vCloud Design, will give you a new understanding of how to
design a productive and effective vCloud environment.
Chapter 7, Operational Challenges, introduces you to solutions to combat common and
uncommon operational problems. This chapter is a collection of all kinds of useful
recipes that will provide you with tips and tricks on how to be more efficient with
vCloud Director.
For More Information:
www.packtpub.com/vmware-vcloud-director-cookbook/book
Chapter 8, Troubleshooting vCloud, focuses on logfiles, error finding, and recovery.
Appendix, contains a list of all the abbreviations used used in this book.
For More Information:
www.packtpub.com/vmware-vcloud-director-cookbook/book
5
Working with
the vCloud API
In this chapter, we will cover topics that will introduce us to accessing the vCloud API using the
most common languages. We will look at the following recipes:
Using PowerShell with vCloud Director
Accessing REST with Firefox
Accessing vCD via PHP
Using vCenter Orchestrator to automate vCloud
A scripted cell shutdown
Adding ISO files to vCD automatically
Introduction
The API interface of vCloud is an HTTPS-based REST interface. This is a major improvement
over the vSphere API, which is SOAP-based. Most of the newer developments of VMware
now come with a REST-based interface, adopting and standardizing on modern standards.
The main difference between SOAP and REST is that REST can be accessed very easily and
without much overhead, while SOAP advertises to clients how it needs to be addressed and
what return is to be expected.
Saying that, vCloud uses REST to talk to vCNS, and SOAP to talk to the vSphere API.
For More Information:
www.packtpub.com/vmware-vcloud-director-cookbook/book
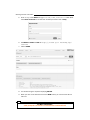
Working with the vCloud API
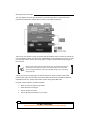
The next diagram shows all the connections of the full vCloud Suite. It shows all the API
interactions between the various vSphere, vCloud, and vCNS components.
The focus of this chapter is to get you started with the different ways to access the vCloud API.
It is not intended to teach you the full set of possibilities of each language or tool, but to make
your first steps easier. At the end of each recipe, I will give you links that will help you get to
the next level.
One thing you really need to understand is that the vCloud web interface
(the GUI) you have used until now is not using the API. This means that
you can't always follow the same way in programming as you do clicking
though the GUI.
You can use almost any language to automate vCloud, but there are a few ready-made
solutions that make your life easier. Such ready-made solutions are provided for Microsoft
PowerShell, PHP, Perl, vCenter Orchestrator, and for using direct REST calls.
For each of these methods, we will investigate:
What we need and where to get it from
Some install and config tips
How to connect to vCloud
How to get base information out of vCloud
160
For More Information:
www.packtpub.com/vmware-vcloud-director-cookbook/book
Chapter 5
How to deploy a new vApp from a vApp template
How to start a vApp
Logging in to the System organization
When you log in to vCloud using the vCloud API, you can log in to the System organization
or a different organization. When you log in to vCloud, you must choose the organization in
which you want to log in to by adding the organization to your username. For example,
MyUser@System would log me in to the System organization (mind the capital S) and
MyUser@MyOrg would log me in to the organization MyOrg.
The System organization is the highest level in vCloud and you have to be SysAdmin to
successfully log in to it. In the System organization, you can do everything that you can
do in vCloud and across all other organizations.
When logged in to another organization, you can only do things your role allows you.
One thing I would always do is create a user for any automation tool that accesses vCloud.
This makes sure that you can easily track what the automation does in the logs, as well as
shut down the access to the vCloud very fast. This is especially true when logged in to the
System organization.
To successfully follow the recipes in this chapter, you need to have access to the System
organization.
Gathering prerequisites and information gathering
For all our recipes we need:
A dedicated user for the API who is SysAdmin in vCloud
An organization and OvDC with an Organization Network that we can use
A vApp template that we can use for deployment
In each recipe, we will have four main themes: connecting to vCloud, gathering information,
creating a vApp, and powering the new vApp on.
In the section where we gather information, we will collect the information that we need in
order to deploy a new vApp. To create a new vApp, we need the following information:
The OvDC that the vApp will be deployed to
The vApp template we want to deploy from
The network we want to connect the new vApp to
161
For More Information:
www.packtpub.com/vmware-vcloud-director-cookbook/book
Working with the vCloud API
Please note that square brackets [ ] will be used to indicate that you need
to enter something into the code at this stage.
So if I write get-Org –name [Name of Org], you should be writing
something like get-org –name MyOrg.
Project Onyx
I would also keep a lookout on the Onyx project. Onyx creates automation code based on
mouse clicks; however, it currently works only with vSphere Client (not the Web Client) and
not with vCloud. But you should keep tabs on it. More on Onyx can be found at:
http://communities.vmware.com/community/vmtn/automatiotools/onyx
Using PowerShell with vCloud Director
This is how you can access vCloud using Microsoft PowerShell.
Getting ready
Please note that the vApp template we will be using should not have a network attached.
Installing PowerCLI
You need to install vSphere PowerCLI; you can download it from
www.vmware.com/go/powercli.
When you install PowerCLI, make sure that you install it with the vCloud Director PowerCLI
option, which is not installed by default. You can always reinstall PowerCLI with the correct
settings. If you already have PowerCLI installed, you can re-run the installer to add the
vCloud PowerCLI.
162
For More Information:
www.packtpub.com/vmware-vcloud-director-cookbook/book
Chapter 5
After you have installed PowerCLI, you have to run the following command in PowerShell to
make it work:
Set-executionPolicy remotesigned
A PowerShell editor
A really good program to use with PowerShell is the free software PowerGUI. It helps with
exploring the API and its objects. You can download it from www.powergui.org.
After you have installed PowerGUI, you need to activate the VMware libraries by performing
the following steps:
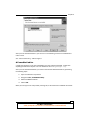
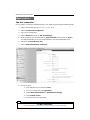
1. Open the PowerGui script editor.
2. Navigate to File | PowerShell Library.
3. Select all VMware libraries.
4. Click on OK.
When you now type in the script editor pressing Tab, it will show all the available commands.
163
For More Information:
www.packtpub.com/vmware-vcloud-director-cookbook/book
Working with the vCloud API
How to do it...
We now go through all the steps, from connecting to powering on the vApp.
Connecting vApp
1. Open PowerShell or PowerGUI Script Editor.
2. Run the following command:
Connect-CIServer [ip or name of vCD]
CI stands for Cloud Infrastructure; most vCloud comments begin with CI
3. You will now be asked for your credentials. Enter the user you created for accessing
the API.
4. Now run the following command:
get-Org
This command should show you all the organizations you have currently in your
vCloud and verifies that everything is working as it should
Gathering information
Now that we are logged in, let's get the information we need to deploy a vApp.
1. We will store everything in variables, so we can use it again later. Now let's get the
OvDC we want. Run the following command:
Get-OrgVdc
It will display all the OvDCs that you currently have
2. We now select one and store it in a variable. If you like, you can just copy and paste
the name of the organization in the following command:
$OvDC = Get-OrgVdc –Name [name of the Org]
If you are using PowerGUI, you will see that the variable $OvDC has been added to the
right side. You can now use your mouse to expand the content, showing all attributes
and child elements of the OvDC you stored in the variable
164
For More Information:
www.packtpub.com/vmware-vcloud-director-cookbook/book
Chapter 5
3. Let's get the Organization Network by using a pipe. The pipe we will be using is the |
symbol and it means that the result from the last command will be forwarded into the
next command as shown in the following command:
Get-org -Name [Org name] | Get-OrgNetwork
The next command shows only the Organization Networks that exists in the
organization you specified:
$Onet = Get-org -Name [Org name]|Get-OrgNetwork -Name [OrgNet
name]
4. We now get the vApp template. This time we will use a filter; however, you can still use
the direct method using the name of the template. The where filter is quite good for
that; playaround or look up the difference between -like and –contains. The $_
variable is very important in Powershell as it stores the values of the last used output.
In the next example, we basically loop through all vApp templates and look if any of
them ($_) have name attributes that are similar to the vApp template names.
$Tvapp=Get-CIVAppTemplate |where {$_.name -like "[template name]"}
We have now collected all the information we need, so let's deploy a new vApp.
165
For More Information:
www.packtpub.com/vmware-vcloud-director-cookbook/book
Working with the vCloud API
Creating vApp
1. To create a new vApp, run the following command:
$vApp =New-CIVApp -Name MyTest -VAppTemplate $Tvapp -OrgVdc $OvDC
As you see, we have captured the new vApp directly in a variable to be reused later.
2. After the vApp is deployed, we now need to add a network to it. It can be done by
running the following command:
$vappNet=New-CIVAppNetwork -ParentOrgNetwork $Onet -VApp $vapp –
Direct
3. The vApp now has a network, but we still need to attach the VM in the vApp to the
network. That is easily done by running the following command:
$vapp|Get-CIVM|Get-CINetworkAdapter|Set-CINetworkAdapter
-VAppNetwork $vappnet -Connected $true -IPAddressAllocationMode
Pool
Have a look at the command. It is rather fancy. We take the vApp, get its VMs, get the
VMs' network card information, and then set the same card with the new settings.
This works not only for one VM inside a vApp but for all VMs and all their network
cards. The pipe | here acts like the for each command.
You now have created a vApp and connected it to a network.
Powering on vApp
The last step of powering on the vApp is very simple. It can be done by running the
following command:
$vapp|Start-CIVApp
How it works...
PowerShell connects to the REST API of vCloud. This means that even if a command currently
doesn't exist or doesn't do all that you expected it to do, you can always build the command
by using variables. The VMware community is a big help and PowerCLI is improving fast for
vCloud use.
Not all options are exposed to PowerCLI at the moment; however, if you use the command
GET-CIVIEW, you will get all the arguments. As an example, have a look at the difference
between the content of the two objects:
$temp
= get-org –name [name of an org]
$temp2 = get-org –name [name of an org] | get-ciview
166
For More Information:
www.packtpub.com/vmware-vcloud-director-cookbook/book
Chapter 5
See also
There is quite some help online in the VMware community at
http://communities.vmware.com/community/vmtn/automationtools/
powercli/vcdpowercli
You can see all the PowerShell commands at http://www.vmware.com/
support/developer/PowerCLI/PowerCLI51/html/ or by navigating to
Windows on Start | VMware | PowerCLI; there you find a help file as well as
other documents
Accessing REST with Firefox
We will now access vCloud using REST directly as explained in the following sections.
Getting ready
Please note that the vApp template we will be using should have a network attached.
We first need to download and install a REST client we can play with. I prefer the Firefox
plugin, which you can download from https://addons.mozilla.org/en-US/firefox/
addon/restclient/.
After downloading and installing the client, we are ready to go.
How to do it...
We will now use the REST API to work with vCloud.
The first connection
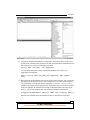
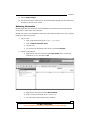
1. Open Firefox and go to the Add On RESTClient.
2. Click on Authentication and select Basic Authentication.
3. Enter your vCloud username and password. The username should be in the format
myuser@System, to make sure you authenticate to the System organization of
vCloud. You may also want to check the Remember me box.
4. Click on Headers and select Custom Header.
167
For More Information:
www.packtpub.com/vmware-vcloud-director-cookbook/book
Working with the vCloud API
5. Enter Accept under Name and application/*+xml;version=5.1 under Value.
Check Save to favorite as we need this constantly and then click on Okay.
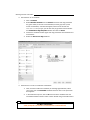
6. Set Method to POST and URL to https://[vcloud ip or hostname]/api/
sessions.
7.
Click on SEND.
8. You should now get a response displaying 200 OK.
9. When you click on the little star next to the SEND button, you can save this URL for
later use.
168
For More Information:
www.packtpub.com/vmware-vcloud-director-cookbook/book
Chapter 5
10. Click on the field Response Body (Preview) to see the child elements that exist. We
will be using this view from now on as it gives us the links to follow.
Gathering information
Now that we are logged on, let's get the information we need to deploy a vApp by performing
the following steps:
1. Set the Method to GET and URL to …/api/org.
2. Click on the Href for the organization we want to deploy in. It will now be put into
the URL window above. Notice the long number? That's the unique reference for
any object.
3. Click on SEND and you should now see in Response the OvDCs and Organization
Networks that are part of the organization. Under each object, you will always see
all its child objects.
4. Copy the Href for the OvDC you want to deploy the vApp in onto a Notepad. We need
that link to create the new vApp.
169
For More Information:
www.packtpub.com/vmware-vcloud-director-cookbook/book
Working with the vCloud API
5. Copy the Href for the Organization Network you want to use with the vApp onto
a Notepad.
6. If your vApp template is in the same organization as the one you want to deploy
it in, you need to find the catalog item in the response. If not, go back to the start
(/api/org) and click on the catalog where your vApp template is located.
7.
Click on the blue Href link from the catalog and it will be automatically put into the
URL, then just click on SEND. Work your way down to the object you want.
8. The Catalog contains the catalog items. Choose the one that contains your
vApp template.
9. Copy the Href of the vApp template object onto a notepad.
10. Now, we just need to get the name of the network the vApp template was
constructed with. Click on the Href for the vApp template and press SEND.
11. The response is a long XML message; you need to find <NetworkConnection
network=.
12. Behind network= is the name of the network you created the template with; copy
it to a Notepad. The name is rather important as vCloud just substitutes the original
network the vApp deploys with the new one. Therefore, we need the old name and
the new network reference.
Creating a new vApp
Now that we have collected all the information, let's create a new vApp. For that we need to
build up the XML for the REST post.
1. Copy the Href of the OvDC into the URL and click on SEND.
2. Now set Method to POST and add /action/instantiateVAppTemplate at the
end of the existing URL. It should now read like https://myCloud/api/vdc/[href
code]/action/instantiateVAppTemplate.
3. Click on Headers and select Custom Header.
4. Enter Content-Type as the name and application/vnd.vmware.vcloud.ins
tantiateVAppTemplateParams+xml as the value.
5. The header section should now contain three headers: Authentication, Accept, and
Content-Type.
6. Now we need to add the following XML to the body. I have highlighted the lines that
need to be changed.
<InstantiateVAppTemplateParams
xmlns="http://www.vmware.com/vcloud/v1.5"
name="[MyNewvApp]"
deploy="true"
powerOn="false"
xmlns:xsi="http://www.w3.org/2001/XMLSchema-instance"
170
For More Information:
www.packtpub.com/vmware-vcloud-director-cookbook/book
Chapter 5
xmlns:ovf="http://schemas.dmtf.org/ovf/envelope/1">
<Description>[My New vApp]</Description>
<InstantiationParams>
<NetworkConfigSection>
<ovf:Info>Configuration parameters for logical
networks</ovf:Info>
<NetworkConfig
networkName="[Old vApp Template Network NAME]">
<Configuration>
<ParentNetwork
href="[href of the OrgNe]" />
<FenceMode>bridged</FenceMode>
</Configuration>
</NetworkConfig>
</NetworkConfigSection>
</InstantiationParams>
<Source href="[href of the vApp Template]" />
<AllEULAsAccepted>true</AllEULAsAccepted>
</InstantiateVAppTemplateParams>
7.
When all the preceding code is put in, click on SEND.
8. If you did anything wrong, a long error message appears as the response; scroll to the
very end to see what is wrong.
9. If everything is correct, the response you get back is a vApp. The new Href is in the
<VApp> object. Copy the vApp Href onto a Notepad; we will need it to power it on.
Powering on
1. Set Method to Post.
2. Delete the content type from the header and the content from the body.
3. Copy the new vApp Href from the last step into the URL field and add
/power/action/powerOn at the end. The URL should now look something
like https://myCloud/api/vApp/[href code]/power/action/powerOn.
4. Alternatively, you could start with /api/org and click through to the vApp you
created, and then look for power on. There is a Href with the action attached to it.
5. Click on SEND.
How it works...
It is clear that the example we saw on how to use the vCloud REST API is not really the best
way to automate vCloud. What is shown here is how the REST API works and how objects
are constructed. Every language that connects to the vCloud must use the API and the way it
works. If you can do something in REST, you can use the same methods to recreate it in any
of the languages. Have a look at the way PHP creates a new vApp; it is quite similar.
171
For More Information:
www.packtpub.com/vmware-vcloud-director-cookbook/book
Working with the vCloud API
As I mentioned before, the vCloud GUI doesn't use the REST interface. This means that you
can't always follow the way the vCloud API does things. Create a new vApp via the GUI and
you will see that you can define the VM name and the VM hostname, as well as the network
IP. Using the REST API, you will need to perform all the previous steps in this recipe after the
vApp is created.
See also
vCloud Director API Reference at http://pubs.vmware.com/vcd-51/index.
jsp. After the website opens, click on vCloud API Schema Reference
vCloud API Community at http://communities.vmware.com/community/
vmtn/developer/forums/vcloudapi
Accessing vCD via PHP
This is how you use PHP to work with vCloud.
Getting ready
Download the PHP vCloud API for vCloud from http://www.vmware.com/go/
vcloudsdkforphp.
I assume you will use PHP on Linux, so you might need a Linux VM with PHP libraries and the
PHP base configuration. You probably need the HTTP_Request2 and Net_URL2 libraries.
Untar the download into the directory from where you would like to use the files. Place the new
script in the main directory (vCloudPHP-5.1.2). You can move them; however, that requires
you to reconfigure the pointer to the libraries.
If you are playing on a Windows environment, the base install might be different and you will
need to follow the instructions that come with the Windows installer.
How to do it...
In this section, we will create a program that will deploy a new VMs from a command line. We
will put some variables inside the program and some to use via the command line. The script
we are using is an adapted and simplified version of the base hellovcloud.php script that
ships with the vCloud API in the sample folder.
Also, it might be interesting to compare the REST approach (see the previous recipe) to the
PHP approach as they are rather similar.
172
For More Information:
www.packtpub.com/vmware-vcloud-director-cookbook/book
Chapter 5
Base PHP skeleton
1. First we create the skeleton of the PHP script:
<?php
// add library to the include_path
set_include_path(implode(PATH_SEPARATOR, array('.','/library',
get_include_path(),)));
require_once 'VMware/VCloud/Helper.php';
require_once dirname(__FILE__) . '/config.php';
[put script here]
?>
2. Then we need to define the input options from the command line. Put everything that
follows from now on between <?php ?> tags.
// Define the input paramaters
$longs = array(
"vm:", //the vApp name
"vdc:", //the OvDC we are deploying to
"onet::", //the ONet we will be connecting the VM to.
);
$shorts = "";
$opts = getopt($shorts, $longs);
// loop through command arguments
foreach (array_keys($opts) as $opt) switch ($opt)
{
case "vm":
$vAppName = $opts['vm'];
break;
case "vdc":
$vdcName = $opts['vdc'];
break;
case "onet":
$OrgNetName= $opts['onet'];
break;
}
Because we don't want to define everything through the command line, we are
making some variables static. If you wonder about the $TNet, the name of the vApp
template network, have a quick look at the REST section, where it is explained.
//Connection variables
$server = "[vCloud Server]";
$user= '[username]@System';
173
For More Information:
www.packtpub.com/vmware-vcloud-director-cookbook/book
Working with the vCloud API
$pswd= '[Password]';
//initialize some other variables
$vAppTempName = "[vapp template name]";
$TNet="[name of the network the template was build with]";
$vdcRef=null;
$vAppTemplateRef=null;
Connecting to vCloud
1. Let's connect to the vCloud.
$httpConfig = array('ssl_verify_peer'=>false,
'ssl_verify_host'=>false);
$service = VMware_VCloud_SDK_Service::getService();
$service->login($server, array('username'=>$user,
'password'=>$pswd), $httpConfig);
Gathering information
Now, let's gather all the information we still need to create a new vApp.
We need to get the object reference (called SDK Object) for the OvDC. I will explain all the
steps as comments (//) in the following code:
//get ovDC ref
$OrgRefs=$service->getOrgRefs();
//get all Orgs from vCloud
foreach ($OrgRefs as $OrgRef) {
//loop thought all Orgs to find OvDC
$sdkOrg = $service->createSDKObj($OrgRef);
//make Org SDK object out of Org Reference
$vdcRefs = $sdkOrg->getVdcRefs($vdcName);
//get all the OvDCs in the Org that match the name $vdcName
if (1 == count($vdcRefs))
{
$vdcRef=$vdcRefs[0];
//Found!
break;
}
}
if (!$vdcRefs){
//not found
exit("No OvDC $vdcName found\n");
}
$sdkVdc = $service->createSDKObj($vdcRef);
//make a OvDC SDK object out of OvDC ref
174
For More Information:
www.packtpub.com/vmware-vcloud-director-cookbook/book
Chapter 5
Now that we found the SDK Object of the OvDC, let's get the Organization Network.
//get ONet Ref
$netRefs = $sdkOrg->getOrgNetworkRefs($OrgNetName);
//as we know what we are looking for we can search directly for it
if (0 == count($netRefs))
{
exit("Onet $OrgNetName not found\n");
}
$netRef = $netRefs[0];
$pnetwkRef = VMware_VCloud_SDK_Helper::createReferenceTypeObj(
$netRef->get_href(),
'ParentNetwork');
//to connect the Network directly we need to get the parent network
reference.
Last but not least, we need the template Ref. We use the same method we used in the OvDC.
We loop through all Orgs and all OvDCs to find the vApp template.
//get Template
$TOrgRefs=$service->getOrgRefs();
foreach ($TOrgRefs as $TOrgRef) {
$TsdkOrg = $service->createSDKObj($TOrgRef);
$TvdcRefs = $sdkOrg->getVdcRefs();
foreach ($TvdcRefs as $TvdcRef) {
$TsdkVdc = $service->createSDKObj($TvdcRef);
$vAppTemplateRefs = $TsdkVdc>getVAppTemplateRefs($vAppTempName);
if ($vAppTemplateRefs)
{
$vAppTemplateRef = $vAppTemplateRefs[0];
break 2;
}
}
}
if (!$vAppTemplateRef){
exit("No vAppTemplate with name $vAppTempName is found\n");
}
Creating a new vApp
Now it is time to create a new vApp. I would recommend having a look at the REST section and
to spot the similarities.
$info = new VMware_VCloud_API_OVF_Msg_Type();
$info->set_valueOf("Configuration parameters for logical
networks");
175
For More Information:
www.packtpub.com/vmware-vcloud-director-cookbook/book
Working with the vCloud API
$conf = new VMware_VCloud_API_NetworkConfigurationType();
$conf->setParentNetwork($pnetwkRef);
$conf->setFenceMode('bridged');
$netconf = new VMware_VCloud_API_VAppNetworkConfigurationType();
$netconf->set_networkName($TNet);
$netconf->setConfiguration($conf);
$section = new VMware_VCloud_API_NetworkConfigSectionType();
$section->setInfo($info);
$section->setNetworkConfig(array($netconf));
$iparams = new VMware_VCloud_API_InstantiationParamsType();
$iparams->setSection(array($section));
$params = new
VMware_VCloud_API_InstantiateVAppTemplateParamsType();
$params->set_name($vAppName);
$params->setDescription("Something");
$params->setInstantiationParams($iparams);
$params->setSource($vAppTemplateRef);
$vApp=$sdkVdc->instantiateVAppTemplate($params);
Powering on the vApp
After we instantiated the vApp, we need to find it and then power it on. Between the instantiate
command and the powerOn command, there should be enough time for vCloud to finish
creating the new vApp; we will wait until the task of instantiating has finished.
$tasks = $vApp->getTasks()->getTask();
if ($tasks)
{
$task = $tasks[0];
$service->waitForTask($task);
}
Now we need to get the SDK object of the new vApp.
$vAppRefs = $sdkVdc->getVAppRefs($vAppName);
$vAppRef = $vAppRefs[0];
$sdkVApp = $service->createSDKObj($vAppRef);
176
For More Information:
www.packtpub.com/vmware-vcloud-director-cookbook/book
Chapter 5
Now we just need to power the vApp on.
$params = new VMware_VCloud_API_DeployVAppParamsType();
$params->set_powerOn(true);
$params->set_deploymentLeaseSeconds(null);
$sdkVApp->deploy($params);
How it works...
PHP is one of the easy ways to get vCloud automation going from Linux; however, it works just
as well in Windows. The main reason for using PHP is that you could put the program directly
into a web server and create your own little web server that provisions VMs automatically.
See also
The help files come with the download, go to the directory [download location]/
vcloudPHP-5.1.2/docs/
PHP Language reference at Php.net
VMware PHP vCloud community at http://communities.vmware.com/
community/vmtn/developer/forums/vcloudsdkphp
Using vCenter Orchestrator to automate
vCloud
We now look into automation using vCenter Orchestrator (vCO).
Getting ready
You need to download the vCO appliance (version 5.1 or better) from VMware. vCO is part of
the normal vSphere software bundle. The appliance is preconfigured with an internal DB and
LDAP and makes getting started with vCO easier. If you are already using vCO as a Windows
install, that's fine.
After downloading, installing, and configuring vCO, we are ready to go. If you need some help
with configuring, refer the See also section of this recipe.
177
For More Information:
www.packtpub.com/vmware-vcloud-director-cookbook/book
Working with the vCloud API
How to do it...
The first connection
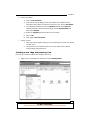
First we need to connect the downloaded vCO to our vCloud by performing the following steps:
1. Open a web browser and go to https://[vCO URL].
2. Click on Orchestrator Configuration.
3. Log in to the configurator.
4. Click on Network and then on SSL Trust Manager.
5. Enter the URL of your vCloud Director in Import from URL and then click on Import.
This will add the SSL cert of your vCloud Director to the vCO-accepted SSL certs.
6. Now click on vCloud Director (5.1).
7.
Click on New vCloud Director Connection.
8. Fill out the form:
1. Enter the URL for your vCloud into Host.
2. Put System (capital S) into Organization.
3. Choose Basic Authentication in Authentication strategy.
4. Check Shared session.
5. Enter your API users' credentials.
178
For More Information:
www.packtpub.com/vmware-vcloud-director-cookbook/book
Chapter 5
9. Click on Apply changes.
10. You should now have a new entry in the vCloud Director settings and vCO should now
be ready to connect to this vCloud.
Gathering information
We will depart from the pattern we have established as vCO doesn't work that way. Instead,
we will have a quick look at how vCO works.
We will now create a new workflow that will create a new vApp and power it on. This is a longer
recipe, but it will teach you a lot.
1. Log in to vCO:
1. Open a web browser and go to https://[vCO URL].
2. Click on Start Orchestrator Client.
3. Log in to vCO.
4. On the top is the drop-down menu; enter it and select Designer.
2. Create a new workflow:
1. Right-click on your user name and select New Folder. Give it a name (for
example, MyStuff) and click on OK.
2. Right-click on the folder and select New workflow.
3. Give it a name (for example, MyFistWorkFlow).
4. You now see the editor window of the workflow.
179
For More Information:
www.packtpub.com/vmware-vcloud-director-cookbook/book
Working with the vCloud API
3. Add elements to the workflow:
1. Click on Schema.
2. Select Workflow element from the Generic elements and drag it between
the green arrow (at the start of the workflow) and the grey circle (at the
end of the workflow). A window will appear; enter into the search text
Instantiate. As you type, you will see that you get fewer choices. Select
the Instantiate a vApp Template workflow and click on Select.
3. Choose the workflow element again and drag it between the instantiate and
end markers.
4. Select the Power on a vApp workflow.
4. Deal with the IN and OUT attributes of workflows:
1. Now, we need to define the variables (in vCO language attributes). Move
your mouse over the Instantiate workflow and then click on the pencil icon
that appears.
2. In the window that opens, click on IN. Here are all the attributes that the
Instantiate workflow needs in order to work. We will now go and define them.
180
For More Information:
www.packtpub.com/vmware-vcloud-director-cookbook/book
Chapter 5
3. Each attribute has Not set in the column Source Parameter. Click on the
first Not set; another window opens.
4. Click on Create parameter/attribute in workflow.
5. In the next window that appears, just click on OK. It will create this attribute
with the default name in our workflow.
6. Repeat the process with all the inputs.
7.
Now move on to the OUT section. There is only one attribute, vappOut;
repeat the above process.
8. Click on Close.
9. Now move on to the Power On workflow. In the IN section, there is only one
variable called vApp and you will see that it is now already automatically
mapped to vappOut. vappOut is the reference of the new vApp we will create
with the Instantiate workflow. You can click on Close as this element has
already been configured by vCO.
181
For More Information:
www.packtpub.com/vmware-vcloud-director-cookbook/book
Working with the vCloud API
5. General, input, and output attributes:
1. Click on General. You will find that all the variables you created are collected
here. We will now configure some static variables and move the others to the
Inputs section. Attributes in the Inputs section will prompt the user for an
input. Attributes in the General section are static.
2. We will ask the user for the name of the new vApp. Move it to the Inputs
section by right-clicking on the Name attribute and selecting move as the
INPUT parameter.
3. We will select a static template, meaning we will not ask the user for it. But we
still have to define what we put into it, so click on Not set next to the attribute.
4. A new window will open showing you the content of your vCloud. Navigate to
the vApp template you want to use to deploy and click on Select.
5. Continue to choose what input you will ask the user for and what you define
yourself static.
182
For More Information:
www.packtpub.com/vmware-vcloud-director-cookbook/book
Chapter 5
6. Verify the workflow:
1. Click on Save and Close.
2. A window will pop up telling you that the workflow isn't validated. That's
expected at this stage and I wanted to show this to you. Click on See details.
3. The validation will show you that the vAppOut attribute of the Power On
workflow element has not been set properly. Click on Bind Attribute and
then select vAppOut.
4. Select the vappOut attribute and bind it to the output.
5. Click on OK.
6. Click again on Save and Close.
7.
Version control:
1. Now a window will appear asking you if you would like to increase the version
number; do so.
2. You are back in the workflow folder. You can now explore your workflow
without editing. Go explore a bit.
Creating a new vApp and powering it on
Now that we created a complete new workflow, let's run it.
1. Right-click on the workflow we created and select Start Workflow….
183
For More Information:
www.packtpub.com/vmware-vcloud-director-cookbook/book
Working with the vCloud API
2. vCO will now pop up a window that asks you for your input. Answer all the questions.
3. Watch the workflow execute; see how it goes into subworkflows and starts filling up
the log.
4. After the workflow has run, you will see that it keeps the runs stored under the
workflow. You can go back into the run and have a look at the attributes and logs.
How it works...
vCenter Orchestrator is quite a powerful tool to use. It can not only interact with vCloud but
also with vCenter. In addition to that, you can download and install plugins that allow you to
use SSH, PowerShell, REST, or SQL to communicate with other systems.
Each of the plugins need to be installed via the vCO configuration tool, but can then also be
accessed via vCO. Each of the plugins bring pre-created example workflows as well as a lot of
small useful scripts (called Actions in vCO).
There's more…
vCenter Orchestrator not only lets you build workflows but also allows you to create webviews.
Webviews are small web pages where workflows are displayed and can be started from. This
allows for automation using a web browser. You should have a look at it as it is rather cool.
Last but not least, you can call vCO workflows via HTTPS, start them, check on their status,
and get the result. This makes it very easy to add vCO as the domain-scripting solution for all
things VMware. Remember that you can script vCenter via vCO directly and vShield via the
REST plugin for vCO.
Not only can vCO use HTTPS but also it can use AMPQ, which allows for a more modern
approach on the subject of automating a whole VMware, Windows, Linux, Storage, and
Network environment.
See also
VMware vCenter Orchestrator at http://www.vmware.com/support/pubs/
orchestrator_pubs.html
A brief document on how to get vCO working at http://communities.vmware.
com/docs/DOC-20368
If you would like to learn more about vCO, I recommend the book Automating vSphere
with VMware vCenter Orchestrator by Cody Bunch, VMware Press Technology
184
For More Information:
www.packtpub.com/vmware-vcloud-director-cookbook/book
Chapter 5
A scripted cell shutdown
We will now create a more controlled shutdown of vCloud.
Getting ready
This script that you create will be running on the vCloud Director VM itself, so we need to be
able to log in to the VM and become a root user.
You also need a user account, that is SysAdmin in order to execute the script.
How to do it...
There are two ways to get the script into the vCloud VM:
Copy/paste via SSH:
1. Log in to the vCloud Director VM via a SSH Client (for example, Putty).
2. Gain root access, if you haven't already.
3. Type the command vi /sbin/vCloud-Shutdown.
4. The text editor vi opens. Press the i key.
5. Copy and paste the code into vi.
6. Press the keys w and q to save and quit vi.
7.
Run the command chmod 744 /sbin/vCloud-Shutdown.
Copy via SCP or SFTP:
1. Open up a connection to the vCloud Director VM with an SCP (WinSCP).
2. Copy the program to /sbin/.
3. Close the connection.
4. Log in to the vCloud Director VM via an SSH Client (for example, Putty).
5. Gain root access, if you haven't already.
6. Run the command chmod 744 /sbin/vCloud-Shutdown.
The script
The script is given as follows:
#!/bin/bash
VCLOUD_HOME=/opt/vmware/vcloud-director/bin
VCDUSER="vcdadmin"
185
For More Information:
www.packtpub.com/vmware-vcloud-director-cookbook/book
Working with the vCloud API
VCDPASS="mypassword"
#
# check if cell is running
#
STATUS=$($VCLOUD_HOME/cell-management-tool -u $VCDUSER -p $VCDPASS
cell -status 2>&1 | grep -i "is active = ")
echo "STATUS :: $STATUS"
case $STATUS in
*true)
$VCLOUD_HOME/cell-management-tool -u $VCDUSER -p $VCDPASS cell
-quiesce true
while [[ true ]];do
ACTIVE=$( $VCLOUD_HOME/cell-management-tool -u $VCDUSER -p
$VCDPASS cell -status | sed -n 's/Job count = \([0-9]*\)/\1/p')
if [[ ACTIVE -eq 0 ]];then
break
fi
sleep 60
done
RESULT=$($VCLOUD_HOME/cell-management-tool -u $VCDUSER -p
$VCDPASS cell -shutdown)
service vmware-vcd status
while [[ true ]];do
count=$(service vmware-vcd status | grep "is not
running" | wc -l)
if [[ $count -eq 2 ]];then
break
fi
sleep 10
echo -n .
RESULT=$($VCLOUD_HOME/cell-management-tool -u $VCDUSER -p
$VCDPASS cell -shutdown)
done
echo $(service vmware-vcd status)
;;
*false)
ACTIVE=$( $VCLOUD_HOME/cell-management-tool -u $VCDUSER -p
$VCDPASS cell -status | sed -n 's/Job count = \([09]*\)/\1/p')
if [[ ACTIVE -ne 0 ]];then
echo "JOBS active ($ACTIVE), wait ..."
186
For More Information:
www.packtpub.com/vmware-vcloud-director-cookbook/book
Chapter 5
$VCLOUD_HOME/cell-management-tool -u $VCDUSER -p $VCDPASS
cell -quiesce true
while [[ true ]];do
ACTIVE=$( $VCLOUD_HOME/cell-management-tool -u $VCDUSER -p
$VCDPASS cell -status | sed -n 's/Job count = \([0-9]*\)/\1/
p')
if [[ ACTIVE -eq 0 ]];then
break
fi
sleep 30
echo -n .
done
RESULT=$($VCLOUD_HOME/cell-management-tool -u $VCDUSER -p
$VCDPASS cell -shutdown)
service vmware-vcd status
while [[ true ]];do
count=$(service vmware-vcd status | grep "is not
running" | wc -l)
if [[ $count -eq 2 ]];then
break
fi
sleep 10
echo -n .
RESULT=$($VCLOUD_HOME/cell-management-tool -u $VCDUSER -p
$VCDPASS cell -shutdown)
done
echo $(service vmware-vcd status)
fi
;;
*)
echo "Status :: $STATUS :: don't know what to do"
;;
esac
How it works...
Let's see why we have built the preceding program in the first place. We can shut down the
vCD VM using vCenter, by using the command service vmware-vcd stop.
Using the service command to shutdown vCD has a disadvantage: it just stops vCD
regardless of operations that are currently under way. In the user manual of vCloud, the
proper shutdown of a vCloud cell is shown using the cell-management-tool tool.
187
For More Information:
www.packtpub.com/vmware-vcloud-director-cookbook/book
Working with the vCloud API
The cell-management-tool tool is found in the /opt/vmware/vcloud-director/
bin/ directory. You require a vCD SysAdmin account to operate it. To shut down vCD
properly, you first have to quiesce the cell by using the command cell-management-tool
-u VCLOUDUSER –p VCLOUDPASS cell -quiesce true.
Where VCLOUDUSER is your vCD SysAdmin account, just the account no @System is
required and VCLOUDPASS is the corresponding password. After you quiesce the cell, you
should check if any jobs are still running by using the command cell-management-tool
[user and pass] cell –status.
When the Job Count reaches zero, you can shut down the cell by running the command cellmanagement-tool [user and pass] cell –shutdown.
Now, you can check the status of the vCD cell with the command service vmware-vcd
status.
After the cell is shut down, you can do the maintenance of the VM or shut down the VM.
Starting vCD is always via the command service vmware-vcd start.
However, if you have just updated vCD or recovered from an error, it is advised to
monitor the messages log; the best command for that is Tail –f /opt/vmware/vclouddirector/log/vcloud-container-debug.log.
For more information refer to Chapter 8, Troubleshooting vCloud.
There's more…
Another slightly annoying problem with scripts is that they contain the SysAdmin password of
vCD in clear text. There are a lot of ways around that; here is one of the easiest while not the
most secure:
1. Create a text file with the vCloud SysAdmin password in clear text. Save it in the /
opt/vmware/vcloud-director directory. Give it permissions that only root can
read (700 root:root); you can also hide it by using . at the beginning of the filename.
2. Then add the following lines at the beginning of the preceding script:
PWFILE=/opt/vmware/vcloud-director/.pwfile
if [[ ! -f $PWFILE ]];then
echo "No pwfile found"
exit
fi
3. Now, replace every occurrence of -p $VCLOUDPASS with -p 'cat $PWFILE'.
188
For More Information:
www.packtpub.com/vmware-vcloud-director-cookbook/book
Chapter 5
Adding ISO files to vCD automatically
Here is a good programming idea that you can now create. It's not easy, but a neat challenge
and a very useful little program to have a go at.
Getting ready
Choose a language or tool of your choice. If you don't have a preferred one, think about which
system will interact with the program or which platform you will be running the script under.
How to do it...
First, we need to define what the program should do:
We want to upload a .iso file from the local disk of your desktop
We want to add the .iso file to a catalog in vCloud
Here are the programming steps you need to do:
1. Create an object that contains the media filename and location as well as the
type ISO.
2. Get the OvDC reference where the catalog we want to upload is stored.
3. Get the catalog reference.
4. Upload the media to the catalog.
5. Wait for the task to finish.
How it works...
To learn a programming language and an API is hard. The first reference you should consult is
the API reference of vCloud. I normally start with the REST API as it shows me what is possible,
whereas the specific language references show me only what has been implemented as
methods so far.
I found people who posted programs that uploaded media in Powershell and PHP. Doing it in
vCO isn't that difficult because there is already a workflow you can use as a base.
Why do I think this is a useful little program? Think about a loop you could
put in there and upload all the ISOs into one library; then go home while
everything is being automated.
189
For More Information:
www.packtpub.com/vmware-vcloud-director-cookbook/book
Where to buy this book
You can buy VMware vCloud Director Cookbook from the Packt Publishing website:
.
Free shipping to the US, UK, Europe and selected Asian countries. For more information, please
read our shipping policy.
Alternatively, you can buy the book from Amazon, BN.com, Computer Manuals and
most internet book retailers.
www.PacktPub.com
For More Information:
www.packtpub.com/vmware-vcloud-director-cookbook/book