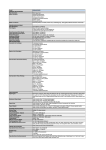
1
Dear Customer, Thank you for using information provided on our website. You can check the latest prices and place orders for products contained in this document by visiting our website at: http://www.partxpres.com Information contained in this document was provided by the product manufacturer or service provider. Although great care has been taken to ensure correctness and relevance of the information, PARTXPRES does not assume any responsibility or liability for the information contained herein. Customer Service PARTXPRES TECHKON Manual Scan-Measurement-Device SpectroJet Software ExPresso 3 TECHKON manuals, technical documentation and programs are copyrighted. Reproduction, translation or transfer to an electronic medium – in whole or in parts – is prohibited. TECHKON software is the intellectual property of TECHKON GmbH. Purchase of the software grants the user a license for the use on one computer only. Programs may only be copied for back-up purposes. TECHKON can not be held liable for any damages that may occur by the use of the software. The TECHKON team takes great care in producing this manual. Nevertheless, we can not fully guarantee the complete absence of errors. TECHKON GmbH and the authors can not be held liable neither for any possibly incorrect statements nor their consequences. Products that are not made by TECHKON GmbH are mentioned for information purposes only and such statements do not represent trademark infringement. All registered trademarks are recognized. TECHKON products and product names are registered internationally under several intellectual patents and trademarks. Specifications can be subject to change without notice. Version 1.1, June 2010 You can reach us at the following address: TECHKON GmbH Wiesbadener Str. 27 • D-61462 Königstein / Germany Telephone: +49 (0)6174 92 44 50 • Telefax: +49 (0)6174 92 44 99 E-mail: [email protected] • http://www.techkon.com Welcome We welcome you among the worldwide community of users of TECHKON products. We are happy that you have selected this high-quality measurement instrument. It will be a valuable tool for your day-to-day quality control tasks. With this manual we invite you to learn how to use SpectroJet, the software ExPresso 3 and SpectroConnect. The manual is divided into four chapters: Chapter 1: General description of the measurement system Chapter 2: Installation of SpectroJet and the software ExPresso 3 Chapter 3: How to use SpectroJet and the software ExPresso 3 Chapter 4: How to use the Windows software SpectroConnect You will be fascinated how easy the system is to use.You will know how to work with SpectroJet after only a few minutes. The third chapter will show you detailed insight into the measurement functions. Please get the device registered by using the detachable registration card, which is the last page of this manual. That way we can keep you updated about product news. Please visit us as well on the internet at http://www.techkon.com. You will find useful information about the complete product range and new software versions. Do you have any suggestions for improvements or do you require information that goes beyond the contents of this manual? We will be glad to hear from you.Your suggestions or questions make an important contribution to the continuous optimization of our documentation and products. Your TECHKON Team Contents Chapter 1: General description of the measurement system 1.1 Product description............................................................................... 5 1.2 Packing list ............................................................................................. 9 Chapter 2: Installation of SpectroJet and the software ExPresso 3 2.1 Assembly of SpectroJet........................................................................ 10 2.2 Installation of the software ExPresso 3............................................ 11 Chapter 3: How to use SpectroJet and the software ExPresso 3 3.1 3.2 3.3 3.4 3.5 Operation of SpectroJet....................................................................... 12 Care and maintenance.......................................................................... 17 Software overview................................................................................. 20 Software settings.................................................................................... 23 Defining and running a print job........................................................ 40 Chapter 4: How to use the Windows software SpectroConnect Software description....................................................................... 62 Installation.......................................................................................... 62 Overview........................................................................................... 63 Software module “SpectroJet settings”....................................... 64 Device update................................................................................... 65 Software module “Export”............................................................. 66 Software module “ColorCatcher”............................................... 67 Software module “PhotoLab”........................................................ 68 Software module „MediaWedge“................................................. 71 4.1 4.2 4.3 4.4 4.5 4.6 4.7 4.8 4.9 Appendix: Technical specifications Manufacturer certificate EC-Declaration of Conformity Registration card Chapter 1 General description of the measurement system 1.1 Product description Accurate, fast and easy to use SpectroJet revolutionizes automatic measurements of print quality on print control bars, color wedges and test charts. Color measurement made easy: The compact measurement device is quickly guided by hand along the color bar. Tracking wheels on the bottom of the device ensure a secure and straight run. At longer distances the device can be slid along a guiding track. The measurement data is transferred simultaneously to a PC in order to control the color quality of the printing press. All-purpose device Thanks to the modular concept of SpectroJet it can be used for any printing process and quality standard. ISO 12647, PSO, Fogra media wedge, Gracol G7™ or any other standardization method can be applied: SpectroJet will always deliver all relevant measurement data necessary for evaluating high quality prints. The supplied software TECHKON SpectroConnect displays clearly all measurement values on the computer screen, which are transferred by SpectroJet via an USB connection. All measurement values can be exported as well into other applications, such as Microsoft Excel™ for example. The additionally available software TECHKON ExPresso is especially suited for the evaluation and documentation of the print quality according to various quality control methods, e. g. ISO 12647 or Gracol G7™. ISO compliant measurements By software command a physical polarizing filter can be inserted which is the precondition for conforming to the print standards. Multiple functions – color densities, colorimetry, printing contrast, gray balance, dot gain or ink setting recommendations – SpectroJet is a versatile and valuable tool for achieving highest print quality and boosting the productivity of a printing press. Manual TECHKON SpectroJet Chapter 1 – General description Page 5 All advantages at a glance: Easy to handle Easy to install • forautomaticmeasurementsofcolorimetric values, densities, dot gain, printing contrast and gray balance • TECHKONExPressoPC-softwarecan be operated with or without the touchscreen • installationismadewithinseconds • measurementdeviceismaintenance free • robustdesignforreliablefunctionin a harsh industrial environment Modular and compact Complete measurement information • workswithanysheetorpressformat • space-savingmeasurementdevicefits on any table • alsooninclinedtablesperfectlyto handle • deliverycontainsallcomponentssupplied in a practical carrying case • anycolorbarcanbemeasured (patch size has to match aperture size) • colorbarcanbeatanylocationonthe printed sheet • nolimitationonpaperthickness • universallydesignedforISO12647 (PSO), Gracol G7™ or any other quality standard • idealforreadingFogramediawedge and similar color control targets Page 6 Manual TECHKON SpectroJet Chapter 1 – General description Accurate Fast • precisespectralengineinpatented measurement head with automatically insertable polarizing filter for easy positioning conforming to ISO and DIN standards (e. g. CIE L*a*b*- and ∆E-measurements) • UVcutfilteroptionavailable • highresolutionspectralmeasurement of a complete color bar within seconds (e.g. 500 mm in only 3 seconds!) • informationoverviewdisplaysrelevant parameters for quality control in realtime The perfect tool for spotand scan-measurements. The guiding track SpectroJet Track, which is optionally available, supports the accurate scanning of long color bars. TECHKON SpectroJet is delivered as a complete turn-key system. Within a few minutes the system is up and running. One unique feature of SpectroJet is its flexibility to be used with any press type or format. Manual TECHKON SpectroJet Chapter 1 – General description TECHKON SpectroJet is the ideal extension to TECHKON’s renown hand held instruments: SpectroPlate is the perfect tool for accurately reading printing plates and SpectroDens is the mobile, multi-purpose spectro-densitometer, which can be used at any location. Page 7 Dimensions 70 mm 135 mm Two different performance packages The scan-measurement device SpectroJet and the MS-Windows software ExPresso form a complete quality control system for increasing productivity and quality of a printing press. There are two different versions available: SpectroJet + ExPresso Basic consists of the spectral measuring device SpectroJet and the MS-Windows software ExPresso Basic with the following functions: • inkzonespecificdensitydisplay • colordensityforCMYKandspotcolors (spectral density) • measurementdataexport • densitometricgraybalance • dotarea,dotgainandprintingcontrast • slur/doublingvalue • targetvalues,references,tolerances, OK sheet • face-andreverseprinting • workswithanycolorbarlength • displayofsinglemeasurementswhen used as a hand held device • statisticalanalysisandreport • supportsupto6printingunits Page 8 SpectroJet + ExPresso Pro contains the same functions as the “Basic” package and additionally: • inkzonespecificcolorimetric ∆E*a*b* display, CIE L*a*b*, ∆L*a*b*, L*C*h*, ∆L*C*h* • “InkCheck”recommendationforink key setting • displayandevaluationaccordingto ISO 12647, Gracol G7™ generator • supportsupto16printingunits A post-purchase software-upgrade from the Basic- to the Pro-version can be done easily. Manual TECHKON SpectroJet Chapter 1 – General description 1.2 Packing list The carrying case protects SpectroJet and parts Contents of delivery: • measurementdeviceSpectroJet • whitestandard,ACadapterwithuniversalplugs, USB cable, carrying case • CDwithsoftwareSpectroConnect • printcontrolstripTECHKONTCSDigital • manualwithISO9000certificate System requirements for TECHKON software: MS-WindowsXP,Vistaor7. Optional accessories: • SpectroJetTrack:horizontaltrackwithtwoverticalbars Standard length: SpectroJet Track 52 (520 mm), 74 (740 mm) or 102 (1020 mm). Special lengths on request • softwareTECHKONExPresso delivered on CD with software protection key (USB-dongle) • printcontrolstripsTECHKONTCS,availableasEPS-andpdf-filesonCD (canbedownloadedfreeofchargeathttp://www.techkon.com) • software-upgradesfromExPressoBasictoExPressoPro Manual TECHKON SpectroJet Chapter 1 – General description Page 9 Chapter 2 Installation of SpectroJet and the software ExPresso 3 2.1 Assembly of SpectroJet SpectroJet is a solidly designed measurement device which is very functional and easy to use. It is compact in size; the buttons can be reached with the right index finger when the device is held with the right hand. The LED row is always visible. A great advantage of SpectroJet is the fact, that it can be easily positioned on the measurement sample. Measurement head Green measurement button LED row Tracking wheels Stop rail for guiding track Grip zone USB connector Device label with serial number at the bottom of the device The device incorporates a high-resolution spectral sensor which analyzes the color spectrum of the measured sample. The spectral data is the base information for calculating densitometric and colorimetric data which is displayed. Densitometric values can be solid density, dot area, dot gain or trapping values. Colorimetric values are typically CIE L*a*b*- or ∆E-color information. The USB-connector is for linking with a PC. The self-locking push-pull-connector fits into the socket at the back of the device. Page 10 Manual TECHKON SpectroJet Chapter 2 – Installation 2.2 Installation of the software ExPresso 3 System requirements: • PCwithMS-WindowsXP,Vistaor7 • 2USBports • Screenresolution:1024x768or higher The software is optimized to be operated with a touch sensitive screen (forexample:Elotouch1715L17"). However, working without a touchscreen by using a conventional mouse / trackpad and keyboard is also possible. Recommended color bar: Print control strip TECHKON TCS Digital (includedwithExPresso3software). Installation: It is important to carry out the following steps in the right order, to make sure that the USB device drivers will be installed properly. 1. Make sure that SpectroJet and the USBdongle(softwareprotectionkey)areNOT connected to the PC. Insert the TECHKON CD into the CD drive of the computer. (You willfindtheCDatthebackofthemanual). 2. Select “ExPresso Installation” from the menu. The installation routine will start automatically. Follow the steps of the installation, until it is completed. 3. Now, after the installation was finished successfully you can connect SpectroJet with the USB cable and the USB-dongle to the PC. 4.TECHKONExPressocannowbelaunched. Manual TECHKON SpectroJet Chapter 2 – Installation Page 11 Chapter 3 How to use SpectroJet and the software ExPresso 3 3.1 Operation of SpectroJet Installation of SpectroJet 4. 3. 1. • Connectthepush-pull-connector(1.)of the included data cable with the socket at the backofthedevice.Pleasemakesurethatyou connectthecableproperly.Thereddots(2.) on the connector and the socket will guide you.Theconnectorhastosnapinaudible. Tip:Disconnecttheconnectorfromthedevice,bygraspingtheflutedareaatthefront oftheconnector.Thusthemovablepartof theconnectorwillshiftbackwhenpulled andtheadjustmentoftheconnectorinthe socketwillbereleased. Data cable • ConnecttheUSB-connector(3.)atthe otherendofthecablewiththePCandthe secondbranchofthecable,whichendsin aphonesocket(4.),withthephonejackof theACadaptercable.NowconnecttheAC adaptertothepowernetwork. 2. Push-pull-connectionofSpectroJet WhenthegreenLEDinthemiddleofthe LEDrowisflashing,SpectroJetisreadyfor use. Toswitchoffthedevice,youjusthaveto disconnecttheACadapterfromthepower network. UK USA Europe TheAC adaptercanbeuseduniversallyfor 100–240Vandafrequencyof47–63Hz. Therearethreeadapterplugsfordifferent countries.Forchanging,justpulltheplugand pushinthenewone.Make sure that the plug adapterhasatightfitanduseonlytheoriginalTECHKONSpectroJetACadapter. ACadapterwithuniversalplugs Page 12 Manual TECHKON SpectroJet Chapter 3 – How to use SpectroJet Guiding track SpectroJet Track (Accessory) TECHKONoffersoptionallytheguidingtrack SpectroJetTrackindifferentlengths,which matchestothemostcurrentprintingsheet formats. Fortheinstallationyouneedtheholder,the guidingtrackandthetwometalbars. Guiding track SpectroJet Track • Firsttaketheincludedscrewdriverandattachtheholdertothestoprailatthebackof theSpectroJetdevice. • Nowthetwoverticalmetalbars,having self-adhesivetapeonthebackside,areattachedtothetableorconsole.Thedistance ofthemetalbarsfromeachotherisgivenby thelengthoftheguidingtrack.Thevertical barsshouldatonesidepreferablyflushwith thelay-onedgeofthetable. • Makesure,thattheverticalbarsareparallelandwellalignedinordertoholdtheleft andrightendoftheguidingtrack,whichwill attachmagneticallytotheverticalbars. • FinallymountSpectroJetwiththefixed holderontotheguidingtrack. Adjustment of the tracking wheels Theresistanceofthetrackingwheelsatthe bottomofthedevicecanbeadjusted. 1. • InsertanAllenkey(1,5)intothelittle hole(1.)whichislocatednearthedevice labelwiththeserialnumberatthebottom ofSpectroJet.Whenyouturnthescrewkey clockwiseyouwilldecreasetheresistance. Turningthescrewkeyanticlockwisewillresultinahigherresistance. ThusyoucancustomizethemovementcharacteristicsofSpectroJettoyourpreferred wayofworkingwhenusingthedevicein scanningmode. Manual TECHKON SpectroJet Chapter 3 – How to use SpectroJet Page 13 Scan measurements • PlaceSpectroJetonthecolorbarwith themeasurementaperturejustaheadofthe firstsection,youwanttomeasure.Pressthe greenmeasurementbutton.Afteranacoustic signalantheilluminationofthewholeLED row,starttoscanthecolorbaratconstant speed.Afterthefirstmeasurementrunyou havecompletedthedensitometricmeasurementanyouwillhear,thatthepolarization filterisswitchedoffforthecolorimetric measurement. • Nowmovethedeviceinaconstantspeed backtothepointwhereyoustartedthe measurement. Ifdensitometricmeasurementswithout polarizationfilterarecarriedout,onlyone measurementrunisnecessary(whichisthe standardpracticeintheUSA). Thefasteryoumovethemeasurement devicealongthecolorbar,themoreofthe greenLEDswilllightupintheLEDrow. WhentheorangeLEDflashesup,thelimit rangeofthespeedisreached. IfthespeedwastoohighandSpectroJetwas notabletoreadallmeasurementpatches, theredLEDattheendoftherowlightsup together with three acoustic signals and the softwaredisplaysthatthemeasurementprocedurehasbeenaborted.Inthatcaserepeat themeasurementatlowerspeed. Ifthemeasurementwascarriedoutsuccessfullyashortdoublesignalcanbeheardand themeasurementdataarecapturedbythe software. Makesurethatthemeasurementheadis alignedexactlywiththecolorbar. Page14 Manual TECHKON SpectroJet Chapter 3 – How to use SpectroJet Heretheoptionalavailableguidingtrack SpectroJetTrackisahelpfultool. • Whenusingcolorbarswithapatchheight smallerthan4,5mm,theedgeofthemeasurementheadofthedevicehastobeplaced exactlyattheupperedgeofthecolorbar,to ensurethatthemeasurementheadispositionedcorrectlyonthepatches. • Whenusingcolorbarswithapatchheight higherthan4,5mm,themeasurementhead hastobeplacedwiththemeasurementapertureatthebottomedgeofthecolorbar. Spot measurements • Tocarryoutaspotmeasurementjustpositionthedevicewiththemeasurementhead onasinglemeasurementpatchandpressthe greenmeasurementbuttonshortly. DuringthemeasurementprocessallLEDs flashupsimultaneously.Adoublesoundconfirms,thatthemeasurementiscompleted andthemeasurementdataaredisplayedby theExPressosoftwareinthewindow“Spot measurement”. How to measure Pleaseensurethatthedevicealwayshasafirmstandonasolidandflatsurface.The rubberwheelspreventthedevicefromslippingintheverticaldirection. Theremust notbeadistancebetweenthemeasurementheadandthesamplewherelightcould passthrough,becausethiscaninfluencethemeasurement.Thecolorofthebackgroundmaterialunderneaththemeasurementsamplecanhaveaninfluenceonthe measurementresult.Differenttechnicalstandardsdescribewhichbackingmaterialto use.Intheprintingindustrythefollowingprocedureiswidelyused:Whitebackingfor singleprintedpapersandblackbackingfordoubleprintedsheetsinordertoavoid thatthebackprintedsidemightshinethroughthepaperandinfluencethemeasurement. Manual TECHKON SpectroJet Chapter 3 – How to use SpectroJet Page15 Paper white calibration Apaperwhitecalibrationcanbecarriedoutbykeepingthegreenbuttonpressedfor afewseconds.Themeasurementaperturehastobepositionedonanon-printedarea ofthesheet. Absolute white calibration The absolute white calibration is carried out on the absolute white standard which is included.SpectroJetmustbeplacedonthestandard,withthemeasurementaperture ontheceramictile.Makesurethattheceramicwhitestandardiscleanandnotdefective. AbsolutewhitestandardofSpectroJet Page16 • ChooseintheExPressoSoftwareunder “Settings Measuring conditions Measurementdevices”thebutton“Settings”and presstheninthe“Measurementsettings” windowthebutton“AbsoluteWhiteCalibration”.SpectroJetwillconfirmthecalibration withanacousticsignalandtheExPressosoftwaredisplaysthatthecalibrationwascarried outsuccessfully. Manual TECHKON SpectroJet Chapter 3 – How to use SpectroJet 3.2 Care and maintenance SpectroJet is a highly-precise optical instrument. It is designed to work in harsh, industrial environments. However, it should be handled with care. Avoid mechanical shocks, heat, dusty or humid environments. Cleaning Although the measurement head with the optical system is sealed against dust and dirt, take care that the visible, open measurement aperture is always free of dust. You can clean the measurement aperture with oil-free, clean compressed air and a brush used for cleaning photographic equipment. Clean the device casing only with a soft cloth and a non-aggressive plastic cleaner. Never use alcohol or chemically aggressive solvent-based cleaners which can destroy the surfaces. The same procedure is valid for the white standard. A soft cloth made of microfibers is especially well suited for cleaning the white ceramic tile. If the white standard should be defective, it has to be replaced completely. Clean the rubber of the tracking wheels regularly with a cloth. Do not use aggressive cleaners for this procedure. Please do not stick any labels at the bottom of the device. This could lead to faulty measurements, because the defined distance – which is important for the correct optical field of depth – might not be maintained. Manual TECHKON SpectroJet Chapter 3 – How to use SpectroJet Page 17 Exchanging apertures Themeasurementaperturecanbereplacedforcleaningpurposes.AspecialscrewdrivertypeTORXT6isrequiredandwhichisincludedintodelivery. • Forthedisassemblyandassemblyoftheapertureturntheinstrumentupsidedown. Useasoftclothasprotectivelayertoavoidanyscratchesofthecase-surface. • AftereachcleaningoftheapertureanewwhitecaIibrationhastobecarriedout. 1. Releasethetwoscrewscompletelyso theycanbetakenout.Nowtheaperturecan beliftedfromthemeasurementhead. 2. Whendisassemblingorassemblingan aperture take care that no dust enters the opticalelements.Donotpressthescrews tootightinordertoavoiddamagingthe threads. Page 18 Manual TECHKON SpectroJet Chapter 3 – How to use SpectroJet Error handling • Should SpectroJet do not work properly, first check, if the ExPresso software is running correctly. The status bar in the lower right corner will display if the device communicates correctly with the PC. Restarting the software ExPresso is also recommended when a problem occurred. • Check that the right measurement device is selected in the software settings. • Check if the AC adapter is connected correctly to the mains plug and the device. When connected properly, SpectroJet shows a flashing green LED in the middle of the LED row. Warranty The warranty for TECHKON products is 24 months starting with the date of purchase. The invoice is the certificate of warranty. The warranty is invalid if the damage is caused by inadequate use of the device. Should a TECHKON product do not work according to the specification, please contact us before sending us the device. In most cases we can solve the problem over the phone or via E-mail. Inspection intervals TECHKON SpectroJet is maintenance free. We recommend to validate the complete functionality of the devices in a 24 months time interval in the TECHKON service center. We offer a complete device check as a service package. Please contact us for details. For a flat fee the device will be cleaned, checked and recalibrated. In case a repair or exchange of components should be necessary we will inform you. Please send the device always securely in the carrying case with complete accessories. Manual TECHKON SpectroJet Chapter 3 – How to use SpectroJet Page 19 3.3 Software overview ThesoftwareExPressoisclearlystructured. Themenubarcomprisesthethreesections“Printjob”(bluebuttons),“Settings”(yellowbuttons)and“Exit”(graybutton). Theappropriatesubmenulayersfollowthiscolorsystempersistently. Print job: P.40 P.41 P.41 P.42 P.43 P.45 P.47P.50(GrayGuideP.51) P.47 P.56 *ExPressoProonly Page 20 P.52* P.53* P.56* P.57* P.59 P.60 Manual TECHKON SpectroJet Chapter 3 – How to use SpectroJet Settings: P.26 P.26 P.31 P.38 P.27 P.29 P.31 P.33 P.36 P.37 P.38 Exit: P.61 Manual TECHKON SpectroJet Chapter 3 – How to use SpectroJet Page 21 Byclickingonthedeviceiconintherightsectionofthemenu bar(1.),onegetsa directaccesstoimportantdevicesettings.Awindowisdisplayedwiththesubmenus “Measurementdevice/Update”,“Measurementsettings”and“Exporttootherapplications”(seep.33–35). Belowthemenubartheprogram window(2.)isdisplayedwhichisactivatedbythe appropriatemenuitem. Thefollowingexampleshowstheprogramwindow“Density”afterameasurement wascarriedout.Inthisprogramwindowaclickonthebargraphopensasecond windowdisplayingdetailedmeasurementdataoftheinkzones. The command line(3.)oftheactiveprogramwindowislocatedatthebottomof theprogramwindow. 1. 2. 3. 4. Thebottomareaofthescreenisastatus line(4.),showingtheconnectionstatusof themeasurementdevice(SpectroDrive,SpectroDriveSimulatororSpectroJet)and oftheUSB-dongleattherightside.Whenmovingthemousepointerontheicons ofoneofthesecomponents,yougetadditionalinformation,e.g.thedensity-and colorimetric-settingsofthedeviceorthesoftwareversion. Page 22 Manual TECHKON SpectroJet Chapter 3 – How to use SpectroJet 3.4 Software settings WhenthesoftwareisstartedbyadoubleclickontheTECHKONExPressoicon,the softwareroutinechecksfirst,whiledisplayingtheintroicon,whetherameasurement deviceandadongleareconnected. Ifthesoftwaredoesnotdetectanymeasurementdevice,aninformationwindow requestsyoutoconnectthemeasurementdevicetothePCortoselectanother measurementdeviceoutofthesettingsmenu.Inthemenuitem“Settings Measuring conditions Measurementdevices”thereisalsotheoption“SpectroDriveSimulator”toyourdisposal.Pleasekeepinmind,thatthesimulatorprovidesonlyvirtual measuringdatafortest-anddemo-purposes. Manual TECHKON SpectroJet Chapter 3 – How to use SpectroJet Page 23 If youhavenotdefinedanyprintingmachineinthemenusection“Settings Printing conditions Presses”uptonow,youwillseethefollowinginfowindow: Youcansetupaprintingmachinewhichfitstoyourprintjob,byclickingonthe “New”buttoninthemenuitem“Presses”.Whenithasbeeninstalledandsaved,the newprintingmachineappearsinalistingintherightsectionofthemenu,whereitis athandifyouwishtochangethepresssettingslater. 1. 2. 3. Page24 Manual TECHKON SpectroJet Chapter 3 – How to use SpectroJet Certain settings are done only once, after the software is installed or have to be changed only occasionally when fundamental parameters have altered. For example the menu language, the selection of the measurement device or the definition of a new printing press will be set once and do not have to be set for each and every print job to be carried out later. This kind of settings is made by pushing one of the yellow “Settings” buttons (1., p. 24) and then selecting one button from the sublayer (2., p. 24). The referring window opens (3., p. 24) and can be edited. All settings which were made, can later be recalled when defining a “Print job”, where the screen will appear in blue color. When you start ExPresso, the sublayers “Make ready”, “Measure” and “Analyze” in the section “Print job” are shaded an can not be activated until you have set up all necessary informations concerning your printing- and measurement-conditions in the “Settings”. Finally you have to click on the “Select” button in the “Print job” section to define or select a print job. Now all menu items in the “Print job” section can be used. Manual TECHKON SpectroJet Chapter 3 – How to use SpectroJet Page 25 The following settings can be made in the “Printing conditions” section: Printing conditions – Presses • Name: • Manufacturer: • Type: • Numberofprintingunits: • Numberofinkzones: • Inkzonewidth: • Reversingafter printingunit: textboxtodefineanameoftheprintingpress textbox(notmandatory) textbox(notmandatory) 1–6forExPressoBasic,1–16forExPressoPro max.100 inmm,max.100mm iftheprintingpresshasareversingunit,thelocation canbeset Youcansetupnewprintingpresses(seep.24)andeditordeletetheoneswhichare alreadydefinedandlistedintherightsectionofthe“Presses”window. Tip:Bydoubleclickingononeoftheprintingpresseswhicharelistedintheright sectionofthemainwindowyouswitchdirectlyintotheappropriate“Edit”window. Youfindthispossibilityofquickeditinginallofthe“Printjob”-and“Settings”-windowswhichcontainsuchlistings.Theorderofthelistedelementscanbechangedby clickingintheheaderoftheregister. Page26 Manual TECHKON SpectroJet Chapter 3 – How to use SpectroJet Printing conditions – Inks Thelistofinksincludedinthedatabaseisdisplayed.ThefourprocesscolorsC,M,Y andK(1.)arepre-installed.TheyarestoredinthecolorbookCMYKandarealready markedbyascreencolor.Thefourprocesscolorscannotbedeletedorduplicated. Butitispossibletoeditfurtherinksandtoimport,duplicateandexportthem. Byusingthe“Export”functionyoucanhandoverindividuallyeditedinksandcolor bookseasilytoanotherprintingmachine. 1. 2. Thedefinitionofnewinksmakesitpossibletoeditandmeasurecustomaryspot colors,forexamplethecolorsofaHKScolorbook. • Firstclickonthe“New”button“(2.),toopenthewindow“Definenewink”. Manual TECHKON SpectroJet Chapter 3 – How to use SpectroJet Page27 1. 2. 3. 4. 5. • Nowenteraninkname(1.)forthespotcolor.Additionallythemanufacturer(2.)canbe defined. • Youcanchooseanalreadyexistingcolorbookforthenewinkorgenerateanewone. Youeditanewcolorbookbyclickingonthebutton“Editcolorbooks”(3.).Inthewindow whichopensnowyouchoose“New”,enteranameforthenewcolorbookandconfirmthe processwith“OK”. • Choose“Maximumdensity“(4.)fordensitychannelforspotcolors. • Nowclickonthegreenarrowtoactivatethe“Measure”function(5.),afteryouhaveplaced themeasurementheadofthedeviceonthecolorpatchyouwishtomeasure.Theprocedure willbecarriedoutandthesoftwareaddsascreencolortothenewink. • Completethedefinitionofthespotcolorbypressingthe“Save”button.Thenewinkappears nowintheinklistintherightsectionofthe“Inks”menu. Thusanycustomaryspotcolorsorindividualcolorscanbemeasuredandaddedto theinklisting. Page 28 Manual TECHKON SpectroJet Chapter 3 – How to use SpectroJet Printing conditions – Color bar Inthismenusectionthelistofcolorbarsincludedinthedatabaseisdisplayed.We recommendtheuseoftheTECHKONTCSprintcontrolstrips,becausetheirdesign isbasedoninkzonesandcoversallrelevantmeasurementpatches.Otherdefinitions canbeloadedbyusingthe“Import”function. Butnotonlyalreadyexistingcolorbarscanbeusedandedited.Youcanalsogenerate yourownprintingdefinitionsinExPresso. Pleasenotethattheusedcolorsareonlyplaceholdersfortheprintedcolorsinthe printjob. Whenyouclickthe“New”buttoninthe“Colorbar”menu,thewindow“Newcolor bar”opens. 1. • Editthetextboxes“Name”,“Manufacturer”,“Numberofinks”,“Patchwidth”and“Inkzone width”.Thenclickonthe“Editpatches”button(1.). Manual TECHKON SpectroJet Chapter 3 – How to use SpectroJet Page 29 Thewindow“Editcolorbarpatches”opens,whichisdividedintothethreesections “Settings”(1.),“Colorbarpatches”(2.)and“Information”(3.). 1. 2. 3. 4. 5. 6. • Firstdefinethreepercentagevaluesforthedotpercentagepatchesandthreeforthebalancepatch(4.),whichbotharelistedin“Colorbarpatches”. • Inthesection“Colorbarpatches”nowsuccessivelycompileyourindividualcolorbarby clickingonthecolorbarpatches.Thecolorbarwhichyouarecreatingisdisplayedinthelower partofthewindow(5.). • Ifyouedited8in“Numberofinks”intheprevious“Newcolorbar”window,nowyouhave thefourprocesscolorsC,M,Y,Kaswellas4spotcolorsatyourdisposal.Eachofthesecolors isgivenassolidink,dotpercentagevalueandslur/doublingpatches.Thebottomlineoffersa balancepatch(BAL),thetrappingpatches(C+M,C+YandM+Y),acalibrationpatch(CAL)and anemptypatch(NO). • Accidentallysetcolorbarpatchescanbemarkeddirectlyinthecolorbar(byslidingover themwiththemousebuttonpressed)andthendeletedbyclickingonthe“Deleteselected patches”button.Toaddpatcheslater,youcansetwithamouseclickamarkerinthecolorbar. Totheleftofthismarkerthenewpatcheswillbefilledin. • Finallythe“Save”-buttonwillsavethecurrentlygeneratedcolorbar(6.)anditwillbelisted automaticallyinthefirstplaceofthealreadyexistingcolorbars. Page 30 Manual TECHKON SpectroJet Chapter 3 – How to use SpectroJet The following settings can be made in the “Measuring conditions” section: Measuring conditions – Target values / Tolerances Alistofdatasetsfortargetvaluesandtoleranceswillbedisplayed.ItisbasedonISO 12467colorvaluesforCMYK.Individualtargetandtolerancesettingscanbemadeas well–alsoforspotcolors. • Clickonthe“New”button(1.)intherightmenusectionbelowthealreadylistedtarget values.Anewwindowopenswhereyoucanenterthenameofthenewtargetsetyouwant togenerate.Confirmtheprocesswith“OK”.Thenewtargetsetwillappearinthelistofthe alreadydefinedtargetsetsinthemenuwindow(2.),butitdoesnotyetcontaincolors. 2. 1. Manual TECHKON SpectroJet Chapter 3 – How to use SpectroJet Page 31 • Nowclickonthe“New”button,whichyoufindonthelowerleftsideofthemenuwindow. Thewindow“Targetvalues/tolerancesforink”appears. • Choosefromthepull-down-menuthe“Inkname”(1.)ofacolor,whichyouhavealready definedin“Settings” Printing conditions Inks”(seep.27). • Additionallyyoucanchangethetargetvaluesandtolerancesofthiscolormanuallybyediting thetextboxesortakethemeasurementdataofSpectroJetbypressingthe“Measure”button (2.). 1. 2. • Confirmthecolorandeventuallysetchangeswith“OK”.Nowthecolorappearsintheleft sectionofthemenuwindowandisaddedtothenewtargetset. • Thusproceedwithallthecolorswhichyouwanttoaddtoatargetset. • Alreadyexistingtargetsetscanbeduplicated,renamed,importedandexportedbyusingthe buttonsinthelowerrightsectionofthe“Targetvalues/Tolerances”window(seepictureon p.31).Thetargetsetsofthefivepaperclassescannotbedeleted. Page 32 Manual TECHKON SpectroJet Chapter 3 – How to use SpectroJet Measuring conditions – Measurement devices ThetypesofmeasurementdeviceswhichcanbeconnectedtotheExPressosoftwareareshown.Whenyouhavechosenthetypeofdeviceyouwishtoconnect,an informationwindowisdisplayedattheleftsideofthewindow.Hereyougetfurther informationabouttheactualdeviceandtheconnectionstatus. Byclickingonthe“Settings”buttonintherightlowercorner,ofthe“Measurement devices”menu,thewindow“TECHKONSpectroJet”opens,whichisdividedinto threesectionsandoffersbasicsettingsoptions. 1. 2. The“Measurementdevice/Update”windowshowsallrelevantinformationconcerningtheconnecteddevice(1.). Thebutton“Startdeviceupdate”(2.)establishestheconnectiontotheharddisk levelofthePCandenablesthechoiceofthedirectory,inwhichtheupdatefileis located. Manual TECHKON SpectroJet Chapter 3 – How to use SpectroJet Page 33 Youcandownloadthelatestfirmwareforyoudevicefreeofchargeintheinternet: www.techkon.comServiceSoftwareFolder:SpectroJet/TECHKONExPresso TECHKONSpectroJetFirmware. ThefirmwareversionoftheconnectedSpectroJetcanbeseenintheinformation window“Measurementdevice/Update”. 1. 2. 3. 4. In“Measurementsettings”thefundamentalsettingsfordensity-(1.)andcolorimetricmeasurements(2.)aredisplayed. Thestandardpre-settingsfordensitymeasurementare • forEurope:polarizationfilteron,whitereferenceispaperwhite,densityfilteris ISOE • fortheUSA:nopolarizationfilter,whitereferenceisabsolutewhite,densityfilteris statusT. Youcanusethe“Densityadjustment/Slopecalibration”(3.)function,toadjustthe measurementdevicetothedensitymeasurementdataofotherdevices. • Selectthewindow”Densityadjustment/Slopecalibration”andfollowtheinstructions. Firstyouhavetocarryoutapaperwhitecalibrationonthepaperpatchofacalibrationchart Page34 Manual TECHKON SpectroJet Chapter 3 – How to use SpectroJet (whichisoptionallyavailable).Thenthereferencevaluesofthecalibrationcharthavetobeenteredintothetextboxesoftheprocesscolors.Nowthecolorpatches(CMYK)ofthecalibrationcharthavetobemeasured.Agreencheckmarkconfirmsthatthemeasurementwascarried outsuccessfully.Thenewdensityadjustmentissavedwith“OK”.Iftheprocedureiscancelledor the“Resetslopevalues”functionactivated,thedevicewillberesetintoitsfactory-madestate. Thepre-settingsforcolorimetricmeasurementsare:polarizationfilteroff,whitereferenceisabsolutewhite,illuminantisD50,observeris2°and∆EformulaisCIELAB. Onecanchooseotherstandardsbyclickingonthepull-down-menuifrequired. Thebuttons“Paperwhitecalibration”and“Absolutewhitecalibration”(4.onp.34) startthecorrespondingcalibration.Afterthecalibrationhasbeencarriedoutproperly,itwillbeconfirmedbytheinformationwindow. Withthismoduleyoucanmeasurewedgesandothermeasurementpatchesaside fromthecurrentlyselectedcolorbarandtransmitthevaluesintootherapplicationssuchasMicrosoftExcel™.Justswitchtoyourtargetapplicationandstartthe measurementatthedevice.Thevaluesarecopiedtothetargetapplicationusingthe clipboard. Manual TECHKON SpectroJet Chapter 3 – How to use SpectroJet Page35 Measuring conditions – Measurement export Aftereachmeasurement,thevaluescanbeexportedtootherapplications. Themostpopularexportformatse.g.CSV(MicrosoftExcel™)arealreadypreinstalled(1.). Intheleftsectionofthewindowfurtherinformationaboutthetargetfileandthe targetfolderaredisplayed(2.). Thebutton“Settings”(3.)opensawindowheadedbythenameoftheselected exportformat.Hereyoucaneditformatspecificsettings.Forexamplein“Digital InformationExport”youcanchoosebetweentext-andtheJDF-format. Forallexportformatstheoption“Automaticexport”(4.)canbeactivated. 1. 2. 4. 3. Page36 Manual TECHKON SpectroJet Chapter 3 – How to use SpectroJet Measuring conditions – GrayGuide targets If in“SettingsSystem/Software”theoptionGracolG7™wasselectedtobethe preferredGraymodedisplay(seepicturep.51),“Settings Measuring conditions GrayGuidetargets”opensnowamenuwindow,whichallowstoadjustthetarget valuesmanually. Graypatchesaswellastheautomaticpaperwhitecanbeedited.Ifrequiredallvalues canberesettotheG7™defaults. Tip: Thereisnoaccesstothesettingswindowsdescribedonpage33–35,whenin “Settings Measuring conditions Measurementdevices”SpectroDriveSimulator isselected.Thesimulatorisavirtualmeasurementdevicewhichcanbeusedfortests anddemonstrationswhennorealhardwaredeviceisconnected.The“SpectroDrive Simulator”willalsobeusedwhennosoftwareprotectionkey(dongle)isconnected andthesoftwarerunsindemomode. Manual TECHKON SpectroJet Chapter 3 – How to use SpectroJet Page37 The following settings can be made in the “System / Software” section: Themenuitemisdividedintothetwosections“Information”(1.)and“Settings”(2.). 1. 2. 3. Information: Displaysthetypeofsoftware(ExPressoBasicorPro),thesoftwareversion,the dongle-IDandifextensionmodulesareinstalled. Settings: • Touchscreensupport:Mustbeactive,whenatouch-sensitivescreenisconnected, toprovideavirtualkeyboardforthetextinput. Page 38 Manual TECHKON SpectroJet Chapter 3 – How to use SpectroJet • Graymodedisplay:Thisselectiondefines,whethertheanalysisofthegraybalance shallbecarriedoutdensitometricallyoraccordingtoGracolG7™. • Printer:Definestheconnectedprinterforprintingthereport. • Language:Setsthelanguage. Thebutton“Databasemaintenance”(3.,p.38)opensanewwindow,whereonecan decide,afterwhichperiodoftimetheprintjobswillbearchived(1.). Theoption“ArchivewhenexitingExPresso”canalsobeselected(2.). Furthermoreolderprintjobscanbearchivedinstantlybyapushofabuttonandin thesamewayalreadyarchivedprintjobscanberestored(3.). ThedatabaseislocatedontheharddiskofthePCintheExPressodirectory.When “Generatedatabasesafetybackup”(4.)isselected,theexistingdatabasewillbesaved underagivenname. Ifrequiredthestoreddatabasecanberestoredusingtheincludedrestoretool(5.). YouhavetoquitExPressoforthisprocedureandstartitagainafterthedatabasehas beenrestored.Restoringofthedatabaseleadstoanoverwritingoftherecentlysaved datainExPresso. 1. 2. 3. 4. Manual TECHKON SpectroJet Chapter 3 – How to use SpectroJet 5. Page 39 3.5 Defining and running a print job Beforerunningaprintjob,certainselectionshavetobemade.Everythingrelatedwith a“Printjob”isindicatedbythebluescreencolor. ExPressohasan“autosave”function.Every“Printjob”willbesavedautomatically.This appliesalsofor“Printjobs”whicharenotcompletedandwillberesumedlater. Select Thelist(1.)contains“Printjobs”whichhavebeenalreadymade.A“Printjob”canbe stoppedatanytimeandresumedlater. Aninformationbox(2.)ontheleftsideofthemenuwindowshowsataglancethe mostrelevantinformations:customername,dateandtimestampofthefirstandlast measurement,press,numberofthemeasurementsandtheselectedcolorbars(for thetopsideaswellasforthereverseside). 2. 1. 3. Page40 Manual TECHKON SpectroJet Chapter 3 – How to use SpectroJet The“Searchfor”functionsupportsthefastresearchforalreadyexisting“Printjobs”. Clickinginthe“Edit”button(3.,p.40)providesadirectaccesstothesubmenu“Print job MakereadyPrintjobinfo”. Tip:Newprintjobssimilartooldprintjobs,canbesetupbyduplicating.Thustime issaved,becausesettingscanbetakenover. ByusingtheduplicationfunctionalsoOK-sheetscanbetakenoverforrepeatedprint jobs. Make ready Certainselectionshavetobemade,beforethemeasurementscanbestarted. Make ready – Print job info Textualinformationabouttheprintjobcanbeeditedin“Printjobinfo”. Thetextenteredin“Printjobname”willbethetitleofthedataset,whichwillbeautomaticallysavedbyExPresso.Itcanbeselectedfromthe“PrintjobSelect”menu. Duringmeasurementsitwillbeshowninthelowerleftsectionofthestatusbar. Thesection“Customername”andatextboxfordetailed“Remarks”concerningthe printjobcanbeusedoptionally. Manual TECHKON SpectroJet Chapter 3 – How to use SpectroJet Page41 Make ready – Press / Inks Selectapress,whichyouhavealreadydefinedin“Settings Measuring conditions Presses”(seep.24and26)andfilltheprintingunitsvirtuallywithink(1.). 1. Aninkingunitcanbekeptemptyaswell(2.). Forexampleifa6-colorpressisusedonlyforCMYK-print,thelasttwoprintingunits canremainempty. 2. Page42 3. Manual TECHKON SpectroJet Chapter 3 – How to use SpectroJet Thepictureonpage42showsan8-colorpress,withtwoemptyprintingunits.Printingunitno.7containsthespotcolorHKS17K(3.),whatcanbeseenataglanceby thescreencolorandthecolornameontheprintingunit. Tip:Thevirtualfillingofthepresswithinkisnotnecessary,whenanalreadyexisting printjobwiththesamepressconfigurationisselectedin“PrintjobSelect”and duplicated. Make ready – Sheet / Color bar Assoonasthepressisfilledwithinkchoosing“PrintjobMakereadyPress/ Inks”,themenuitem“Sheet/Colorbar”isunlockedandselectable. 1. 1.Ontheleftsideofthewindowa“Colorbar”canbeselected,afterhavingbeendefinedor pre-installedin“Settings Printing conditions Colorbar”(seep.29f.). Manual TECHKON SpectroJet Chapter 3 – How to use SpectroJet Page43 If acolorbarisselected,whoseinkzonewidthdiffersfromtheinkzonewidthofthe selectedpress,awarningisdisplayed. Iftheselectedcolorbardoesnotcontainapaperwhitepatch,apaperwhitecalibrationhastobecarriedoutmanually,beforethefunction“Scancolorbarlength”can beused. Thegreenarrowlocatedleftfrom“Scancolorbarlength”indicatesthatthecolor barhastobemeasured.NowscanthecolorbarusingSpectroJet.Asadefault,the colorbarwillbecentrallyaligned. Additionallytheinkzoneforthefirstmeasurementcanbedefined.Usethearrow buttonsofthe“Startsininkzone”functiontodefinewhichinkzoneofthepresswill correspondwiththefirstzoneofthecolorbar(1.). Theselectedconnectionbetweenthecolorbarandtheinkzonesoftheprinting pressisalsoshowngraphically(2.). Usingthebuttons“totopside”and“toreverseside”(3.)youcanswitchbetween themeasurementofthecolorbarlengthfortop-andreverse-printing.Thisrequires thatapresswithareversingunithasbeendefined. Thegreenarrowdisappears,ifacolorbarlengthhasbeenscannedandcapturedsuccessfully. 3. 4. 2. Page44 1. Manual TECHKON SpectroJet Chapter 3 – How to use SpectroJet Thebutton“Changeplateassignment”(4.,p.44)opensanewwindow,wheretheassignmentofaprintingplateinregardtoaprintingunitcanbedefinedindividually. Achangeoftheplateassignmentisalwaysnecessary,whentheorderoftheinkshas beenchangedorifspotcolorsareused. InthefollowingexampleithasbeennecessarytoassigntheinkMagenta(1.)tothe spotcolorHKS17Kinprintingunitno.7.Thusthecolorbarwillfeatureameasurementpatchattherightposition,whichguaranteesapropermeasurementandanalyze ofthecolorbar. 1. Make ready – Target values / Tolerances Astheprintingunitshavebeenfilledwithink,nowtheyareassignedwithtargetand tolerancevalues;preferablytolerancesetsaccordingtotheprintingstandardISO 12647forthepaperclasses1–5,whicharealreadypre-installed. Manual TECHKON SpectroJet Chapter 3 – How to use SpectroJet Page45 1. 2. 3. Besidesthealreadypre-installedtargetsetsforthefivepaperclasses(1.),thelistcan alsocontainindividualtargetsets(2.),whichhavebeenalreadyeditedusing“Settings Measuring conditions Targetvalues/Tolerances”(seep.31f.).Theinformation boxontheleftsideofthemenuwindowshowsallcolorswhichbelongtoatarget setandtheirtargetvalues. Individualtargetvaluesandadmissibletolerancescanbeeditedandmeasuredfor eachprintingunit.Whenatargetsethasbeenconfirmed,justclickonthebutton abovetheprintingunit(3.).Itchangesintoan“Edit”button,whichopensthefollowingwindow: Page46 Manual TECHKON SpectroJet Chapter 3 – How to use SpectroJet Measurement of a print job Measure – Density Thisscreenwilldisplayallrelevantinformationafterascanmeasurement.Thescan measurementcanbestartedbypressingthegreenmeasurementbuttononthe device. 1. 3. 2. 1.Detailedinformationforeveryinkzonebypointingonthebargraph. 2.Measurementvaluesoutoftolerancewillbemarkedwithredtop. 3.Thissectiondisplaysindetailtheaveragevaluesofthemeasurementparametersofthe singleprintingunits. Manual TECHKON SpectroJet Chapter 3 – How to use SpectroJet Page47 Theinfosectionofthemenuitem densitymeasurementshowsindetailthe followingparameters: 1. 2. 3. 4. 5. 1.Soliddensity 2.Printingcontrast 3.Dotarea80% 4.Dotarea40% 5.Slur/doublingfactor Inthemeasurementmenus”Colorimetric” and“InkCheck”therelevantparametersfor thesemeasurementsaredisplayed. Red,yellowandgreendots,locatedahead oftheaveragevalues,showfundamental problems.Greendotsindicatevalueswithin thetolerance.Reddotsshowvaluesoutof tolerance.Valuesclosetothetolerancelimit (75%)aremarkedbyyellowdots. Structure of the command line 1.2.3.4.5.6.7. Onthebasisofthecommandlineofthemenusection“Printjob Measure Density”allcommandoptionswillbeexplained.Theorderandtheavailabilityofthe particularcommandoptionscanvaryinthedifferentmeasurementmenus,butthey havealwaysthesameeffect. 1.Thewhitepatchshowsaftereachmeasurementwhichwascarriedout,thenumberofthis measurementautomatically.Usingthearrowbuttonsonecannavigatethroughthealready mademeasurementsofaprintjob. 2.Clickingonthebuttonwiththeprintericonopenstheconnectiontotheprinter,whichhas beenalreadydefinedin“SettingsSystem/Software”.Theprinteroptionallowstoprintout thedisplayedwindow. Page48 Manual TECHKON SpectroJet Chapter 3 – How to use SpectroJet 3.Thesebuttonscanoptionallydeletethecurrentmeasurementorallmeasurementsofaprint job. 4.Thebutton“Maskinkzones”opensawindow,whereoptionallysingleinkswithintheink zonesorcompleteinkzonescanbemasked.Pleasenotethatthemaskedinkzoneswillnotbe takenintoaccountforthecalculationofthereportstatistics. 5.“Exportmeasurement”startstheexportintoanotherapplication(seep.36). 6.“SetOK-sheet”,definestheOK-sheet,whichissetinsteadofthetargetset. WhensettingtheOK-sheet,itwillbenumberedtothecorrespondingmeasurementandwill bedisplayedinthelowerstatusline.Nowthebuttonswitchesto“DeleteOK-Sheet”and servesforthisfunction. 7.“Totopside”respectively“toreverseside”switchesbetweentop-andreverse-printing,ifa presswithareversingafteraprintingunithasbeenselected. Manual TECHKON SpectroJet Chapter 3 – How to use SpectroJet Page49 Measure – Gray balance (densitometric) Whenmakingameasurementonagraybalancepatch,thereferringdensityvalues fortheprocesscolors(withoutK)areshowninabargraph.ThevaluesforCyan, MagentaandYellowshouldbeincloserangetoeachothertoensureaneutralgray balancewithoutacolorhue. Itisimportantthatthegraybalancepatch,onwhichthemeasurementistaken, comprisestheright%-valuestoachieveaneutralgraywhenprintedcorrectly.The processstandardISO12647foroffsetprintdefinesthevaluesas: C=50%,M=40%andY=40%. ThecolorbarsTECHKONTCSDigitalincludeagraybalancepatchcompliantwith ISO12647ineveryinkzone.Thegraybalancedisplaywillshowdensitometricgray balancevaluesforCMYinabargraph. Ataglancetherecanbediagnosed,iftheoverprintofCMYisaneutralgrayorifit hasacolorcast(1.). 1. Page50 Manual TECHKON SpectroJet Chapter 3 – How to use SpectroJet Measure – GrayGuide (according to Gracol G7™) TheGrayGuidefunctionisaveryusefulfeaturewhencontrollingaprintingpress accordingtotheGracolG7™method,whichisespeciallycommonintheUSA. Itrequirestheuseofanappropriatecolorbar. 1.“G7™”hastobeselectedinthesection“Graymodedisplay”in“SettingsSystem/Software”,tomaketheGrayGuidefunctionavailableinthemenubar. Inthefollowingexampletheadjustmentrecommendation(1.)shows,thatallofthe threeinksCMYhavetobeincreasedtomatchtheGracoltargets. 1. Manual TECHKON SpectroJet Chapter 3 – How to use SpectroJet Page51 Measure – Colorimetric (ExPresso Pro) ThankstothespectralperformanceofSpectroJetitispossibletocalculateand displaycolorimetricvaluesaswell.Measurementsincolorimetrymodeshavethe advantageofanabsolutedescriptionofcolorbasedoncharacteristicvalues.Soitis possibletomeasurespotcolorsaswell. Colorimetricmeasurementsreferinmostcasestothemostpopularcolorsystem intheprintingindustry:theCIEL*a*b*colorspace.Thecolordistance∆E describes howclosetwocolorsmatch.Avalueof0meansthattwocolorsareidentical. Itcanbedefinedinthe“Measurementsettings”(seep.34)accordingtowhich∆E formulathecolordistanceiscalculatedbyExPresso. 1. 2. 3. 1.Detailedinformationforeveryinkzonebypointingonthebargraph. 2.Averagevaluesforallinkzones. 3.Measurementvaluesoutoftolerancewillbemarkedwithredtop. Page52 Manual TECHKON SpectroJet Chapter 3 – How to use SpectroJet Measure – InkCheck (ExPresso Pro) Densitometricvaluesareadirectmeasurefortheinkappliedonthepaper.They areveryprocess-related,althoughtheyarerelativevaluesonly.Colorimetricvalues asrecommendedinprintstandardISO12647areabsolutevalues,buttheyarenot suitedtousethemforhandlingtheprintingprocess.ThankstothespectralmeasurementtechnologyofSpectroJet,theveryuseful“InkCheck”functioncombinesthe bestofbothworlds:Spectrallybasedrecommendationshowtosettheinkkeysas usedfromdensityinordertomeetcolorimetrictargetsrequiredforprintingwithin ISOstandards. Inthiscasethereistoomuchyellowink appliedininkzone7.Inordertoachievea lower ∆E,thedensityhastobereducedby 0,10fromD=1,42toD=1,32.Thatreduces ∆Efrom3,8to1,78. Manual TECHKON SpectroJet Chapter 3 – How to use SpectroJet Page53 Spot measurement Tocarryoutaspotmeasurementsjustpositionthedevicewiththemeasurement headonasinglemeasurementpatchandpressthegreenmeasurementbutton shortly.DuringthemeasurementprocessallLEDsflashupsimultaneously.Adouble soundconfirms,thatthemeasurementiscompletedandthemeasurementdataare displayedbytheExPressosoftwareinthewindow“Spotmeasurement”inthesubmenu“Sample”. Allrelevantdensity-andcolorimetric-valuesareshownhereveryclearlyandcan thereforebeinterpretedataglance.Themaximumdensityaccordingtothewave lengthisdisplayedaswell. Inthemenu“SpotmeasurementReference”(seep.55)areferencecanbeselectedforthemeasuredcolor.Thiscanbeasecondmeasurementoranalreadydefined ink(seep.27). Thewindow“SpotmeasurementDeviation∆”(seep.55)displaysthedeviationof themeasurementvaluesofthesampletotheselectedreference.Thedensitometric andcolorimetricnumericalvaluesaresupplementedbyagraph. Page54 Manual TECHKON SpectroJet Chapter 3 – How to use SpectroJet Manual TECHKON SpectroJet Chapter 3 – How to use SpectroJet Page55 Analyze Thefunctionsinthe“Analyze”menuservetoanalyzesinglemeasurementsorcompleteseriesofmeasurements(printjobs). “Singlemeasurementreport”and“Jobreport”areusedinregardtoindividually definedtargetsetsandtolerances.“ISO-reportsinglemeasurement”and“ISOjob report”includeadditionallythecompliancewithtargetsetsandtolerancesaccording totheinternationalstandardfortheprintingprocesscontrolISO12647. Theresultingevaluationsofthedifferentanalysescanalsobeprintedoutinsocalled reports. Analyze – ISO-report single measurement (ExPresso Pro) 1. 3. 2. 4. Page56 5. 6. 7. Manual TECHKON SpectroJet Chapter 3 – How to use SpectroJet “ISO-reportsinglemeasurement”includestwosections: ∆E*a*b*-soliddensityanddotgain.Thedotgainisdocumentedfor40%and80%and themidtonespreadisvisualizedgraphically. 1.Greendotsindicatethatthevaluesarewithintolerance 2.Displayofthecolorgamut 3.Tonal%curves 4.Selectionofmeasurementtobeanalyzed 5.Function“Maskinkzone”(seep.49) 6.Switchbetweentopsideandreverseside(ifavailable) 7.Printsreports Analyze – ISO job report (ExPresso Pro) ThejobreportaccordingtotheISOstandardallowsthedocumentationofthewhole printingprocessduringtheentireprintjob.Youcanchoosebetweenasummary(1.) andthedisplayofdetailedreportsofsingleparameters,whichyoucanselectfrom thepull-down-windowinthelowerleftcornerofthemenuwindow. 1. Manual TECHKON SpectroJet Chapter 3 – How to use SpectroJet Page57 Window:withdetailedinformation“ISOjobreport”for∆Eandselectedmeasurementno.7: Agreendotindicates,thatthemeasurementvaluemeetsthetolerance. 1. Theexampleshowsareddotinthemeasurementseriesno.9(1.),whichsignalizesameasurementvaluewhichisoutoftolerance.Thisisalsoindicatedbythefactthatthepositionofthe dotisfarabovethebaseline. Thevariationwithinasheetisdescribedbyaverticallinewithinthedot.Theheavierthevariation,thelongertheverticalline. Page58 Manual TECHKON SpectroJet Chapter 3 – How to use SpectroJet Usingthebutton“Maskinkzones”inthelowerpartofthemenuwindow(seep. 57)youwillswitchtothe“Maskinkzones”function.Hereyoucandefinewhich OK-sheetwillbethestartingpointfortheevaluationoftheprintjob.Optionallya measurementcanbeselectedtoserveasstartingpoint.Thisfunctionisavailablefor thetopsideaswellasforthereverseside. Analyze – Single measurement report “Singlemeasurementreport”canbecomparedwith“ISO-reportsinglemeasurement”,buttheevaluationdoesnotrefertotheISOstandard.Thereforetheinformationsections“Soliddensity”and“Dotgain”referonlytoindividuallydefinedtarget setsandtolerances. Uptoeightcolorscanbedisplayed,e.g.CMYKandfourspotcolors. Manual TECHKON SpectroJet Chapter 3 – How to use SpectroJet Page59 Analyze – Job report “Jobreport”isanevaluationofthewholeprintjobinregardtothetargetvaluesand tolerancesaccordingtocustomerstandards. Youcanchoosebetweenasummary(seethepicturebelow)andthedisplayofsingle parameterse.g.dotgain40%,dotgain80%,slur/doubling,contrastand∆E(ExPresso Proonly),whichyouselectbyclickinginthepull-down-menuinthelowerleftcorner ofthemenuwindow(1.)(seepage58forfurtherinformation). 1. Page60 Manual TECHKON SpectroJet Chapter 3 – How to use SpectroJet Exit Justpressthe“Exit”buttontoquittheExPressoapplication. Awindowforconfirmationwillappear: Thereisnoneedtoactivelysavea“Printjob”orsettingsmade.SinceExPressohas an“autosave”functionality,alldataissecurelystoredalready. Manual TECHKON SpectroJet Chapter 3 – How to use SpectroJet Page61 Chapter 4 How to use the Windows software SpectroConnect 4.1 Software description The supplied Windows Software SpectroConnect allows to transfer measurement data to the PC and to make device specific settings from the PC. The measurement values can be displayed on the computer monitor. Color information is displayed, colors can be compared and data can be exported into other software applications, e.g. Microsoft Excel™. The software requires a computer with a free USB port and a completely installed Microsoft Windows 2000, XP, Vista or 7 operating system. 4.2 Installation It is important, to carry out the following steps in the right order, to make sure that the USB device driver will be installed properly. 1. Make sure that the device is not connected to the PC. Insert the SpectroConnect CD into the CD drive of the running computer. You will find the CD at the back of this manual. 2. The installation routine will start automatically. Follow the steps of the installation, until it is completed. 3. Now, after the installation was finished successfully you can connect the device with the USB cable to the computer. Page 62 Manual TECHKON SpectroJet Chapter 4 – SpectroConnect 4.3 Overview The application will be installed in the Windows program files section in the folder “TECHKON GmbH / TECHKON SpectroConnect”. Software symbol SpectroConnect After starting the program the main screen “Compare colors” will appear. It is divided into four logical segments: On the left side you see the scan measurement settings and already carried out spot and scan measurements of the connected device, in the center the active program module, on the right side the color library which is stored on the PC and in the section at the bottom a bar which lists all available and selectable program modules. 1. 5. 2. 3. 4. 6. 1. The menu bar includes functions known from standard Windows applications. They comprise: New, Open, Save, Print and Quit. 4. “Selected scan measurement”: the whole information of a selected measurement will be displayed in the middle of the screen (5.). 2. The window “Last spot measurements” shows the last spot measurements carried out. 5. Window of the active program module. 3. The window “Last scan measurements” shows the last scan measurements carried out. 6. This bar shows the list of available program modules. They can be selected from this bar directly via mouse click and the application will appear in the middle of the display. After launching SpectroConnect it is pre-set to display the module “Compare colors”. Manual TECHKON SpectroJet Chapter 4 – SpectroConnect Page 63 4.4 Software module “SpectroJet settings” In this module device specific settings can be made. 1. SpectroJet: All settings concerning the SpectroJet device can be carried out with this software feature. It is very convenient for choosing density and colorimetric settings and according references as well as starting the paper white calibration and the absolute white calibration. 2. Device update: New device software can be uploaded into the device. In this program window you can also check the firmware version. 1. Page 64 2. Manual TECHKON SpectroJet Chapter 4 – SpectroConnect 4.5 Device update By the application of this module SpectroJet can be loaded with a new internal firmware which is selected by Device update. The procedure is explained in the program window: Manual TECHKON SpectroJet Chapter 4 – SpectroConnect Page 65 4.6 Software module “Export” Measurement data can be exported in any other Windows application e.g. Microsoft Excel™, Word™ or other programs which can handle color data, e.g. a RIP calibration software. SpectroJet works like the keyboard: Pressing the measurement button will place the measurement value automatically at the location where the cursor is. 1. 2. 1. Here is defined, which data will be transmitted, how it will be formatted and what type of spacing between the measurement data will be. All the settings can be saved and recalled later. Page 66 2. The Export window can also be used for testing data transmissions. This example shows the transfer of CMYK density values. Manual TECHKON SpectroJet Chapter 4 – SpectroConnect 4.7 Software module “ColorCatcher” Based on a L*a*b*-measurement and referring to selected ICC profiles the program module “ColorCatcher” displays the conversion into the color models L*C*h*, RGB and CMYK. Furthermore an automatic search for the closest matching color of a pre-set or self created color book is carried out. The lower part of the module window informs you about the exact color deviations between the sample and the recommended color of the color book. 1. 2. 4. 3. 6. 5. 8. 7. 9. 1. Selected ICC profiles 6. Self created color book 2. Measured sample color 7. Colors from a color book 3. Calculation of L*a*b*-, RGB-, L*C*h*- and CMYK values based on selected ICC profiles for the current sample. 8. Variations and visible differences 9. Software module “ColorCatcher” 4. Shows the closest match to the current sample out of the selected color book. 5. Calculation of L*a*b*-, RGB-, L*C*h*- and CMYK values based on selected ICC profiles. Manual TECHKON SpectroJet Chapter 4 – SpectroConnect Page 67 4.8 Software module “PhotoLab” TECHKON PhotoLab is a program module for evaluating and displaying L*a*b* color data graphically. Selected measurements can be displayed and analyzed. 1. 2. 3. 4. 1. In the upper section of the module window, the color differences between sample and reference are shown numerically. 2. Reference: viewfinder with tolerance circle Sample: bold point The current selected value is marked in white. 3. Color samples and references are directly imported into PhotoLab by making measurements with SpectroJet having it connected to the PC via the USB-cable Page 68 Furthermore, color values and complete color books from the device memory or out of the PC color library can be selected and be moved by drag-and-drop with the mouse pointer directly to the center of the display where the L*a*b*-color circle is. A pop-up window will ask, if the values should be used as sample or as reference values. 4. A mouse click on the program symbol will start the plug-in PhotoLab within the SpectroConnect environment. Manual TECHKON SpectroJet Chapter 4 – SpectroConnect 2. ... 3. 1. 4. 5. 6. 1. Masters and references can be selected directly with a mouse click or by choosing from the “pull-down” menu. Delete and renaming is done via the menu. 2. Different modes of the L*a*b*-display can be selected: • Themodes“Bargraph”and“QualityCertification Chart” show the trend of ∆L*-, ∆a*- and ∆b*-values of a measurement series. • The“TableView”showsallvaluesnumerically. • Inthe“Job”windowjobrelevanttextdata can be edited. 3. A measurement value highlighted in red indicates an out-of-tolerance sample. 4. The black circle line indicates the tolerance limit of the ∆E*-region. If the black pointer reaches into the outer segment of the circle, the tolerance has been exceeded. 5. Enlarged view of the tolerance circle 6. Display of the color components ∆L*, ∆a* and ∆b*. Manual TECHKON SpectroJet Chapter 4 – SpectroConnect Page 69 PhotoLab settings When you open the pop-up window “PhotoLab settings” in the menu bar of the program module PhotoLab, you can select and edit three areas. 1. General settings: This is the window for setting the dimensions of the L*a*b*-color circle and the ∆L*a*b*color deviation. 2. Tolerances: In this window the tolerances for the color deviations are defined and the size of the tolerance circle is set. 3. Mean values: It can be appropriate to take several single measurements on one sample which then are averaged to an average value. The number of measurements which result in the calculation of the average value is defined in this window.. Page 70 Manual TECHKON SpectroJet Chapter 4 – SpectroConnect 4.9 Software module “Media Wedge” The program module “Media Wedge” serves the fast, colorimetric analysis of the Ugra/Fogra media wedge. This digital control element is available from Fogra, the German “Graphic Technology Research Association” (www.fogra.org). The test element is placed at the border of a proof. The software evaluates the color quality printed in colorimetric terms. Color differences between the Fogra target values and the measured samples will be clearly represented in the program module “Media Wedge”. 5. 1. 2. 3. 4. 1. Selection of the media wedge version (you will find the version number on the printed test element) 2. Overview of information concerning the printjob 3. Selection of reference values 4. Overview of measurement results 5. Optionally a short protocol can be printed on a self-adhesive label with a Dymo label printer, which can be stuck on the proof, or a detailed report of the measurement values can be printed out. Manual TECHKON SpectroJet Chapter 4 – SpectroConnect Page 71 1. 1. After the import of the media wedge a short protocol will be generated and can be printed on a self-adhesive label with a Dymo label printer. 2. 2. The software supports also the Ugra/Fogra media wedge in version 3.0. Page 72 Manual TECHKON SpectroJet Chapter 4 – SpectroConnect TECHKON Measurement technology Spectral remission measurement and color density determination to ISO 5-3/4 Measurement geometry 0/45° optics to DIN 5033 Spectral range 400 to 700 nm in 10 nm steps Measurement aperture 1,5 mm, appropriate for measuring patches with at least 3 mm height and 3 mm width. UV cut filter optional Light source Gas-filled lamp, type A illumination Polarization filter Twice linear crossed, switched on and off per software command Measurement time Approximately 160 mm/s for 4 mm patches (equals approximately 3 seconds for 520 mm sheet length), approximately 400 mm/s for 8 mm patches; single measurement approx. 1 second Scanlength Unlimited White reference Absolute and relative Density measurement range 0,00 D – 2,50 D Repeatability 0,01 D 0,03 CIE ∆E*a*b* Production spread 0,01 D 0,3 CIE ∆E*a*b* Data transmission USB-connection Power supply AC adapter, 100 – 240 V, 47 – 63 Hz Weight Measurement device: 360 grams Dimensions: see page 8 Contents of delivery: see page 9 Software TECHKON ExPresso Delivery on CD with software protection key (USB-dongle) and CD with print control strip TECHKON TCS Digital System requirements: Windows XP, Vista or 7 Recomm. touchscreen: Elotouch 1727L 17" Illumination types / Standard Observer A, C, D50, D65, F 2/7/11 / 2°, 10° Density filter DIN 16536, DIN 16536 NB, ISO/ANSI T, ISO/ANSI I, ISO E, spectral density Dmax Specifications can be subject to change without notice. All mentioned trademarks and copyrights are recognized. SpectroPlate, SpectroDens, SpectroJet, SpectroDrive, SpectroCheck, InkCheck and TECHKON are registered trademarks of TECHKON GmbH. Manufacturer certificate applicable for ISO 9000 documentation Device: Scan-Measurement device TECHKON SpectroJet Serial Number: Manufacturer: TECHKON GmbH • Wiesbadener Str. 27 • D-61462 Königstein Telephone: +49 (0)6174 92 44 50 • Telefax: +49 (0)6174 92 44 99 E-mail: [email protected] • http://www.techkon.com Certification: The device is compliant with R&TTE directive 1999/5/EC concerning the electromagnetic compatibility EMC and is provided with the CE label. The device is RoHS compliant (class 9). Standards: • German Standard (DIN EN): DIN EN 61000-4-6:2008-04 • European Standard: EN 61000-4-6:2007 + Corrigendum August 2007 • IEC/CISPR-Standard: IEC 61000-4-6 + A1:2004 + A2:2006 • EN61000-4-2 and 4-4 • EN 55022:2006 + A1:2007 2008-05 • EN 55024:1998+ A1:2001 + A2:2003 in parts 2003-01 • 47CFR15 2008-07 • ICES-003, Issue 4 2004-02 The supplied AC adapter is according to regulations UL, IP 40, IEC 950 and VDE EN-EC10. The device ist to be used only with original TECHKON SpectroJet AC Adapter, 7,5 V DC, Part no.: FRIWO FW 75550/08. Maintenance: The device is maintenance free. The measurement aperture has to be kept clean from dust. It can be cleaned with clean, compressed air and an optics brush. We recommend a functionality check-up every 24 months at the TECHKON service center, which includes the issue of a new Manufacturer certificate. Warranty: The warranty for TECHKON products is 24 months starting with the date of purchase. The warranty is invalid if the damage is caused by improper use of the device. Only original TECHKON spare parts and accessories are to be used. Recycling: The device is according to §14 ElektoG registered under the EAP no.: DE 98280049. Devices for disposal can be sent directly to the manufacturer. Calibration: The integrated spectral sensor is calibrated by a white calibration. After performing a white calibration with the supplied absolute white standard integrated in the charging console, the device is long term stable. We recommend to make a white calibration before every measurement series, to ensure the device is calibrated correctly. The remission values documented on back of the charging console are derived from a ceramic white standard, which is referenced to measurements taken and certified by the German Institute for Material Testing (Bundesanstalt für Materialprüfung, BAM). Standards: The measurement device is manufactured according to the recommendations of the technical standards DIN 5033 part1-9, CIE, DIN ISO 16 536 part 1+2 and ISO 5-3. The accuracy of the device is checked during the manufacturing by spectral measurements on color samples which were measured and certified by the German Institute for Material Testing (Bundesanstalt für Materialprüfung, BAM). The calculation of colorimetric values is according to the formulas and tables of DIN 6174, DIN 5033 part 1-9 and CIE. The calculation of densitometric values is according to the formulas and tables of DIN 16527 part 3, ISO 5-3 and the handbook of standardizationof the German Printing and Media Industries Federation (Bundesverband Druck und Medien e.V.) and fogra (Forschungsgemeinschaft Druck e.V.). D-61462 Königstein Place Date Signature EU-Konformitätserklärung EC-Declaration of Conformity Déclaration de Conformité de la CE Dichiarazione di conformità CE Hersteller: TECHKON GmbH Manufacturer / constructeur / costruttore Adresse: Address / adresse / indirizzo Wiesbadener Str. 27 D-61462 Königstein erklärt, dass das Produkt: Declares that the product / déclare, que le produit / si dichiara che il prodotto Typ: SpectroJet Type / tipo Verwendungszweck: Farbmessungen Intended use / utilisation prévue / uso previsto Color measurements / mesure de la couleur / misurazione del colore bei bestimmungsgemäßer Anwendung den grundlegenden Anforderungen gemäß EU-Richtlinie 2004/108/EC entspricht und dass die folgenden Normen angewandt wurden: complies with the essential requirements of the 2004/108/EC Directive, if used for its intended use and that the following standards has been applied / répond aux exigences essentielles du Article 3 de la directive 2004/108/EC, prévu qu’il soit utilisé selon sa destination, et qu’il répond aux standards suivants / soddisfa tutti i requisiti della direttiva 2004/108/EC qualora venga utilizzato per l’uso previsto e che le seguenti norme siano applicate Angewendete Norm: Applied standard / standard appliqué / EN 55022:2006 Ausgabe: 2008-05 +A1: 2007 EN 55024 Ausgabe: 2003-01 1998+A1:2001+A2:2003 norma applicata / édition pubblicato # Please send me information about the entire TECHKON product range Please put my E-mail address on the mailing list for the TECHKON-Newsletter TECHKON GmbH Wiesbadener Straße 27 D-61462 Königstein / Germany via Telefax to: +49 (0)6174 92 44 99 TECHKON Registration card Device Serial number: (label on the bottom of the device) Your TECHKON-Dealer: E-mail: Telefax: Telephone: Country: City / ZIP-Code: Address: Department / Job title: Company: Name: Please send this registration card by mail or via telefax to us. This way we can keep you informed in future about product news. You can send your registration information by E-mail as well. TECHKON GmbH • Wiesbadener Str. 27 • D-61462 Königstein • Telefax: +49 (0) 6174 92 44 99 • E-mail: [email protected]