1
A Brief Tutorial on Studio Monitors
A quick way to find the best
location for your subwoofer is to
temporarily place it in the mix
position and play some program
material that contains a lot of bass.
Move around the half of the room
where your full-range monitors are
positioned until you find the spot
where the bass sounds best. Again,
it’s important to remember that low
frequencies are not directional, so
placing the subwoofer beside you will
not be an issue. However, try to keep
your subwoofer on the same plane as
your full-range monitors. This will help
to minimize phase issues.
In general, you will want to avoid
placing your subwoofer too near
to reflective surfaces, like a wall or
in a corner, as this will exaggerate
the bass energy and make your
monitor system sound “boomy.” But
every room is different, and some
subwoofers perform just fine near a
wall, so use your ears rather than your
eyes.
Once you find the place in the
room where the bass sounds the
smoothest, place your subwoofer in
that spot, return to the mix position,
and listen again. You may need
to adjust the location; just keep
making small adjustment (a foot or
so at a time) until the bass response
sounds as even as possible. Don’t
locate your subwoofer where it will
exaggerate frequencies, as this will
have the opposite effect on your mix.
For example, if your system has a
bump around 100 Hz, what you hear
will not accurately reflect what is in
your mixes, so that massive kickdrum punch you hear in your mix
environment won’t be there when you
listen in your car.
5.2. Calibrating your
subwoofer level
Just as it is important to make
sure your full-range monitors are
calibrated to the same level, you
must ensure that your subwoofer
is calibrated to match the fullrange speakers. There is no need
10
to recalibrate your studio monitors
if you followed the 85 dB standard
reference described earlier. If you are
connecting your full-range system to
the outputs of your sub, rather than to
the outputs of your audio source, you
should recalibrate your full monitor
system.
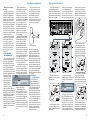
1. Turn your subwoofer input level
to its lowest setting and power down
your full range monitors.
5.3. Setting the
crossover transition
0
GND
5. If your subwoofer has a variable
lowpass filter, set the filter to its
highest frequency. This will create an
overlap between your subwoofer’s
and your full-range system’s
frequency responses.
0
GND
0
2. Play 20 Hz to 20 kHz, fullbandwidth pink noise at 0 dB through
the outputs of your primary audio
source.
3. Turn up the outputs of your
primary audio source to their Unity
Gain setting.
A Brief Tutorial on Studio Monitors
GND
6. Turn your full-range monitors
back on, play program music
with a lot of bass in it through
your new 2.1 system, and
experiment with the polarity
switch on your subwoofer to see
which position provides the best bass
response at your mix position. Leave
the polarity switch in the position that
provided the loudest bass response.
This means that your subwoofer is in
phase with your full-range system.
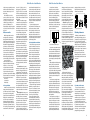
Many full-range
monitors (like the
Eris and Sceptre
series) provide a
highpass filter for
bass management.
These highpass
filters are usually
not fully variable but
often a few different
frequency-cutoff
options will be available.
Some subwoofers (like the Temblor
T8 and T10) also provide a highpass
filter on the outputs for this purpose.
Depending on the system, leaving
frequency content below 60 to 120
Hz in your full-range monitors can
introduce destructive cancellation
and reinforcement with the highest
frequencies that are reproduced by
your subwoofer. Using a highpass
filter on your full-range monitors
will remove these frequencies and
help you to create a more seamless
crossover transition with your
subwoofer.
If your subwoofer, like the Temblor
series, provides a variable lowpass
filter, your job is made a little easier in
that you have more control over the
crossover point.
The first rule of thumb when dialing
in the crossover transition in your
2.1 system is to listen. Depending
on the frequency range of your fullrange monitors and your subwoofer,
you may not have to do much. For
example, if the lowest frequency
your full-range monitors can reliably
reproduce is between 70 and 80 Hz,
you may not have to do anything but
plug in your subwoofer. If, however,
your full-range monitors are accurate
below 60 Hz, you will most likely need
to use the following instructions to
configure your crossover network.
If your subwoofer provides a
variable lowpass filter:
1. Set the highpass filter for your
full-range monitors using either their
onboard controls or the highpass
filter on your subwoofer.
2. Set the lowpass filter on your
subwoofer to the same frequency. For
example, if you are engaging an 80
Hz highpass filter on your full range
monitors, set the variable lowpass
filter on your subwoofer to 80 Hz.
From this point you can
experiment with the lowpass filter
setting that provides the smoothest
crossover transition while listening
to your favorite music. Again, your
subwoofer should naturally extend
the low-frequency response of your
monitor system. You should not hear
any frequency boosts or cuts.
Once your system is properly
calibrated, listen to a wide variety of
your favorite music and mixes and
make any final adjustments. At the
end of the day, your ears are the best
tools you have in the studio.
0
4. Begin slowly increasing the
input sensitivity of your subwoofer
until the acoustic level of the test
tone reaches 79 dB SPL. Again, take
your SPL measurement holding your
meter at arm’s length at a 45-degree
downward angle, where your head
will be.
Note: If you set each full-range
model to a lower level than 82 dB,
you will want to do the same with
your subwoofer. For example, if you
set each full-range monitor to 79 dB,
reduce your subwoofer by -3 dB as
well (to 76 dB).
11