1
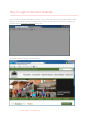
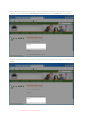
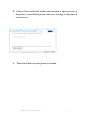
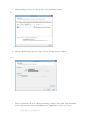
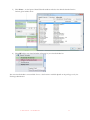
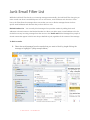
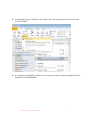
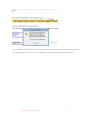
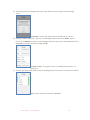
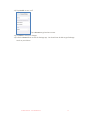
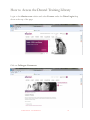
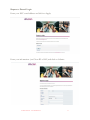
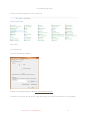
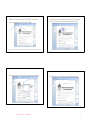
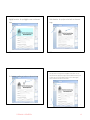
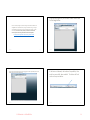
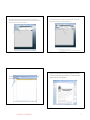
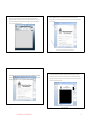
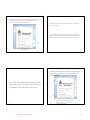
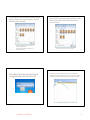
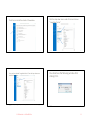
IT USER MANUAL 11400 Robinwood Drive Hagerstown, MD 21740 P. 240-500-2457 F. 301-393-3684 [email protected] www.hagerstowncc.edu Table of Contents I. Department Overview ...................................................... 1 Location Hours of Operation Staff Requesting Help From IT II. Login Procedures ............................................................ 4 How to Login to a Campus Computer How to Login to Outlook Web How to Login to the HCC Webside Login Procedures for WebAdvisor III. Networking .....................................................................14 How to Change your Network Password How to Install a Network Printer How to Locate the Computer Name Directions for Installing the VPN Client Directions for Connecting to HCC VPN IV. Outlook/Exchange ........................................................25 How to Add a Shared Mailbox in Outlook 2013 How to Open a Shared Calendar How to Change Your Password in Exchange Webmail How to Filter Junk Mail How to Setup Exchange on Your iPhone V. Datatel/ImageNow ........................................................38 How to Access the Datatel Training Library Fix For WebNow Java Error ImageNow Training Guide VI. Phone ...............................................................................64 CallXpress Quick Reference Card User Training -- 4018 and 4019 Series User Training -- 4029 Series IT USER MANUAL - NOVEMBER 2014 -1- Mission Statement The HCC IT department is responsible for all networking, computer hardware and software, telecommunicating, and the college administrative system. IT will provide the highest quality technology-based services, in the most cost effective manner, to facilitate HCC’s mission as it applies to the curricular functions which are designed to meet student and community success. Location CPB-130 Hours of Operation Monday through Thursdays, 7:30 a.m. until 10:00 p.m. Fridays, 7:30 a.m. until 5:30 p.m. Staff Director Craig M. Fentress, 1998 - B.S., Frostburg State University - M.B.A., Frostburg State University Manager, Information Technology Jacquelyn A. Simmons, 2000 - A.S., Hagerstown Community College Database System Administrator Christopher C. Davis, 1998 - A.A., Hagerstown Community College SQL Administrator Joseph C. Seiler, 2014 - A.A.S., Hagerstown Community College - B.A., Shippensburg University Senior Information Systems Specialists Cynthia J. Golem, 2008 - A.A., A.A., Hagerstown Community College - B.S., Shippensburg University Jeanne L. SanGiovanni, 2007 Senior Network System Administrator Wiley Scott McIntyre, 1983 - A.A., Allegany College of Maryland IT USER MANUAL - NOVEMBER 2014 1 Telecommunications and Maintenance Service Manager Robert L. Mitchell, 1977 - A.A., Hagerstown Community College - B.S., Pennsylvania State University Network Administrator Herbert R. Fiege, 2009 Coordinator, Technology Support Christopher S. McAfee, 2002 - A.A.S., Hagerstown Community College Computer Support Technician Melissa L. Yourich, 2012 - A.A., Pennsylvania Highland Community College Computer Support Technician, part-time Anthony T. Campello, 2005 - A.A.S., A.A.S., Hagerstown Community College - B.S., University of Maryland University College - M.S., M.S., University of Maryland, University College User Support Specialist I Tina M. Hartman, 1978 Kathy L. Stakem, 1993 - A.A., Allegany College Web Programmer Ricky L. Martz Jr., 2000 - A.S., Hagerstown Community College IT USER MANUAL - NOVEMBER 2014 2 Requesting Help from I.T. If you are having issues with your computer, printer, phone, or fax machine you can request help by emailing [email protected] or by phoning our help desk at extension 2457. Please include the following information when submitting a request: 1. Include a succinct and meaningful subject line. 2. Name of person who is having the problem. 3. If you have worked with a technician about the problem before, please list his or her name. 4. The details of your request; a. What equipment is affected? Explain in as much detail as possible. i.e. won’t boot, can’t print, can’t open webpages, internet, software errors etc. b. When did you notice the problem? c. Tell us if there are error messages and if possible, document them. d. Tell us what the last thing you did before you noticed the problem. i.e. installed an update, clicked on a link, inserted a disk/thumb drive, etc. e. Tell us the exact location where the problem is occurring to include: building, room number, and phone extension. f. If you are reporting a problem in a computer lab, please give us the specific location of the problem computer. Please list the asset tag number that is located on the back of the computer. It’s a white sticker that has “HCC #####” printed on it. 5. Your work order will be given a priority based on the following: a. Priority 1 – computer/phone/network completely down and issue will be addressed within 4 hours. b. Priority 2 – computer/phone/network down but an alternate device is available so the issue will be addressed within 24 hours. c. Priority 3 – request is non-urgent and will be completed within one week. d. Priority 4 – request is not urgent and will be handled within a six-week time frame. IT USER MANUAL - NOVEMBER 2014 3 How to log in to a Campus Computer 1. Make sure system is powered on. 2. Read the security text (See Figure 1) and agree to abide by the “Acceptable Use of Computer Systems and Networks Policy” by clicking the “OK” button Figure 1 3. In the “User name” field (See Figure 2), type your HCC username, typically in the format of first initial, middle initial, full last name, i.e. John Q Public’s username would be jqpublic. a. Other acceptable formats of the username are: hcc\jqpublic, and [email protected], these simply specify the domain name already listed by default in the “Log on to: HCC” statement on the login screen. 4. In the “Password” field (See Figure 2), type your HCC password, if you are a new hire your password will have been supplied by documentation from the IT department. Type the password exactly as stated, capitalization, numbers, and special characters all count. 5. After entering this information click the right arrow button (See Figure 2), or press the “Enter” button on your keyboard to initiate login. a. If this is your first time logging in to a Campus Computer it may take longer than normal because your profile it being built. Figure 2 IT USER MANUAL - NOVEMBER 2014 4 How to login to Outlook Web 1. Open a browser such as: Mozilla Firefox, Google Chrome, or Internet Explorer. a. If you have Internet Explorer 11, or Windows 8.1 or higher it is recommended to use either Firefox or Chrome. See the Issues section below for an explanation. 2. Navigate to http://hcc-exch01.hagerstowncc.edu/owa or see the “Alternative Methods” section. 3. In the “User name” field (See Figure 1), type your HCC username, typically in the format of first initial, middle initial, full last name, i.e. John Q Public’s username would be jqpublic. 4. In the “Password” field (See Figure 1), type your HCC password, if you are a new hire your password will have been supplied by documentation from the IT department. Type the password exactly as stated, capitalization, numbers, and special characters all count. 5. After entering this information click the “Sign in” button (See Figure 1), or press the “Enter” button on your keyboard to initiate login. Figure 3 Alternative Methods 1. 2. 3. 4. 5. Navigate to http://www.hagerstowncc.edu/ Click the “Faculty & Staff” link. Under “Popular Links” click “Outlook Web Access.” Click “Outlook Web Access.” See instructions in “How to log in to Outlook Web” section. IT USER MANUAL - NOVEMBER 2014 5 Issues Internet Explorer 11 does not support the version (Exchange 2010) of Outlook Web Access currently used by HCC, unless you add it to the Compatibility View list. 1. Click the gear icon in the upper right corner of Internet Explorer 11. 2. Click “Compatibility View settings” in the list. 3. In the “Add this website:” textbox type: hagerstowncc.edu and click the “Add” button, finally click “Close.” a. Outlook Web Access should now display properly in Internet Explorer 11. However, the HCC main website will now not display correctly. IT USER MANUAL - NOVEMBER 2014 6 How to Login to the HCC Website Open a web browser like Internet Explorer or Firefox. There will be a place near the top left of the window outside the page area that will allow entering a url address for the website you’d like the browser to retrieve. Click into the black area and type www.hagerstowncc.edu into that area. The website will load showing you the HCC website. IT USER MANUAL - NOVEMBER 2014 7 A menu is across the top of the page reading Quick Links, Directory, Site A-Z, Register/WebAdvisor, and Faculty/Staff Login. Click the Faculty/Staff Login link. You will now be on the login page. IT USER MANUAL - NOVEMBER 2014 8 In the field below username use your first part of your email address or what you use to sign into on campus computers. If your email address is [email protected], then you enter jldoe in the username field. In the password field, enter the password you use when you check your HCC email or sign into a computer on campus. IT USER MANUAL - NOVEMBER 2014 9 After entering your password, click the login button. You may have to scroll down to see it in your browser. Upon logging in, your profile page will load showing your information. You will now be browsing the web site while logged in. When you are done browsing the site, you should log off to avoid allowing a person access to restricted areas. The logoff button is located in the black bar across the top of the page to the left of the hello message. IT USER MANUAL - NOVEMBER 2014 10 Login Procedures for Web Advisor From the college’s main web site at the top left-hand corner, click on the link Register/WebAdvisor: Next you will click on the link Access your account or search for classes: IT USER MANUAL - NOVEMBER 2014 11 On the main WebAdvisor page on the right-hand side near the top, click on the words Log In: Enter your user name that you received in a letter from the IT department. This would be the same user name you use to login to the HCC network. Make sure you use all LOWER case letters. If this is your first time logging into WebAdvisor, your initial password would be your seven-digit ID number. If you have ever logged into WebAdvisor before, your password would be something you created that contained both letters and numbers, between 6 and 9 characters, but NO capital letters or special characters. IT USER MANUAL - NOVEMBER 2014 12 If this is your first time accessing WebAdvisor, you will be required to create a new password. On the next page is a screen shot for the page where you will set up your new password. Your user name will remain the same. Enter your seven-digit ID number for the old password. Your new password must be between 6 and 9 characters, contain both letters and numbers, NO capital letters or special characters, and if you choose to enter a hint – the hint cannot contain any part of the password (not even the numbers). If you have had your password reset, the new password you create must be unique. Meaning, it should contain mostly new letters and all new numbers from any password you think you may have used before. If you receive a message that you are not permitted to change your password, you must exit WebAdvisor altogether and start over. If you have problems with the system accepting a new password, here is one hint – if you normally start your passwords with letters, try starting with numbers for the new password. After successfully logging into WebAdvisor, you will return to the main Welcome screen: IT USER MANUAL - NOVEMBER 2014 13 How to change your network password Log into the computer with the assigned login and password that you received from the Network Administrator at the time of hire. After the computer boots up and you can see the desktop, hold down the “Ctrl and Alt” keys at the same time. While still holding down the Ctrl and Alt keys, press the “Delete” key. This will bring up a blue Windows screen with 5 options to choose from. The 4th option down is “Change a password”. Choose this option. The first line on the screen you will see will be: HCC\login id name (your login id will already be filled in this field). The second line you will key in your old password and the third line will be where you key in your new password. The fourth and last line is where you will key in your new password to confirm it and then click on the “arrow” to the right of the confirmation line. This will change your login password. IT USER MANUAL - NOVEMBER 2014 14 How to Install a Network Printer 1. Click on the Windows Start button and navigate to Devices and Printers and click on it. 2. A window will open up with two choices: Add a Device or Add a Printer. Choose Add a Printer. IT USER MANUAL - NOVEMBER 2014 15 3. Another window will open up with two choices. Navigate to the bottom option: Add a Network, Wireless, Bluetooth printer. Click on this option. 4. The next window that opens is Searching for available printers. IT USER MANUAL - NOVEMBER 2014 16 Choose: The printer I want isn’t listed 5. The next window that opens will be: Find a Printer by Name or TCP/IP Address. Click on Find a printer in the directory, based on location or feature. 6. Find Printers window opens and next to Location type in building for example: LRC, LSC, ASA, CPB, SLC, ATC, ARCC, STEM. Then click on Find Now. IT USER MANUAL - NOVEMBER 2014 17 7. At the bottom, under Search Results will be the network printers listed for the building you requested by room number. Choose the appropriate printer you want to install by double clicking on it. Wait until it installs. When the printer is installed the next screen will be: You’ve successfully added Name of printer – See Example IT USER MANUAL - NOVEMBER 2014 18 8. Click on Next and the last window that will open is where you can set this printer to your Default printer and send a test page to the printer if you choose to. 9. Then click Finish and your printer is installed. IT USER MANUAL - NOVEMBER 2014 19 Locating the computer name Open System by clicking the Start button, right‐clicking Computer, and then clicking Properties. IT USER MANUAL - NOVEMBER 2014 20 Under Computer name, domain, and workgroup settings, you can find your computer name, and its full computer name if your computer is on a domain. IT USER MANUAL - NOVEMBER 2014 21 How to Install the Cisco AnyConnect VPN Client 1. Navigate to Control Panel > Programs and Features and make sure you have a recent version of Java installed on your system. If you do not, go to http://java.com/en/download/index.jsp. Here you can download and install the latest version of Java on your system. 2. After you’ve made sure you have Java installed, open Internet Explorer and navigate to https://hccvpn.hagerstowncc.edu/. This will take you to the VPN client installation site. 3. Enter the user name and password you were previously given by Information Technology and click Login. 4. Click AnyConnect in the left-hand navigation pane. 5. Click Start AnyConnect in the right-hand navigation pane. The VPN will start downloading the client software and install it. Once the VPN client has been installed, you can close your browser. You are now connected to HCC through the VPN client. 6. Take note of the AnyConnect icon in your system tray. There is a lock on the icon and you are connected to the VPN. Please remember that while you’re connected to HCC through the VPN client, you will only be able to access HCC resources. You will not be able to use your internet connection until you disconnect from the VPN. 7. Click the tray icon as shown above. You will see a pop-up window appear. Click the Disconnect button and you will be disconnected from the VPN. 8. If you have successfully disconnected, your tray icon should look like the one below. You will now be able to access the internet. IT USER MANUAL - NOVEMBER 2014 22 How to Connect to the VPN and Use Remote Desktop 1. Click the Cisco AnyConnect icon in your system tray. 2. Log into the VPN client by clicking Connect. 3. After you’ve logged in the first time, you should only need your password. The VPN client will remember your name. Enter the password supplied to you by Information Technology and click OK. 4. After the VPN client connects, you will see a banner stating that you are now connected. You can now connect to your remote desktop. Click the Start icon, click All Programs > Accessories > Remote Desktop Connection. Enter your work computer name that you located from the instructions entitled How to Locate the Computer Name and click Connect. IT USER MANUAL - NOVEMBER 2014 23 5. When you are asked for your user name and password, use your normal network credentials. It may be necessary to click Use another account to put in your user name and password. Type in your user name (if required) and password, then click OK. 6. Once you are connected, you may continue as though you were on campus. 7. When you are finished and wish to disconnect from your remote desktop, slide your mouse cursor to the top of the screen. When the status bar appears, click the X on the right side and disconnect. 8. When you are ready to disconnect from the VPN, click the tray icon as shown below. 9. Click Disconnect to disconnect the VPN client. 10. When the VPN client is disconnected, your system tray icon will look like the one shown below. 11. You are finished using the VPN client and remote desktop. IT USER MANUAL - NOVEMBER 2014 24 How to add a Shared Mailbox to Outlook 2013 1. Log on as the user that needs to add the shared mailbox to Outlook 2013. 2. Open Outlook 2013. 3. Click the “File” button (See Figure 1) in the upper left-hand corner. Figure 4 4. Click the “Account Settings” drop-down button (See Figure 2) and then click the “Account Settings” button (See Figure 3) from the list. Figure 5 Figure 6 IT USER MANUAL - NOVEMBER 2014 25 5. Click the “Change” button (See Figure 4) on the “Account Settings” window. Figure 7 6. Click the “More Settings” button (See Figure 5) on the “Change Account” window. Figure 8 7. Click the “Advanced” tab on the “Microsoft Exchange” window. Click “Add” under the Mailbox section. Type the name of the shared Mailbox in the “Add Mailbox” textbox (See Figure 6). IT USER MANUAL - NOVEMBER 2014 26 Figure 9 8. Click the “Ok” button on the “Add Mailbox” window. 9. Click the “Ok” button on the Microsoft Exchange” window. 10. Click the “Next” button on the “Account Settings” window. 11. Click the “Finish” button. 12. The shared mailbox should now be displayed in Outlook 2013 below your main email account. IT USER MANUAL - NOVEMBER 2014 27 How to Open a Shared Calendar 1) Open Outlook and click the Calendar bar in the left navigation pane. 2) On the tool bar at the top of your Outlook screen click the down arrow on the Open Calendar button. IT USER MANUAL - NOVEMBER 2014 28 3) Click Name… on the Open a Shared Calendar window and select the desired calendar from the Outlook global address book. 4) Click OK and the new shared calendar will appear in your shared calendar list. The new shared calendar is now available for use. The functions available depend on the privileges set by the Exchange administrator. IT USER MANUAL - NOVEMBER 2014 29 How to Change Your Password in Exchange Webmail 1) Log into your Outlook account through the Exchange Webmail interface. Once you’re logged in, click on “Options” in the upper-right hand corner of the window. 2) On the pop-up menu, click “See All Options…” 3) Look on the right side of the window under the section entitled “Shortcuts to other things you can do” and click “Change your password”. 4) In the boxes provided enter your current password, type your new password and then type it again. When you’re finished, click “Save”. 5) You have just changed your password. IT USER MANUAL - NOVEMBER 2014 30 Junk Email Filter List While the Junk Email Filter checks your incoming messages automatically, the Junk Email Filter Lists give you more control over what is considered spam. You can add names, email addresses and domains to these lists so the Filter allows for messages from sources that you trust, or blocks messages that arrive from specific email addresses and domains that you don't know or trust. Blocked Senders List - You can easily block messages from particular senders by adding their email addresses or domain names to the Blocked Senders List. When you add a name or email address to this list, Outlook moves any incoming message from that source to the Junk E-mail folder. Messages from people or domain names that appear in this list are always classified as junk, regardless of the content of the message. To block a sender: 1. Select the email message from the sender that you want to block by single clicking the message to highlight it. (eBay example below) IT USER MANUAL - NOVEMBER 2014 31 2. In the Delete group on the Ribbon bar click on the “Junk” drop down arrow and then click on “Block Sender”. 3. A message box will display, click OK if you are sure you want to send all messages from this sender to the Junk Mail folder. IT USER MANUAL - NOVEMBER 2014 32 If you would like to know more about setting up email rules click on the “Help” button at the top right of the Outlook window or press “F1” on your keyboard. Then type in the search field “Filter Email”. IT USER MANUAL - NOVEMBER 2014 33 How to Setup Exchange on your iPhone These instructions will help you setup an HCC email account on your iPhone and sync it with the Exchange server. 1) Tap the Settings icon on your iPhone. 2) Scroll down the screen and tap Mail, Contacts, Calendars 3) If this is your first email account, tap Exchange on your screen. Otherwise, scroll down the screen and tap Add Account and then tap Exchange. 4) Now let’s get started. Type in your full HCC email address, your network password and an optional description in the appropriate fields as shown below. IT USER MANUAL - NOVEMBER 2014 34 5) You may get an error message the first time your iPhone tries to connect to the Exchange server. Tap Details to review your information and make sure it’s correct. 6) Now we complete the setup. Type in hcc-exch01.hagerstowncc.edu for the Server, type in hcc.int for the Domain and type in your Exchange ID (the first part of your email address) for the Username. If you get a warning message, tap OK. Tap Save or Next – if you get an error it’s probably because there is a typing error. 7) You can now select which portions of your Exchange account you want to sync with your iPhone. When you’ve made your selections, tape Save. IT USER MANUAL - NOVEMBER 2014 35 8) Now we have to make final adjustments to your account settings. Select your Exchange account on the Mail, Contacts, Calendars screen. Tap Exchange. 9) Tap your account information to go to the settings screen. 10) Scroll down to the bottom of the settings screen. Tap Advanced Settings. IT USER MANUAL - NOVEMBER 2014 36 11) Tap Use SSL to turn it off. Tap < Account to go back one screen. 12) Tap Done to save your changes. 13) Press the Home button to exit the Settings app. You should now be able to get Exchange email on your iPhone. IT USER MANUAL - NOVEMBER 2014 37 How to Access the Datatel Training Library Login to the ellucian.com website and select Forums under the Client Login drop down at the top of the page: Click on Colleague Customers: IT USER MANUAL - NOVEMBER 2014 38 Login using your personal username and password: If this is your first visit to this website, you will need to create a login by selecting Request a Login Now. For detailed instructions on how to request a login, please refer to the “Request a Datatel Login” section at the end of this document. After you have logged in, select Training & Education > My Subscription Library: IT USER MANUAL - NOVEMBER 2014 39 On the My Subscription Library page, you will see a list of Course Collections that HCC has access to: Select Enroll to gain access to a Course Collection. A one-time enrollment in each Course Collection is required to begin. Once enrolled, click Start Now to access your courses. IT USER MANUAL - NOVEMBER 2014 40 Request a Datatel Login Enter your HCC email address and click on Apply: Enter your information (our Client ID is H02) and click on Submit: IT USER MANUAL - NOVEMBER 2014 41 HCC’s System Administrator will be contacted via email to confirm your employee status. Once you are confirmed by the System Administrator, you will be sent a confirmation email with an activation link. You must click on the activation link to activate your login. IT USER MANUAL - NOVEMBER 2014 42 Fix for WebNow Java Error Go into Control Panel (Change the view to small icons) Click on Java Go to Security Tab Lower the security level to Medium Edit Site List and add the WebNow URL (http://hcc-in2:8080/webnow/) Not all Java versions have the “edit site list” option but lowering the security level should take care of the problem. IT USER MANUAL - NOVEMBER 2014 43 What is ImageNow? • ImageNow a document imaging system that adapts to business processes. • Ensures that all documents are secure, quickly retrievable, and tied to the files and applications you want, with comments and annotations as needed. • ImageNow can also capture and manage data from e‐mails, reports, and non‐image file formats such as DOC and TXT. ImageNow 6.6 The reliable solution for all of your document management needs. 11/07/2014 1 11/07/2014 2 Processing Documents • Involves three essential tasks: • Capture the documents into ImageNow, which is typically done by scanning or importing them from a computer. • Review each document to ensure they were captured to the standards of quality that you need. • Link them to index keys so that they are grouped in a logical order and matched to records in your business application (Datatel). ImageNow 6.6 Scanning (Simplex + Duplex Documents) Simplex = Single‐Sided Documents Duplex = Double‐Sided Documents 11/07/2014 3 IT USER MANUAL - NOVEMBER 2014 11/07/2014 4 44 If needed, adjust the side guides to the width of the document(s). Do not leave space between the side guides and the document(s). Otherwise the document(s) may be fed skewed. Load document(s) into scanner (Fujitsu fi‐6130Z) face down. 11/07/2014 5 Log in to ImageNow by clicking the ImageNow icon on your desktop and using the username and password supplied to you. If you have already been given access to ImageNow or WebNow, use the standard username and password you always have. 11/07/2014 6 On the ImageNow toolbar click the Capture Profile button drop‐down menu and choose Documents (Simplex). For documents with text on both the front and back choose Documents (Duplex). You can mix both simplex and duplex documents with the Documents (Duplex) capture profile. 11/07/2014 The username and password is typically the same as what you use to log in to your computer or access e‐ mail off site. 7 IT USER MANUAL - NOVEMBER 2014 11/07/2014 8 45 Once the document(s) have been scanned click the Batches button drop‐down menu located on the ImageNow Toolbar and choose Ready for QA. You should see the recently scanned documents listed as its own batch within the ImageNow Explorer window, as shown below. If nothing is there, press F5 to refresh the window until it appears. Make sure the State column is listed as “Completed.” 11/07/2014 9 Double‐click the newly created batch to open the scanned documents in ImageNow Viewer for a legibility check. You should see a window display that looks similar to the image below: 11/07/2014 10 Optional: Annotation • It is possible to add an annotation to your documents as you verify image quality. • An annotation is a mark or comment on a document that does not affect the image itself. • It is typically used to verify the document was reviewed and stamping it approved. • You can express your review of a document by stamping it approved, signing off on it using a pen, or adding a check mark. • You can also add sticky notes to add small notes to a document object, either inline or as a global comment on the document. • Customized annotations can be created, but only by an ImageNow administrator. • For example, a Stamp template can be created with the following text: “Received by Accounts Payable.” Your ImageNow administrator can set the template security so that only users in the Accounts Payable group can use, modify, or delete annotations created using that Stamp template. • The following slides will give examples of the most commonly used annotations. 11/07/2014 11 IT USER MANUAL - NOVEMBER 2014 11/07/2014 12 46 Stamp Annotation – lets you stamp predefined (Approved, Confidential, Rejected, and so forth) or custom messages on document images. Where can I find these so‐called “Annotations”? Annotation choices are located on the Annotation Toolbar. Note: If you do not see the Annotation toolbar, click View on the Menu bar, select Toolbars, and click Annotations. 11/07/2014 13 15 IT USER MANUAL - NOVEMBER 2014 14 Text Annotation – lets you place text on document images. Sticky Note Annotation – lets you add small notes to document images. 11/07/2014 11/07/2014 11/07/2014 16 47 Highlight Annotation ‐ lets you highlight an area on a document image. 11/07/2014 Check Annotation ‐ lets you place a check mark on a document image. 17 19 IT USER MANUAL - NOVEMBER 2014 18 Each image will be its own page within the ImageNow Viewer window. Once you have determined the image quality is legible, and possibly added an annotation, click the “Mark page as OK” link under Batch Processing or click the “Mark Page OK” button on the bottom left hand side of the window. Pen Annotation ‐ enables you to draw on a document image. 11/07/2014 11/07/2014 11/07/2014 20 48 If the capture profile of Documents (Duplex) was chosen on slide 8 and the batch included both simplex and duplex documents, you may notice blank pages being a part of the batch. These pages should be deleted as you go through the Ready for QA process. The Documents (Duplex) profile is set up to automatically delete blank pages, but pages with any type of markings on the back may show up as well. These pages should also be deleted as you go through the Ready for QA process. Page with random marking on back Blank Page 11/07/2014 To do this click the “Delete this page” link under Batch Processing or click the “Delete Batch Page” button on the lower left hand corner of the window. 21 11/07/2014 Once you have gone through each page and verified its quality the ImageNow Viewer window will automatically close and bring you back to the ImageNow Explorer window, as seen below. 11/07/2014 22 We are now ready to begin the process of linking student data from Datatel into ImageNow itself. Open Datatel 4.4 by using the link below and sign in using the ID and password supplied to you (if you have changed your password, use that one instead). Due to certain setup criteria you will need to use Microsoft Internet Explorer when linking data between Datatel and ImageNow. a. https://hcc‐dui2.hagerstowncc.edu/production_ui44/sl/index.htm b. In order to ensure the linking process works properly, DO NOT PERFORM THE FOLLOWING ACTIONS: i. Within Microsoft Internet Explorer: 1. Install toolbars (Google, Yahoo, etc.) 2. Display the Menu, Favorites, or Command bar 3. Adjust the Zoom settings (should be left at 100%) ii. Within Microsoft Windows 1. Adjust the Display to either Medium – 125% or Larger – 150% (should remain at Smaller – 100%(default)) 23 IT USER MANUAL - NOVEMBER 2014 To do this click the “Delete this page” link under Batch Processing or click the “Delete Batch Page” button on the lower left hand corner of the window. 11/07/2014 24 49 Once you are signed in your window should look similar to the image below. We are now ready to begin the process of linking student data from Datatel into ImageNow itself. Open Datatel 4.4 by using the link below and sign in using the ID and password supplied to you (if you have changed your password, use that one instead). Due to certain setup criteria you will need to use Microsoft Internet Explorer when linking data between Datatel and ImageNow. a. https://hcc‐dui2.hagerstowncc.edu/production_ui44/sl/index.htm 11/07/2014 25 27 IT USER MANUAL - NOVEMBER 2014 26 If the button is darkened, that indicates Compatibility View mode has successfully been enabled. The button will look similar to the picture below: In order to ensure the linking process works properly, click the Compatibility View mode button within your browser’s address bar. 11/07/2014 11/07/2014 11/07/2014 28 50 Pay attention to the search area in the upper left hand corner of the window. It should say “Person Search” within the white space. If it says “Form Search,” click the button to the left to switch it to “Person Search.” Type the student ID you want to link with your documents within the search area and press Enter to bring up the student’s Datatel account. 11/07/2014 11/07/2014 29 Double‐click the document batch you just verified on slide 20 (or slide 21 if there are duplex documents in the batch). The window that opens should look similar to the image below. Go back to ImageNow Explorer and choose “Ready for Linking” under the Views pane. 11/07/2014 31 IT USER MANUAL - NOVEMBER 2014 Name searches are possible as well, if a student ID is not available. i. Ensure the correct student is selected by verifying other demographic information such as date of birth, address, 30 etc. if only searching by name. 11/07/2014 32 51 Within ImageNow Viewer click “Link this page” under Batch Processing in the Actions pane or the button with a picture of a key on it on the bottom left hand side of the window. Before you perform the linking process make sure Datatel is still open and the appropriate student information you want to link is still displayed. Also, if you have more than one tab open within Microsoft Internet Explorer, make sure the Datatel tab is the one selected and in view. 11/07/2014 33 11/07/2014 Note: If you do not see the Actions pane on the left hand side of the window, click View on the menu bar and select Actions. 34 After linking the document between Datatel and ImageNow you should see the fields automatically populate under the Document Keys area on the right hand portion of the ImageNow Viewer window. If one of the documents in the batch is the Student Accommodation Form, please manually type the class section within the Class Section area under Document Keys. Otherwise make sure the area is blank. The format used for the class section should look similar to the example below: 11/07/2014 11/07/2014 35 IT USER MANUAL - NOVEMBER 2014 Example: MAT‐098‐M14 36 52 Select the appropriate document type using the drop‐down menu under Document Keys. The example below is an image of the Note Taker Request Form, so that particular form should be selected under Document Type. Verify the correct student information has been linked and the correct document type has been selected. If the wrong student data was populated in the document keys, navigate back to Datatel, pull up the correct student, and perform the linking process again (slide 34). Performing this action will repopulate the document keys with the correct data. 11/07/2014 Be sure to adjust any Custom Properties that may be associated with a particular document type. 37 11/07/2014 38 Once you have verified the data is correct click the “Save this page” link under Batch Processing or the “Save this batch page” button on the lower left hand corner. If the Student Accommodation Form is the document currently being worked on, make sure the class section is entered and in the appropriate format, as the example on slide 36 shows. 11/07/2014 39 IT USER MANUAL - NOVEMBER 2014 11/07/2014 Once you save the image it will automatically close out and display the next image in the batch. If only one document was originally scanned, skip to slide 45. 40 53 Be careful when working with the following document types: Be careful when working with the following document type: ‐ DSS – Accommodation Form You may have instances where the same document type is associated with the same student/employee within a batch. If so, you may receive an error message similar to the image below when trying to save the document (slide 40) (be sure to click Cancel if you do). This message will result if the class section has not been entered (see slides 36 and 39): 11/07/2014 41 If you receive the error message mentioned on the previous slide, click “Link this page” under Batch Processing or the “Link this page” button on the lower left hand portion of the window again. This will prevent the error message from presenting itself and let you continue through the rest of the recently scanned/imported batch. ‐ Payroll – Community Health Donation ‐ Payroll – HCC Exempt Time Sheet ‐ Payroll – HCC Foundation Donation ‐ Payroll – HCC Non‐Exempt Time Sheet ‐ Payroll – HCC Student Worker Time Sheet ‐ Payroll – United Way Donation You may have instances where the same document type is associated with the same student/employee within a batch. If so, you may receive an error message similar to the image below when trying to save the document (slide 40). Be sure to click Cancel: 11/07/2014 42 Next page: Typically the linking process is only performed once within a batch as long as the same student is being utilized for the document(s) displayed. If different students are a part of the batch you are working with, make sure to pull the appropriate student up in Datatel before linking the document (slide 34). Note: When the “Link this page” action is performed multiple times within a multiple page document, and the same student is being utilized, it will separate each page into its own line item within your drawer. If you want to keep the multiple page document together, be sure to only perform the linking process once. Different document types and documents with additional unique identifiers will still be separated, regardless of whether or not you perform the linking process multiple times within the same batch. 11/07/2014 43 IT USER MANUAL - NOVEMBER 2014 11/07/2014 44 54 Make sure the data between the image and the document keys from the linking process performed match and choose a new document type (if needed). Again, if the document being reviewed is the Student Accommodation Form, be sure to include the Class Section (see slide 36). Otherwise leave that area blank. 11/07/2014 11/07/2014 45 After you have saved each page the batch will automatically close and be filed under the document drawer you are assigned to. To navigate to your assigned document drawer return to ImageNow Explorer by clicking the Documents button on the ImageNow toolbar. Once you have verified the data click either the “Save this page” link located underneath Batch Processing or click the “Save this batch page” button on the bottom left hand side of the window. 11/07/2014 Repeat slides 44‐47 until you have linked and chosen the appropriate document type for each page within the batch. IT USER MANUAL - NOVEMBER 2014 46 47 11/07/2014 48 55 Within your assigned drawer you should now see the recently reviewed, linked, and saved documents, each one separated by document type. ImageNow 6.6 File Importing 11/07/2014 49 11/07/2014 50 On the ImageNow toolbar click the Capture Profile button drop‐down menu and choose File Import. • The File Import process is the act of selecting one or multiple files, be it PDF, Word, Excel, etc., and sending them to ImageNow. • With this method the files you import are stored in their original file format, making the ability to annotate more difficult. • For example, if importing a Microsoft Word document, the ability to view is available, but annotation is not. • The table below is a list of file formats and an indication of whether annotation is possible: Format BMP (24 bit, or lower) GIF JPG Microsoft Office documents PNG TIFF LZW PDF Annotate in ImageNow Yes No Yes No No Yes No No 11/07/2014 51 IT USER MANUAL - NOVEMBER 2014 11/07/2014 52 56 Once you choose the File Import capture profile you will be prompted to navigate to the file(s) you want to import into ImageNow. The prompt should look similar to the image below. Within the File Capture – Batch prompt, navigate to the file(s) you would like to import into ImageNow. Select the file(s) within the directory chosen and click Open. With the File Import capture profile you can import more than one file into the ImageNow system. 11/07/2014 When importing more than one file, each file will be its own page within a document batch. After clicking Open the file(s) selected will be imported into ImageNow. 53 55 IT USER MANUAL - NOVEMBER 2014 54 You should see the recently imported file(s) listed as its own batch within the ImageNow Explorer window, as shown below. If nothing is there, press F5 to refresh the window until it appears. Make sure the State column is listed as “Completed.” Click the Batches button drop‐down menu located on the ImageNow Toolbar and choose Ready for QA. 11/07/2014 11/07/2014 11/07/2014 56 57 Navigate to slide 9 and continue through the process as if you have just recently scanned hard copies through a physical scanner. ImageNow 6.6 Click to navigate to Slide 9 ImageNow Printer 11/07/2014 57 11/07/2014 58 To send an e‐mail to ImageNow open the e‐mail and click File. • ImageNow Printer can be used from any software that has a print option. • For example, it allows you to import a Microsoft Word document, Microsoft Excel workbook, or an e‐mail without having to print and scan it first. • ImageNow Printer is its own printer object and works similar to how one would typically create an Adobe PDF file. • Annotation is possible with any document/file you send through ImageNow printer since the file is automatically converted to a TIF format. • This is important to know in case you have files that are not possible to annotate through the File Import process. 11/07/2014 59 IT USER MANUAL - NOVEMBER 2014 11/07/2014 60 58 Click the drop‐down menu under Printer and choose “ImageNow Printer.” Click Print on the left hand side of the window. 11/07/2014 61 Note: Make sure you are logged in to ImageNow before clicking Print, otherwise you will receive an error message. IT USER MANUAL - NOVEMBER 2014 62 You should see the following window after clicking Print. Once you have selected “ImageNow Printer” from the drop‐down menu click the Print button. 11/07/2014 11/07/2014 63 11/07/2014 64 59 If ImageNow Printer is not the selected Capture Profile, click the drop‐down menu and choose it. If you already have it selected, click OK. 11/07/2014 Once the e‐mail has “printed” click the Batches button drop‐ down menu located on the ImageNow Toolbar and choose Ready for QA. 65 11/07/2014 66 You should see the recently “printed” e‐mail listed as its own batch within the ImageNow Explorer window, as shown below. If nothing is there, press F5 to refresh the window until it appears. Make sure the State column is listed as “Completed.” Navigate to slide 9 and continue through the process as if you have just recently scanned hard copies through a physical scanner. Click to navigate to Slide 9 11/07/2014 67 IT USER MANUAL - NOVEMBER 2014 11/07/2014 68 60 To send a Microsoft Word document to ImageNow open the file and click File. 11/07/2014 Click Print on the left hand side of the window. 69 Click the drop‐down menu under Printer and choose “ImageNow Printer.” IT USER MANUAL - NOVEMBER 2014 70 Once you have selected “ImageNow Printer” from the drop‐down menu click the Print button. 71 11/07/2014 11/07/2014 Note: Make sure you are logged into ImageNow before clicking Print, otherwise you will receive an error message. 11/07/2014 72 61 If ImageNow Printer is not the selected Capture Profile, click the drop‐down menu and choose it. If you already have it selected, click OK. You should see the following window after clicking Print. 11/07/2014 73 Once the Word document has “printed” click the Batches button drop‐down menu located on the ImageNow Toolbar and choose Ready for QA. 11/07/2014 74 You should see the recently “printed” Microsoft Word document listed as its own batch within the ImageNow Explorer window, as shown below. If nothing is there, press F5 to refresh the window until it appears. Make sure the State column is listed as “Completed.” 11/07/2014 75 11/07/2014 76 IT USER MANUAL - NOVEMBER 2014 62 Navigate to slide 9 and continue through the process as if you have just recently scanned hard copies through a physical scanner. Click to navigate to Slide 9 IT USER MANUAL - NOVEMBER 2014 63 Telephone Models Models 4018 / 4019 (6 buttons) IT USER MANUAL - NOVEMBER 2014 64 The Instrument 1 FRI Jul 27 2 11:00AM 3151 3151 3151 1 1x20 character display 2 Navigation Keys 3 Feature Keys 4 6 Programmable keys Hold 4 3 IT USER MANUAL - NOVEMBER 2014 65 Feature Keys Messaging Button - to access various mail services: if the button flashes, new voice or text messages have been received Speakerphone: Button to make a call without lifting the handset Guide Button – to obtain information on the preprogrammed keys To adjust the speaker or handset volume up or down End Button Redial Button Terminates a call in progress Or completes a programming activity Redials the last number you dialed IT USER MANUAL - NOVEMBER 2014 Interphone / MUTE Key: During a call, press button so that the called party cannot hear you. When terminal idle, press this button to that all incoming calls will be automatically answered, without lifting the receiver Phone Book Button – to access your personal phone book 66 Making a Call 3 1 1 Dial by Phone Number 2 Programmable Keys 2 3 IT USER MANUAL - NOVEMBER 2014 Personal Phonebook 67 Answering a Call While the set is ringing you will see: In the display the name of the caller if it is an internal call or if an external call you will see the caller id (i.e. 321-259-8469) 1:Smith John The 1: tells you which line it is 3151 3151 3151 The green light next to the ringing line will be flashing. Hold To Answer the call Simply pickup the handset IT USER MANUAL - NOVEMBER 2014 68 Answering Multiple Calls While on a call and a second call comes in: For a brief couple of seconds you will see 2: (for the second line) and the callers name (if internal) or caller id (if external) The green light next to the 2nd line will be flashing. 2:Roberts Sara 3151 3151 3151 Hold To answer the second call: Press the line key next to the flashing green light. This will automatically place your first caller on hold. To switch between the 2 calls press the line key next to the line you want IT USER MANUAL - NOVEMBER 2014 69 Transfer a Call While in conversation: Press an available line key Smith John Dial the number you want (if external, dial 9 first) 00:04 3151 Using the Navigation keys, Press the down arrow until you see Transfer in the display. Press the OK button. 3151 3151 Note: Hold UnSupervised Transfer – You transfer the call before the caller answers. Supervised Transfer – You wait until the caller answers and announce the call before you press transfer. IT USER MANUAL - NOVEMBER 2014 70 3 Party Conference Call While in conversation: Using the Navigation keys, Press the down arrow until you see Conference in the display. Press the OK button. This will place the first caller on hold automatically >Conference Dial the number you want (if external, dial 9 first) 3151 3151 3151 Once the 2nd caller answers, use the navigation keys again to arrow down until you see Conference in the display then press the OK button. All three parties are now on the line. Hold IT USER MANUAL - NOVEMBER 2014 71 Group Call Pickup • You do not need to know the ext. number that is ringing to use the Group Call Pickup feature, you just need to be in the same Pickup Group. Pickup Groups were identified during the initial telephone interviews • When a phone is ringing and it is in your pickup group simply press *73 to answer the call. • For Directed Call Pickup, press *72, then the ringing set. IT USER MANUAL - NOVEMBER 2014 72 Call Forward With the Set Idle: Using the Navigation keys, Press the down arrow until you see Forward in the display. Press the OK button. Forward Press the down arrow until you see Immediate forward in the display then press the OK button. 3151 3151 3151 Dial the number where you want your calls to go then press the End Button Your display will show that your calls are forwarded to the ext number you entered. Hold Imm fwd 3150 IT USER MANUAL - NOVEMBER 2014 73 First Time Access Press the MWI Then press OK IT USER MANUAL - NOVEMBER 2014 button. > No new voice messa 74 Listen to the Voice guide : Listen to the greeting message Dial your temporary password (this is 0000) Dial your new password. Press # Record your first and last name. Press # Record your Personal Greeting message. Press # 11/07/2014 IT USER MANUAL - NOVEMBER 2014 75 Telephone Models Models 4028 / 4029 (6 buttons) Models 4038/4039/4068 (10 buttons) IT USER MANUAL - NOVEMBER 2014 76 The Instrument 5 1 4 2 IT USER MANUAL - NOVEMBER 2014 1 Handset 2 Number Pad 3 Alphabetic Keypad 4 Feature and Navigation Keys 5 LCD Screen & Programmable Key 3 77 LCD Display Menu page: contains all features and applications accessible via the buttons associated with the words on the screen IT USER MANUAL - NOVEMBER 2014 Main page: contains call line buttons (allowing supervision of calls) and programmable call buttons Info page: contains information on the telephone & the status of its features: name, telephone number, number of msgs, activation of forward feature, Appointment Reminder, etc. 78 LCD Display Secondary Display ICON: ICON will be displayed, when multiple calls are active at one time. Line or Extension Number of Instrument: Multi-Line instrument, allows for up to 3 calls simultaneously IT USER MANUAL - NOVEMBER 2014 Slide Bar Control. Allows you to scroll down to additional information and speed dial locations displayed off the first screen. Display ICON: Will change ICONS, with activity of instrument. Programmable Keys Area: May program up to 72 Speed Dial Numbers. 79 Call Display Icons Incoming call Forward icon: pressing the button next to this icon allows you to program or change the Forward feature Call in progress or outgoing call Receiver connected Call on hold If you get two calls at the same time, you can switch from one call to the other by pressing the display button associated with each call Appointment programmed Silent mode enabled Display buttons: pressing a display button activates the feature shown associated with it on the screen IT USER MANUAL - NOVEMBER 2014 80 Feature Keys Speakerphone: Button to make or answer a call without lifting the handset To adjust the speaker or handset volume up or down End Button Terminates a call in progress Or completes a programming activity Interphone / MUTE Key: During a call, press button so that the called party cannot hear you. When terminal idle, press this button to that all incoming calls will be automatically answered, without lifting the receiver IT USER MANUAL - NOVEMBER 2014 Up-Down navigator keys: used to scroll through the content of a page on the display screen OK: Used to validate your choices and options while programming or configuring instrument Left-Right navigator keys: Used to move from one page to another Back / Exit button: To return to previous menu (short press) or return to first screen (long press); During a conversation provides access to welcome screens and returns to conversation Icon screens. 81 Feature Keys Guide button: used to obtain information on features of the Menu page and to program key of the Main page. For a brief description of each feature, press and release the (i) button, then press and release a white button next to any topic: Setting, Appointment, Text mail, Events, Outside calls, or Forward Messaging button to access various mail services: if the button flashes, new voice or text message(s) have been received Redial button: to activate the redial function Hold button: the call is placed on hold Transfer button: transfer the call to another number IT USER MANUAL - NOVEMBER 2014 82 Making a Call 1 Dial by Phone Number 2 Programmable Keys 3 Call by Name 2 1 3 IT USER MANUAL - NOVEMBER 2014 83 Call By Name Fri Oct 14 9:02 am Dial by Name Dial by Name smi Name Initials Use the Alphabetic keypad to dial by name. Enter at least 2 characters of the last name of the person you want to call, then press the button next to Name on the display. When more than one name meets the entered criteria, use the Navigator Down Arrow key to scroll thru the names. Press the button next to the person’s name you wish to call. You may enter part of the last name, a space, then the first initial, then select Name&First. This may be helpful searching for persons with a common last name. smi d will present Smith Dan IT USER MANUAL - NOVEMBER 2014 84 Answering a Call Fri Oct 14 9:02 am John Smith Calling Silent Take Call To answer a call simply pick up the handset or press the speaker button In this example the incoming call is an internal caller, if the call was an external call you would see the callers caller id (ie 321-259-8469 Morse Communications) IT USER MANUAL - NOVEMBER 2014 85 Answering Multiple Calls Fri Oct 14 9:02 am John Smith 3300 Bob Williams Conversation 00:43 Calling Co nsult/Eng Transfer When a 2nd call comes in you will briefly see a small window that tells you the callers name or caller id. This window will only be displayed for approx 5 seconds. To answer this 2nd call simply press the first white button on the left next to the incoming call icon Your first caller will automatically be placed on hold IT USER MANUAL - NOVEMBER 2014 86 Answering Multiple Calls Fri Oct 14 9:02 am Bob Williams 3500 Conversation 00:30 Consult/Eng Transfer To switch between calls press the 1st white button on the left or the right. The button on the right is your 1st caller and the button on the left is the 2 nd caller. Each time you press one of the buttons your current caller is automatically placed on hold. See the musical note. IT USER MANUAL - NOVEMBER 2014 87 Transfer a Call Fri Oct 14 9:02 am Training 7219 Conversation 00:43 New Call Transf Press the New Call key (1st caller will automatically be placed on hold), Dial the number where the call will be transferred. Fri Oct 14 9:02 am Dennis Jim 6001 Conversation 00:43 Cnsl/En Off Transf After dialing the number, Press the Transfer Key. IT USER MANUAL - NOVEMBER 2014 88 3 Party Conference Call Fri Oct 14 9:02 am Training 7219 Conversation 00:43 New Call Transf When in conversation, Using the Navigator Control, scroll down and Press the Conf Key. Fri Oct 14 9:02 am Training 7219 Conversation 00:43 Forbid Camp Conf Dial the number of the person you wish to add to the conference, then wait for the call to be answered. Once the caller has answered, press the Conf key a second time. All three parties will now be in the conference IT USER MANUAL - NOVEMBER 2014 89 Group Call Pickup • You do not need to know the ext. number that is ringing to use the Group Call Pickup feature, you just need to be in the same Pickup Group. Pickup Groups were identified during the initial telephone interviews • When a phone is ringing and it is in your pickup group simply press *73 to answer the call. • For Directed Call Pickup, press *72, then the ringing set. IT USER MANUAL - NOVEMBER 2014 90 Call Forward Forward No forward activated Imm Fwd Other Fwd Fwd to text Press the button. The Display will change and provide options for the Various forwarding capabilities. IT USER MANUAL - NOVEMBER 2014 91 Call Forward • Imm Fwd (Immediate Forward): Forwards all calls to designated number you enter. Instrument does not ring • Other Fwd: Other forward allows you to select different forwarding options such as •Fwd on Busy, No Answer •Fwd on Ring, No Answer IT USER MANUAL - NOVEMBER 2014 92 First Time Access Press * # # Listen to the Voice guide : l Listen to the greeting message l Dial your temporary password (this is 0000) l Dial your new password. Press # l Record your first and last name. Press # l Record your Personal Greeting message. Press # IT USER MANUAL - NOVEMBER 2014 93 Welcome! After Recording and Approving a Message Your organization’s new CallXpress unified messaging system is designed to provide you with the same convenient access to your voice, fax, and email messages whether you are at your desk or calling in over the telephone. When you call in, our Avaya Intuity AUDIX emulation saves you the effort of relearning most of the keystroke commands you use to send, retrieve, and manage messages. Before You Start If you want to … Then enter … Mark the message private #1 Mark the message urgent #2 Request future delivery #3 Address the message to the first subscriber and to each additional subscriber destination # Review or modify your list of recipients ✱1 To set up CallXpress, your system administrator will give you the following information. Look up a recipient in the subscriber directory ✱2 CallXpress internal number: Delete the last mailbox number you entered ✱3 Send the message ## CallXpress external number: After Listening to a Message Your subscriber mailbox number: Your system administrator may also give you a default security code to use when you log on to CallXpress for the first time. Gaining Access to Your Mailbox Follow these simple steps to start using CallXpress. 1. Call the CallXpress internal or external number. 2. If necessary, press # or any other key that your CallXpress system requires. 3. If prompted, enter your subscriber mailbox number. 4. Enter a security code (or the default code, if your administrator has given you one). If you want to … Then enter … Forward the message to another subscriber 12 Delete the message ✱3 Reply (with a new voice message) 11 Send the message to your default fax number (if it is a fax) ✱11 Send the message to a fax number you specify (if it is a fax) ✱12 Setting Up Your Mailbox If you want to … Then enter … Change your busy greeting 55 or 5 1 3 1 Change your name recording 515 Change your out-of-office greeting 56 or 5 1 3 3 Change your password 514 Change your standard greeting 54 or 5 1 3 2 Create or update a personal distribution list 523 Set automatic message forwarding 524 Set Immediate Message Notification 511 Performing Common Tasks If you’re looking for a quick hint on how to perform a specific task, read on. Getting Started If you want to … Then enter … Record and send a message 1 Review all new messages 2 P/N 1081-50118-00 Rev 01 (7.80) AVST and CallXpress are registered trademarks of Applied Voice & Speech Technologies, Inc. Avaya and AUDIX are registered trademarks and Intuity is a trademark of Avaya, Inc., which is not affiliated with and does not sponsor, license, or endorse this or other products of Applied Voice & Speech Technologies, Inc. All other company names, brand names, and product names are the property and/or trademarks of their respective companies. © May 2006 Applied Voice & Speech Technologies, Inc. All rights reserved. Ê1081-50118-004Š www.avst.com Quick Reference Card for Avaya Intuity AUDIX Emulation Activity Menu Record Messages Menu Address Messages Menu Record and send a message 1 Get and respond to messages 2 Change user options 5 Exit ✱✱7 Pause or continue recording Replay Delete Approve for sending Enter destinations number, then # Review or modify list of destinations ✱ 1 Address by name ✱2 Delete last destination ✱3 Add personal distribution list ✱5 Finish addressing # 1 23 ✱3 # Send Options Menu Playback Options Rewind to beginning of message Pause or continue playback Increase volume† Go back 5 seconds Advance 5 seconds Decrease volume† Decrease speed † Increase speed† Message Type (optional) Voice messages Fax messages Email messages 2 3 4 5 6 7 8 9 Set or clear Private status Set or clear Urgent status Set or clear Future Delivery Send 1 2 3 # 1 2 3 Get Messages Menu (while or after message header plays) Listen to the message Respond or forward Print a fax Replay header† Delete Recover Skip to the next message 0 1 ✱1 23 ✱3 ✱✱8 # Response and Forwarding Menu Reply by voice message Forward with comment Return to Get Messages menu User Options (PhoneManager™) Personal Options Personal options Messaging options Automated attendant options Record your standard greeting Record your busy greeting Record your out-of-office greeting Change message notification Change daily message reminder Record personal greeting Change security code Record your name Record an announcement for a mailbox you sponsor Change language selection Change SMS notification 1 2 3 4 5 6 Automated Attendant Options Change call screening Change call blocking Change extension-specific processing Change diverted call processing 1 2 3 4 Messaging Options Record a name for a sponsored mailbox Change a personal distribution list Change message forwarding Change message presentation ordering Change message envelope settings †Depending 2 3 4 5 6 on how your CallXpress system is set up, these commands may not be available. Please consult your system administrator for additional information. 1 2 # 1 2 3 4 5 6 7 8 Busy greeting Standard greeting Out-of-office greeting 1 2 3